...
| Table of Contents |
|---|
Monitoring Settings
Under Monitoring Settings, select the "Default Monitoring API IP", and enter any additional setting options as follows:

Default Monitoring API IP: The default IP to be used for API calls (heartbeat, activation, etc.) . This is the IP of ProVision's server, at which the managed servers will send API requests. This is because if systemd-resolved is stopped, it is highly possible that ProVision's host is not resolvable. For this reason we make the API requests similar to "curl https://194.24.189.120/api/endpoint -H 'provision.mycompany.com'". Here, we list the local IPs of ProVision. for managed server monitoring and to send API requests, as multiple IPs may be available depending on the Provision set up.
- Note: The Default Monitoring API IP can be set to a default value in this area, but it may also be set individually per managed server as an override.
Verify CA: Toggle to "on" if you wish to enable the CA check.
...
Aggregated data retention: The number of days to retain aggregated data.
Update Settings
...
Enter Update settings to use for Managed Servers, starting with API timeout (in milliseconds) and Update Mode.
Fill in the remaining update settings as applicable to the selected update mode:
Internet Docker Update (Recommended) - This uses a Docker update directly from our docker registry. Internet connection is required for the managed server in order this mode to work.
- When this is chosen, fields to enter tokens for the DNS / DHCP repository will displayed.
Note For assistance obtaining repository tokens, please contact support@6connect.com.
| Expand | ||||
|---|---|---|---|---|
| ||||
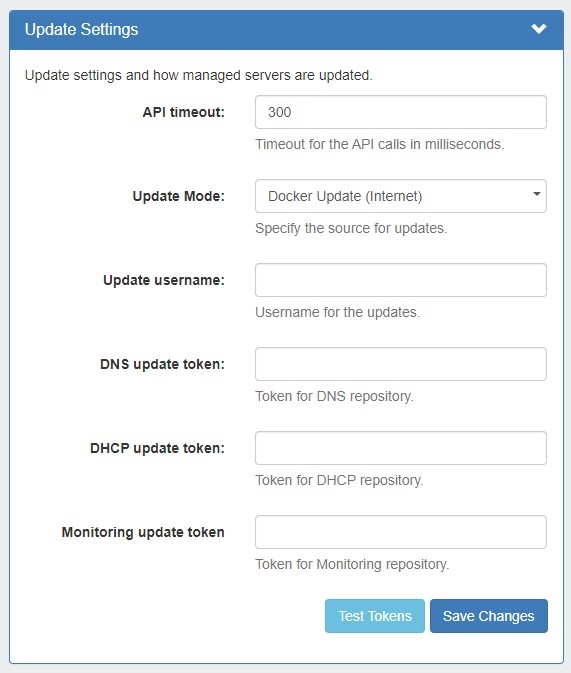
Update Settings - Docker Update Mode (Internet)
API timeout: Timeout for API calls in milliseconds. Update Mode: Enter the source for updates, depending on internet accessibility. Two options are available:
|
ProVision Image Download - If Update Mode is set to "Image Download (Local)", then no internet connection is required from the managed server, but an image file must be manually downloaded from a separate secure site to then upload into ProVision.
| Expand | ||
|---|---|---|
| ||
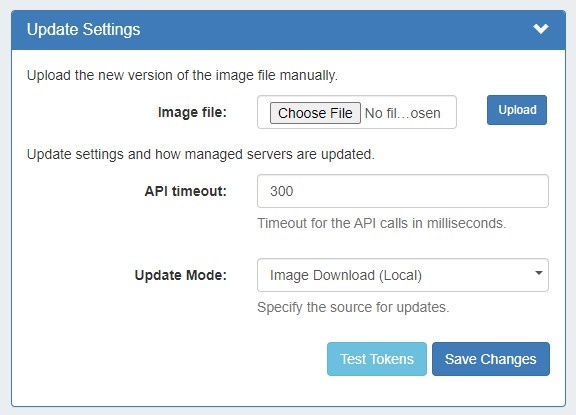
Update Settings - Image Download |
API timeout: Timeout for API calls in milliseconds.
Update Mode: Enter the source for updates, depending on internet accessibility. Two options are available:
- ProVision Image Download - This is for updates from ProVision. No internet connection is required from the managed server. When this option is selected you have to get the image files from our gitlab and upload it in ProVision. The relevant gitlab project is at https://git-lju.6connect.com/6connect/pv-monitor/-/releases
- Internet Docker Update - This uses a Docker update directly from our docker registry. Internet connection is required for the managed server in order this mode to work. When this is chosen fields for tokens for our gitlab/registry appear to be filled in:
- Update username: Enter the username for updates.
- DNS update token: Enter the token for the DNS repository.
- DHCP update token: Enter the token for the DHCP repository.
- Monitoring update token: Enter the token for the Monitoring repository.
Test Tokens: Click to test the applied tokens for DNS, DHCP, and Monitor.
...
(Local)If Update Mode is set to "Image Download (Local)", |
...
the following settings will display to enter:
Image file: Attach the Image file for upload to ProVision.
API timeout: Timeout for API calls in milliseconds. Update Mode: Enter the source for updates - Image Download (Local), or opt to change to Docker Update (Requires Internet). Images history: Available only after saving changes. Test Tokens: Click to test the applied tokens for DNS, DHCP, and Monitor. |
Monitoring Services
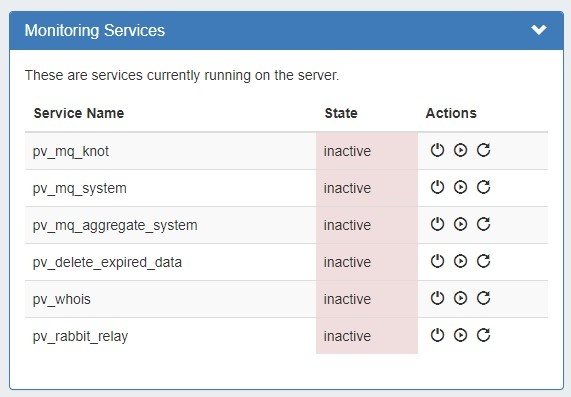
The Monitoring Services module shows the OS services running on Provision's server and their activity state. Available actions are: Stop, Start, and Restart Service.
...
If RabbitMQ has not already been installed on your ProVision instance / VM, you will need to perform the following steps:
...
install it by running the included shell script (Note: Installing RabbitMQ requires internet access.):
1)
...
Run install_rabbitmq.sh.
| Code Block |
|---|
/usr/bin/sh /path_to_provision/tools/install_rabbitmq_{OS}.sh |
Ubuntu RabbitMQ installation script:
| Code Block | ||||||
|---|---|---|---|---|---|---|
| ||||||
#!/usr/bin/sh

# https://www.rabbitmq.com/install-debian.html#apt-quick-start-cloudsmith

sudo apt-get install curl gnupg apt-transport-https -y

## Team RabbitMQ's main signing key
curl -1sLf "https://keys.openpgp.org/vks/v1/by-fingerprint/0A9AF2115F4687BD29803A206B73A36E6026DFCA" | sudo gpg --dearmor | sudo tee /usr/share/keyrings/com.rabbitmq.team.gpg > /dev/null
## Launchpad PPA that provides modern Erlang releases
curl -1sLf "https://keyserver.ubuntu.com/pks/lookup?op=get&search=0xf77f1eda57ebb1cc" | sudo gpg --dearmor | sudo tee /usr/share/keyrings/net.launchpad.ppa.rabbitmq.erlang.gpg > /dev/null
## PackageCloud RabbitMQ repository
curl -1sLf "https://packagecloud.io/rabbitmq/rabbitmq-server/gpgkey" | sudo gpg --dearmor | sudo tee /usr/share/keyrings/io.packagecloud.rabbitmq.gpg > /dev/null

## Add apt repositories maintained by Team RabbitMQ
sudo tee /etc/apt/sources.list.d/rabbitmq.list <<EOF
## Provides modern Erlang/OTP releases
##
## "bionic" as distribution name should work for any reasonably recent Ubuntu or Debian release.
## See the release to distribution mapping table in RabbitMQ doc guides to learn more.
deb [signed-by=/usr/share/keyrings/net.launchpad.ppa.rabbitmq.erlang.gpg] http://ppa.launchpad.net/rabbitmq/rabbitmq-erlang/ubuntu focal main
deb-src [signed-by=/usr/share/keyrings/net.launchpad.ppa.rabbitmq.erlang.gpg] http://ppa.launchpad.net/rabbitmq/rabbitmq-erlang/ubuntu focal main

## Provides RabbitMQ
##
## "bionic" as distribution name should work for any reasonably recent Ubuntu or Debian release.
## See the release to distribution mapping table in RabbitMQ doc guides to learn more.
deb [signed-by=/usr/share/keyrings/io.packagecloud.rabbitmq.gpg] https://packagecloud.io/rabbitmq/rabbitmq-server/ubuntu/ focal main
deb-src [signed-by=/usr/share/keyrings/io.packagecloud.rabbitmq.gpg] https://packagecloud.io/rabbitmq/rabbitmq-server/ubuntu/ focal main
EOF

## Update package indices
sudo apt-get update -y

## Install Erlang packages
sudo apt-get install -y erlang-base \
	                        erlang-asn1 erlang-crypto erlang-eldap erlang-ftp erlang-inets \
				                        erlang-mnesia erlang-os-mon erlang-parsetools erlang-public-key \
							                        erlang-runtime-tools erlang-snmp erlang-ssl \
										                        erlang-syntax-tools erlang-tftp erlang-tools erlang-xmerl

## Install rabbitmq-server and its dependencies
sudo apt-get install rabbitmq-server -y --fix-missing

sudo rabbitmq-plugins enable rabbitmq_management

sudo rabbitmq-server start -detached

sleep 5

sudo rabbitmqctl add_user pv_rabbitmq S3curePassW0rd!
sudo rabbitmqctl set_user_tags pv_rabbitmq administrator
sudo rabbitmqctl set_permissions -p / pv_rabbitmq ".*" ".*" ".*"

sudo systemctl enable rabbitmq-server

echo "RabbitMQ user is:  pv_rabbitmq"
echo "RabbitMQ password is:  S3curePassW0rd!"
echo "RabbitMQ port is:  5672"
echo "RabbitMQ management port is:  15672"
|
CentOS RabbitMQ installation script:
| Code Block | ||||||
|---|---|---|---|---|---|---|
| ||||||
#!/usr/bin/sh

# https://www.rabbitmq.com/install-debian.html#apt-quick-start-cloudsmith

sudo yum install curl gnupg apt-transport-https -y

## Team RabbitMQ's main signing key
curl -1sLf "https://keys.openpgp.org/vks/v1/by-fingerprint/0A9AF2115F4687BD29803A206B73A36E6026DFCA" | sudo gpg --dearmor | sudo tee /usr/share/keyrings/com.rabbitmq.team.gpg > /dev/null
## Launchpad PPA that provides modern Erlang releases
curl -1sLf "https://keyserver.ubuntu.com/pks/lookup?op=get&search=0xf77f1eda57ebb1cc" | sudo gpg --dearmor | sudo tee /usr/share/keyrings/net.launchpad.ppa.rabbitmq.erlang.gpg > /dev/null
## PackageCloud RabbitMQ repository
curl -1sLf "https://packagecloud.io/rabbitmq/rabbitmq-server/gpgkey" | sudo gpg --dearmor | sudo tee /usr/share/keyrings/io.packagecloud.rabbitmq.gpg > /dev/null

## Add apt repositories maintained by Team RabbitMQ
#sudo tee /etc/apt/sources.list.d/rabbitmq.list <<EOF
## Provides modern Erlang/OTP releases
##
## "bionic" as distribution name should work for any reasonably recent Ubuntu or Debian release.
## See the release to distribution mapping table in RabbitMQ doc guides to learn more.
#deb [signed-by=/usr/share/keyrings/net.launchpad.ppa.rabbitmq.erlang.gpg] http://ppa.launchpad.net/rabbitmq/rabbitmq-erlang/ubuntu focal main
#deb-src [signed-by=/usr/share/keyrings/net.launchpad.ppa.rabbitmq.erlang.gpg] http://ppa.launchpad.net/rabbitmq/rabbitmq-erlang/ubuntu focal main

## Provides RabbitMQ
##
## "bionic" as distribution name should work for any reasonably recent Ubuntu or Debian release.
## See the release to distribution mapping table in RabbitMQ doc guides to learn more.
#deb [signed-by=/usr/share/keyrings/io.packagecloud.rabbitmq.gpg] https://packagecloud.io/rabbitmq/rabbitmq-server/ubuntu/ focal main
#deb-src [signed-by=/usr/share/keyrings/io.packagecloud.rabbitmq.gpg] https://packagecloud.io/rabbitmq/rabbitmq-server/ubuntu/ focal main
#EOF

## Update package indices
sudo yum update -y

## Install Erlang packages
sudo yum install -y erlang-base erlang-asn1 erlang-crypto erlang-eldap erlang-ftp erlang-inets erlang-mnesia erlang-os-mon erlang-parsetools erlang-public-key erlang-runtime-tools erlang-snmp erlang-ssl erlang-syntax-tools erlang-tftp erlang-tools erlang-xmerl

## Install rabbitmq-server and its dependencies
sudo yum install rabbitmq-server -y

sudo rabbitmq-plugins enable rabbitmq_management

sudo rabbitmq-server start -detached

sleep 5

sudo rabbitmqctl add_user pv_rabbitmq S3curePassW0rd!
sudo rabbitmqctl set_user_tags pv_rabbitmq administrator
sudo rabbitmqctl set_permissions -p / pv_rabbitmq ".*" ".*" ".*"

sudo systemctl enable rabbitmq-server

echo "RabbitMQ user is:  pv_rabbitmq"
echo "RabbitMQ password is:  S3curePassW0rd!"
echo "RabbitMQ port is:  5672"
echo "RabbitMQ management port is:  15672"
|
This script is taken from Installing on Debian and Ubuntu — RabbitMQ and may need an update in future.
...
2)
...
You may verify the installation is working by opening http://your.host:15672
3)
...
Once confirmed working, go to ProVision Admin Settings → Managed Server Settings. Then, enter the RabbitMQ IP, port, username, and password into the RabbitMQ Settings section. When done, click "Save Changes".
Additional Information
For additional information on working with Managed Servers, see Managed Servers