...
Resource Tab / Entry List User Interface
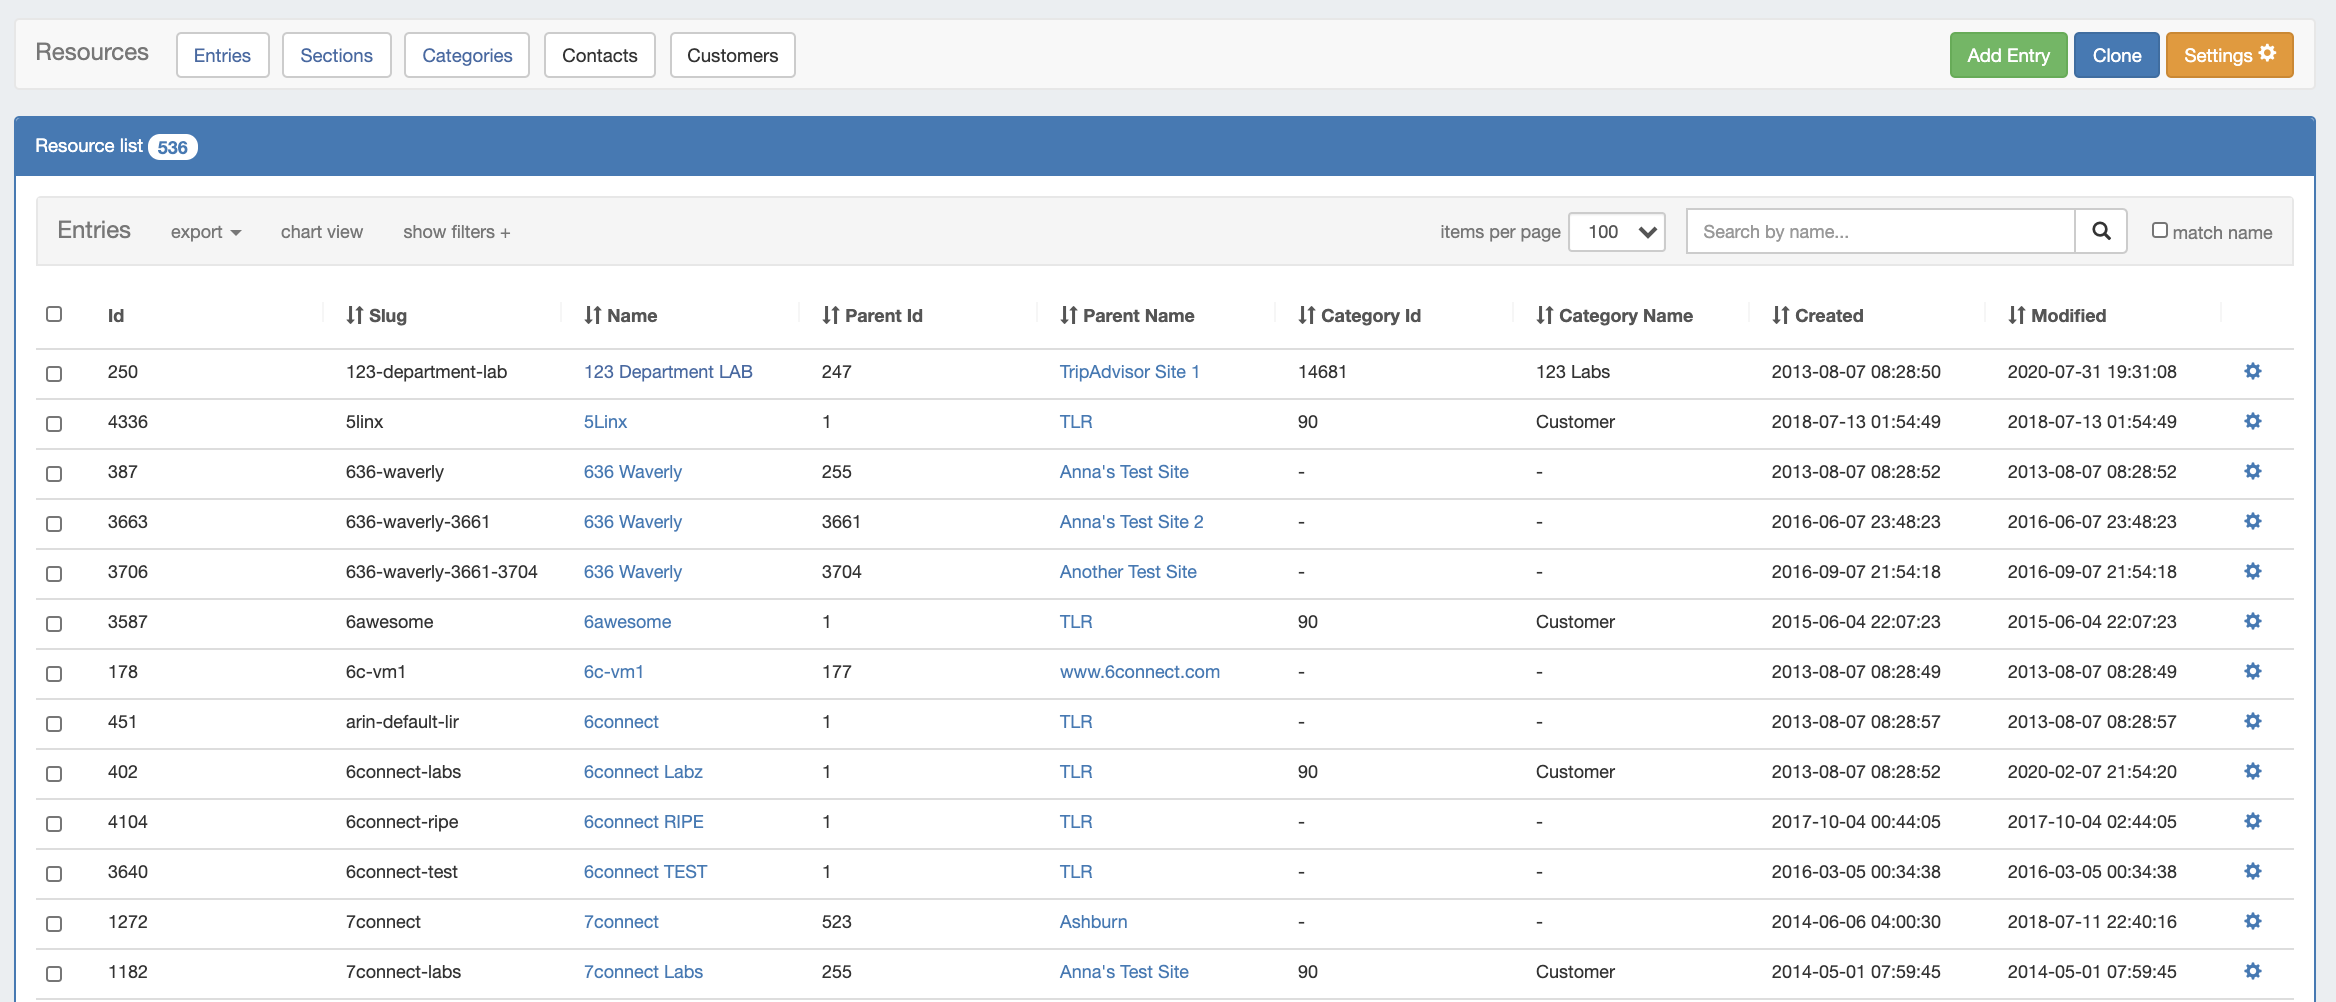
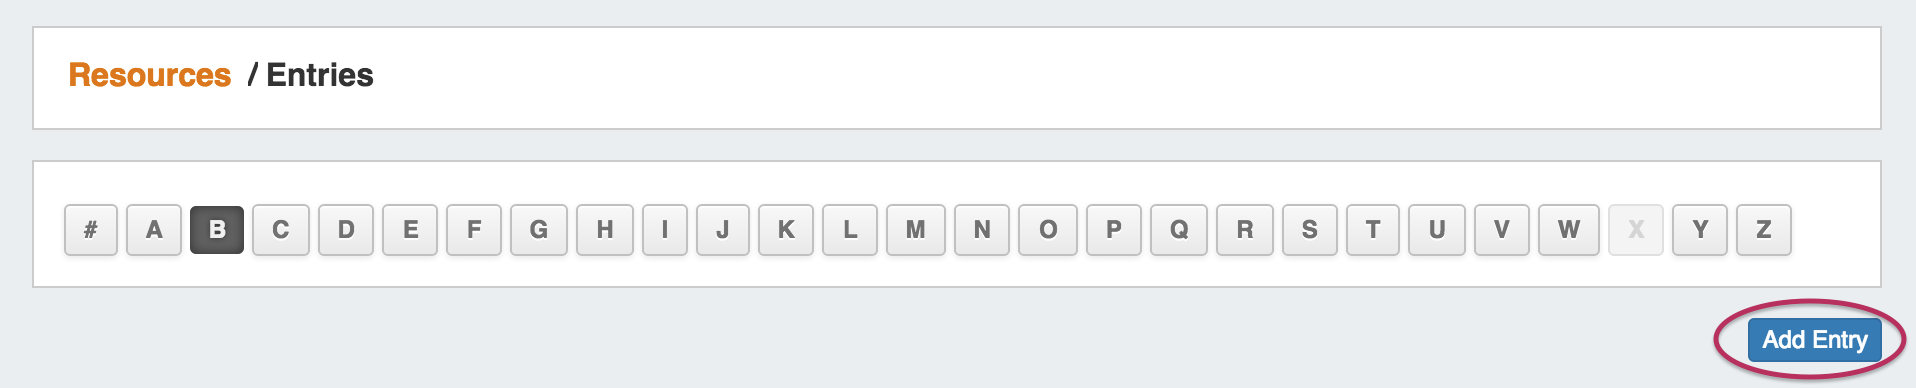
Page Header Button Bar:


1) Alphabetical Filter: Entries are organized by the first letter of the name. Click on a letter to see entries starting with that letter. List View Buttons: Click each Resource View button to display the desired list. Entries, Section, Categories, Contacts, and Customers are provided by default, although custom list views may be created and pinned to the button bar.
2) Add Entry Button: Click to add a new entry.
3) PaginationClone Resource Button: Click to clone an existing resource
4) Settings: Click to view additional pages of Entries under the selected letter.
4) Viewing Options: Select "Table View" or "Chart View" .
Table View (shown above), lists the Entries, Allocations, and Zone Count along with color-corded Category and Section information.
...
open up the settings page, where default and custom list filters, settings, column fields, and column order may be customized.
Resource List:

1) List Resource Count: Displays the number of resources in the current list view
2) List View Name: The name of the current view
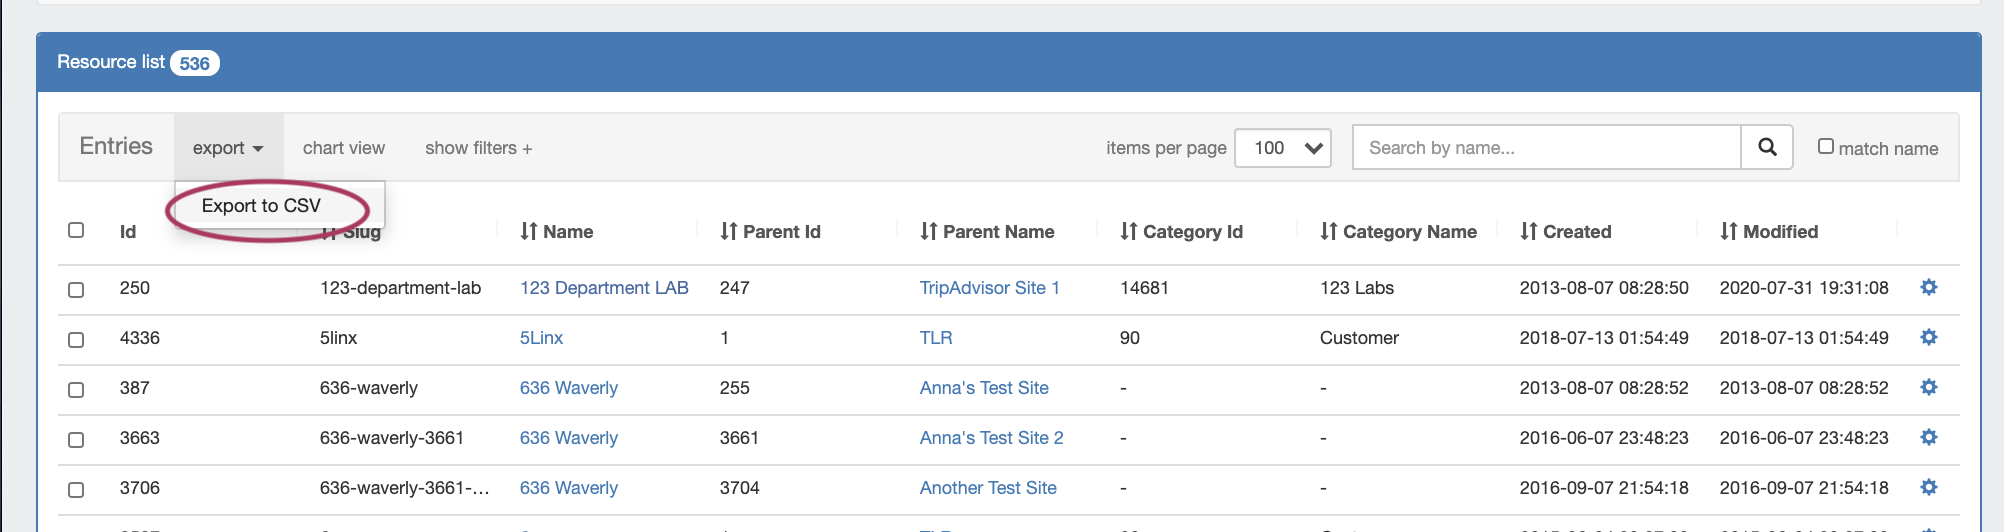
3) Export Options: Click to export the list to .csv
4) Chart View: Opens a link to Chart View, which graphically shows the entries in filterable, hierarchy form.
5) Search Box:) List Filters: Click to expand list filter options, including Section, Category, Parent Resource, Resource Type, or Attribute Name / Value.
6) Items per Page / Pagination: Set the desired number of resources per page. Pages display at the bottom of the resource list.
7) Search: This This text box allows the user to enter in criteria to filter the list of Entries.
6) Category: Color-coded Category indicator. The Category name will appear upon mouseover. Clicking on the Category box when the hand icon appears will redirect to a filtered list of entries of that Category.
7) Section: Color-coded Section indicator. The Section name will appear upon mouseover. Clicking on the Section box when the hand icon appears will redirect to a filtered list of entries of that Section.
Click "match name" for an exact name match.
8) Resource Selection Box: Click to select multiple resources to apply bulk changes to. When multiple resources are selected, the actions menu will change to display options to apply to the selected resources.
9) Resource Field Columns: Each column displays a resource field. Columns with arrows next to the names may be sorted by ascending/descending values by clicking on the column name. The fields that display, as well as their order, may be customized in "Settings".
10) Resource Links: Clicking on a resource 8) Name: A list of the Resource Entry names. Clicking on a name will take the user to that resource's individual entry page.
911) Allocations: The number of IP blocks assigned to that resource.
10) Zone Count: The number of zones assigned to that resource.
11) Action Menu: Action Menu: Right click anywhere on a resource's row to open the Action Menu. The Action Menu (wrench gear icon) gives a list of additional actions to perform on the zone
Entry List Action Menu
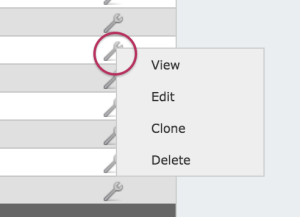
resource. If more than one resource is selected, bulk edit actions will display instead.
Resource Action Menu
Action Menu - Single Resource
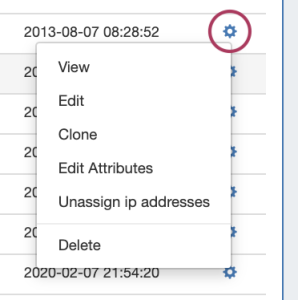
Opening Clicking on the Action Menu in the Entry List View for a single resource will bring up the following options:
...
Edit: Opens to the resource's Edit pageoptions
Clone: Opens the clone resource page for the selected resource
Edit Attributes: Opens the edit attributes options to view or update field values for that resource
Unassign IP Addresses: Unassigns all IP addresses assigned to the resource
Delete: Deletes the resource, if appropriate permissions exist.
Action Menu - Multiple Resources
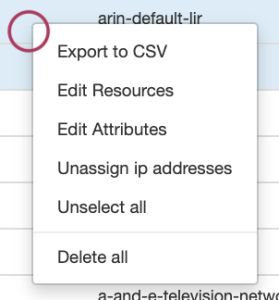
Opening the Action Menu in the Entry List View when multiple resources are selected will bring up the following options:
Export to CSV: Exports the selected resources to .csv
Edit: Opens the resource Edit options, to bulk change all resources
Edit Attributes: Opens the edit attributes options to view or update field values for the selected resources.Note: Attributes will only be able to be changed if the available fields are the same for all selected resources (in general, the resources are of the same section).
Unassign IP Addresses: Unassigns all IP addresses assigned to the resources
Unselect All: Deselects the resources
Delete All: Deletes the resources, if appropriate permissions exist.
...
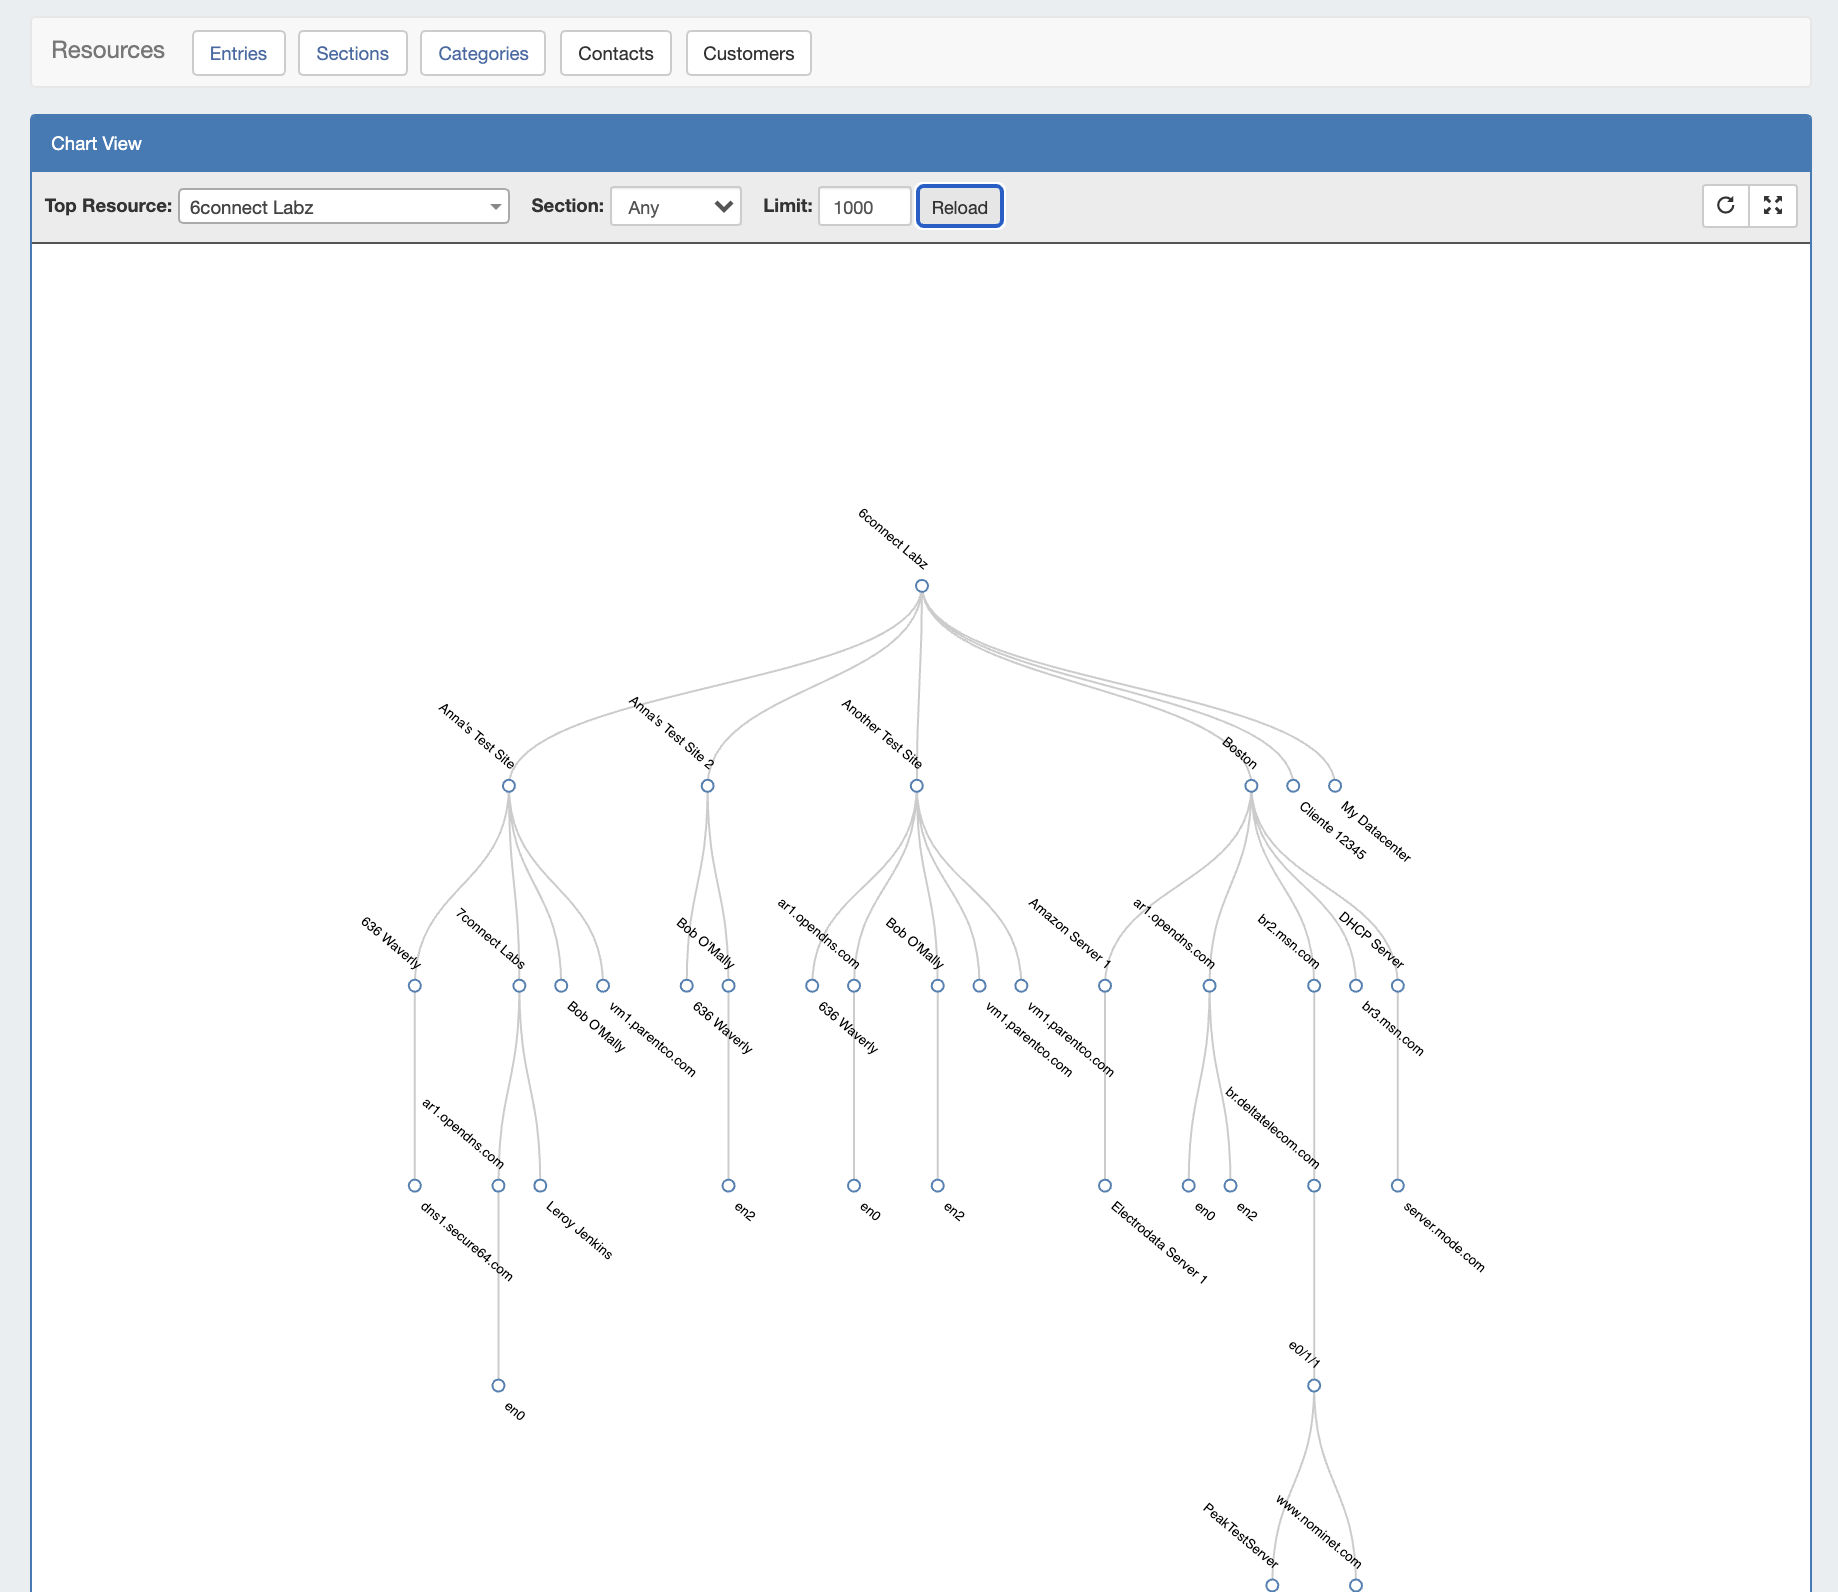
Chart View illustrates the resources created in a node-based tree.
Select the Top Resource and/or the , Section Type, and limit of number of resources to display from the dropdown menus to limit the view, if desired, and then click "Reload".
Users will only be able to view sections of the resource tree on which they have view permissions.
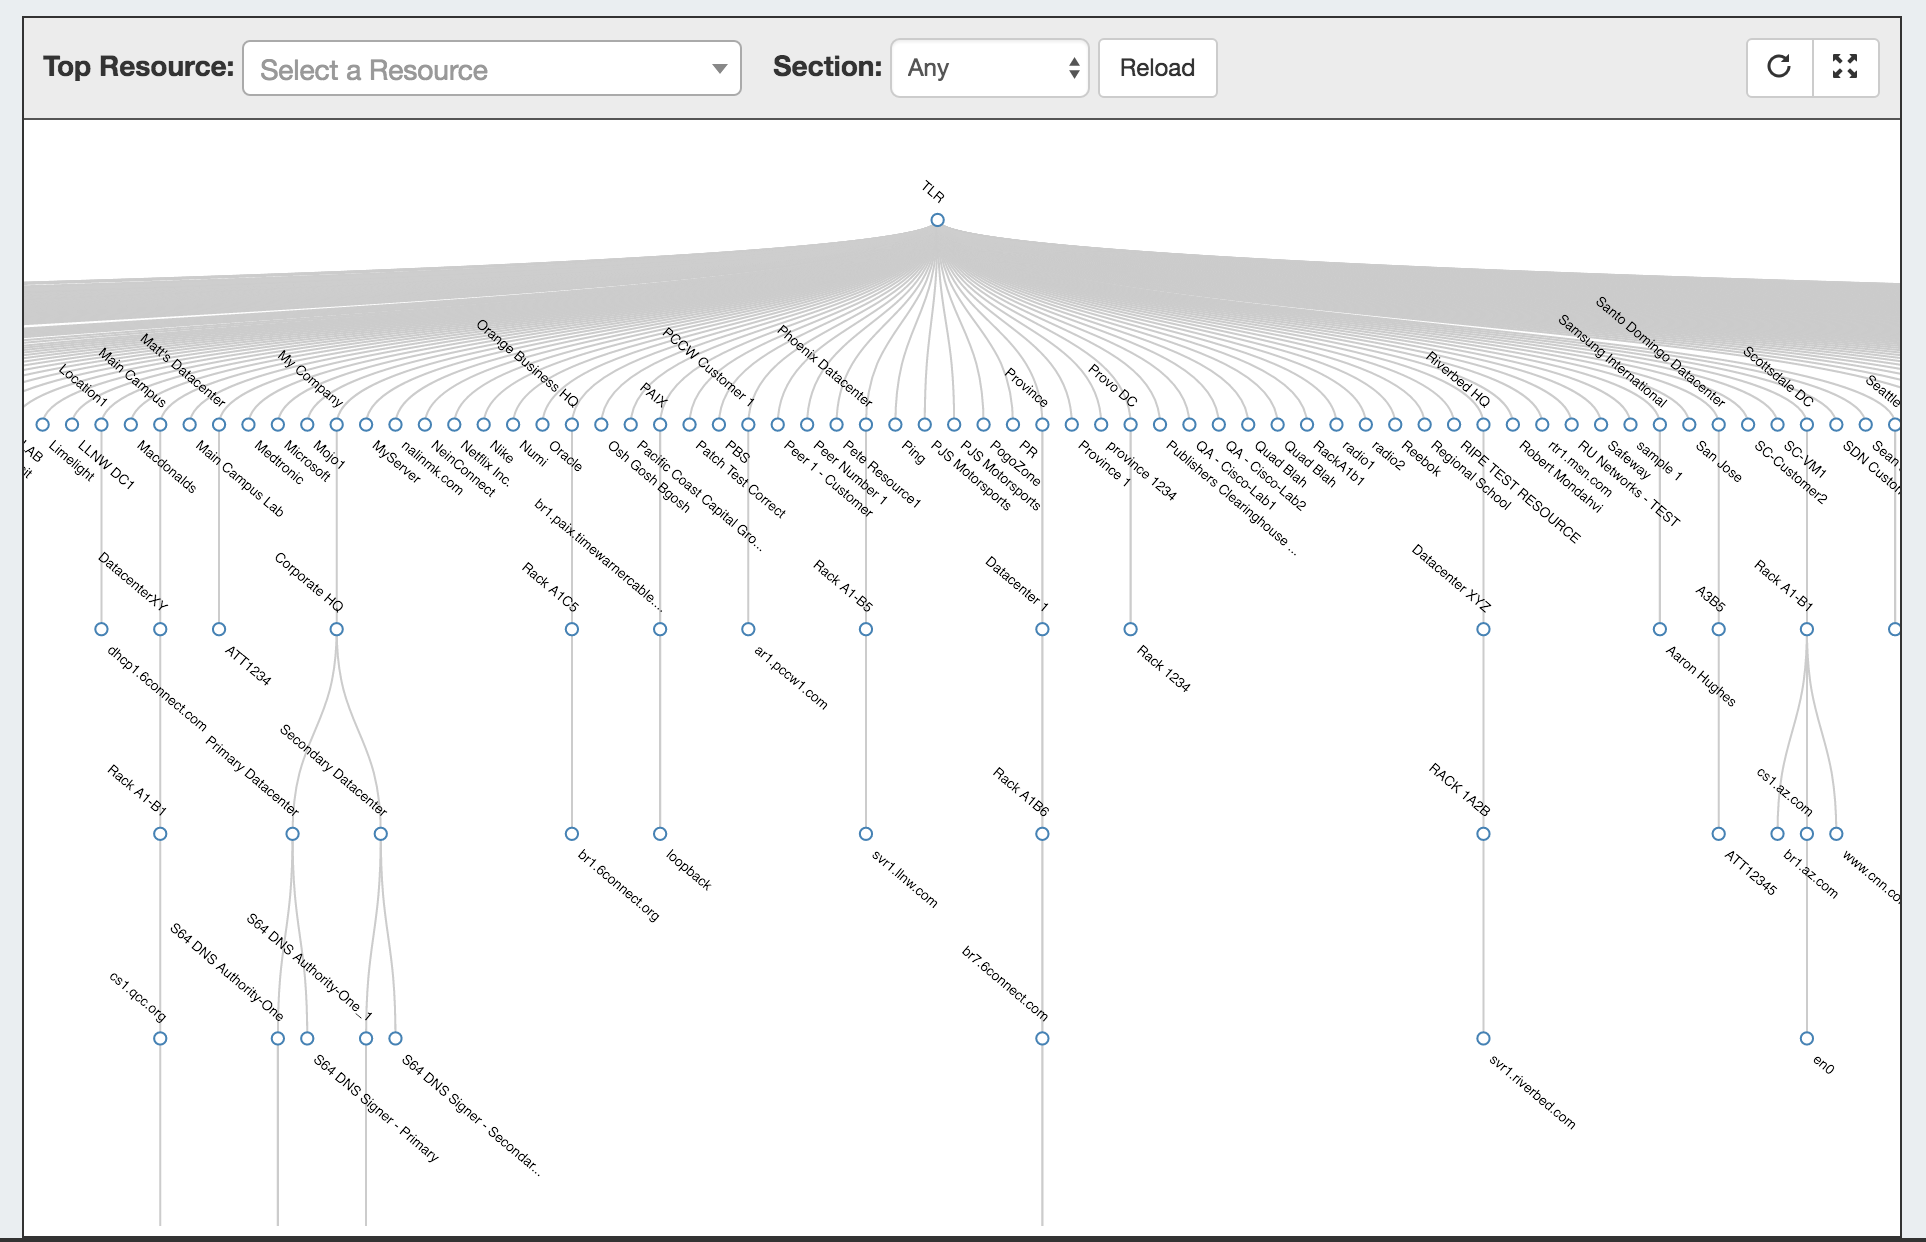
While viewing the main chart, you may:
- View in horizontal or vertical tree mode by clicking the "Switch Chart Orientation" button.

- View fullscreen by clicking the "View Fullscreen" button.

- Left click and drag within the tree view, or scroll wheel in/out to change the area viewed.
- Single or double-clicking on a node with children will collapse or expand the tree at that resource.
- Clicking and dragging a resource node to another resource will relocate the resource to be a child of the resource it is dropped on.
Hovering over a specific Resource or node, then right clicking will open a context menu with the following options:
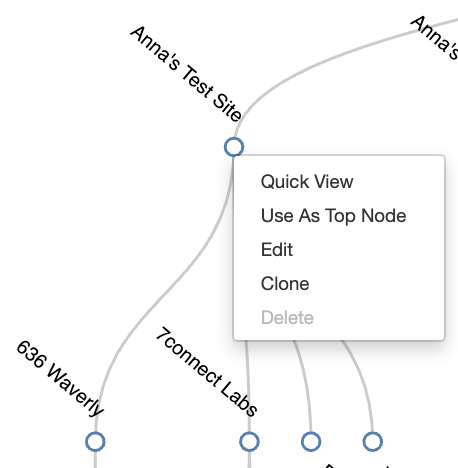
Quick View: Shows summarized details about the resource and its children, and links to the Resource Entry page(s).
Use As Top Node: Set the current resource as the Top Node of the displayed hierarchy.
Edit: Opens to the resource's Edit page
...
Delete: Deletes the resource, if appropriate permissions exist and no child resources/assignments exist under the resource.
The Resource Entry Page (View Resource)
...
Open the page by clicking on a Resource name from the Resource List, or select "View" from the Action Menu for the resource in the Entry List.
The Resource Entry page displays basic details about the Resource, including name, id, section, and category.

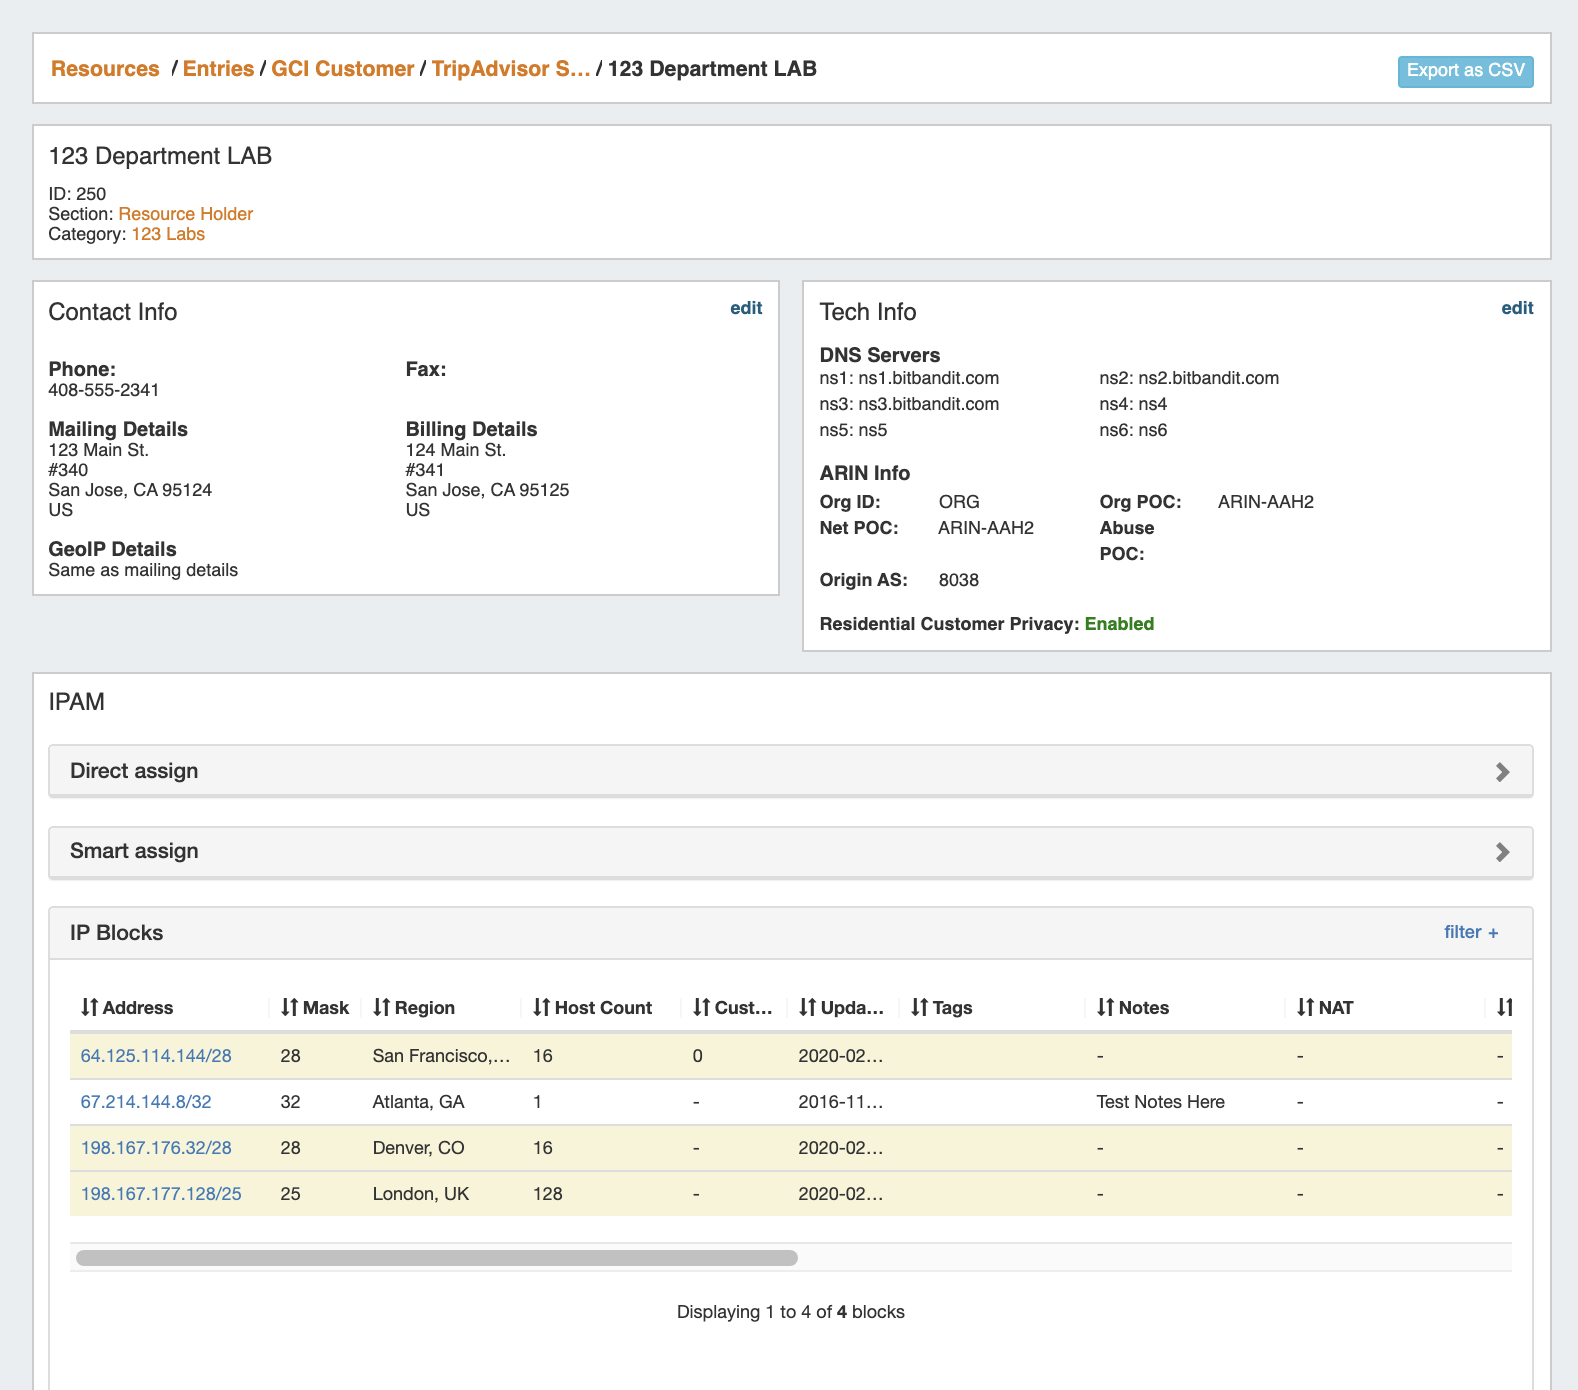
Additional information and actions are available to perform for the Resource, depending on which Gadgets are enabled for the associated Section:
...
- ACP ("Workflows") Gadget: Connector to ProVision's API Composer Platform. Executes selected ACP Workflows.
- Contact Info: Displays phone, address, and billing details for the Resource.
- Contacts: Assigns Contacts to the Resource from the Contact Manager.
- DHCP Server Management (Legacy): Manage a DHCP Server details and pools.
- DHCP Customer Configuration (Specialized): Assign and Configure DHCP Pools from APNIC Blocks.
- DNS: Lists DNS Zones associated with the Resource and links to the zone's DNSv3 page.
- DNS Autogenerator: Autogenerates DNS forward and reverse zones for the resource, based on assigned IP Blocks.
- Document Storage: Load, View, and Download assorted image or text documents.
- Field Gadget: View and Edit data and information fields associated with the current resource.
- IPAM (Legacy): Manage IP Blocks.
- IPAMv2: Manage IP Blocks - supports additional functionality over the old IPAM Gadget.
- Notes: Type and view short text notes.
- Peer Groups: View and assign Router Peer Groups.
- Peering Sessions: View and manage peering sessions.
- Peering VRFs: Manage Peering VRFs.
- Resource Linkage Gadget: Create a reciprocal link to another resource.
- Resource Linkage - IPAM Linked IPs Gadget: View the IPs assigned to Linked Resources.
- Resource View: Displays the basic Resource entry information - name, section, etc.
- Reverse API Console: Display custom reverse API content.
- Tech Info: Display NS and Technical RIR info.
...
To create a new Entry, click on the "Add Entry" button from the Resource Tab / Entry List Page.

This will take you to the Add Entry pageResource screen.
Fill in the Name of your new Resource Entry, select a Section (the chosen Section determines what gadgets will show on your new resource's Entry page), the Parent Resource, Category, and enter a Custom ID number if desired.
When complete, click the "Create" button. If you wish to exit without saving your changes, click "CancelClose".

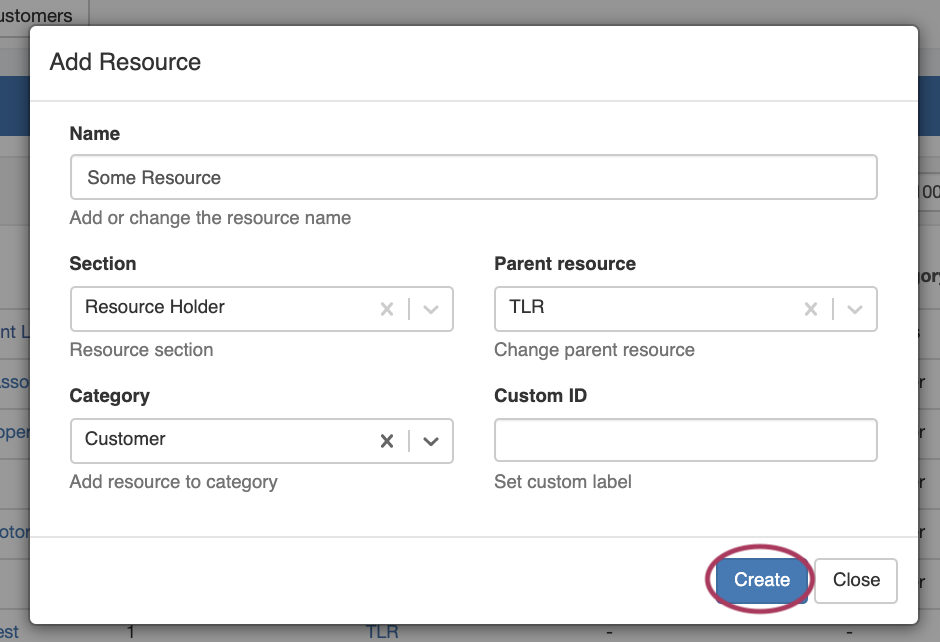
Once the Entry is created, the Resource Entry page loads for that Resource, displaying whatever gadgets are enabled for the associated Section.
...
If you wish to delete the Entry, select the "Delete" button.
You may also edit or delete an Entry from the Resource Entry List, by right clicking on the resource, and selecting "Edit" or "Delete" from the Action Menu.
| Info | ||
|---|---|---|
| ||
If an entry has children, the delete option will not be available. Child Entries must be deleted before a Parent Entry can be deleted. |
Export Resource Fields
Resource List Export:
To export all resources/ resource fields displayed in a Resource List, select "Export to CSV" from the top header for the desired resource list.
Multiple Resources Export:
To export multiple resources, select the desired resources from the resource list, then open the action menu and click "Export to CSV".
Single Resource Export:
Resource Entry pages have an "Export As CSV" button that generates a .csv file containing the Resource's basic field information.
...
Information Cloned: Format of the original Resource (which gadgets are enabled, location, fields), contact / tech information, field information, and (if selected) Child Entries, and Child Entry sections, fields, and field informaiton information - in general, items that are chosen or input at the entry creation, or input into text fields.
...
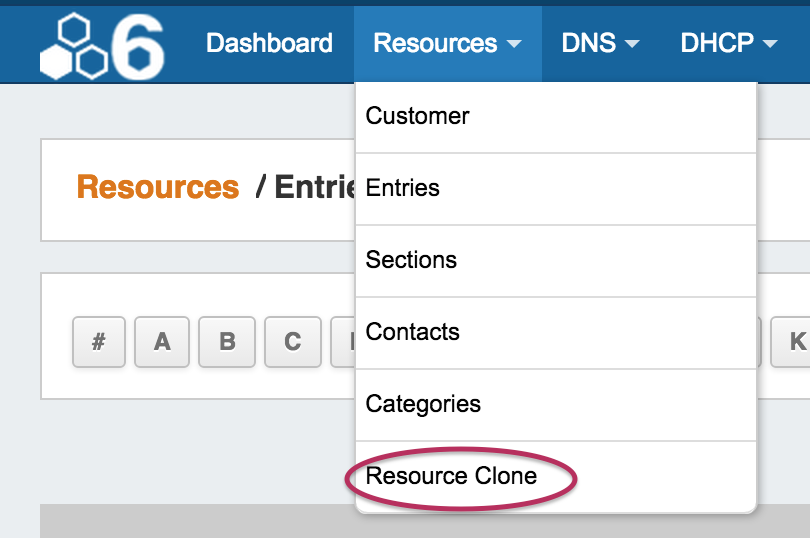
The Resource Clone feature may be accessed from either the Resources Tab dropdown menu, or from a Resource Entry page.
From the Resources Tab dropdown, select "Resource Clone". This will take you to open the Resource Clone pageoptions.

You may also select "Clone" from the bottom of a Resource Entry page, in which case the Entry page you clicked "Clone" from will be automatically selected as the resource to clone.
...
Continue on to the following pages for additional information on working with Working with Resources in Provision:
...
| Children Display | ||||||
|---|---|---|---|---|---|---|
|
...