...
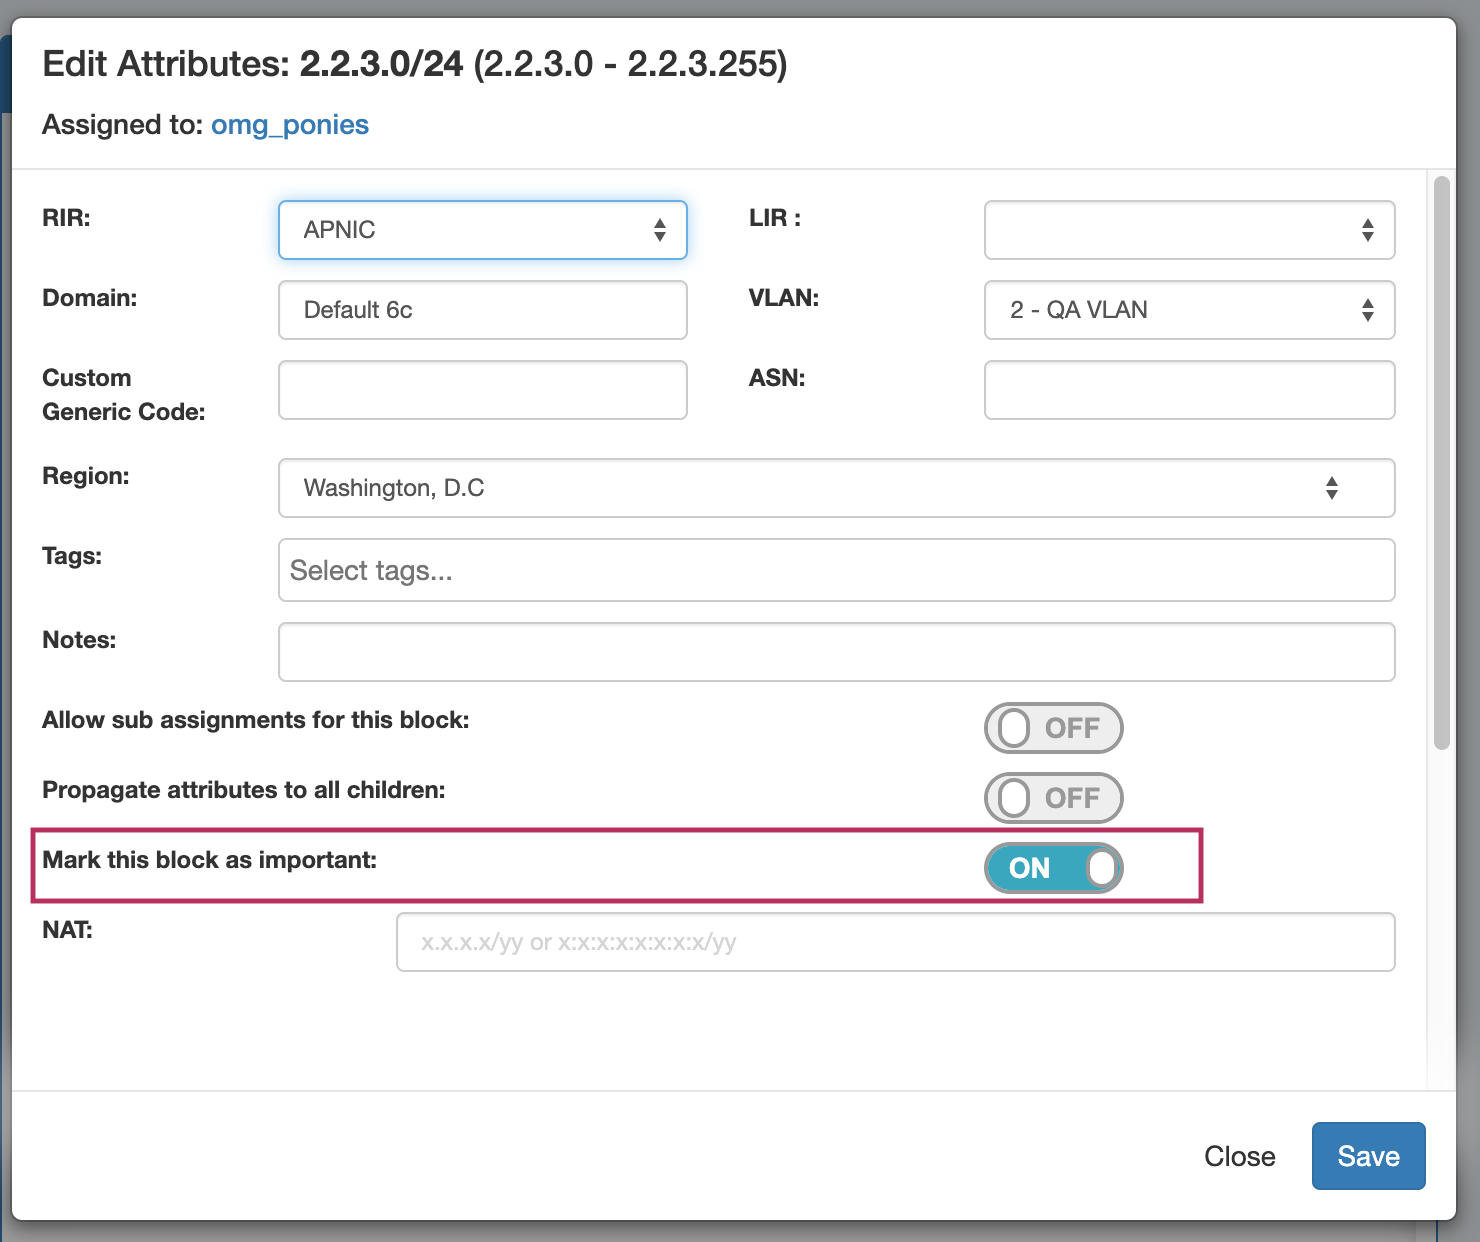
Blocks may be manually marked or unmarked as "Important" from either the "Edit Block" interface (by opening "Edit" for the block, then selecting the toggle for "Mark this block as important"), or from the API .
Working with IP Blocks - Common Tasks
Individual Blocks may be managed from either IPAM Manage, or the IPAM Gadget. (if assigned to a resource, and the IPAM Gadget is enabled on the Resource's Entry Page).
In general, standard actions from the Action Menu will be performed the same in either area, with "Assign" being the exception.
IPAM Block Action Menu - Overview
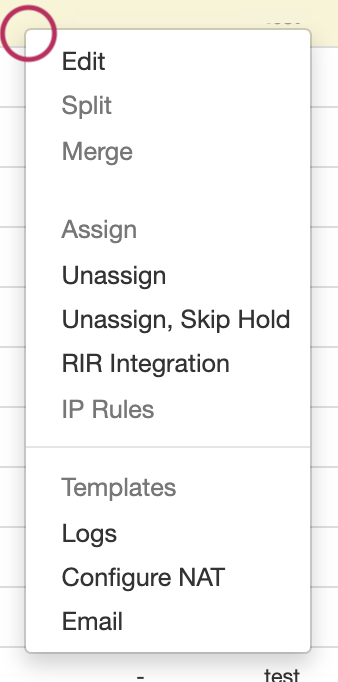
Most actions performed with block managed are contained under the IPAM Manage - Action Menu. Open the Action Menu by left clicking on the Gear Icon, or right clicking anywhere on the block's row. The same Action Menu is also available to manage blocks via the IPAM Gadget.
...
| width | 25% |
|---|
| Column | ||
|---|---|---|
| ||
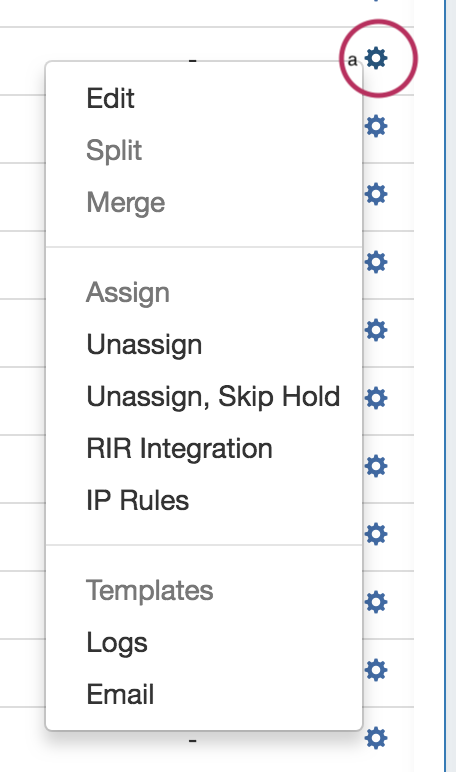
The Action Menu contains the following options:
|
Split or Merge Blocks Manually
To split a block manually, click on the Action Menu (Gear icon), or right-click anywhere in the row for the available block you wish to modify.
In the menu that appears, select the "Split" function.
To aggregate blocks, select "Merge" from the same menu.
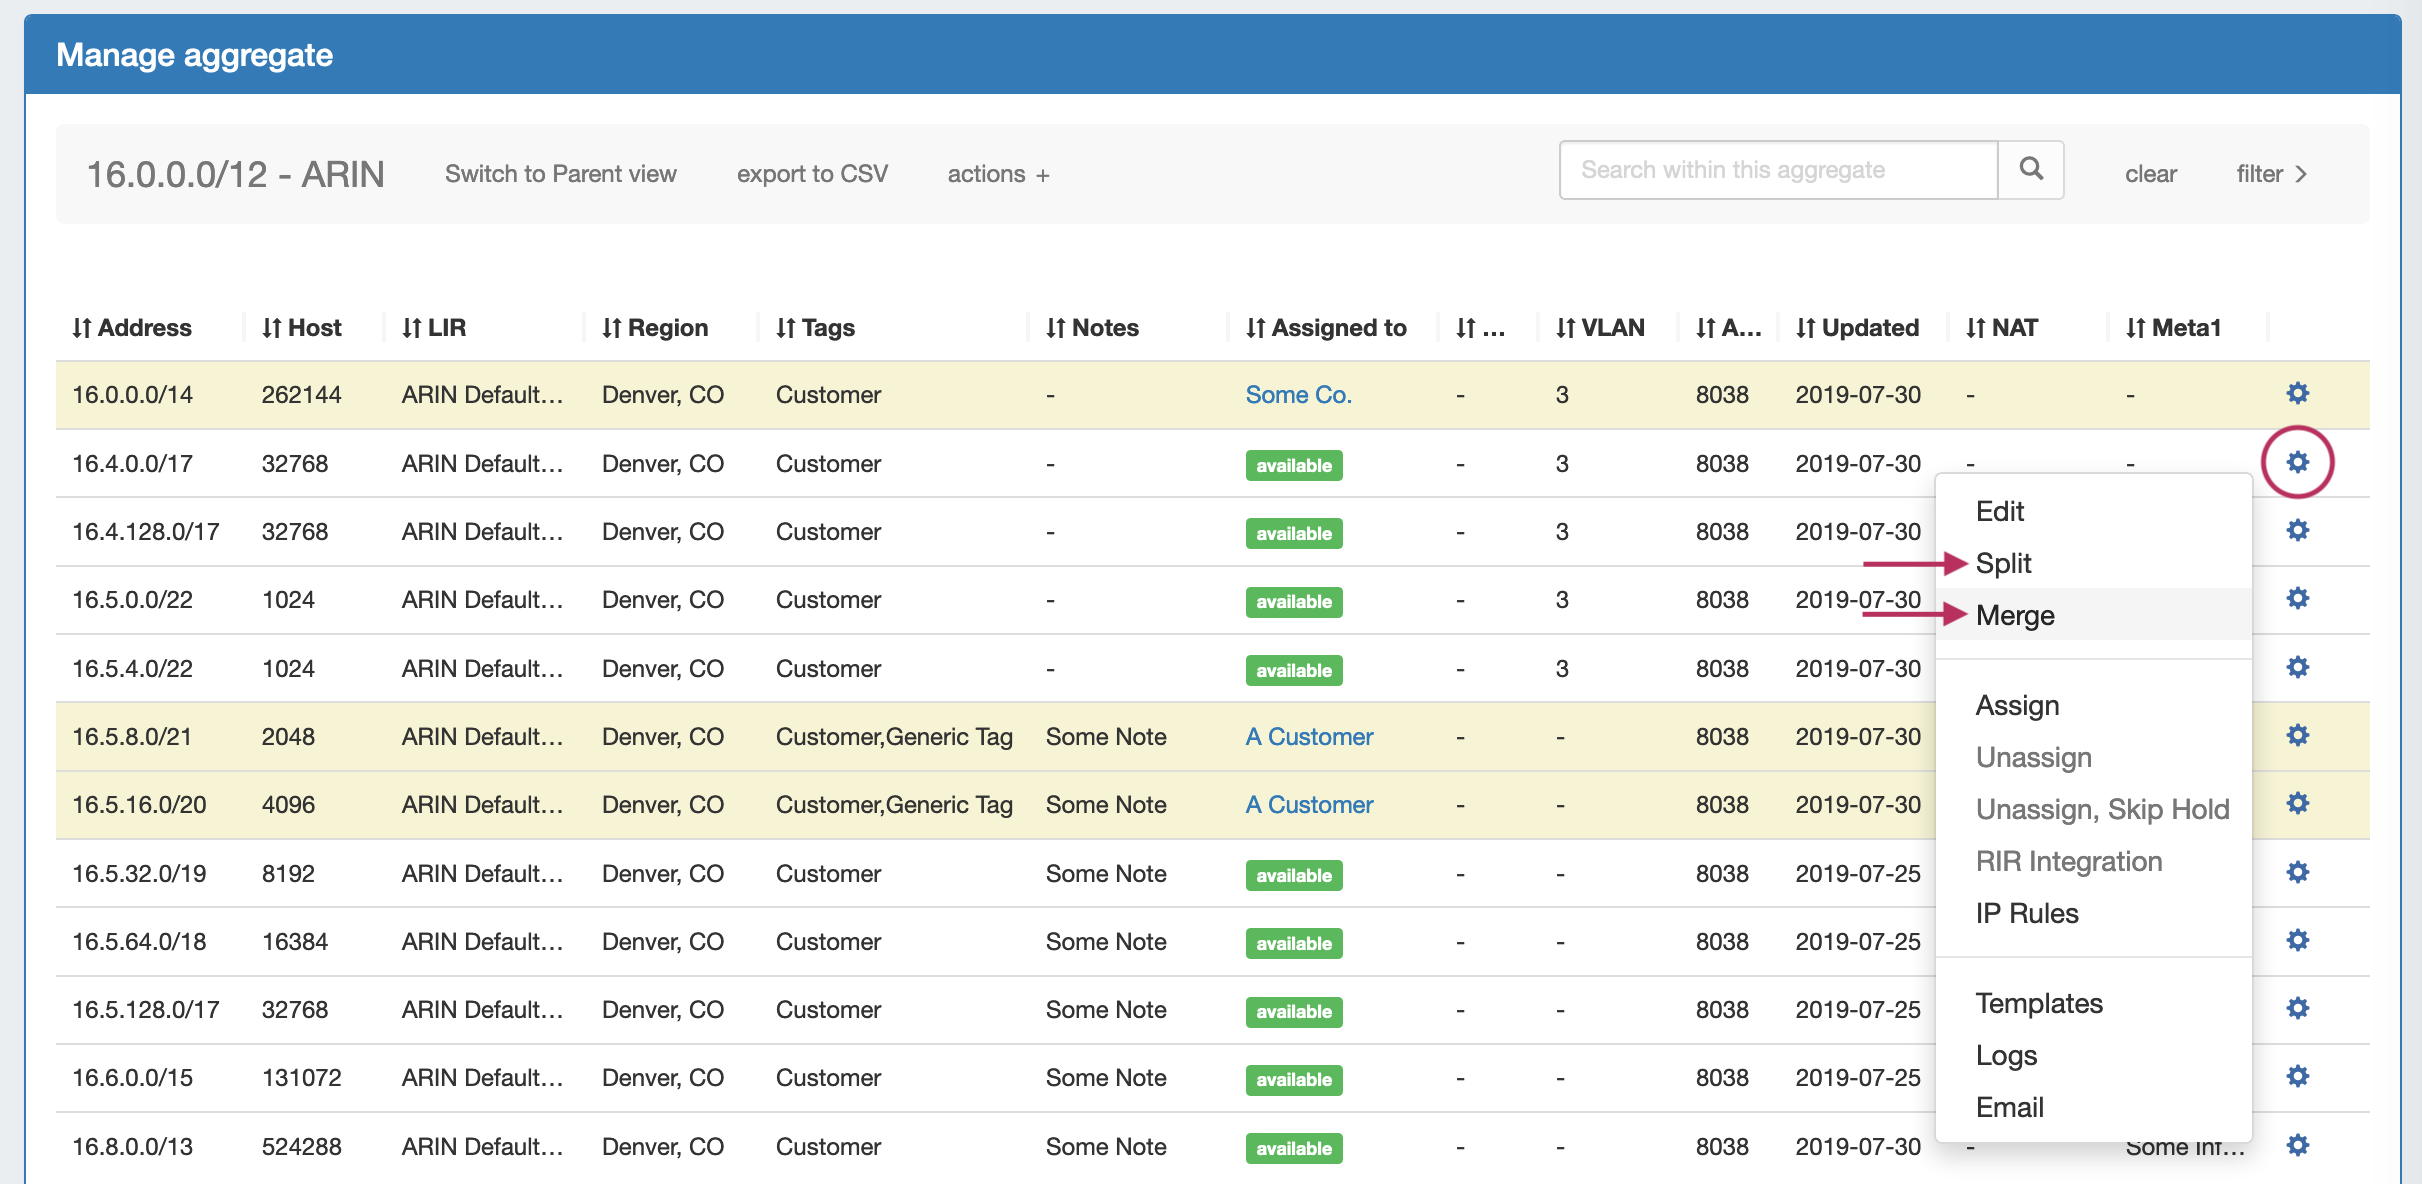
The Split option is not available for blocks that are already of the smallest available size ( IPv4 /32s or IPv6 /128s), for blocks in "Holding", or for blocks that are already assigned and do not have subassignments enabled. If more than one level of splitting is needed, use "Templates - Auto Split" instead.
Merge is only available for adjacent blocks of the same size that are "Available", in "Holding", or is subassignable.
Split or Merge Blocks Using Templates
Templates for a block are available under the Action Menu (wrench icon or right-click) for that block. Templates are only usable from IPAM Manage.
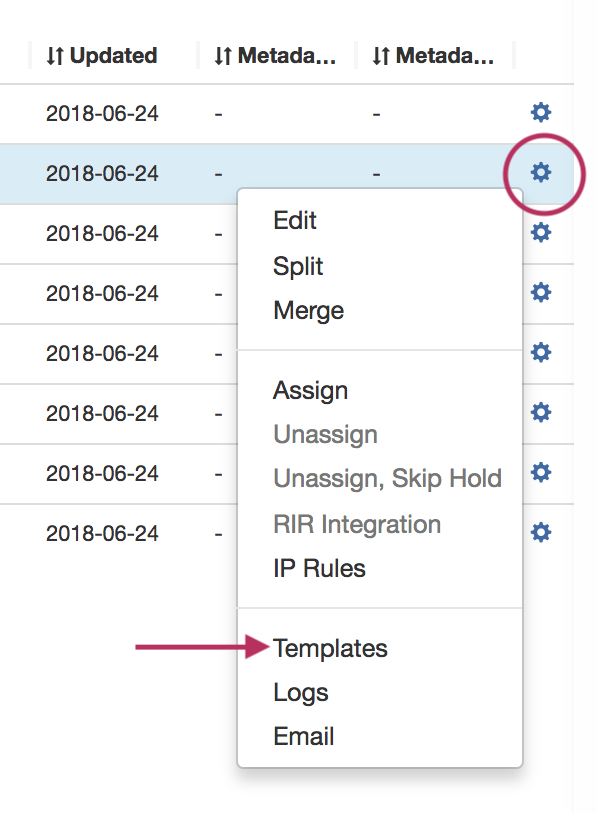
There are two templates available: Cleanup (Only available for parent blocks) which auto-aggregates the block, and Auto-split.
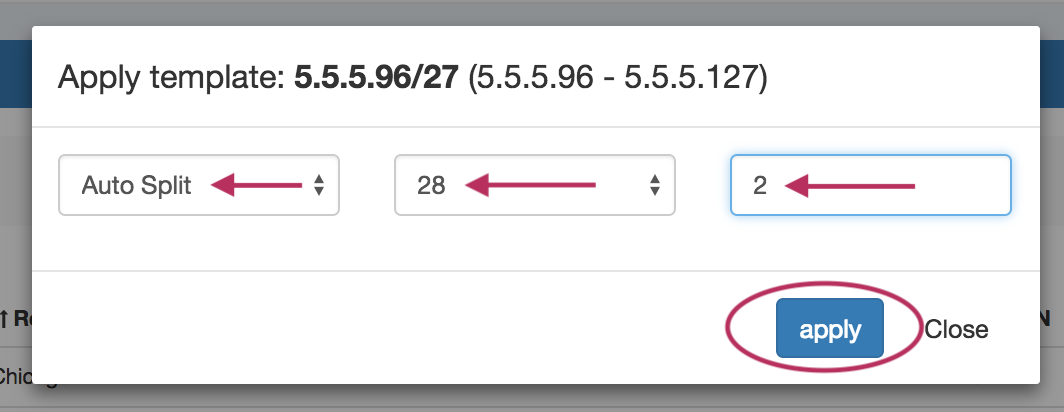
Select the available template action, the mask, and the limit. When done, click the "Apply" button.
You can also use the "Templates" option from the Action Menu on the IPAM Manage screen for the specific block.
Edit IP Block Attributes
You may edit a block / multiple blocks from either IPAM Manage or the IPAM Gadget, with the same options available.
Select the "Edit" option from the Action Menu (or double click on the block row) for a given block to get the Edit Attributes menu.
To edit multiple blocks at a time, shift-click each block you wish to edit - they will highlight in blue. Once selected, right-click on any highlighted block to open the multi-edit attributes screen.

Once selected, right-click on any highlighted block to open the multi-edit attributes screen.
From here you can set a variety of attributes for a given block. These values are also customizable from the Admin screen - see IPAM Administration and IPAM Parameters to customize, enable, or disable the available parameters.
| Tip |
|---|
If a field that you know is supported in ProVision appears to be 'missing' from the IPAM Mange, IPAM Manage filters, or Edit Attributes screens, check the following: Have an Admin verify that the field is set to "enabled" in Admin → IPAM Admin → Edit Columns. Any field disabled here will be hidden throughout ProVision, and some functions are dependent on certain fields being enabled - for example, filtering by Mask in IPAM Manage requires the "Host" field to be enabled. In IPAM manage, verify that the column widths of each field are set wide enough to display the column header Check for a scroll bar - when all attributes are enabled, many screens will require scrolling down or to the right in order to see all of the available data. |
After editing the desired attributes for the block, simply hit "Save".
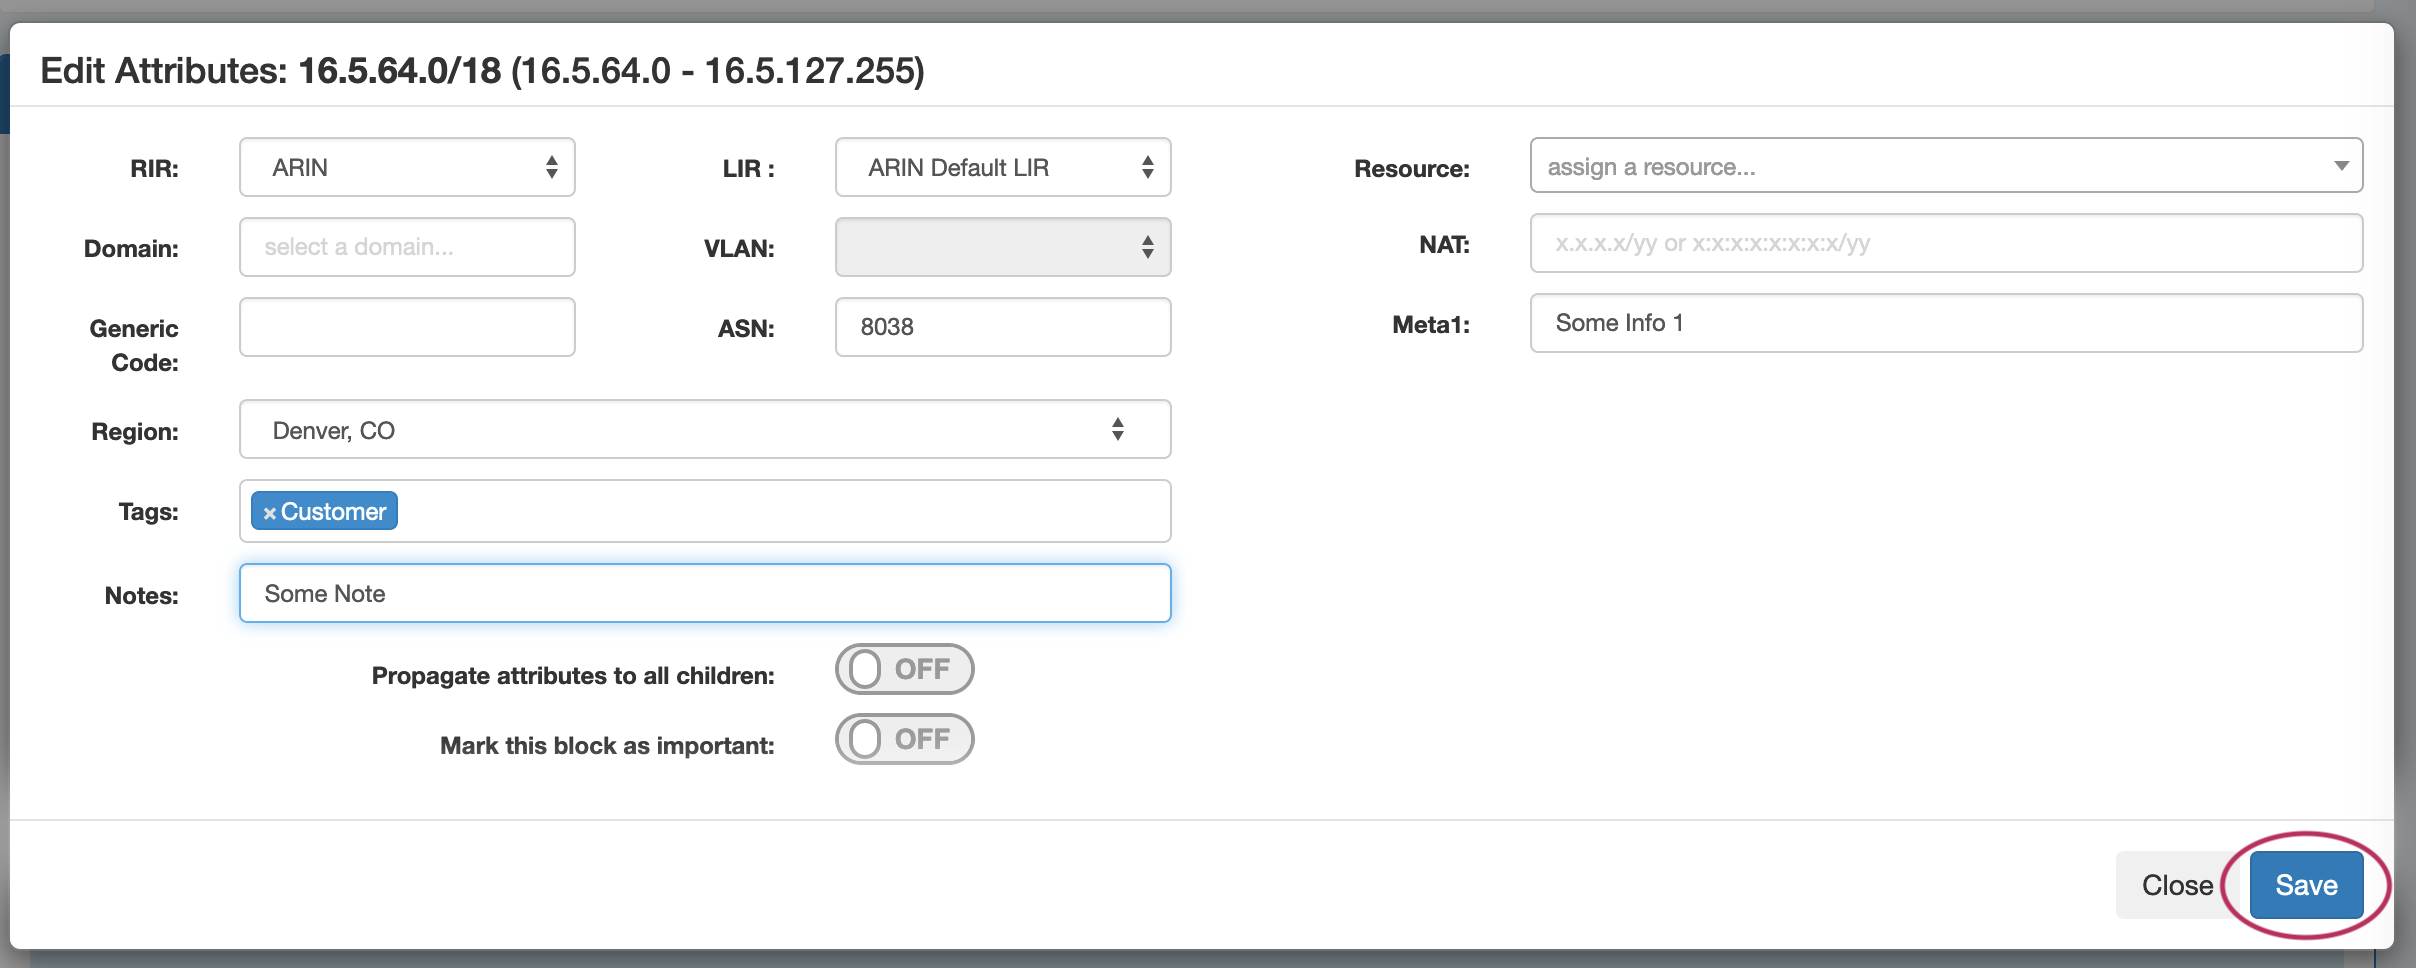
Edit Attributes Overview:
RIR: The RIR associated with the aggregate / block.
LIR: If LIRs are set up in IPAM Admin for the associated RIR, they will be selectable in this dropdown. See LIR Management and Use.
Domain: The VLAN Domain to associate with the block. To set up domains in ProVision, see VLAN - Working with Domains.
VLAN: VLAN information for the block, must have domain selected to view available VLANs.
Generic: This is a customizable text field that can be used to track information specific to your needs. It can be filtered in the IPAM Manage screen. The header, display, and enable/disable settings for this field are set under IPAM Configuration in the IPAM Administration section.
ASN: The ASN to associate with the block.
Region: Select the region from the drop down menu. Regions can be added and customized in the IPAM Admin section of ProVision - see IPAM Administration and IPAM Parameters.
Tags: Tags can be set under Edit Tags in the IPAM Administration section.
Notes: Freeform text field for additional information you wish to capture.
Resource: The resource assigned to the block.
NAT: The corresponding public or private block CIDR that is associated with the current block.
Metadata1 - Metadata 10: User-defined text fields, as set in IPAM Administration Edit Columns.
Allow Subassignments: When editing a block that has been assigned, toggling this setting to "On" allows for further subassignments, indicated by a blue arrow next to the assignment in the Manage screen. Note: Subassign status cannot be changed if a block has children.
Propagate Attributes to Children: Toggle this setting to "On" when editing a parent block to carry through attribute changes to all children of that block for that edit. This is not a persistent setting - it only applies to the specific edit you are in the process of making.
To view parent blocks, and which children would be affected, ensure that top level or all masks are selected in the Filter menu in the IPAM Manage screen. See Working with IP Blocks for more information.
...
If multiple blocks are selected with mixed "important" statuses, then the toggle will display in the "Off" position. To update all selected blocks to flag as important, switch the toggle to "On", and save changes. To switch all to the "Off" position, you may either toggle all blocks to "On", save changes, then switch all blocks back to "Off" and re-save, or adjust your selection to only include the blocks that need the Important Flag removed. (Tip: Use the list filter to show only "important" blocks!)
Working with IP Blocks - Common Tasks
Individual Blocks may be managed from either IPAM Manage, or the IPAM Gadget. (if assigned to a resource, and the IPAM Gadget is enabled on the Resource's Entry Page).
In general, standard actions from the Action Menu will be performed the same in either area, with "Assign" being the exception.
IPAM Block Action Menu - Overview
Most actions performed with block managed are contained under the IPAM Manage - Action Menu. Open the Action Menu by left clicking on the Gear Icon, or right clicking anywhere on the block's row. The same Action Menu is also available to manage blocks via the IPAM Gadget.
| Column | ||
|---|---|---|
| ||
|
| Column | ||
|---|---|---|
| ||
The Action Menu contains the following options:
|
Split or Merge Blocks Manually
To split a block manually, click on the Action Menu (Gear icon), or right-click anywhere in the row for the available block you wish to modify.
In the menu that appears, select the "Split" function.
To aggregate blocks, select "Merge" from the same menu.
The Split option is not available for blocks that are already of the smallest available size ( IPv4 /32s or IPv6 /128s), for blocks in "Holding", or for blocks that are already assigned and do not have subassignments enabled. If more than one level of splitting is needed, use "Templates - Auto Split" instead.
Merge is only available for adjacent blocks of the same size that are "Available", in "Holding", or is subassignable.
Split or Merge Blocks Using Templates
Templates for a block are available under the Action Menu (wrench icon or right-click) for that block. Templates are only usable from IPAM Manage.
There are two templates available: Cleanup (Only available for parent blocks) which auto-aggregates the block, and Auto-split.
Select the available template action, the mask, and the limit. When done, click the "Apply" button.
You can also use the "Templates" option from the Action Menu on the IPAM Manage screen for the specific block.
Edit IP Block Attributes
You may edit a block / multiple blocks from either IPAM Manage or the IPAM Gadget, with the same options available.
Select the "Edit" option from the Action Menu (or double click on the block row) for a given block to get the Edit Attributes menu.
To edit multiple blocks at a time, shift-click each block you wish to edit - they will highlight in blue. Once selected, right-click on any highlighted block to open the multi-edit attributes screen.
Once selected, right-click on any highlighted block to open the multi-edit attributes screen.
From here you can set a variety of attributes for a given block. These values are also customizable from the Admin screen - see IPAM Administration and IPAM Parameters to customize, enable, or disable the available parameters.
| Tip |
|---|
If a field that you know is supported in ProVision appears to be 'missing' from the IPAM Mange, IPAM Manage filters, or Edit Attributes screens, check the following: Have an Admin verify that the field is set to "enabled" in Admin → IPAM Admin → Edit Columns. Any field disabled here will be hidden throughout ProVision, and some functions are dependent on certain fields being enabled - for example, filtering by Mask in IPAM Manage requires the "Host" field to be enabled. In IPAM manage, verify that the column widths of each field are set wide enough to display the column header Check for a scroll bar - when all attributes are enabled, many screens will require scrolling down or to the right in order to see all of the available data. |
After editing the desired attributes for the block, simply hit "Save".
Edit Attributes Overview:
RIR: The RIR associated with the aggregate / block.
LIR: If LIRs are set up in IPAM Admin for the associated RIR, they will be selectable in this dropdown. See LIR Management and Use.
Domain: The VLAN Domain to associate with the block. To set up domains in ProVision, see VLAN - Working with Domains.
VLAN: VLAN information for the block, must have domain selected to view available VLANs.
Generic: This is a customizable text field that can be used to track information specific to your needs. It can be filtered in the IPAM Manage screen. The header, display, and enable/disable settings for this field are set under IPAM Configuration in the IPAM Administration section.
ASN: The ASN to associate with the block. ProVision auto-generates AS-Resources when an ASN is provided for the field in standard ASN format.
Region: Select the region from the drop down menu. Regions can be added and customized in the IPAM Admin section of ProVision - see IPAM Administration and IPAM Parameters.
Tags: Tags can be set under Edit Tags in the IPAM Administration section.
Notes: Freeform text field for additional information you wish to capture.
Resource: The resource assigned to the block.
NAT: The corresponding public or private block CIDR that is associated with the current block.
Metadata1 - Metadata 10: User-defined text fields, as set in IPAM Administration Edit Columns.
Allow Sub-assignments: When editing a block that has been assigned, toggling this setting to "On" allows for further subassignments, indicated by a blue arrow next to the assignment in the Manage screen. Note: Subassign status cannot be changed if a block has children.
Propagate Attributes to Children: Toggle this setting to "On" when editing a parent block to carry through attribute changes to all children of that block for that edit. This is not a persistent setting - it only applies to the specific edit you are in the process of making.
To view parent blocks, and which children would be affected, ensure that top level or all masks are selected in the Filter menu in the IPAM Manage screen. See Working with IP Blocks for more information.
| Info |
|---|
| Note: The VLAN of a child cannot be different from that of its parent, so for mutil-level situations (Parent -> Child -> Grandchild), VLAN should be updated at the top tier parent level. |
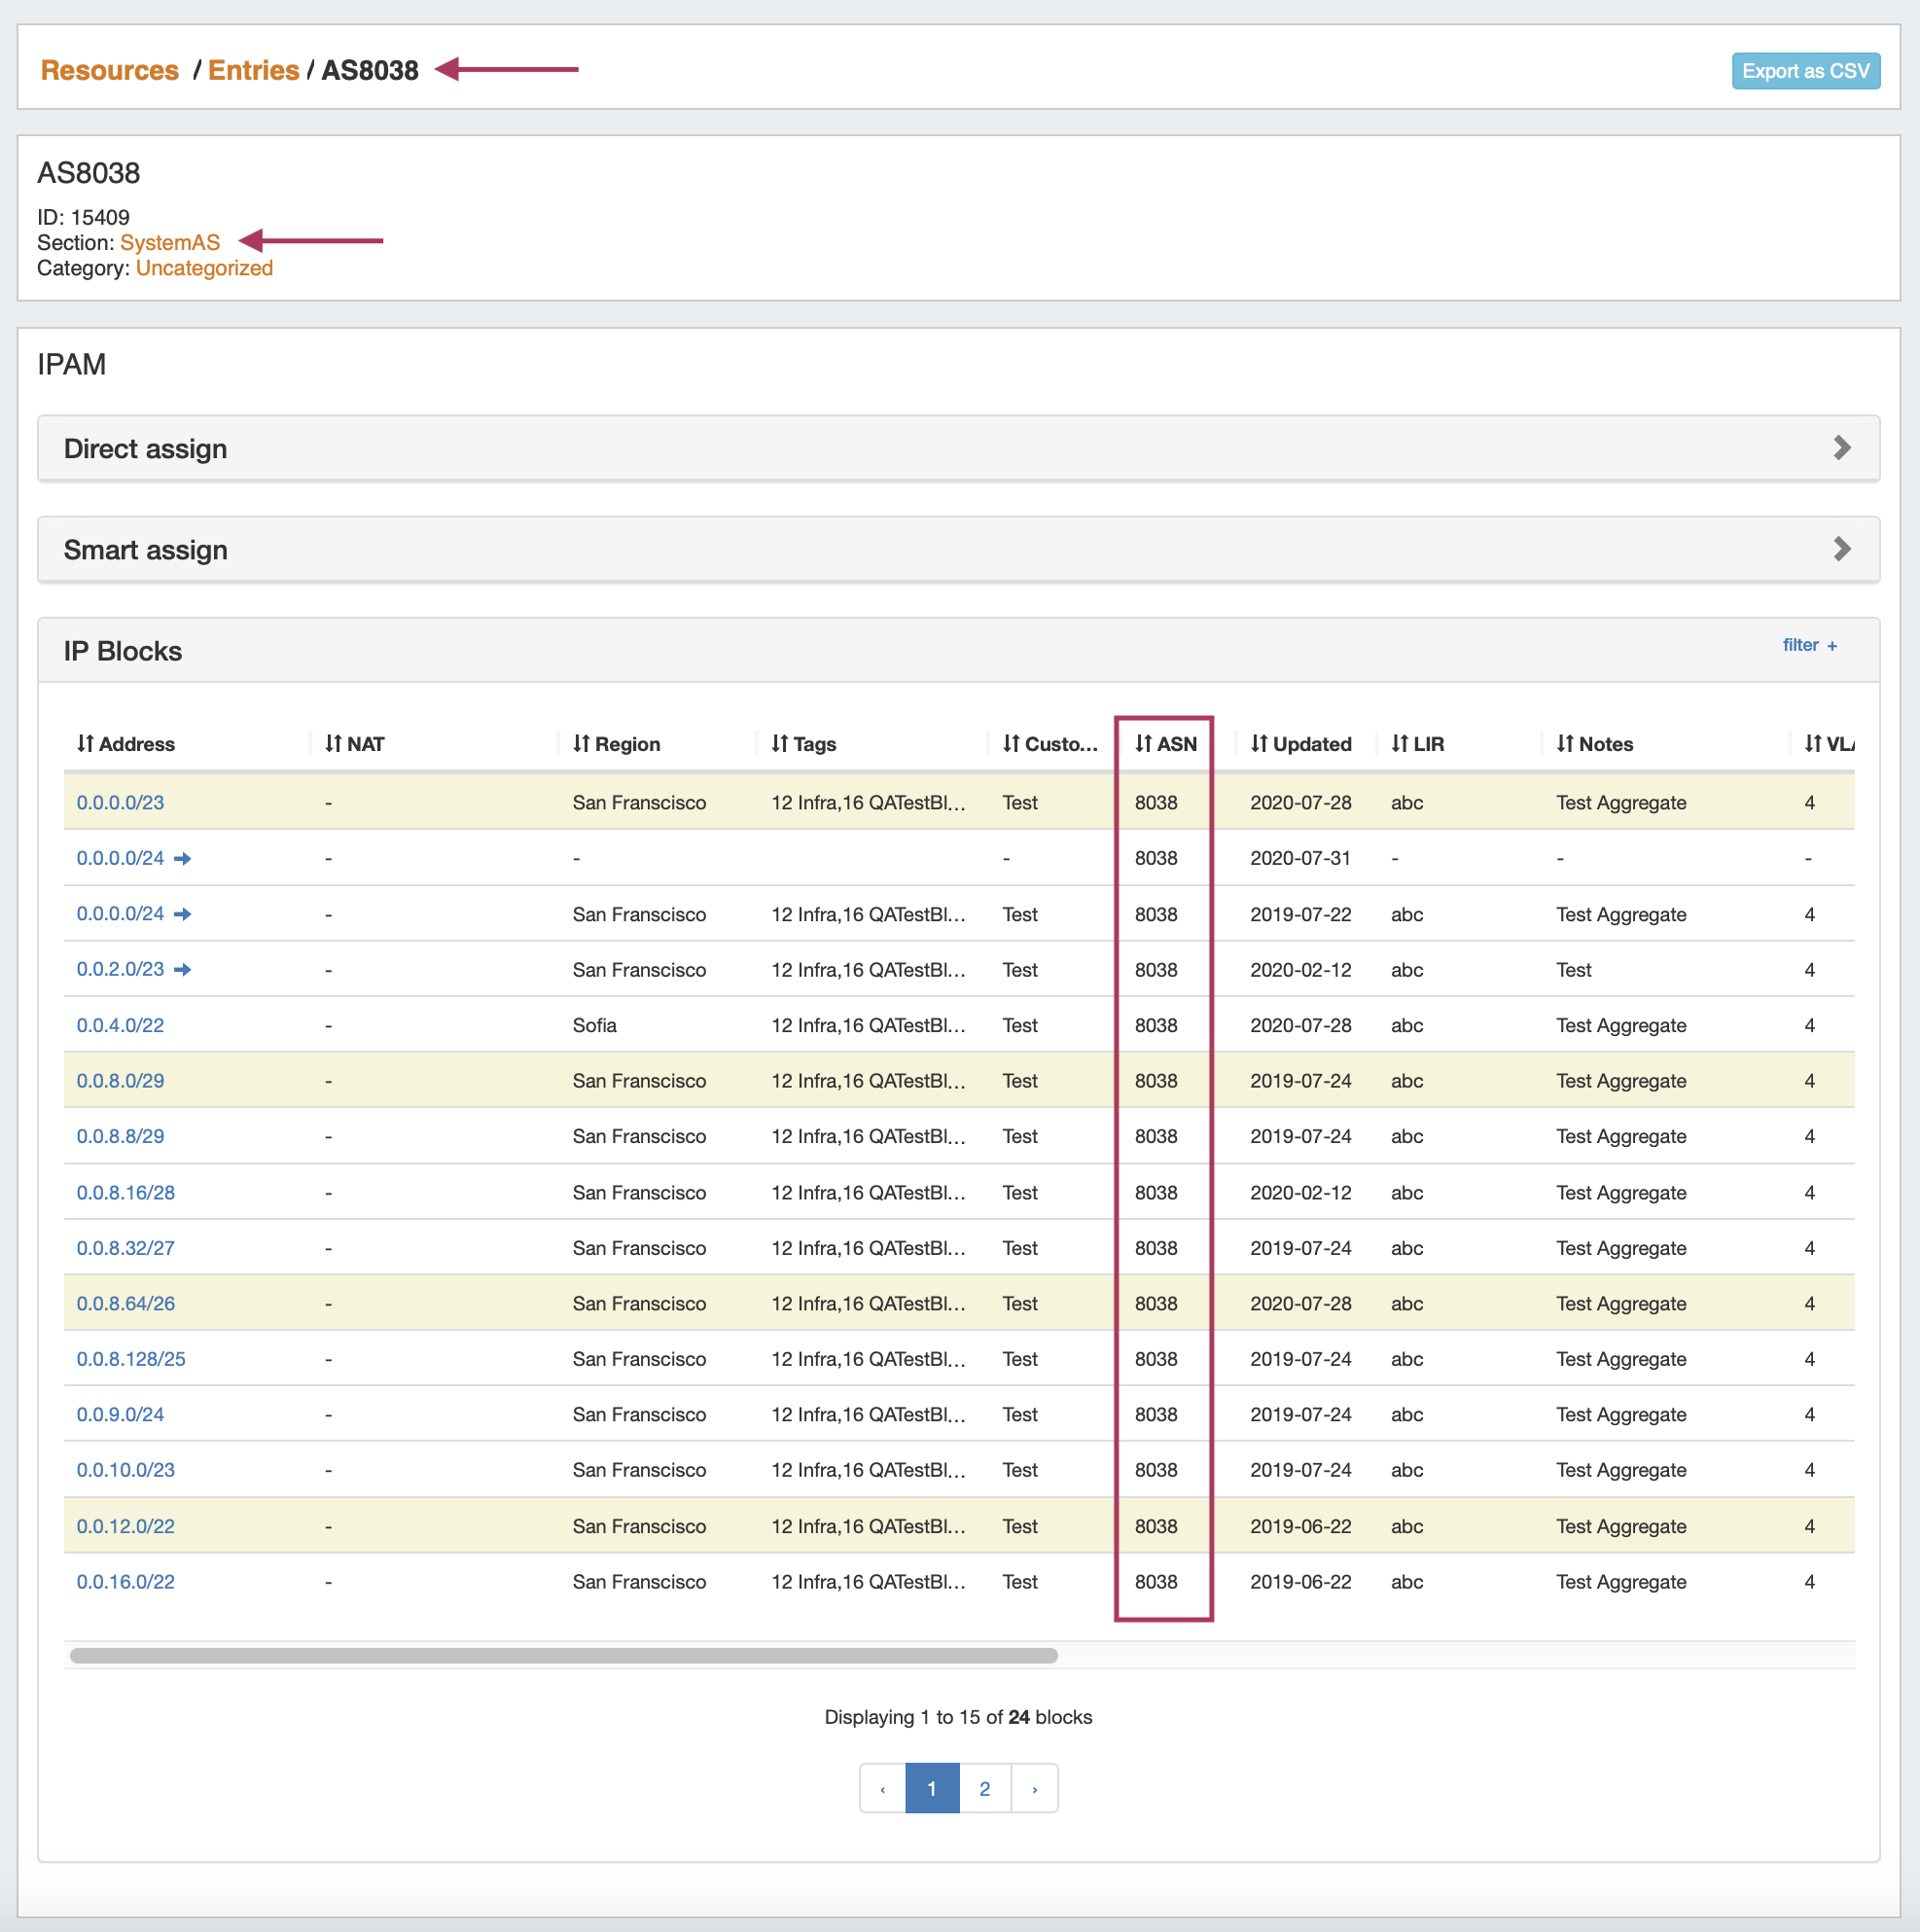
IPAM Auto AS-Resource
ProVision automatically creates an AS resource for ASN's entered into IPAM Manage (formatted as "AS1234" or "1234").

An ASN in IPAM Manage will link to the created resource, which will display all IP Blocks in ProVision with that ASN value. SystemAS resources may not be edited, however they may be deleted by an admin if desired.
...
Assign IP Space
There are two areas where you can assign IP Space: in the IPAM Gadget for the particular Resource, or through IPAM Manage for manually assigning a block to a resource.
...
For more information on the Holding Tank, see Holding Tank Management.
| Tip |
|---|
For a fast method of unassigning all blocks from a particular resource, you may also bulk-unassign IPs from the Resource List! See Working with Entries |
Working with NAT Blocks
Track IP NAT Associations
...