...
The Upload / Import from CSV tool is used if you have a simple .csv file with IP block information, such as CIDR, Mask, ASN, RIR, etc. It is accessed from the Data Import Tab from the Admin section of ProVision.
To import your IP block information, follow the following steps:
| Table of Contents |
|---|
Methodology
The Import from CSV tool will create Top-Level Aggregates and place blocks under those aggregates based on the following method:
First, the importer will parse through the provided data, order all blocks from largest to smallest, then attempt to split the largest block out of an existing block matching the IP space and RIR. If that fails (no larger block exists), then that block is added in the system as its own Top-Level-Aggregate. Subsequent blocks will undergo the same process.
This method ensures that your list of IP blocks does not need to be organized in any particular order.
| Tip |
|---|
If your import includes a large number of small blocks (/30s, /32s), be sure you've included at least one large block which encompasses them (/24, /22). This will ensure that the smaller blocks are neatly organized under the larger block, rather than imported as their own Top-Level Aggregates. |
Before you Begin: Prepare your Data for Import
...
Be sure to review "Preparing Data for Import" on the Importing your Data page before you begin. Verify that your .csv is correctly parsed and cleanly formatted with your IP block information (using your choice of the available field list shown below), and is UTF-8 encoded for best results.
Common normalization steps required for ProVision IP imports include:
- Remove any empty rows in the data range
- Remove any empty columns in the data range
- Remove stray data from inside and outside the data range, such as:
- notes, comments, and placeholder text as field values, when not set as their own data column
- nested secondary information located in additional rows under a primary record
- Ensure proper data formatting
- Check for data formatting errors - a common issue is leading zeros being dropped from a ZIP field when a file is opened. Re-specify format as needed.
- Ensure each field has consistent formatting for values
Note title Data Encoding Format To ensure correct importing of any special characters, make sure to use UTF-8 encoding for your CSV file!
This tool supports the following fields:
| Expand |
|---|
 |
| Note | ||
|---|---|---|
| ||
For IP Import from .csv, the following fields are REQUIRED:
All other fields are optional. |
Import Your Data
Step 1: Create a new
...
IP Import Job
Navigate to the Data Import Tab from the Admin button. Select "Upload / Import from CSV" under "IP Import".
Create a Job Name and Description for the import. This is especially useful to keep track of progress in cases the data arrives from multiple sources, or will require multiple stages of manual review.
Select the .csv file that you prepared above by selecting the "Choose File" button, and browsing to the correct file location. Then hit "Start Import".

| Note | ||
|---|---|---|
| ||
Although you cannot add new files to an existing job, for jobs with multiple sources for data (which may have different formatting), you can simply create separate jobs and descriptions for each source - no need to manually combine the data into one file before importing. The Import tool's mapping and editing functions will allow for the data to be reconciled in ProVision. For large data sets where multiple stages of manual review might be needed, you can create a new job using the same set of data files in order to work in parallel on a different portion of the data. |
...
After importing, the new job will appear under the "Existing Jobs" section. To continue working with this job, select it from the list (by clicking on the link) and the next step will appear on the page.

Step 2: Define Columns
Using the dropdown menu above each data field, select the appropriate definition for each of the imported columns.
- CIDR or IP/Mask fields must be
...
- provided
- Notes, Tags, and Regions may have multiple columns associated with the data.
- If you do not have a defined RIR column, you must select a default RIR to associated the blocks to.
Other columns which do not apply under the available definitions should be left as blank, and will be skipped during the upload process.

Make sure that you have defined all desired fields by using the scroll bar below your data to view additional columns.
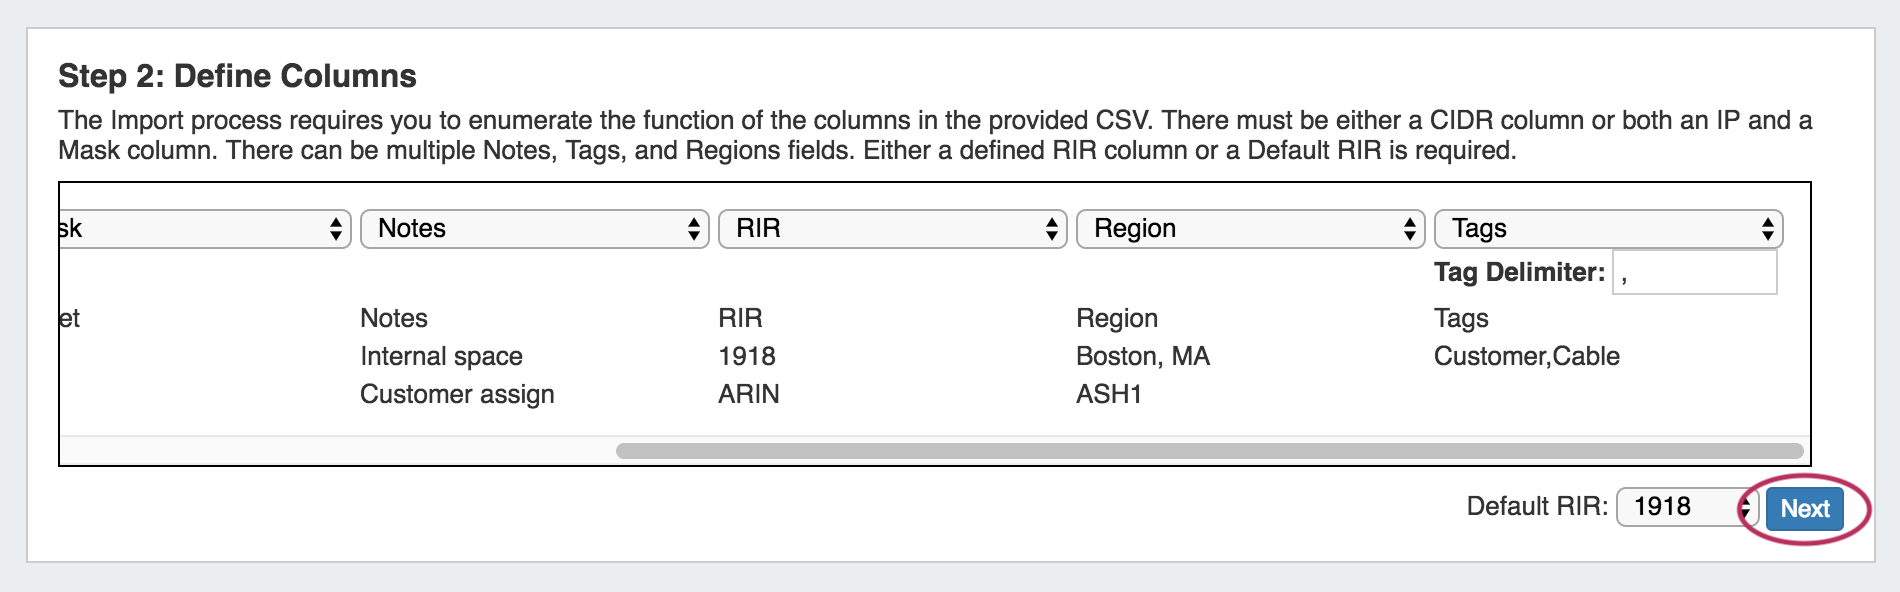
When completed, hit "Next".
Step 2.5: Missing References
If references exist in your data that do not currently exist in ProVision (such as new tags or resources) the import tool will alert you to the missing references, and give you the option to create those references in ProVision. If you wish to add these elements, select the checkboxes next to the element and click the "Add (Element name)" button below.
| Tip | ||
|---|---|---|
| ||
If your .csv has a header row as the first line, that row may give information that produces a missing reference notice - such as "Tag", "Region", "Block", and so forth. If this is the case, simply uncheck that item and add only the desired references. |

In this example, we get a notification that we are missing a tag named "Tags". However, we know by looking at our data that is simply an item that was part of the header line in the .csv, so we want to bypass this step.
...
...
If your .csv has a header row as the first line, that row may give information that produces a missing reference notice. If this is the case, simply uncheck that item and add only the desired references.
Step 3: Reviewing Data
After supplying the file and defining columns, a review step is provided. Records with errors will show as color coded, and can be filtered to be viewed by All, Valid, Warnings, Invalid, or Ignored.
...
| Tip | ||
|---|---|---|
| ||
If your .csv has a header row as the first line, that row will be shown as the first record in review data as well. Simply click "Ignore" on the first record to disregard the row. |
Hitting If warnings or invalid entries are found, you may edit the data by clicking the "Edit" button for the record provides options to change or add information for available fields. .

Here you can edit the invalid field, or add /change information for any other available field.

After editing, hit "Save". If the edits are valid, and continue reviewing / the background color for the data row will be white.
Continue reviewing and editing data as desired. When done, proceed to Step 4.

Step 4: Execute Import
When the review step is completed, hit the "Execute Import" button. A progress bar will appear to show progress and note errors if they occur.

When the bar reaches 100%, the import is complete.
The Data Review section will show which data rows were successfully imported.

Post Import Followup
After the Import is complete, there are a few followup options for working with the import job or imported blocks. We recommend:
- Reviewing the imported blocks in the IPAM Tab, adding additional IPAM data, custom metadata, rules, or subassignments. See Working with IP Blocks and Working with IP Rules.
- If the IP Import was only partially successful or requires additional review, you may keep the import job in the "Existing Jobs" list and revise the failed / invalid blocks at a later time. Re-running the import from the same job will allow you to re-attempt import on only the previously unsuccessful / ignored / edited blocks - successfully imported and unchanged blocks will not be affected.
If the IP Import was fully successful, and you do not wish to retain the job data, the Import Job may be deleted from the "Existing Jobs" list by clicking the delete icon next to the job name.
| Warning |
|---|
Deleting an import job is permanent and non-recoverable! When working with large or sensitive import jobs, consider performing a backup of your instance before and after the import job as a safeguard. |
Additional Information
See the following areas for information on working with IPAM / IP Blocks post-import:
...