...
LDAP authentication options are accessed by clicking the "Authentication" sub-tab at the top of the Admin Settings page, then selecting "LDAP" from the "Authentication Options" module.
ProVision authenticates against an LDAP server by using the following three steps:
- Attempts to do an LDAP query for the user based on the Auth DN provided
- Pulls the user's own object from the LDAP server
- Attempts to match group names in the "LDAP Group Attribute" against existing groups in ProVision.
Before you enter LDAP settings, ensure that you have the LDAP server set up and configured for ProVision.
...
Set up an LDAP Server for Authentication
To setup an LDAP server for this authentication, you must perform the following three procedures:
- Configure the LDAP server using the 6connect LDAP Schema
- Create the LDAP user(s) in a 'LDIF' file ( testing the query using LDAP Search, if desired)
- Configure ProVision with the LDAP authentication settings by enabling LDAP then entering (at minimum) the following information:
- LDAP Server Address
- Port
- LDAP Auth DN List
- LDAP Fetch DN
- LDAP Group Attribute
Configure the LDAP Server:
Configuring the LDAP server involves (( adding the schema )) and adding LDAP users / groups to the server:
...
SSH into your openLDAP server and create a new 'ldifLDIF' file. Example:
| Code Block |
|---|
dn: cn=JoeSmith,ou=people,dc=6connect,dc=com cn: JoeSmith sn: JoeSmith objectclass: top objectclass: person objectclass: sixConnectPermissionsV2 sixConnGroup: "Global Admins" sixConnGroup: "IT Engineering" sixConnGroup: "Sales" sixConnGroup: "Customer Admin" userPassword: testpass |
To create a new user, make a new ldif LDIF file and change all instances of "JoeSmith" to whatever username you wish to create and update the password. Keep all of the object class definitions as listed above. Add a sixConnGroup declaration for each ProVision user group a user is in.
After the file is created, run the following command to add the new user to LDAP server in the following format:
| Code Block |
|---|
ldapadd -h [SERVER] -x -f [LDIF FILE] -D [ROOTDN] -w [ROOT PW] -v |
...
| Code Block |
|---|
ldapadd -h localhost -x -f 6connect.ldif -D "cn=ManagerJoeSmith,dc=6connect,dc=com" -w secret -v |
The user will now be active in openLDAP and can be used to login to ProVision.
Test the LDAP Server with LDAP Search
The best method to confirm the LDAP server settings is to perform an LDAP search.
To query the LDAP server, run the following command on any server which has openLDAP enabledwhile SSH'ed into your LDAP Server, replacing the placeholders (in brackets) with your specific LDAP information:
| Code Block |
|---|
ldapsearch -b [BASE] -h [IPADDRESS] -D [DOMAIN] -w [PASSWORD] [USER] |
...
At the end of the command where [USER] is specified, user or groups can be used (in LDAP format) to query.
Example with User:
| Code Block | ||
|---|---|---|
| ||
ldapsearch -b "dc=6connect,dc=com" -h 50.240.195.129sometestserver.lab.com -D "cn=JoeSmith,ou=people,dc=6connect,dc=com" -w testpass "cn=JoeSmith" |
Example with Group:
| Code Block | ||
|---|---|---|
| ||
ldapsearch -b "dc=6connect,dc=com" -h sometestserver.lab.com -D "cn=MayorJoeSmith,ou=people,dc=6connect,dc=com" -w testpass "cn=MajorMinerJoeSmith" memberOf |
The LDAP search should return the extended LDIF information similar to the following:
| Code Block | ||
|---|---|---|
| ||
# extended LDIF
#
# LDAPv3
# base <dc=6connect,dc=com> with scope subtree
# filter: cn=JoeSmith
# requesting: memberOf
#

# JoeSmith, 6connect.com
dn: cn=JoeSmith,dc=6connect,dc=com
memberOf: cn=Global Admins,ou=groups,dc=6connect,dc=com

# search result
search: 2
result: 0 Success

# numResponses: 2
# numEntries: 1 |
The Auth DN is used to derive the ldapsearch base and domain, then uses the Fetch DN to pull the user, and the Group Attribute to filter on the list of groups the user is a part of. The end result is this list of user groups:
memberOf: cn=Global Admins,ou=groups,dc=6connect,dc=com
Authentication from ProVision checks to see
Configure ProVision for LDAP Authentication
To configure the use of LDAP authentication with ProVision, follow the steps below.:
- Log into 6connect ProVision
- Go to Settings Tab → Admin Settings -> Authentication
- Select "LDAP" under "Authentication Options"
- Move the LDAP Enable selector to the "ON" position.
- Fill in the hostname or ip address, authentication port, LDAP Security, Auth DN List, and Fetch DN. Optionally, enter the LDAP Username and Password in order to allow ProVision to import LDAP Contacts and sync LDAP contact information (see: Contact Manager)
- Click "Test Server" to verify the connection.
...
- LDAP Group Attribute.
Example values in this case would be:
- LDAP Enable: (Checked)
- LDAP Server Address:
...
- IP or Domain, such as 1.2.3.4 or somelabserver.lab.com
- LDAP Port: 389 ( or SSL/TLS port is 636)
- LDAP Security: None
- LDAP Auth DN:
...
- cn=%LOGIN%,
...
- dc=6connect,dc=com
- LDAP Fetch DN: cn=%LOGIN%
- LDAP Group Attribute: memberOf
- LDAP Username / LDAP Password: Optionally, you may enter LDAP admin credentials to allow ProVision to import and sync LDAP contacts. See Contact Manager for details on LDAP contacts.
- Click "Test Server" to verify the connection.
- NOTE: If you experience authentication errors at this step, confirm the LDAP settings using an LDAP Search, as described in the previous section.
| Note | ||
|---|---|---|
| ||
In the login screen, you would select the authentication method from the dropdown. If you like, you can set the default login option in the following way: Go to the /data/globals.php and open in vi (or other editor). Add in the following text as the last line of the file (before the closing ?>) define('DEFAULT_LOGIN_TYPE', 'ldap'); |
...
Add or Update LDAP Settings
To view, add, or update LDAP settings, go to the Settings Tab → Admin to enter the Admin area of ProVision.
Then, click the "Authentication" sub-tab at the top of the Admin Settings page, and select "LDAP" from the "Authentication Options" module.

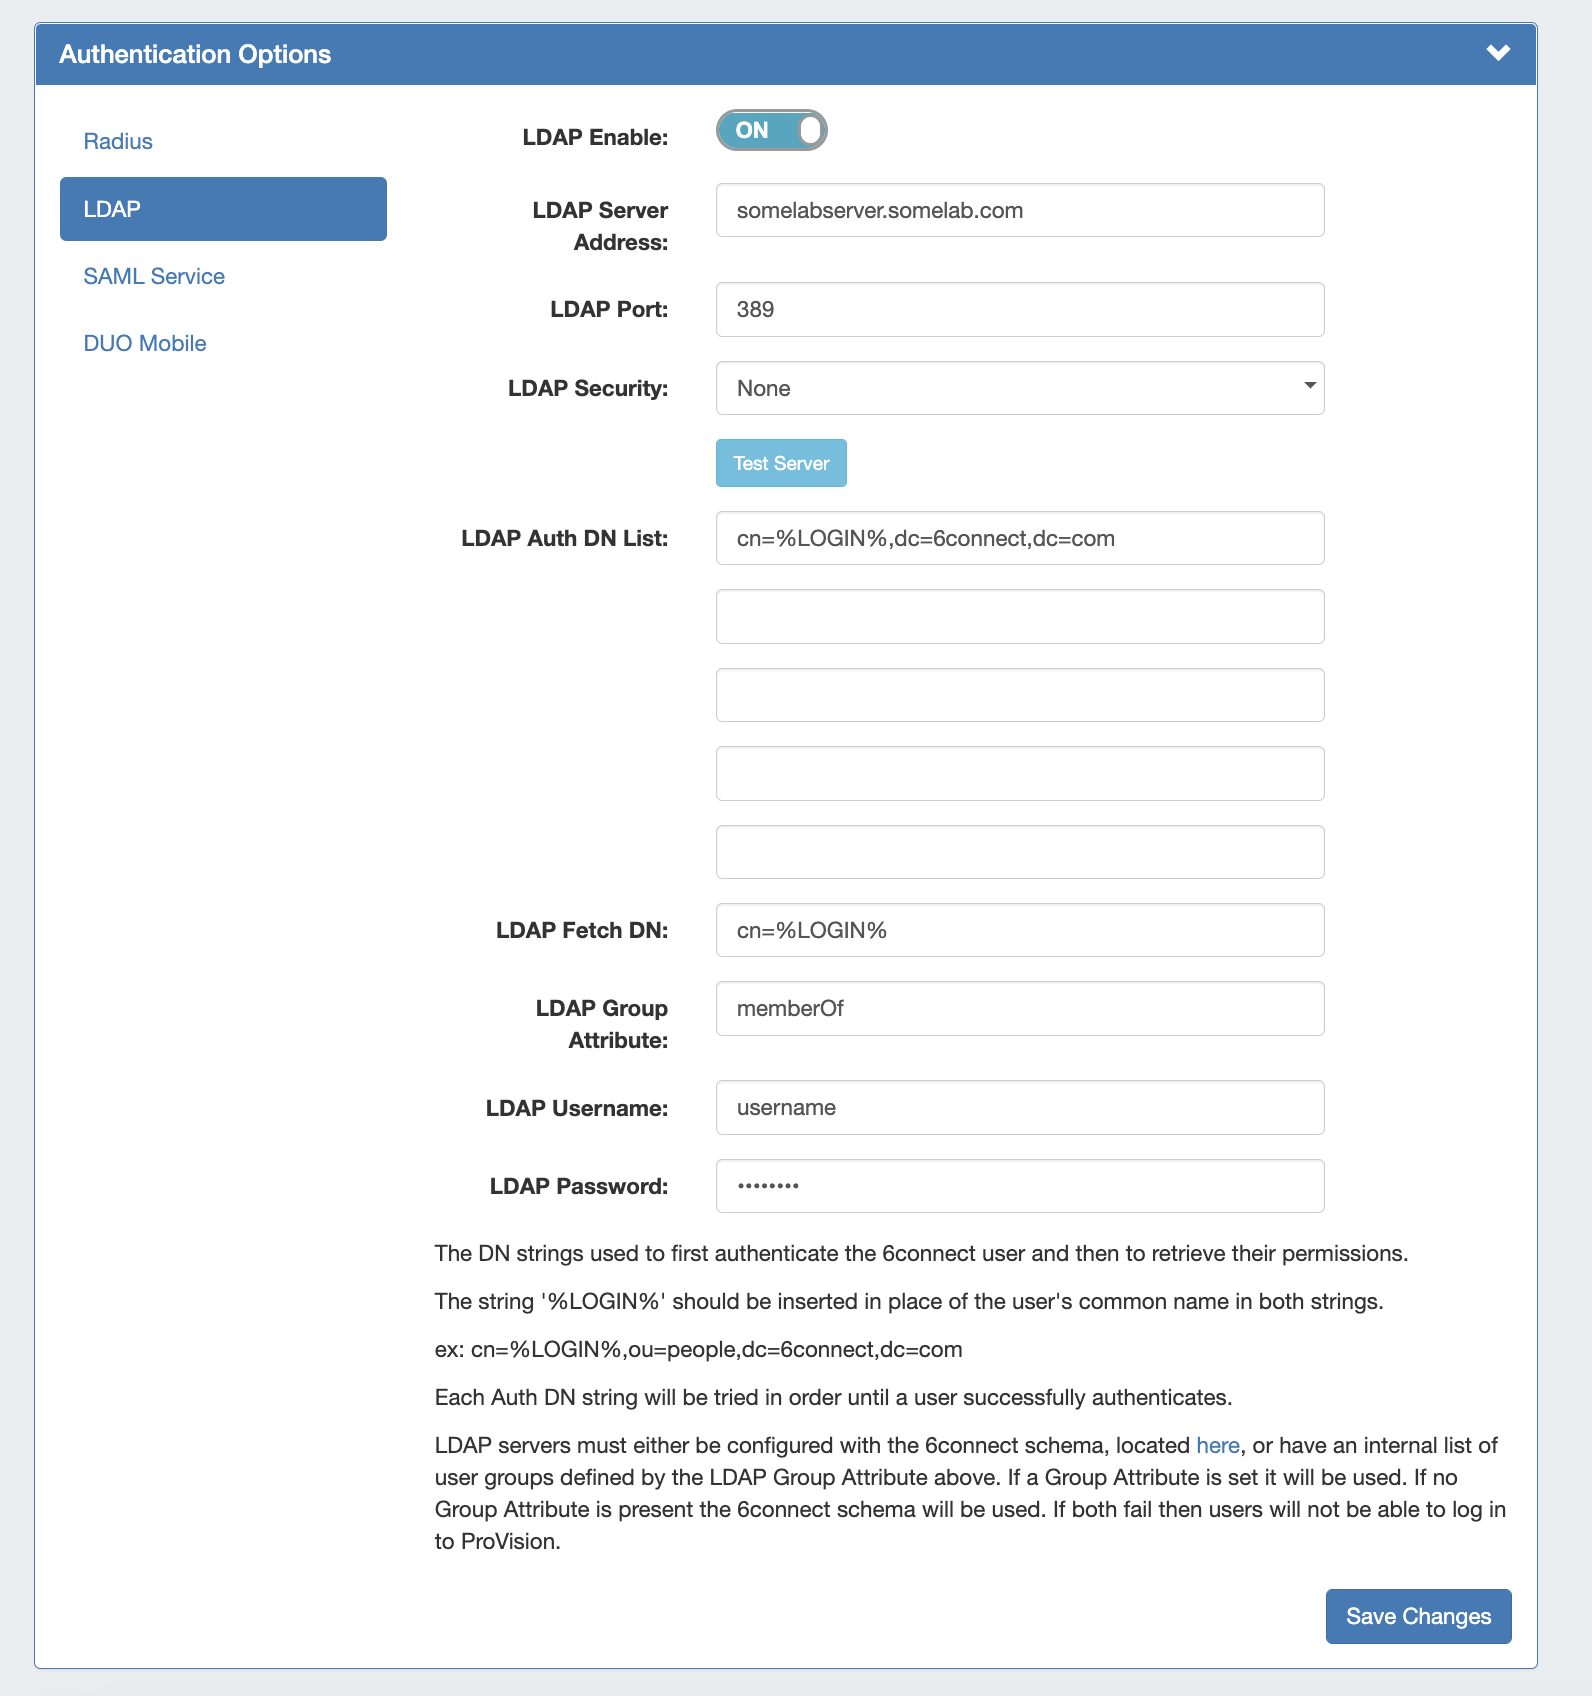
Enter The following settings are available to add or update the following settings:
- LDAP Enable: check Check the box to enable LDAP functionality.
- LDAP Server Address: Set the The IP address or domain of your LDAP server.
- LDAP Port: Set the port for your LDAP server 389 ( or SSL/TLS port is 636)
- LDAP Security: Select the security method of your LDAP server - SSL, TLS or None
- Test Server: Click to test the connection to the LDAP server.
- LDAP Auth DN /Fetch DN: These strings are used to first authentication the 6connect user and then to retrieve their permissions. The string '%LOGIN%' should be inserted in place of the user's common name both stringsList: A query string that will be used to authenticate the user against the LDAP server. %LOGIN% is a variable string that will be replaced with the user name. This may be in list format, and the auth system will try each to authenticate the user. (ex: cn=%LOGIN%,ou=people,dc=6connect,dc=com)
- LDAP Fetch DN: The LDAP query that will be used to pull the user object
- LDAP Group Attribute: If The LDAP attribute that will hold the LDAP-GNI group links. If using an internal list of user groups instead of 6connect groups, enter the attribute name for the LDAP groups here. If a Group Attribute is set, it will be used first, otherwise the 6connect schema will be used.
- LDAP Username / LDAP Password: Optionally, you may enter LDAP admin credentials to allow ProVision to import and sync LDAP contacts. See Contact Manager for details on LDAP contacts.
- NOTE: Mapping Permissions to 6connect schema: To integrate 6connect permissions with your existing directory structure then you will need the 6connect schema. It It should snap in with any existing LDAP structure and allow you to assign 6connect permissions to your existing users. You can download a copy of the schema from this section.
When done, you may optionally click "Test Server" to verify the connection to the LDAP server with the entered settings, then "Save Changes".
...