ProVision 8.0.0 is a major release with new features, improvements, and bug fixes.
| Table of Contents | ||
|---|---|---|
|
| Warning | |||||||||||||||
|---|---|---|---|---|---|---|---|---|---|---|---|---|---|---|---|
Software Requirements:ProVision 8.0.0 includes updated software dependencies. Please ensure that local installations can meet the following dependencies prior to upgrading to ProVision 8.0.0. Base Software Needed (v 8.0.0 +) :
|
| Note | ||||||
|---|---|---|---|---|---|---|
PeeringDB URL Update (March 2022):Previous versions of PeeringDB allowed authenticated requests to Customers updated to v8.0.2 and later do not need to take any action and are not affected. Local customers using versions 8.0.1 or earlier, and who are using Peering (or wish to start using Peering), should perform the following update(s) as applicable to their situation: A) Existing local customers who already have their peeringdb account details saved in Provision should update PEERINGDB_URL in globals.php to:
B) Customers who wish to begin using Peering (thus, do not already have saved peeringdb account details) will not be able to add their account via the GUI prior to v8.0.2. An attempt to do so will fail the "valid account test", which uses a hardcoded string value. Instead, affected users must do both of the following: B1) Save peeringdb account details using the API:
B2) Update PEERINGDB_URL in globals.php to:
|
| HTML |
|---|
<div id="google_translate_element"></div>
<script type="text/javascript">
function googleTranslateElementInit() {
  new google.translate.TranslateElement({pageLanguage: 'en'}, 'google_translate_element');
}
</script>
<script type="text/javascript" src="//translate.google.com/translate_a/element.js?cb=googleTranslateElementInit"></script> |
ProVision 8.0.0 is a major release with new features, improvements, and bug fixes.
| Table of Contents | ||
|---|---|---|
|
...
New Features
...
Theming
ProVision 8.0 includes a complete UI refresh with an eye towards flexibility and accessibility. GUI themes can be set on a per-user level, including the much-requested "dark mode" to help alleviate eyestrain. In addition, we now provide several methods of customizing the entire product, which will allow for additional company branding and fine control over what areas of the product are visible and what are not.
...
Expand title How to hide menu tabs... Step 1: Open the Menu Customization File
Using the Command Line Interface (CLI), navigate to your instance's "assets" directory, located at: "/var/www/html/[instance name]/assets"
Code Block language bash cd /var/www/html/[$your instance name]/assets

Open the menu customization file, "menu.json" in vi, or another text editor:
Note: Depending on available user permissions "sudo" may or may not be required.
Code Block language bash sudo vi menu.json

Step 2: Find the Tab in menu.json
When you view menu.json, tabs and their drop down sub-menu options are visible in a hierarchy organized by menu type.
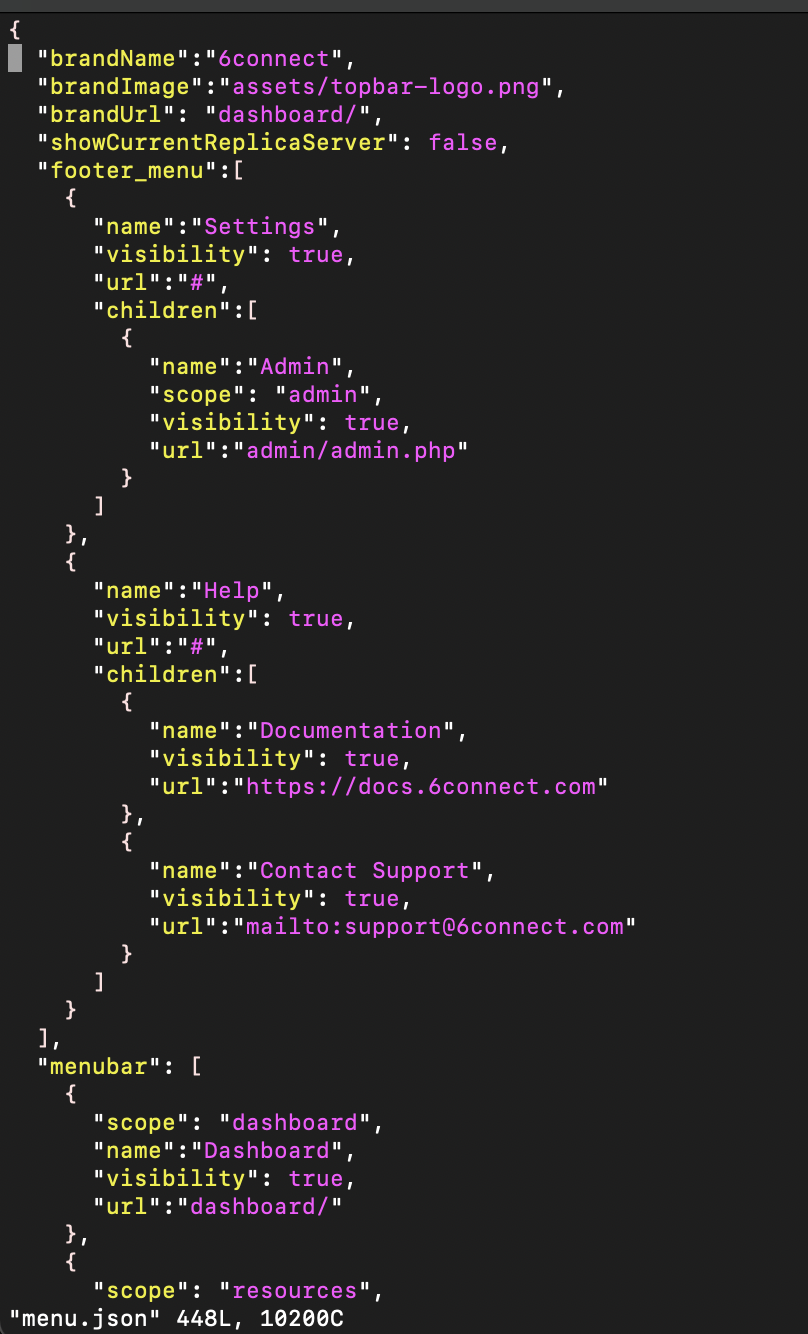
In order, the three top menu levels are:
- "footer_menu", containing settings for the Settings and Help menus
- "menubar", containing settings for the standard provision navigation tabs
- "admin_menubar", containing settings for the admin area navigation tabs
Under each menu grouping, on the second level of the hierarchy, is each main menu tab.
Each tab has properties for name, visibility, url, and tab children.
The third level, under "children" for a tab, lists the drop-down menu options available for the tab. Each child menu option has the same available properties, and can likewise be edited.
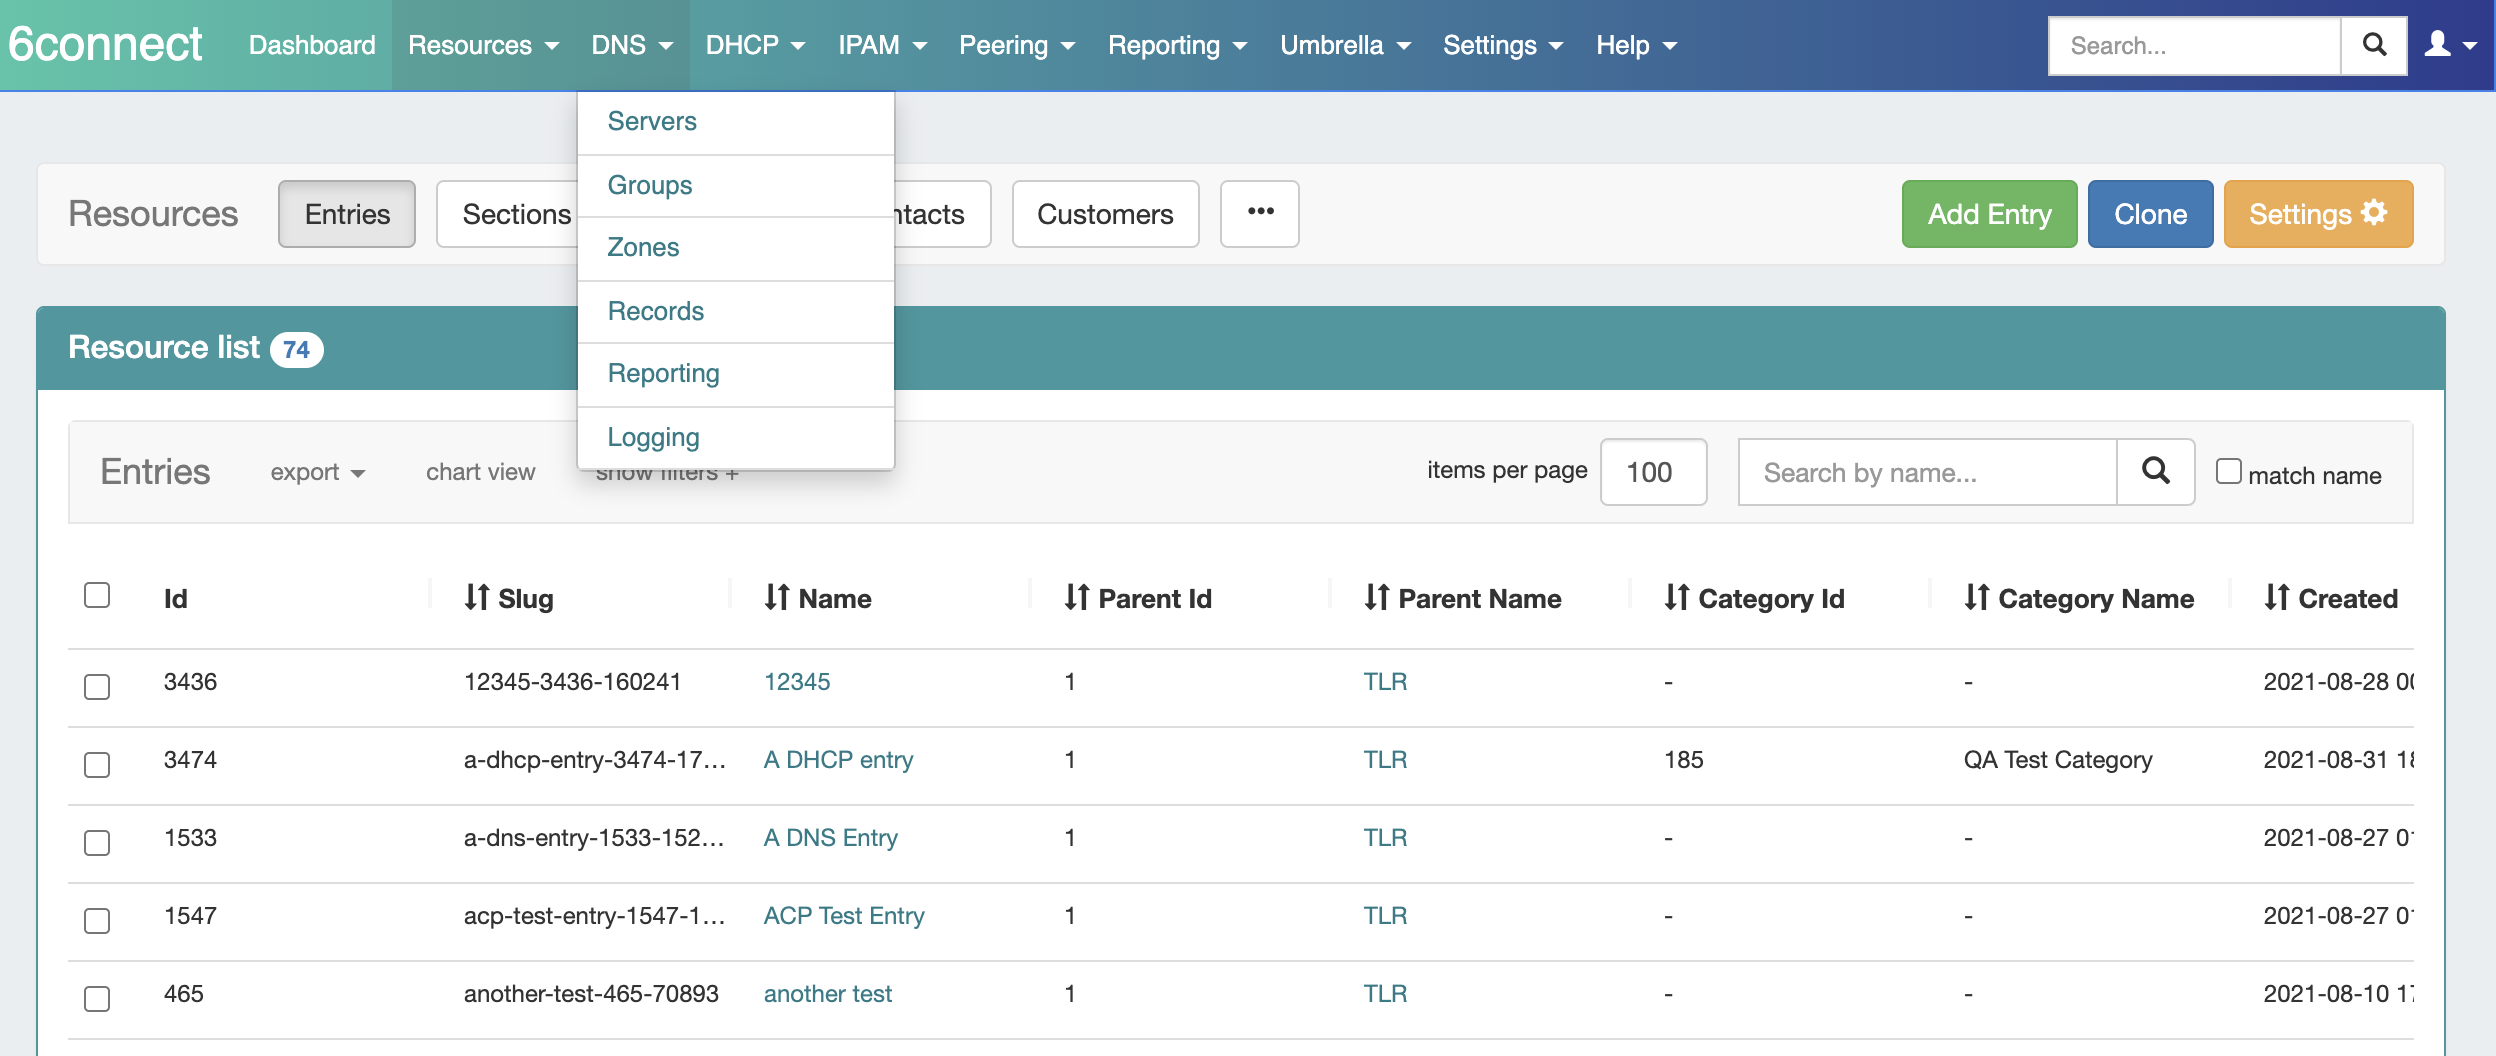
Since we are wanting to hide the "IPAM" tab in the standard area of ProVision, we need to scroll down to the "menubar" navigation grouping, and then find the second level tab with name "IPAM".
Step 3: Change the Tab Visibility
Once you find the desired tab to hide, enter edit mode, then change the "visibility" property from "true" to "false" (do not include the quotes, and be sure to retain the trailing comma).
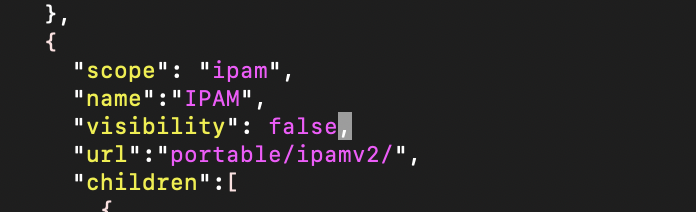
Save/write your changes to the file and exit.
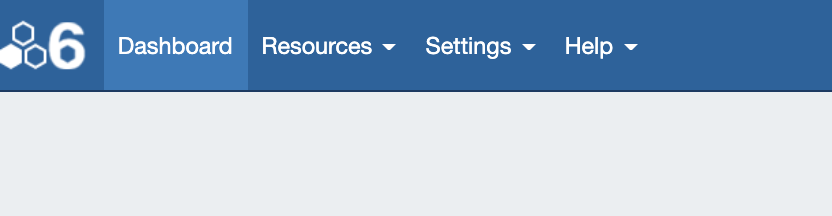
Step 4: View the Updated Navigation
Clear your browser cached image files, and log into ProVision.
The updated navigation should be apparent, in this case with "DNS", "DHCP", "IPAM", "Peering", and "Reporting" tabs no longer visible.
...
Expand title Change the logo image... Tip title Tip - Before You Begin Have your logo file ready to save into ProVision (png., .jpg, etc) ahead of time, and verify that the logo design is visible at small sizes, 48px or 64px wide.
There are no set size limitations, however ProVision will set the image to 48px wide by default.
This size property can be adjusted in the custom css theme files by searching for the the css property: "--brand-image-width", and adjusting the pixel width accordingly.
Step 1: Save your desired logo into ProVision
Using the Command Line Interface (CLI), save the desired logo image file (here, "panda.png") to your instance's "assets" directory, located at: "/var/www/html/[instance name]/assets"
Code Block language bash cd /var/www/html/[$your instance name]/assets
Step 2: Open the Menu Customization File
Open the menu customization file, "menu.json" in vi, or another text editor:
Note: Depending on available user permissions "sudo" may or may not be required.
Code Block language bash sudo vi menu.json
Step 3: Change the brandImage Reference
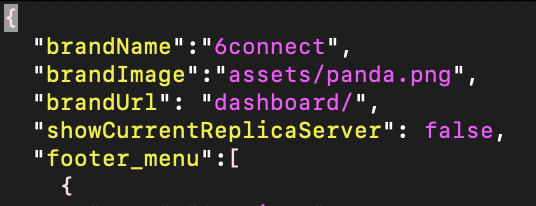
At the top of the file, look for the "brandImage" attribute. By default, it should read "assets/topbar-logo.png".
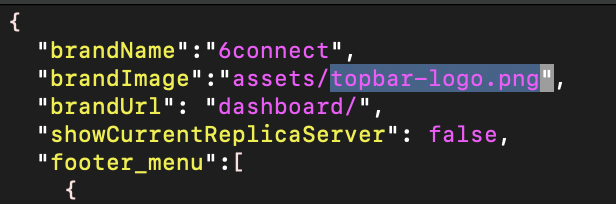
Edit the menu customization file to change the "brandImage" property to the new image name, here "assets/panda.png".
If needed, you may also update the "brandName" property to reflect your company or brand to match the new logo.
Save/write your changes to the file and exit.
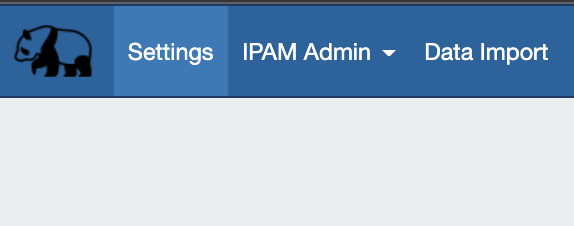
Step 4: View the New Logo
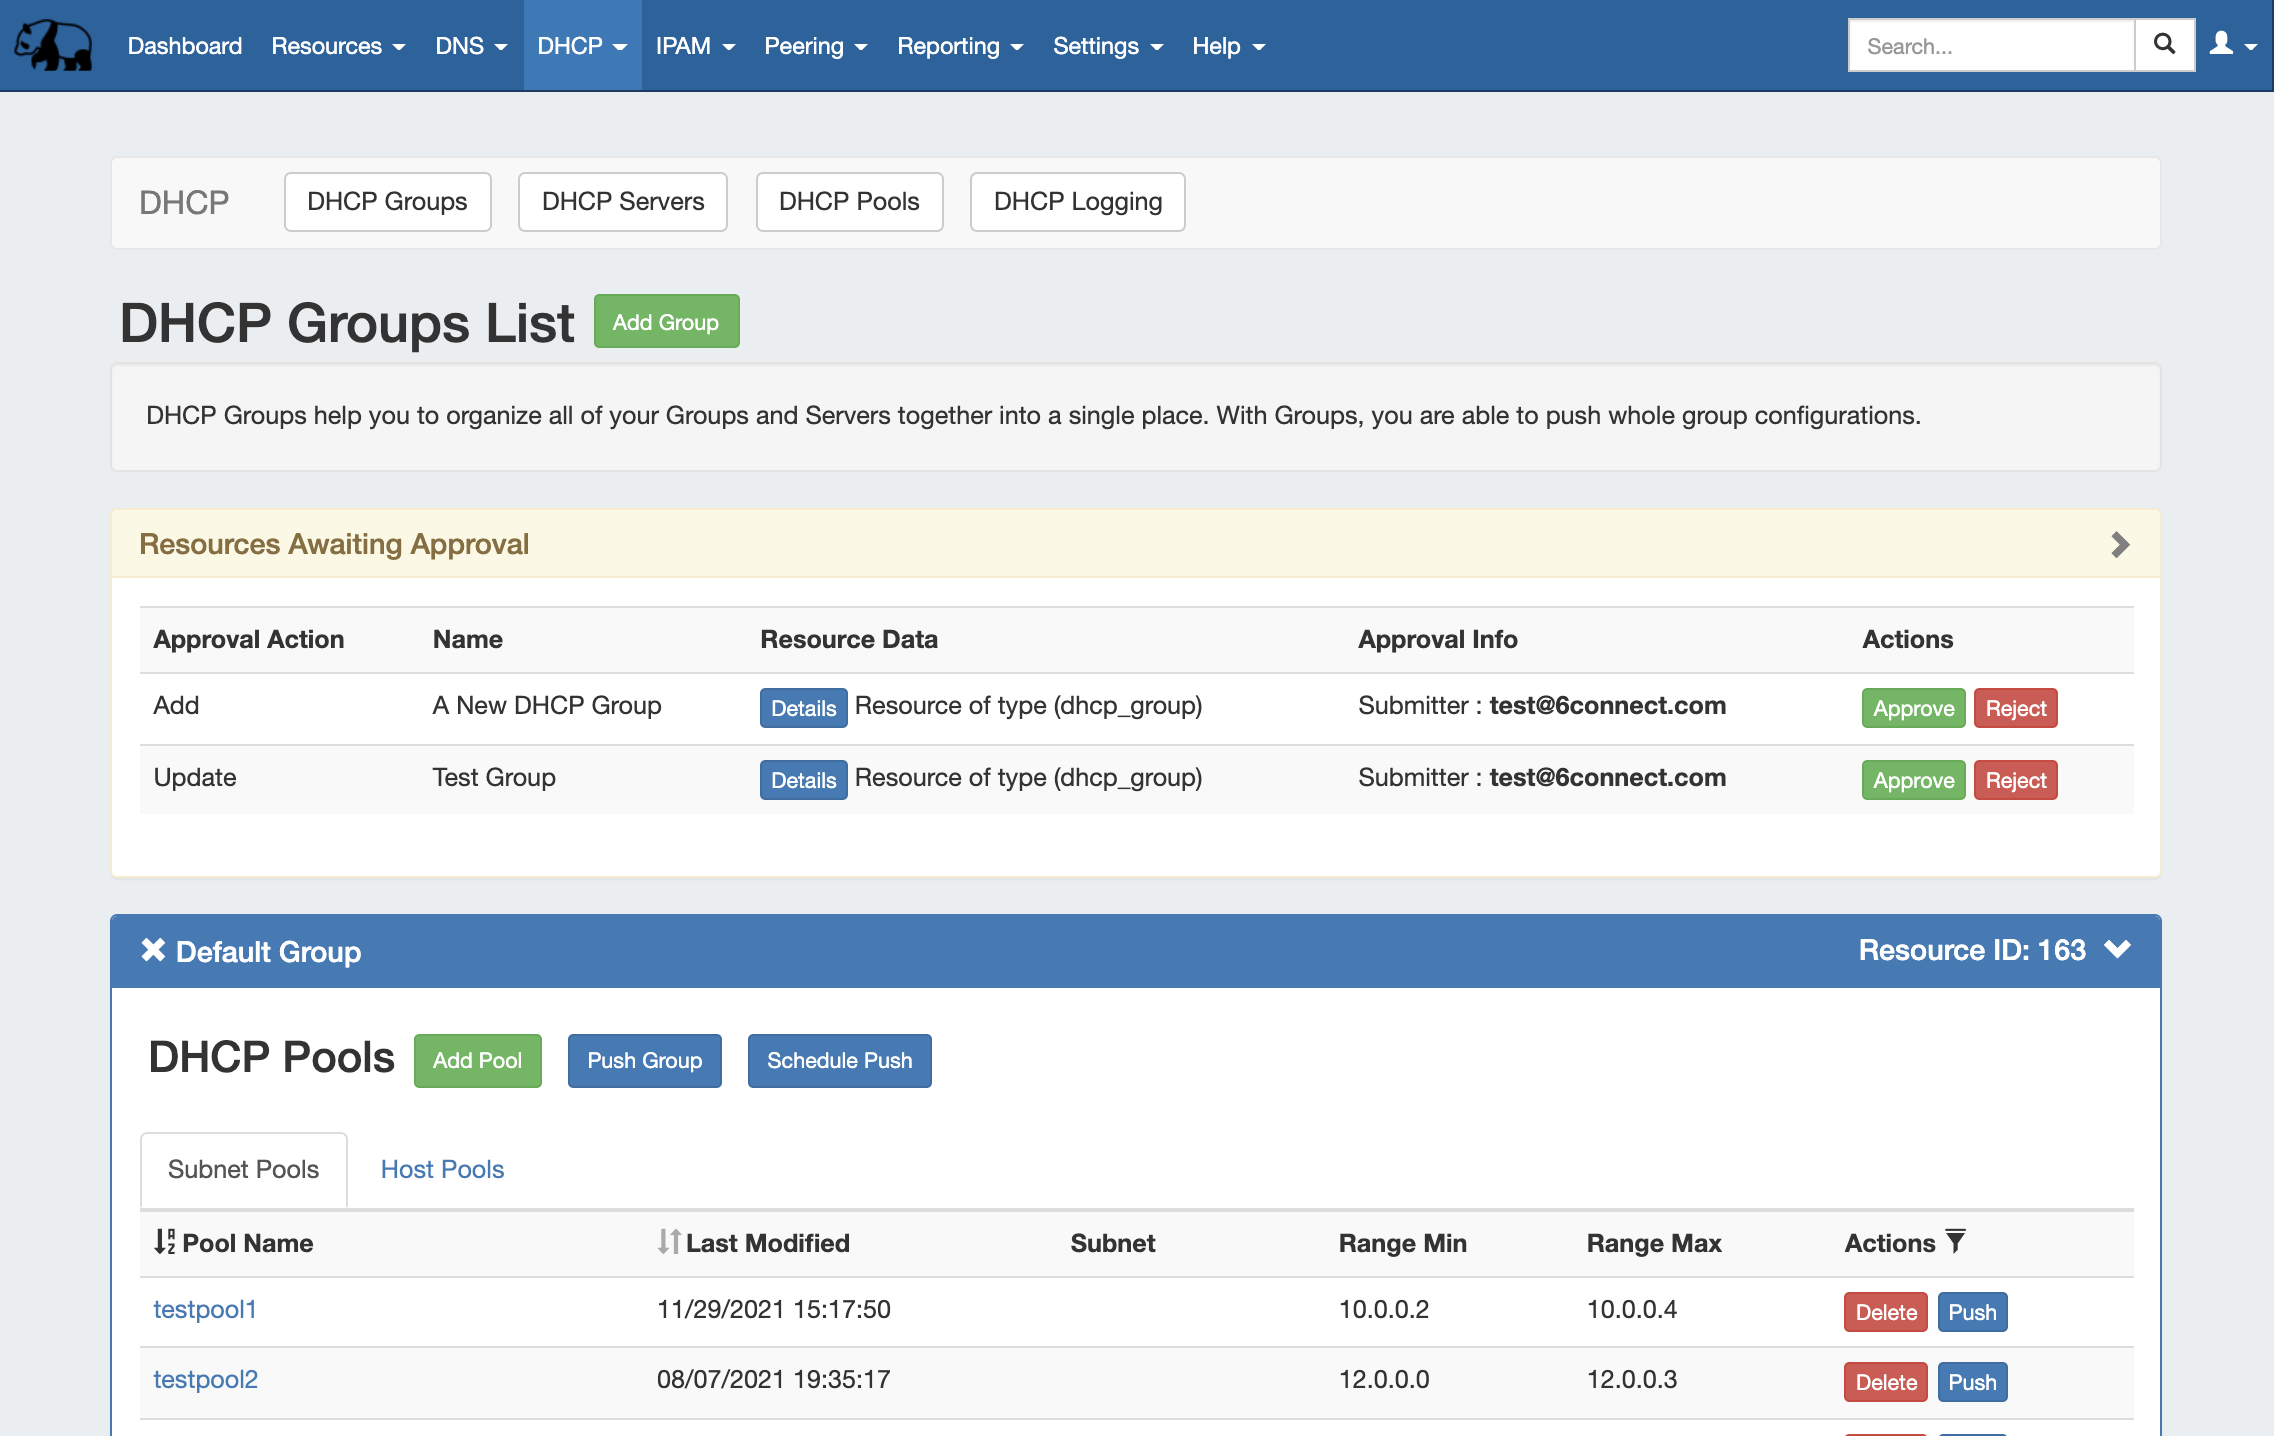
Clear your browser cached image files, and log into ProVision. The new logo image should be visible on the left side of the navigation menu.
...
Expand title How to enable a custom theme... Step 1: Create a Theme file
To customize the default theme and change how the application looks with CSS, you’ll need to add your own stylesheets or edit an existing theme file. If you edit an existing theme file, we recommend making a copy of the existing file and keeping it as a backup file (.BKP).
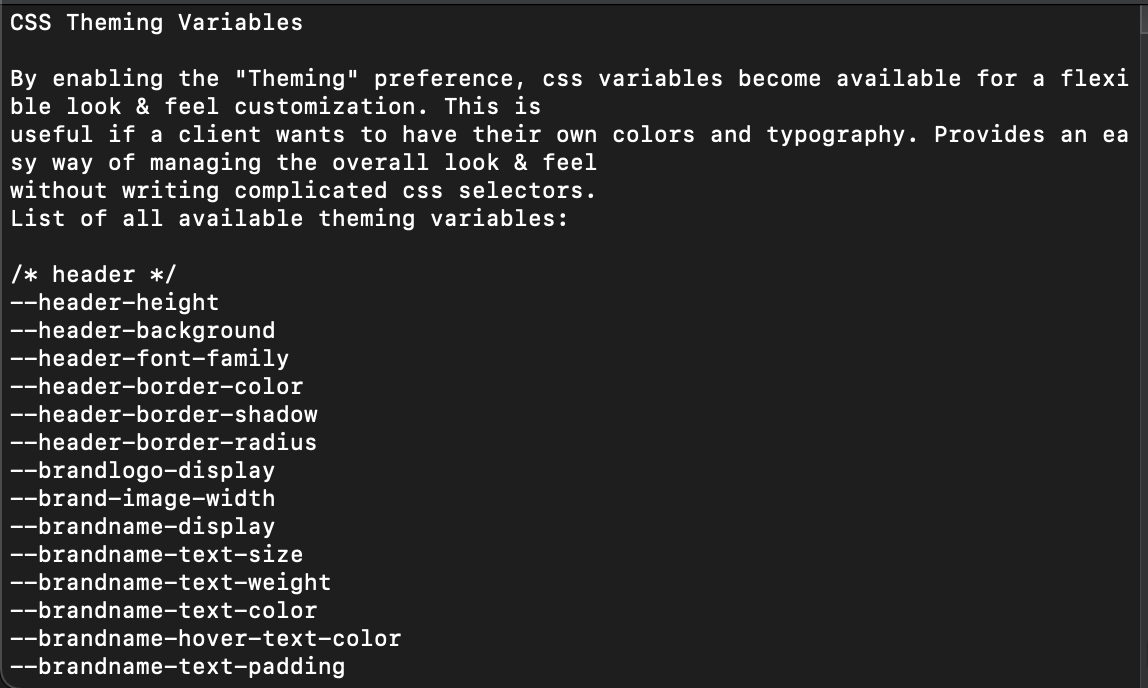
The best practice is to manage your customizations in a new css file, using the information provided in the README.txt file under [ your instance directory ]/assets/css/custom (as seen below).

The README.txt file provides basic instructions as well as list of all available theming variables that may be used for a custom theme.
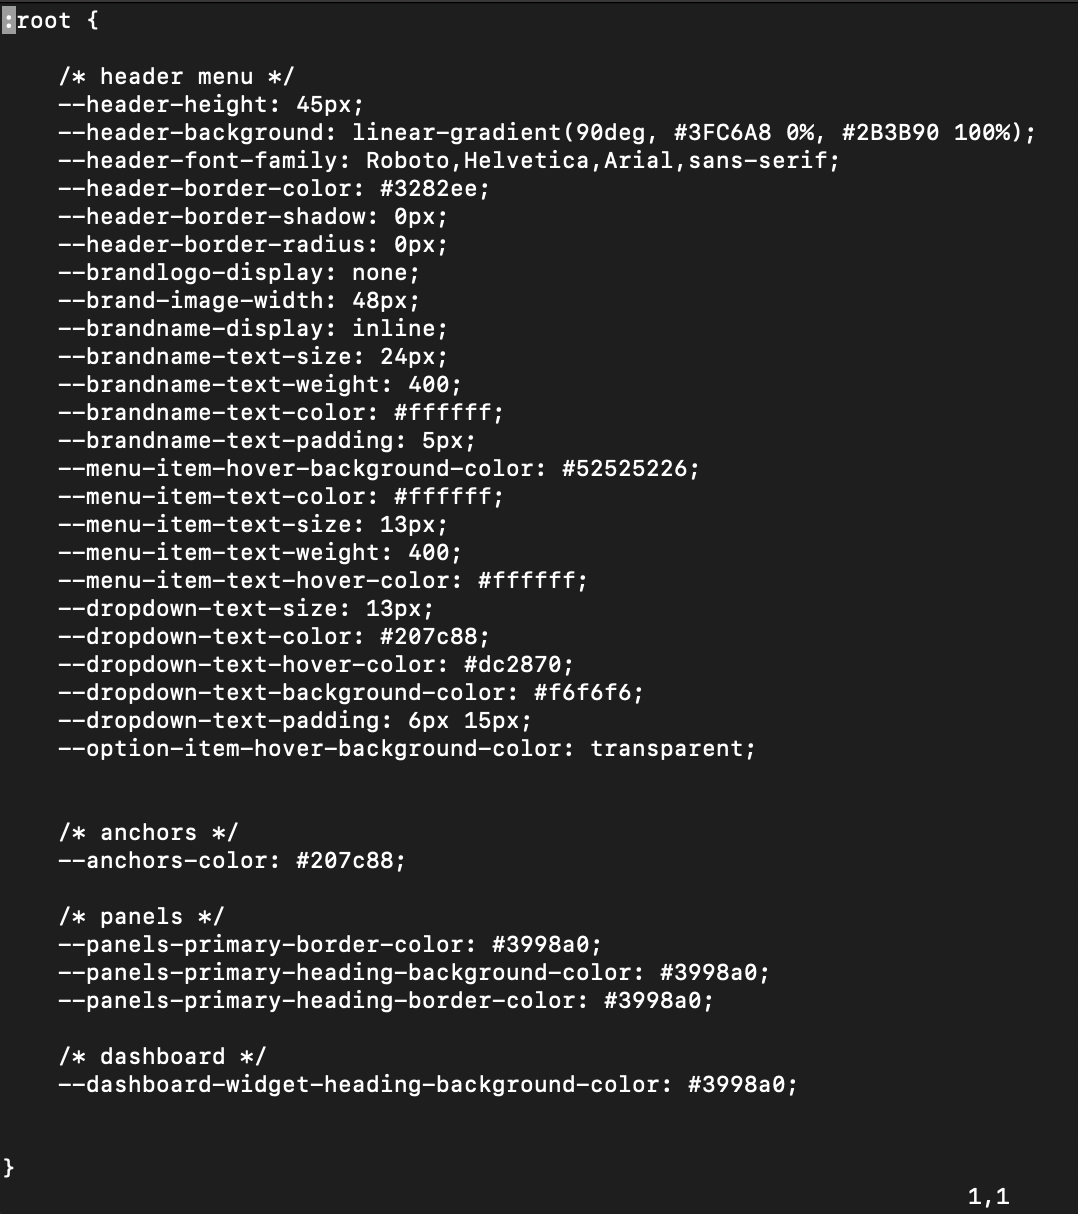
In this example, we'll create a simple teal theme using some of these variables, which focuses on color and font changes to the top navigation menu, panels, and dashboard:
Once you are done, save your custom stylesheet file(s) into the assets/css/custom directory, like this:
└── assets/
└── css/
└── custom/
├── custom-theme-one.css
├── custom-theme-two.css
└── custom-theme-three.css
Make sure that any files used for the intended theme use the .css extension, and any separate theme or backup theme files are changed to the .BKP extension.
In our example, we are using "custom-theme-simple.css" as our new primary theme file:
Step 2: Enable Theming in ProVision
Log into ProVision, and go to the User dropdown -> "User Preferences" → "Appearance".
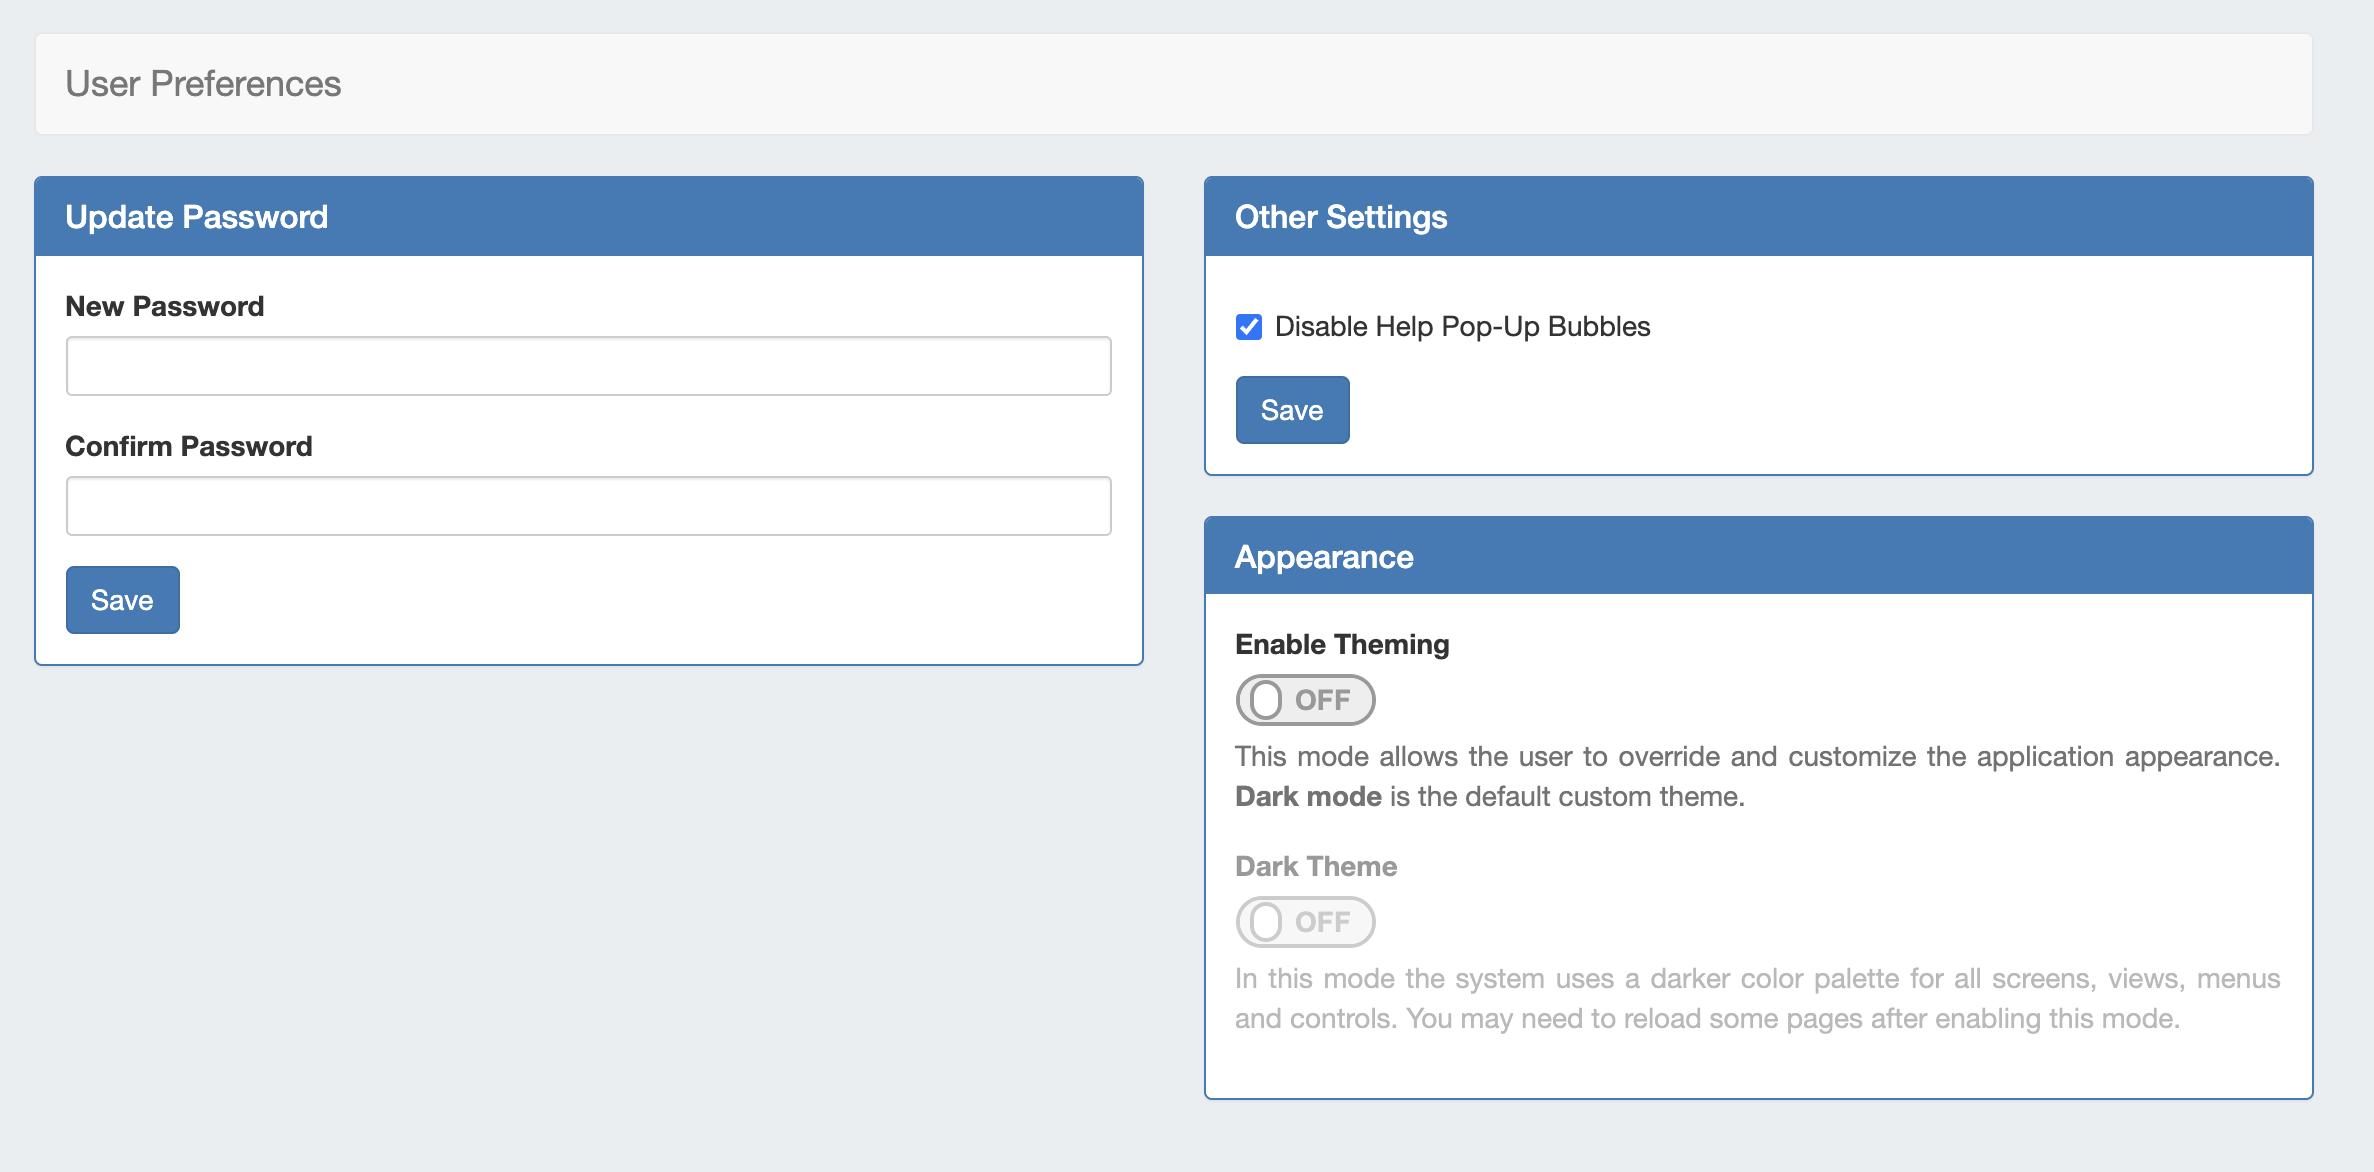
Under "Enable Theming", turn the toggle to the ON position, and verify that "Dark Theme" is turned to OFF (otherwise, Dark Mode theming will overwrite the custom theming files).
Once you're done, refresh the page and the custom theme should be visible. In some cases, you may need to empty your browser's cached images and files, and "Hard Refresh".
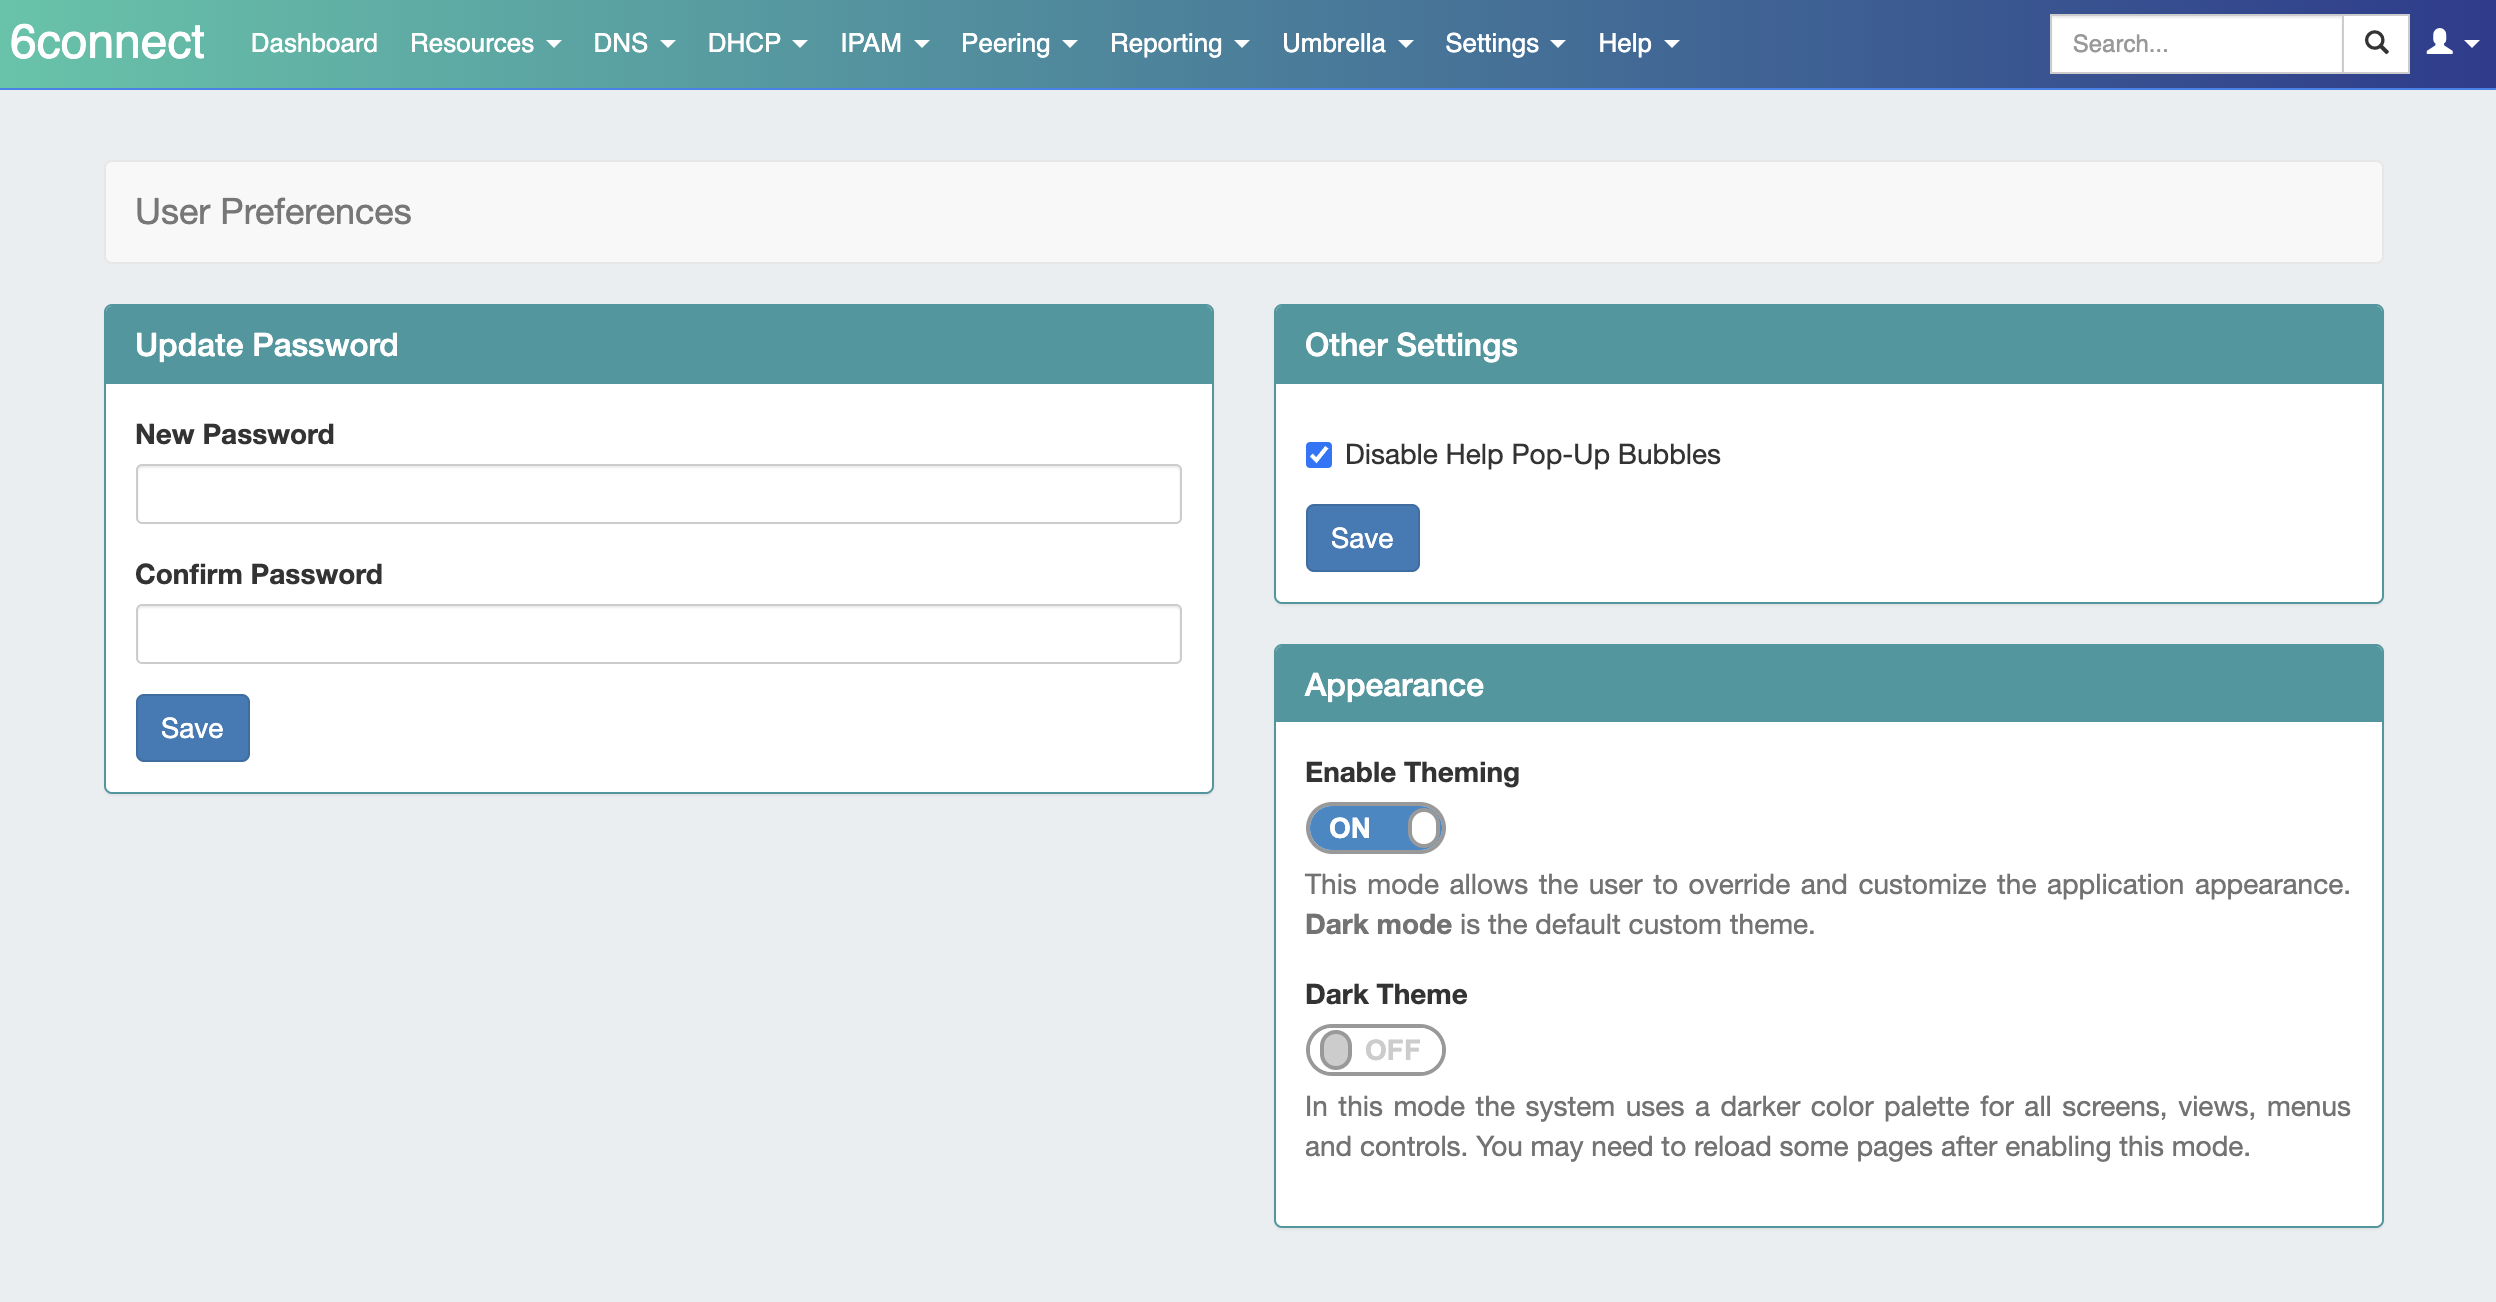
Here, we can see the new theme has changed the color and font of the top navigation menu, menu dropdowns, and panels.
...
Actions made to DHCP Groups, DHCP Pools, DHCP Reservations, and DHCP Servers can now be used with ProVision's Approvals systems.
| Expand | ||
|---|---|---|
| ||
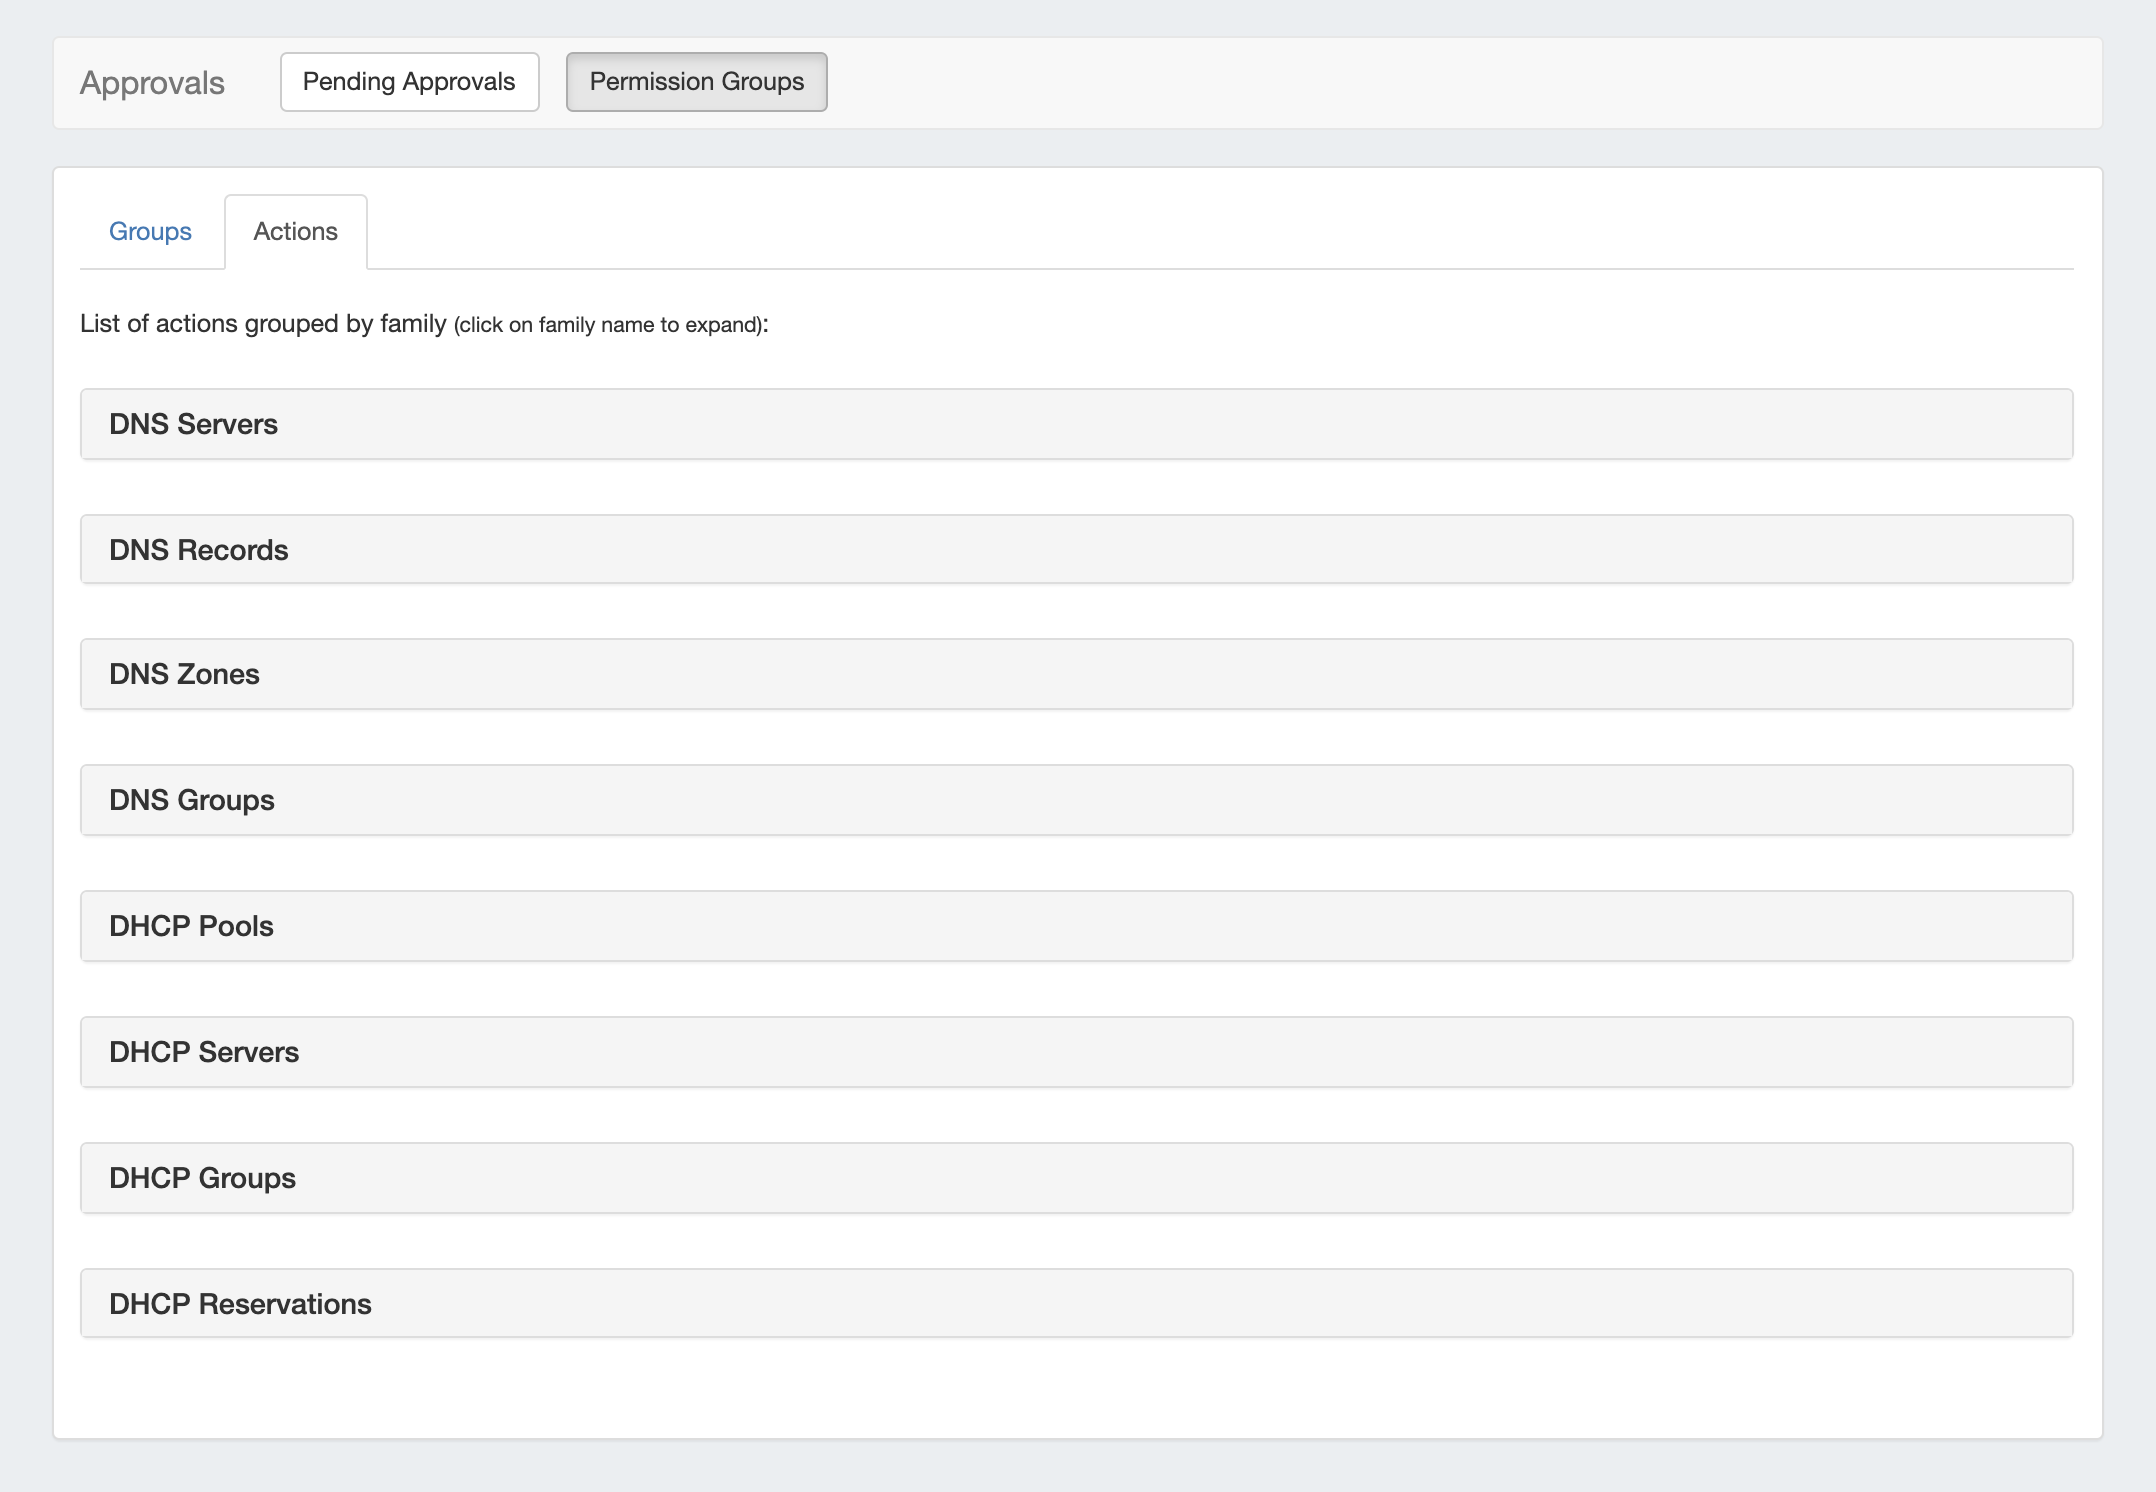
Permission Groups and Approval Actions for DHCP Approvals may be managed from the Admin Approvals Tab.
A "Resources Awaiting Approval" module will appear on the DHCP Groups, DHCP Servers, and DHCP Pools page(s) for the approvee/approver user(s) once an approval request has been submitted. |
...
DHCP Approvals must have permissions / action groups set up from the Approvals tab, similarly to DNS Approvals. |

See Approvals for detailed information on how to set up and use the Approvals system.
...
Admins may add and group connectors, nodes, and servers to graphically visualize their network, and customize visual settings for each.
...
.
Documentation Note: Due to the scope of this feature, detailed documentation is still in progress. For immediate assistance, please contact 6connect support.
6connect Global Commander ™️ (BETA)
GC-1: Integration of 6connect Global Commander ™️ (IN BETA)
6connect Global Commander ™️ is a new add-on module for 6connect ProVision which allows a network architect to visualize the complete IP landscape across a large, decentralized, heterogeneous organization. As companies grow larger they will naturally acquire distinct IT departments which operate with their own tools and their own rules. Viability into these sub-organizations is often difficult, leading to situations where IP resources are unused by one department when they are critically needed in another.
6connect Global Commander ™️ addresses this problem by utilizing a series of connectors (including Infoblox, Bluecat, Netbox, PHPIPAM, OpenStack, vCenter) to normalize the data stored in downstream IPAM systems to present a complete IP landscape in a single top-level view. This view is the first step in standardizing IP policies across business units, which will save time and support fees as well as serve as the backbone for network-wide automation initiatives. Finally, once fully synced with all daughter systems, the central Global Commander node can become a clearinghouse for IP information for the entire organization.
Documentation Note: Due to the scope of this feature, detailed documentation is still in progress. For immediate assistance, please contact 6connect support.
Additional Features / Improvements
...
Entirely new interface, with separate pages for Users, Groups, and Permissions Chart View
Query permissions for a user from the user details page
Quickly navigate between users and their assigned groups
Improved password reset handling
- Improved speed and asynchronous handling when updating groups
- Inclusion of non-editable external Radius / LDAP / SAML users into the Users List
- Graphical indicators if a user is an external user, disabled, or a part of multiple groups
- Ability to select multiple users/groups to delete simultaneously
- New page view /search / filter options
- Added column sort options
For details on working with Users, Groups, and permissions, see the following areas: Users & Permissions , Working with Users, Working with Groups, and Verifying Permissions.
Encrypted Data gadget
IM - 3917: Added Encrypted Data gadget to Resource Sections
The Encrypted Data gadget allows users to store encrypted notes.

| Expand |
|---|
Enable gadget by adding to section from "Manage Gadgets" dropdown. Once added click "Edit" to change title and input data.
Click "Save" to save your changes.
Once data is entered click "Decode" to view or edit. |


Dashboard
IP Aggregate Utilization Widget
IM - 1210: Added an IP Aggregate utilization widget
View Utilization data for a specific netblock or aggregate.
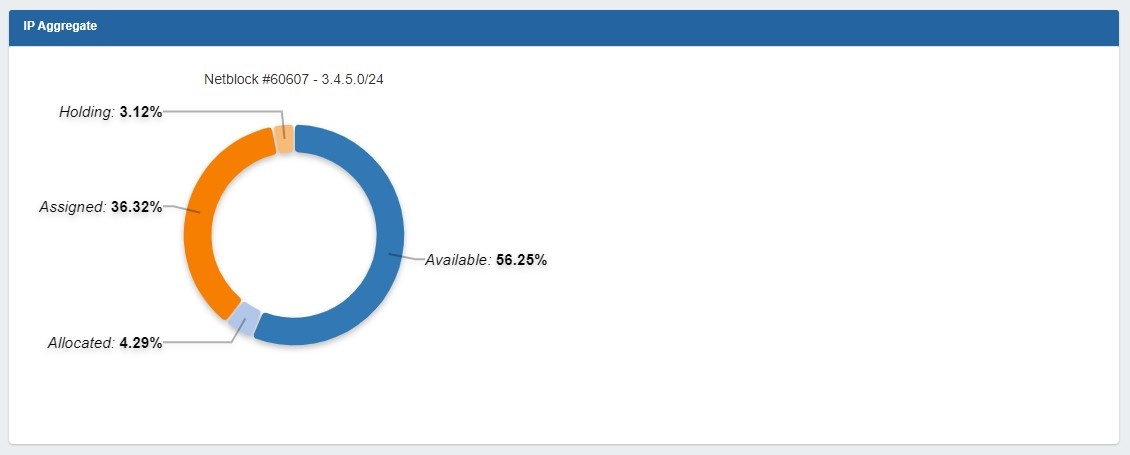
The IP Aggregate widget illustrates the percentage of assigned, unassigned, allocated, and holding tank hosts for a specific netblock.
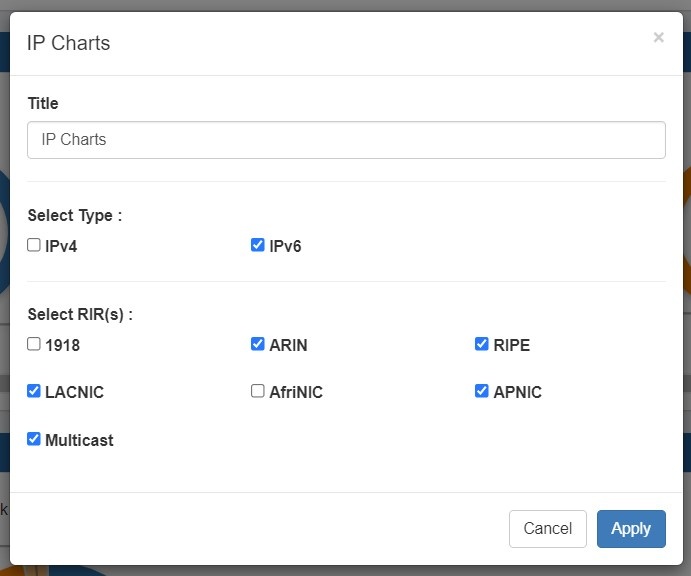
Improved IP Charts
IM - 3958, IM - 3959: Improvements to - 3959: Added space type and RIR selection options to the IP Charts widget
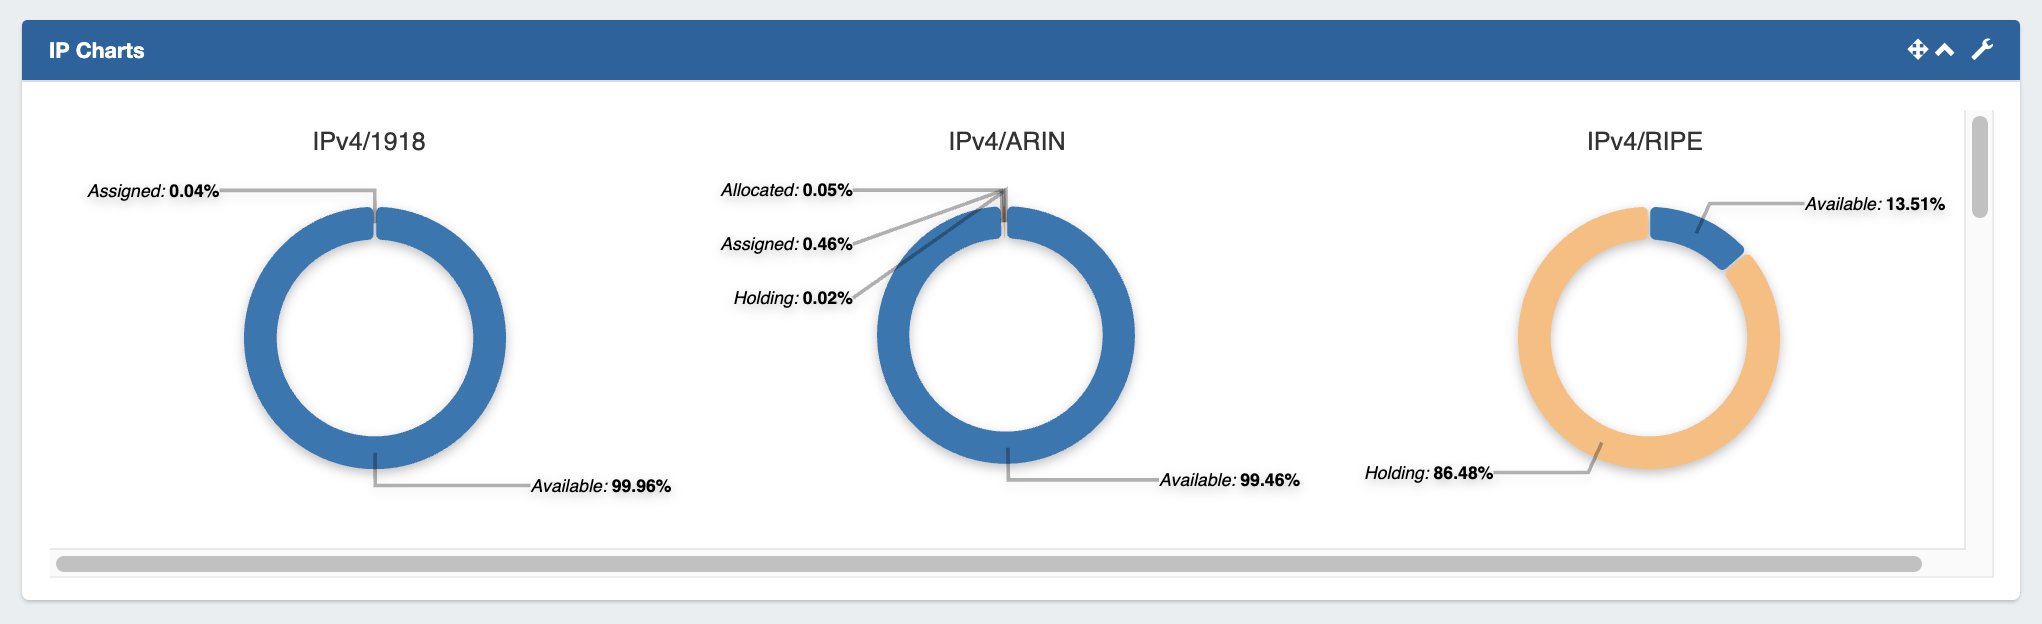
Expanded the IP Charts widget to allow for customized views by IP Type and RIR.
Numbering Authority
...
New Numbering Authority options "Meta Multi-range" and "Meta IPv6" provide expanded options for not only generating a number from a multi-range / IPv6 set, but also determining the selection ordering mode for the range to generate in forward/backwards/even/odd order (Meta Multi-range) or forward/backwards (Meta IPv6).
Meta Multi-range
The Meta Multi-range numbering type is similar to Multi-range, but includes additional options to specify the ordering sequence.
...
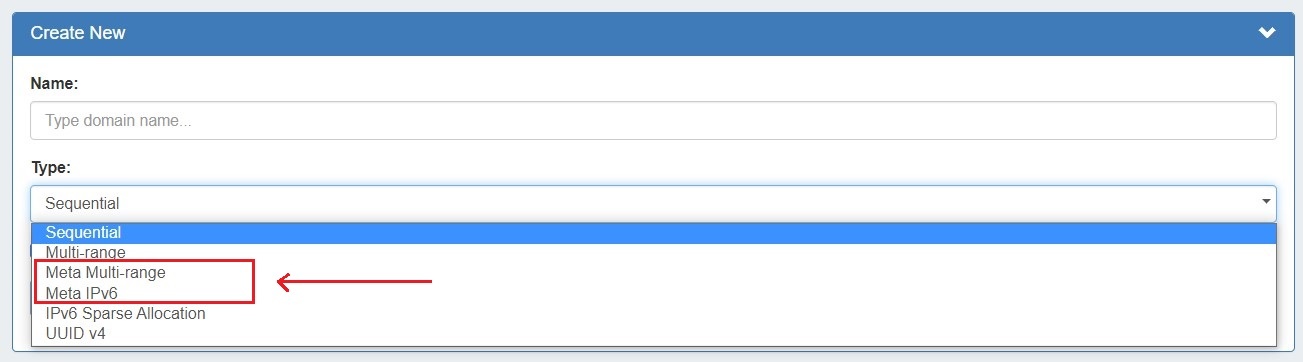
Expand title Create a Meta Multi-range Numbering Authority... Creating a new Meta Multi-range Numbering Authority:
Go to Admin → IPAM Admin - Numbering Authority.
Under "Create New", enter the following:
- Name: Name to give the new numbering authority range
- Type: Select "Meta Multi-range"
- Domain →
- Ranges: Enter the numbers / number ranges to include
- Exclude Ranges (optional): Enter any numbers / number ranges to exclude
- Selection Types:
- Selection Name: Enter a nickname for each desired selection order to add
- Selection algorithm: Choose the number ordering method to use for each selection type added. Options are: Forwards, Backwards, Even first, or Odds First.
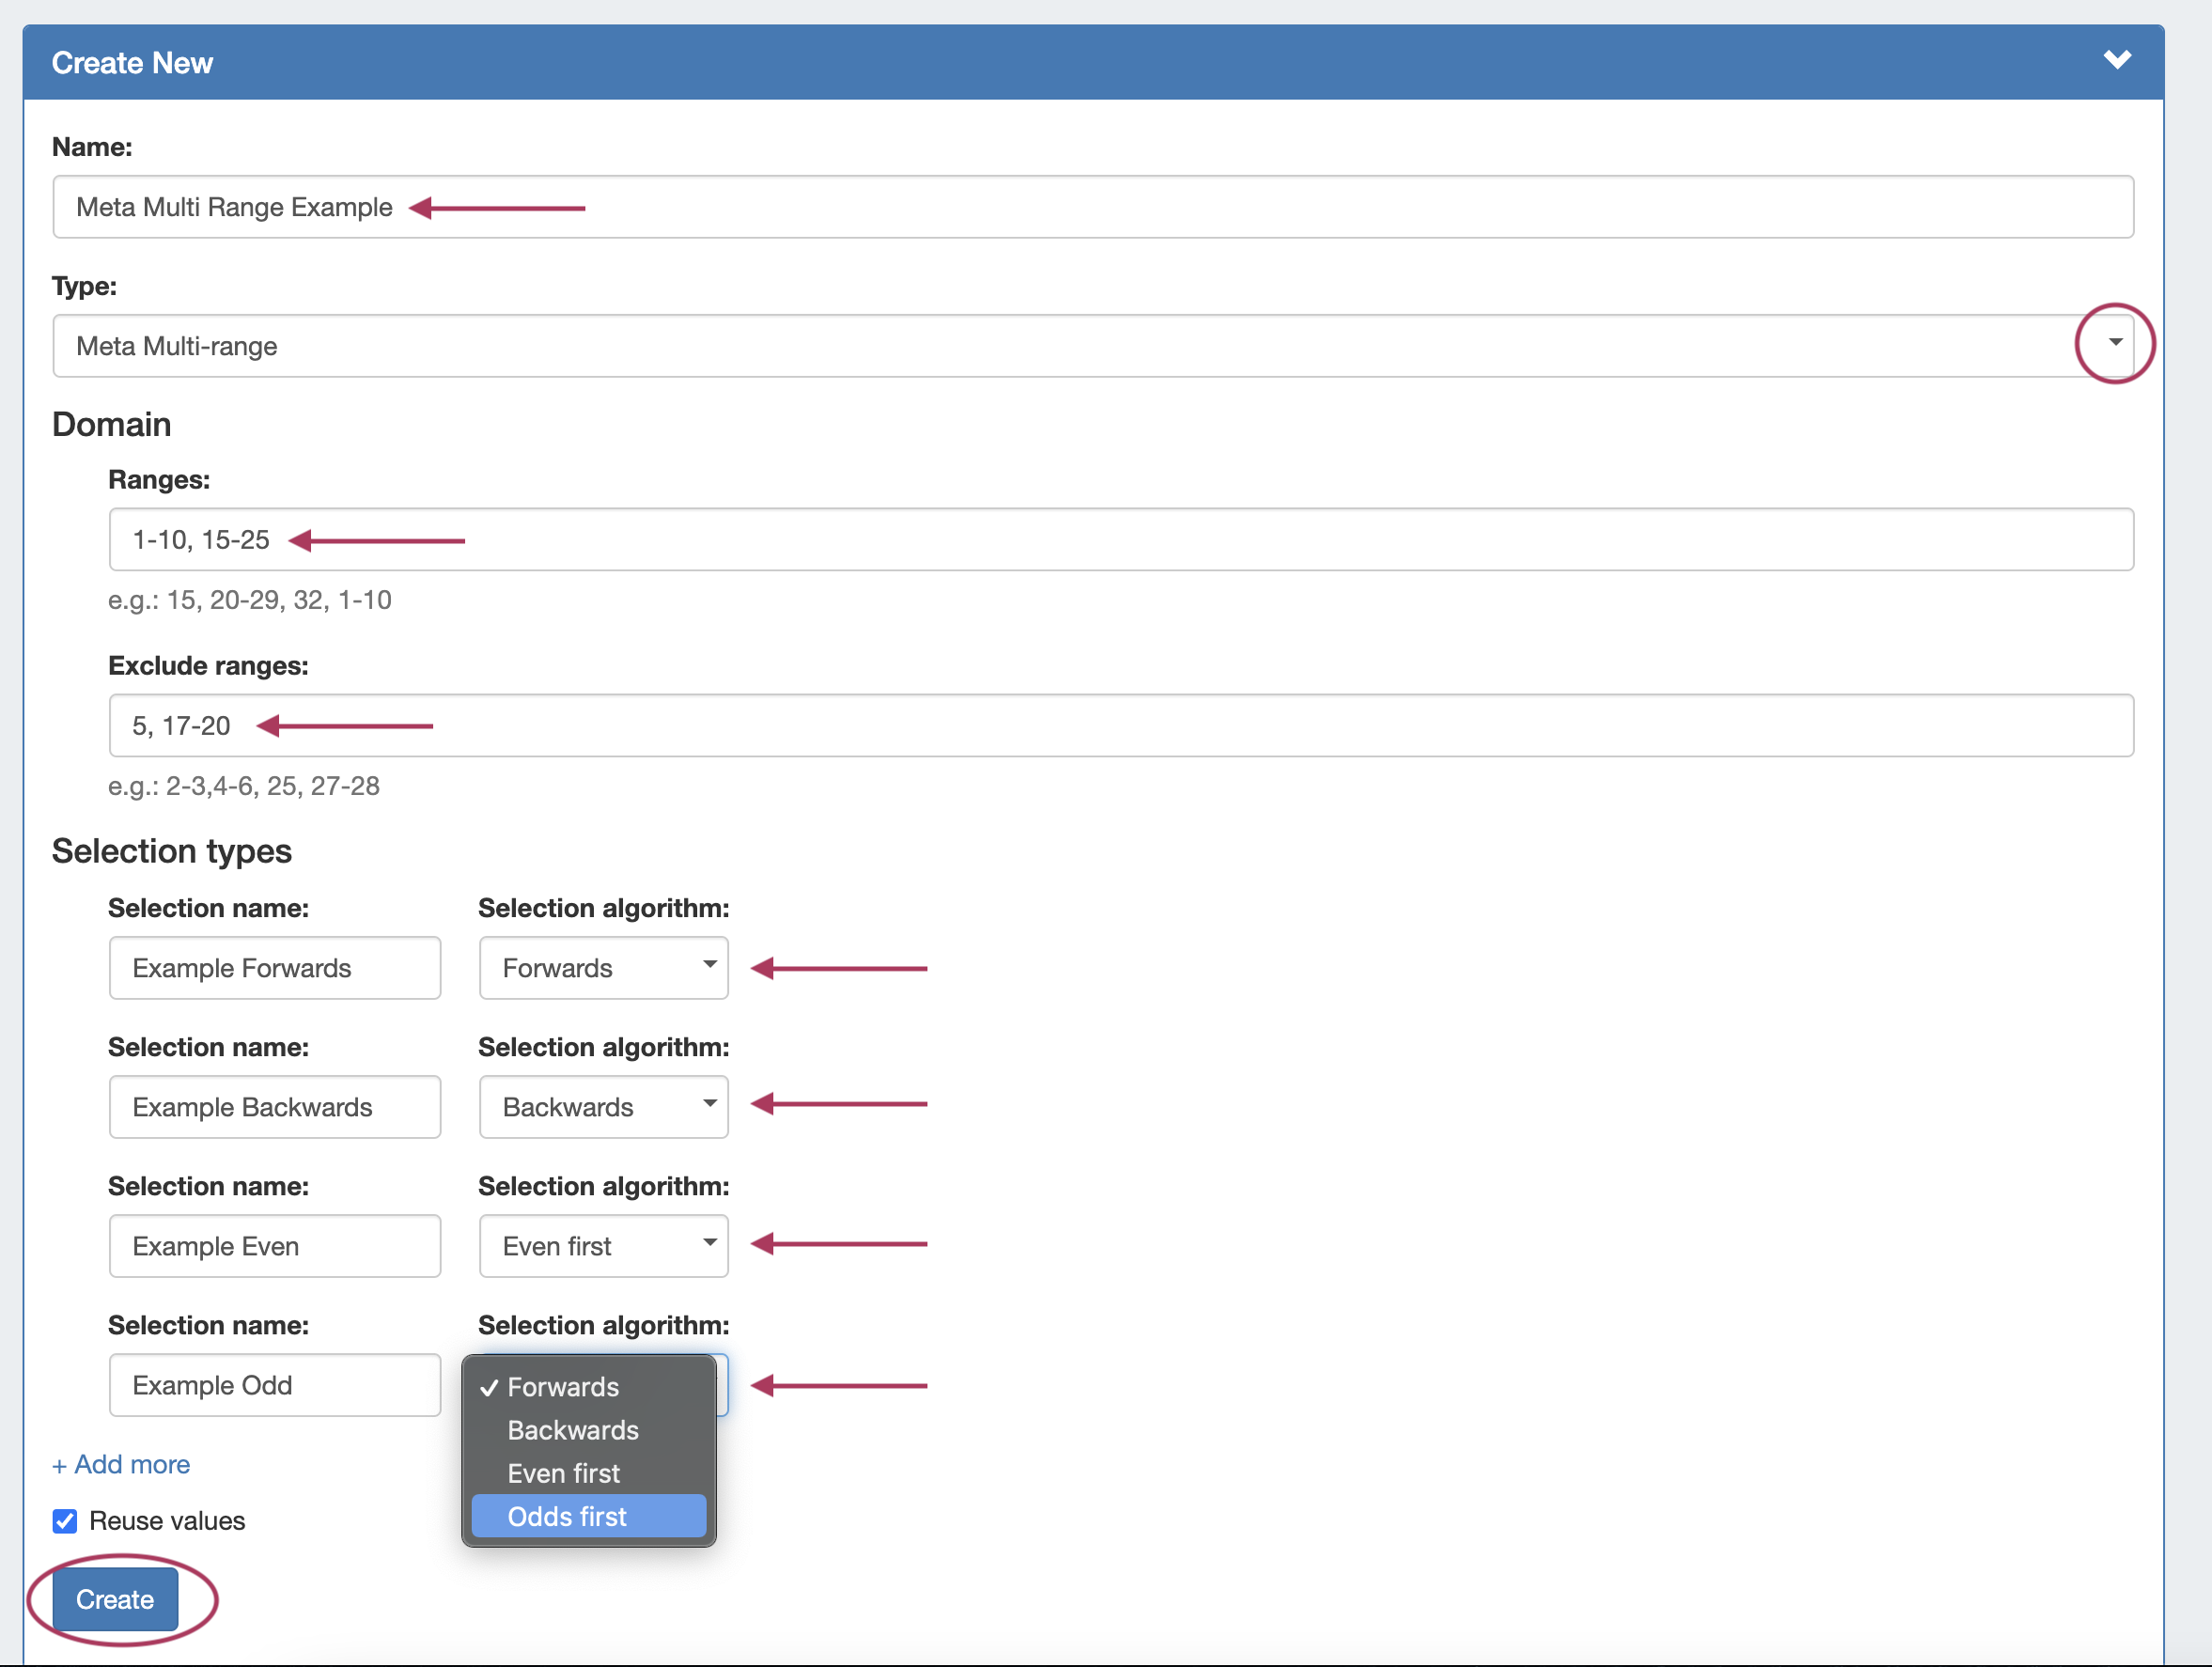
When done, click "Create". The Meta-Multi-range type will be added to the Numbering Authority List.
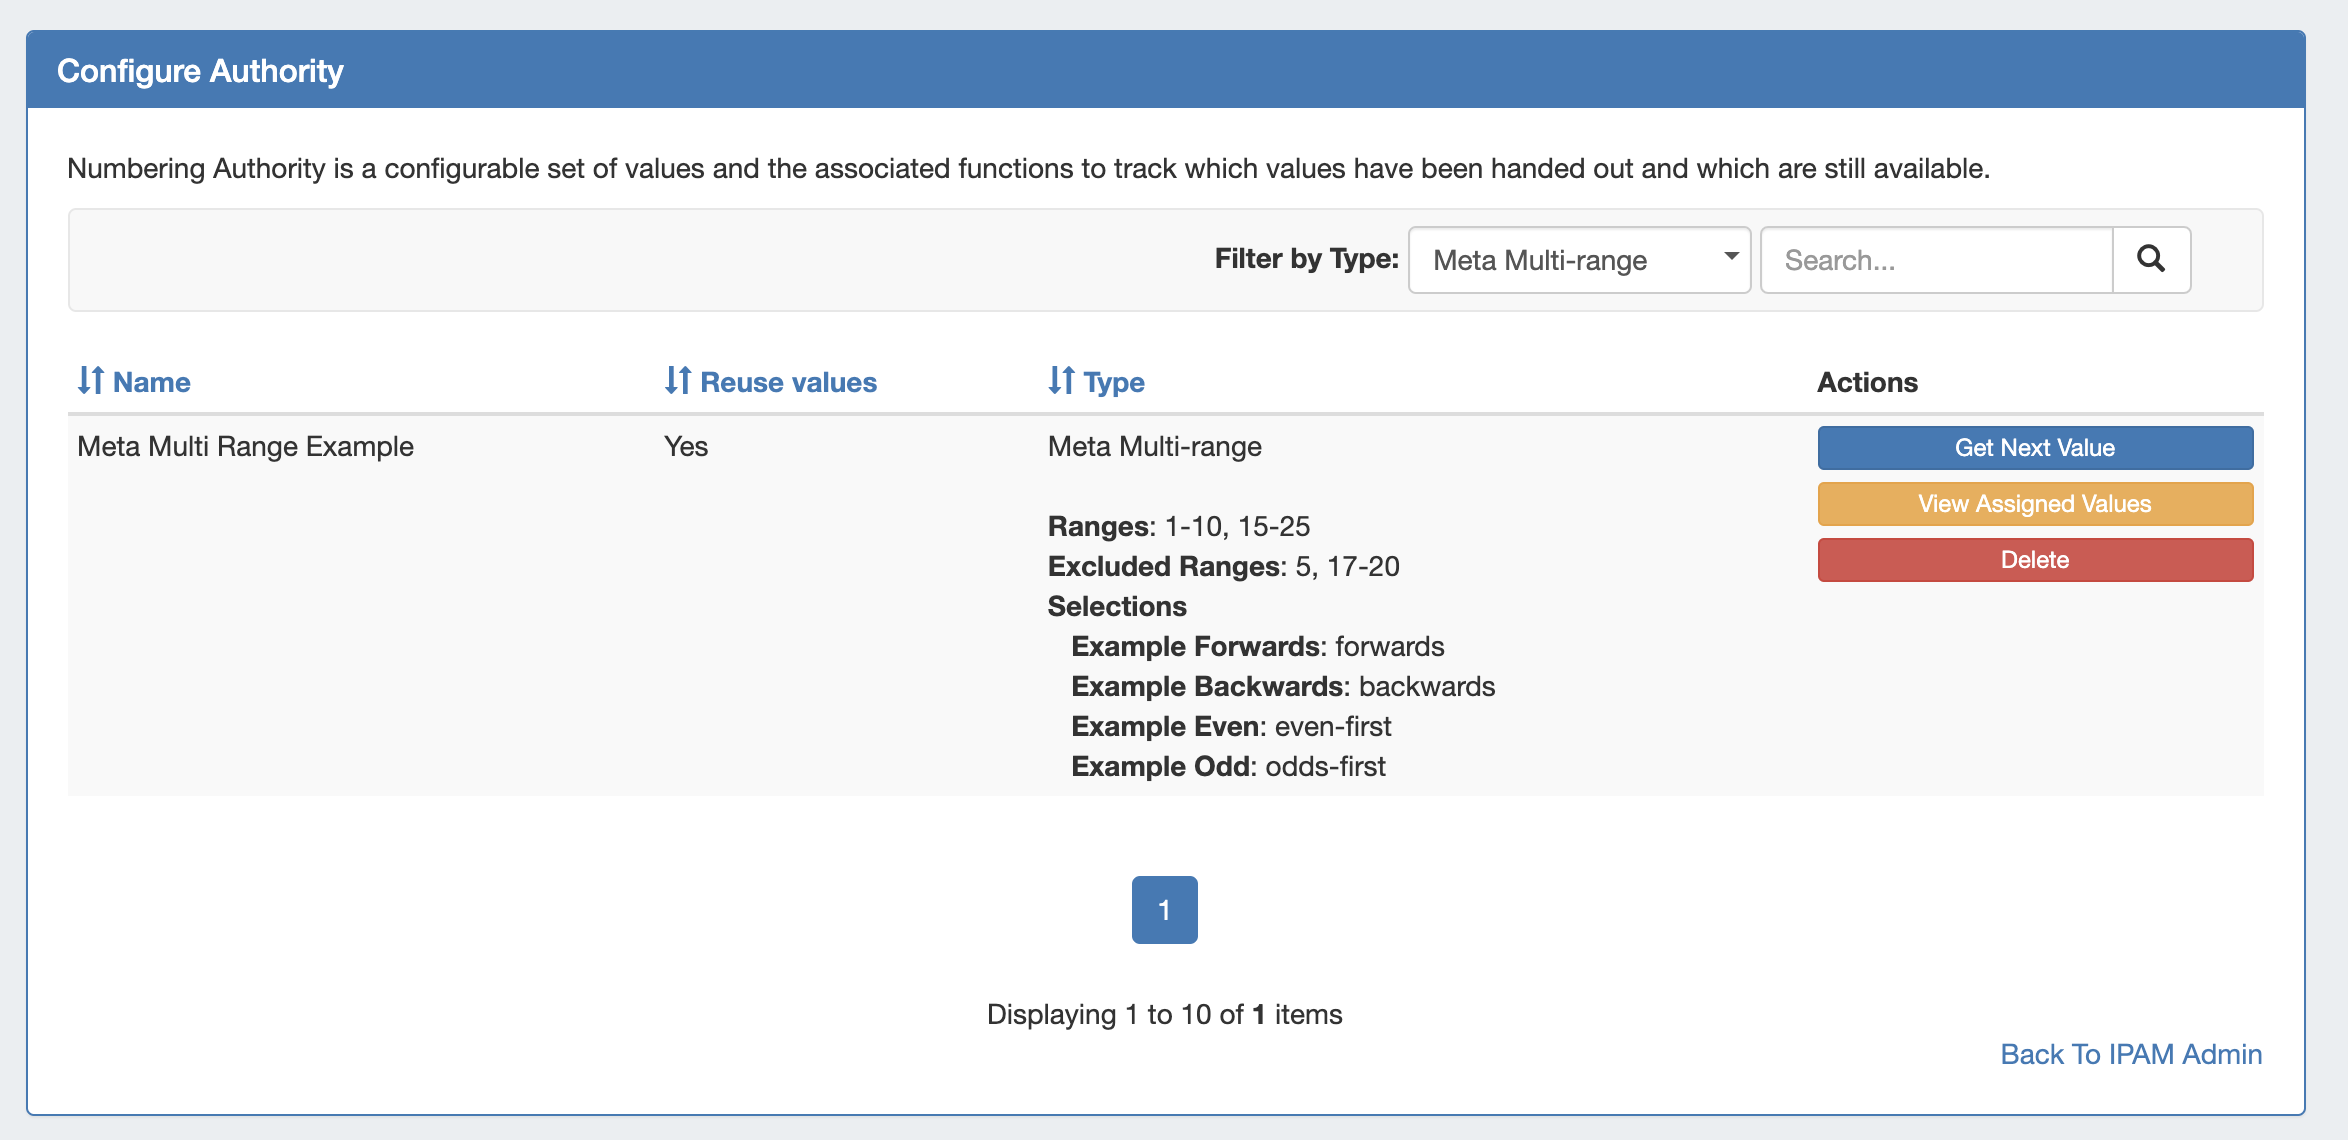
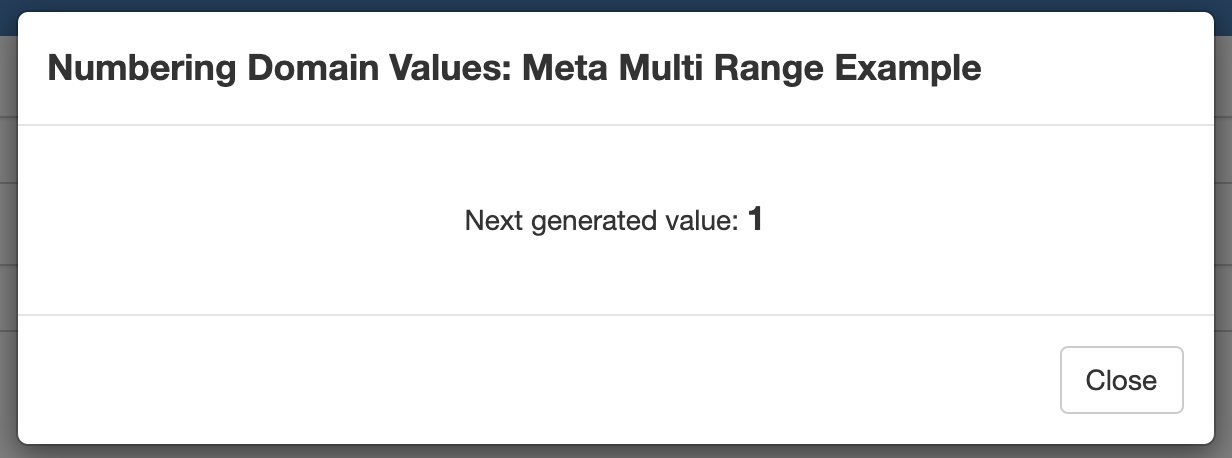
To Get Values, Click "Get Next Value" under "Actions", then choose the selection name to use for the number generation.

Click "Confirm". The next number, according to the chosen selection order, will be displayed.
For Additional information on using Numbering Authority, see IPAM Lists Management - Numbering Authority
...
Expand title Create a Meta IPv6 Numbering Authority... Creating a new Meta IPv6 Numbering Authority:
Go to Admin → IPAM Admin - Numbering Authority.
Under "Create New", enter the following:
- Name: Name to give the new numbering authority range
- Type: Select "Meta Meta IPv6"
- Domain →
- IP Block: Enter the parent IP Block from which to generate the IPv6 addresses
- IP Mask: Enter the mask of the parent IP Block
- Selection Types:
- Selection Name: Enter a nickname for each desired selection type to add
- Mask: Enter the desired mask of the child blocks to generate
- Selection algorithm: Choose the number ordering method to use for each selection type added. Options are: Forwards, Backwards.
- Create Numbering Domain: If other Meta IPv6 Numbering Authority Domains exist, you may opt to create a new numbering domain from an existing domain each time a number is generated. The automatically generated sub-domain may then have numbers generated independently. This may be useful in cases of complicated hierarchical IPv6 relationships, or which multiple levels of exclusions exists.
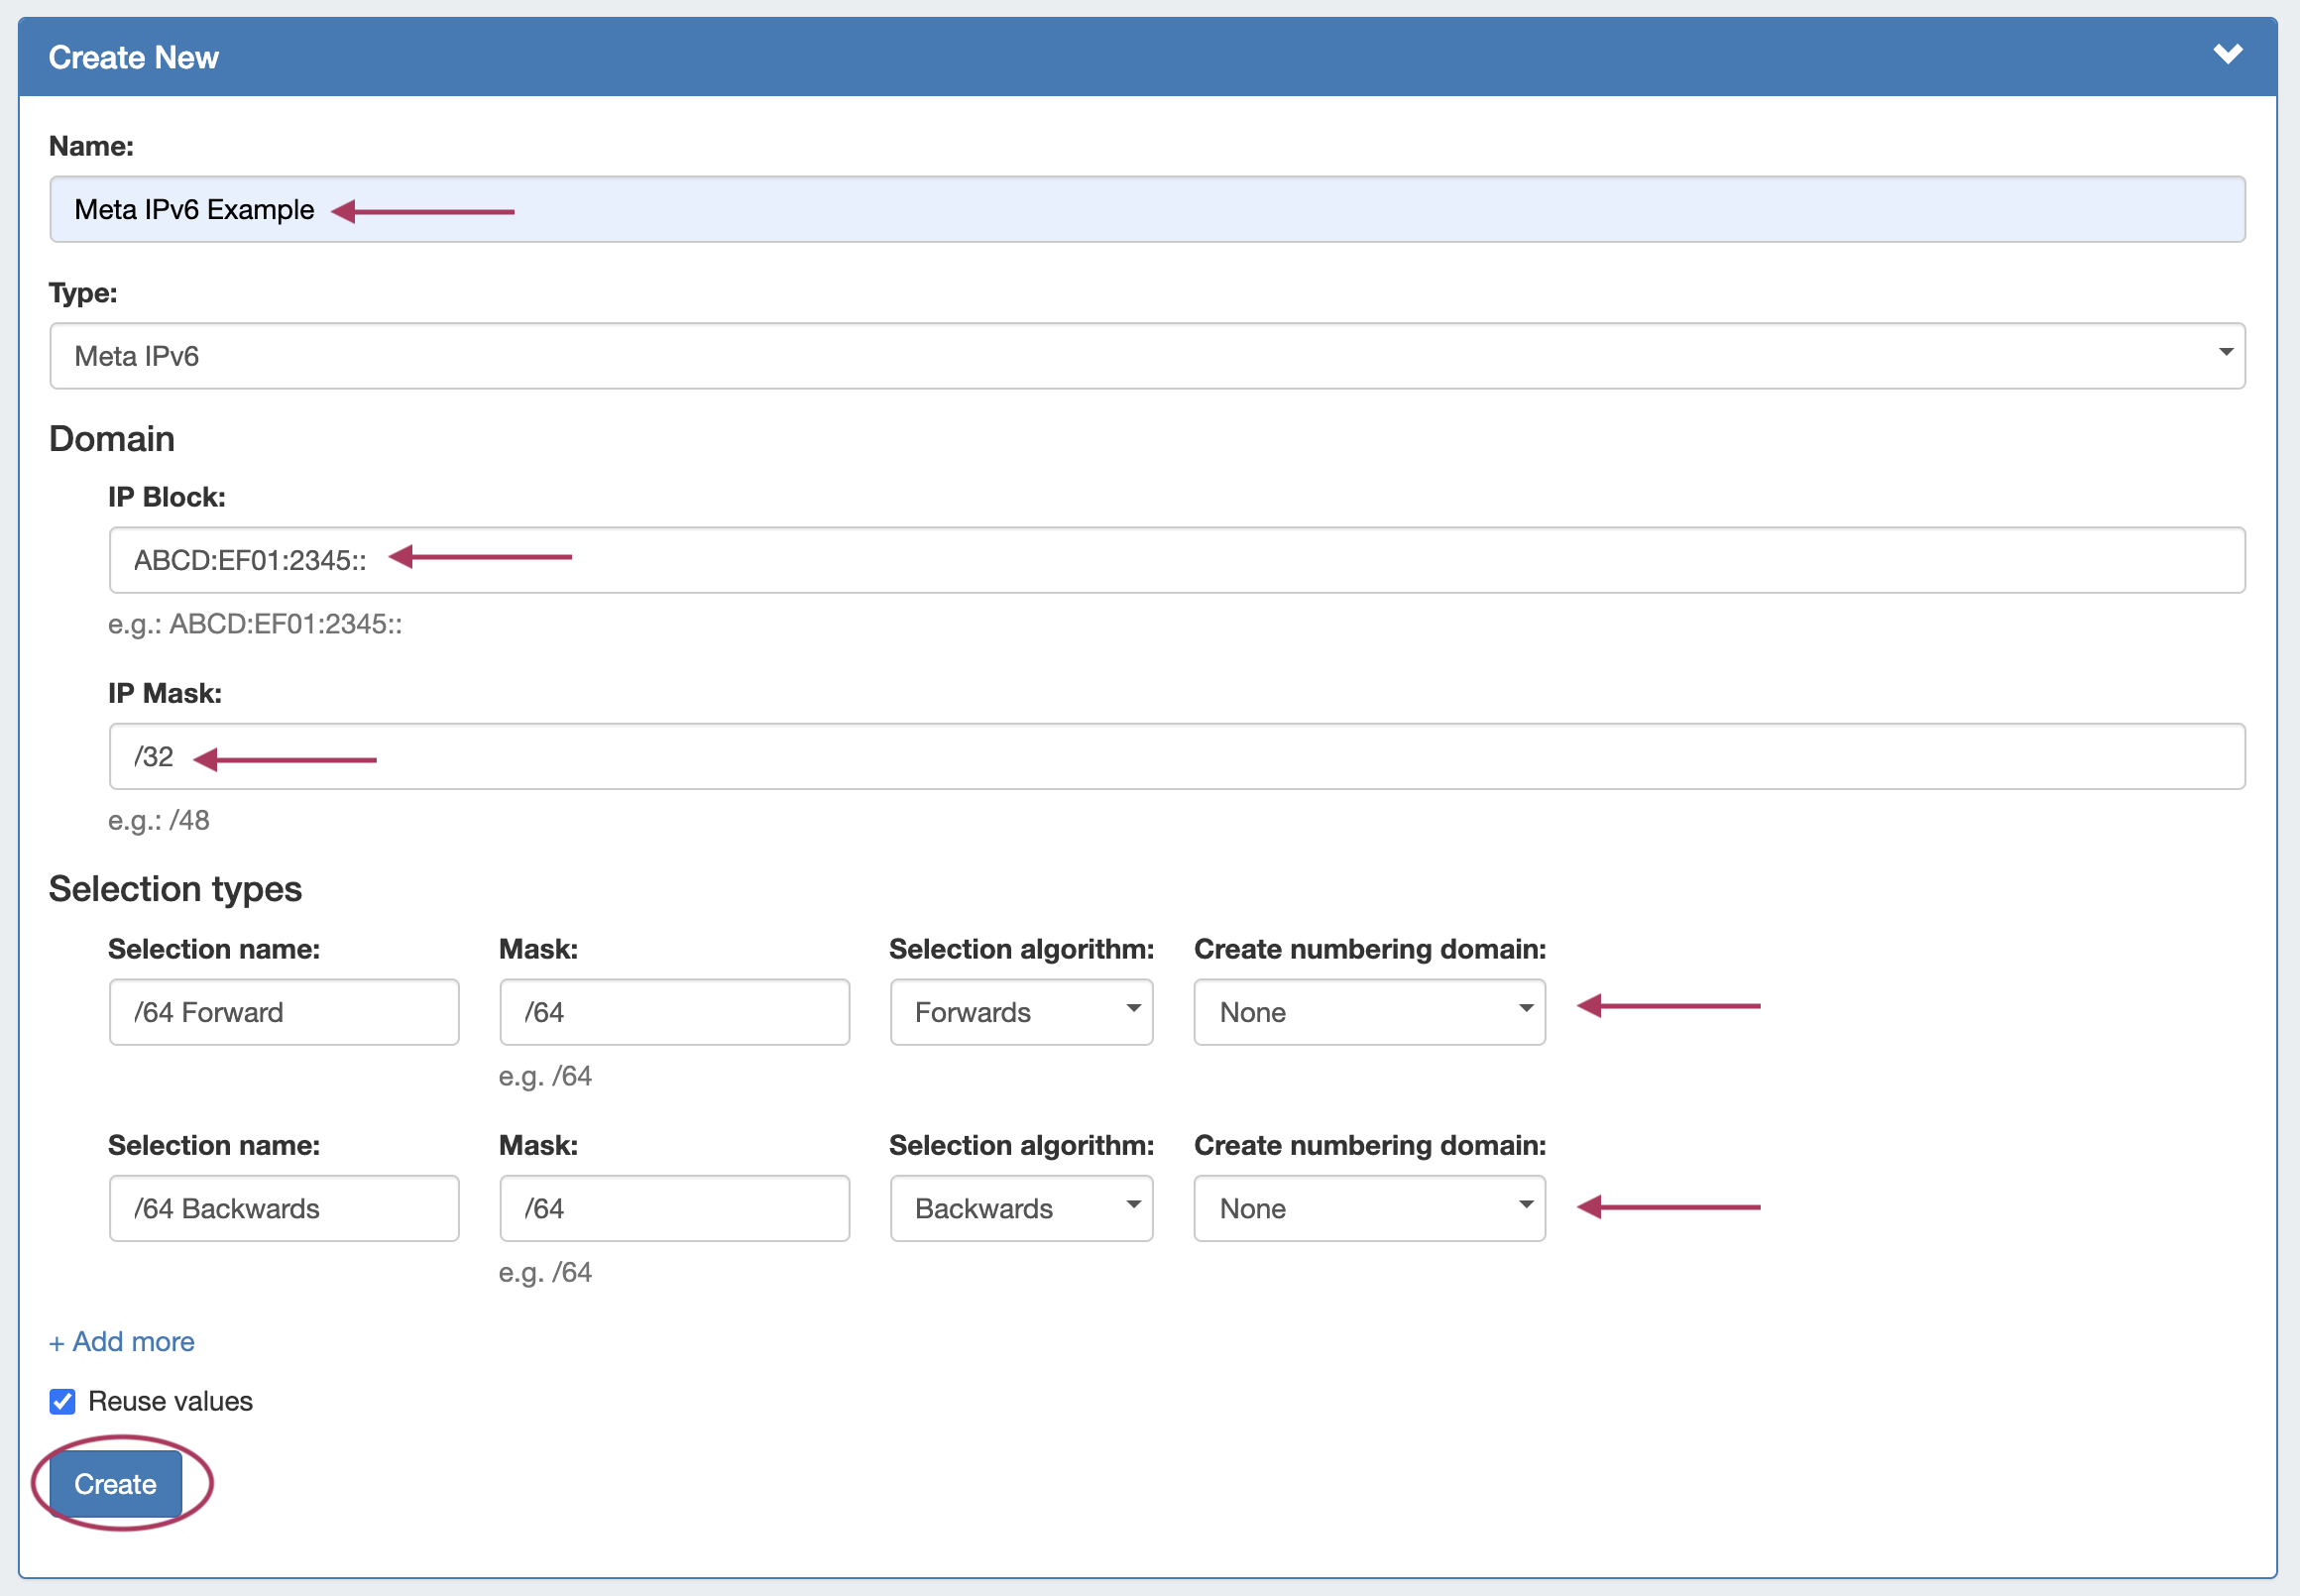
When done, click "Create". The Meta-Multi-range type will be added to the Numbering Authority List.
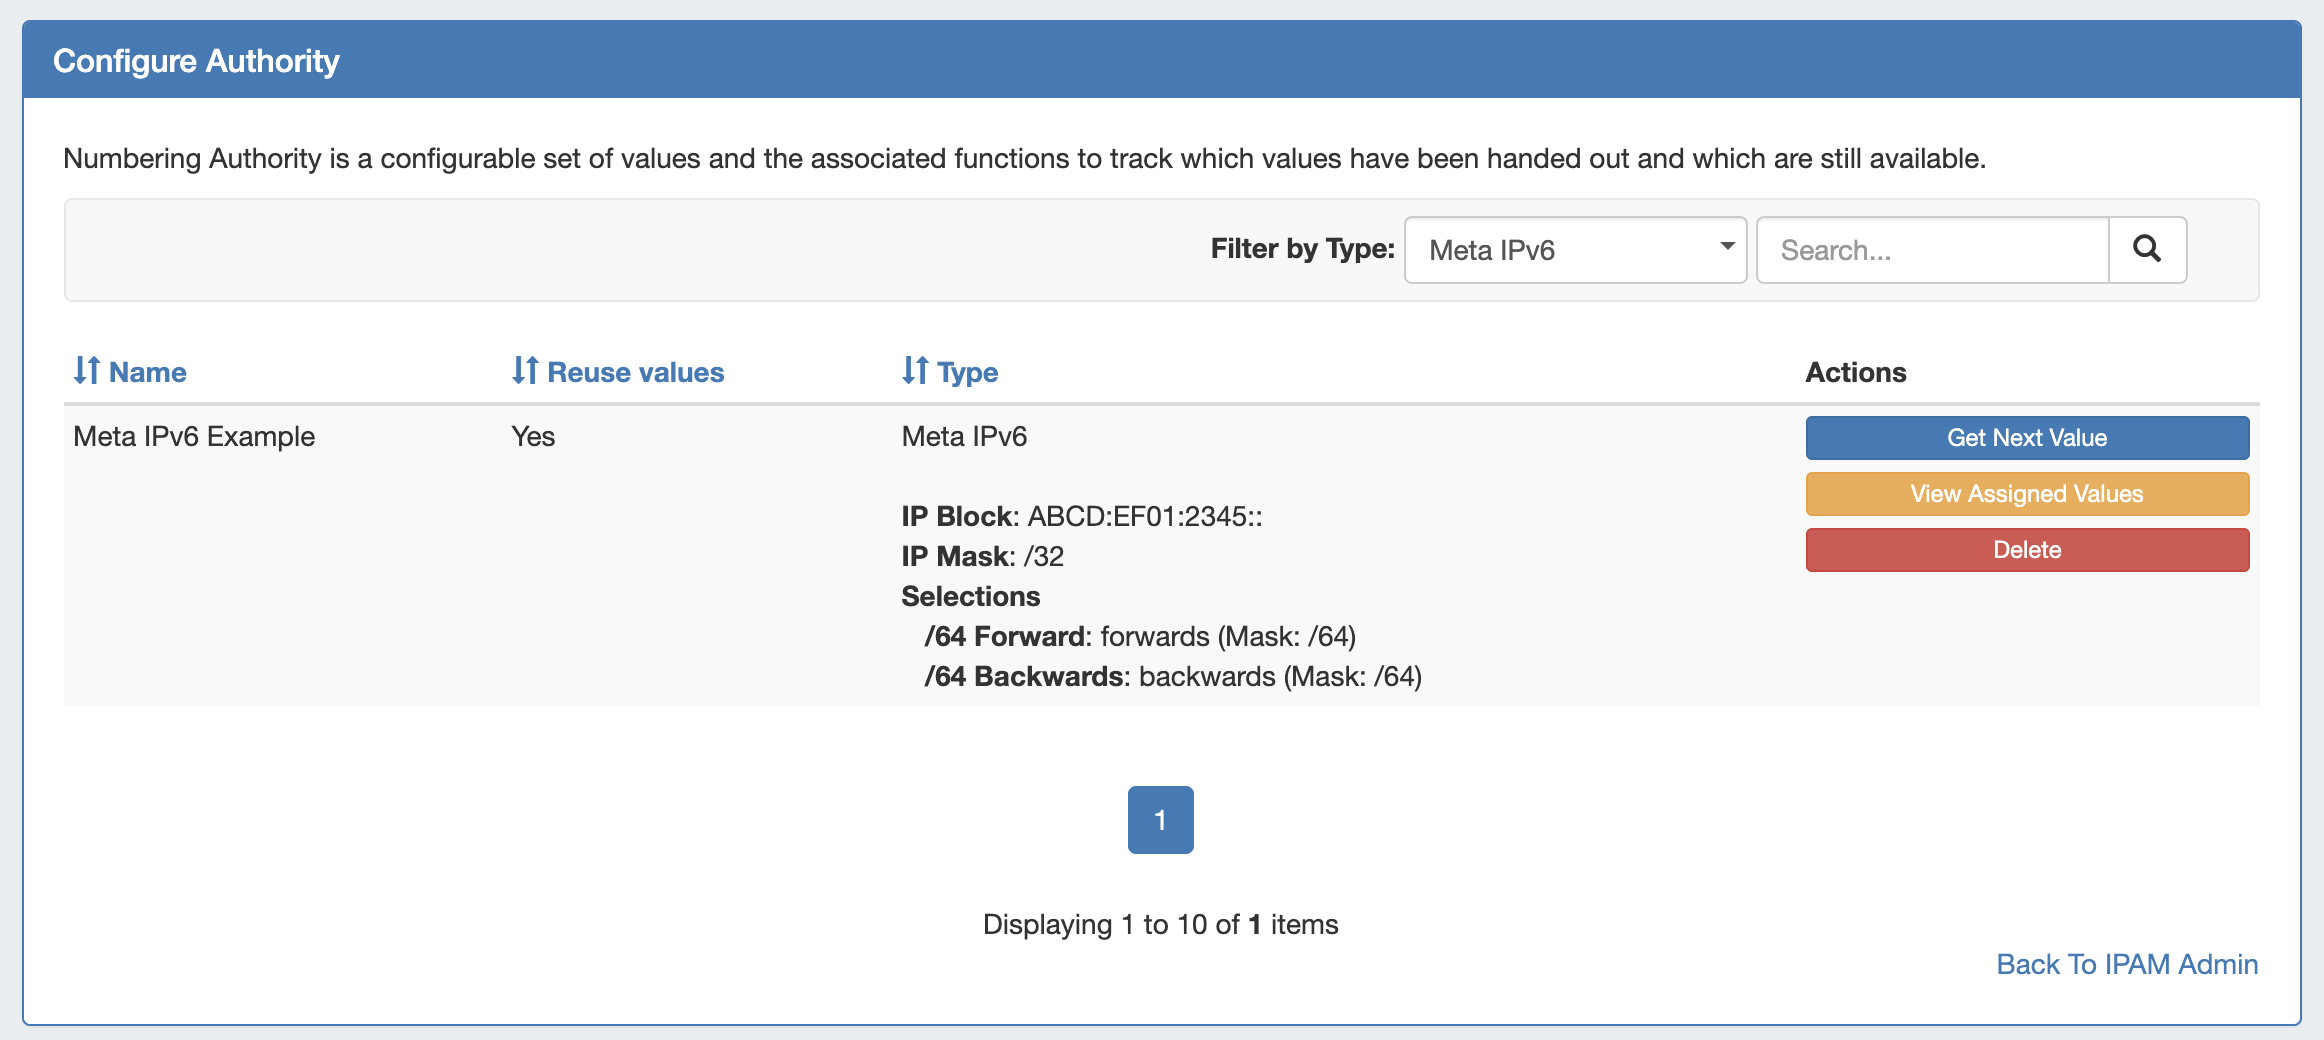
To Get Values, Click "Get Next Value" under "Actions", then choose the selection name to use for the number generation.
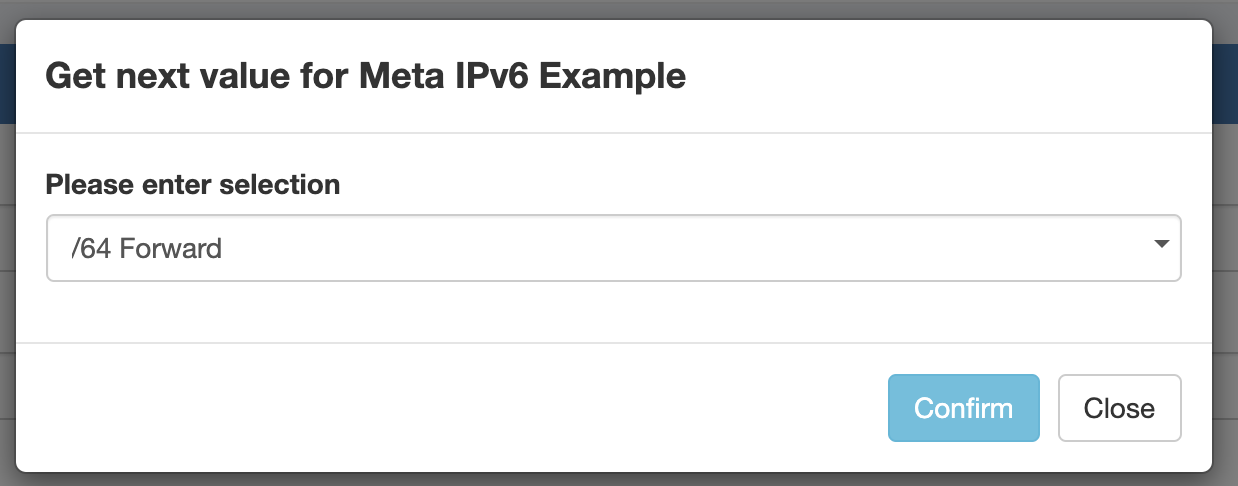
Click "Confirm". The next number, according to the chosen selection order, will be displayed.

Meta Domain Creation
If "Create numbering domain" was set to create a new domain from an existing Meta IPv6 setup, then each time a number is generated a new Meta-IPv6 sub-domain item will be created using the settings from the referenced domain.
Here, we've created a new Meta IPv6 Numbering Authority "Meta IPv6 Example with Domain", where the selection creates a new domain based off "Meta IPv6 Example".
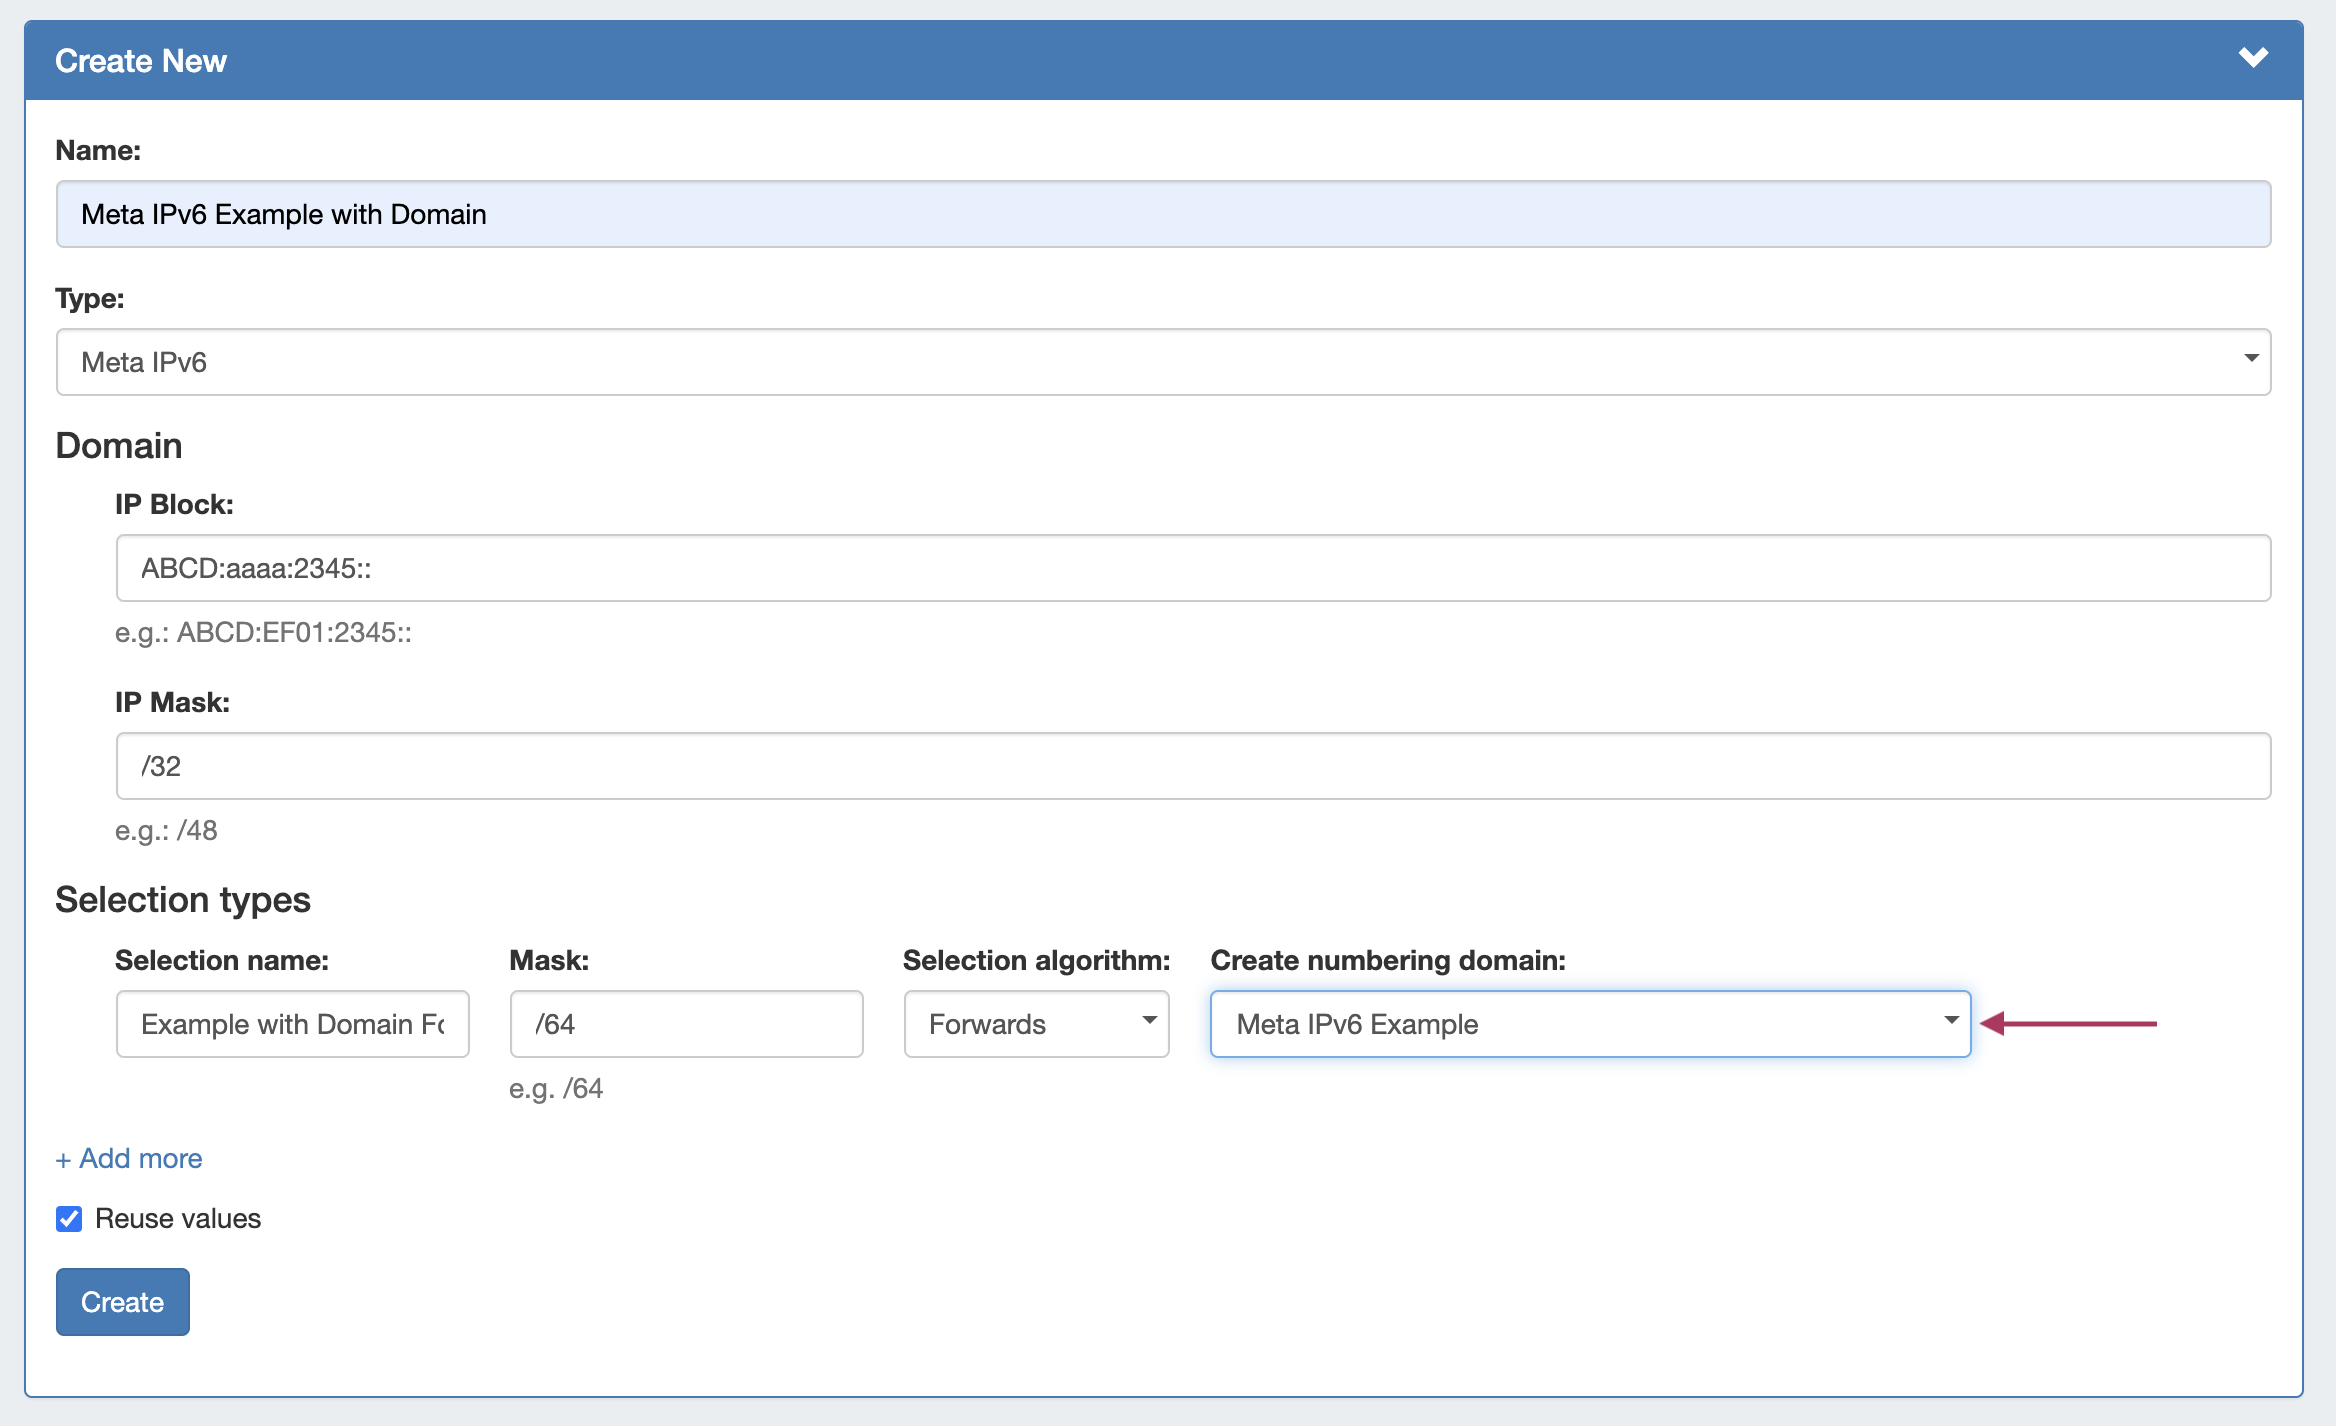
Then, after clicking "Get Next Value" on "Meta IPv6 Example with Domain", not only is the next number provided, but an entirely new numbering domain is created - ("Meta IPv6) Automatic domain for abcd:ef01:2345:1::/64" using the settings referenced from "Meta IPv6" example.
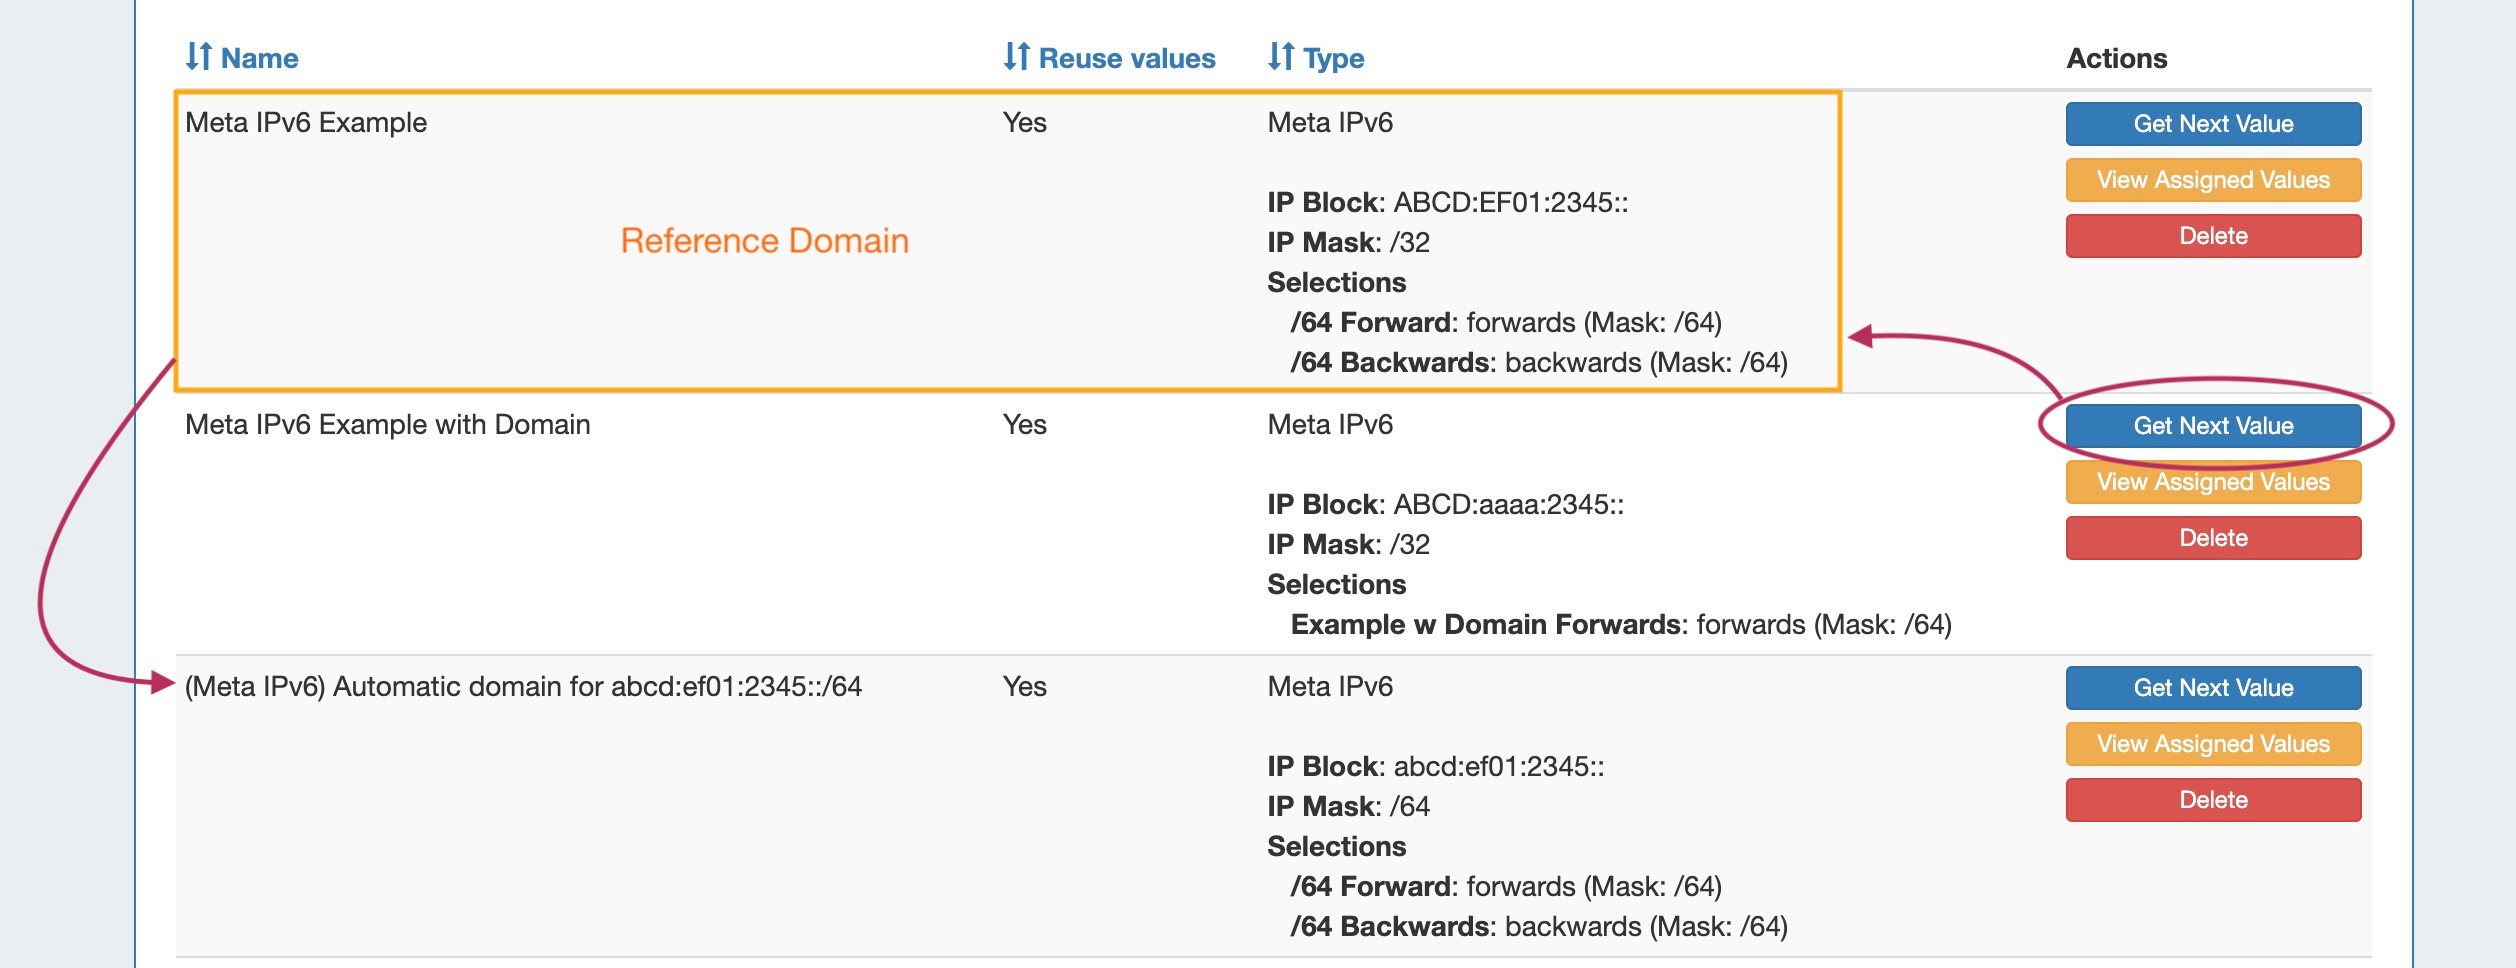
Once an Automatic domain has been created, it can have values generated and be managed independently from the original parent domain.
This allows for more complicated hierarchy assignment systems to have numbers generated at each tier separately, using different masks and/or selection ordering.
For Additional information on using Numbering Authority, see IPAM Lists Management - Numbering Authority
...
| Expand |
|---|
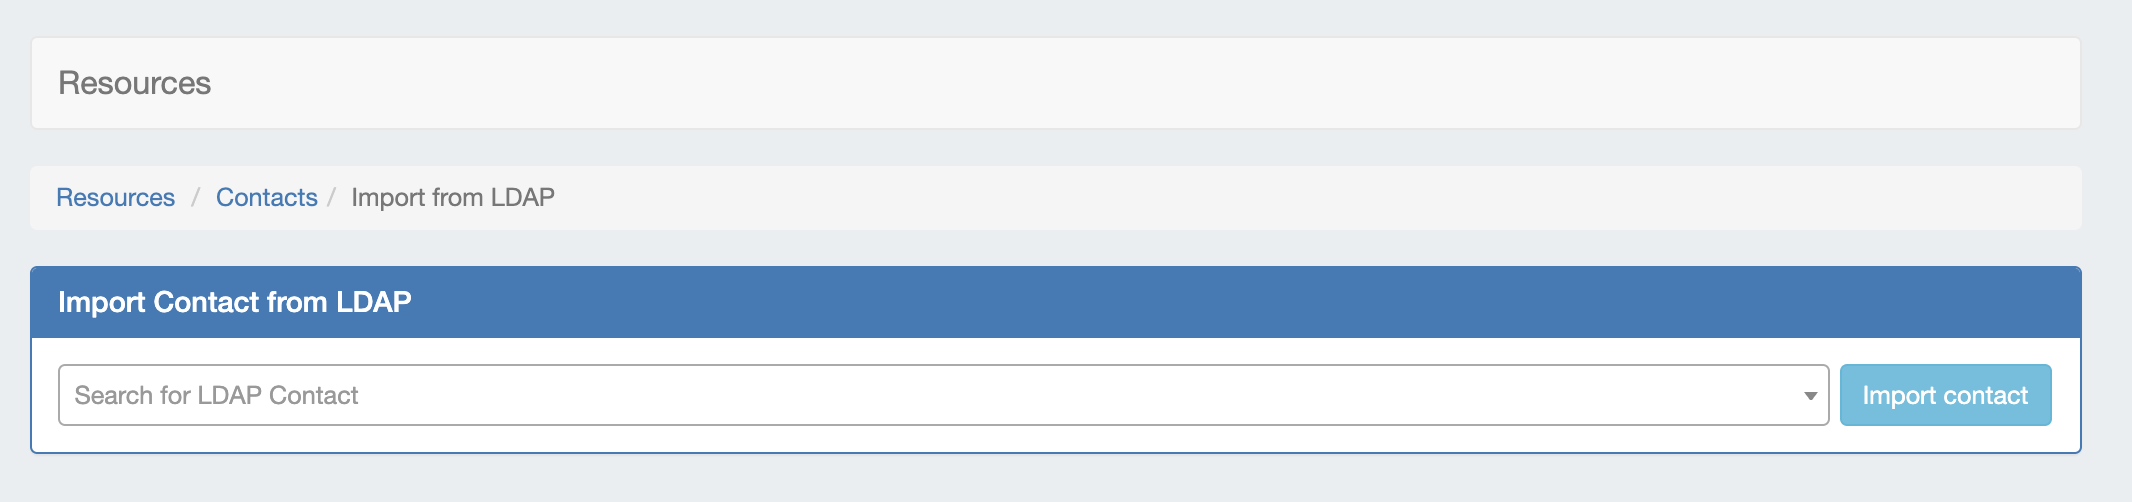
IM - 4135: Added "Import from LDAP" to the Contacts List options From the Resource Tab → Contacts List, click "Import from LDAP" at the top of the list.
From there, search for the desired LDAP contact (Note: The LDAP server must be enabled and set up in Admin Settings → Auth → LDAP with admin credentials in order to connect and import the contact). When done, click "Import contact". The LDAP contact will be available to assign in the Contact Gadget and will show in the Users List.
IM - 4492: Added Scheduler task "LDAP - Sync LDAP Contacts" to support LDAP Contacts. This task updates imported LDAP users with any changes made on the LDAP server. This task must be manually created at at the desired interval in order to automatically update the user based on the server information. |

MySQL Replication Monitor:
IM - 3936: Added MySQL Replication monitoring to Admin Settings.
MySQL Replication Monitor displays the enabled/disabled status of replication, and periodically checks the replication state and displays the result in Admin Settings.
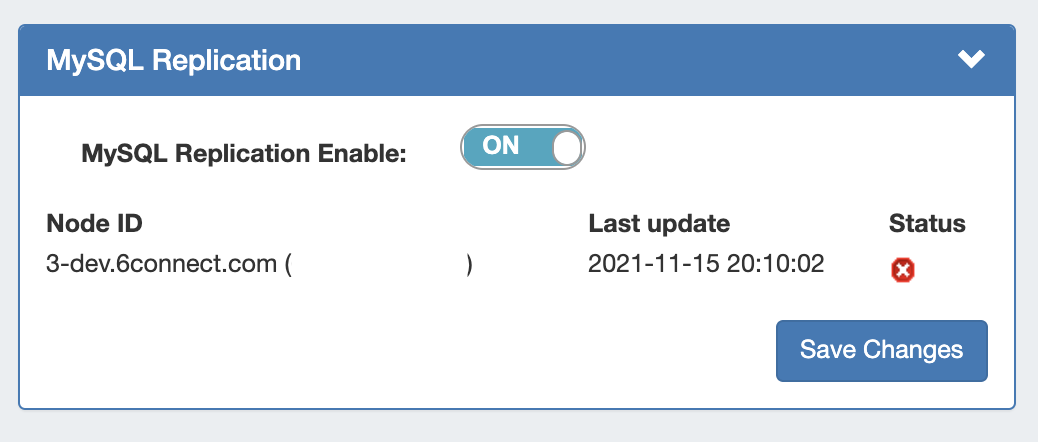
Note: The associated "MySQL Replication Monitor" Scheduler task must be created for the desired interval in order
...
for the monitor to execute. See Scheduler Tab updates, below, or the the Scheduler for details on setting up tasks.
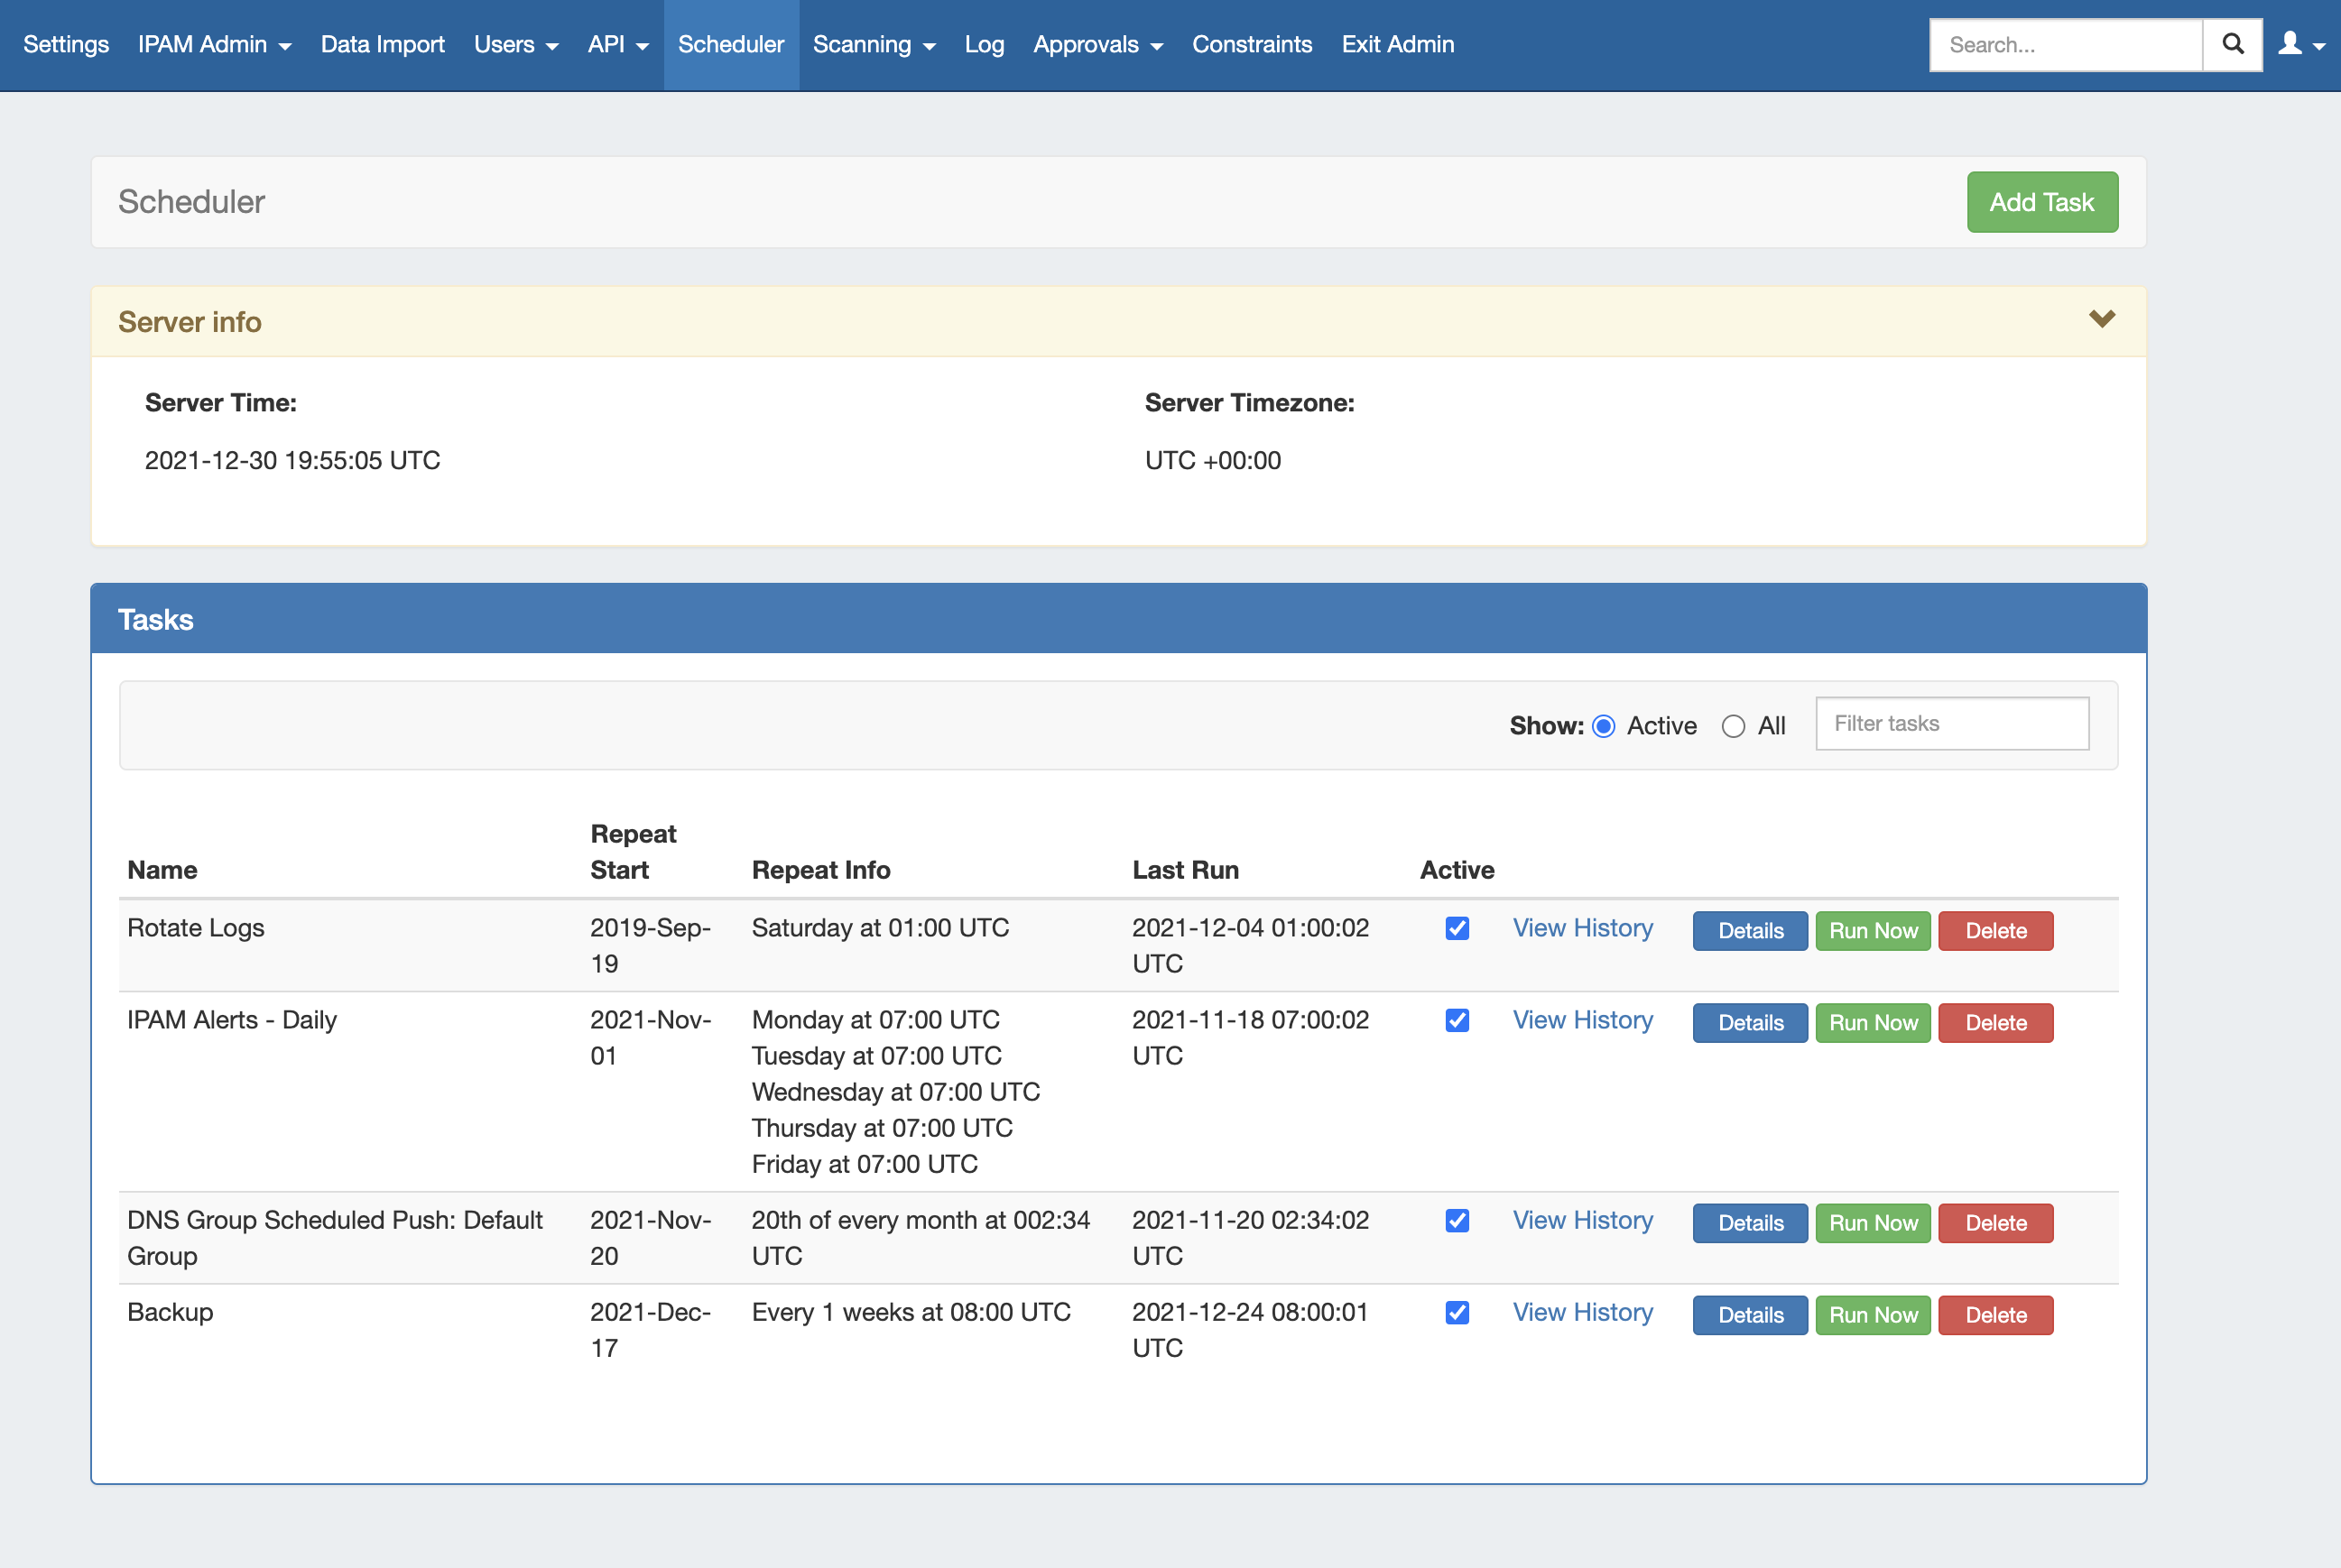
Scheduler Tab Updates
Various improvements have been made to the Scheduler Tab:
...
Added new tasks to support new features:
- IM - 3940: ACP - Run Workflow: Runs the selected ACP Workflow at the scheduled time. Requires an ACP license and ACP settings successfully configured under Admin → Settings → ACP Settings.
- IM - 4492: LDAP - Sync LDAP Contacts: Connects to the LDAP server set up in Admin Settings → Auth → Authentication Options -> LDAP and updates imported LDAP users with any changes.
- IM - 3936: MySQL - Replication Monitor:Runs the MySQL Replication Monitor and provides status information when "MySQL Replication" is enabled under Admin Settings → Application → "MySQL Replication".
- IM - 3942: DNS - Queue Push:If "Enable DNS Push Queue" is set to ON in Admin → DNS → Push Settings, this task must be created in order for the scheduler to run at the desired interval to execute the queue.
...
Multiple minor improvements have been made to the Scheduler UI for ease of access and product consistency.
Related Scheduler improvements include:
...
CFR - 153: Updated Permissions groups Groups to allow non-admin users to have the ability to view and push view (with 'read' permissions) and work with DNS/DHCP servers if appropriate per-server permissions are set (via "Perms" button).
CFR - 194: Added UI notification to IPAM Manage when default filters are enabled for an aggregate
...
IM - 3806: Optimized Resource Tree for better loading and searchabilityIM - 3937: Improvements to Dynamic Updates autogenerated records handling
IM - 3839: Fixed IPAM Manage Aggregate search box for IPv6 to return results if user includes leading zero that ProVision truncates
...
IM - 3928: Added "Directory permissions are not set! Please run configDir.sh!" message to main Admin page when configDir.sh has not been run
IM - 3937: Improvements to Dynamic Updates autogenerated records handling
IM - 3942: Added more customizable push settings to DNS Global Settings and related task to Scheduler tab
...