| HTML |
|---|
<div id="google_translate_element"></div>
<script type="text/javascript">
function googleTranslateElementInit() {
  new google.translate.TranslateElement({pageLanguage: 'en'}, 'google_translate_element');
}
</script>
<script type="text/javascript" src="//translate.google.com/translate_a/element.js?cb=googleTranslateElementInit"></script> |
Working with IP Aggregates
![]()
IPAM Aggregates
IP Aggregates are edited and managed from the IPAM Tab and IPAM Manage page.
Aggregates may be viewed, filtered, created, and deleted from the IPAM Tab, and setting IPAM alerts and using Aggregate Templates are performed in IPAM Manage.
For an overview of the IPAM Tab, see IPAM Tab. For information on working with individual blocks, continue to Working with IP Blocks.
| Table of Contents |
|---|
Working with IP Aggregates - Common Tasks
Add an Aggregate
On the main IPAM Tab, expand the "Add Aggregate" module. Once clicked, you get a more detailed screen to add an aggregate block.
![]()
Enter in the desired IPv6 / IPv6 CIDR and RIR, at minimum. Region, Tags, Resource, Domain, VLAN, and subassignment status are optional, if desired.
If creating the aggregate for a specific use, keep in mind that certain uses may require additional information is provided in the aggregate, such as requiring 1918 space (DHCP Pools), a region to be provided (DHCP Customer Configuration Gadget), or a resource to be assigned with subassignments enabled. In such cases, it may be useful to assign a specific IPAM tag to associate with that use to assign at aggregate creation (such as "DHCP" )
When done, click "Add Aggregate". The Aggregate will be listed under the Host Utilization and Aggregate Blocks list of the IPAM Tab.
Delete an Aggregate
Aggregates may be deleted from the Gear Icon in the top right corner of their Host Utilization box display.

A warning dialog box will appear confirming the deletion, and noting whether assigned blocks exist in the aggregate that would also be deleted.
Merge Aggregates
Adjacent Top Level Aggregates may be merged into a single aggregate, if meeting validity criteria (adjacent, but not overlapping).
To do so, right click anywhere on the Aggregate Blocks list, and choose "Select Aggregates" from the menu.
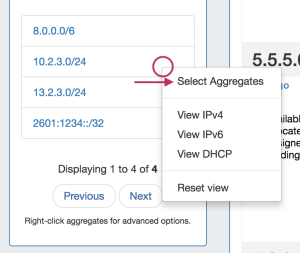
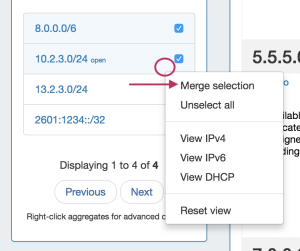
Then, click the check boxes for the two aggregates you wish to merge, and then right click and select "Merge Selection".
A confirmation dialog box appears to confirm the blocks to merge, and proceed with testing to see if the merge is valid. Click "Test Merge" to proceed.
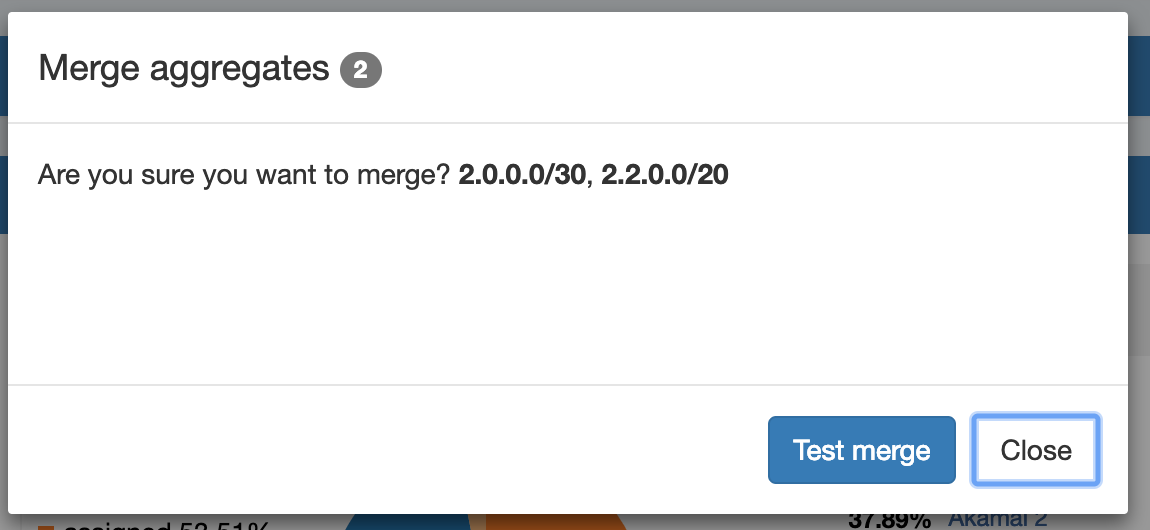
ProVision will pre-test the merge, and if valid, give you the option to proceed.
Otherwise, an error message will display detailing why the aggregates are unable to be merged.
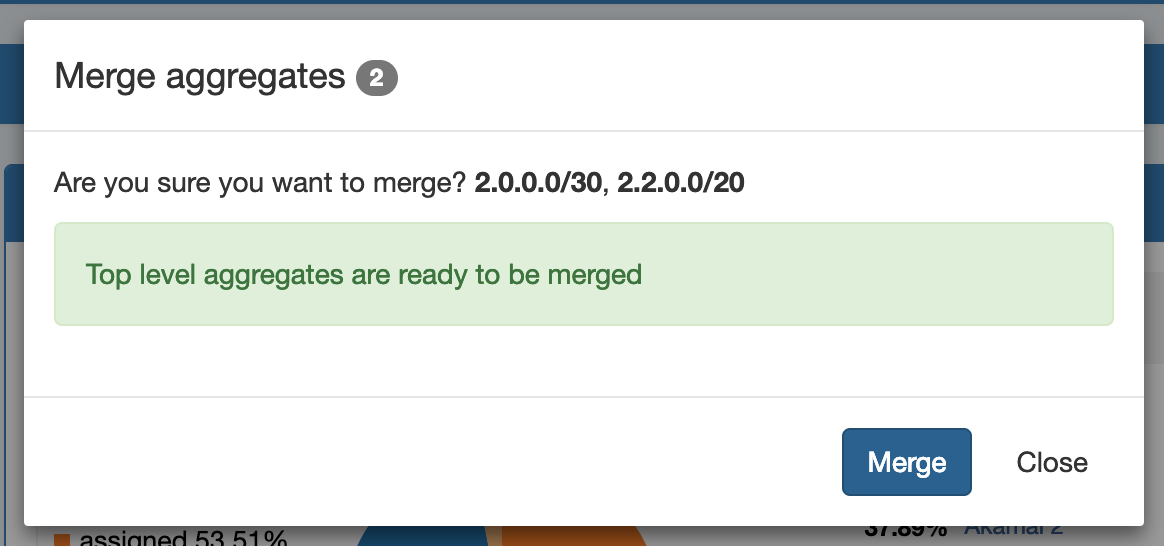
Complete the aggregate merge by clicking "Merge".
To Exit out of the selection prior to merging, select "Close".
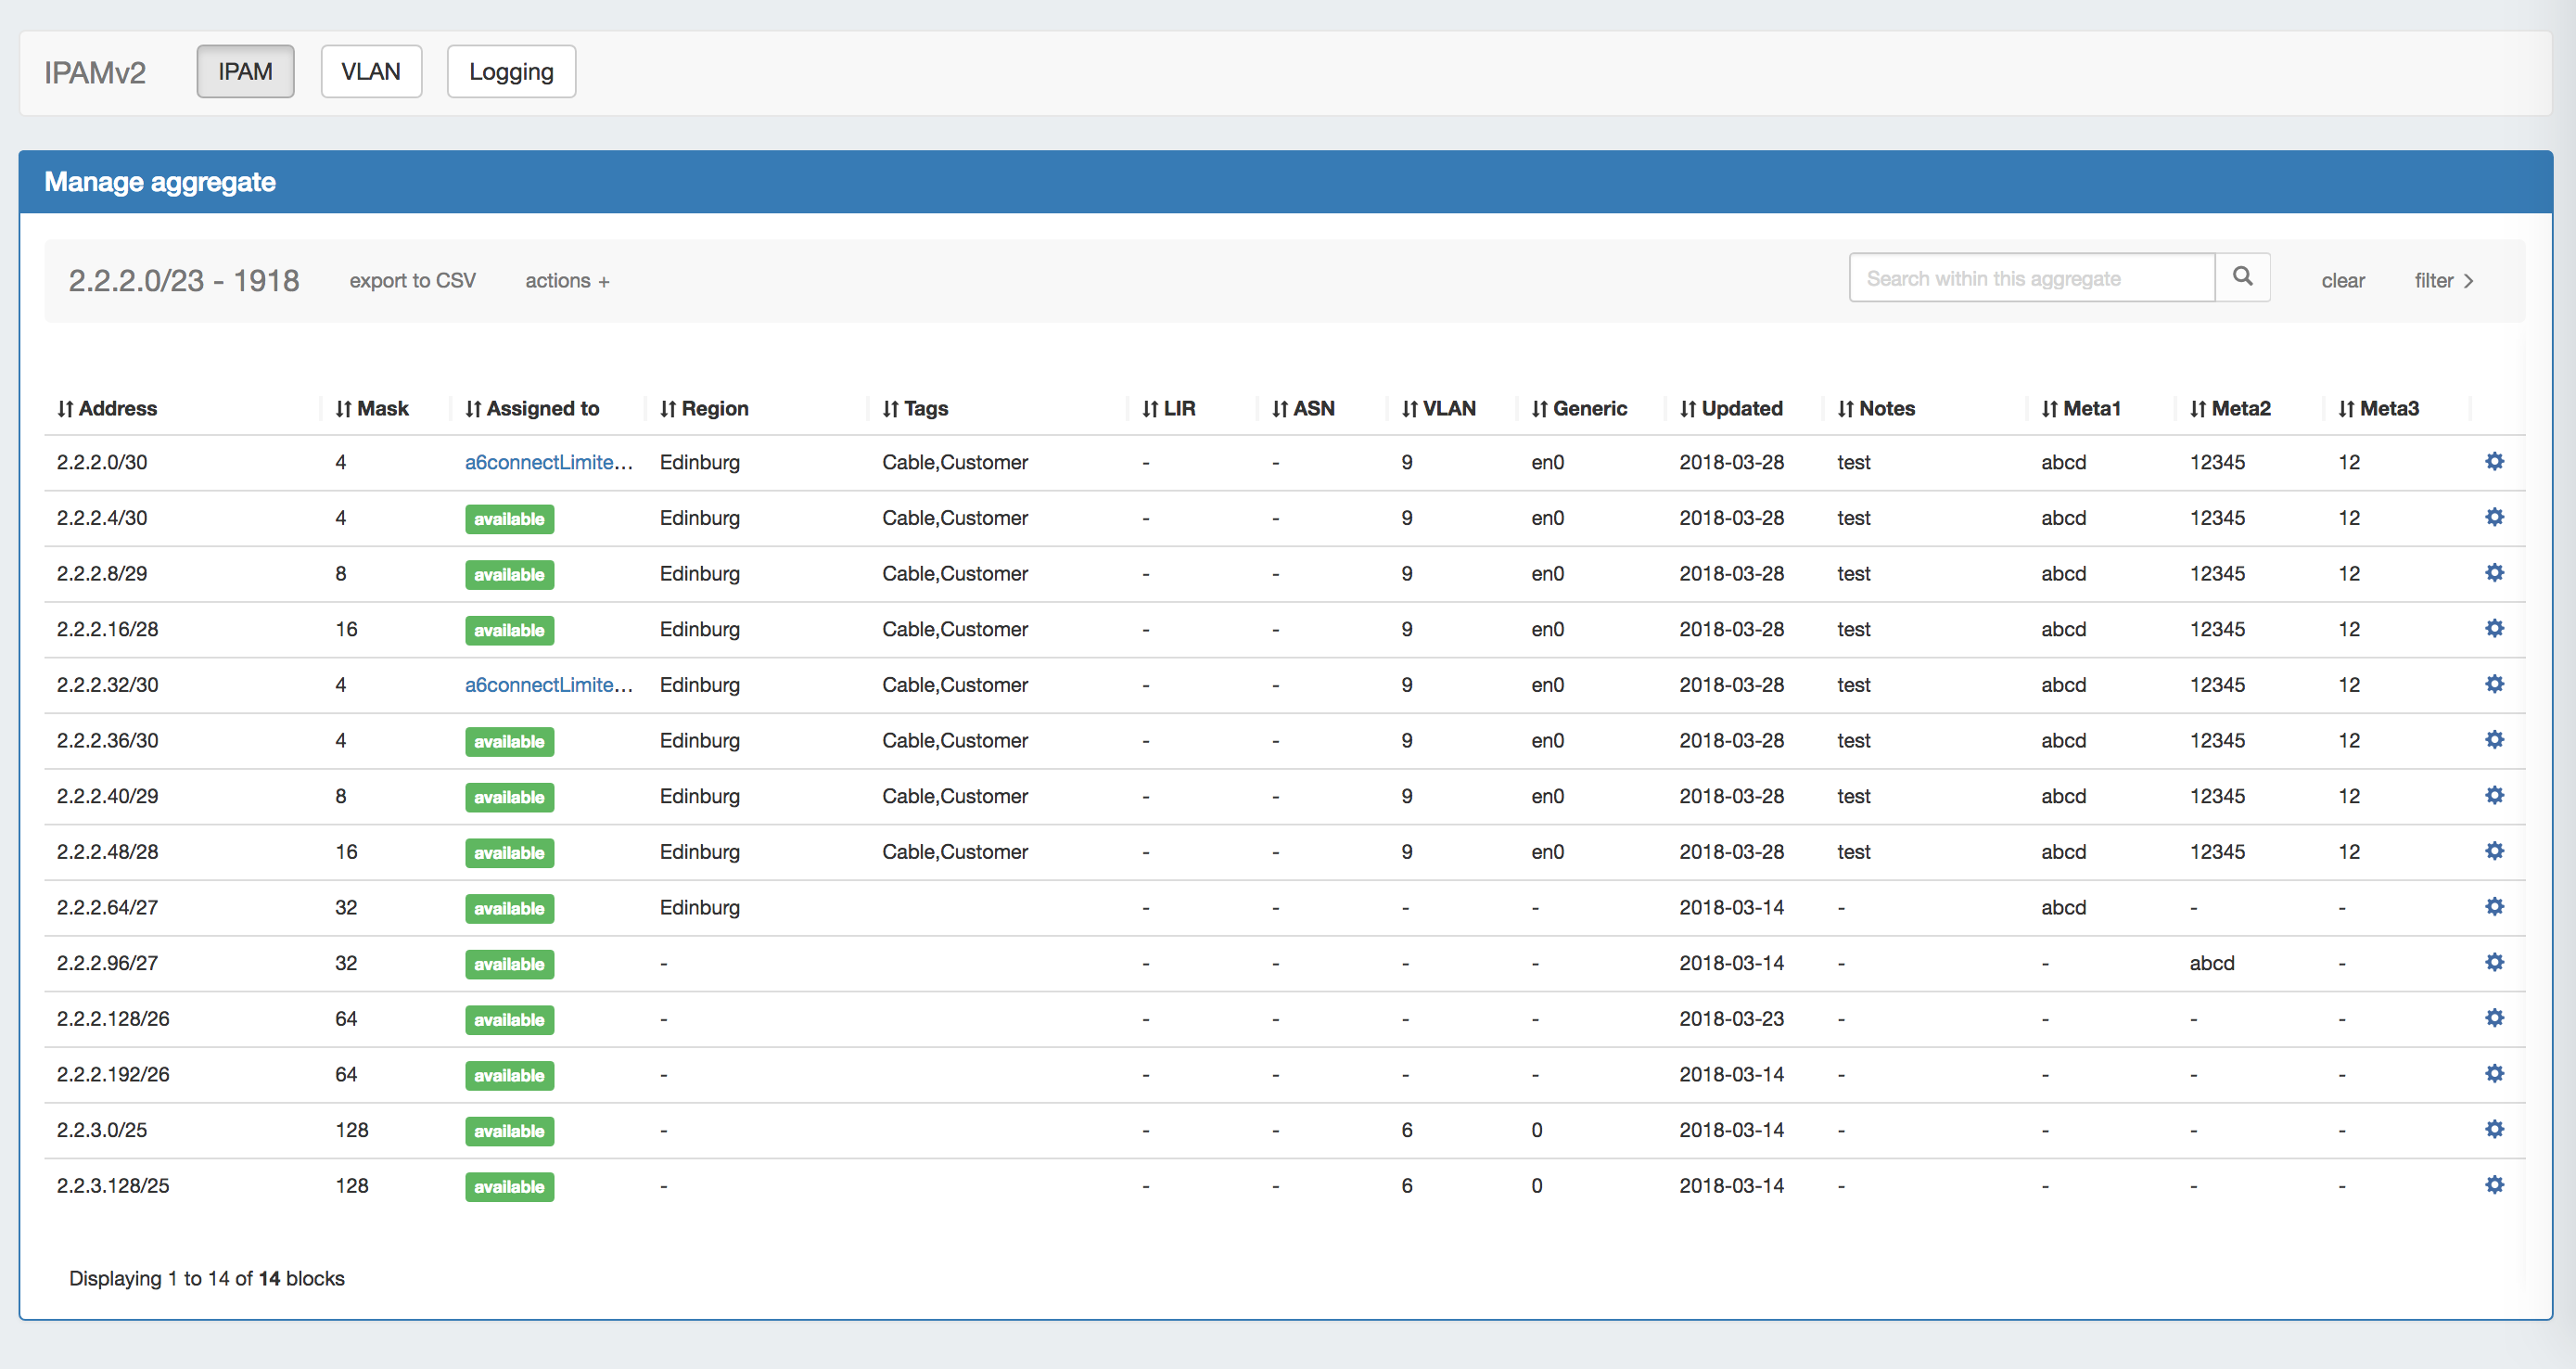
Manage an Aggregate
Managing an aggregate is mostly performed in the IPAM Manage screen for the aggregate.
From IPAM Manage, you can perform the aggregate template actions of Auto-Split / Clean-Up, Set IPAM Alert information, export the block list, as well as manage individual blocks.
For detailed information on using the IPAM Manage screen and managing at a block level, see Working with IP Blocks.
Open IPAM Manage for an Aggregate
Open the IPAM Manage screen for a block by:
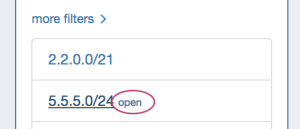
- Searching for the block in the Global search, and clicking on the resulting CIDR
- Clicking the "Open" link in the aggregate blocks list from the IPAM tab.
- Clicking on the CIDR header of the Aggregate Block Host Utilization module, or selecting "Edit" from the module's Gear Icon from the IPAM tab.

- Clicking on the CIDR listed in the Aggregate Info box in IPAM Maps
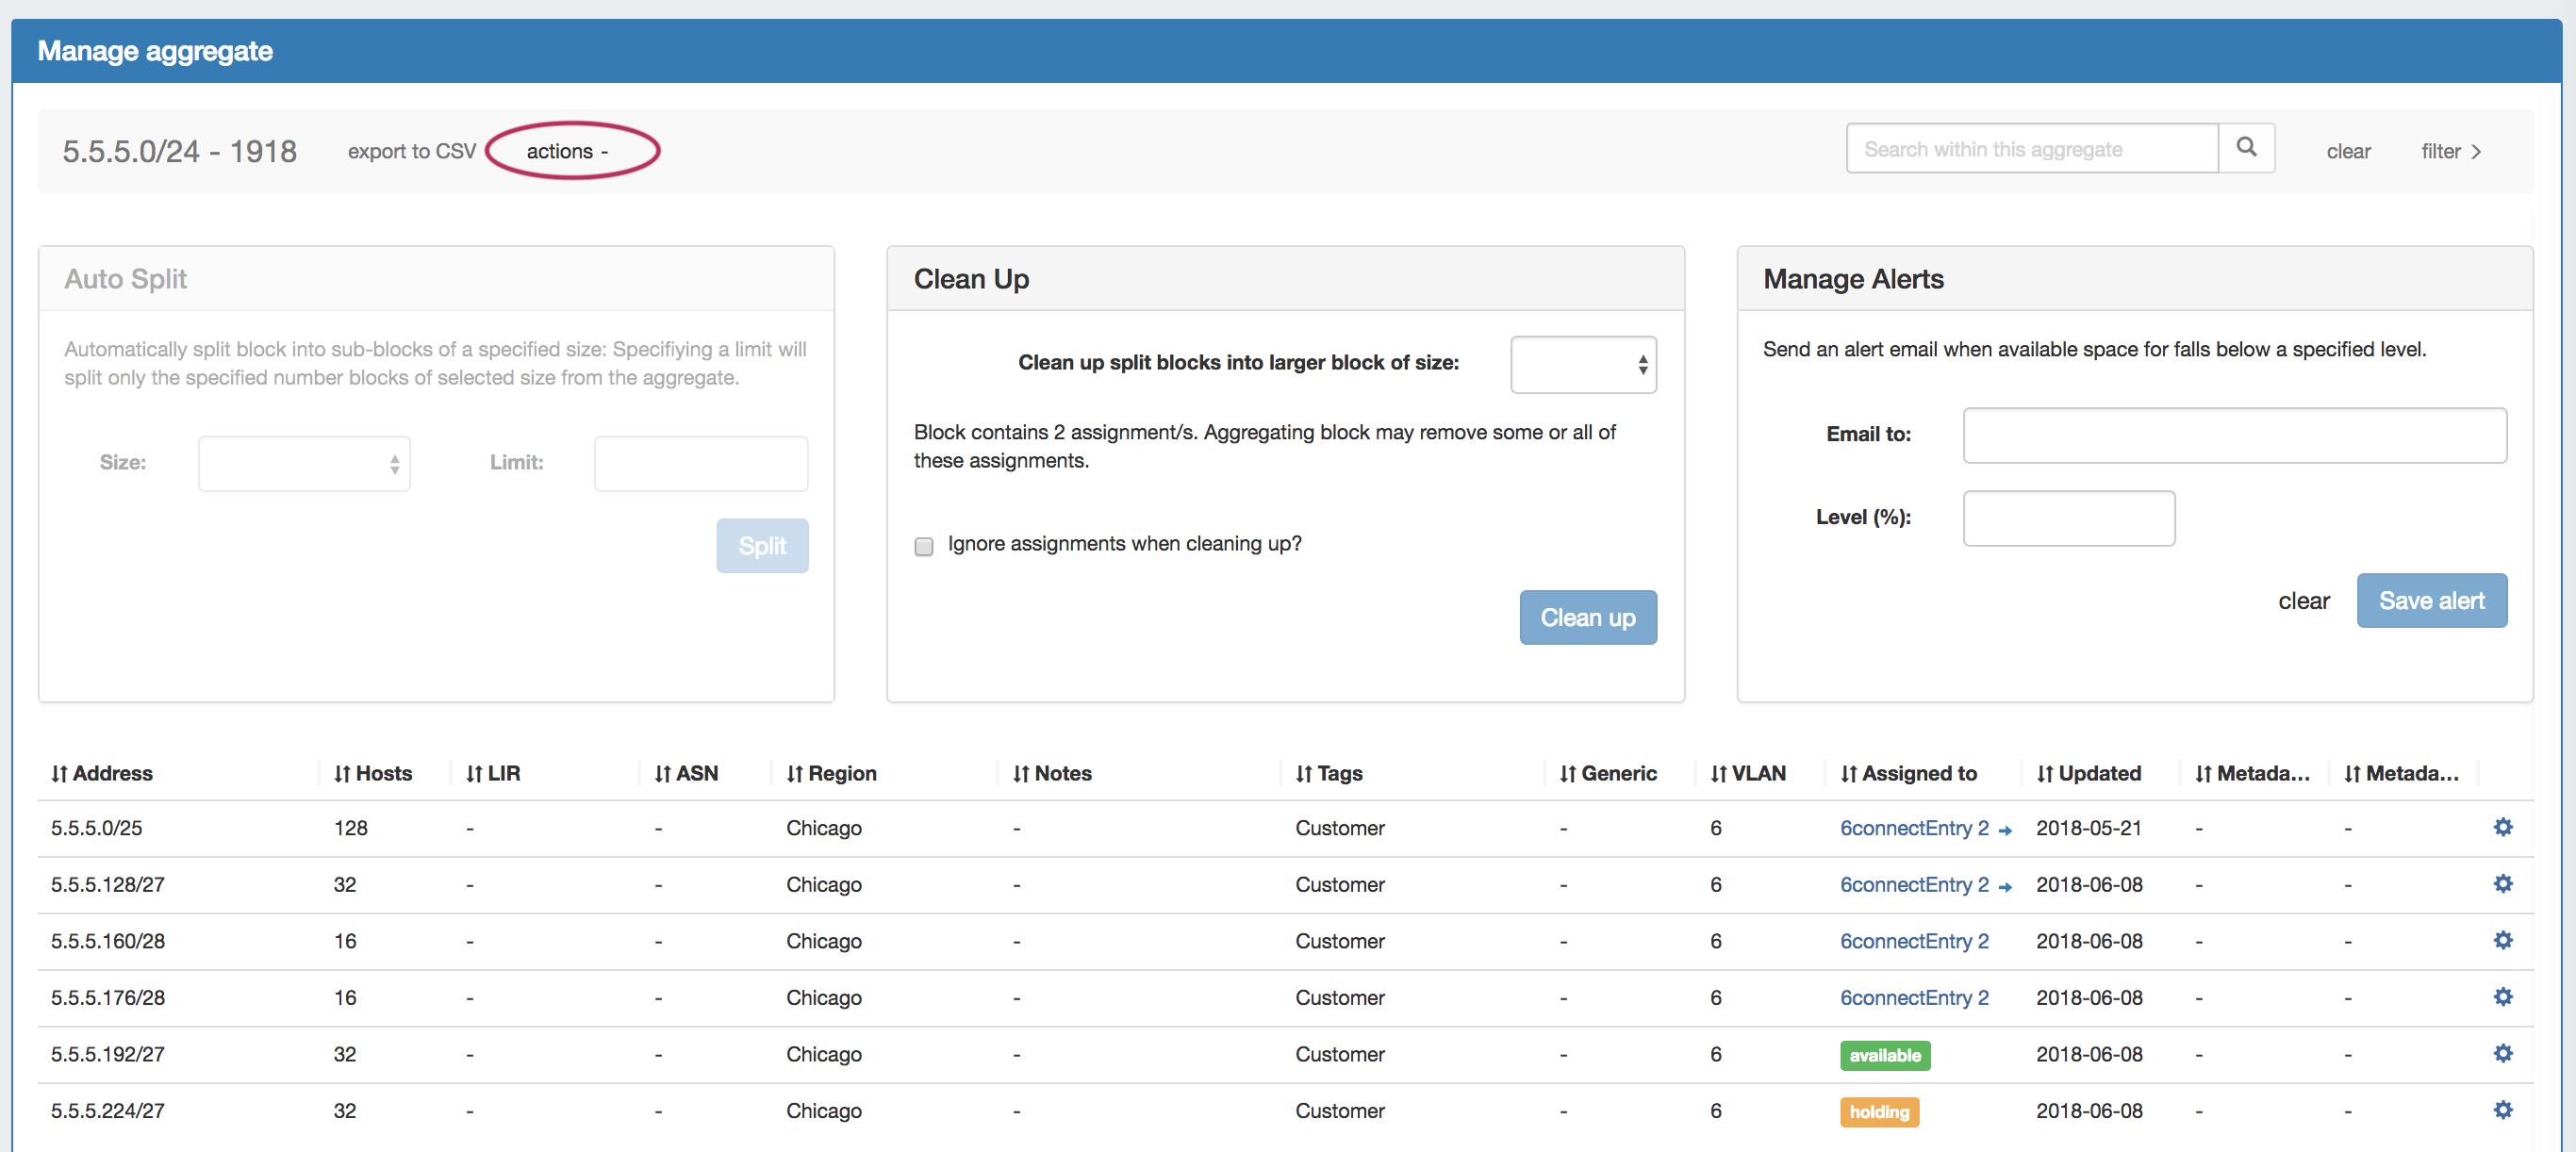
Aggregate Actions
Open up aggregate level actions in IPAM Manage by clicking on the "Actions" link in the Manage Aggregate header.
Three options are available - Auto Split, Clean Up, and Manage Alerts.
| Expand | ||
|---|---|---|
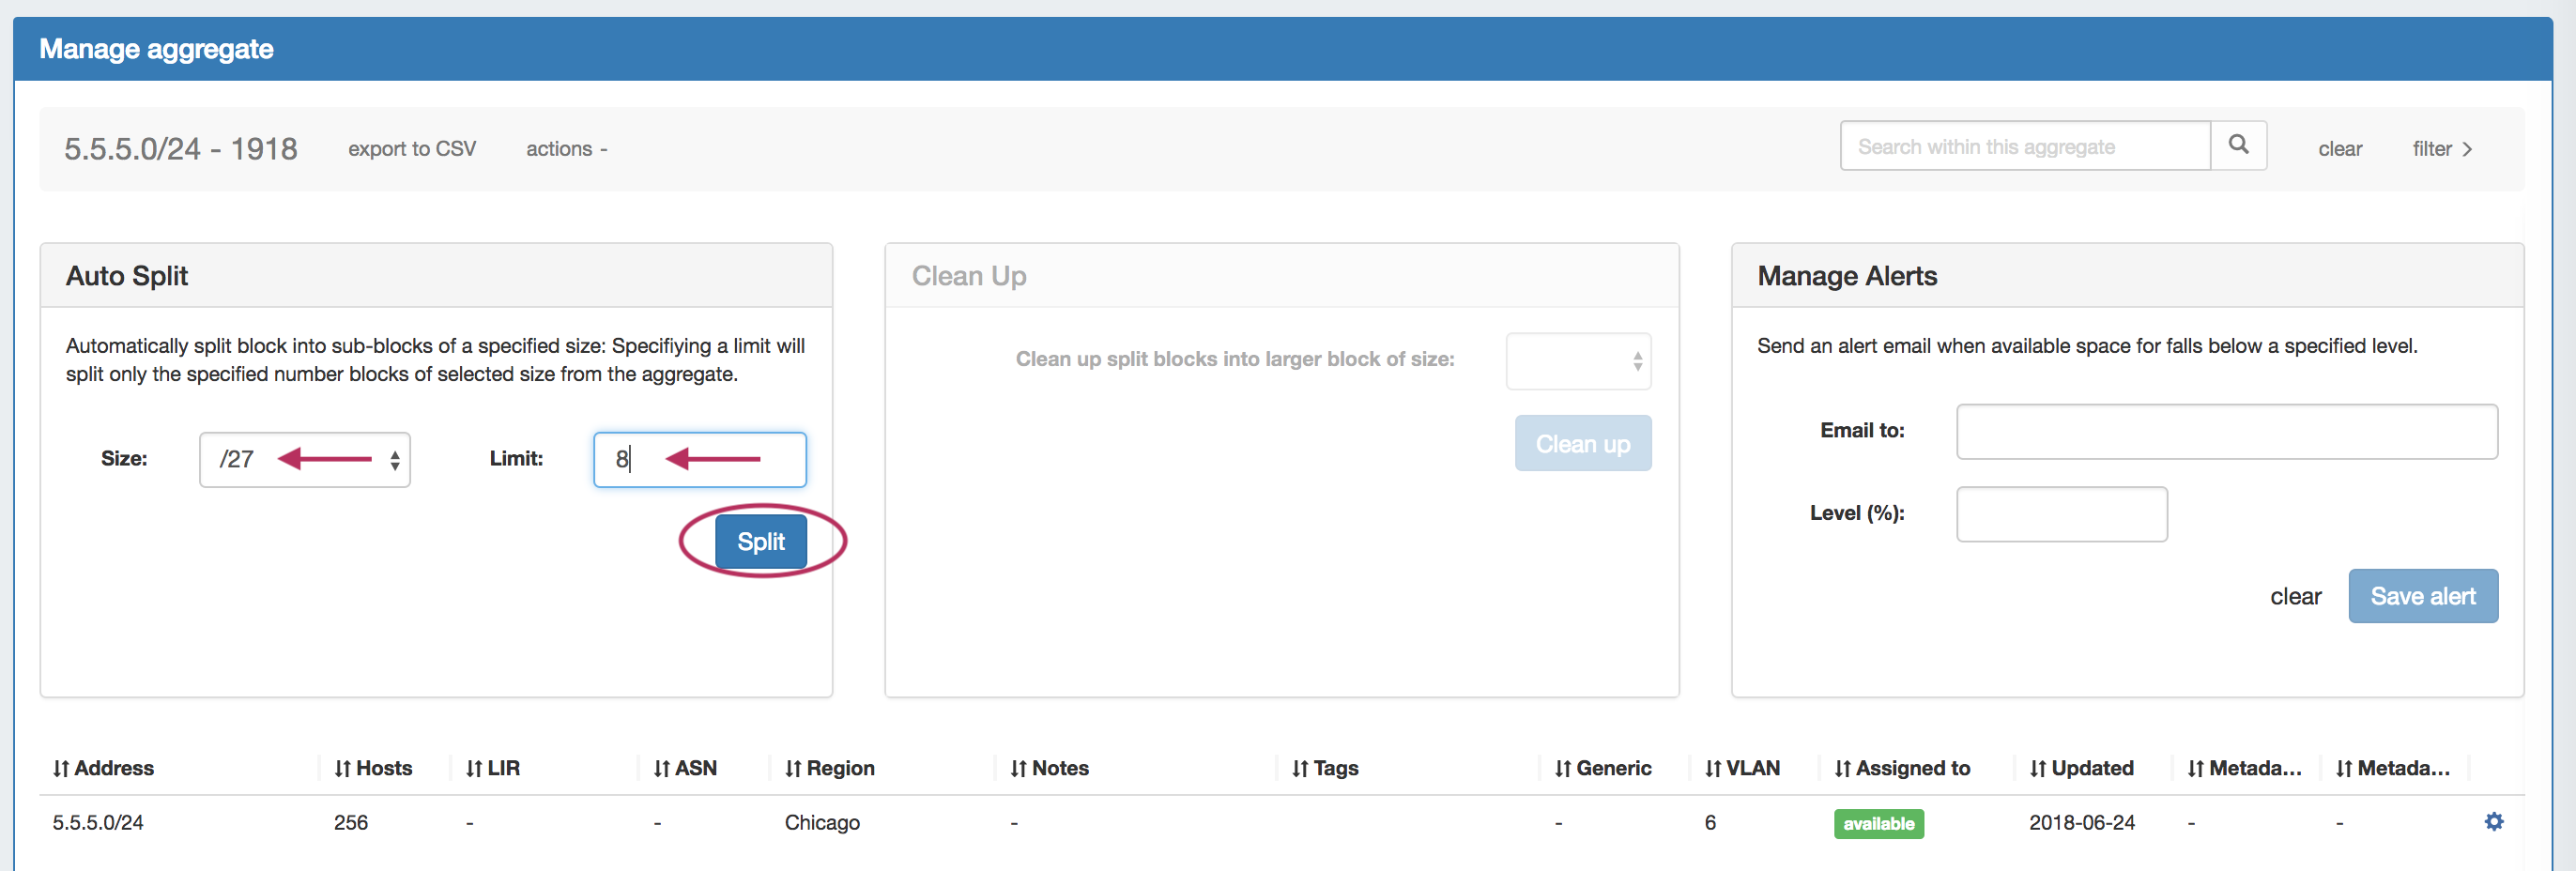
Auto Split AggregateAuto Split an available aggregate into blocks of a specific size, up to a specific quantity of blocks by selecting "Size" and "Limit" under "Auto Split". The block limit must be a power of two, or an error will appear. When done, click "Split".
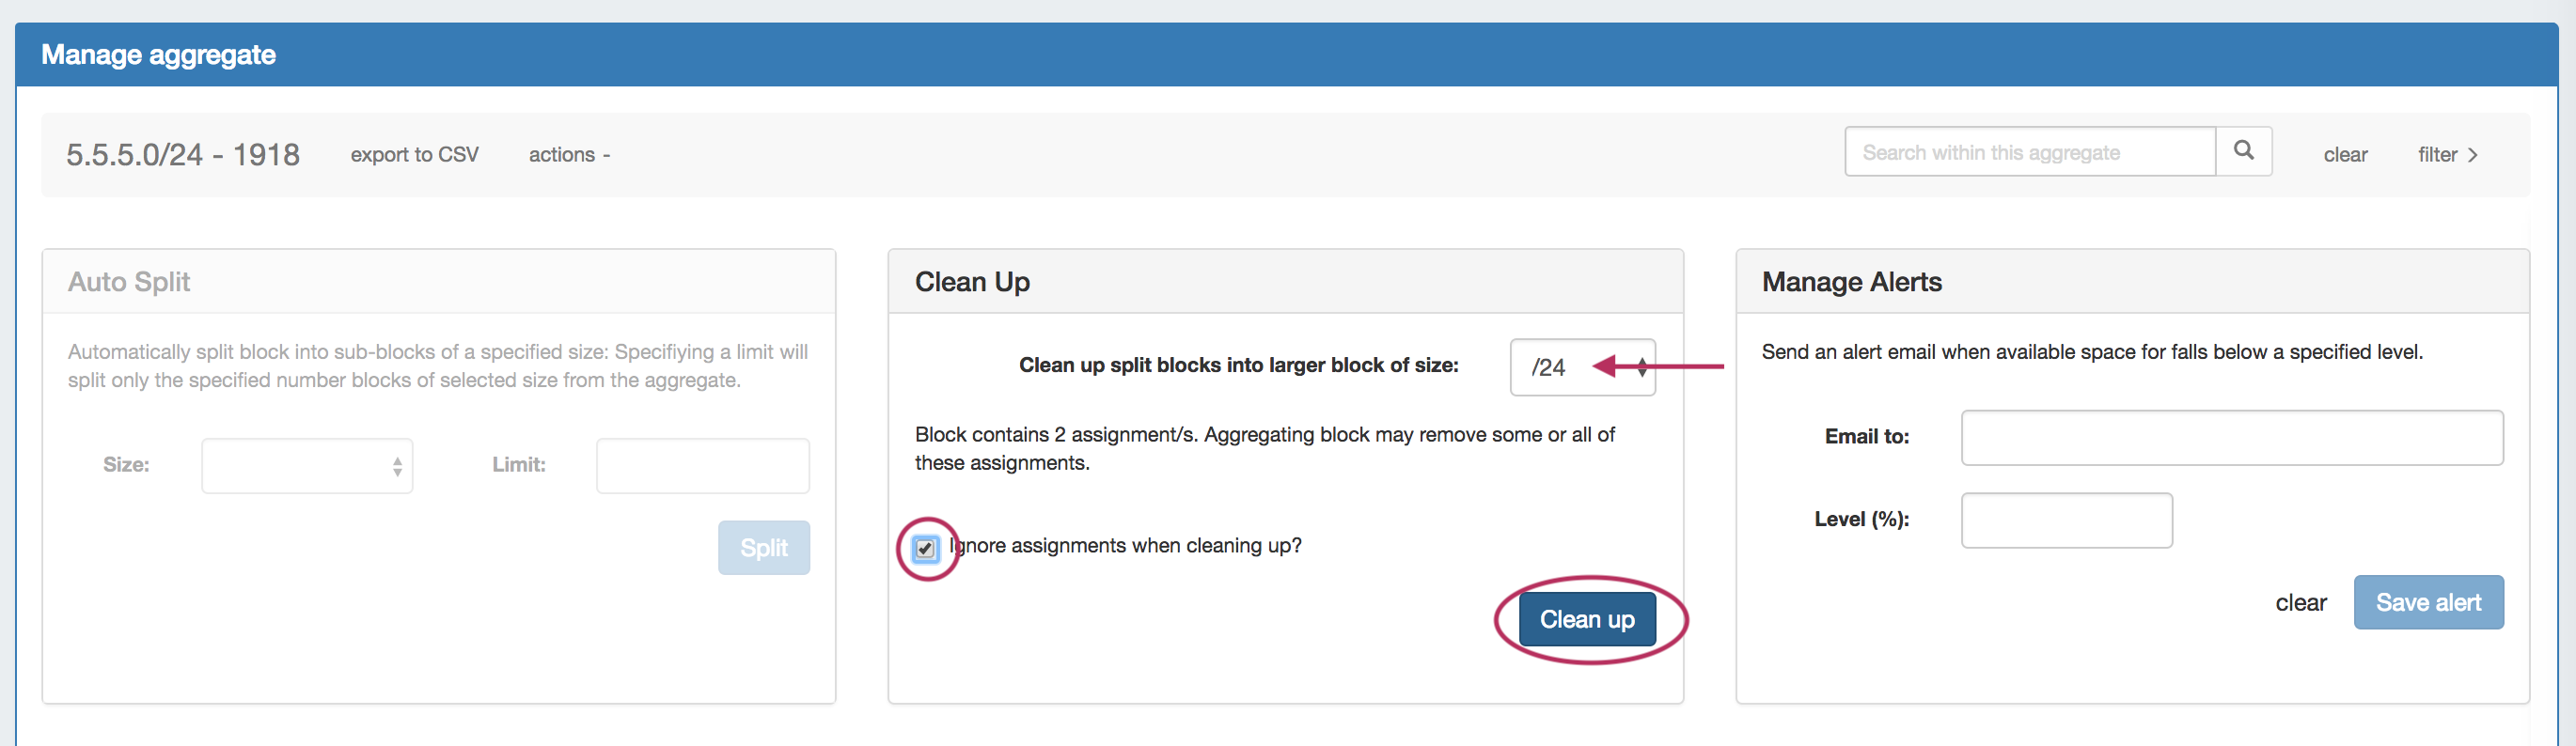
Clean Up AggregateClean up an Aggregate into fewer blocks of a specific size, by selecting your desired block size and clicking "ignore assignments" (if blocks have assignments that would prevent merging). When done, click the "Clean Up" button. All blocks will be merged to the set size and reset to available.
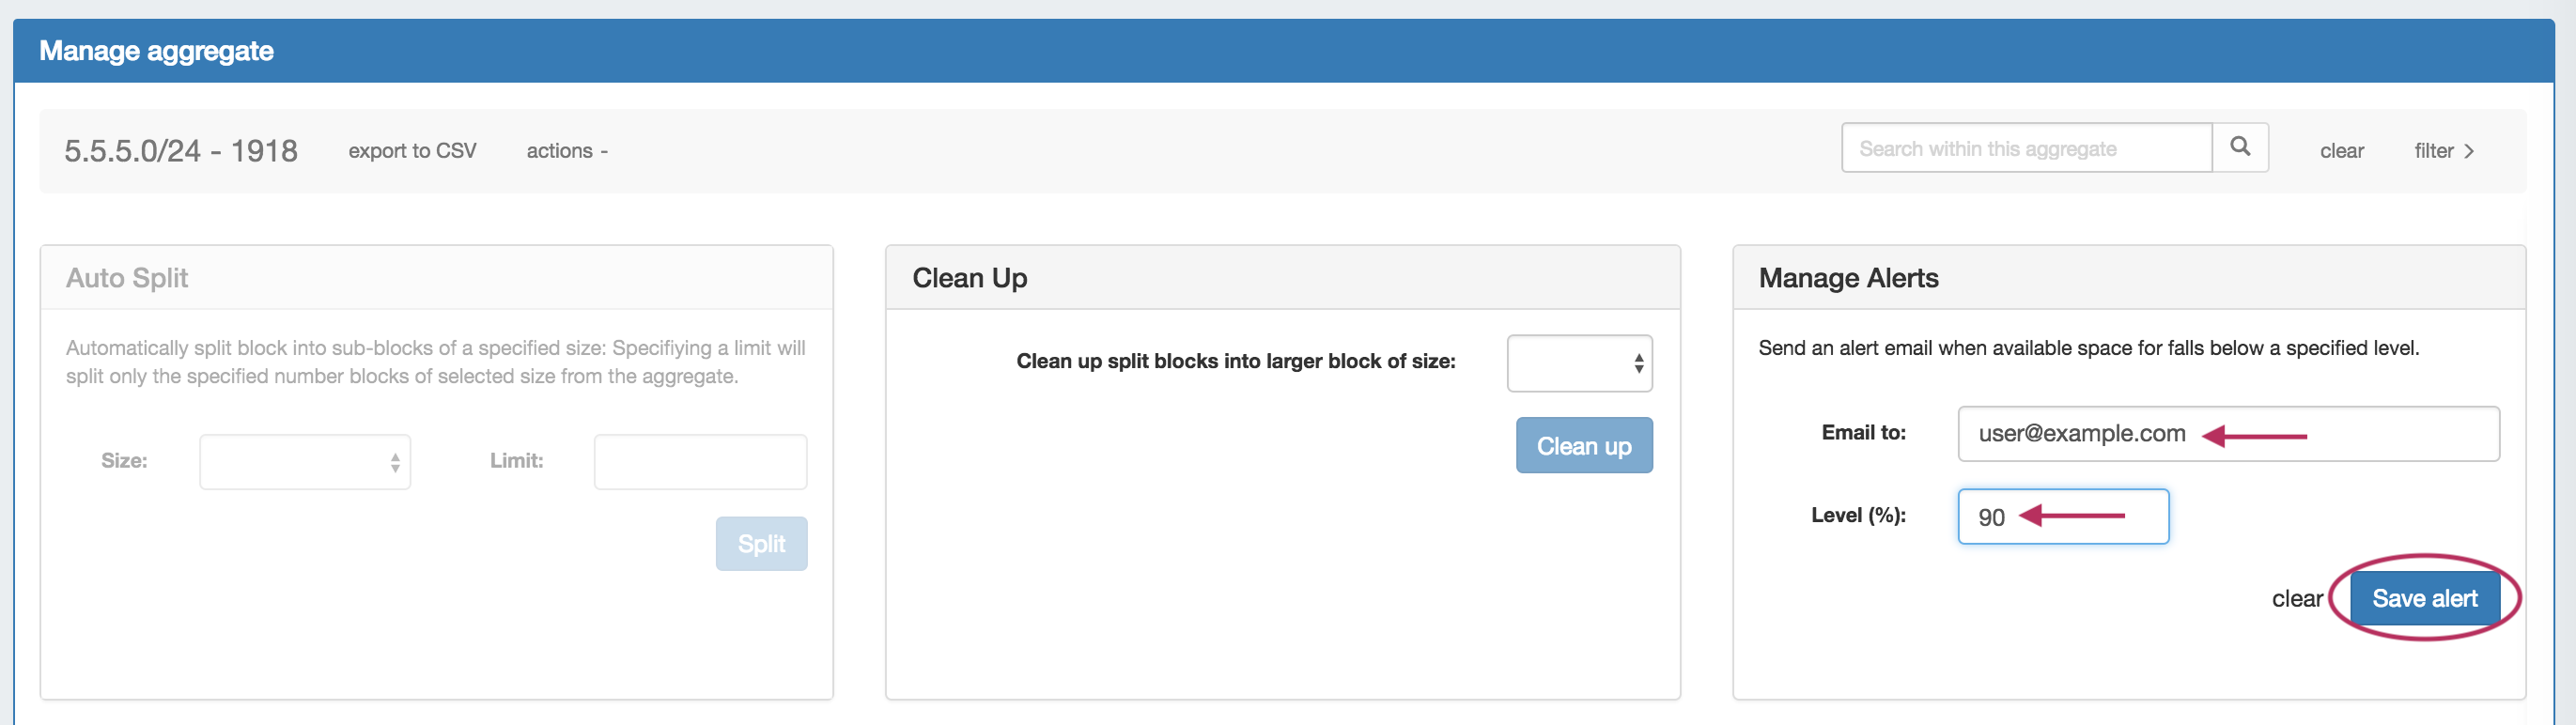
Set Aggregate AlertsEnable or clear aggregate alert emails for the aggregate by setting an email address and utilization percentage level. When the aggregate is utilized to the set percent, an email alert will be sent to the provided address.
When done, click "Save Alert". To clear an existing alert, hit "Clear Alert", and the alert information will be removed and status saved. |
Working with IP Blocks
For additional information on performing IPAM tasks and working with blocks, continue on to Working with IP Blocks.
Additional Information
For additional information on working with the IPAM system in ProVision, see the following areas:
- IPAM Tab
- Gadgets (IPAM and IPAMv2 Gadgets)
- Working with IP Rules
- IPAM Administration