...
| HTML |
|---|
<div id="google_translate_element"></div>
<script type="text/javascript">
function googleTranslateElementInit() {
  new google.translate.TranslateElement({pageLanguage: 'en'}, 'google_translate_element');
}
</script>
<script type="text/javascript" src="//translate.google.com/translate_a/element.js?cb=googleTranslateElementInit"></script> |
IP Block Management
![]()
Managing IP Blocks
...
From either area, you can perform standard block-level actions such as assign, unassign, split, merge, edit attributes, track NAT associations, and more.
The primary difference between the two areas is that IPAM Manage shows all blocks (or all blocks under an aggregate), regardless of assignment or status, where the IPAM Gadget shows only the blocks assigned to the specific resource that you are currently viewing on the Resource Entry Page. However, the IPAM Gadget has more advanced assignment options and criteria available (Direct Assign, Smart Assign, Smart Browse).
...
| Expand | ||
|---|---|---|
| ||
IPAM Manage Features
IPAM Manage is accessed from: the IPAM Tab → Edit Aggregate / Aggregate CIDR; IPAM Tab →Advanced button; and most block CIDR Links in ProVision. Here, you can:
|
...
| Table of Contents |
|---|
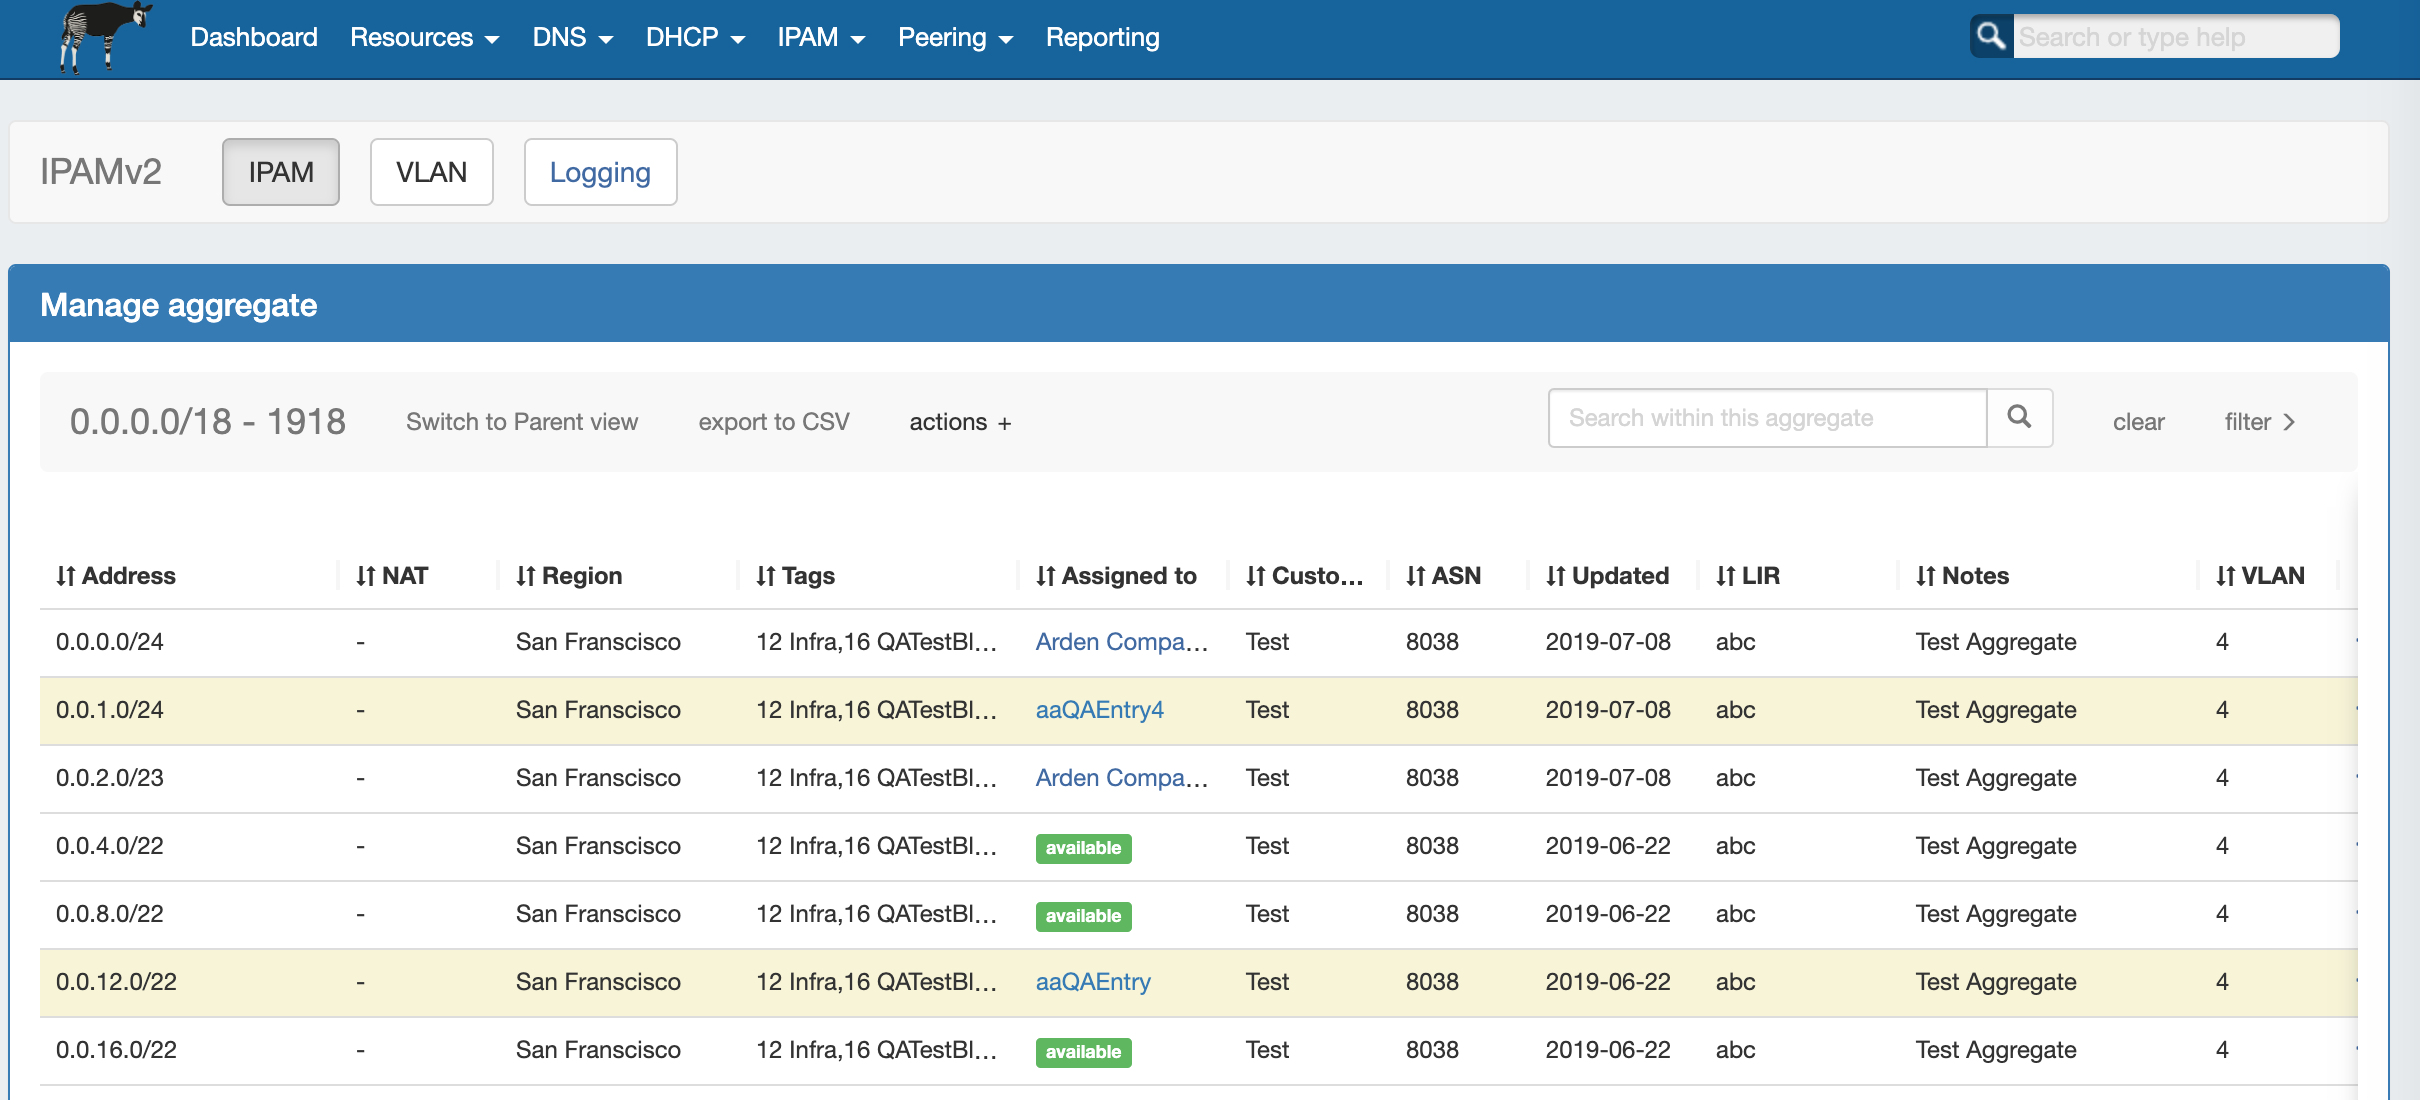
Working in IPAM Manage
In IPAM Manage, you can manage aggregate level actions, such as Split , Clean Up, Alerts, and Export, as well as viewing and managing individual blocks. In IPAM Manage - Advanced, aggregate-level actions are not available.
...
The list will sort between ascending and descending order for that field.


Filter Blocks
Filter the block list in IPAM Manage by toggling the "Filter +" link in the top right corner of the aggregate header.
A flyout will appear with filter criteria options. Type in or search for the term under your desired field, and hit "Apply". When done, click "clear". To hide the filter flyout, just click the "filter -" link again.
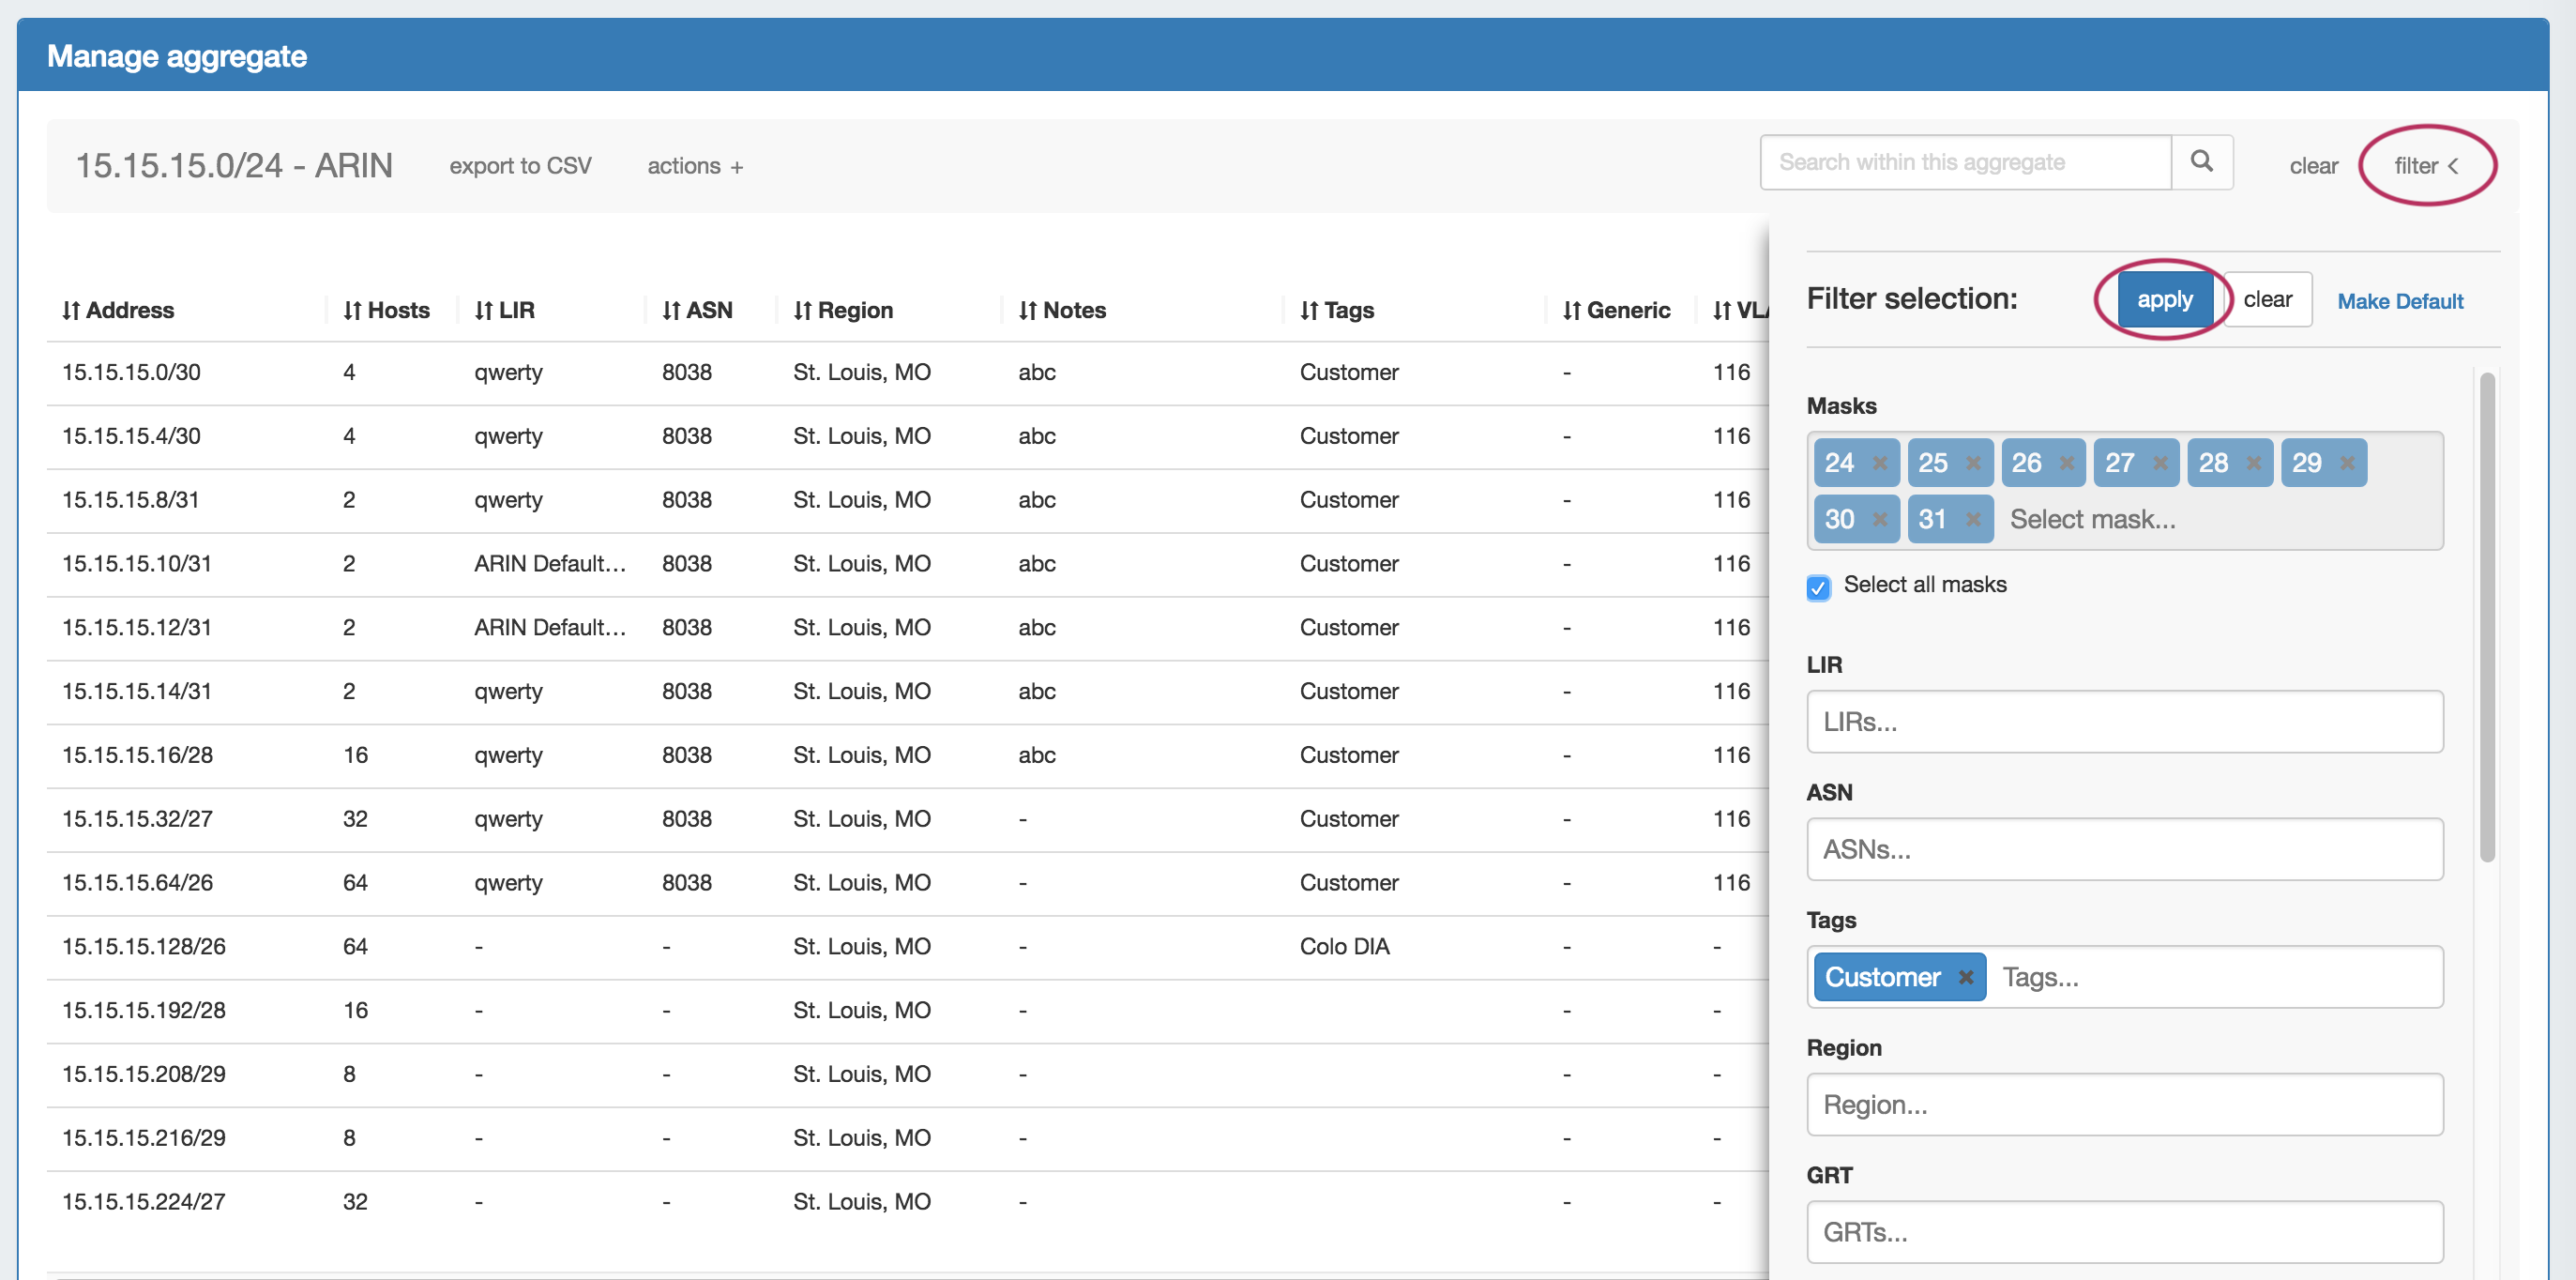
Type in or search for the term under your desired field, and hit "Apply".
...
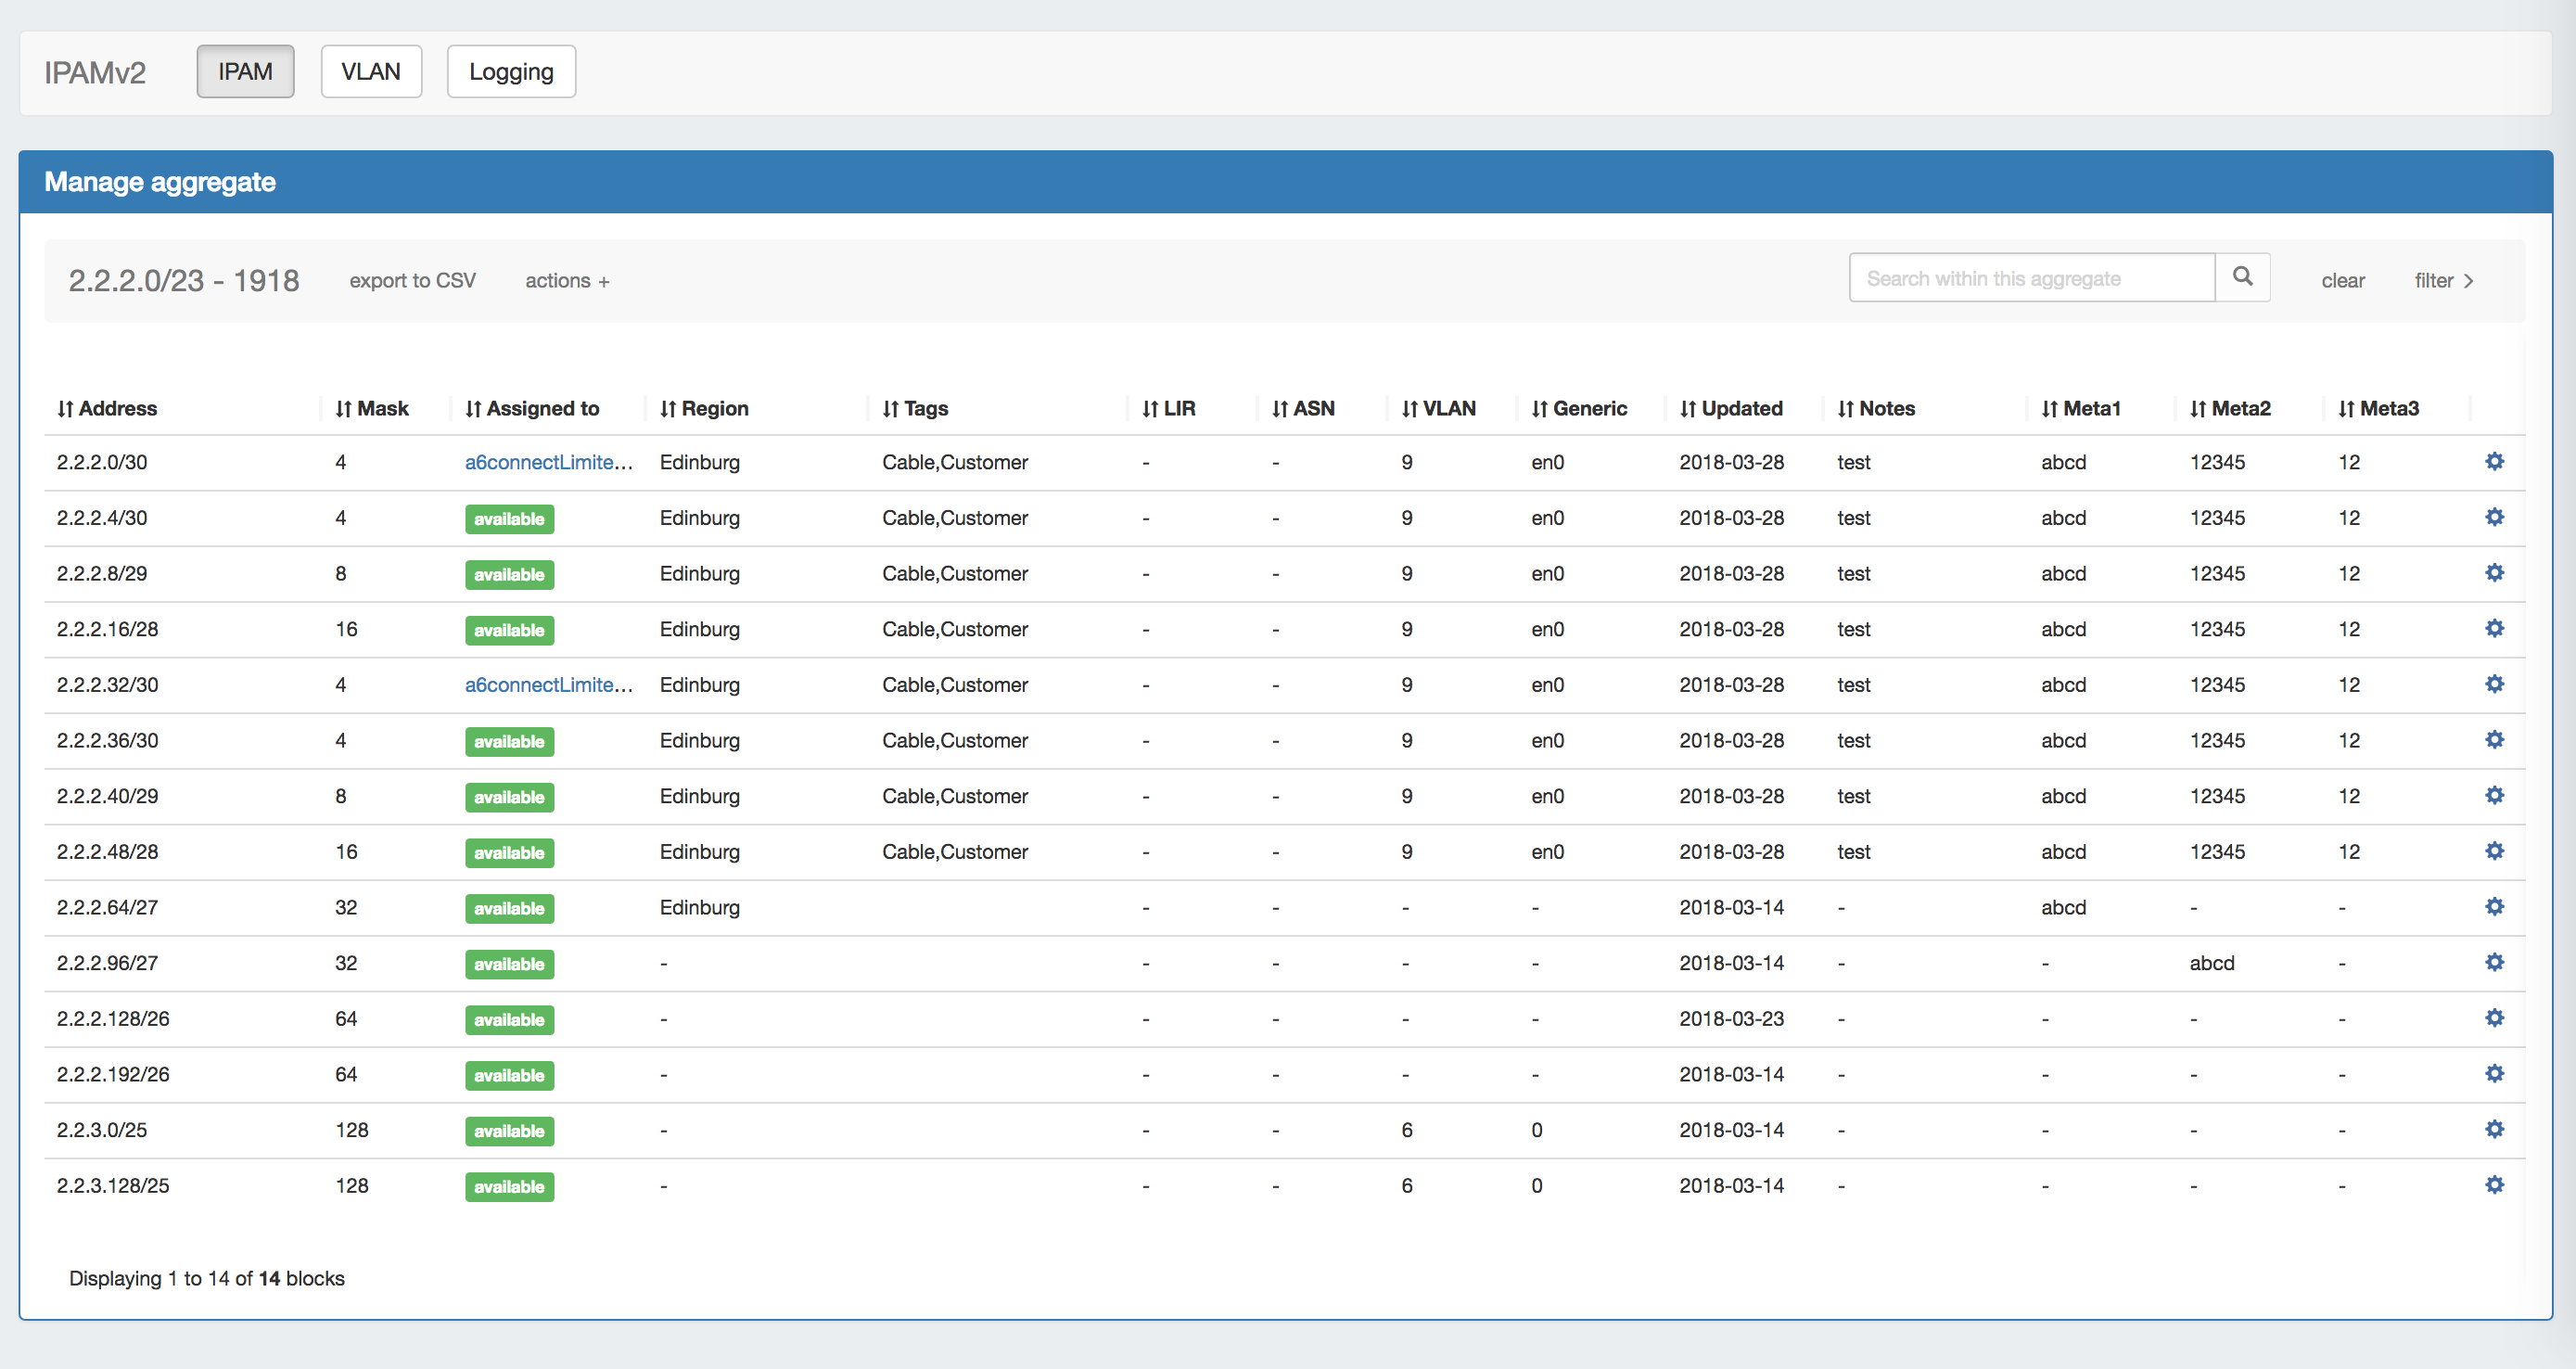
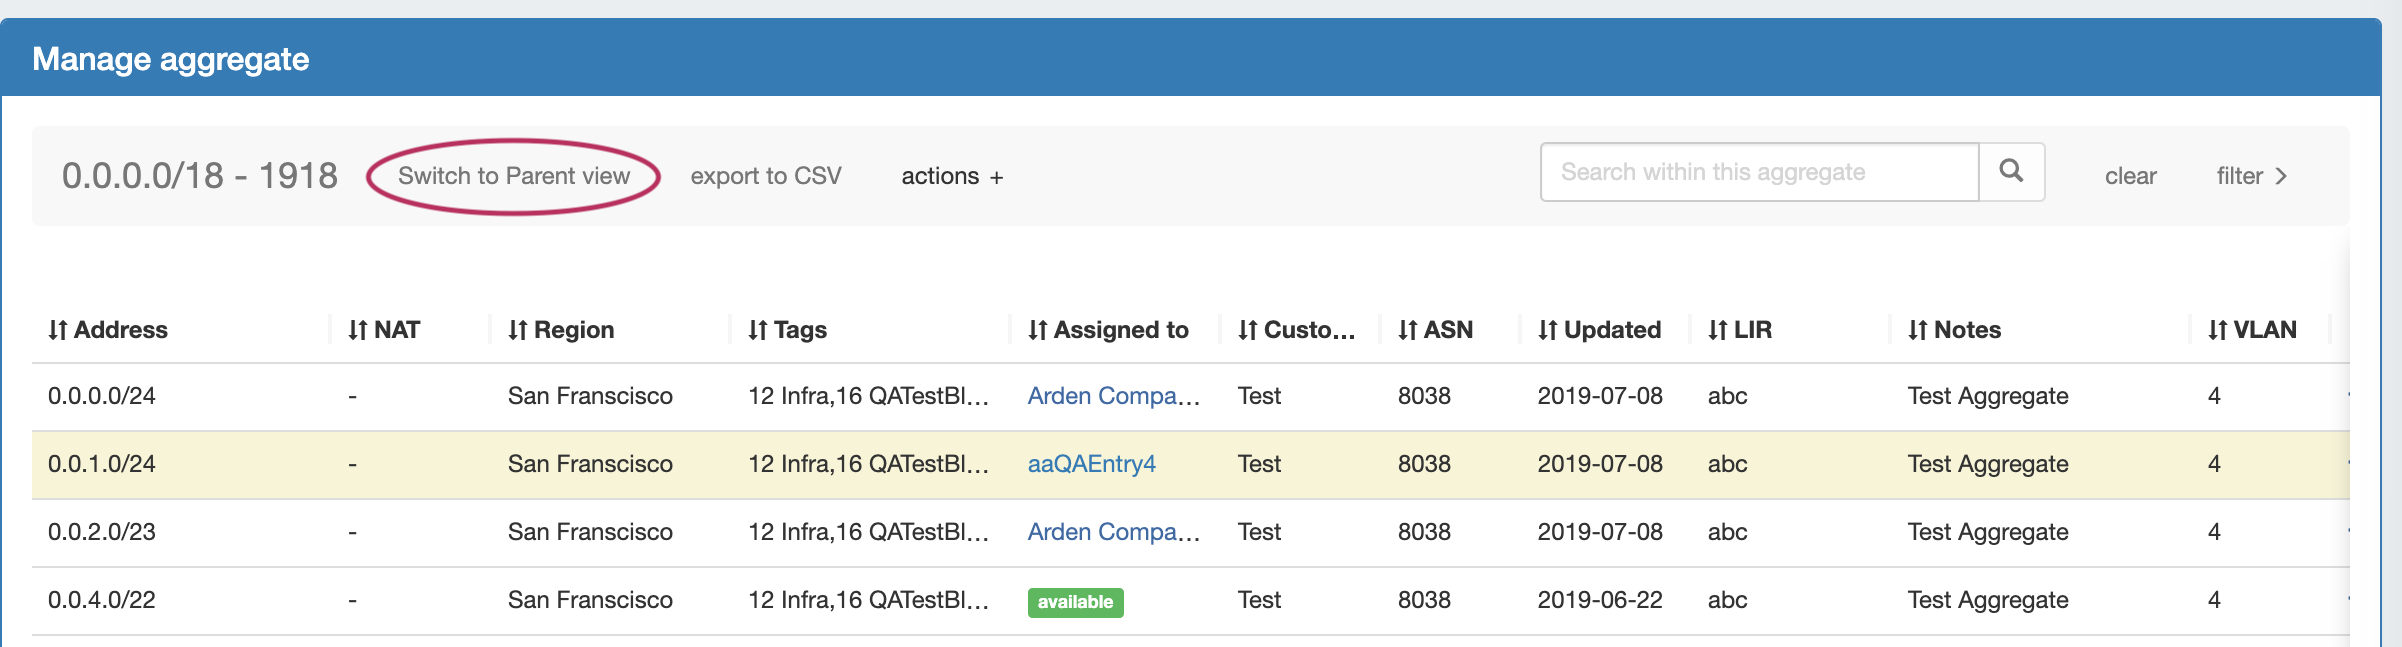
To view parent blocks / IP block hierarchy, click on "Switch to Parent View" at the top of the block list.
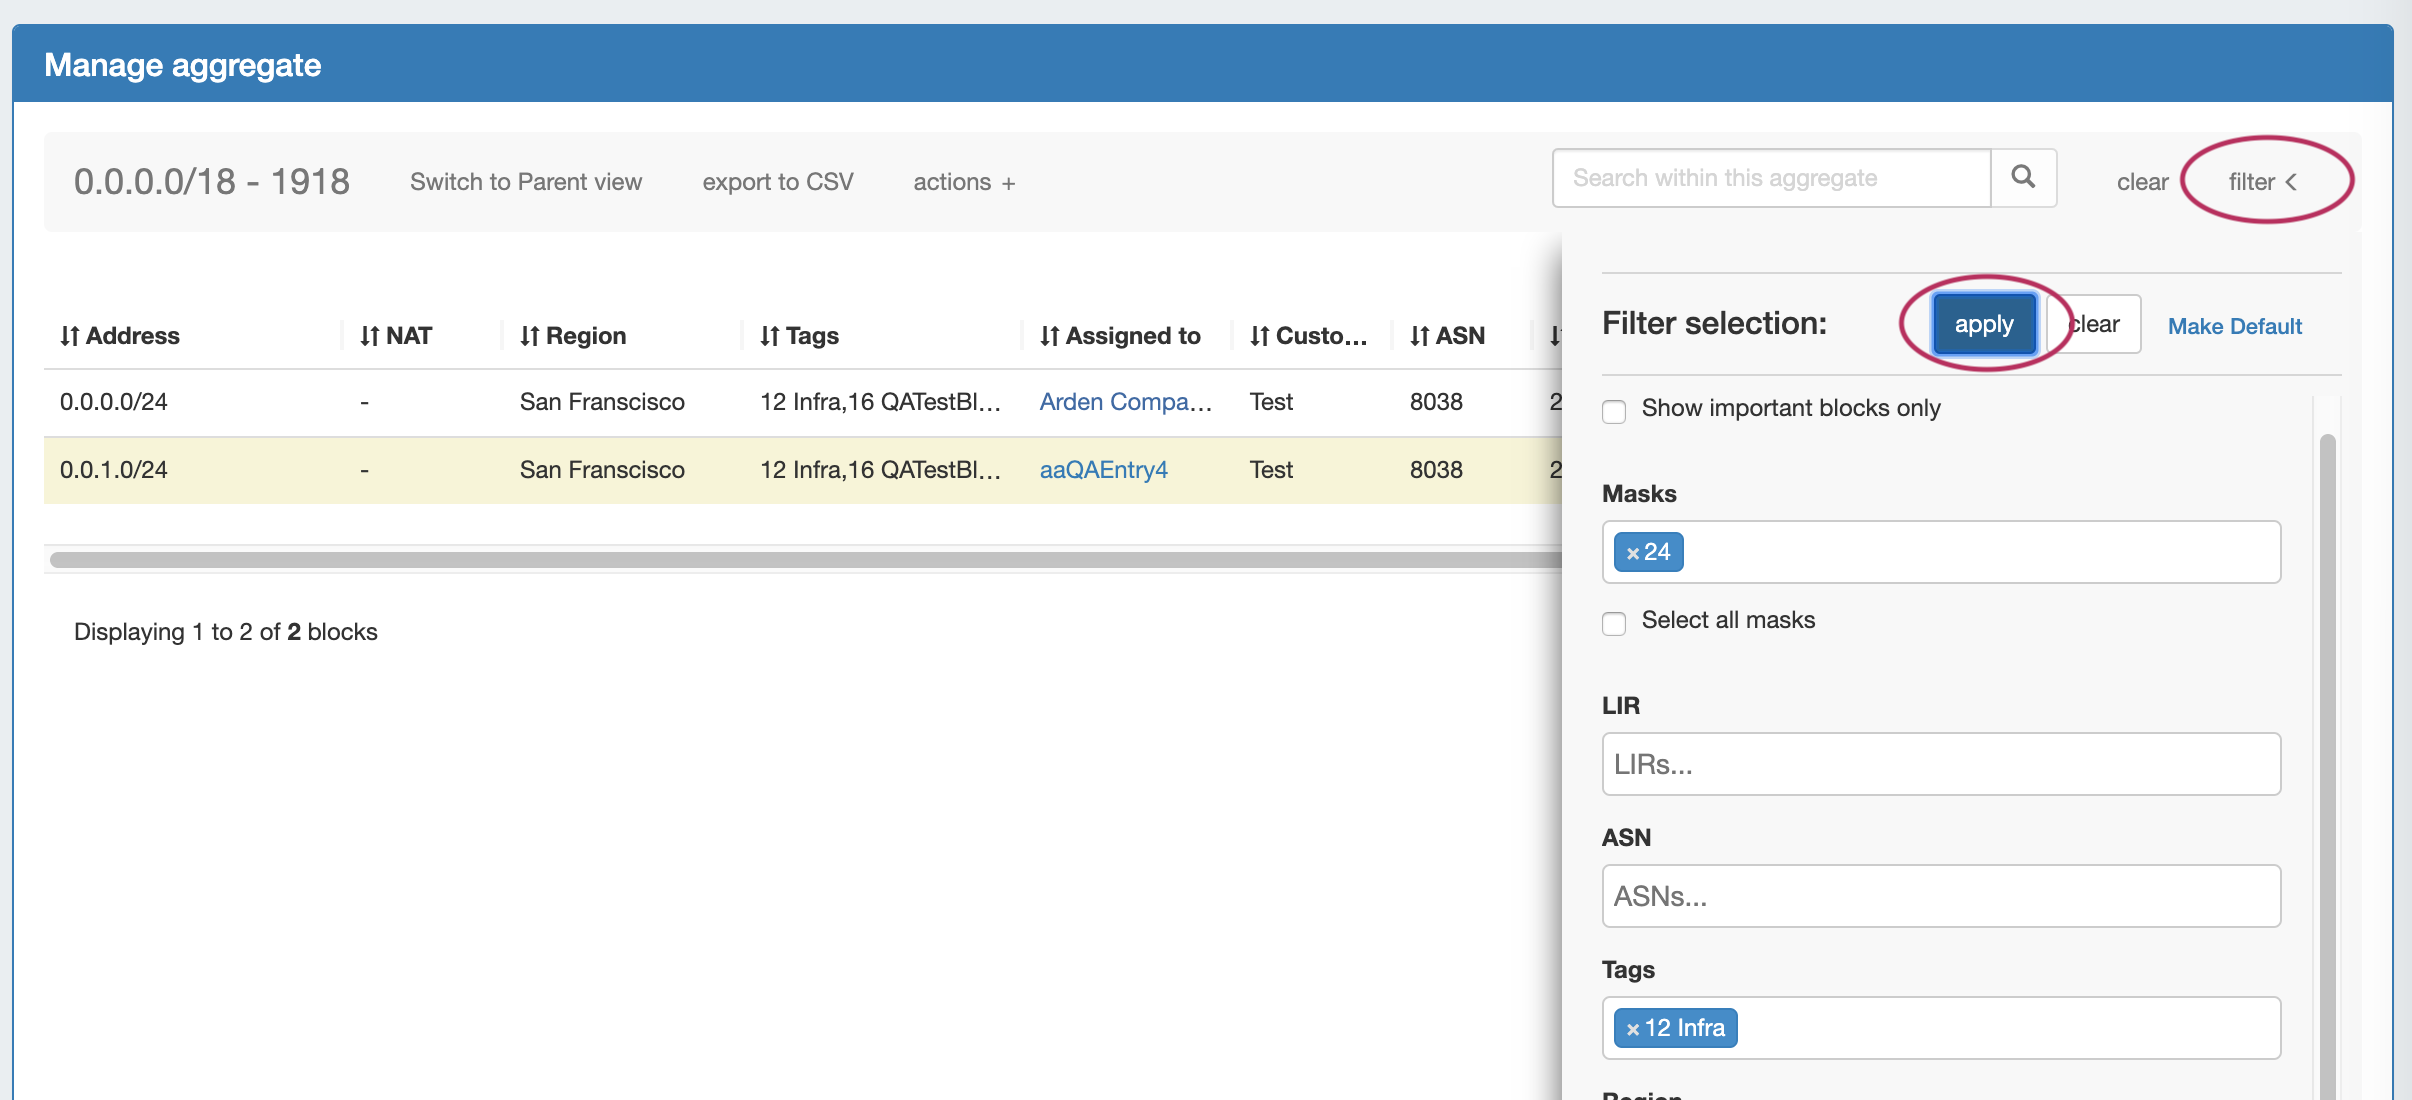
You may also enter Parent View from in the "Filter" menu, check by checking the "Select All Masks" checkbox and click clicking "Apply".
Once all masks are enabled to view, the block list changes to include the "Parent" blocks, showing all masks throughout the assignment tree.
A parent block with children will show "Has Children" in the column where assignment status is shown, its immediate child resource (if applicable) and the block CIDR will show as a clickable link.
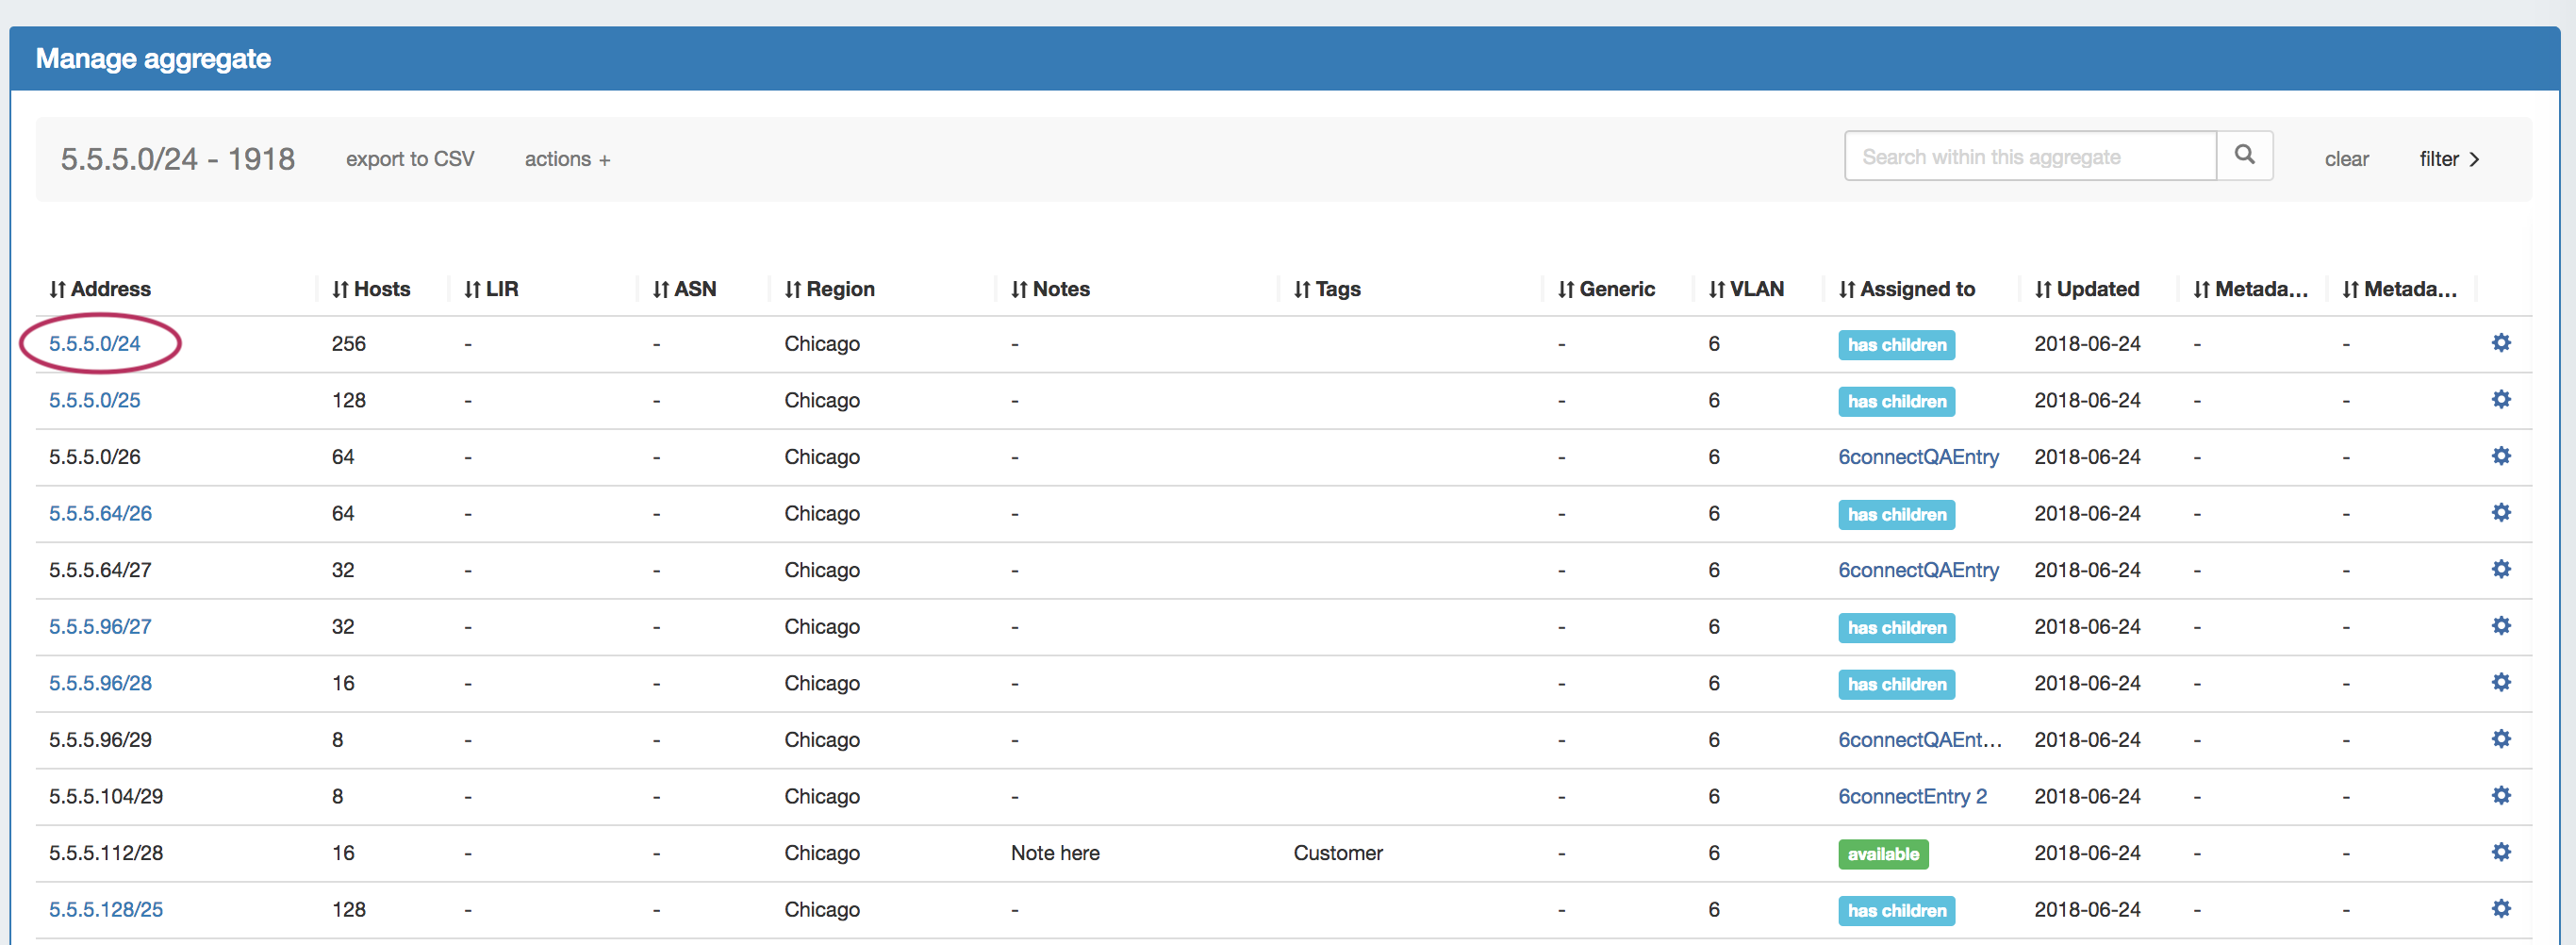
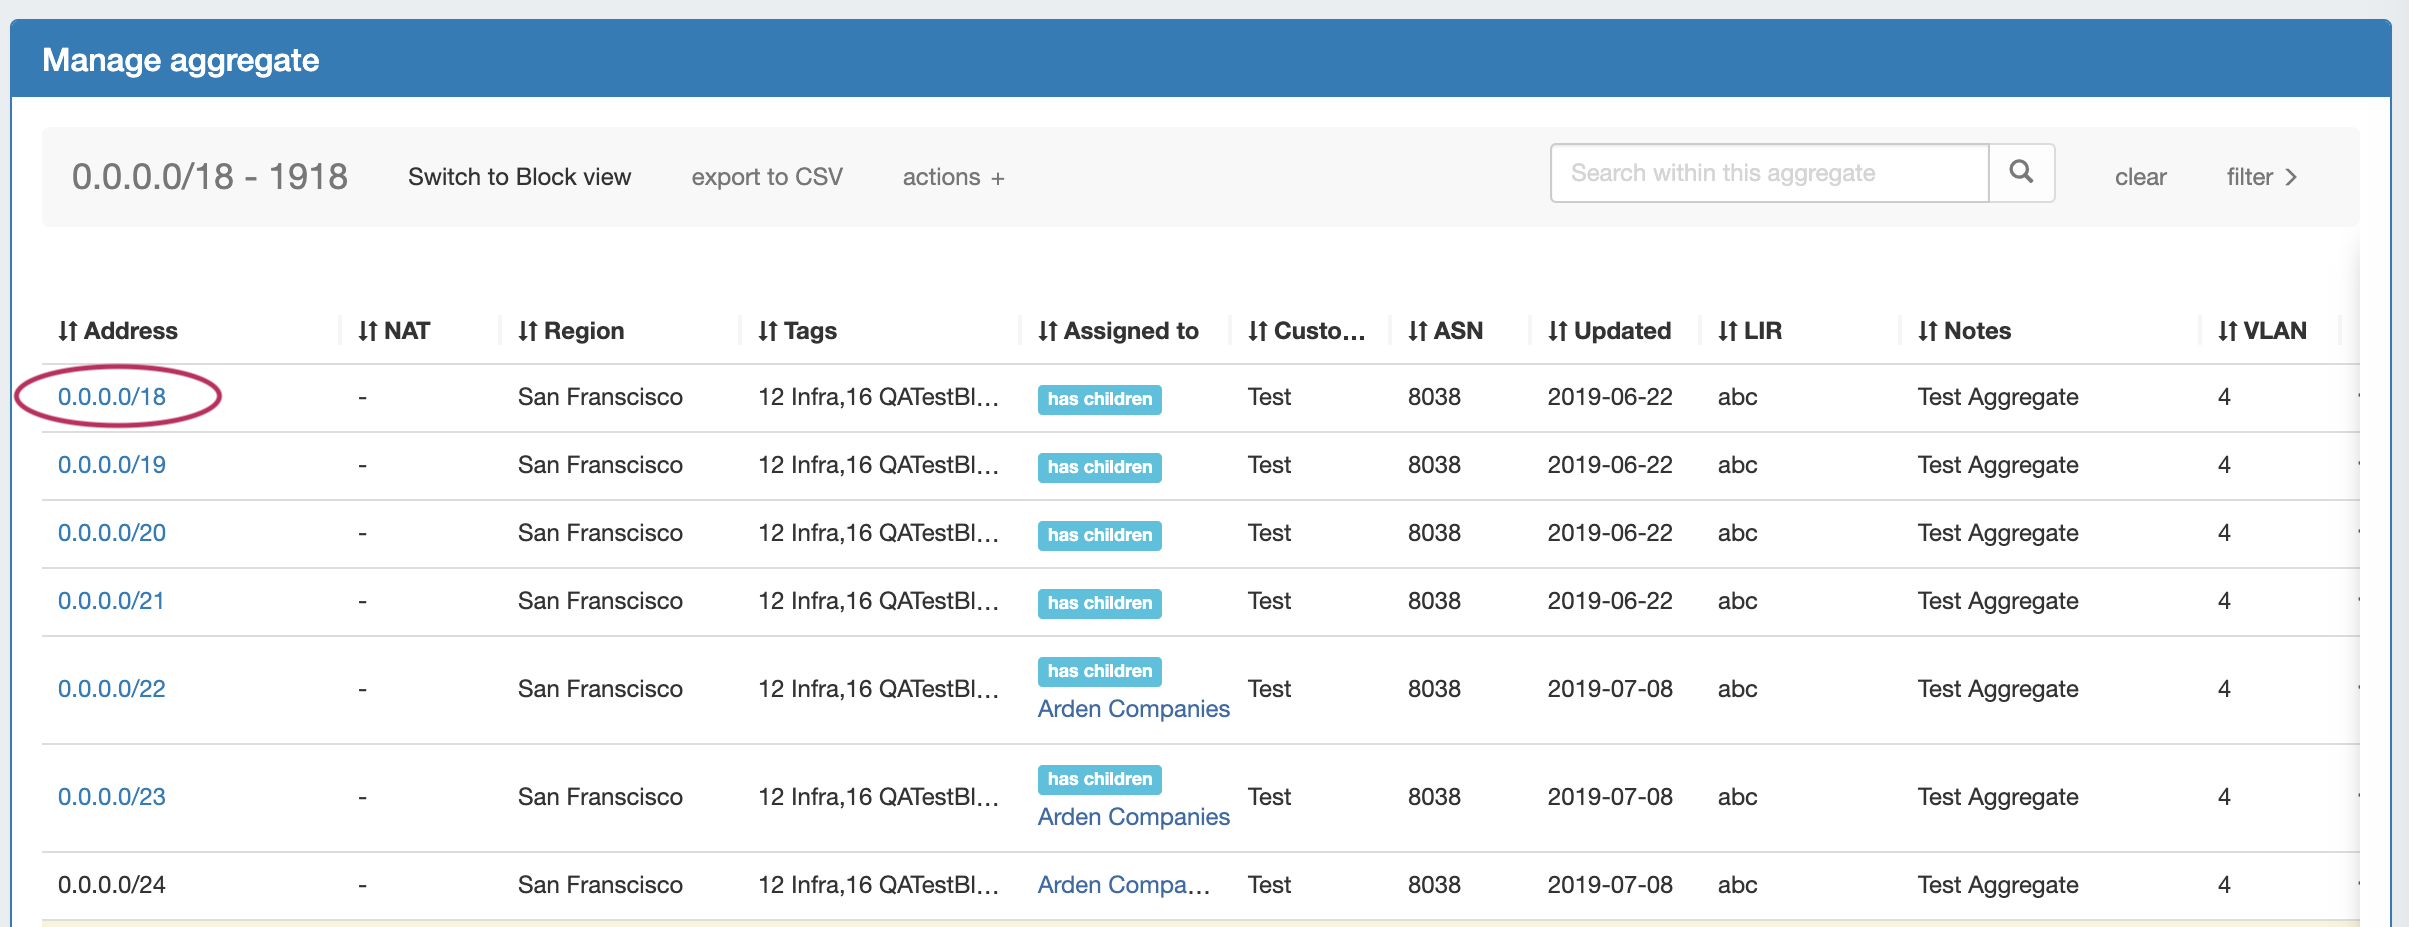
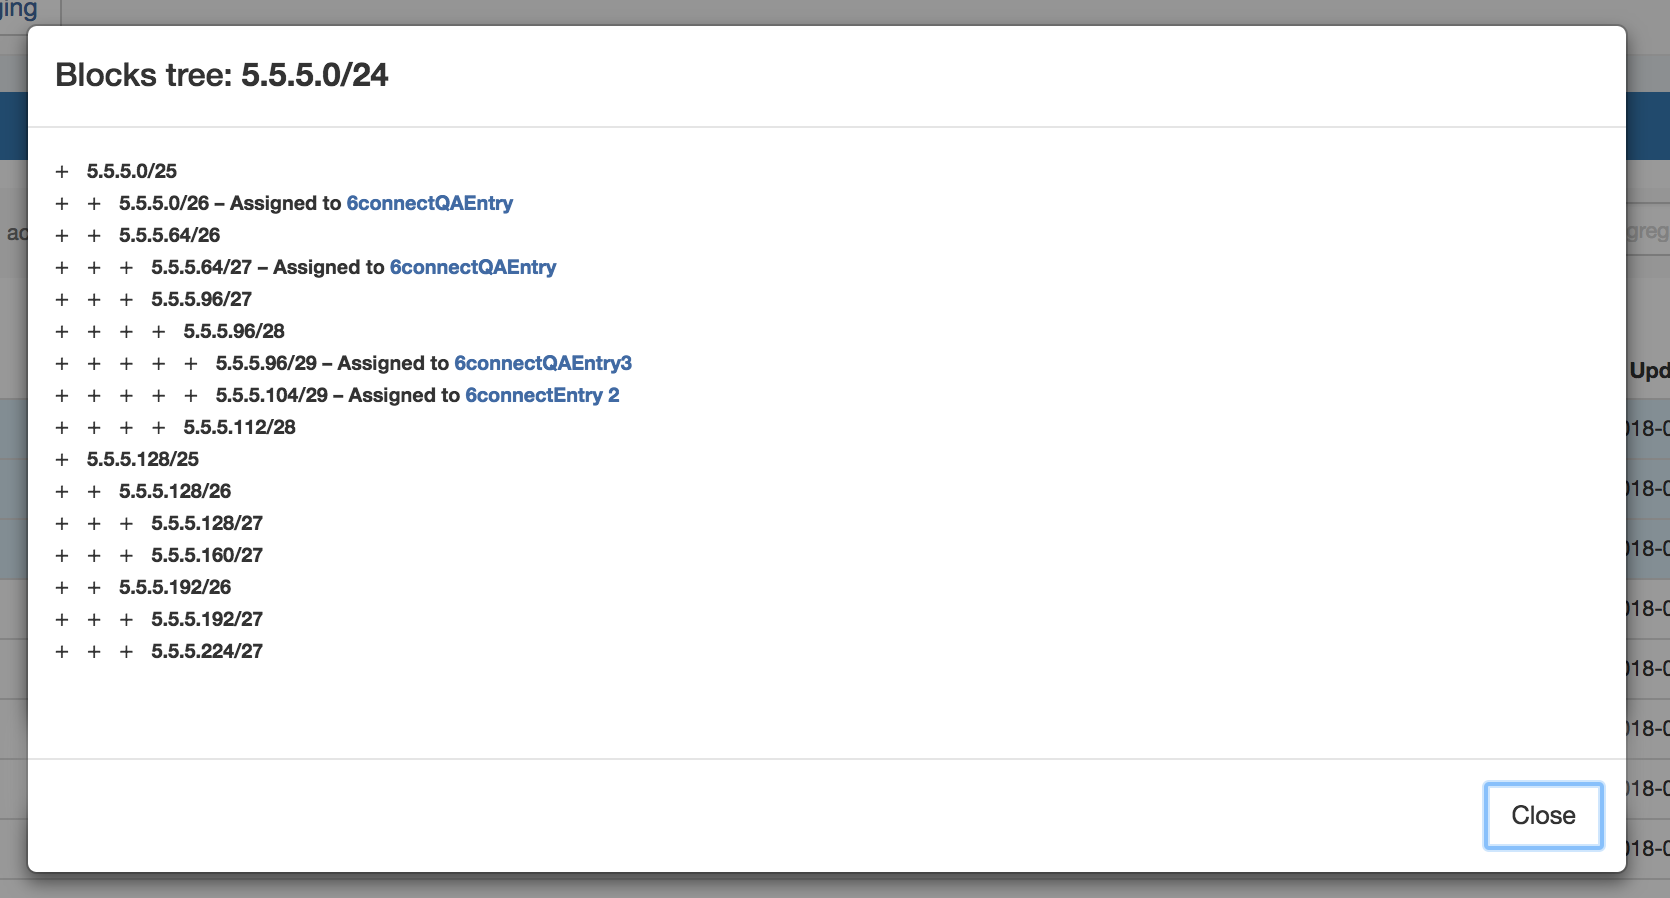
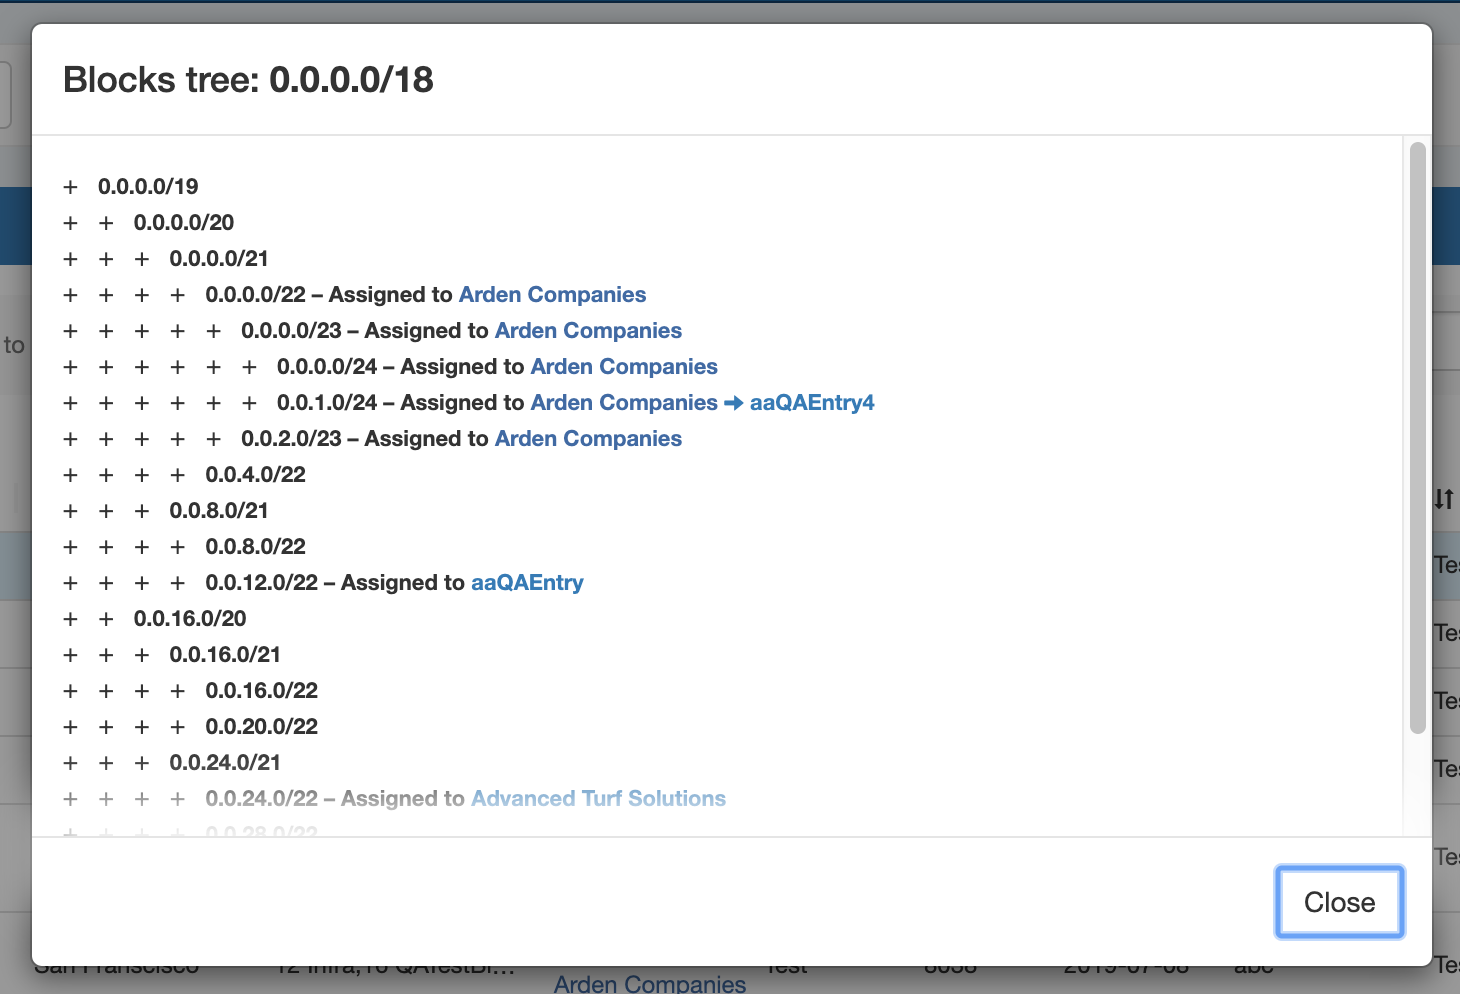
Clicking on the CIDR for a block that has children will open "Block Tree" view, showing the hierarchy of blocks and their assignments.
Working with IP Blocks - Common Tasks
Individual Blocks may be managed from either IPAM Manage, or the IPAM Gadget. (if assigned to a resource, and the IPAM Gadget is enabled on the Resource's Entry Page).
In general, standard actions from the Action Menu will be performed the same in either area, with "Assign" being the exception.
IPAM Block Action Menu - Overview
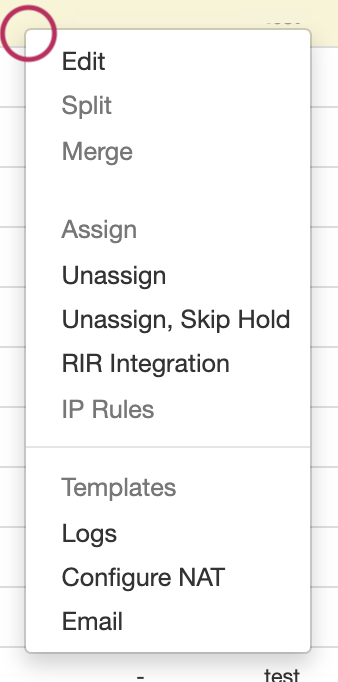
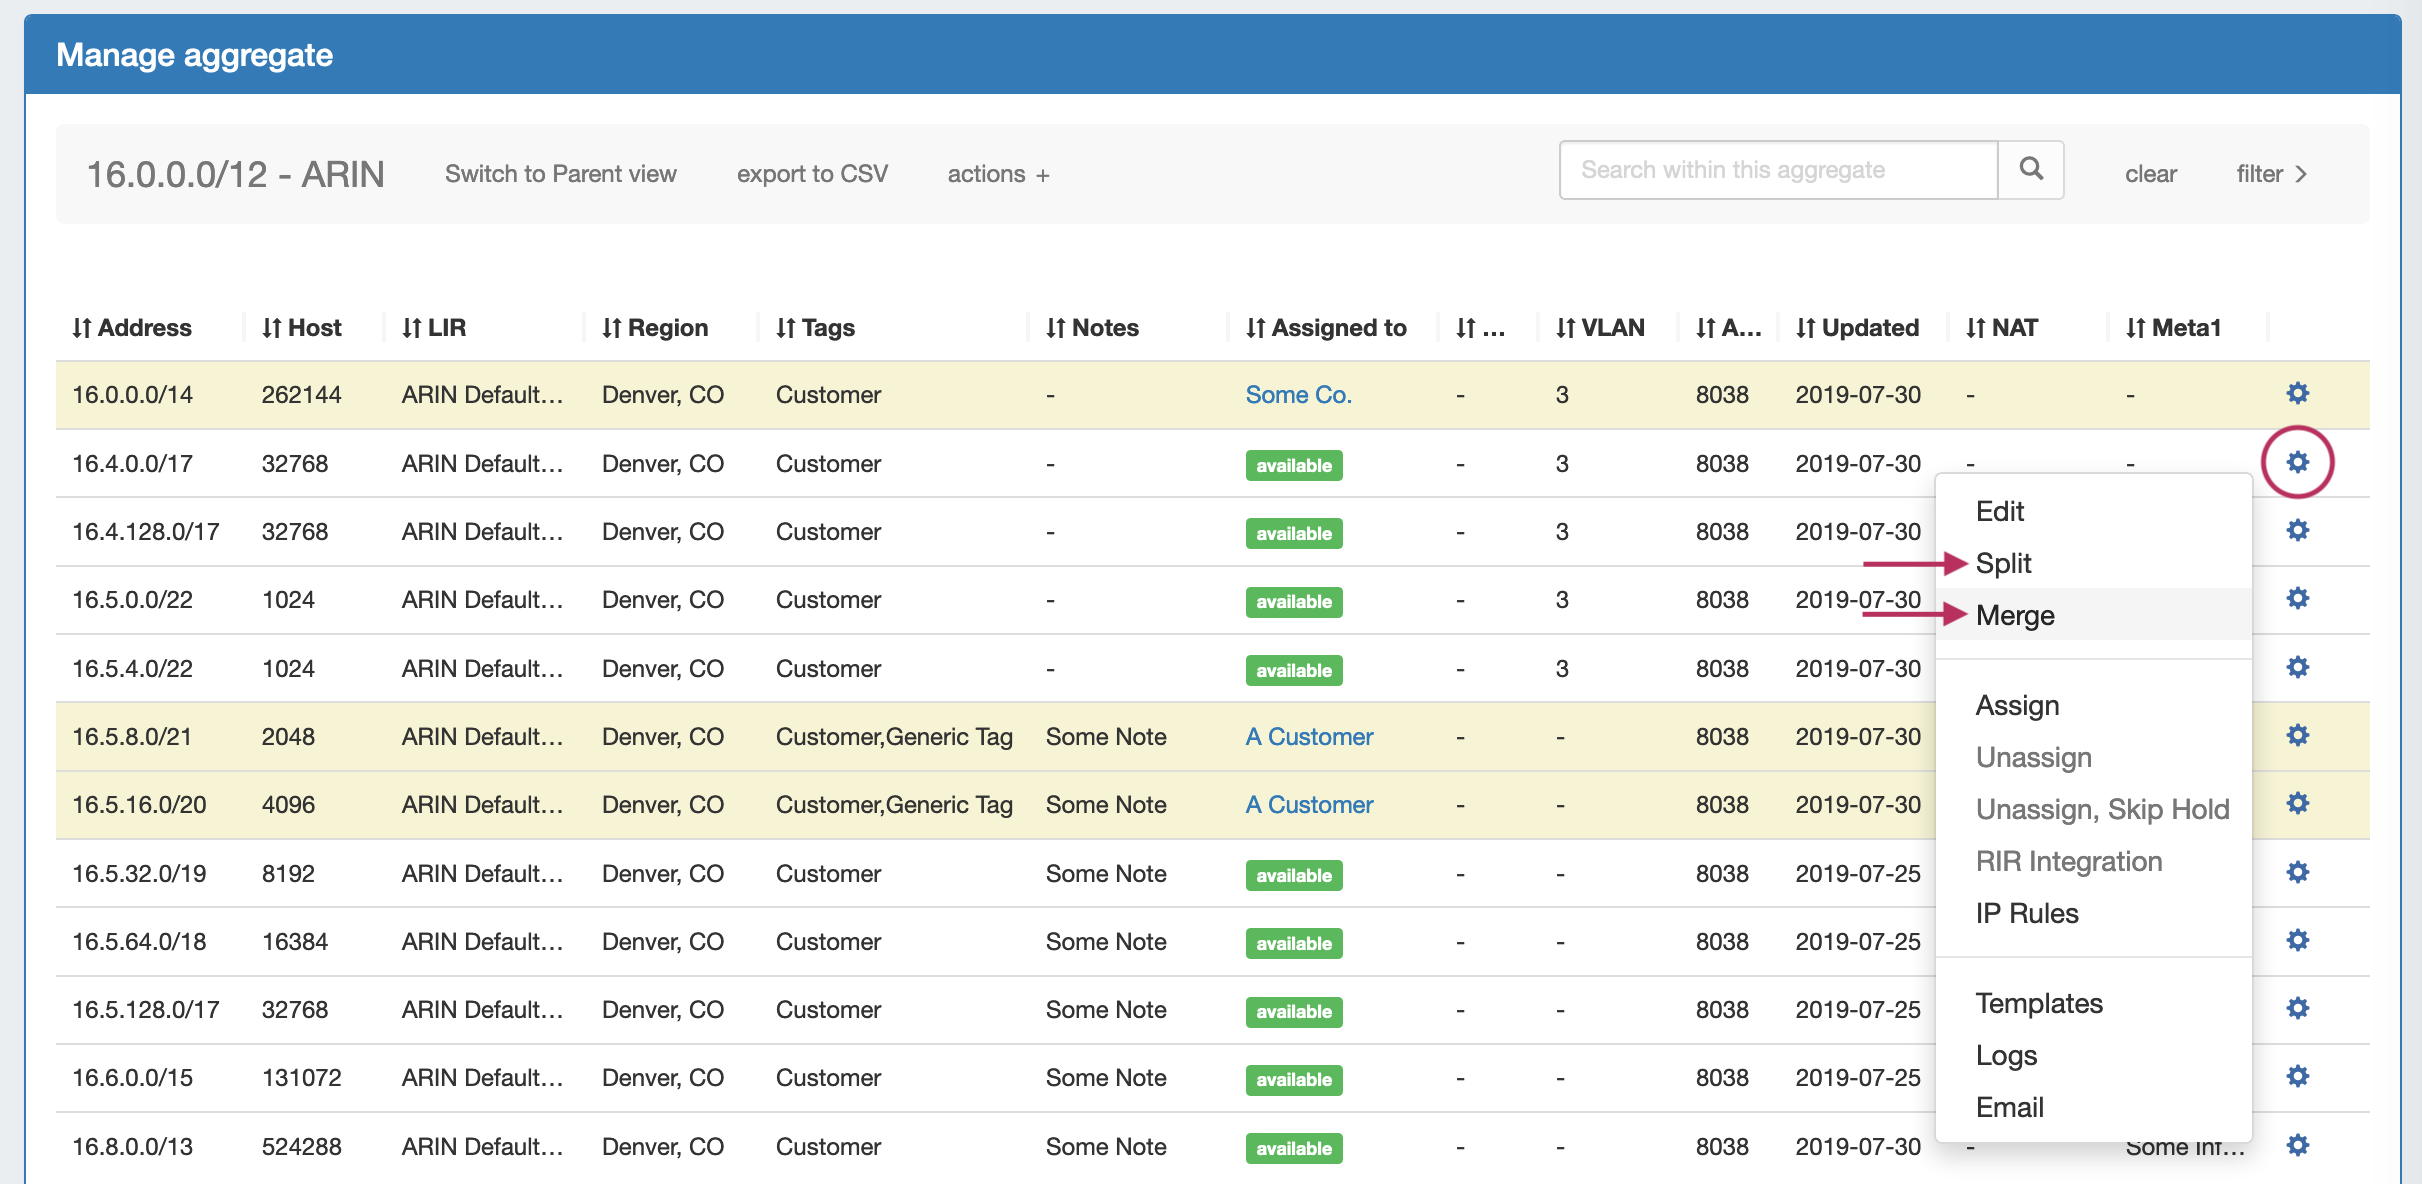
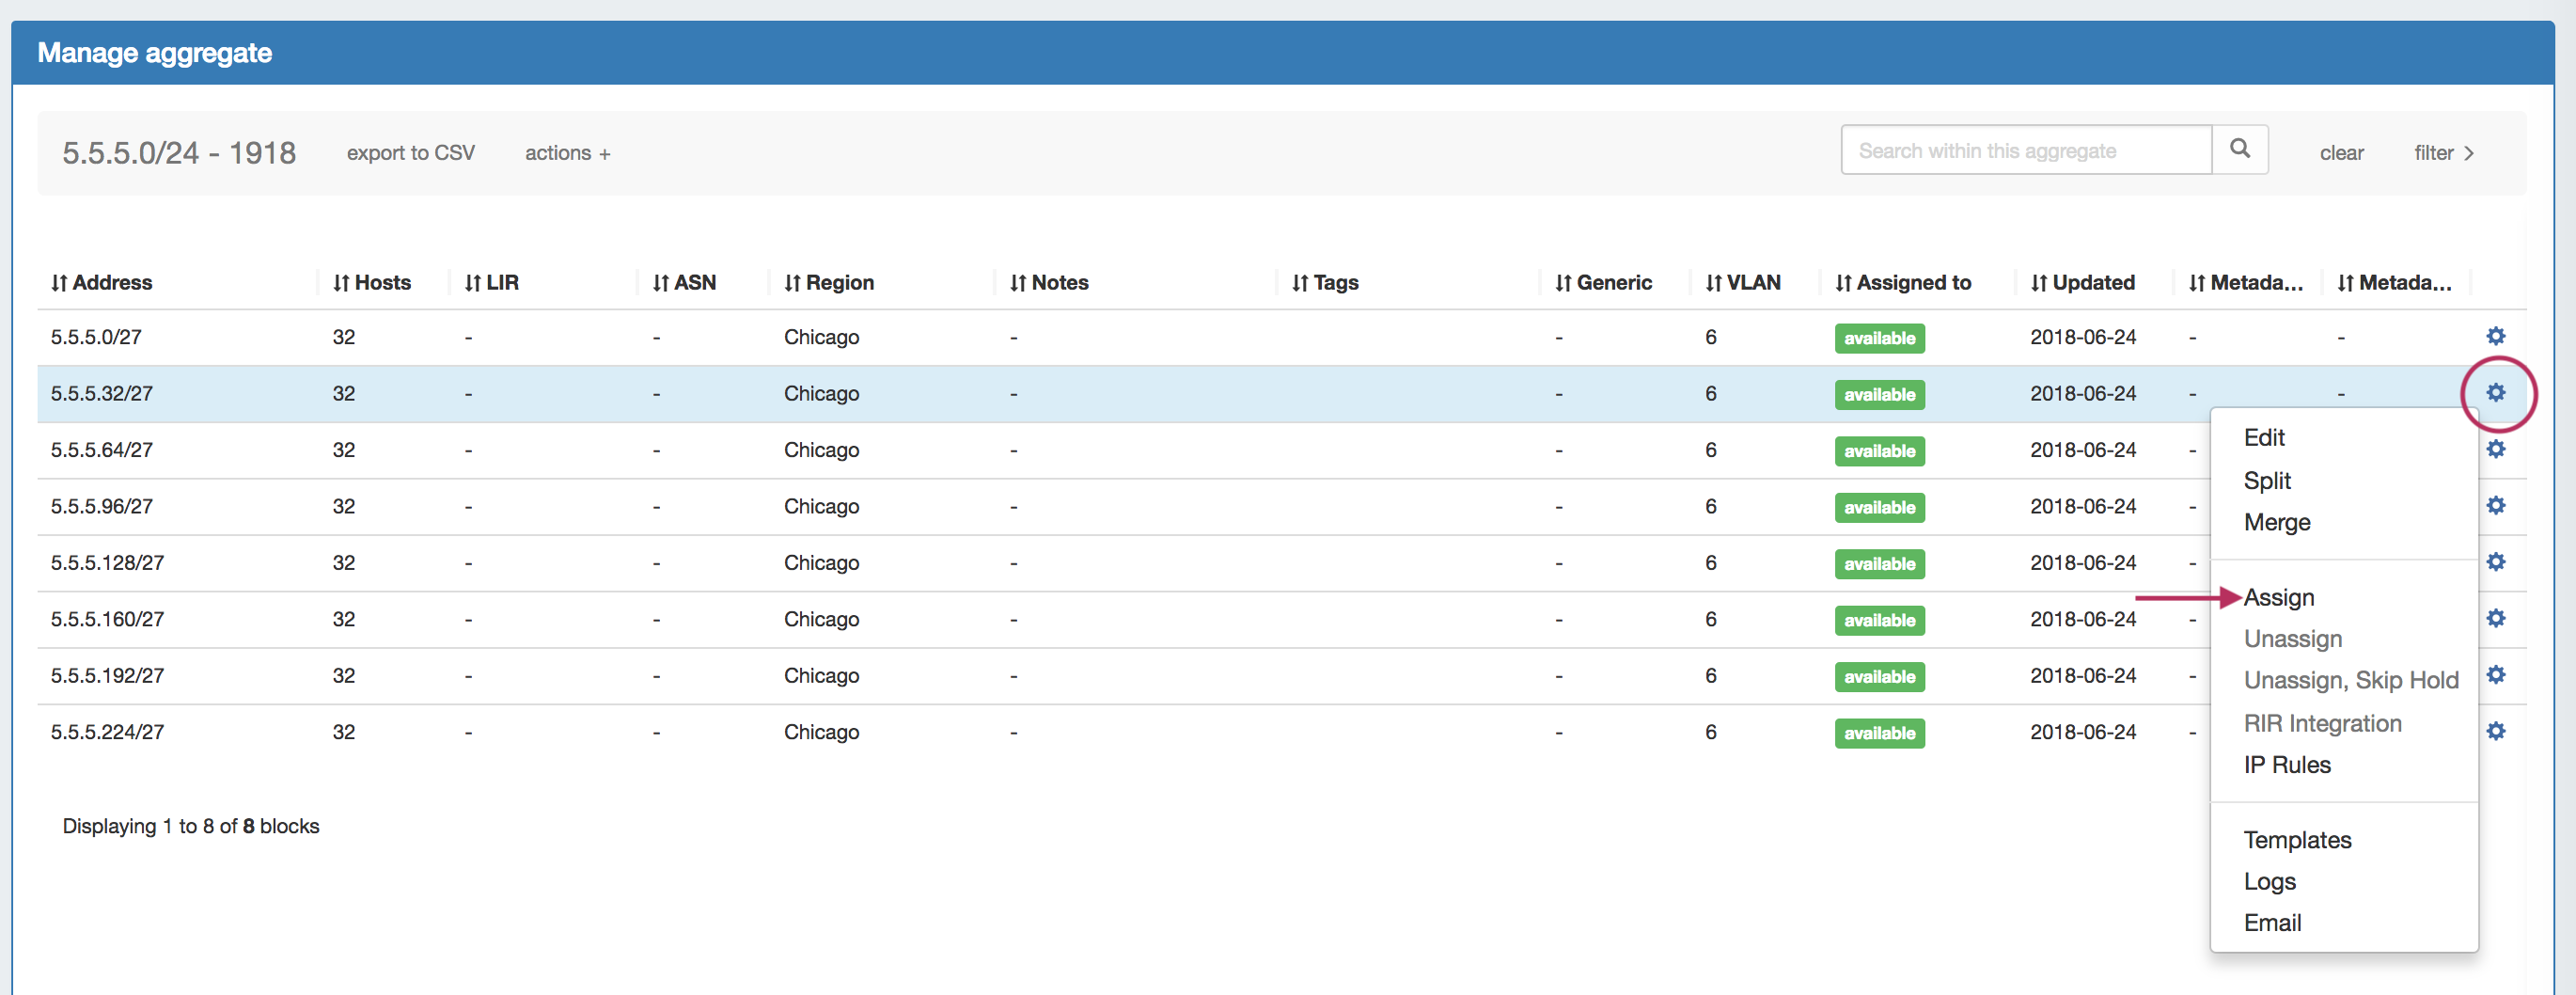
Most actions performed with block managed are contained under the IPAM Manage - Action Menu. Open the Action Menu by left clicking on the Gear Icon, or right clicking anywhere on the block's row. The same Action Menu is also available to manage blocks via the IPAM Gadget.
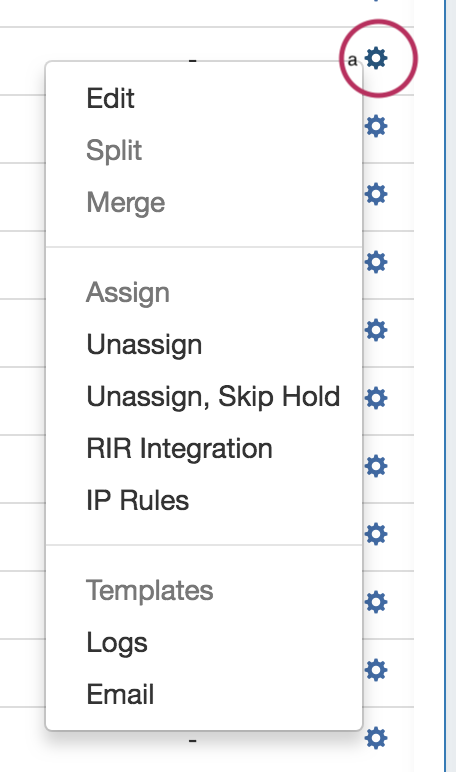
The Action Menu contains the following options:
...
Split: Splits the selected single block into two equal smaller blocks, of the next smallest mask, e.g. a /24 will be split into two /25s. The Split option is not available for blocks that are already of the smallest available size ( IPv4 /32s or IPv6 /128s), for blocks in "Holding", or for blocks that are already assigned and do not have subassignments enabled. If more than one level of splitting is needed, use "Templates - Auto Split" instead.
...
Merge: The opposite of Split. Merge combines two blocks of equal size into the next largest mask, e.g., two /25s will be merged into one /24. Merge is only available for adjacent blocks of the same size that are "Available", in "Holding", or is subassignable.
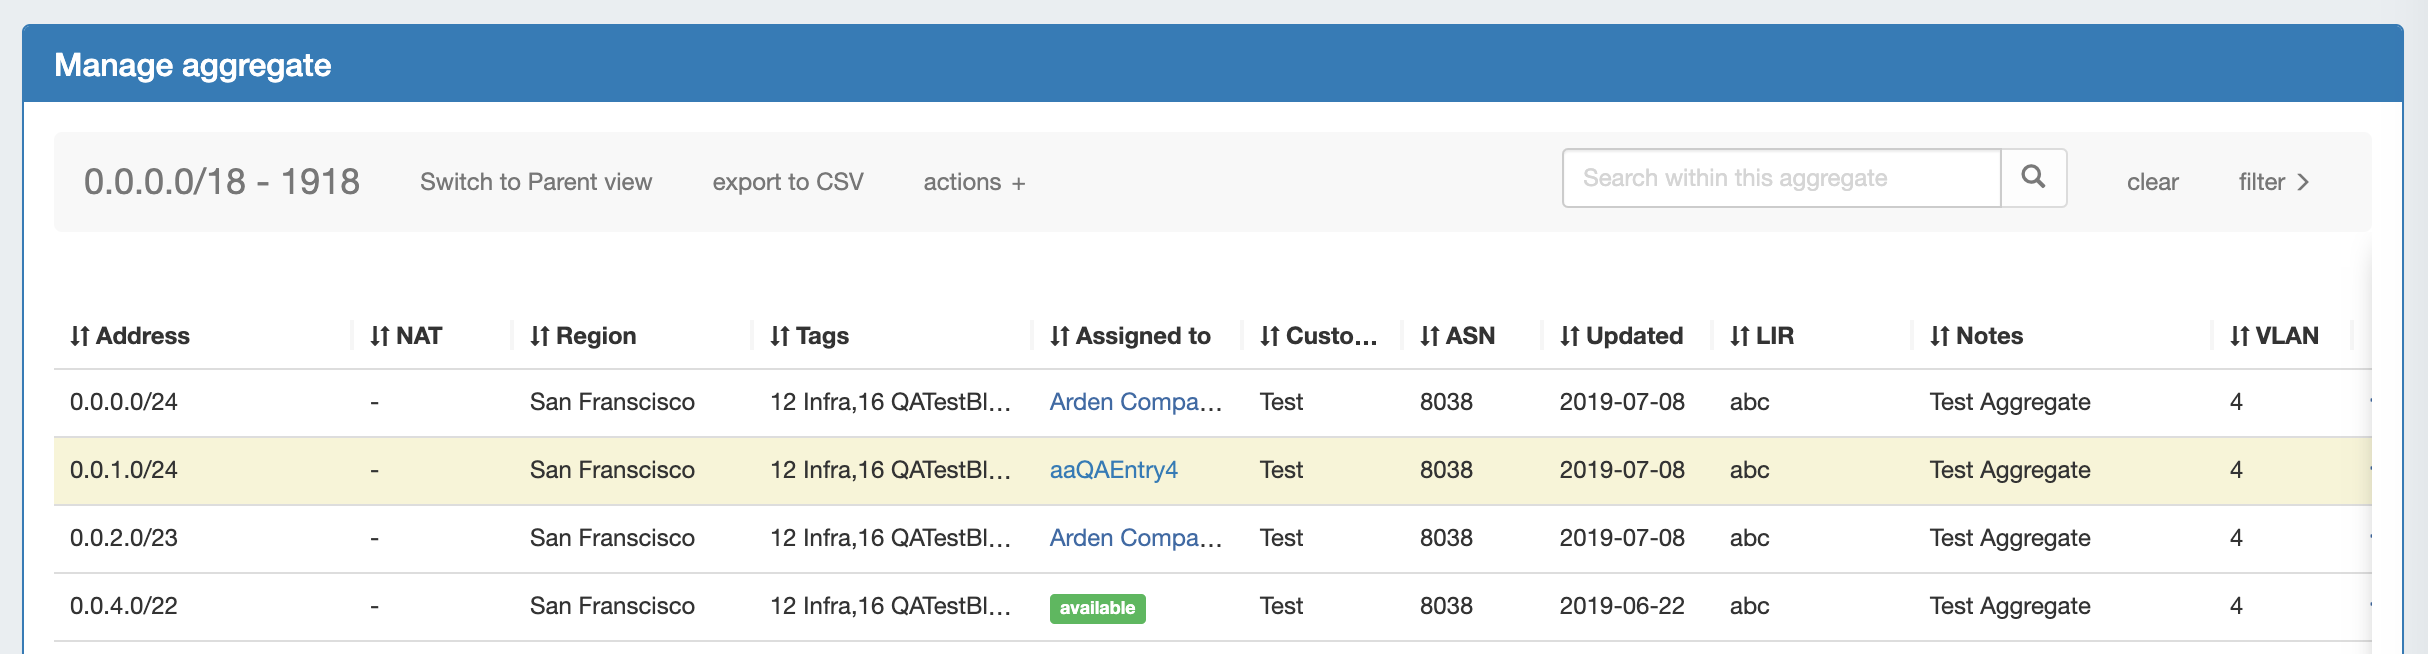
Important Blocks
"Important" IP blocks display with a yellow background highlight. By default, any block that has been manually assigned, unassigned, or had other high-level manual interactions performed will be automatically marked as "Important".
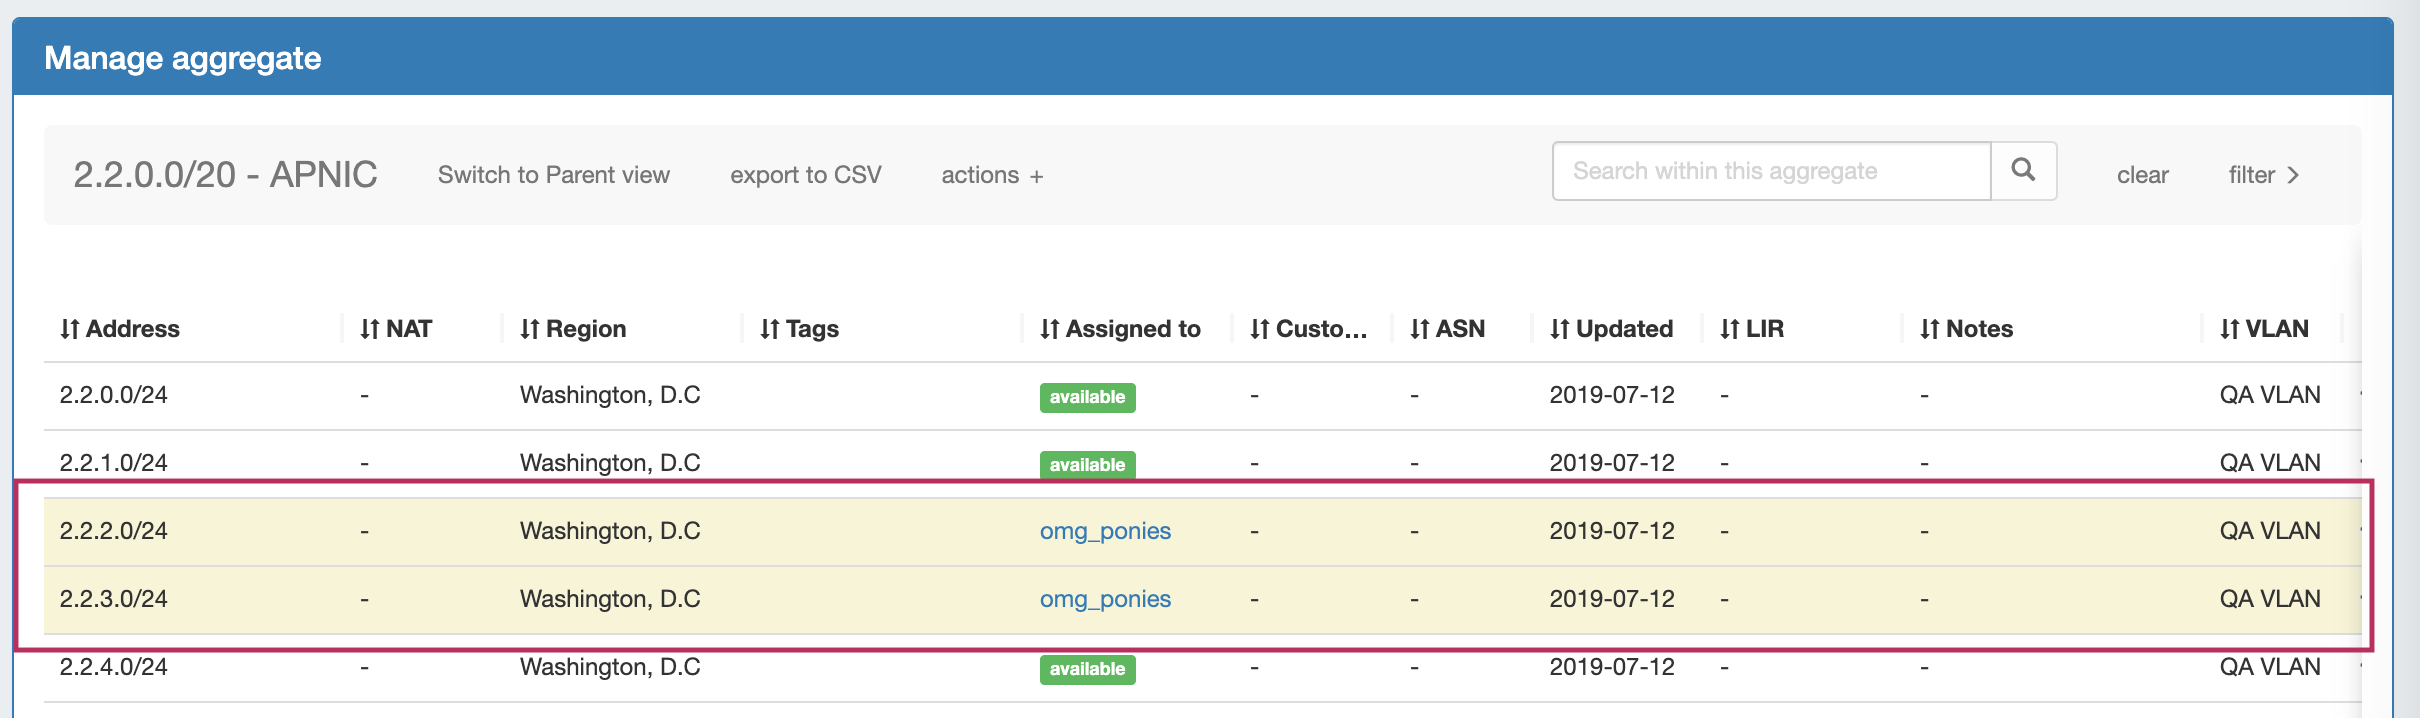
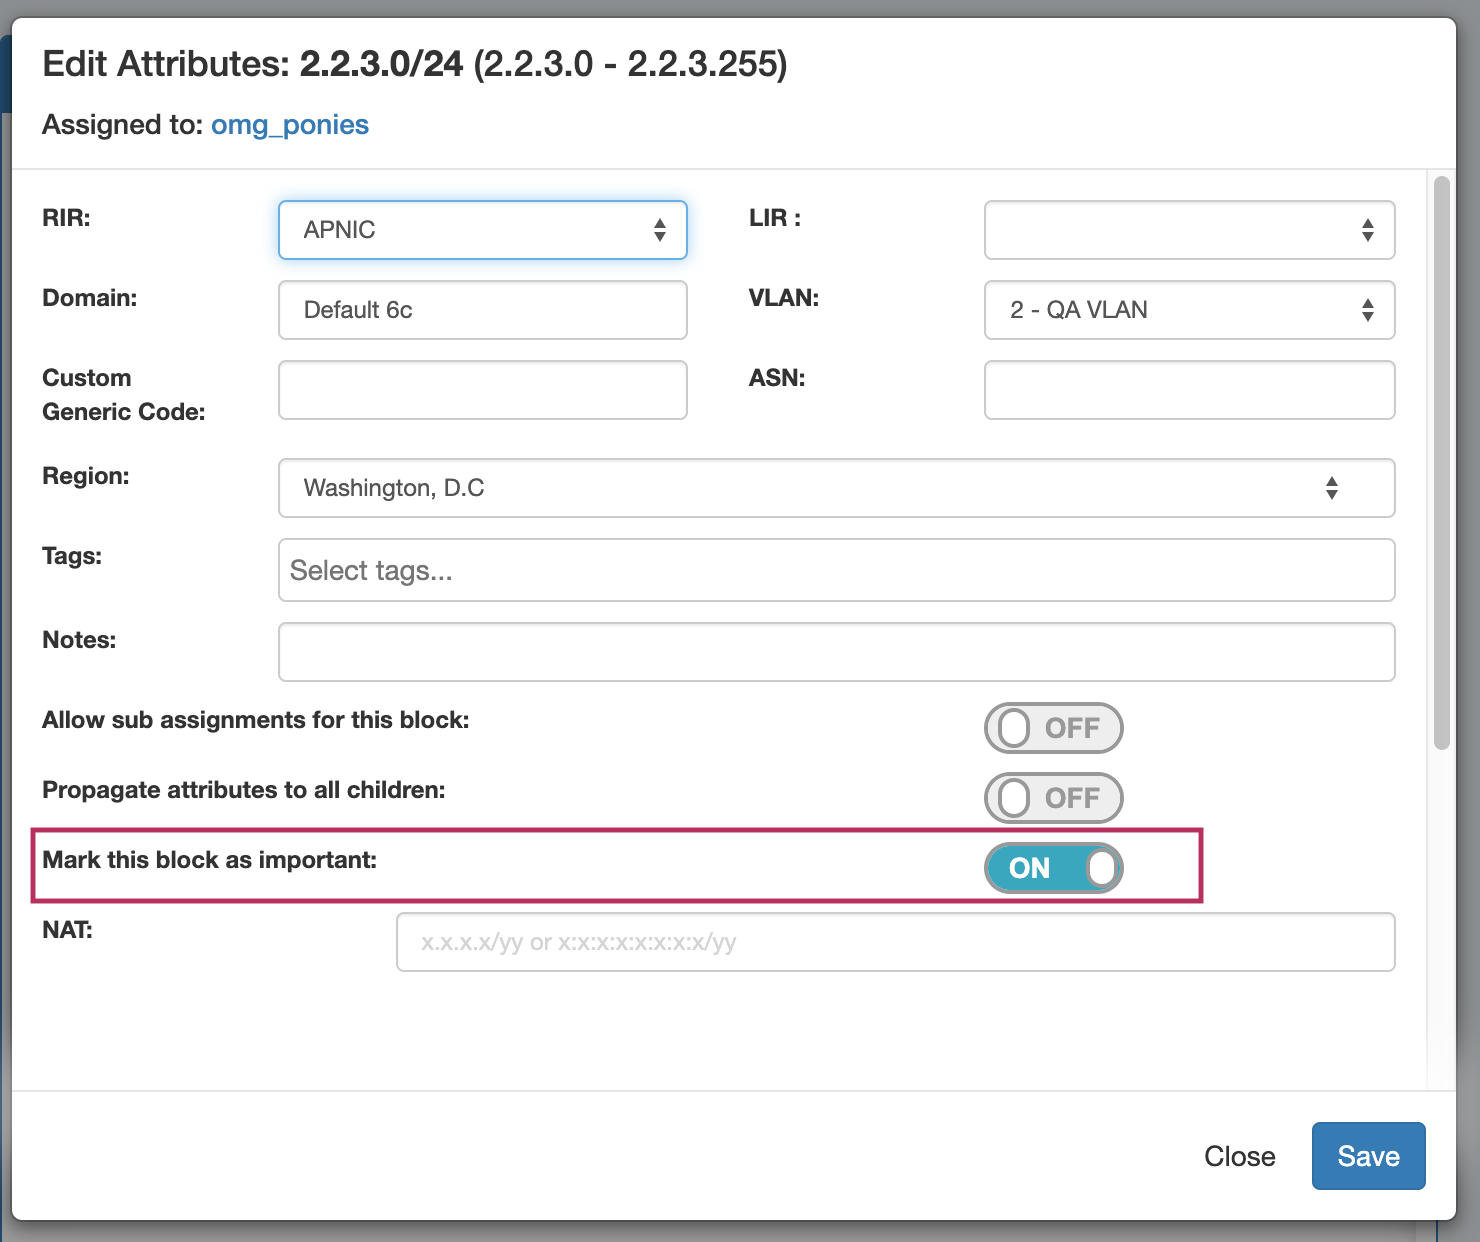
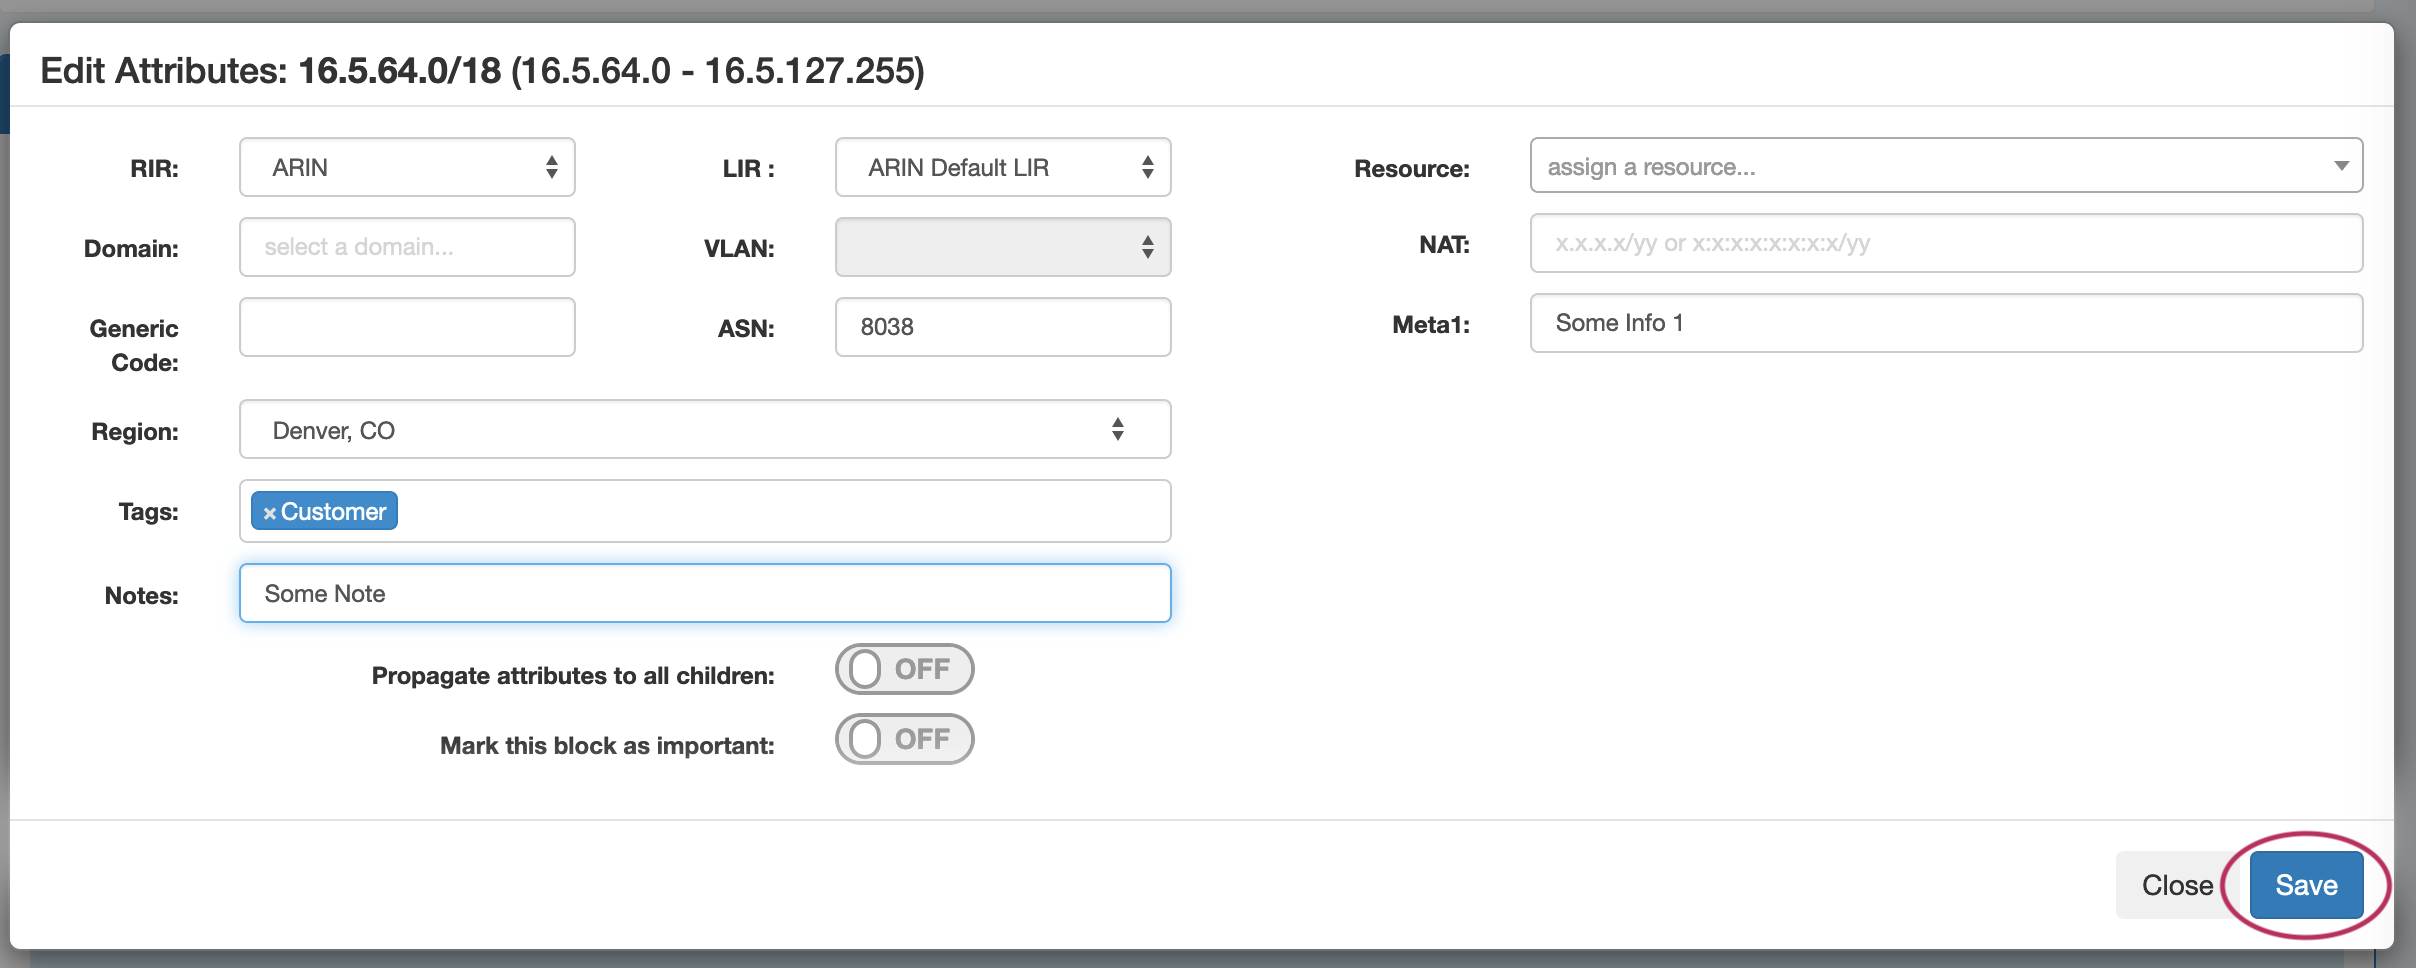
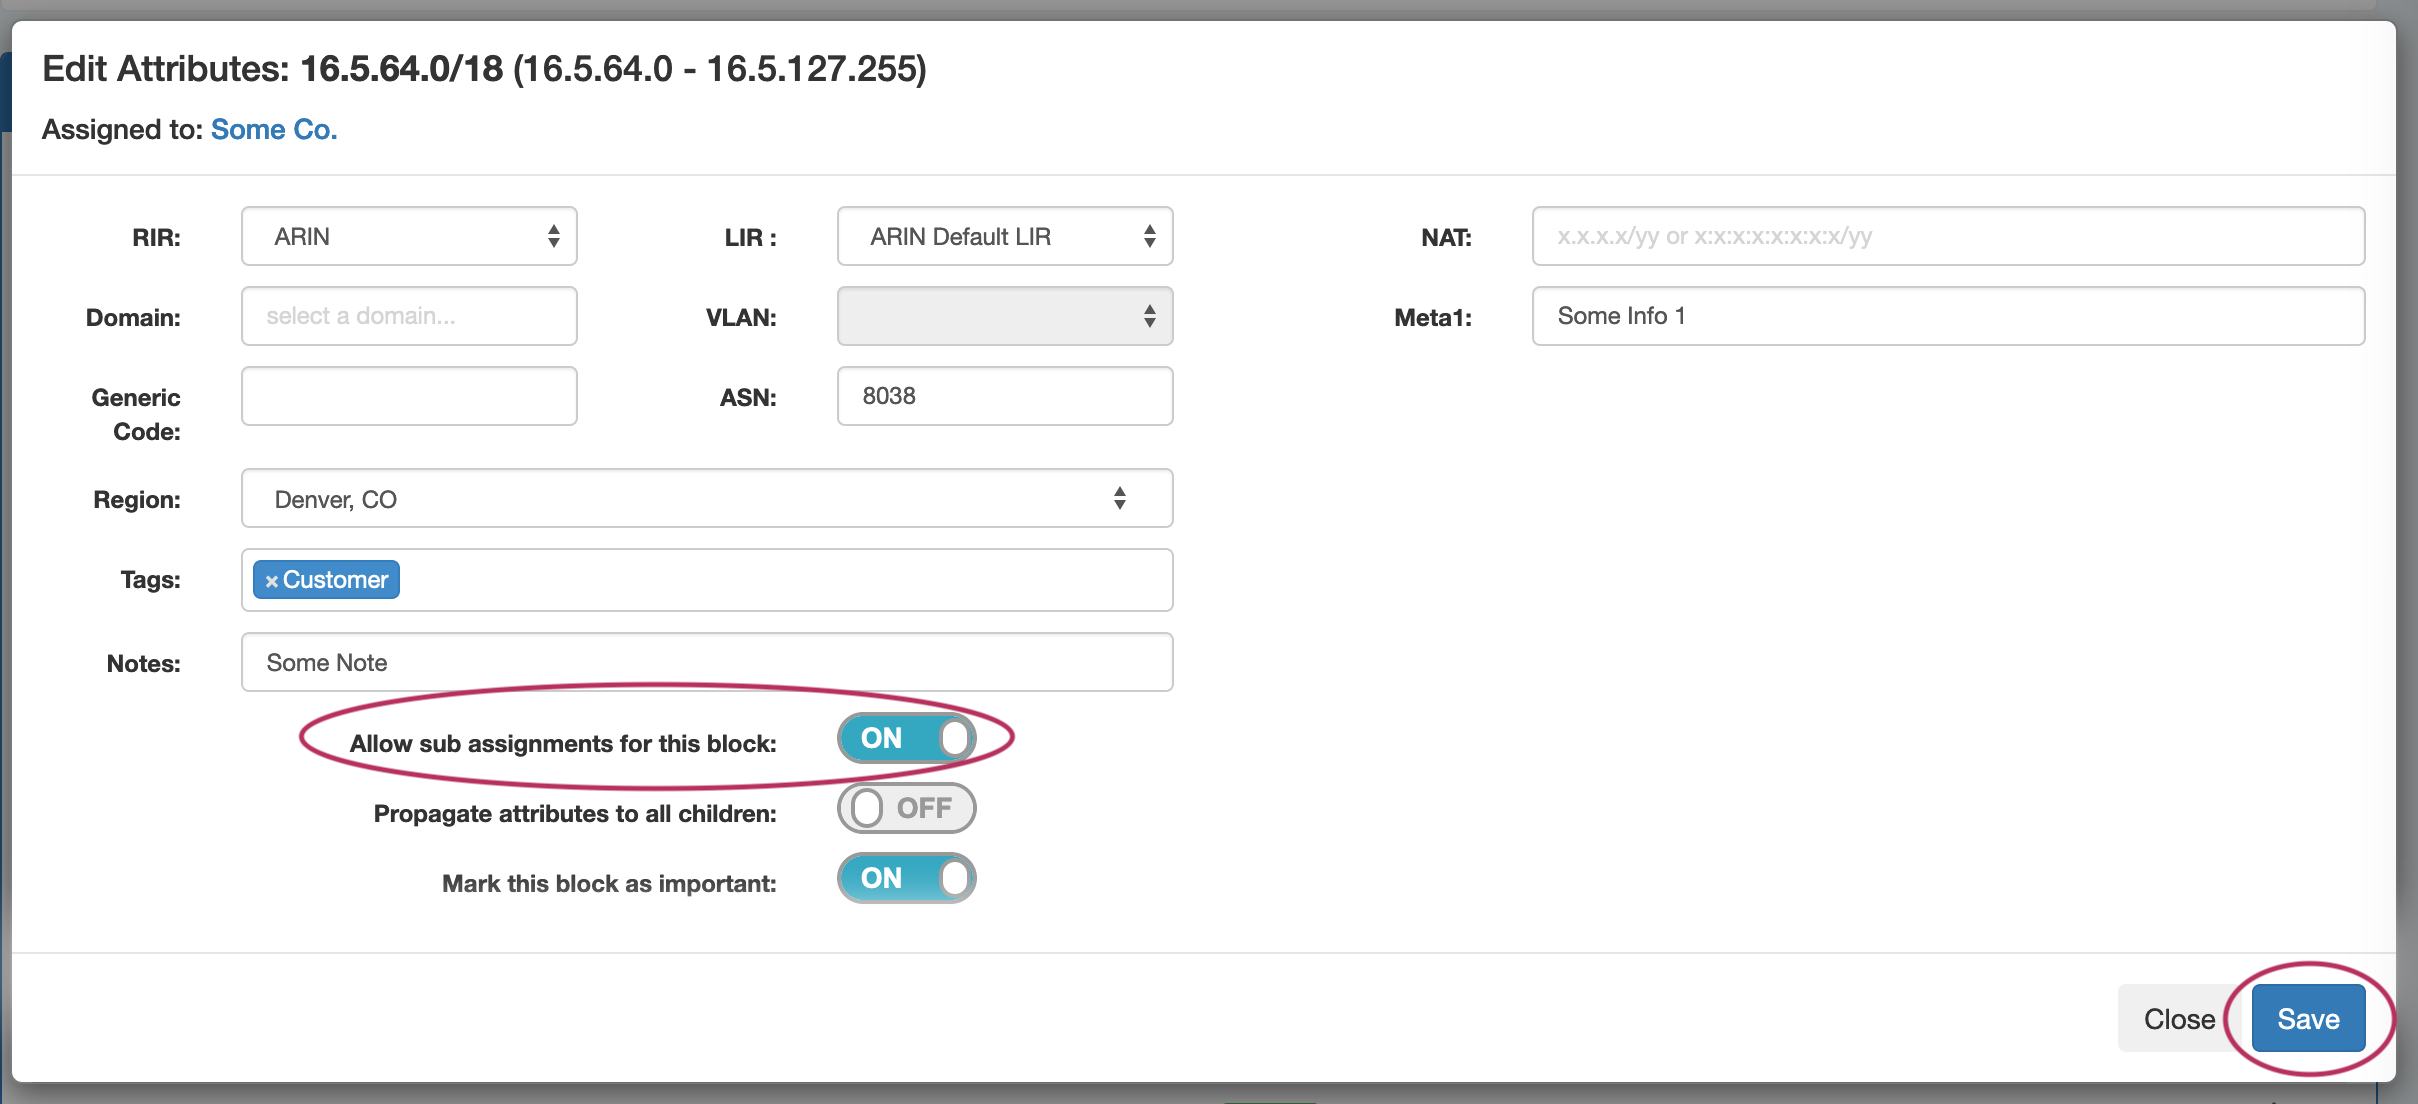
Blocks may be manually marked or unmarked as "Important" from either the "Edit Block" interface (by opening "Edit" for the block, then selecting the toggle for "Mark this block as important"), or from the API .
Working with IP Blocks - Common Tasks
Individual Blocks may be managed from either IPAM Manage, or the IPAM Gadget. (if assigned to a resource, and the IPAM Gadget is enabled on the Resource's Entry Page).
In general, standard actions from the Action Menu will be performed the same in either area, with "Assign" being the exception.
IPAM Block Action Menu - Overview
Most actions performed with block managed are contained under the IPAM Manage - Action Menu. Open the Action Menu by left clicking on the Gear Icon, or right clicking anywhere on the block's row. The same Action Menu is also available to manage blocks via the IPAM Gadget.
| Column | ||
|---|---|---|
| ||
|
| Column | ||
|---|---|---|
| ||
The Action Menu contains the following options:
|
...
|
...
|
Split or Merge Blocks Manually
...
To aggregate blocks, select "Merge" from the same menu.
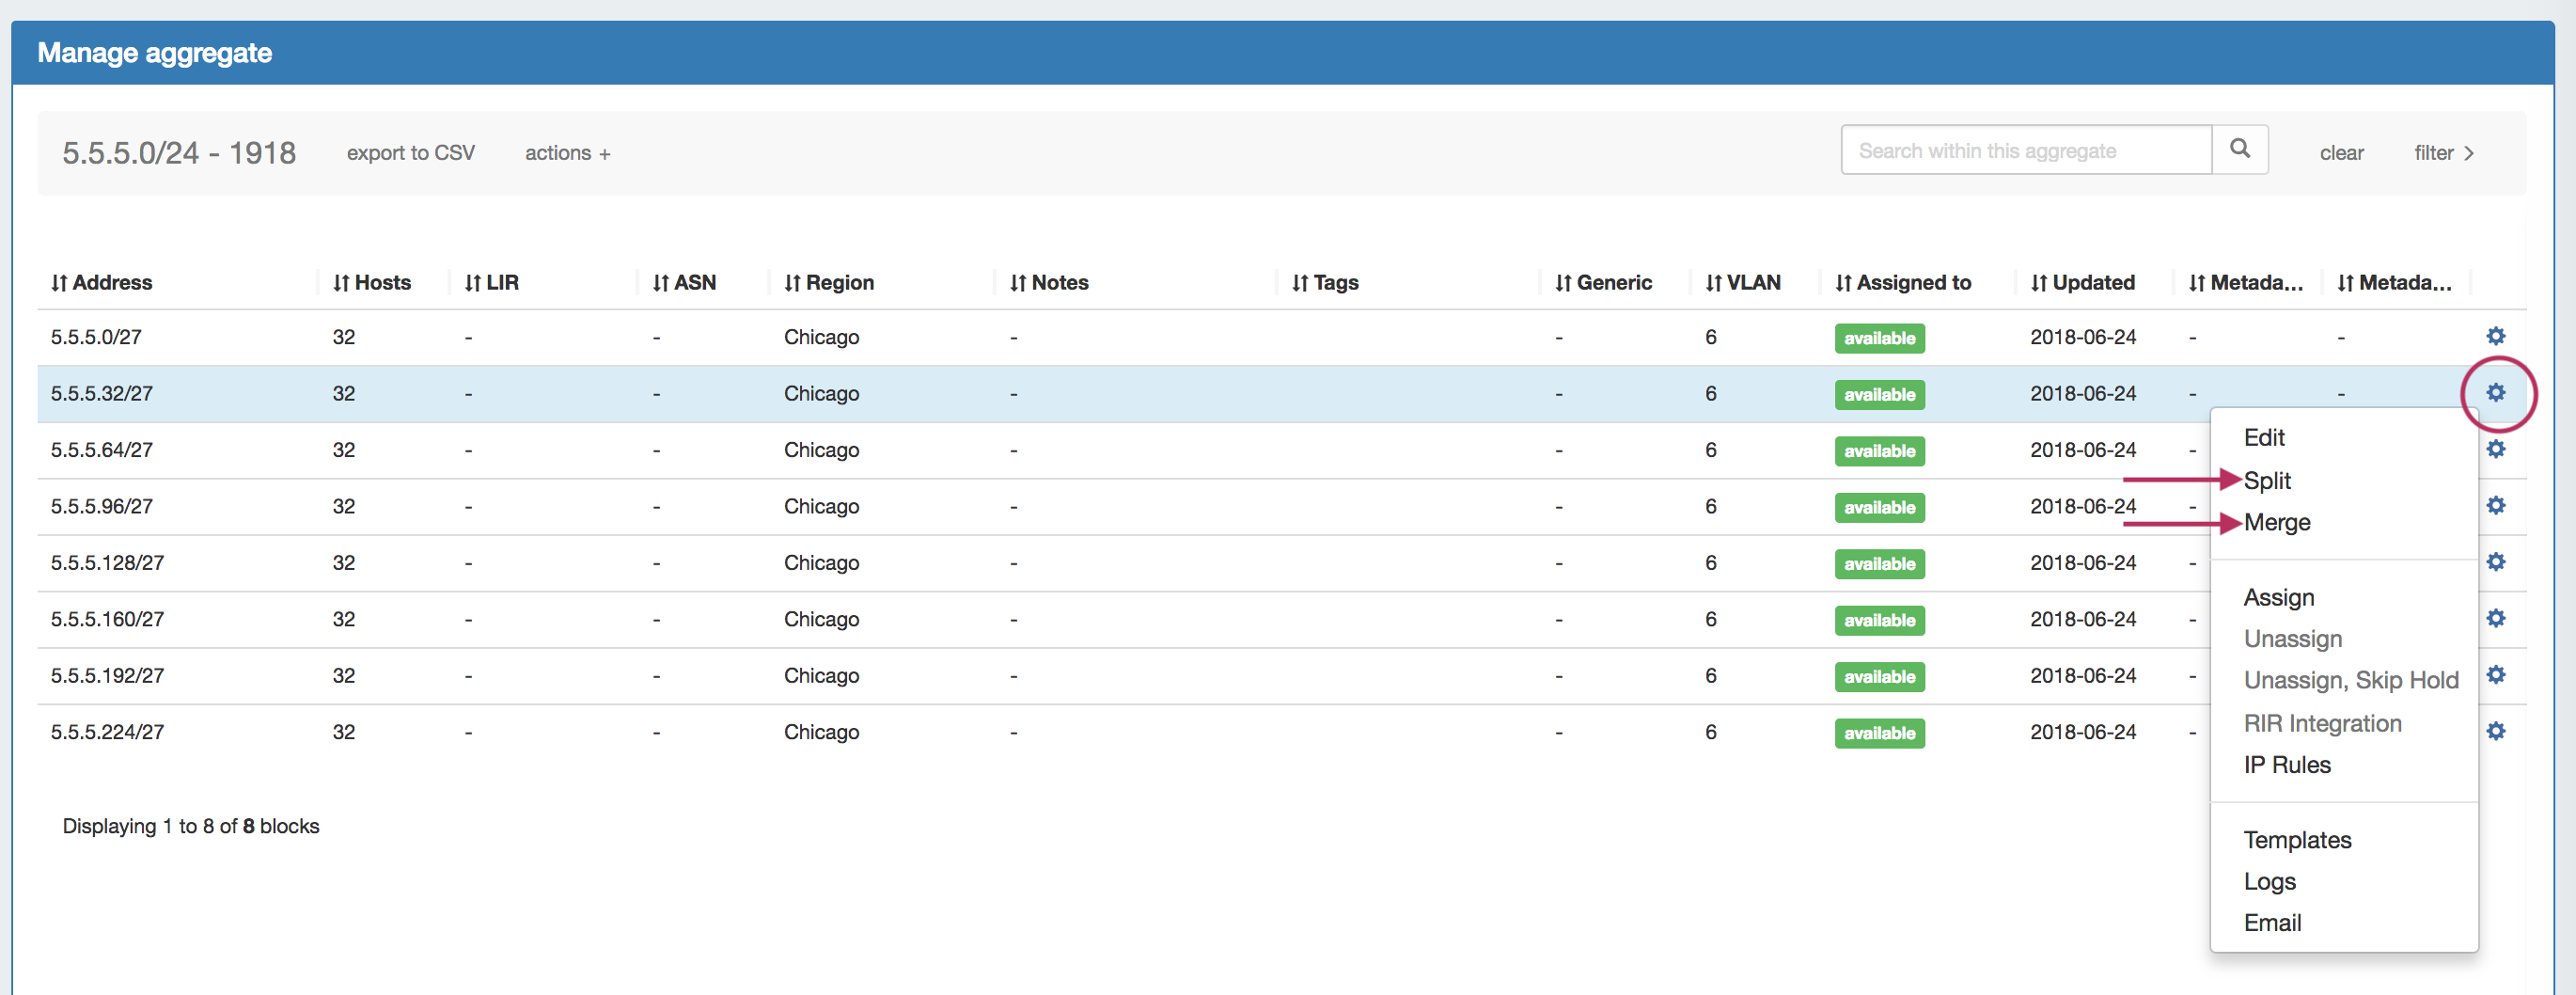
The Split option is not available for blocks that are already of the smallest available size ( IPv4 /32s or IPv6 /128s), for blocks in "Holding", or for blocks that are already assigned and do not have subassignments enabled. If more than one level of splitting is needed, use "Templates - Auto Split" instead.
...
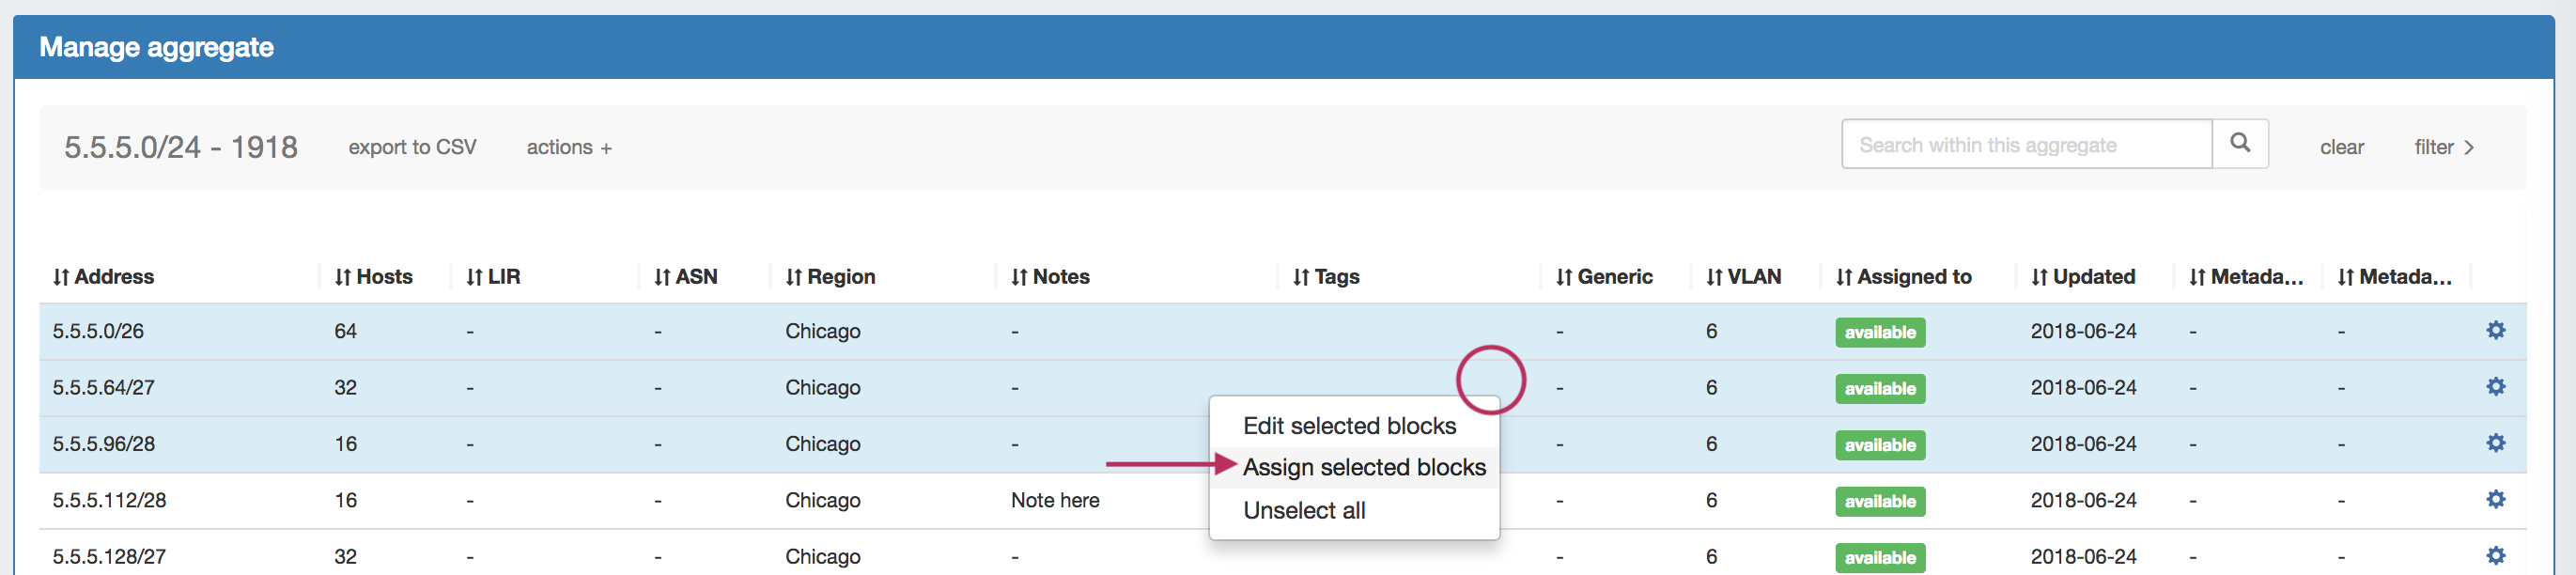
To edit multiple blocks at a time, shift-click each block you wish to edit - they will highlight in blue. Once selected, right-click on any highlighted block to open the multi-edit attributes screen.
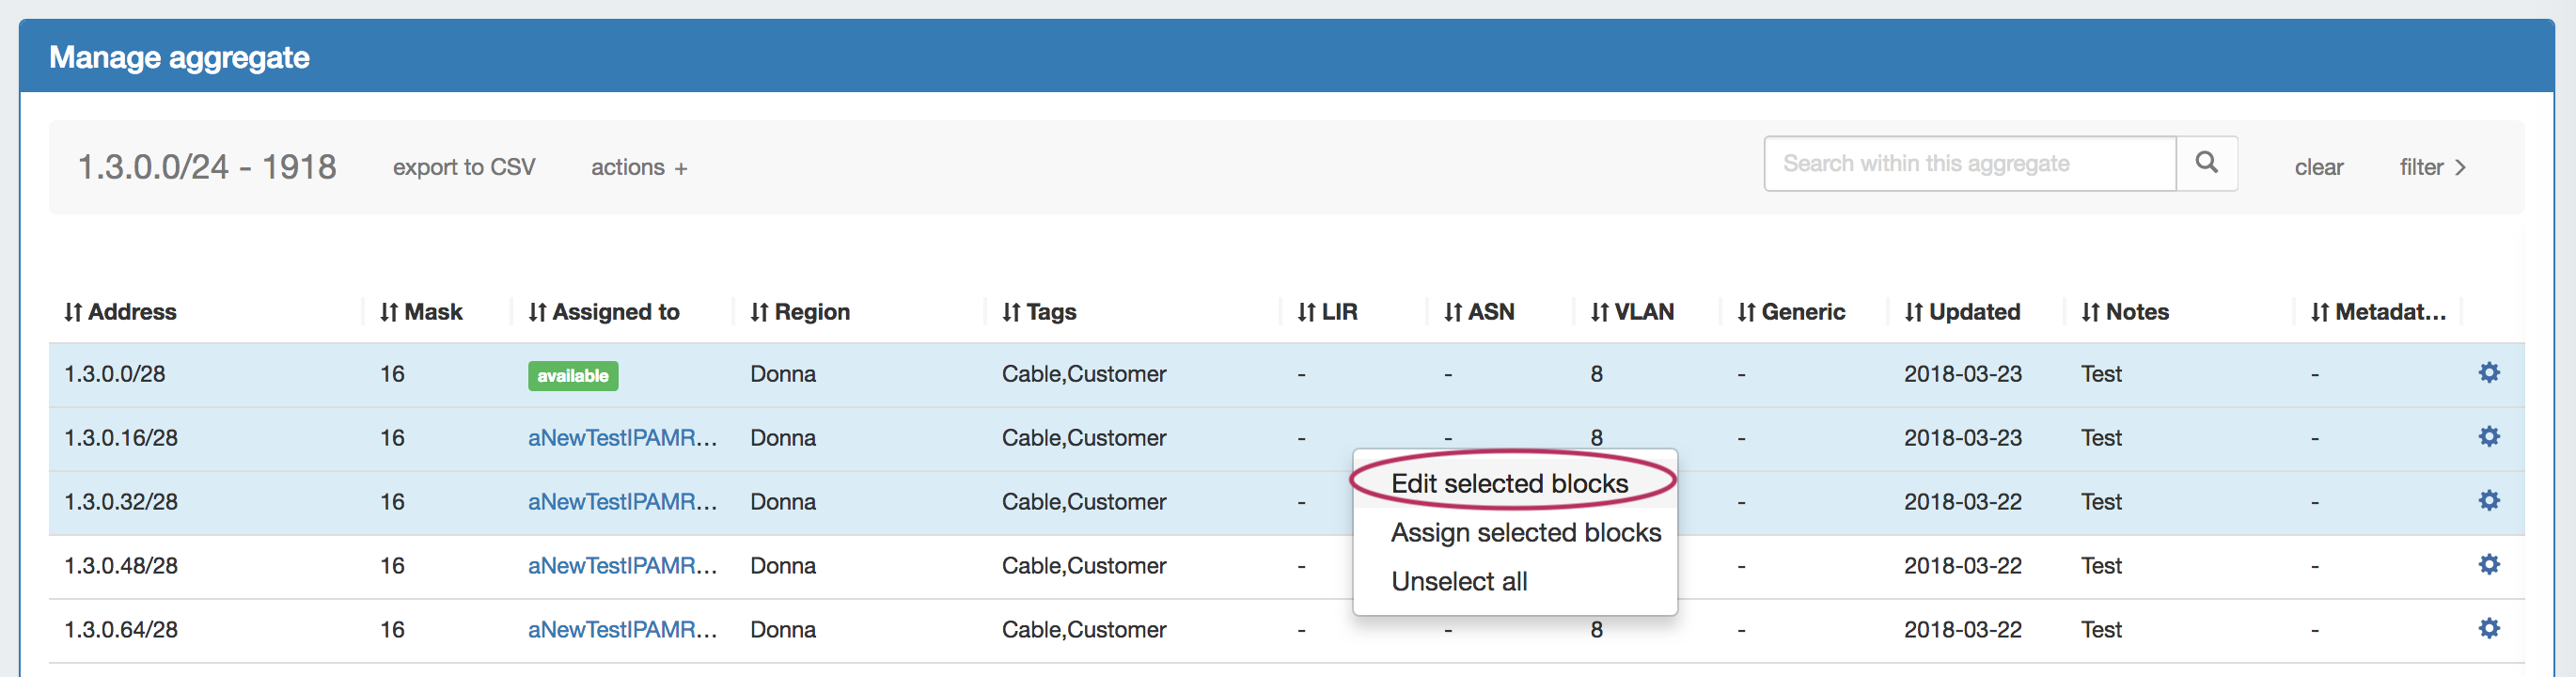

Once selected, right-click on any highlighted block to open the multi-edit attributes screen.
...
After editing the desired attributes for the block, simply hit "Save".
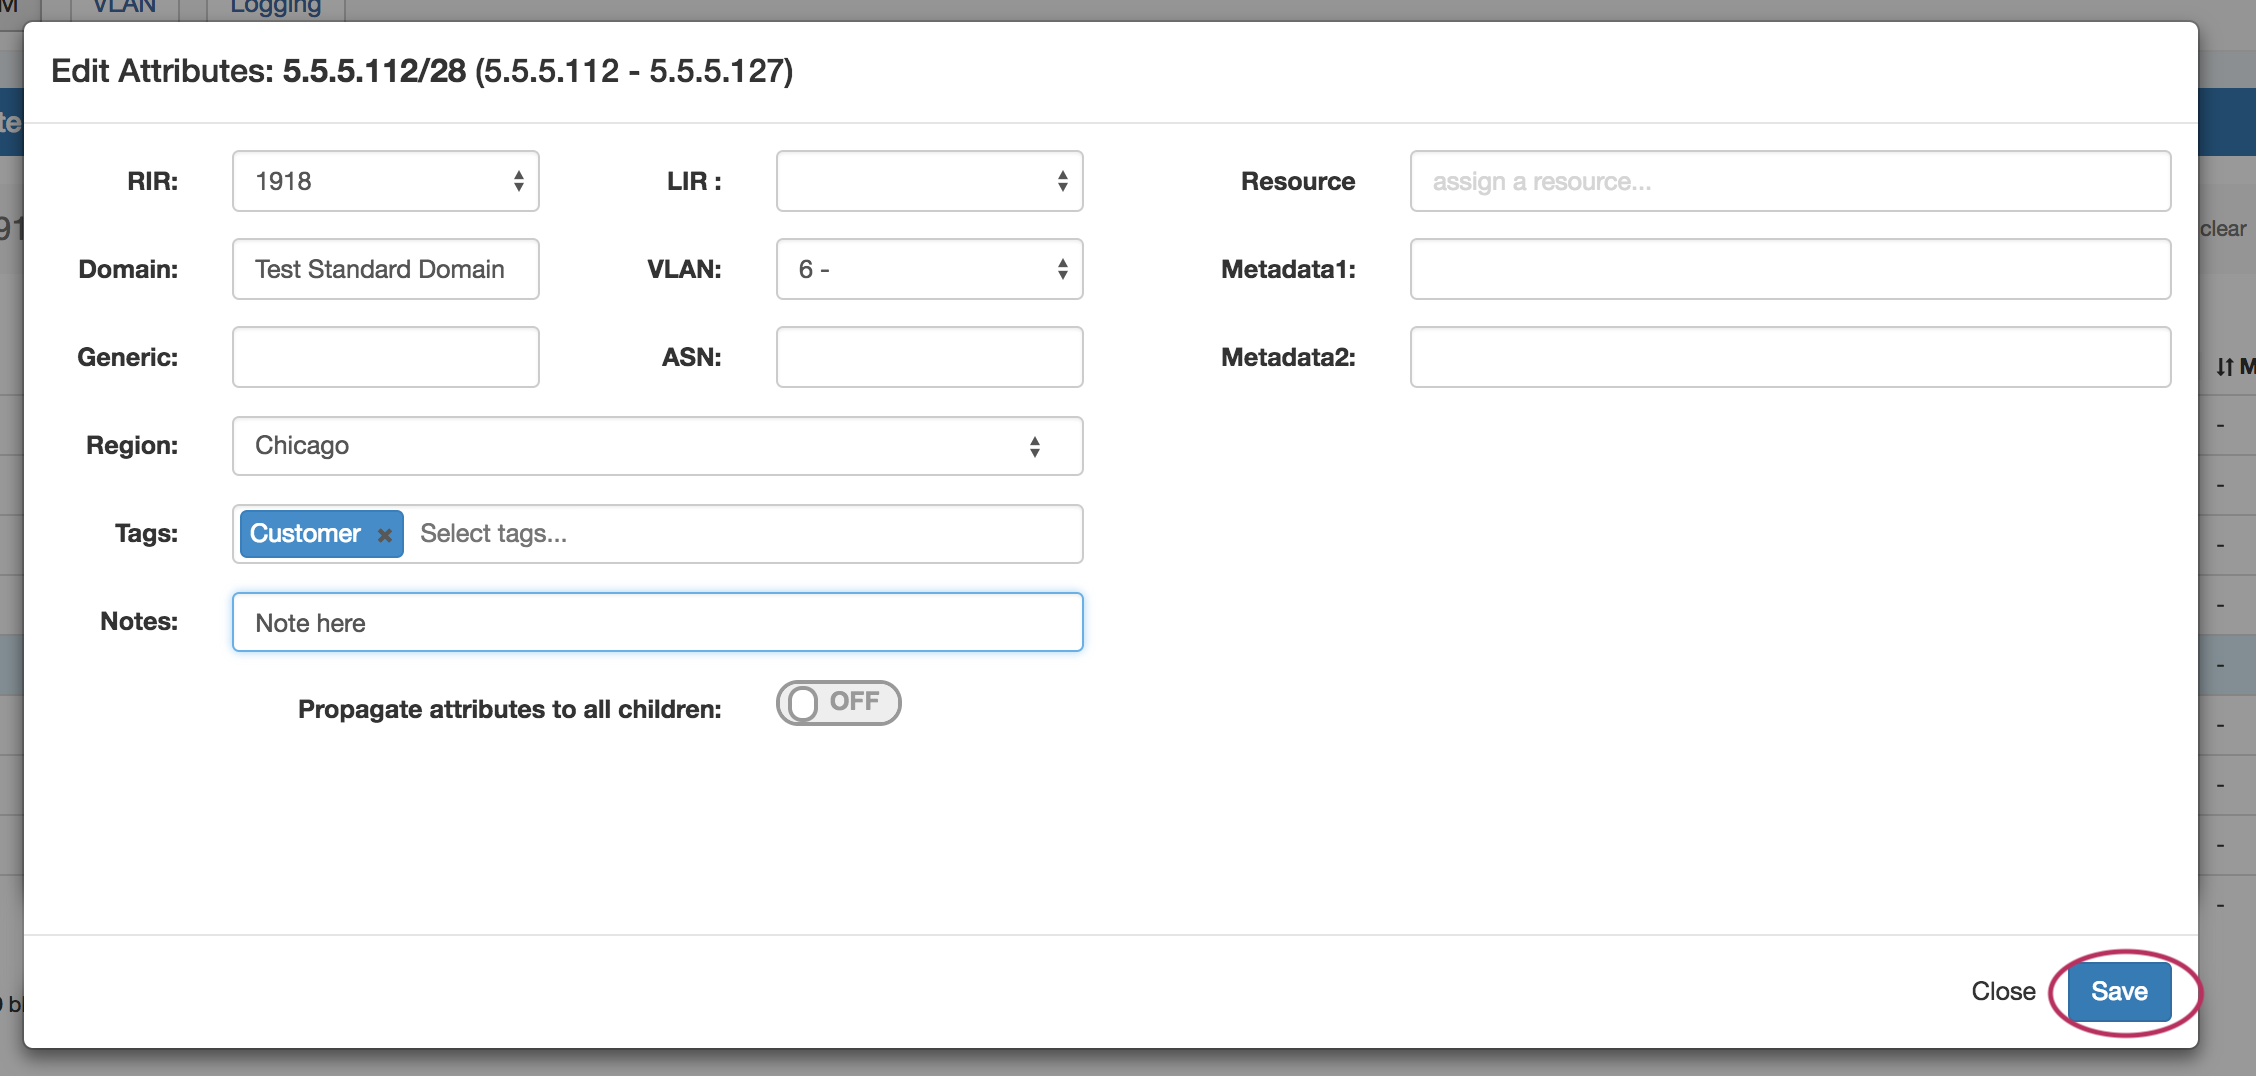
Edit Attributes Overview:
...
Resource: The resource assigned to the block.
NAT: The corresponding public or private block CIDR that is associated with the current block.
Metadata1 - Metadata 10: User-defined text fields, as set in IPAM Administration Edit Columns.
...
You can also assign blocks manually using the "Assign" function from the IPAM Manager screen (accessible from the IPAM Tab). Open the Action Menu for a block, then select "Assign".

Assignments may also be performed for multiple blocks at a time, by shift-clicking the desired blocks, and right-clicking on any highlighted row to open the multi-block menu (choose "Assign Selected Blocks") :

Then, search for / select the Resource to assign the block. A filter tool is provided to narrow the list to a particular Section type.
...
| Tip | ||
|---|---|---|
| ||
If you need to create a 'reserved' pool from which to assign blocks, you can achieve this by creating a "Reserved" Section. Create a Section called "Reserved", add the IPAM gadget to it, then create an Entry with that Section to be the address group. From there, use the IPAM gadget and the IPAM Manage page to assign and unassign IP space from that pool. For more details, see the FAQ entry: "How do I 'reserve' IP Space?" |
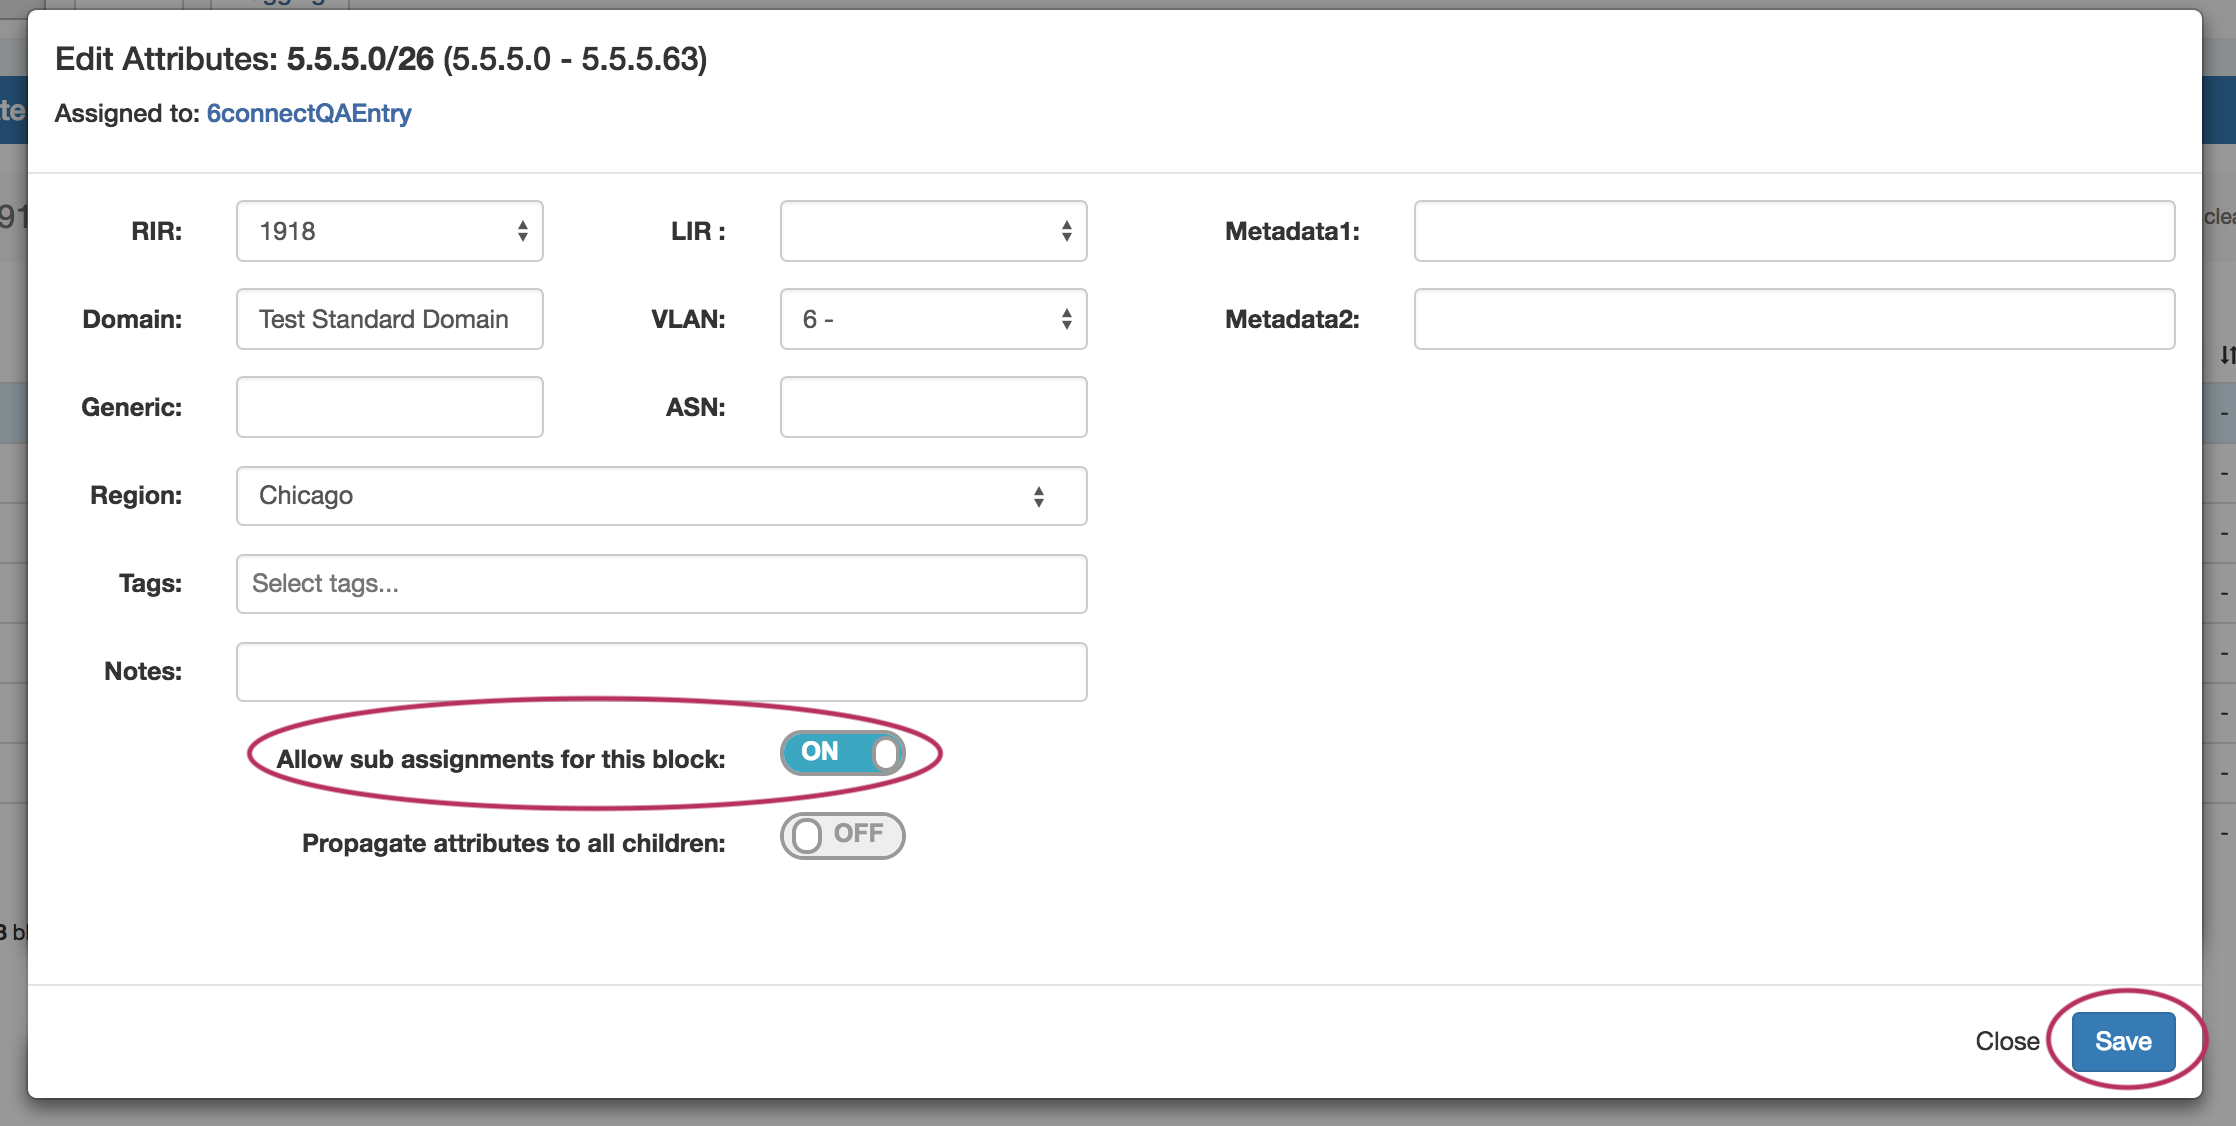
Sub Assigning IP Space
To allow sub assignments, just toggle the "Allow sub assignments" button to "On" under Edit block.
...
Sub assignments can be useful for tracking IPs assigned to a customer with multiple subsidiaries, or locations.
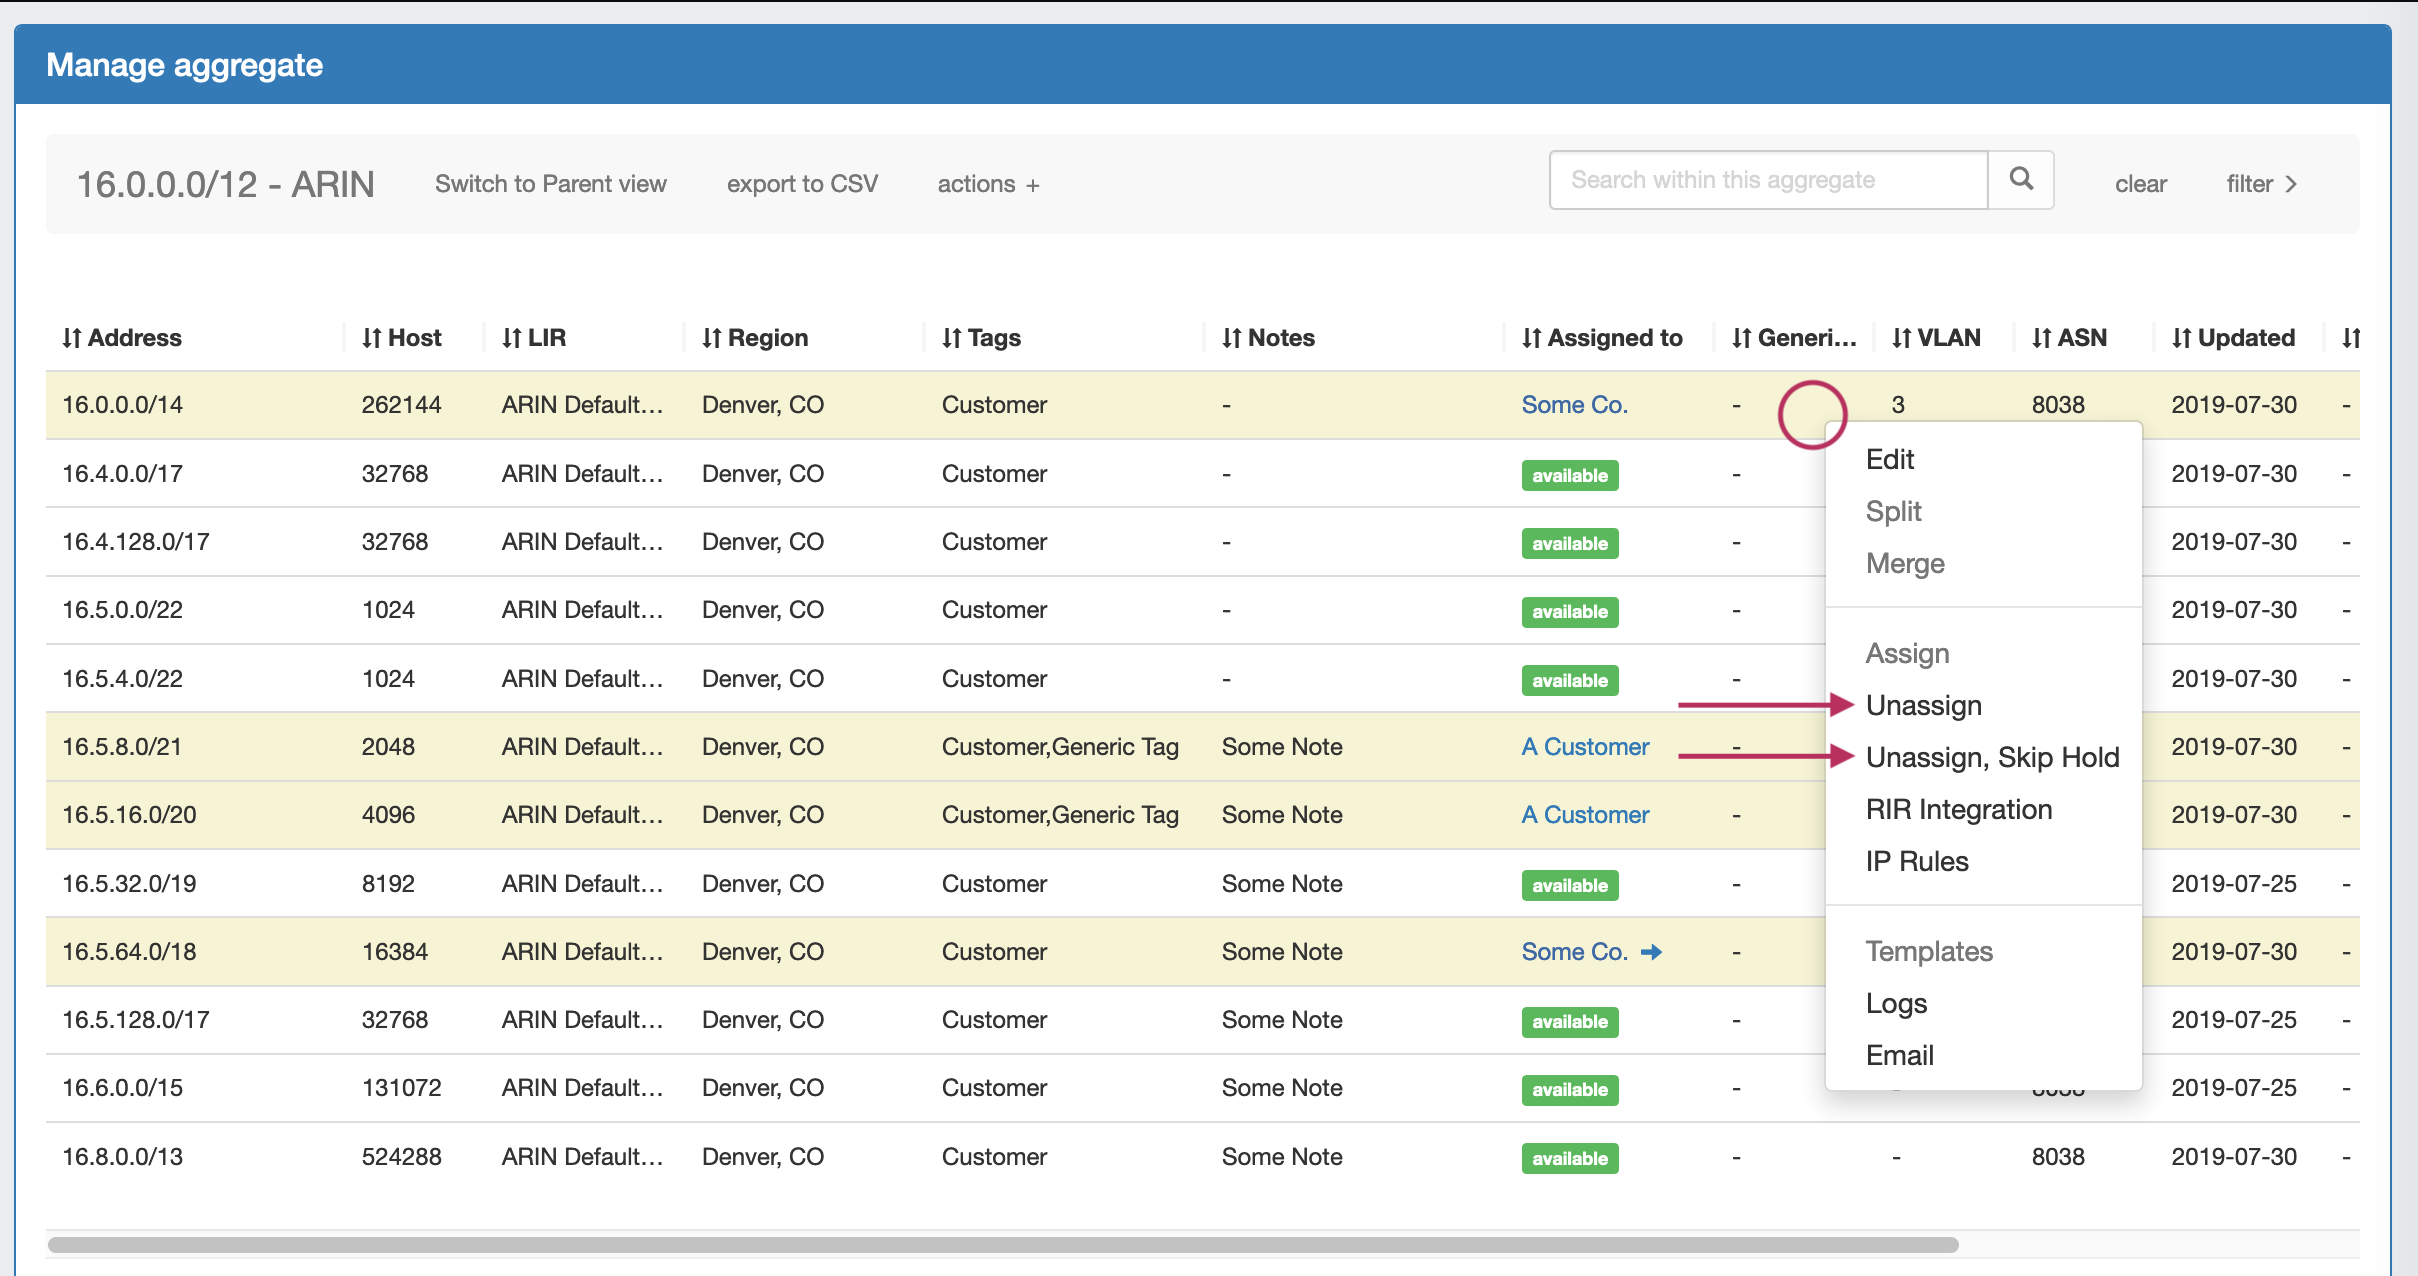
If a block is subassignable, a blue arrow will display in the "Assigned To" field in IPAM Manage.


In the IPAM gadget, subassignable blocks display a blue arrow in the 'Address' field.

Unassign IP Space
When a block is assigned, you will have the option of unassigning the block from the resource and returning it to the Holding Tank.
...
You may also chose "Unassign, Skip Hold", which unassigns the block and immediately returns it to available, bypassing the holding tank.
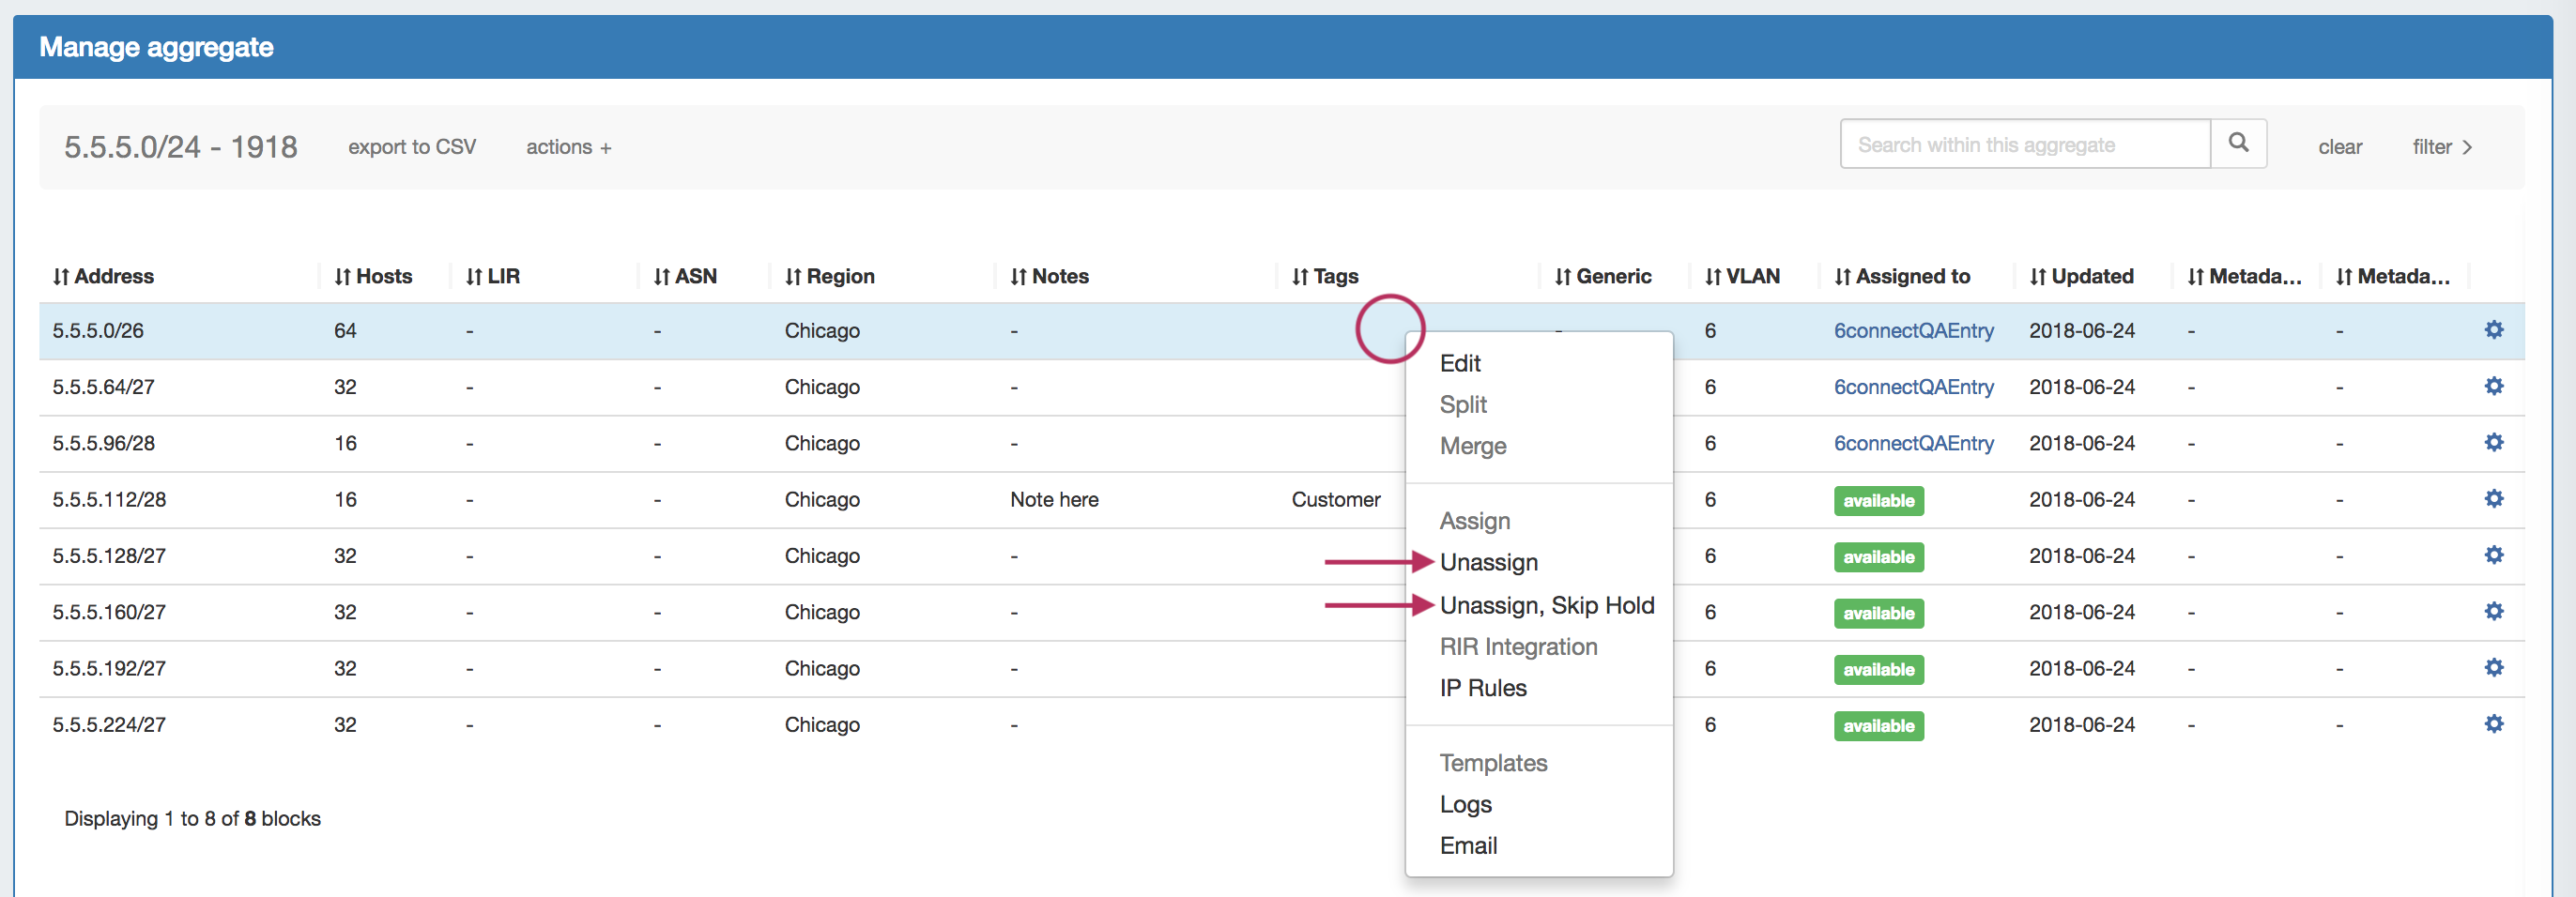
After unassigning blocks / skipping holding, newly available blocks will be merged upon next page refresh. Blocks which had been subassigned will revet back to the parent resource.
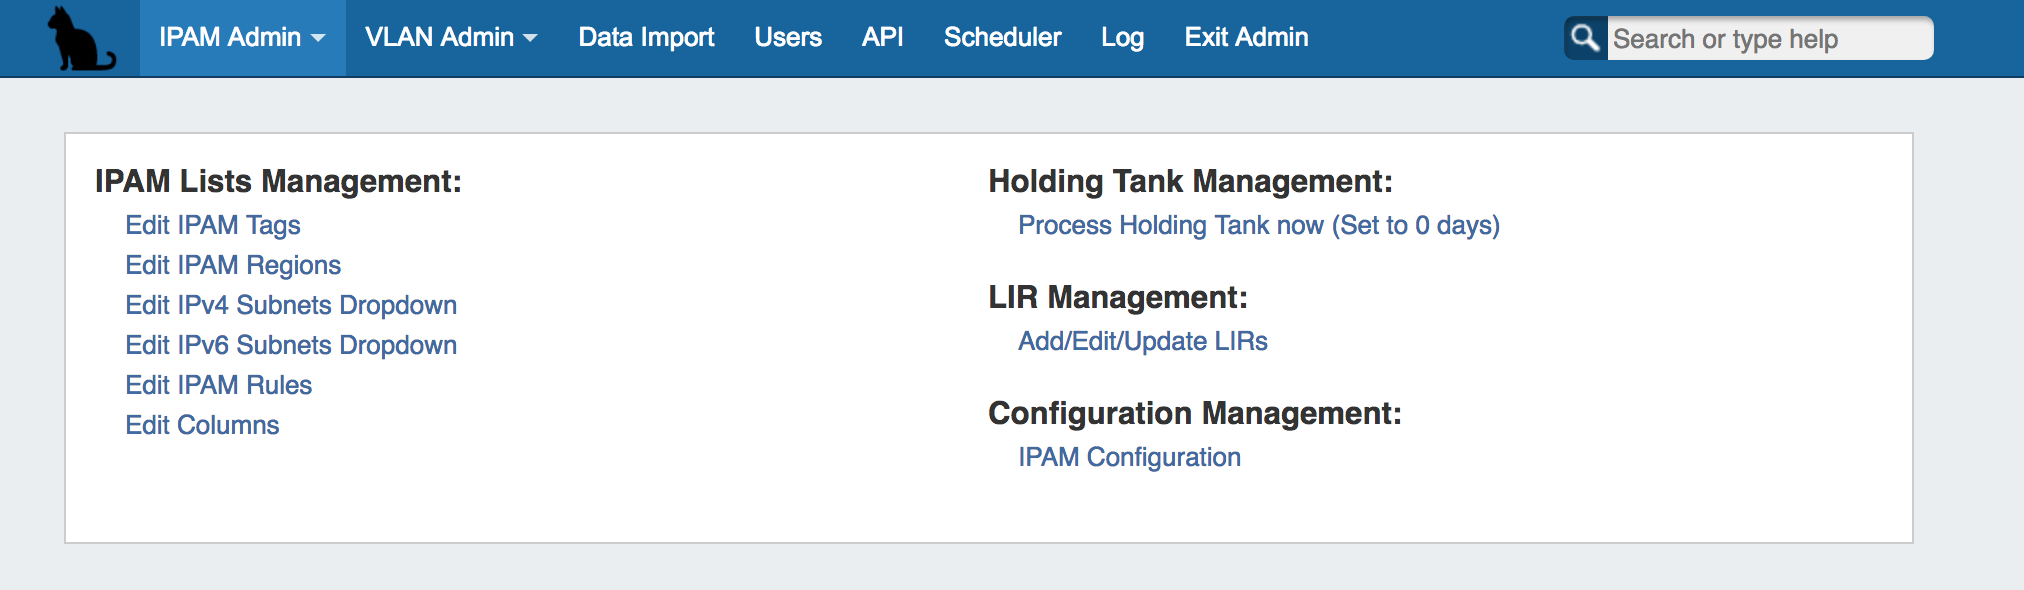
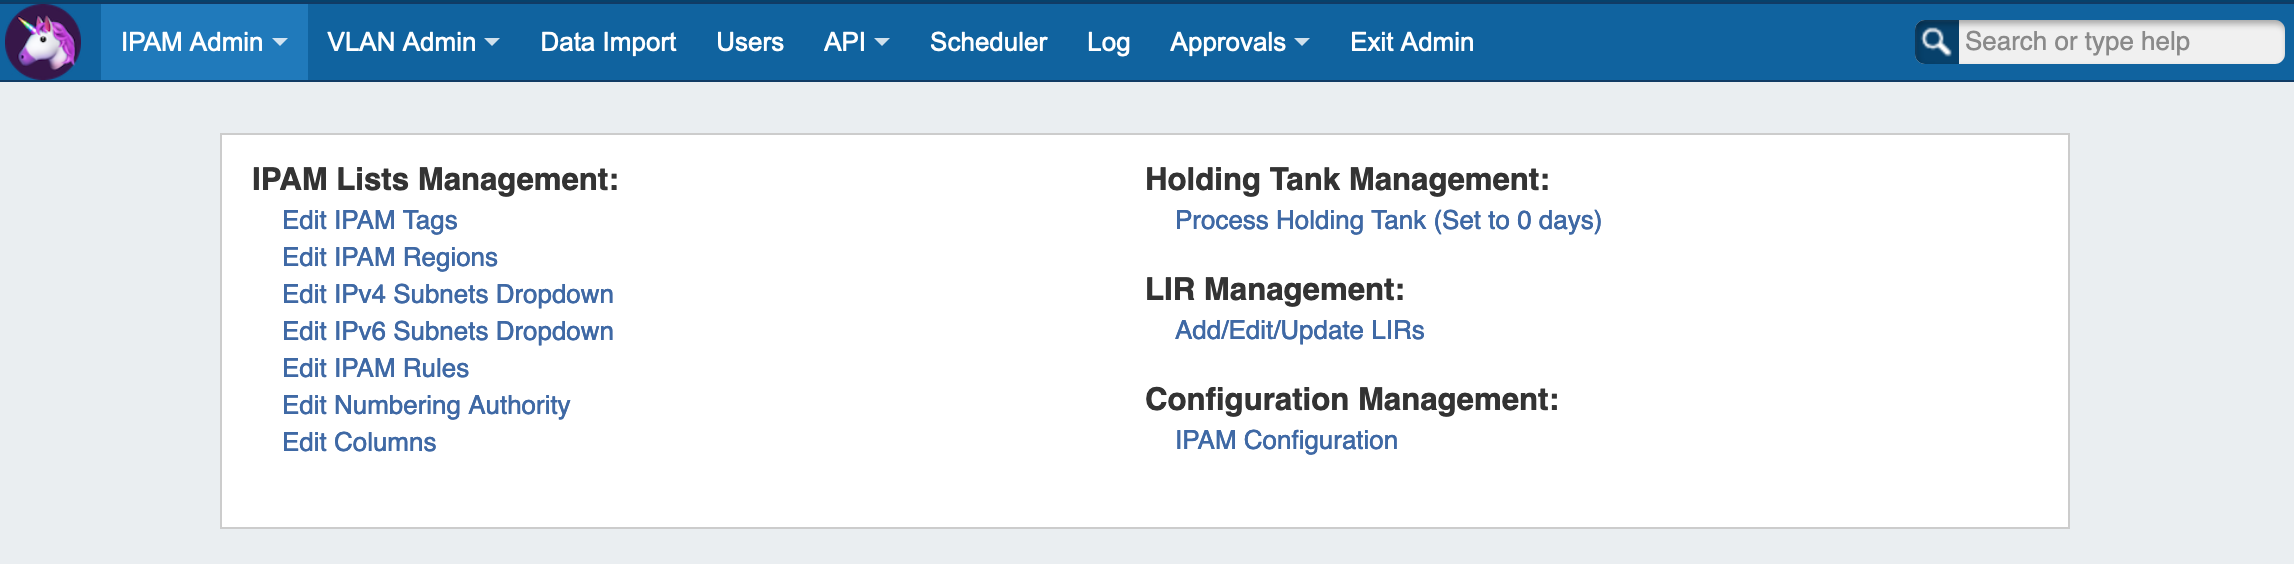
To return IP space in the Holding Tank to the Available Pool, process the Holding Tank via the Admin screen under IPAM Admin (this will only process blocks that were present for the specified number of days).
...
Admin screen under IPAM Admin (this will only process blocks that were present for the specified number of days).
For more information on the Holding Tank, see Holding Tank Management.
Working with NAT Blocks
Track IP NAT Associations
Track NAT associations between public and private (1918) blocks via the IPAM "NAT" Field.
The "NAT" field accepts a single IPv4 CIDR to associate with the current block, and automatically updates the corresponding block with the NAT association.

| Note |
|---|
Working with NAT'ed BlocksUse caution when managing NAT'ed blocks or aggregates - major actions that change either block's assignment or size (assign, unassign, split, merge, autosplit/cleanup) removes the NAT association. In this case, complete the necessary high-level block tasks, and then re-save the NAT CIDR association to either block. |
Enable NAT
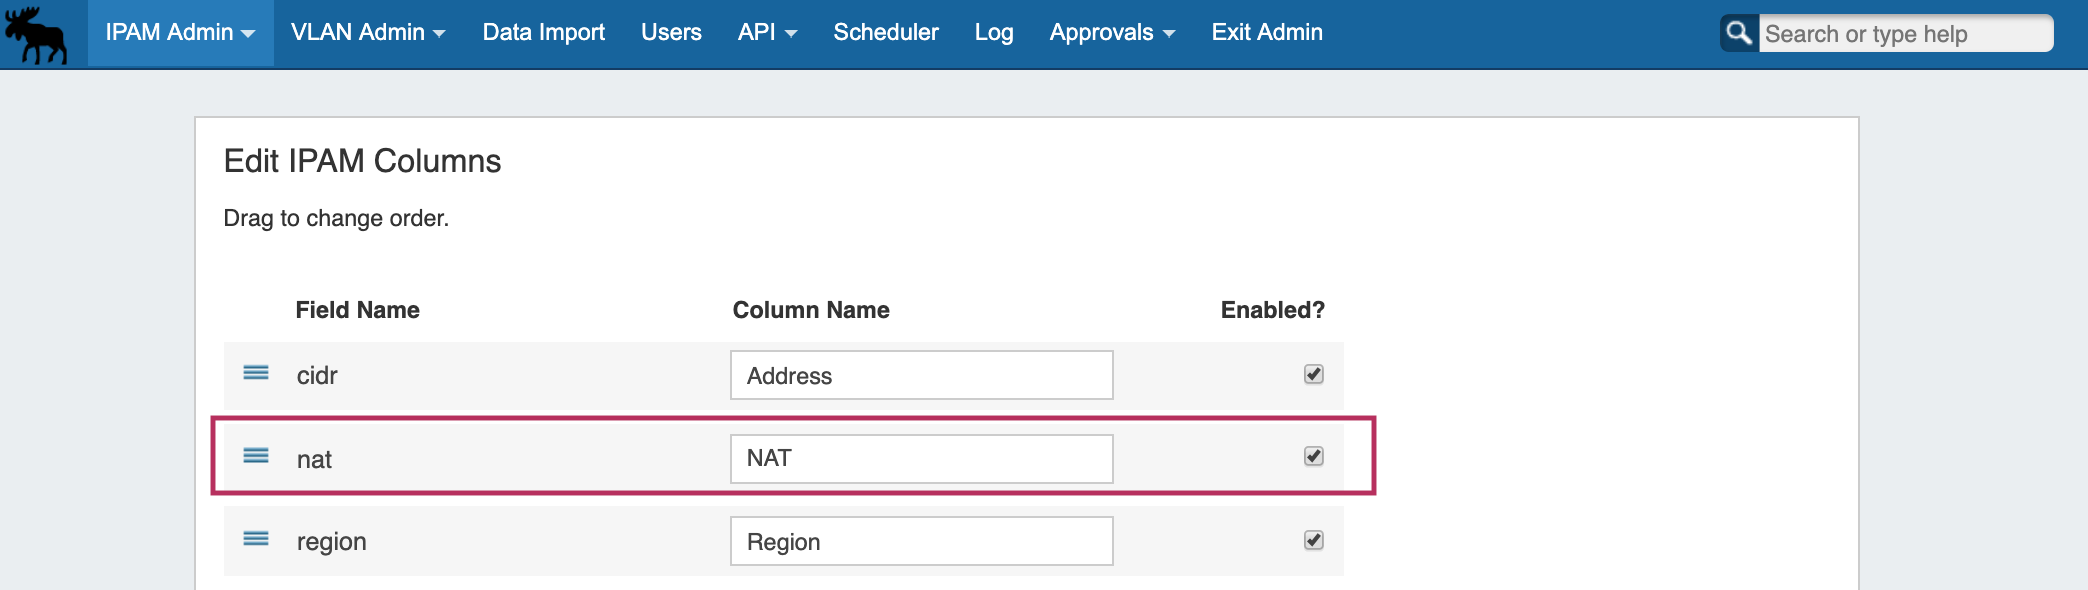
Enable the NAT field by navigating to IPAM Admin → Edit IPAM Columns.
| Expand |
|---|
From there, ensure that the NAT column is checked (enabled), and customize the column location if desired. Be sure to click "Update" to save any changes.
|
Create NAT Association
Ensure that the two appropriate IP Aggregates (one public, one 1918 private space) containing the desired blocks to NAT have been added into ProVision. (See: Working with IP Aggregates)
After verifying the aggregates and blocks, you may add the NAT association:
| Expand |
|---|
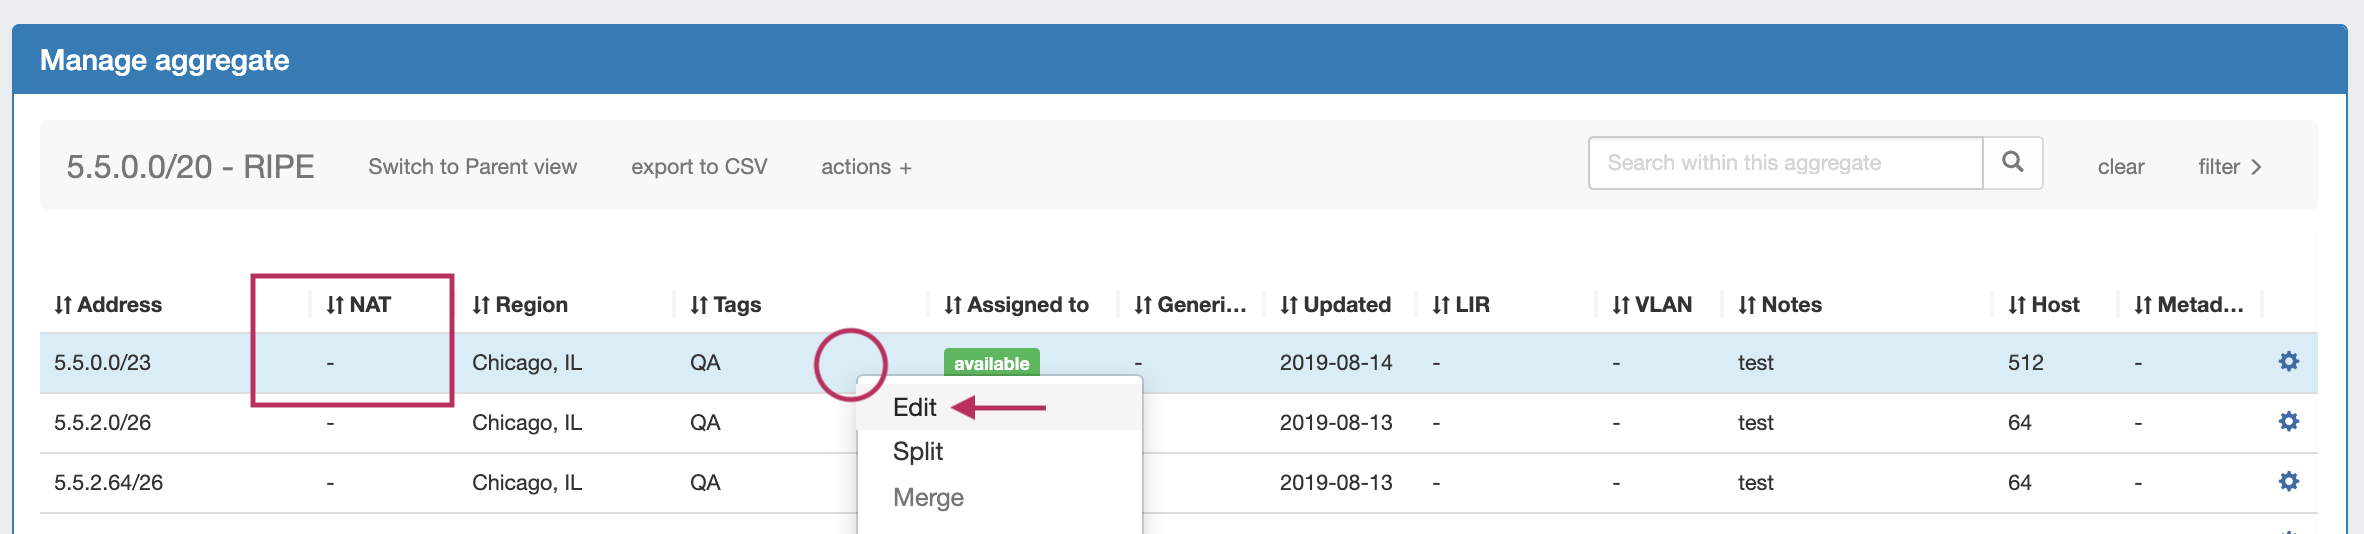
Open IPAM Manage for either aggregate, then open "Edit Block" for the specific block you wish to NAT. (See:Working with IP Blocks)
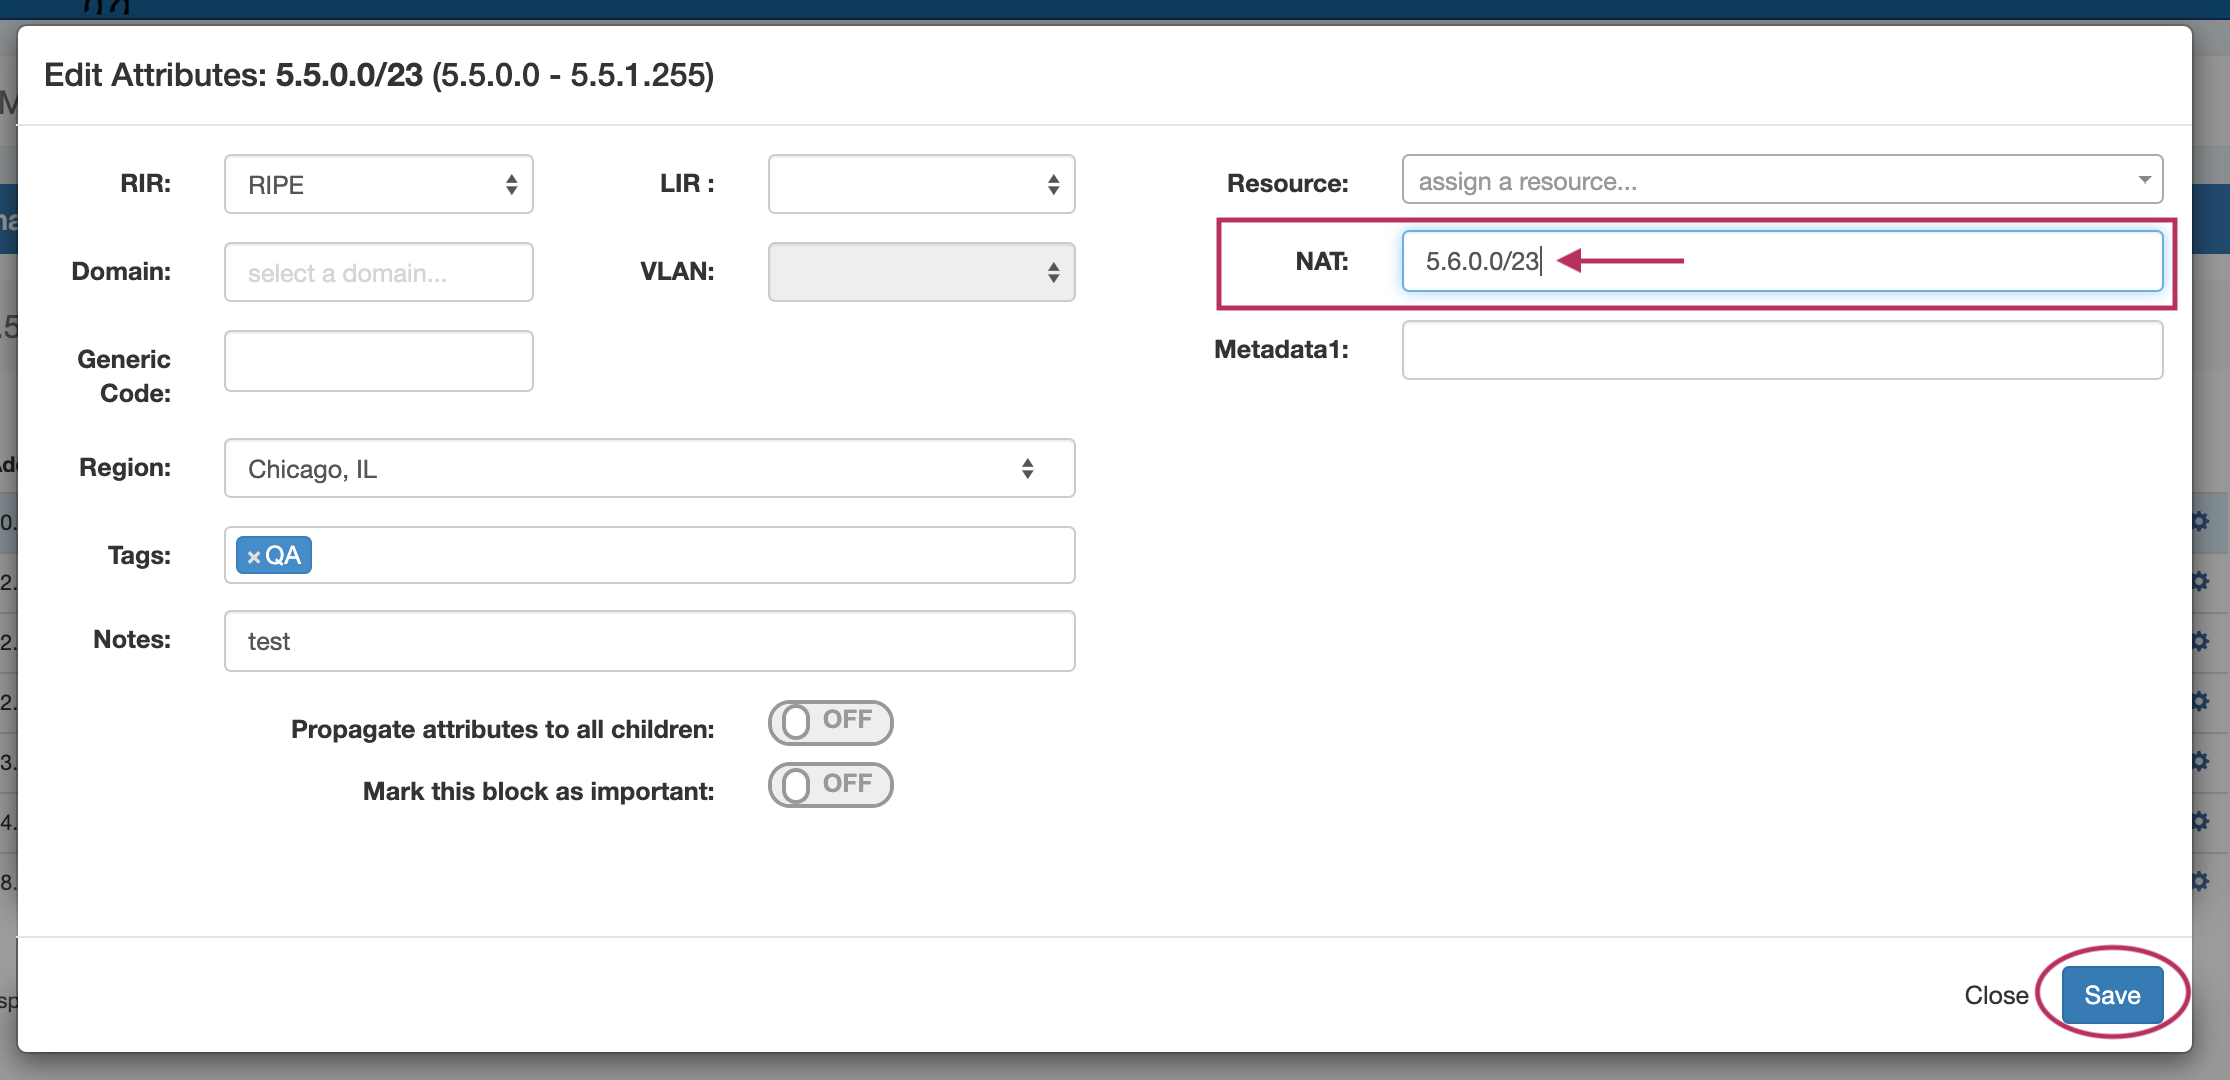
In the Edit Block dialog, enter the IPv4 CIDR of the corresponding NAT block. When complete, click "Save".
Once the NAT field has been saved, the association will display in the NAT Column.
The corresponding block (here, the private 1918 space block) will automatically have the NAT associated applied.
|

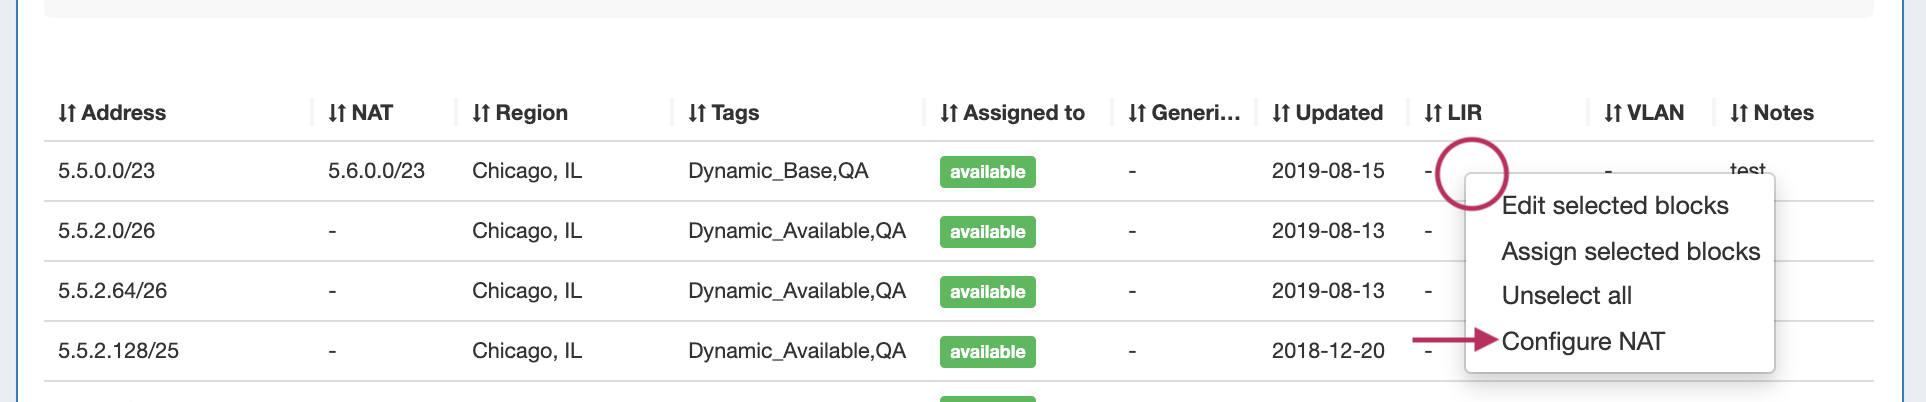
Configure NAT to Router(s)
To push the NAT association to a router, go to the IPAM Manage Action Menu, and select "Configure NAT" for the NAT'ed block(s) (For information on adding a router to ProVision, see Peering Routers).
| Expand | ||
|---|---|---|
| ||
Open the Action Menu for the NAT'ed block(s) and select "Configure NAT".
Then, select the router. Add the custom configuration / interface information for the router and click "Configure". 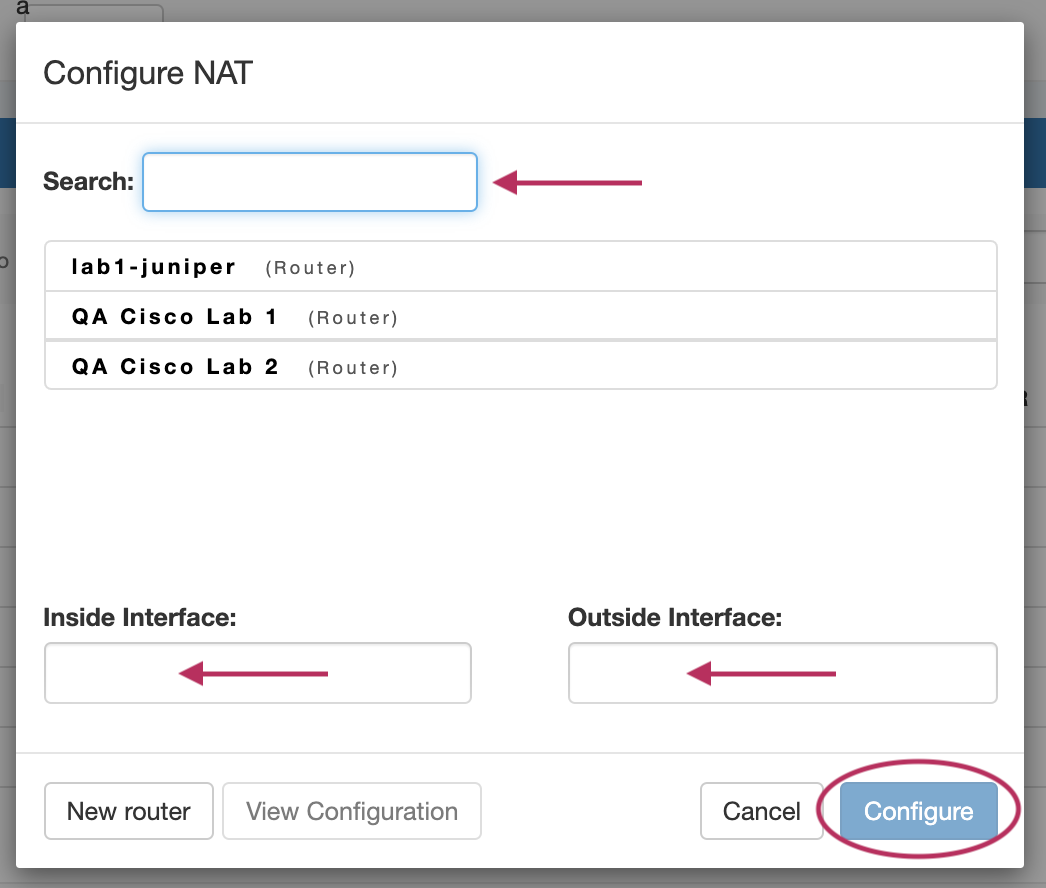 |
NAT Rotate Dynamic IPs
NAT'ed block assignments may be automatically rotated to other available IPs via the "Rotate Dynamic IPs" scheduler task available in the Admin → Scheduler tab.
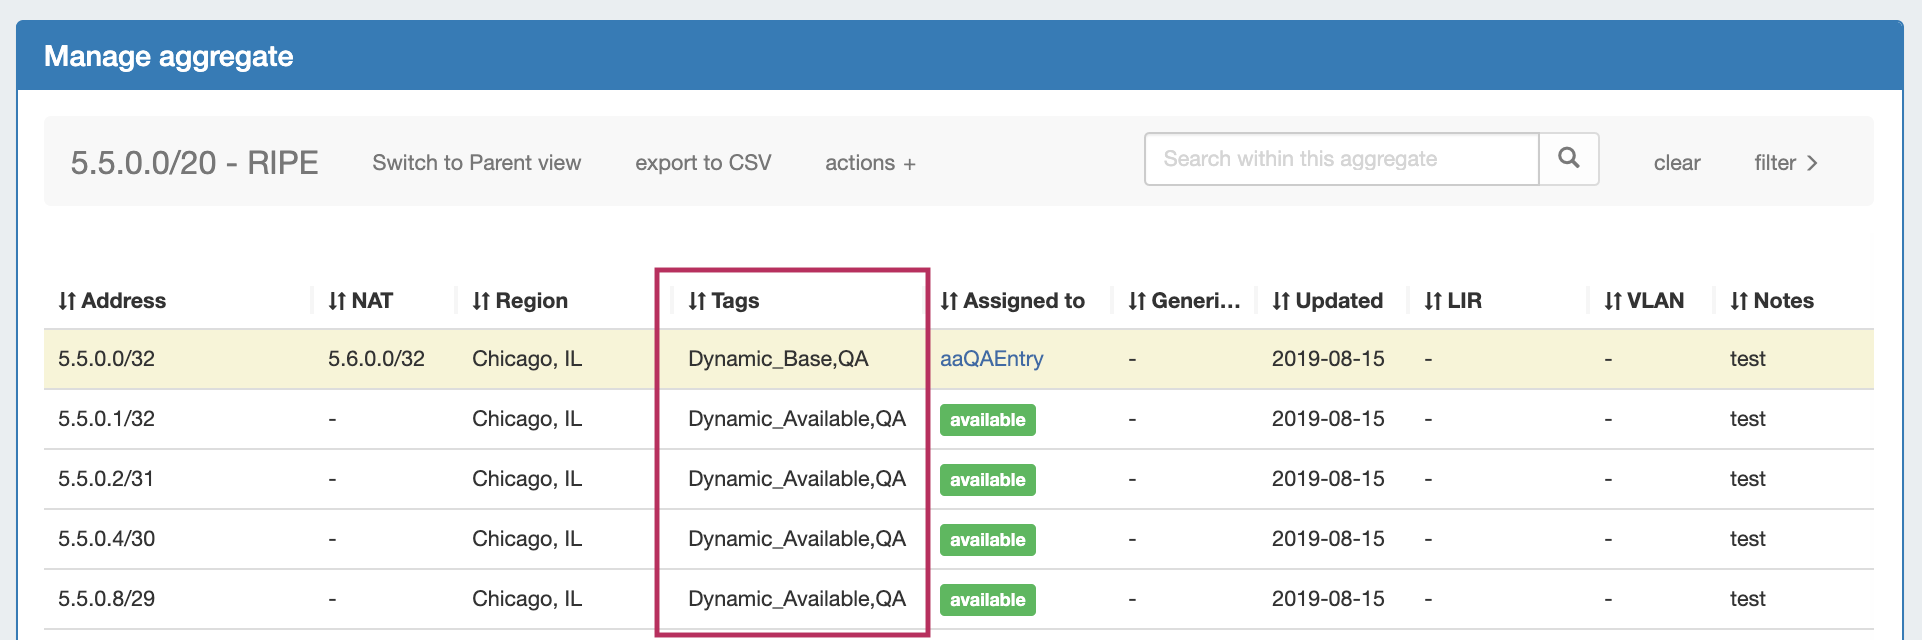
"Rotate Dynamic IPs" reassigns single IPv4 NAT addresses (/32s) after 'x' days (since last config push) to an available address denoted by blocks associated with the Dynamic_Available tags.
Prior to using this task, two blocks (one public, one private) must be NAT'ed in IPAM, the NAT Config pushed to a router, and appropriate blocks tagged with "Dynamic_Base" and "Dynamic_Available".
| Expand | ||||||||||
|---|---|---|---|---|---|---|---|---|---|---|
| ||||||||||
Before you BeginBefore setting up NAT Dynamic IP Block Rotation, ensure the follow has been completed:
Add Dynamic Tags to BlocksAfter NAT blocks and aggregates have been set up in ProVision with sufficient size, matching IPAM tags, and NAT metadata, you can identify which blocks to use for dynamic rotation by adding the "Dynamic_Base" and "Dynamic_Available" tags.
Set up Scheduler TaskGo to Admin → Scheduler, Add the scheduler task "IPAM - Rotate Dynamic IPs".
|

Additional Information
For additional information on working with the IPAM system in ProVision, see the following areas:
- Gadgets (IPAM and IPAMv2 Gadgets)
- Working with IP Rules
- IPAM Administration
...