| HTML |
|---|
<div id="google_translate_element"></div>
<script type="text/javascript">
function googleTranslateElementInit() {
  new google.translate.TranslateElement({pageLanguage: 'en'}, 'google_translate_element');
}
</script>
<script type="text/javascript" src="//translate.google.com/translate_a/element.js?cb=googleTranslateElementInit"></script> |
...
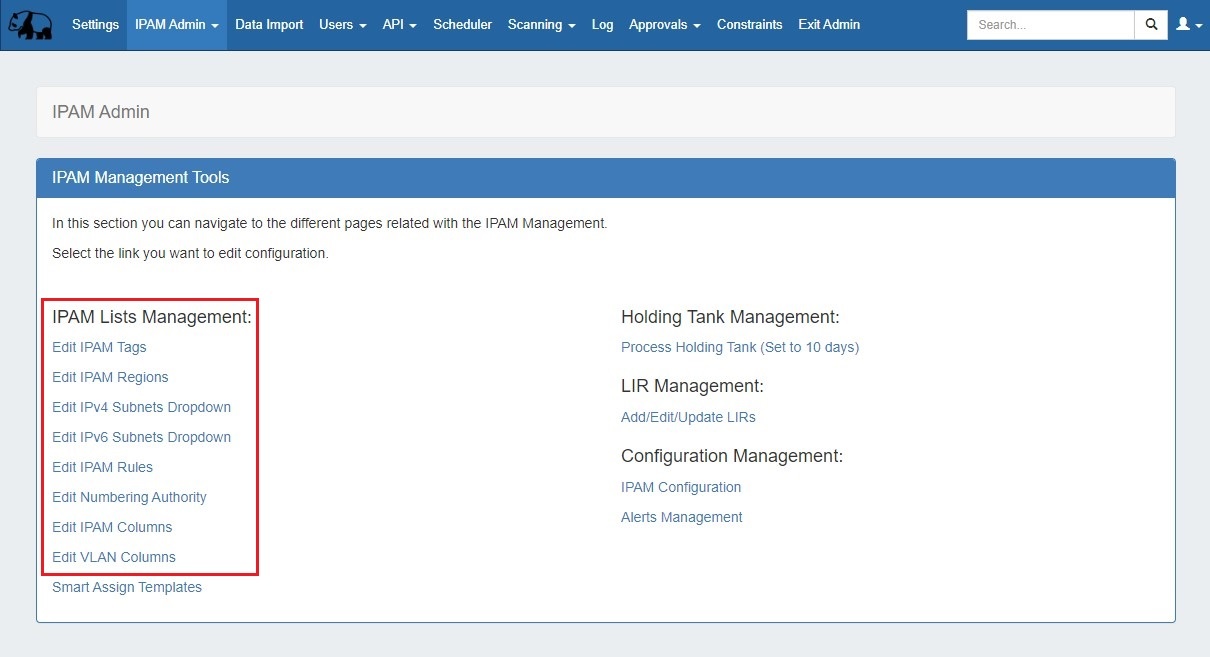
IPAM Lists Management - Overview
IPAM Lists Management is access accessed from the Admin section of ProVision, under the IPAM Admin tab.
Through this area, admin users can update IPAM tags, IPAM Regions, IPv4 / IPv6 subnets, IPAM Rules, Numbering Authority, and IPAM / VLAN Columns.

| Table of Contents | ||
|---|---|---|
|
...
When you are applying properties to IP blocks, you have the option to edit tags. IPAM Tags are used in a number of areas in ProVision and can be added or edited from this screen.
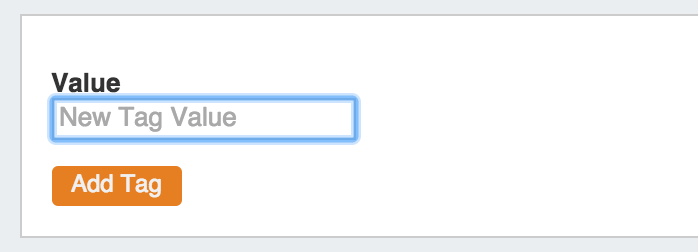
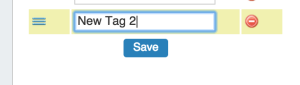
To add a new IPAM tag, click on "Add Tag" type the desired name value for the new tag in the box at the top of the Edit IPAM Tags page .
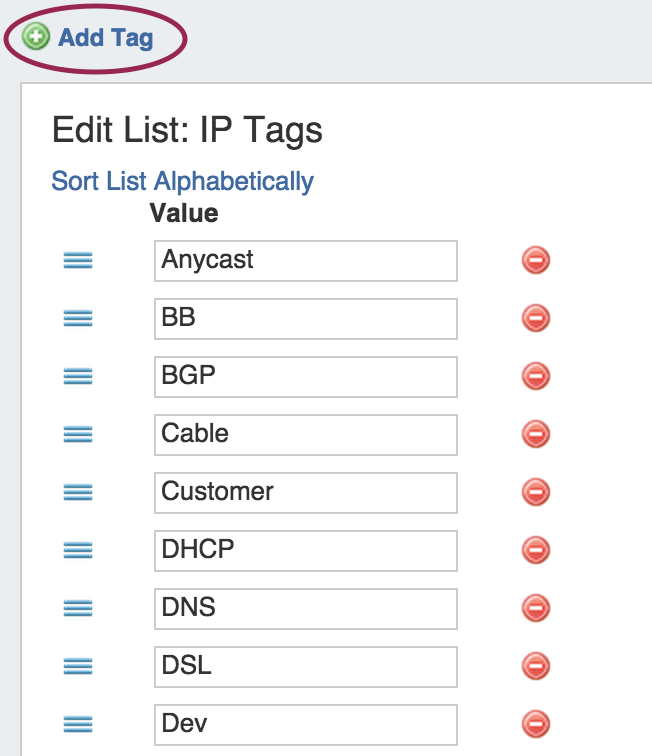
Then, type in the desired name value for the new tag, and hit and click "Add Tag".
To edit a tag, simply type your changes in to the text box with the tag name. Tags with unsaved changes will be highlighted until saved.

To reorder the tag list, click and hold on the "list" icon (three lines) to the left of the tag name, then drag to the desired location in the list and release. You can also click the "Sort Alphabetically" button at the top.

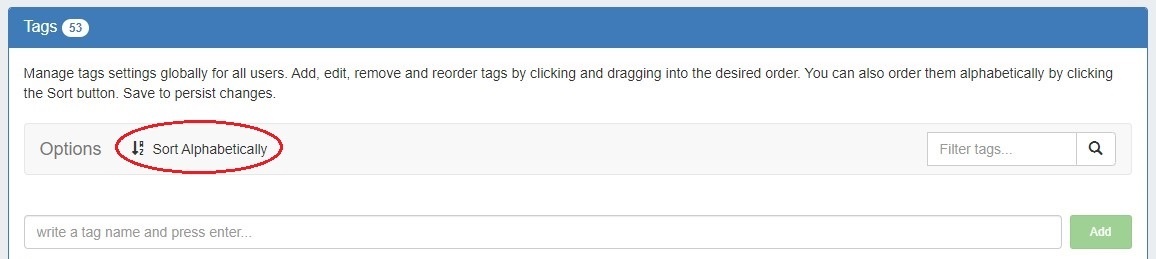
To delete a tag, click on the red "deleteDelete" symbol button to the right of the tag name.

When complete, be sure to click on the "Save Changes" button to save your changes.
Add / Edit Regions
...
| title | Google Geocode API Key Requirement |
|---|
...
Regions
...
Any customers who require an alternative geocode option supported apart from Google Geocode API key, please contact us at feedback@6connect.com.
If enabled, Regions can function as a way to further define your network segments (regional tie-downs, etc.). This gives you flexibility for allocations and assignments beyond simply using Tags. Regions are used by the IPAM Gadget, the IPAM Manage UI, and IPAM Map View.
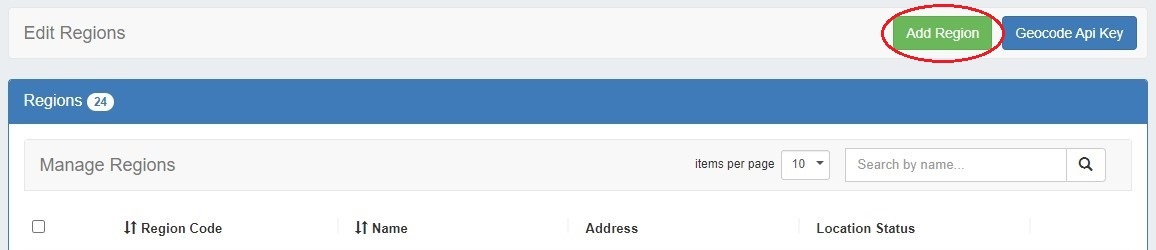
Access IPAM regions from IPAM Admin → Edit IPAM Regions.
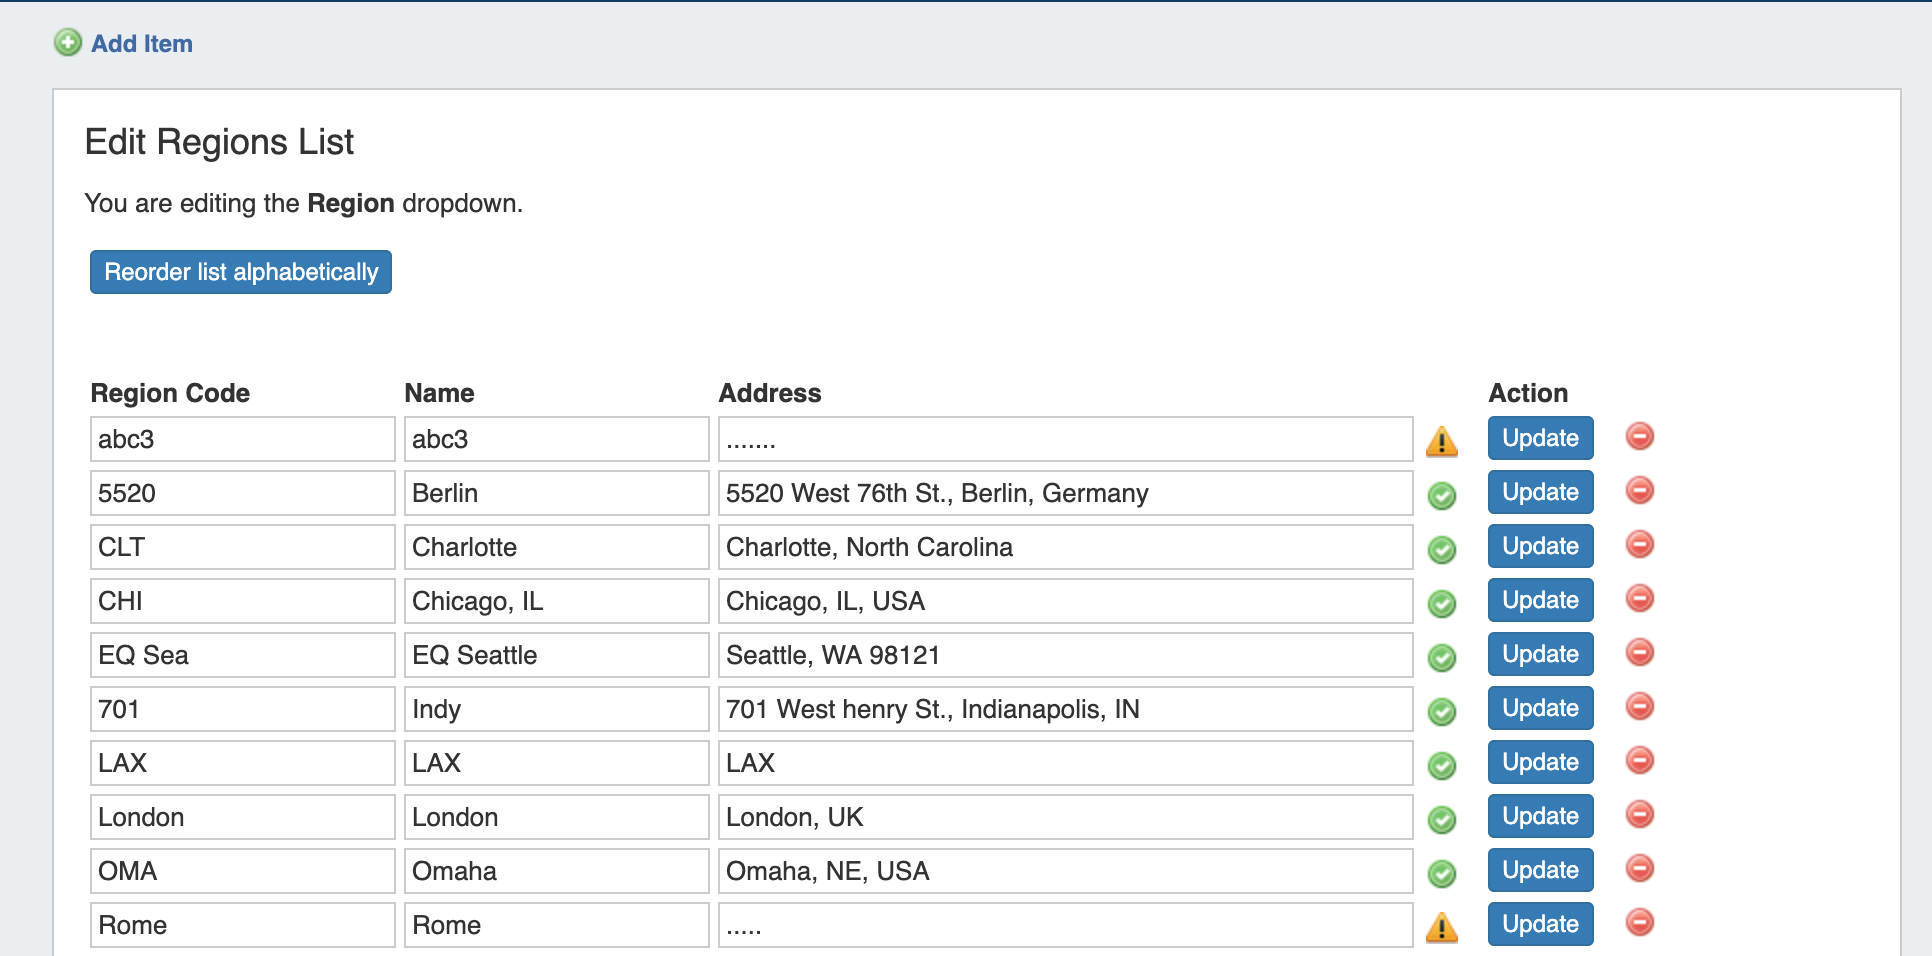
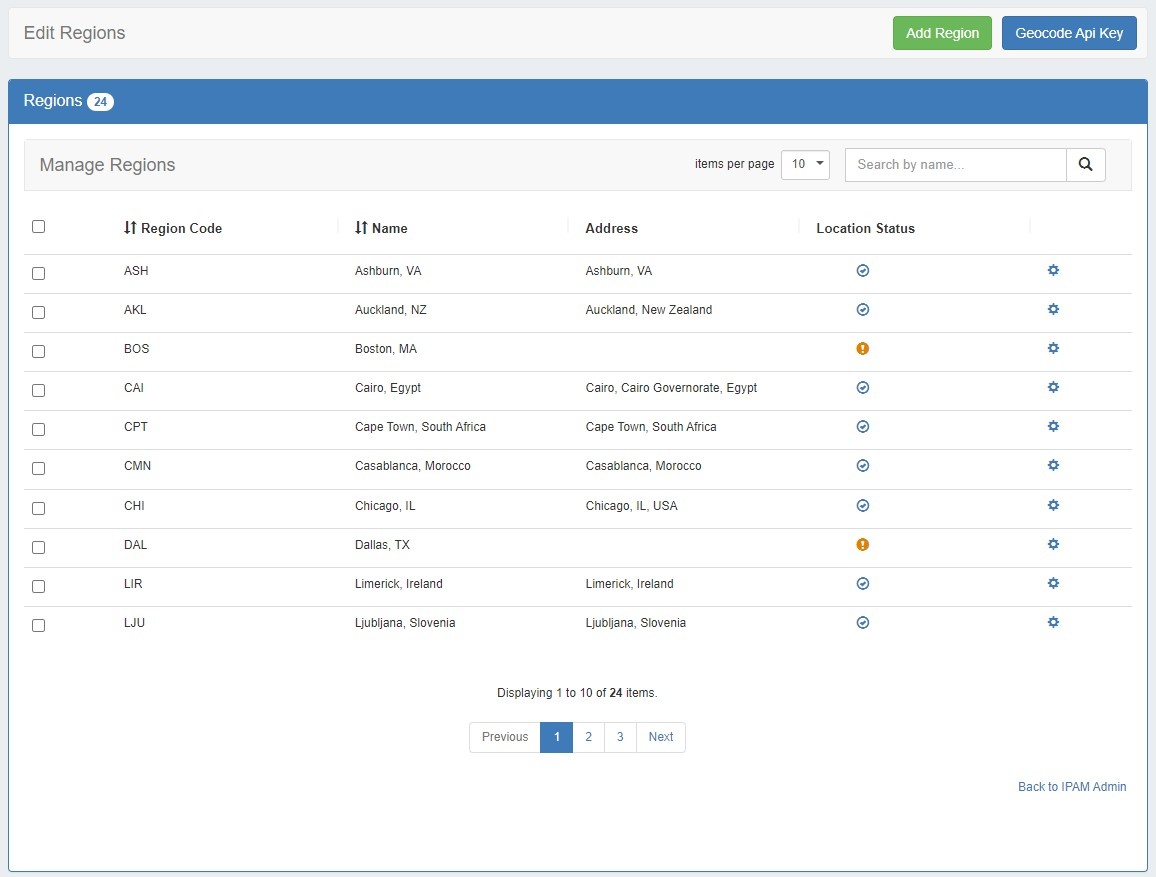
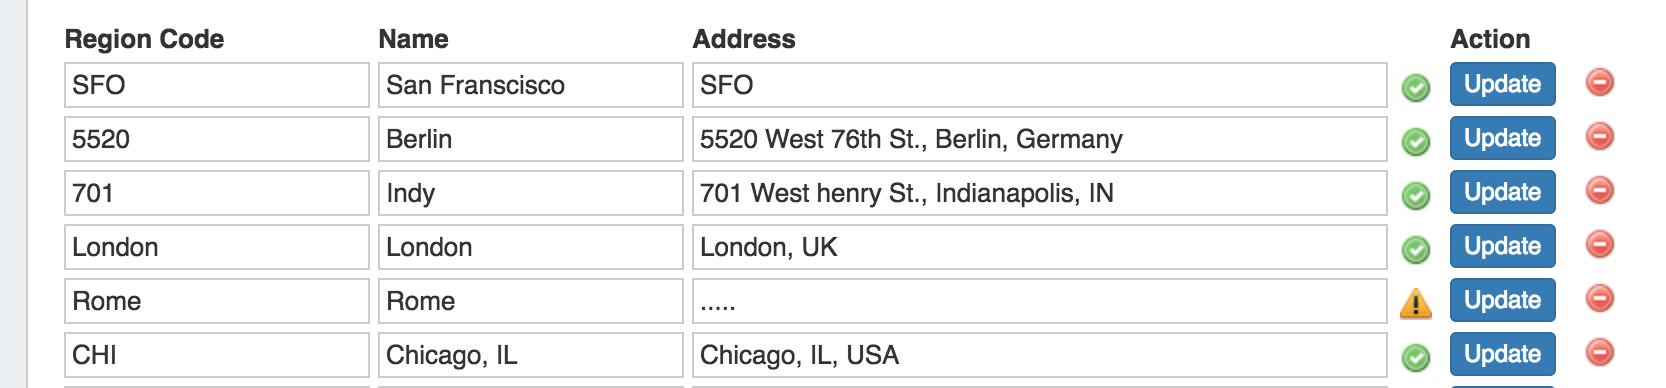
The Regions display includes fields for Region Code, Name, and Address.
- 'Region Code' is the shorthand name that will show in the IPAM Gadget and IPAM Manage screens.
- 'Name' is the long form name value that will be written to the database, used for API calls, and is also used for some filter selectors.
- The 'Address' field is used by IPAM map view (via Google Geocode API) to geolocate aggregates with that assigned region. Address may be in the form of a City / State / Country, a full street address, a company name, or other search term that Google the Geocode API can return a location for. The more accurate your address information, the more accurate map view will be with your aggregate locations. To use regions, you will need to apply a Geocode API Key. An "address" value that appears invalid to Google Geocode API will display a yellow
 warning symbol.
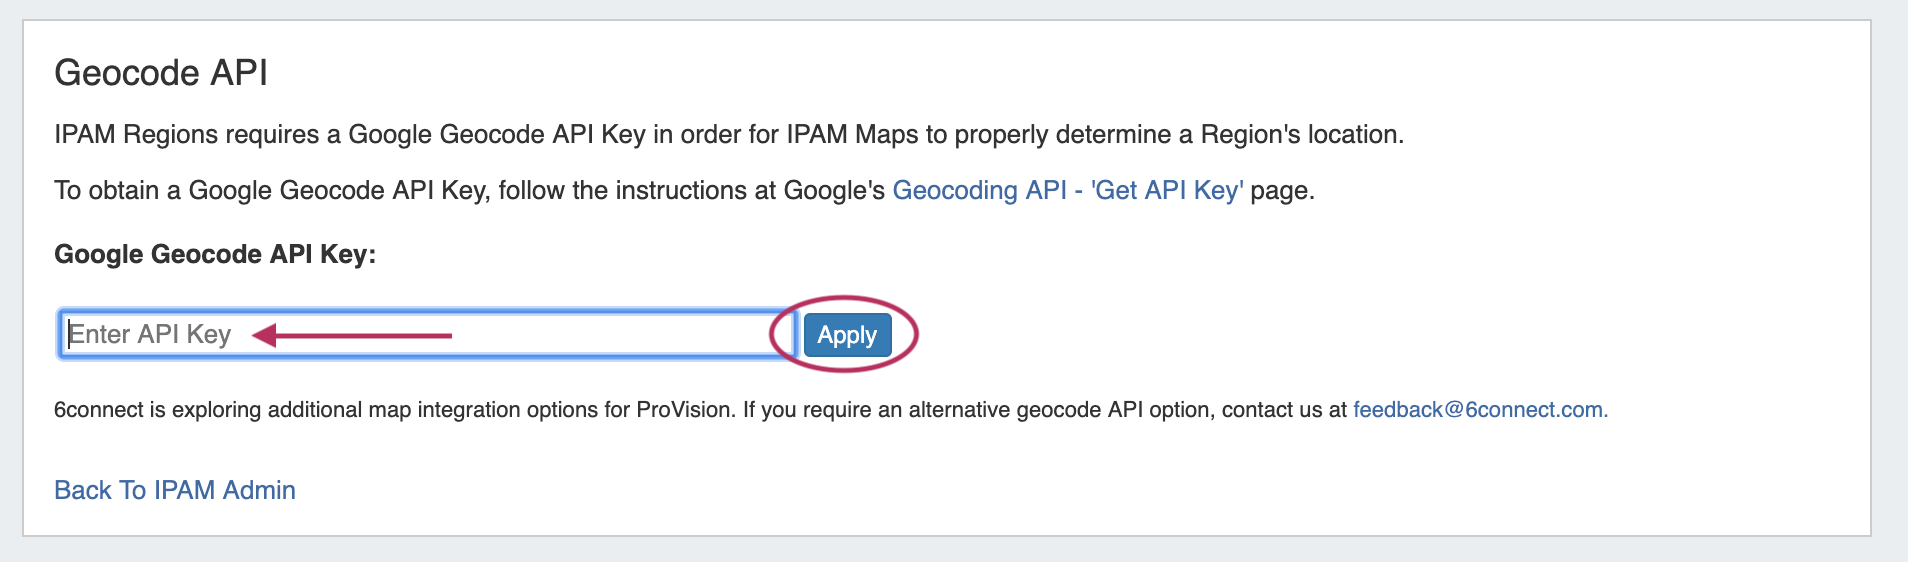
To use regions, you will need to apply a Google Geocode API Key.
Applying a
...
Geocoding API Key:
| Expand | ||
|---|---|---|
| ||
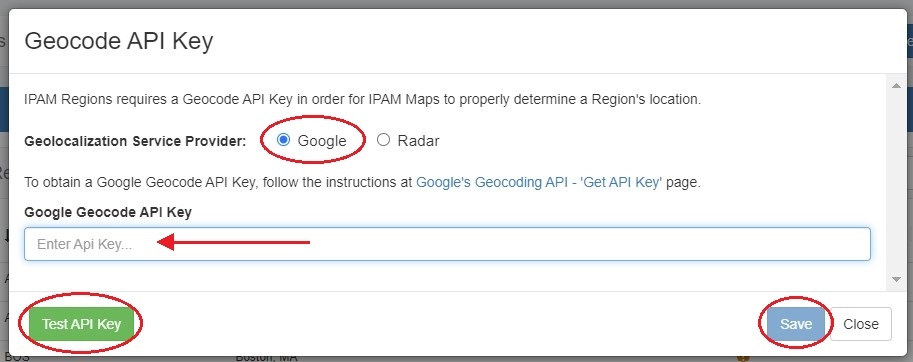
Step 1: Obtain a Google Geocoding API Key To get a Google Geocoding API Key, follow the instructions listed here: How to get a Google Geocoding API Key Note: In order to obtain a Google Geocoding API Key, a company must have a subscription enabled to Google Cloud Platform Console. Step 2: Assign the API Key to IPAM Regions Once assigned a Google Geocoding API Key, from the Edit Regions page, click "Geocode API Key". Then select the Google radio button, paste the API key into the Geocode API dialog, and click "Save" . You can test the API Key by clicking the Test button at lower left.
|
| Expand | ||
|---|---|---|
| ||
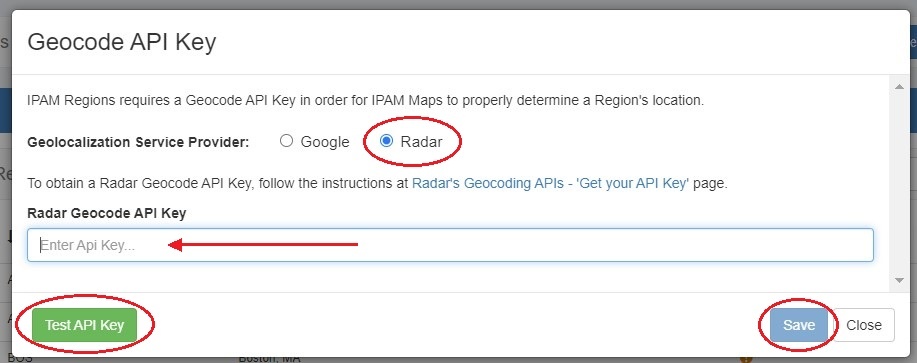
Step 1: Obtain a Radar Geocoding API Key To get a Radar Geocoding API Key, follow the instructions listed here: How to get a Radar Geocoding API Key Step 2: Assign the IPAM regions page under "Apply google geocode api key" and click the "Apply" button. API Key to IPAM Regions Once assigned a Radar Geocoding API Key, from the Edit Regions page, click "Geocode API Key". Then select the Radar radio button, paste the API key into the Geocode API dialog, and click "Save". You can test the API Key by clicking the Test button at lower left.
|
Managing Regions
To add a new Region item, click the "Add ItemRegion" link button at the top of the screen.
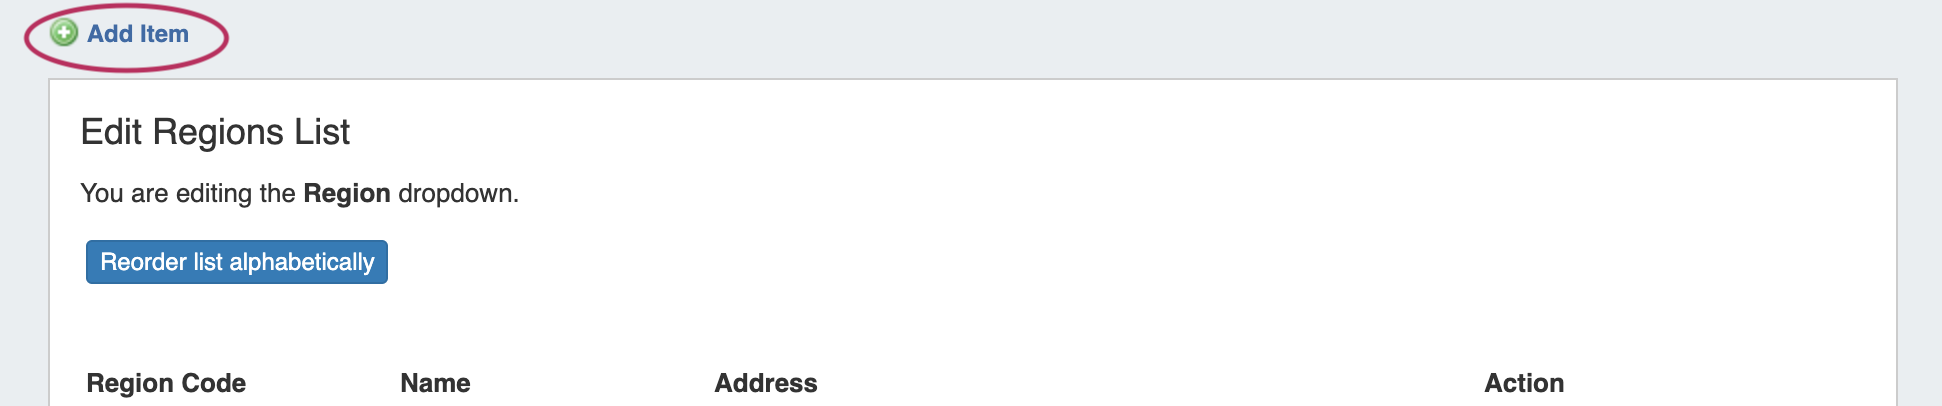
In the form that appears, type in a new Region Code, Name, and Address into the empty fields and click "Add ElementSave".

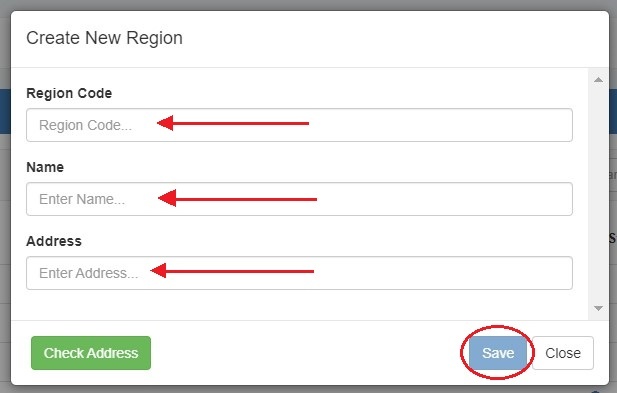
The new Region will be added to the Region list.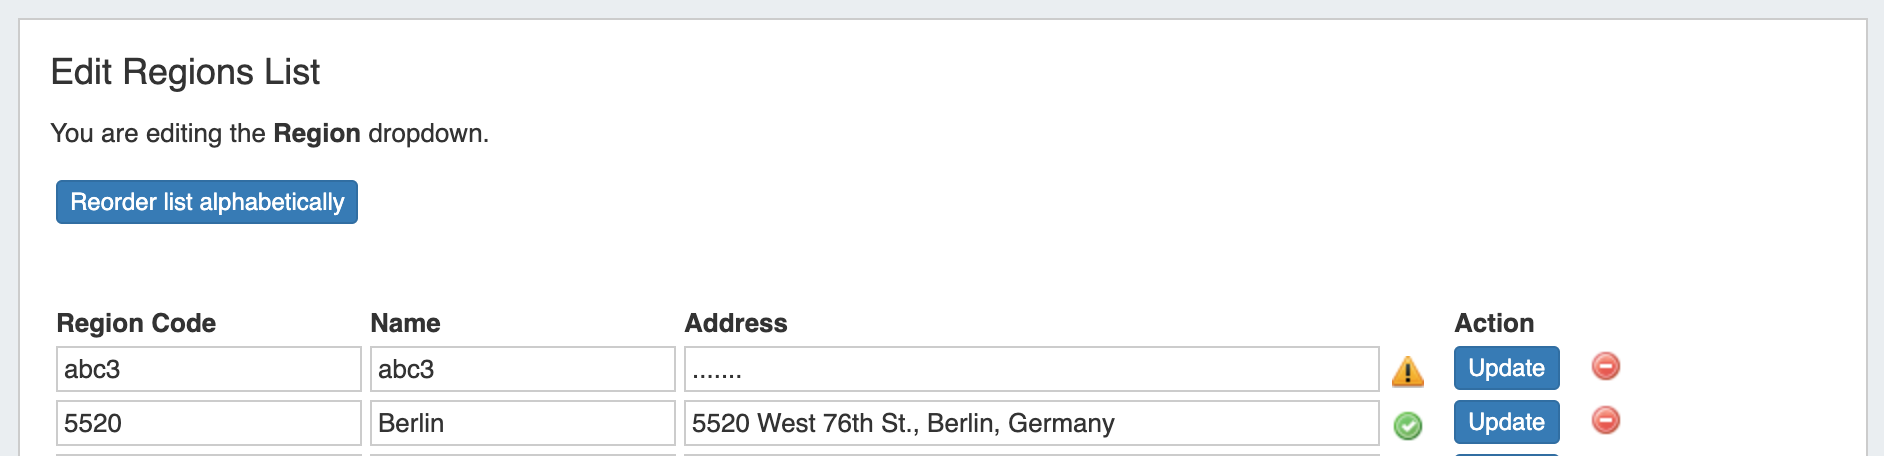
To sort the regions list, click on a column header to sort by Region Code or Name.
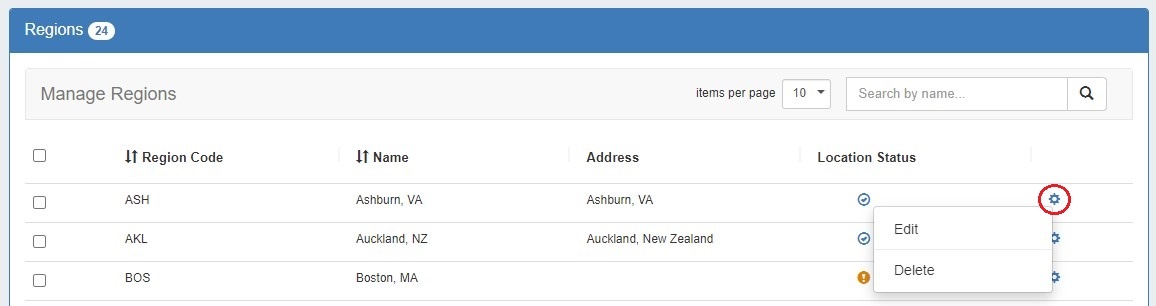
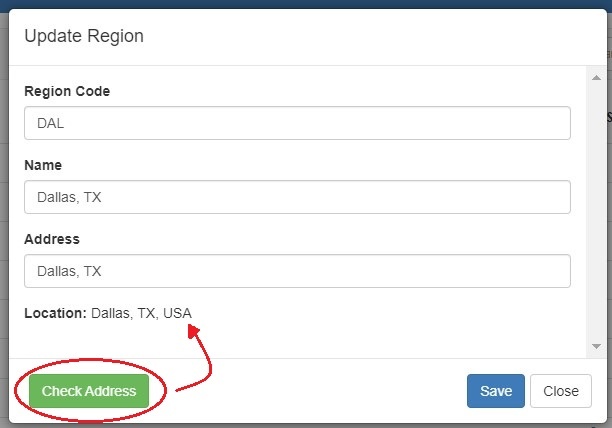
To edit a region, simply type your changes in to the text box with the region name. Then, click on the "Update" Button a region, right click on the row and select "Edit" from the Action Menu. This will bring up the edit modal. Input your desired changes, then click "Save".
To delete a region a single region, select "Delete" from the the Action Menu (gear icon).
To delete multiple regions, select the regions to delete by clicking the checkboxes at left. Then, click on the red "deleteActions" symbol to menu at the right top of the region namelist and select "Delete All". To reorder the regions list,
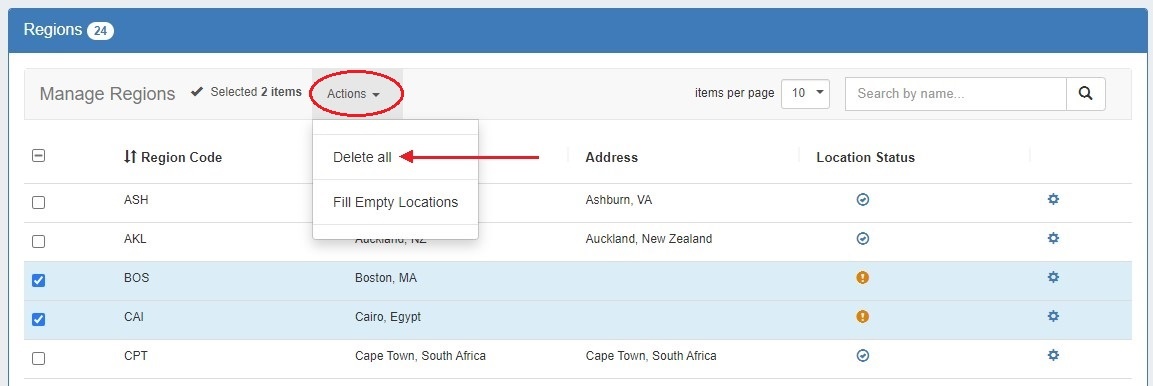
You may also right click on the "Reorder list alphabetically" button.selected items to open a context menu to either "Unselected all" or "Delete all".

Valid / Invalid Regions
Valid addresses (according to Google's API) will show a green check mark next to the address in the "Location Status" field, invalid/empty addresses (unable to be mapped) will show a yellow exclamation mark.
...
point. When adding or editing a region, click the "Check Address" button at the lower left of the modal to check the validity of an address.
Fill Empty Region Locations
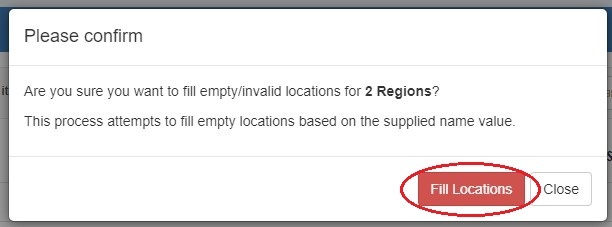
To quickly fill empty addresses for multiple regions, select "Fill Empty Locations" from the "Actions" menu at the top of the Regions list. This will fill the addresses based on their supplied "Name" value.
![]()
Region Resource Generation
Optionally, users may generate a resource entry for a region, in order to associate items such as contacts, notes, linked resources, or fields with that region.
Clicking on a region link from IPAM Manage will automatically generate a resource entry for that region, under the "SystemRegion" section.
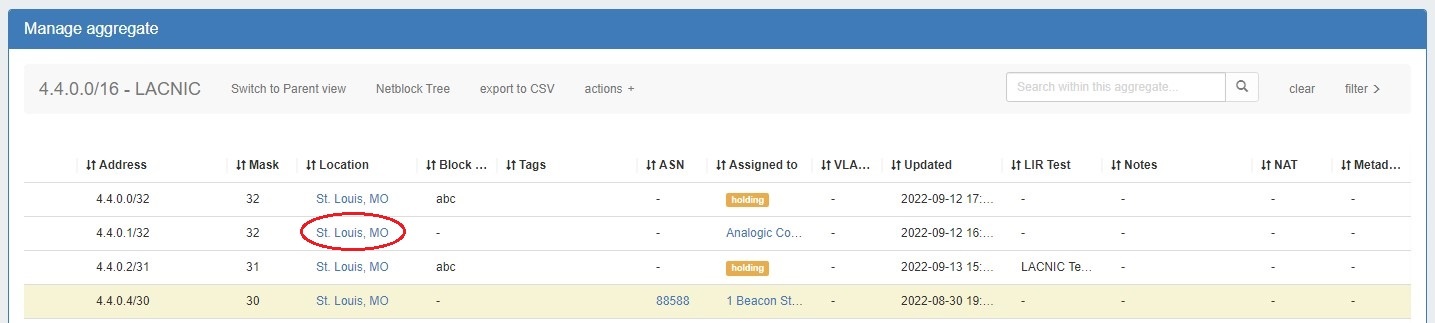
The (non-editable) SystemRegion section includes the following Gadgets: Resource View, IPAMv2, Contacts, Resource Linkage, Notes, Document Storage, and Fields.
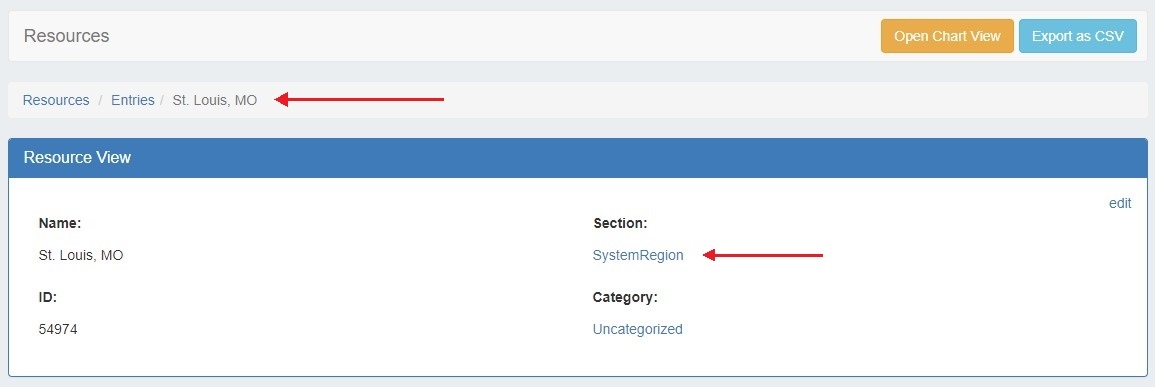
Users may then use those Gadgets on the region resource to associate contacts, notes, custom fields, or other information to that region.
Add / Edit IPv4 / IPv6 Subnet Dropdowns
When assigning blocks using the "Smart Assign" function in the IPAM Gadget, the user has an option to assign an IP resource by allocation size. ProVision supports assignments Assignments down to a single host level (/32 for IPv4, /128 for IPv6) are supported.
| Info | ||
|---|---|---|
| ||
Keep in mind that this is a global edit. If the values in the dropdown are changed, it will affect ALL users of the ProVision application. |
To add a new Subnet item, click on "Add Item" at the top of the Edit List: IPv4 or IPv6 Subnets page.
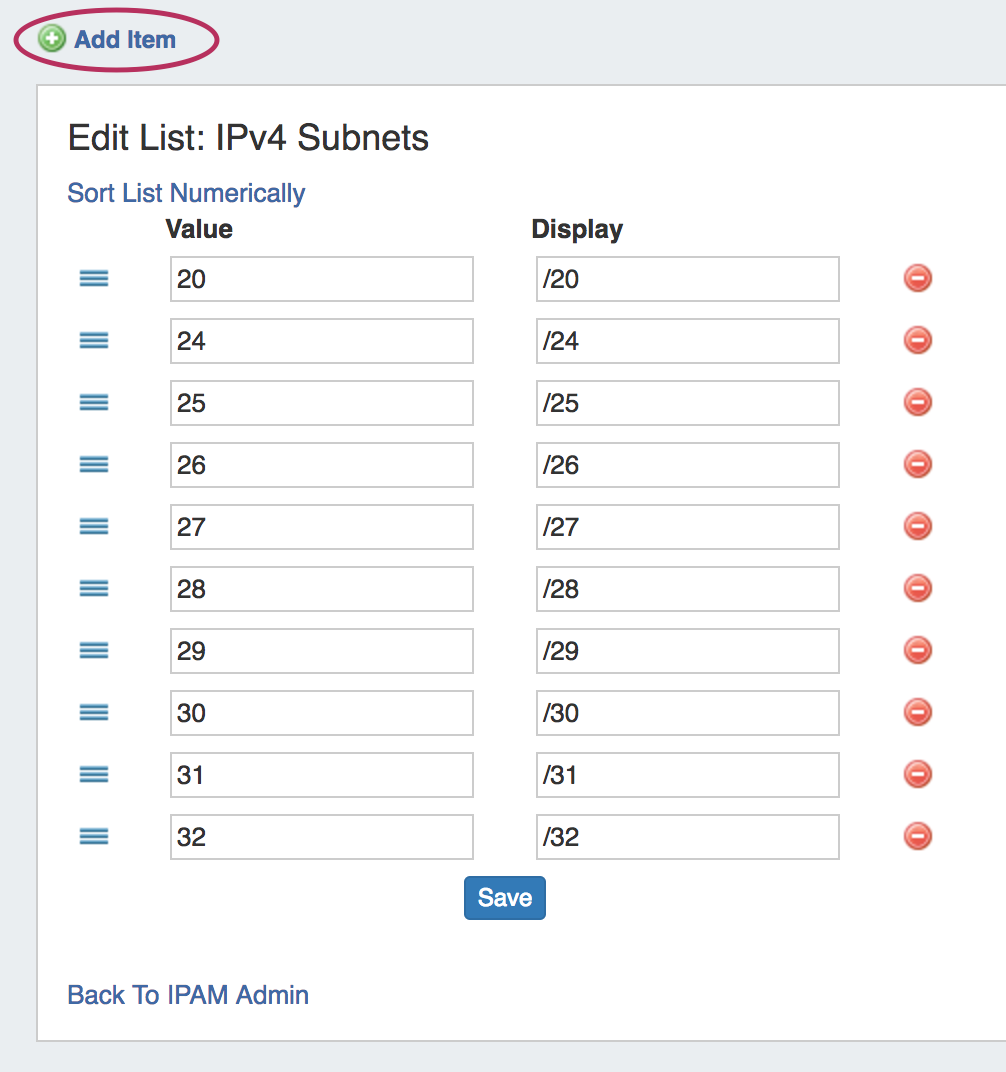
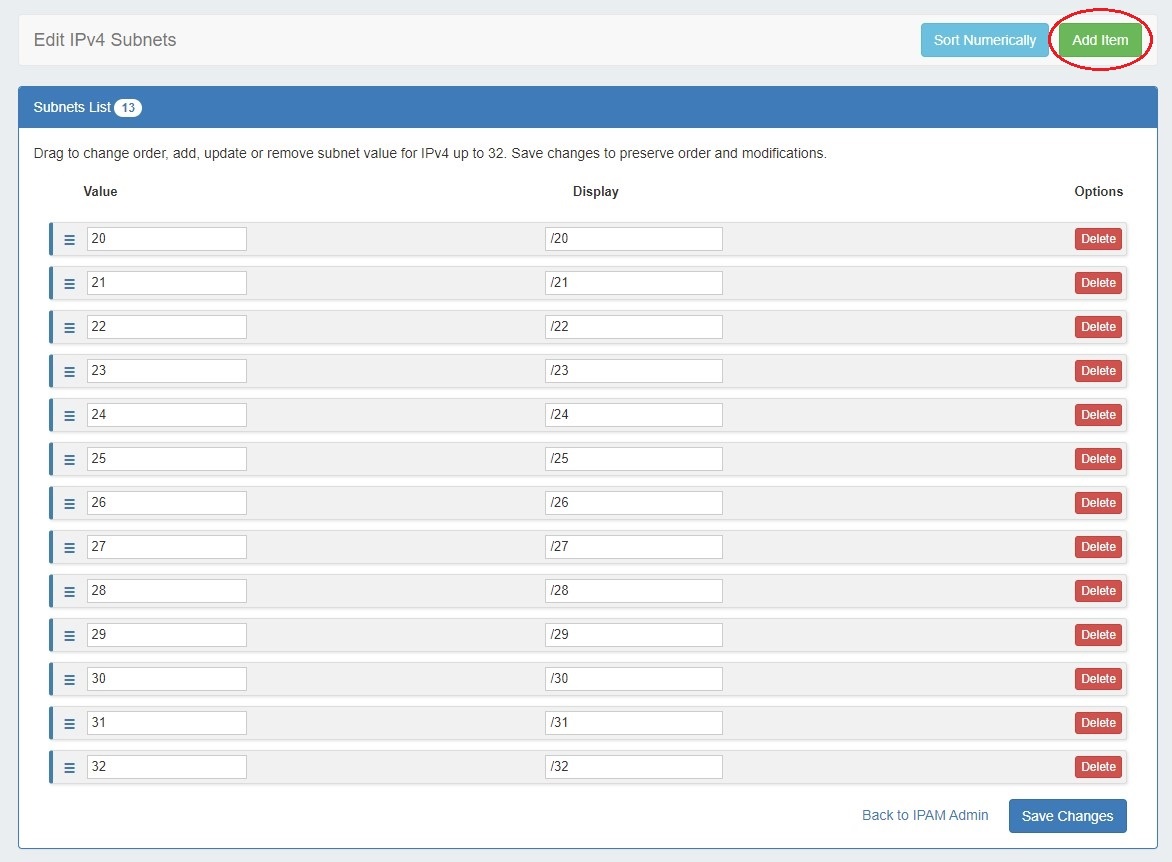

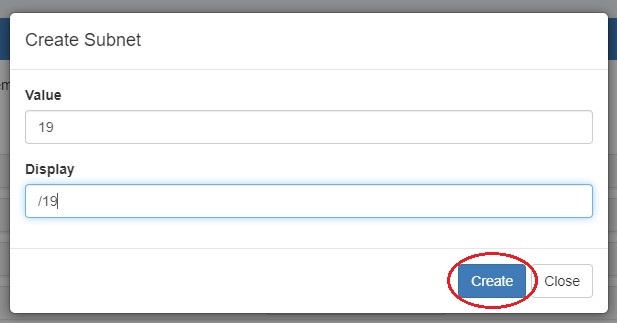
After adding a new item, it will show at the bottom of the list highlighted in yellow. Hit "Save Changes" to save your changes.

To edit a a subnet, simply type your changes in to the text box. Entries with unsaved changes will be highlighted until saved. Remember to click "Save Changes" before exiting.
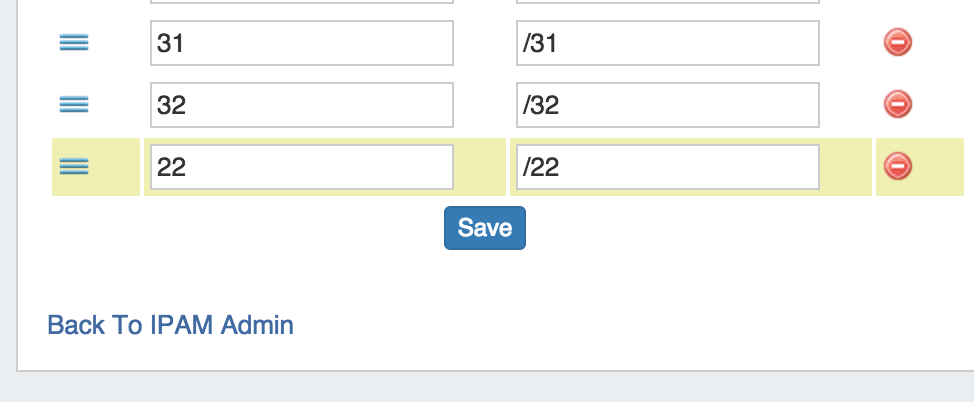
To reorder the the subnet list, click and hold on the "list" icon (three lines) to the left of the subetsubnet, then drag to the desired location in the list and release.
After adding or editing a subnet, you may wish to clean up the list order by hitting "Sort List Numerically" at the top of the page to reset the list order, including the new entry.
To delete a a subnet, click on the red "deleteDelete" symbol button to the right of the subnet entry.
...
These rulesets may be managed in the "Edit IPAM Rules" section of IPAM Admin.
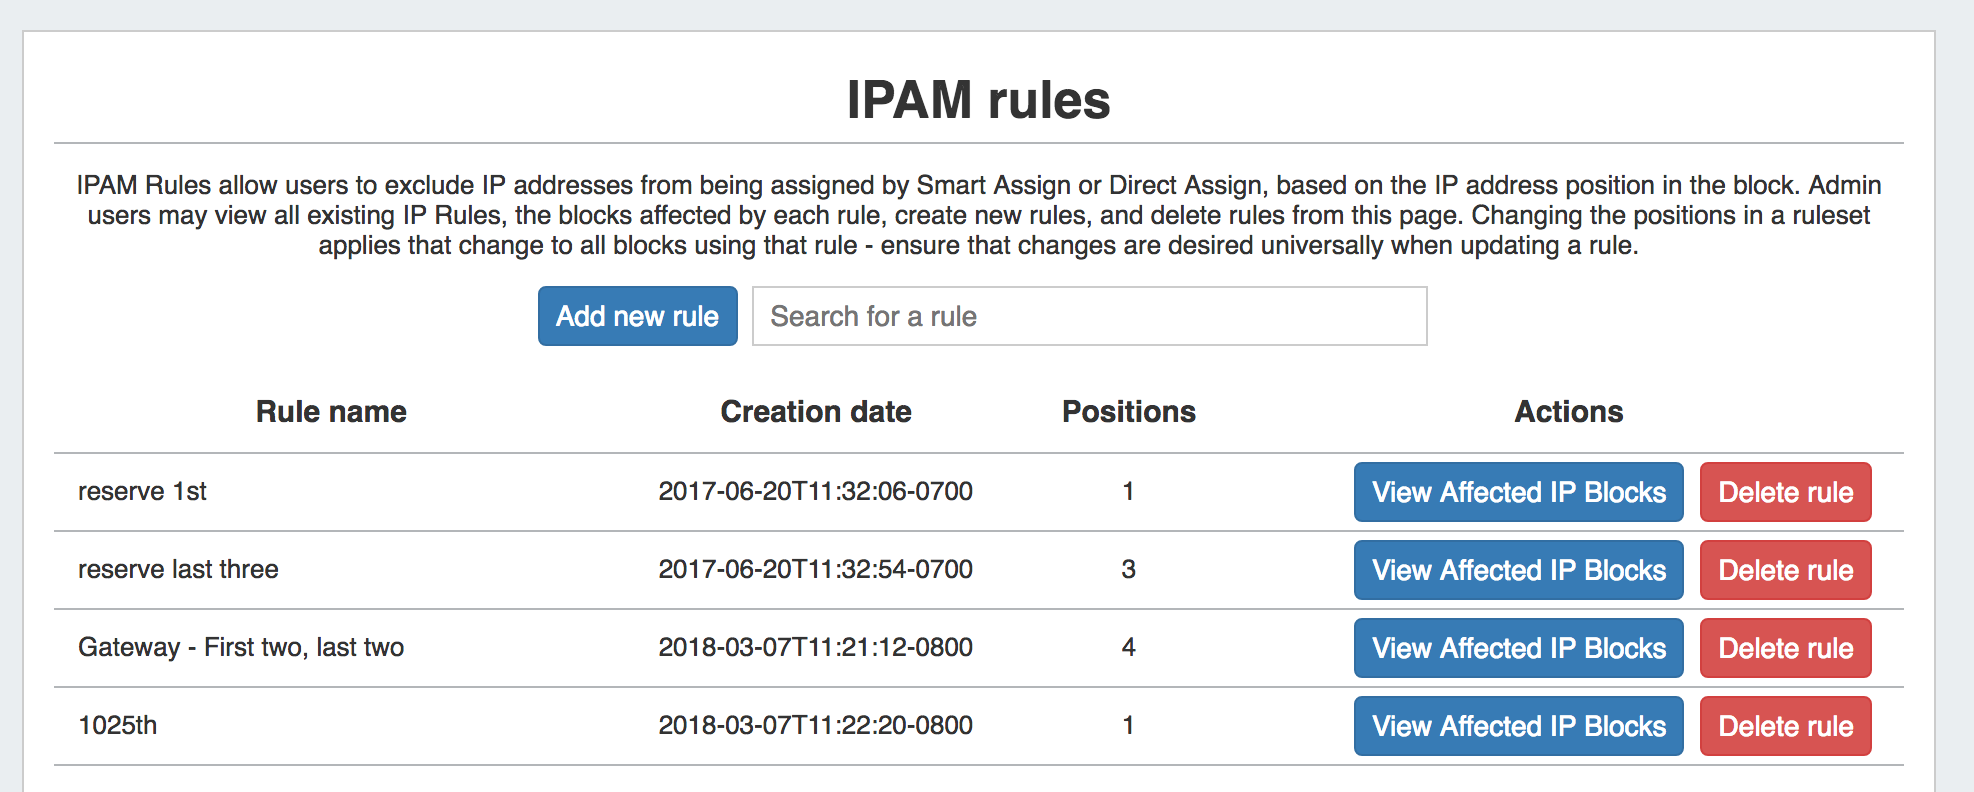
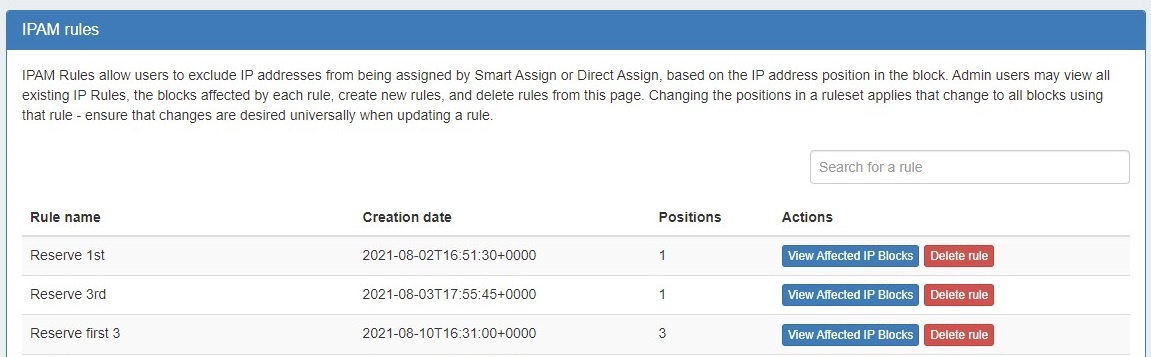
For additional details, see IPAM Rules.
...
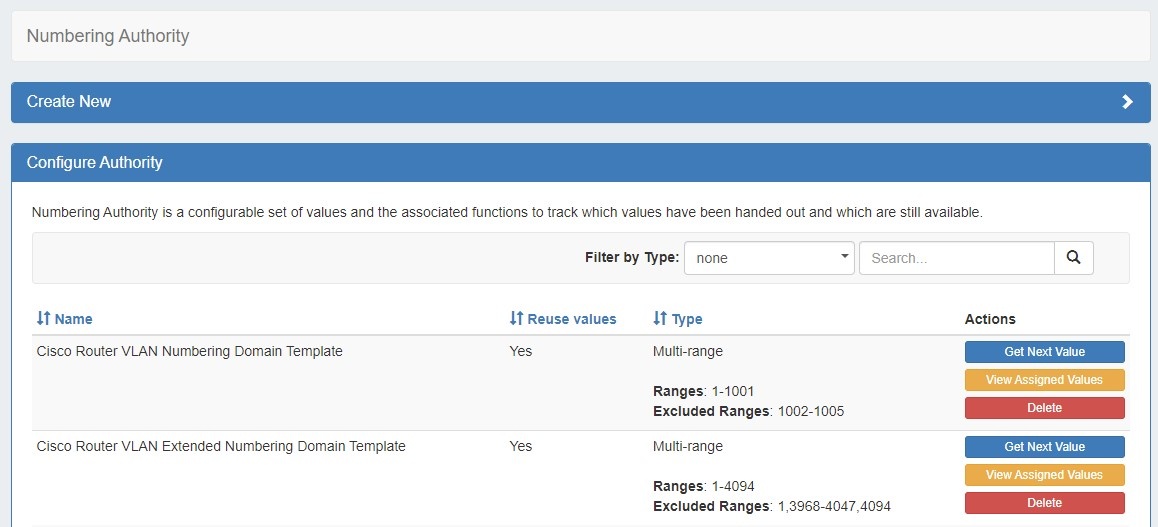
Numbering Authority allows Admin users to configure domain sets of values, for use with associated ProVision functions or external number tracking.
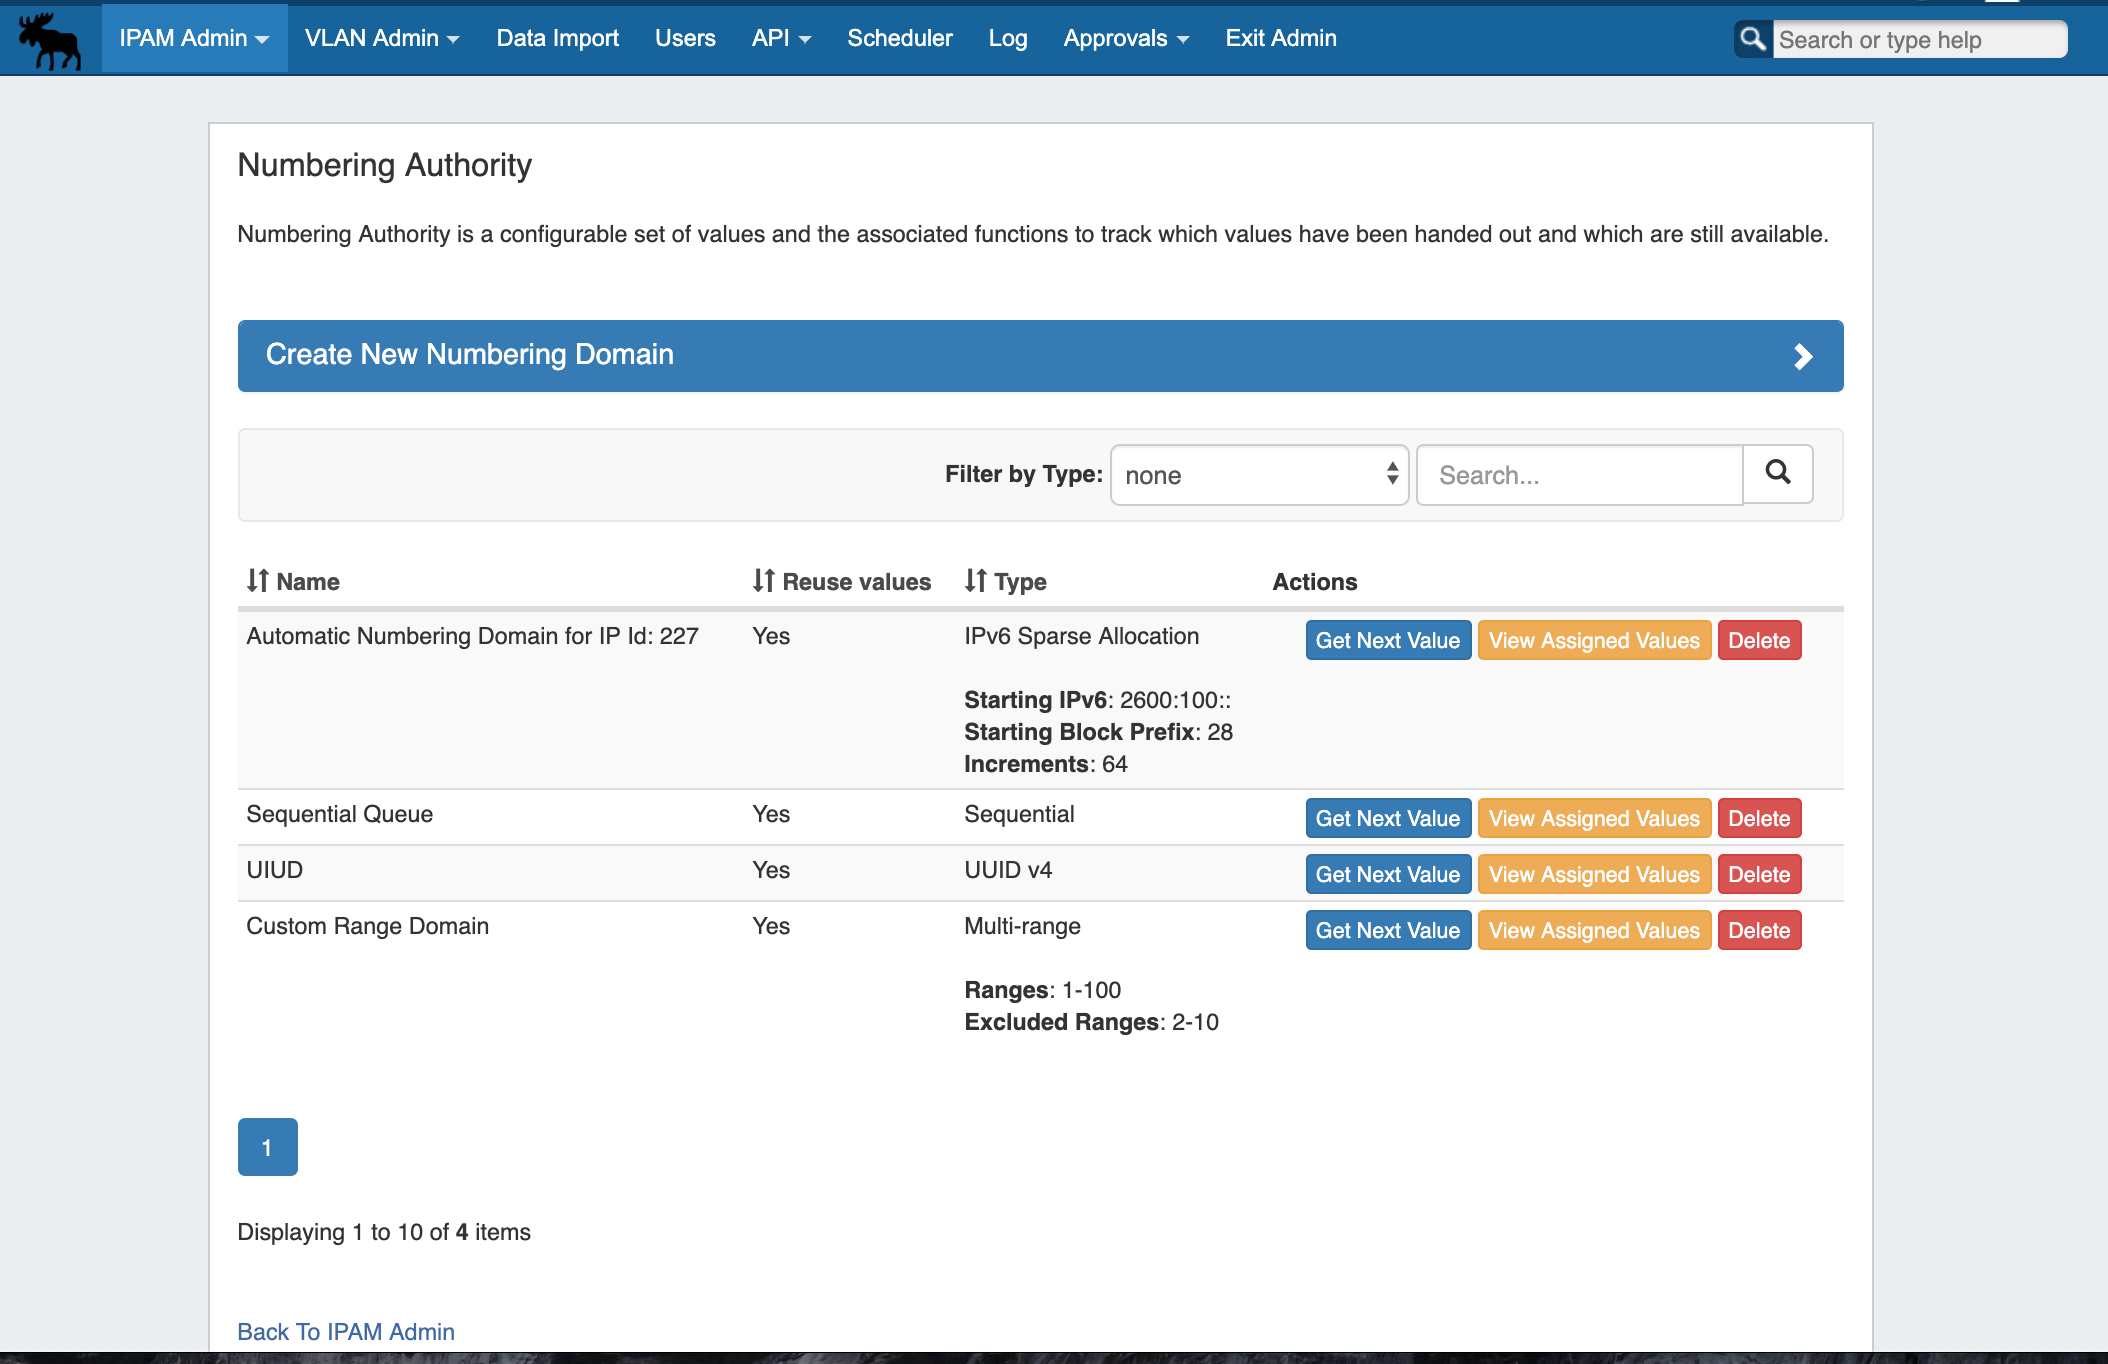
With Numbering Authority, you can create new numbering domains, track which values have been handed out, free values no longer in use, generate the next sequence value, and associate keys-value pairs to a number value. Numbering Domains may be used with ProVision's APIv2 with APIv2 to generate numbers for use within ProVision instances or custom applications.
Available Domain Types
Four Six numbering domain types are available in Numbering Authority: Sequential, Multi-Range, Meta Multi-range, UIUDv4, and IPv6 Sparse Allocation, and Meta IPv6.
Sequential:
Provides a sequential number domain starting with '0' and progressing in numerical order. Potential Applications: Ticketing Queues, Customer Numbers
...
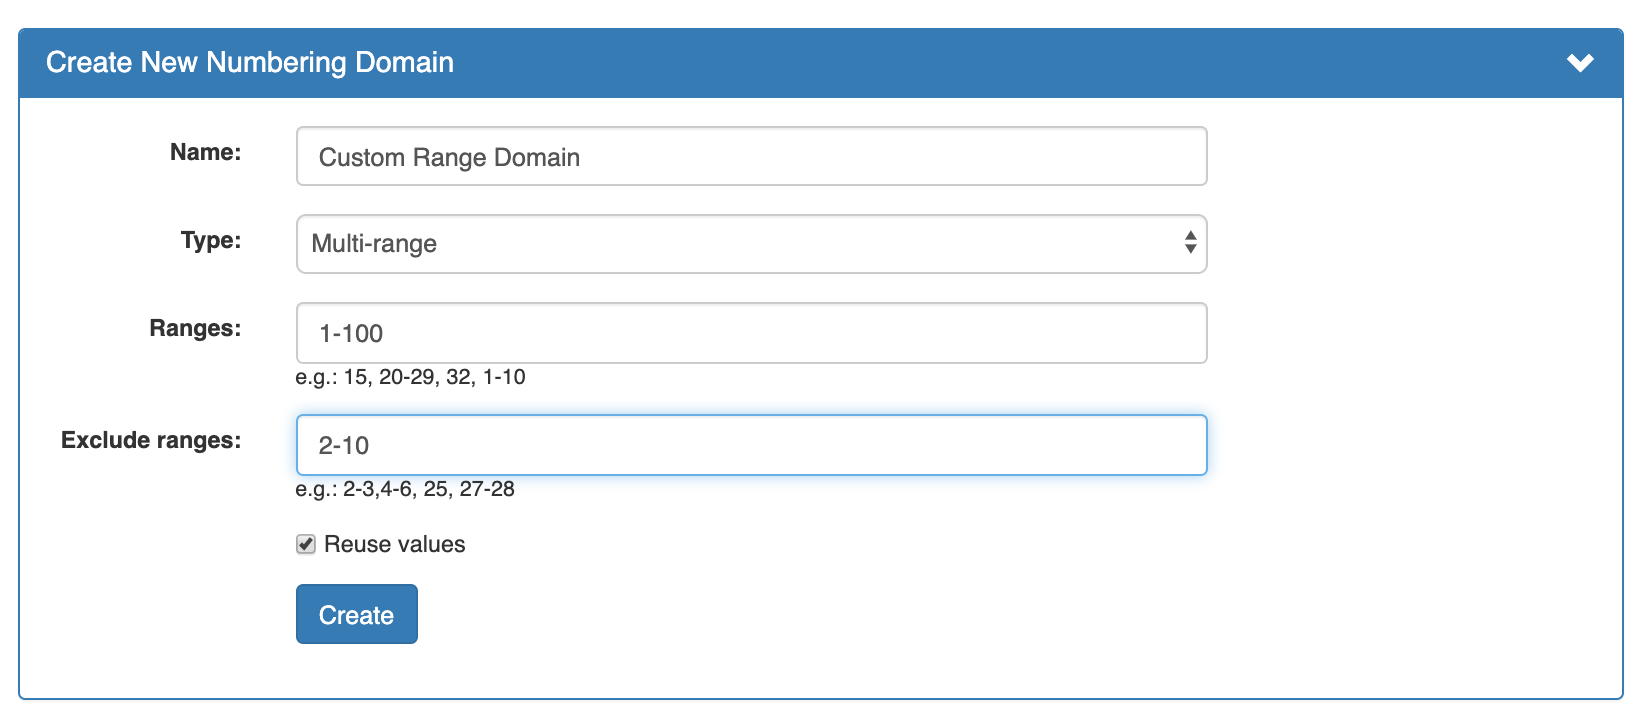
User-defined numbers and number ranges (e.g.: 2-3,4-6, 25, 27-28) to include or exclude as available. Potential Applications: VLANs
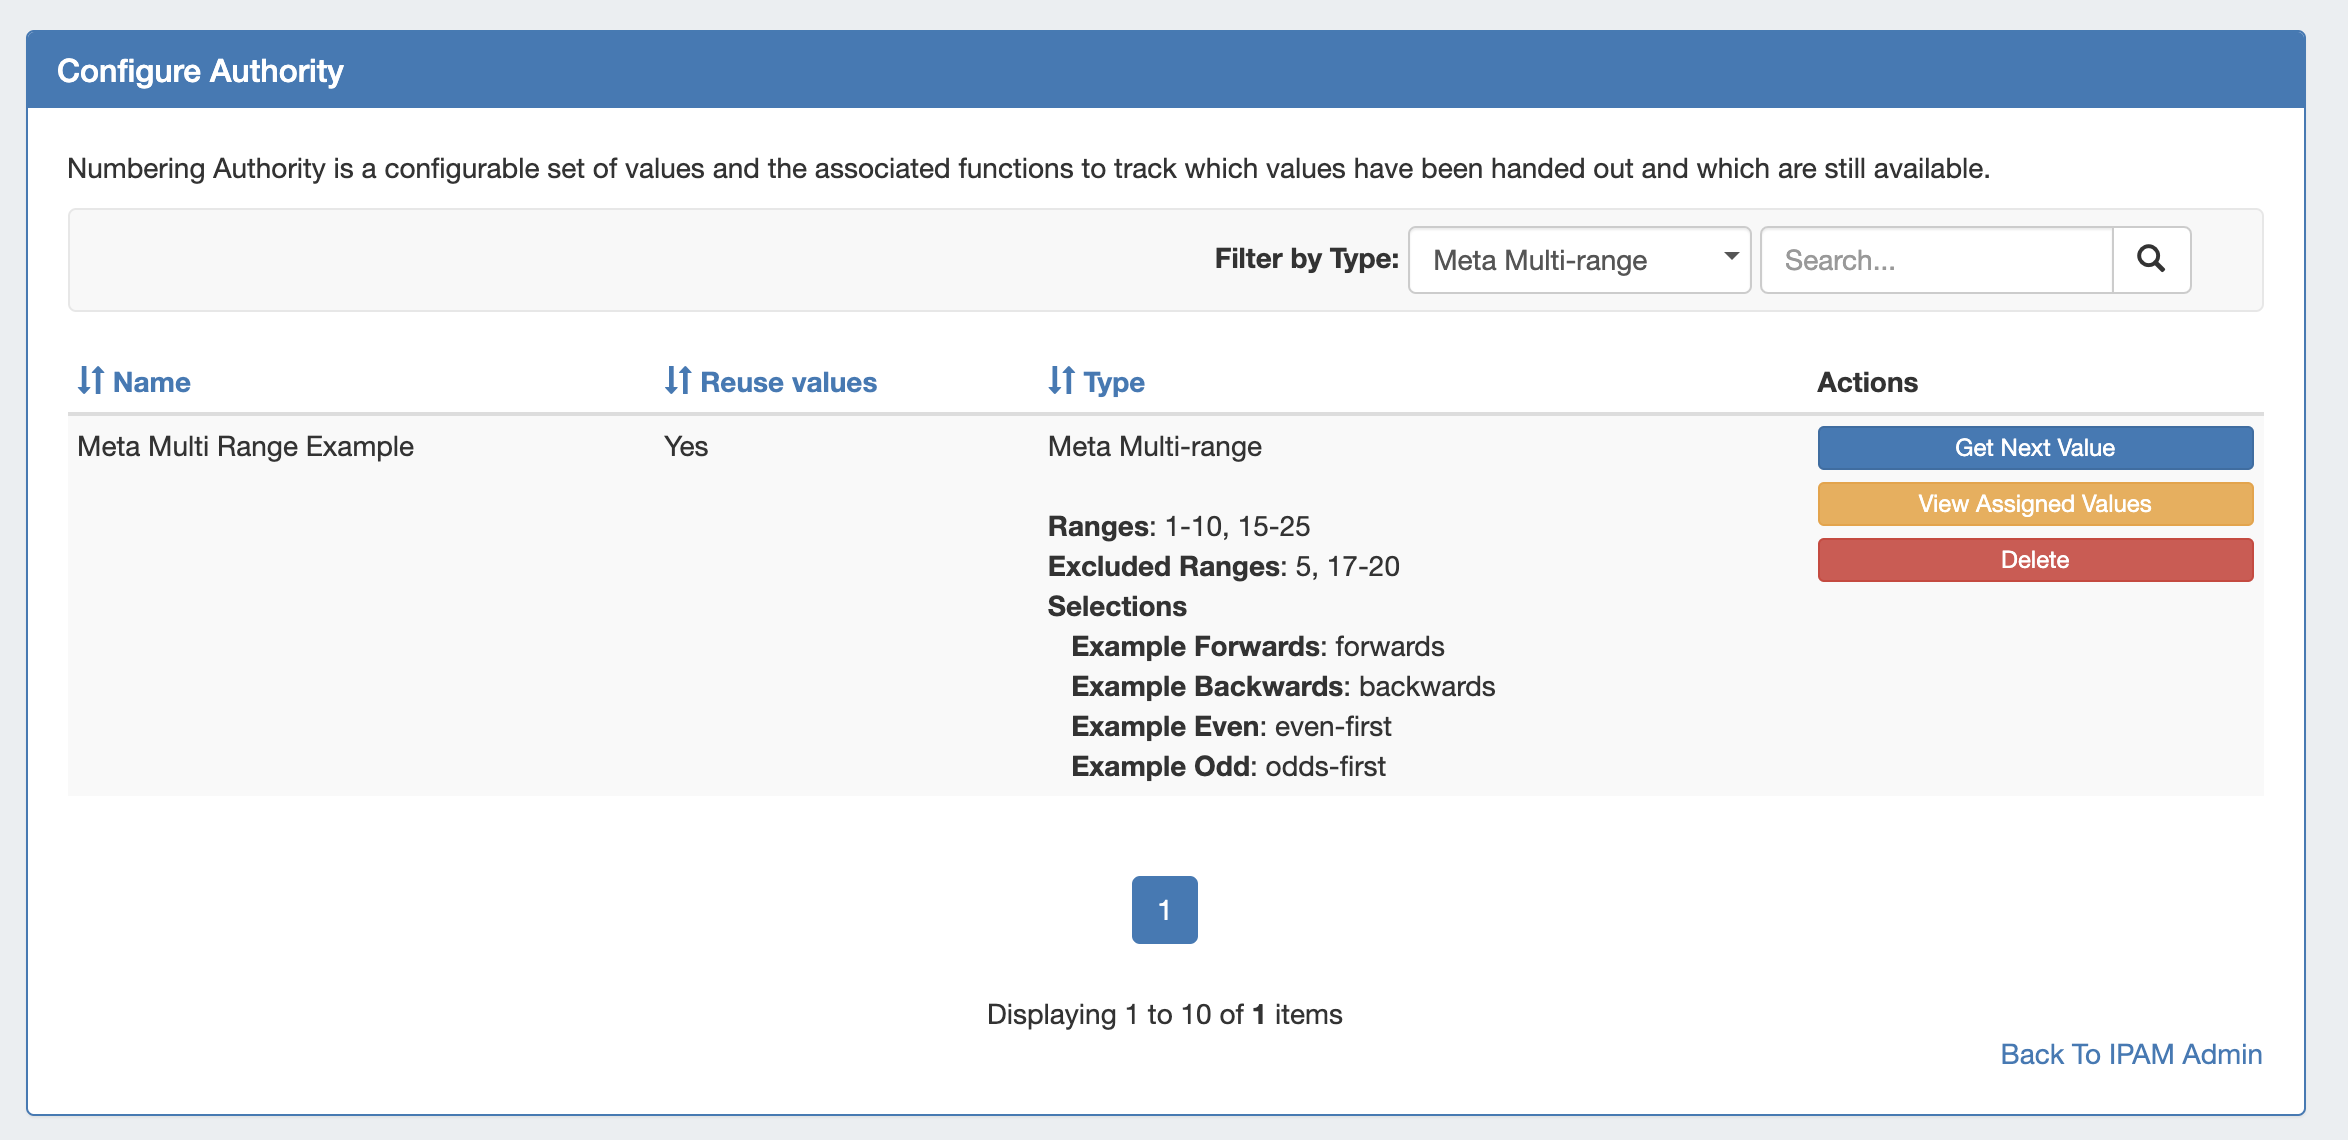
Meta Multi-Range:
The Meta Multi-range numbering type is similar to Multi-range, but includes additional options to specify the ordering sequence.
Users define individual numbers and number ranges (e.g.: 2-3,4-6, 25, 27-28) to include or exclude as available, and then may also specify a Selection name and algorithm to specify the order.
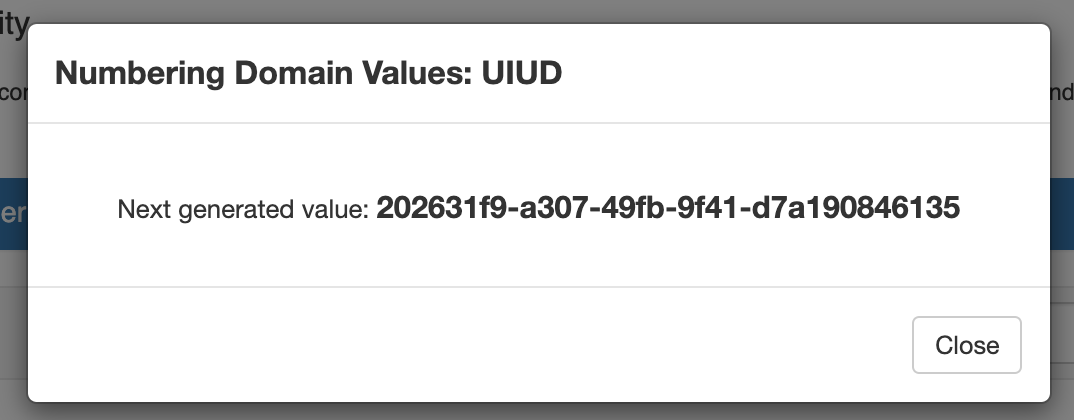
UIUD v4:
Generates a Universally Unique Identifier according to v4 (Random) standard. Potential Applications: Unique Identifiers
...
Determines the next IPv6 block to assign to evenly distribute assignments throughout the provided range. Used with the IPAM IPv6 Aggregate Sparse Allocate function. See: Working with IP Aggregates . Applications: ProVision IPv6 Sparse Allocation
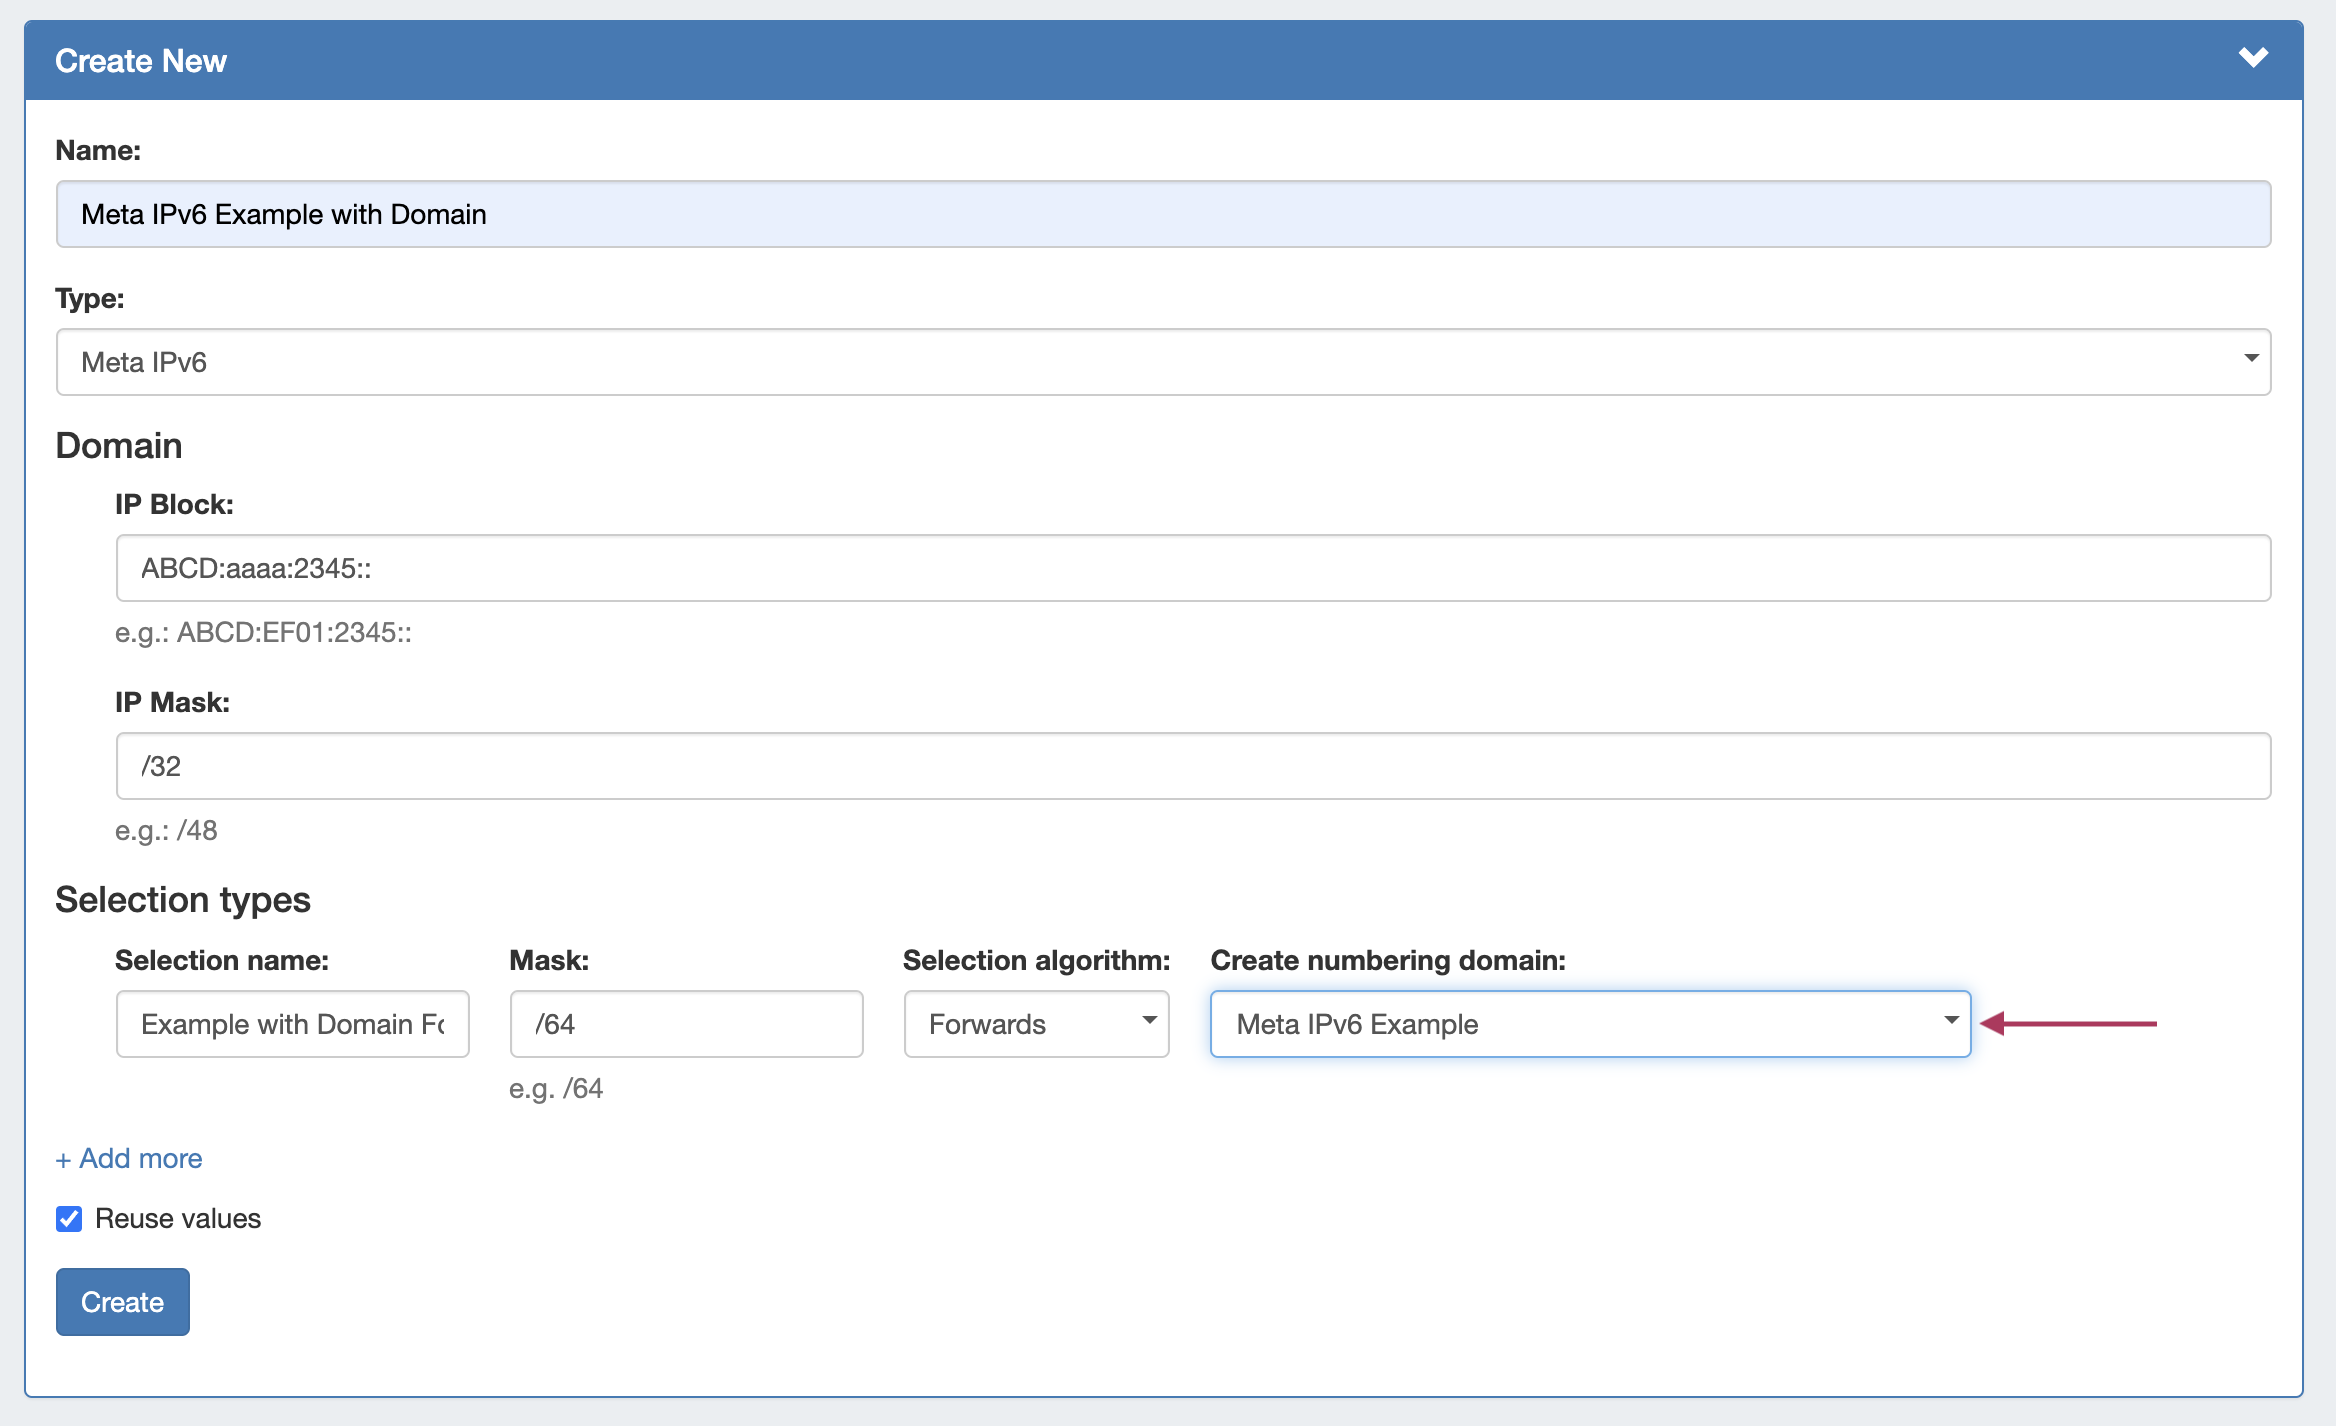
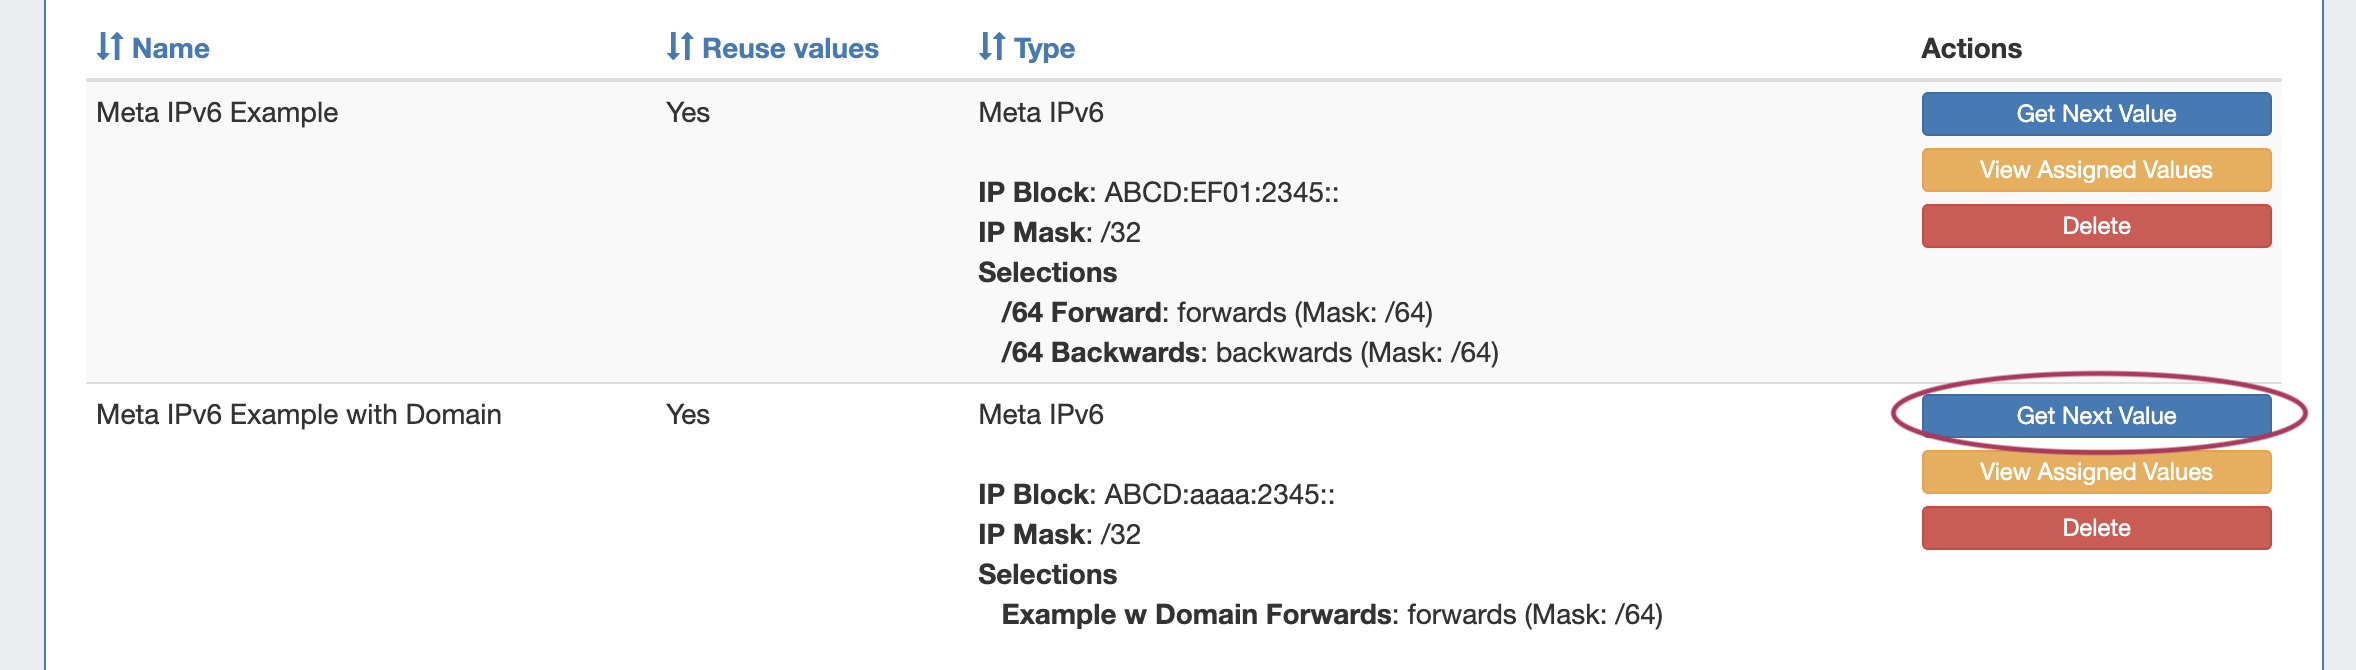
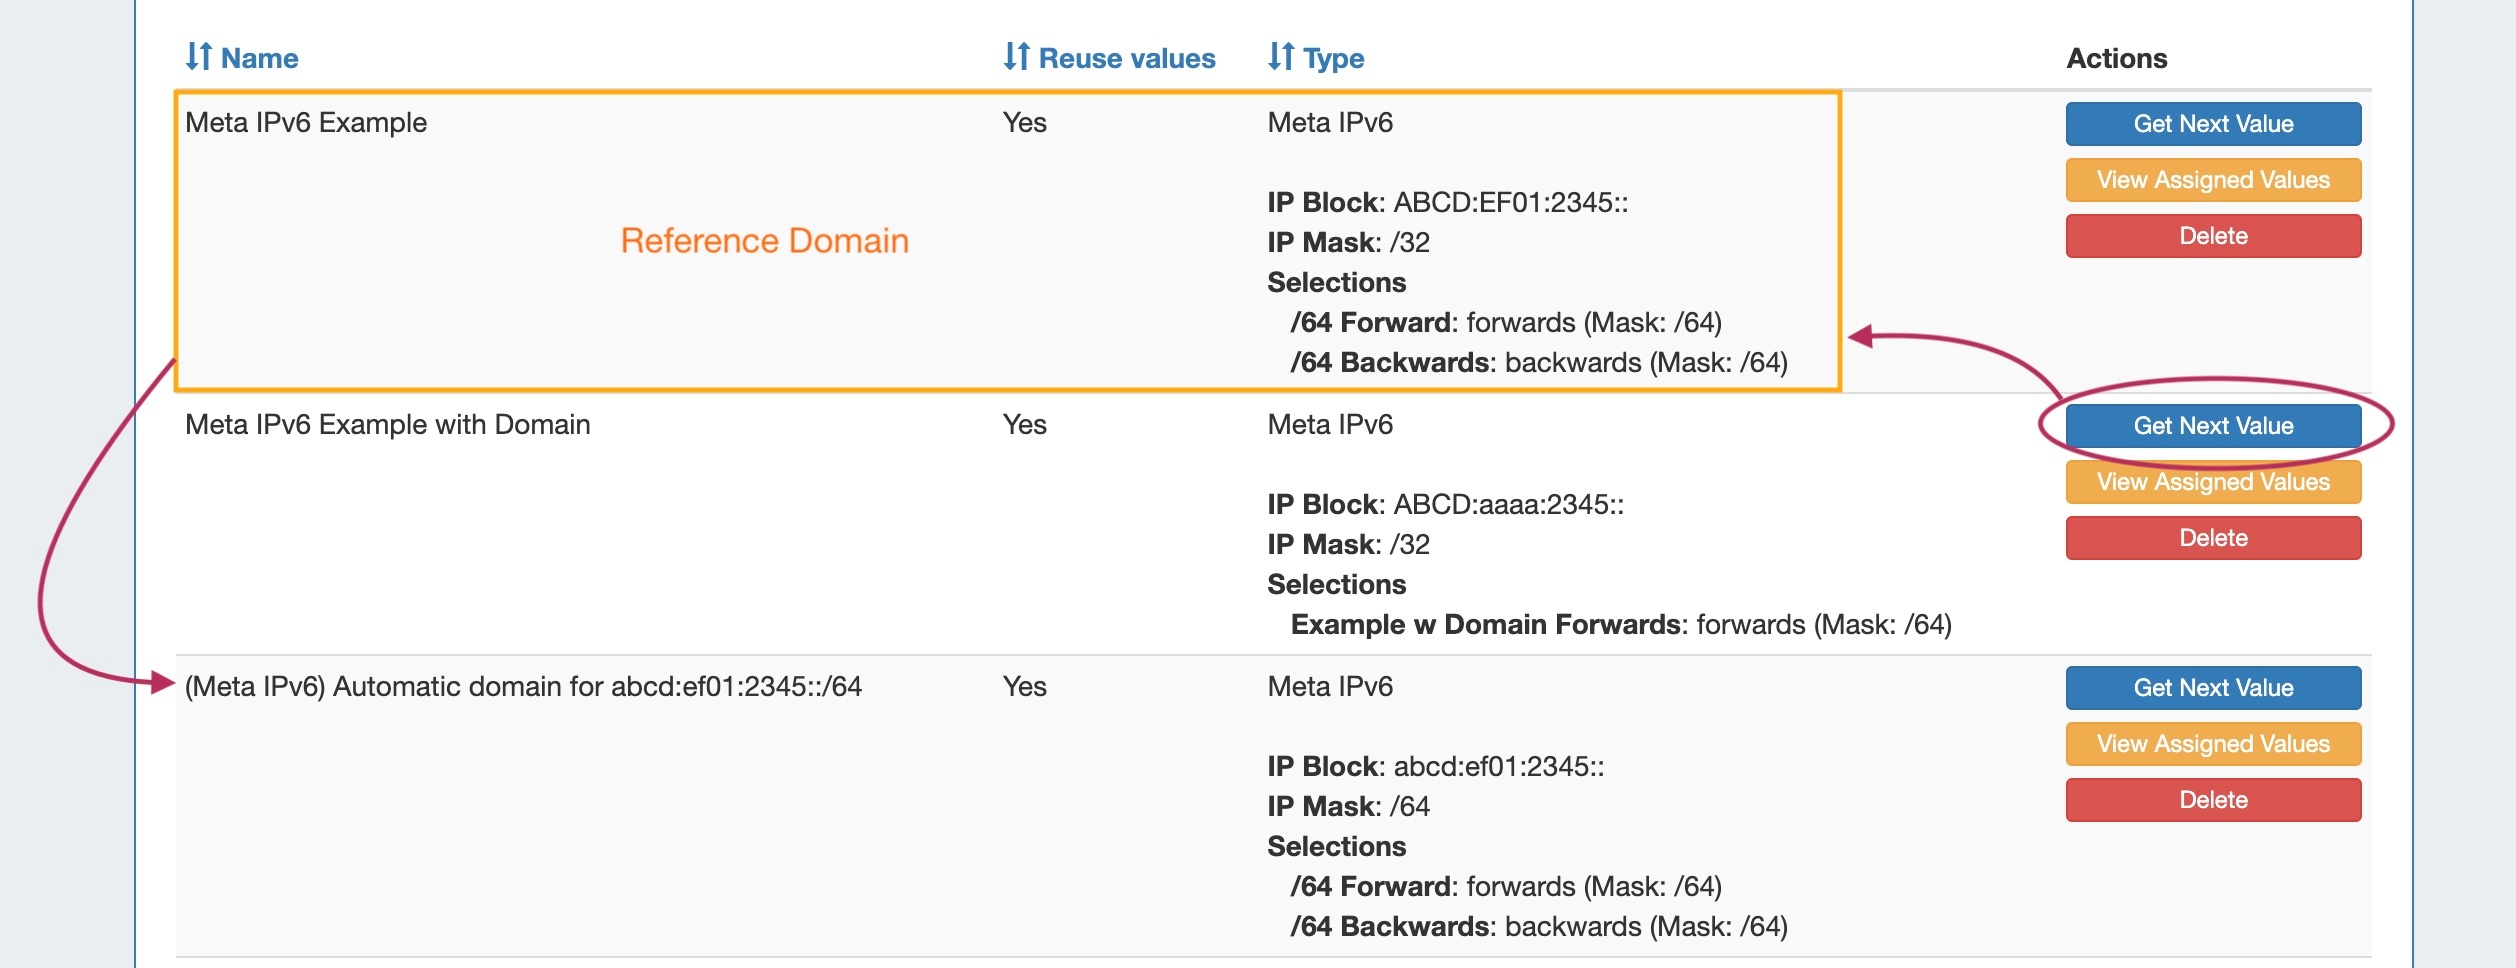
Meta IPv6:
The Meta IPv6 numbering type generates the next IPv6 block of the specified mask from a larger aggregate. Users may specify a Selection name and algorithm to specify the order (forwards/backwards).
Optionally, new sub numbering domains may be created automatically at each number generation in order to generate assignment blocks for hierarchical IPv6 relationships.
Working with Numbering Domains
...
| Expand | ||||||||||||
|---|---|---|---|---|---|---|---|---|---|---|---|---|
| ||||||||||||
Create a Numbering DomainGo to Admin → IPAM Admin, and select the "Numbering Authority" page. Create a new numbering domain by expanding the "Create New Numbering Domain" section, then typing in a name for the new domain and selecting a domain type.
Enter information for the specific domain type, if necessary, and select whether to allow number reuse. When done, click "Create". All Numbering Domains must have, at minimum "Name" provided and a "Type" selected. Additional options may exist based on the selected Numbering Domain type:
Number Domain Actions
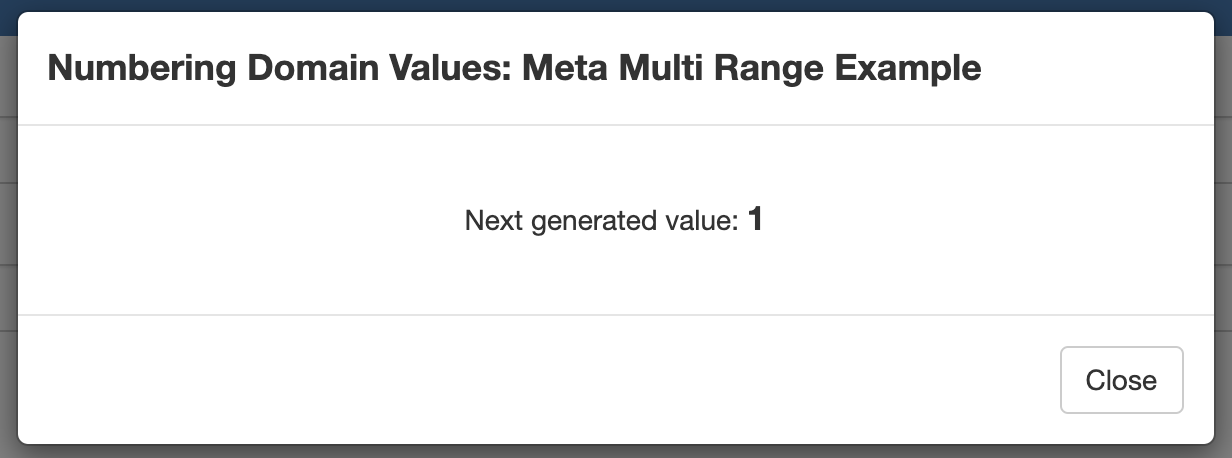
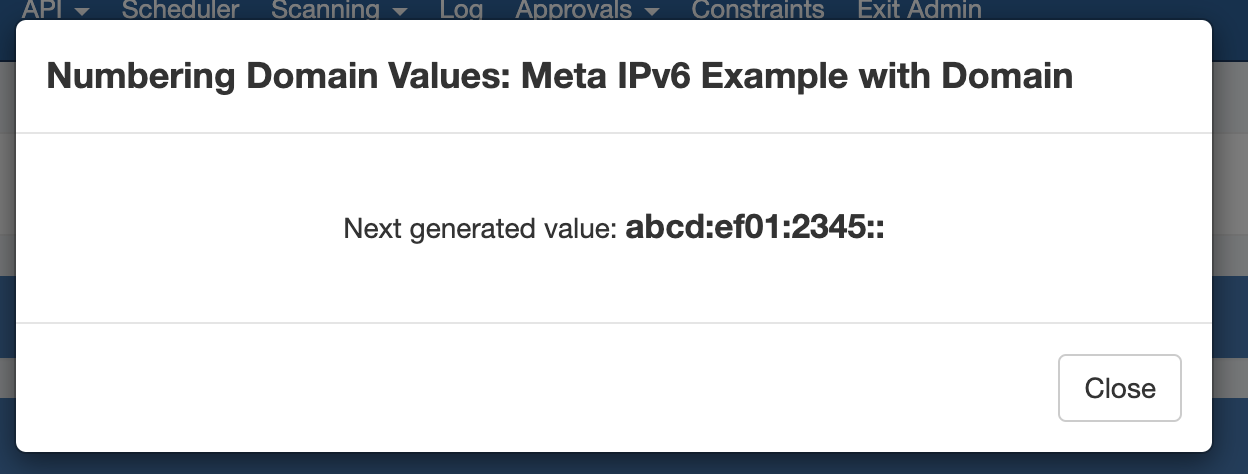
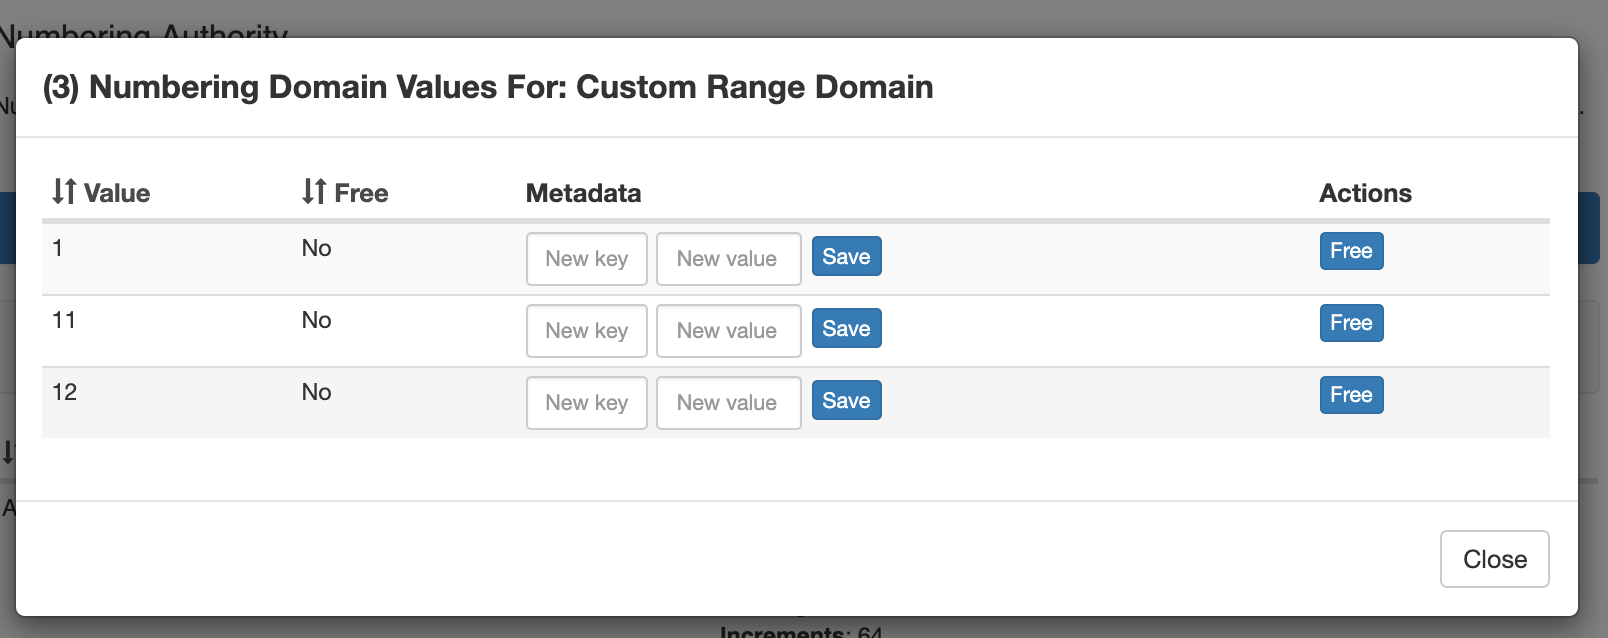
Once a numbering domain is created, you may perform the following actions: Get Next Value:Gets the next value in the domain, adds it to the list of used domain values (assigns to the domain), and displays that value to the user.
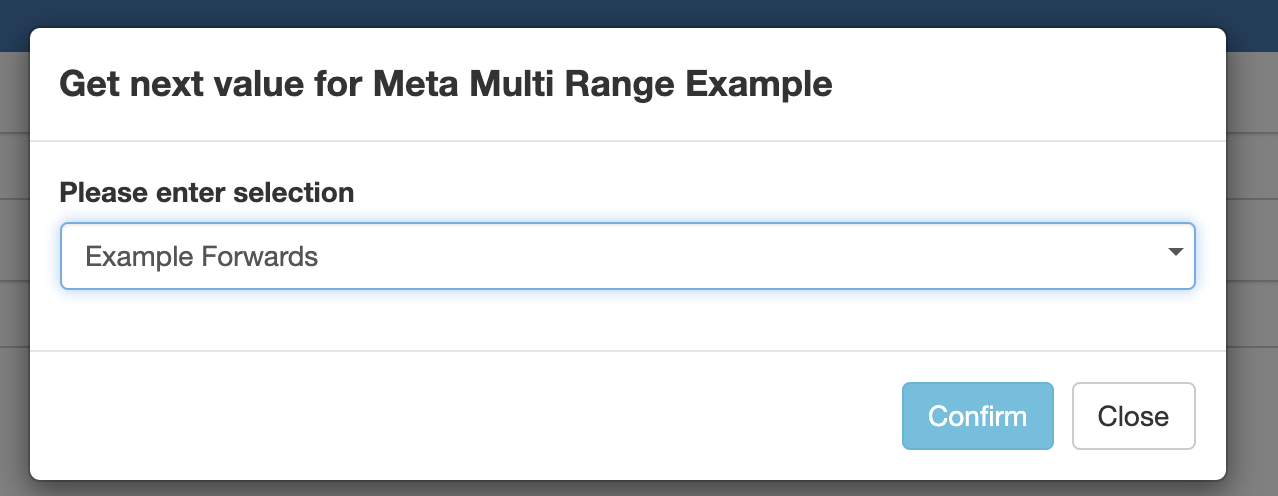
Get Next Value with Selection Types:If the numbering domain has associated Selections, such as the Meta Multi-range Example below, then the Selection type (pick order) will need to be set prior to generating the next number.
Get Next Value with Selection Types:If "Create numbering domain" was set to create a new domain from an existing Meta IPv6 setup, then each time a number is generated a new Meta-IPv6 sub-domain item will be created using the settings from the referenced domain.
View Assigned Values:View values that are assigned to the domain, view used/free status, free assigned blocks, and save key-value metadata to values. |

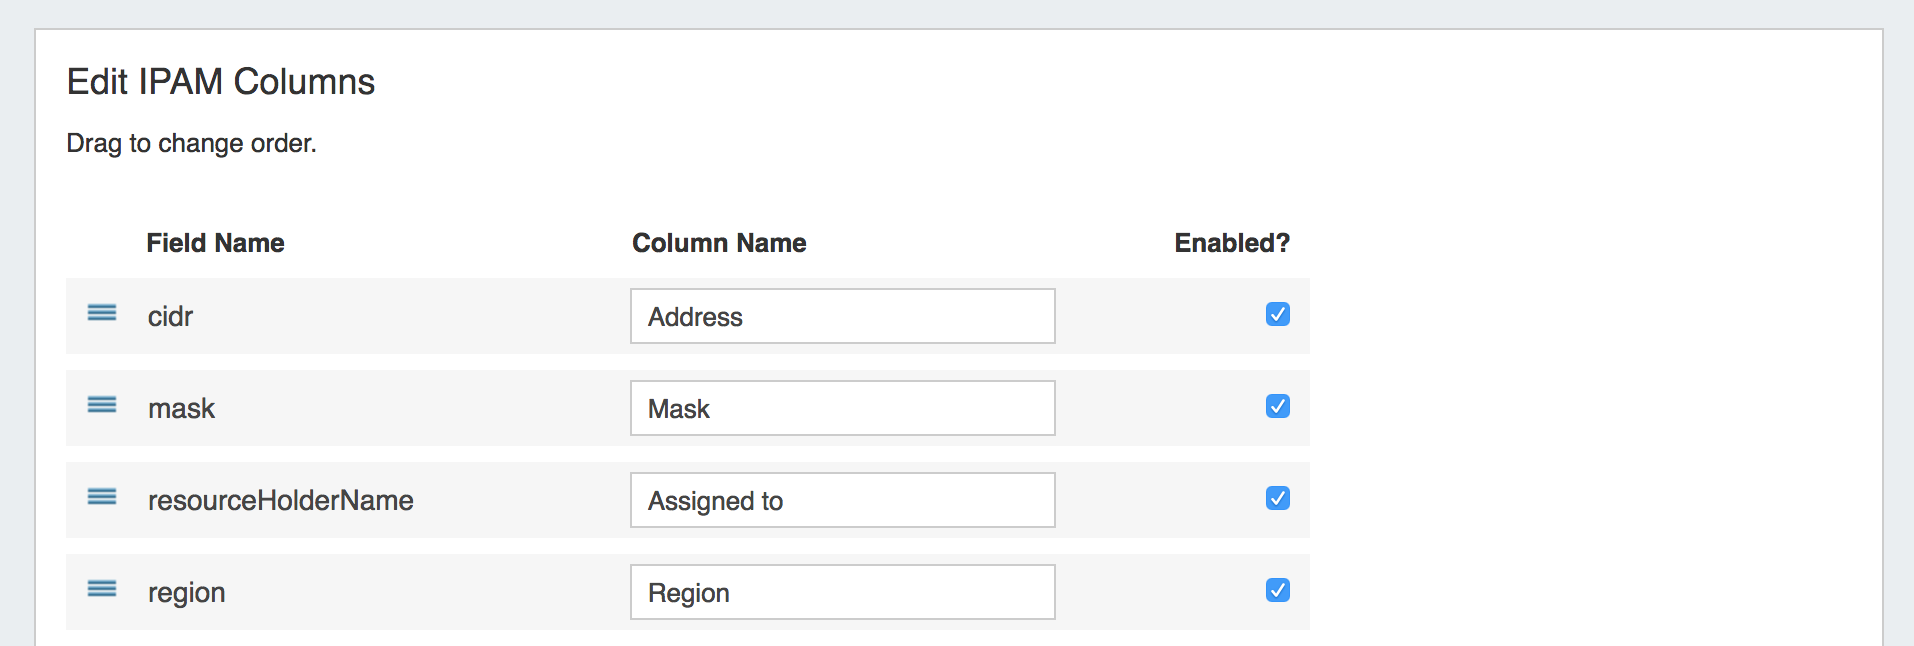
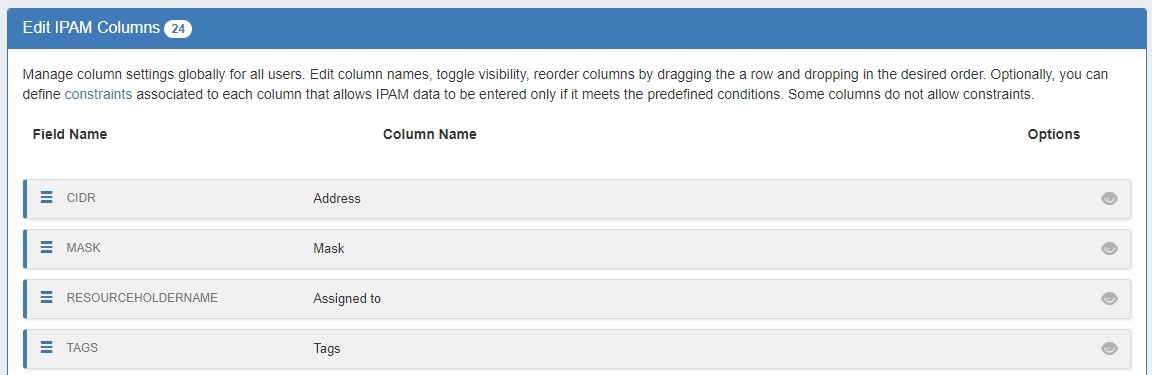
Edit IPAM or VLAN Columns
The Edit IPAM Columns page and Edit VLAN Columns pages lets you change the order, column name, and visibility of IPAM / VLAN columns globally for IPAM / VLAN areas in ProVision, respectively.
Editing IPAM Columns will affect the order, name, and visibility of columns in IPAM Manage and the IPAM Gadget, and the available fields in Edit Block for both VLAN and IPAM.
Editing VLAN columns will affect the order, name, and visibility of columns in VLAN Manage, VLAN Advanced, and the available fields in Edit Domain / Edit VLAN.
Additionally, for both IPAM and VLAN, any disabled fields will not be filterable or accessible in IPAM / VLAN Reports.
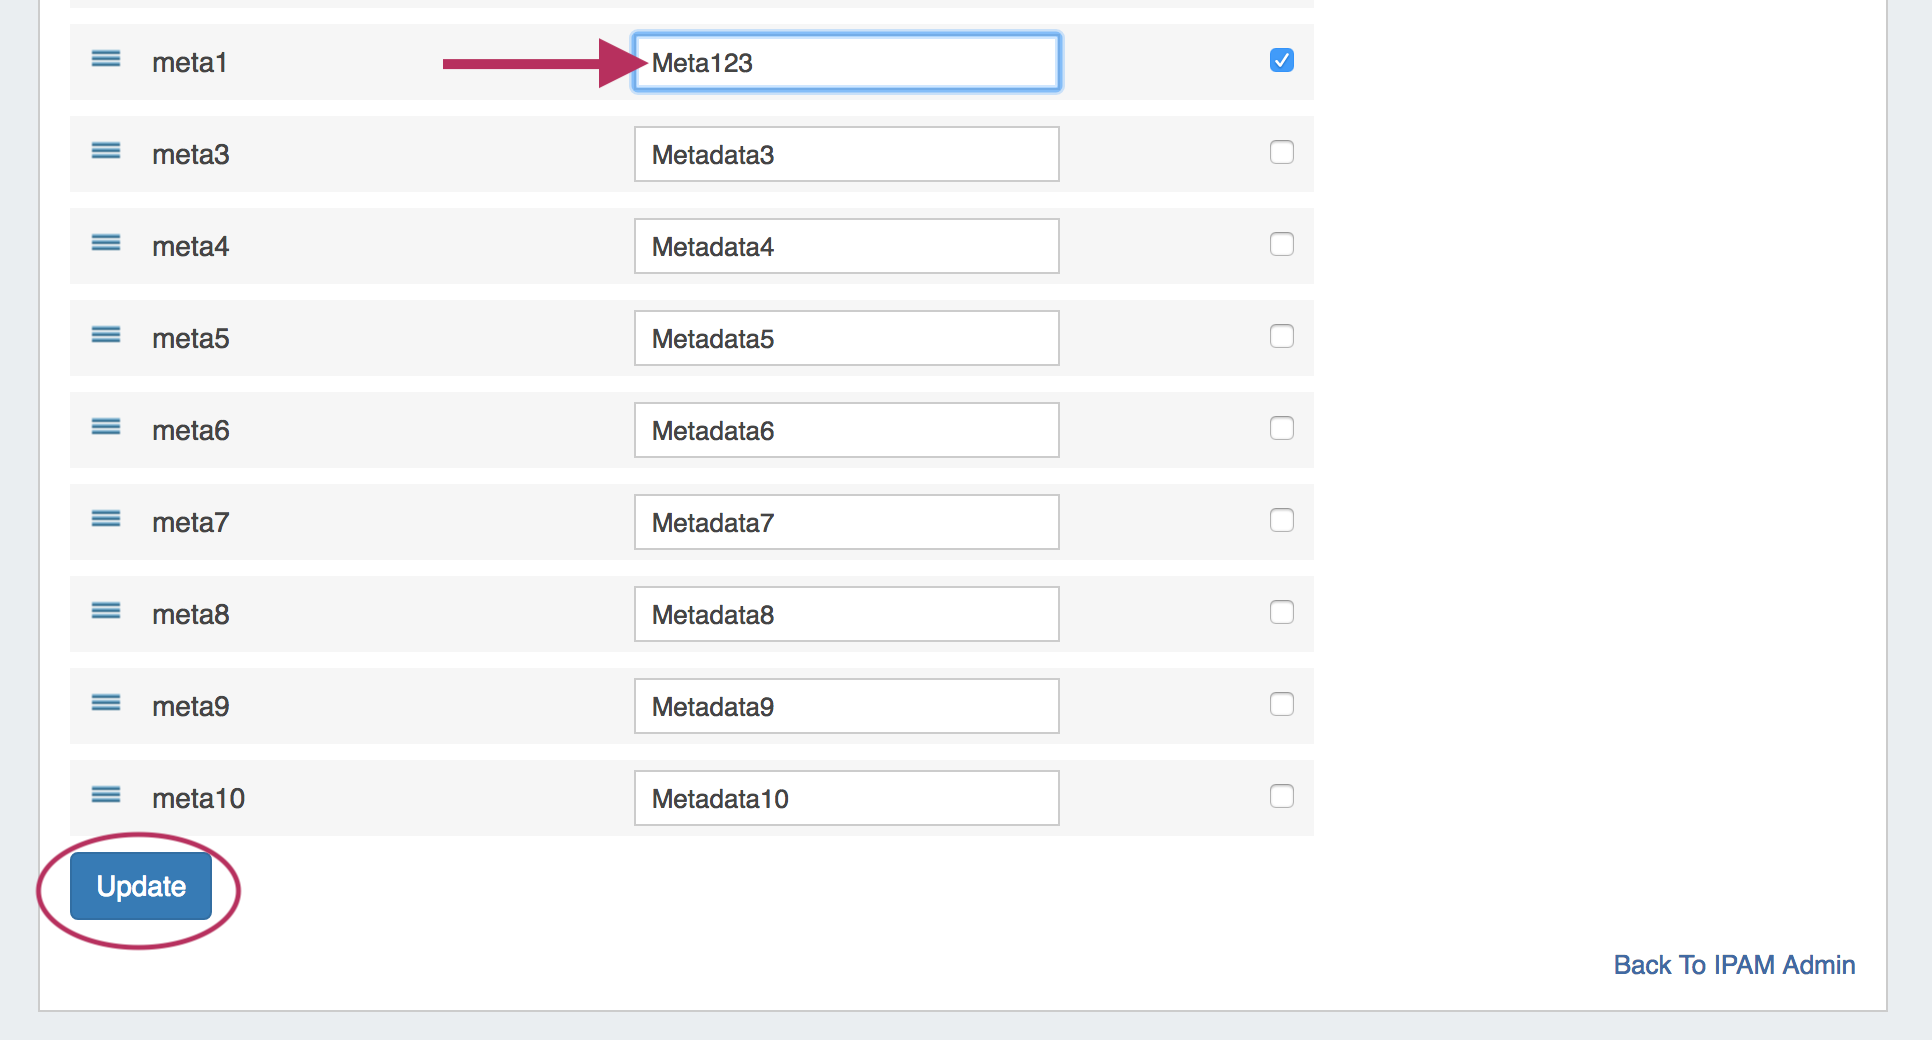
Eleven default ProVision fields and ten user-defined "Metadata" fields are available for customization.
| Info |
|---|
Keep in mind that "Edit Columns" is a global edit. If the values for order, header, or visibility are changed, it will affect ALL users of the ProVision application! |
To edit a a column name, simply type your changes in to into the text box. and click the "UpdateSave Changes" button.

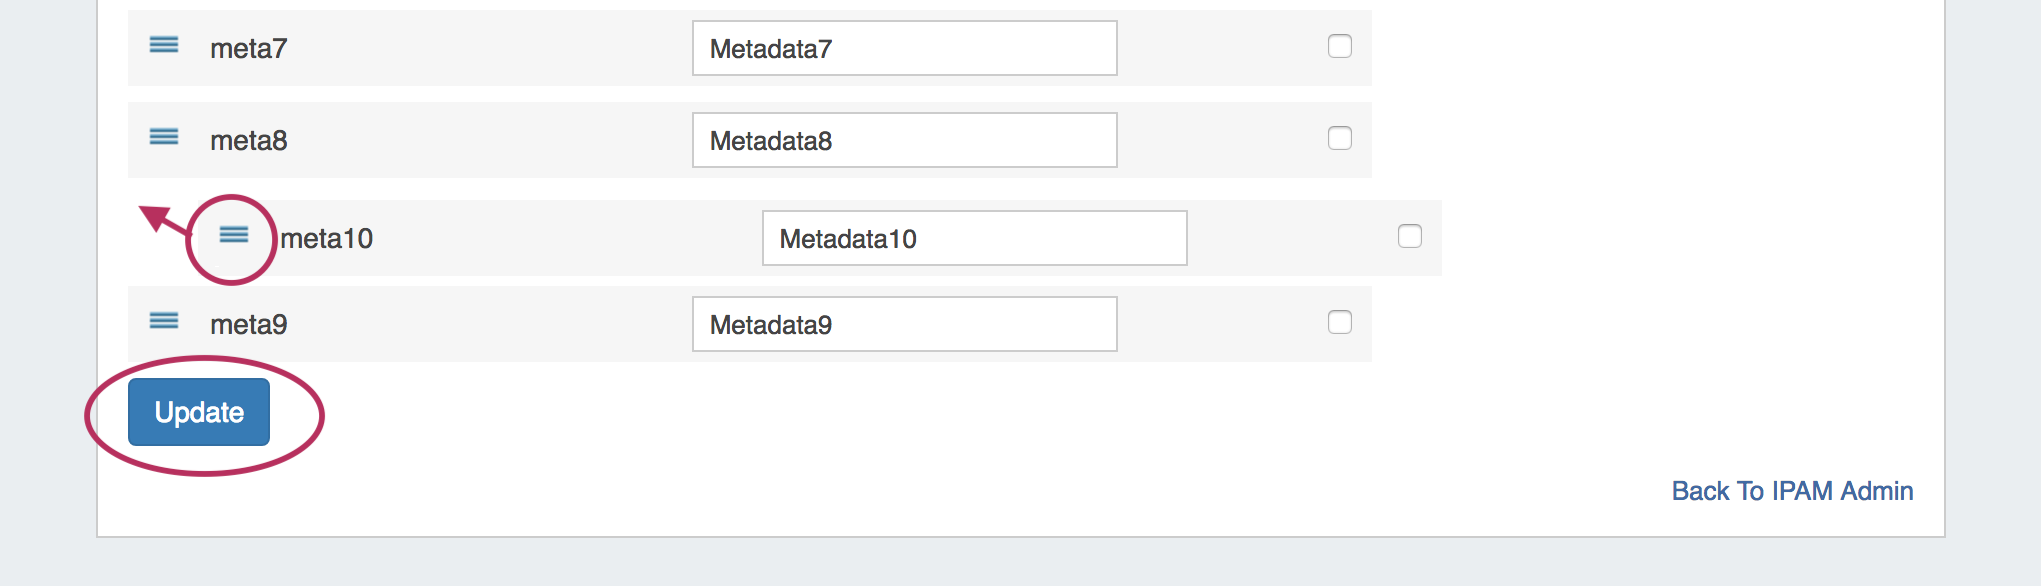
To reorder the the columns, click and hold on the "list" icon (three lines) to the left of the subetsubnet, then drag to the desired location in the list and release.

To toggle visibility for for a column, click in the checkmark field eye icon to the right of the column name to enable / disable visibility.
This shows or hides the column in both IPAM Manage and the IPAM Gadget, and affects all users.


When complete, be sure to click on the "UpdateSave Changes" button to save your changes.
Adding Constraints to IPAM Columns
The Constraints system allows for custom field validation and field restrictions to be created for IPAM fields. The applied constraint may be anything from a numerical comparison operation, a check against a pre-determined text string, ensuring selections from a pre-set list, or forcing entries into a specific format, such as IPv4/IPv6, phone number, or RegEx. For more detail on available types of constraints and creating them see the Constraints section.
A column that may have a constraint applied will have a checkmark icon in the "Options" column. Click the icon and select a constraint from the dropdown.
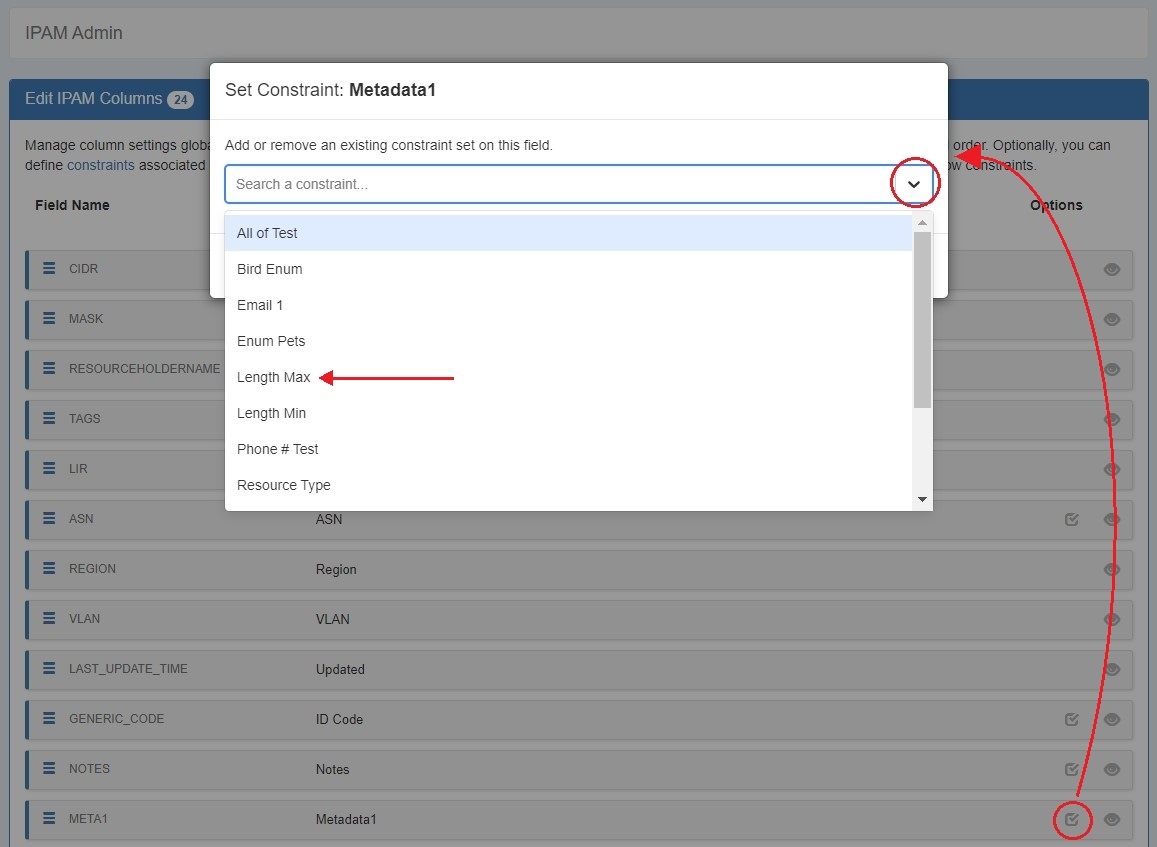
Click "Save".
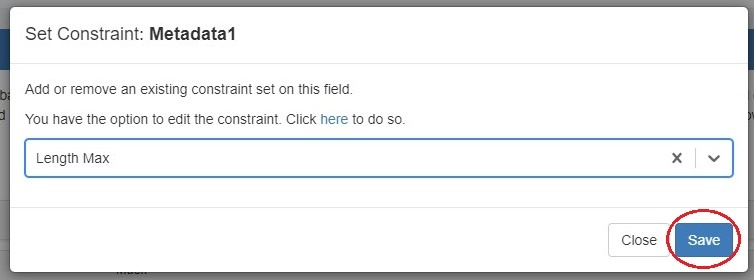
The applied constraint name will then be displayed in the column row.
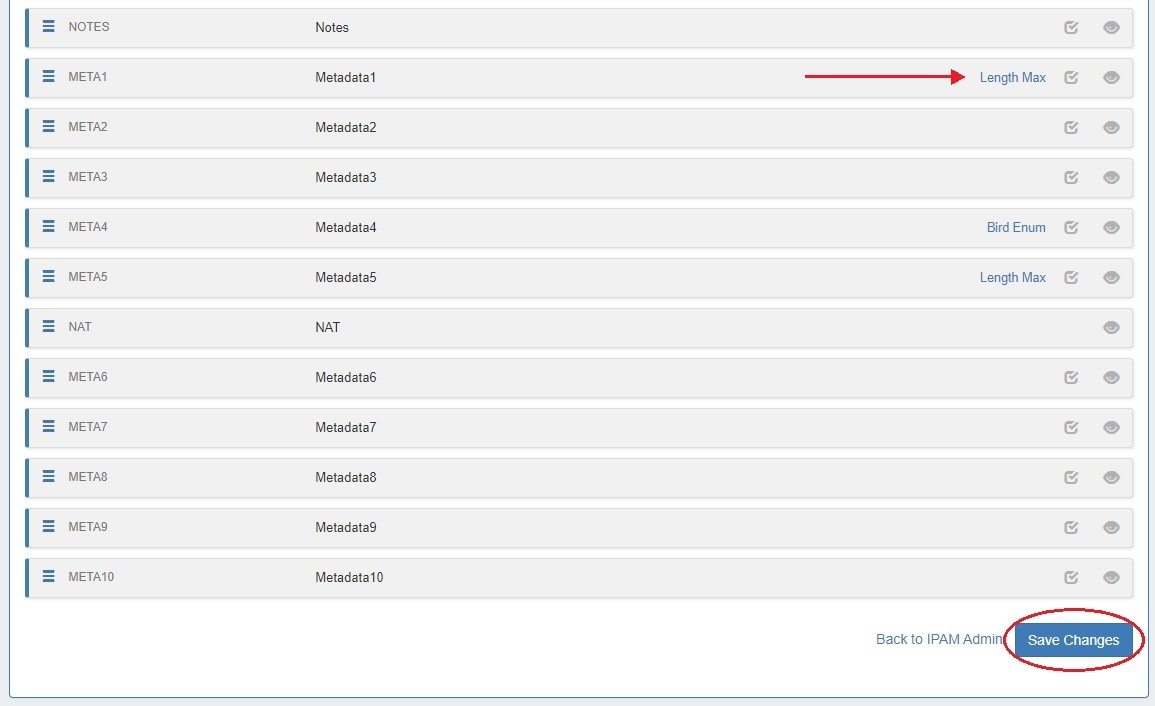
Click "Save Changes" before exiting the IPAM Column page to retain changes.
Additional Information
Continue on to the following pages for additional information on IPAM Admin tasks in ProVisionAdmin tasks:
For additional information on non-admin IPAM areas, see:
...