...
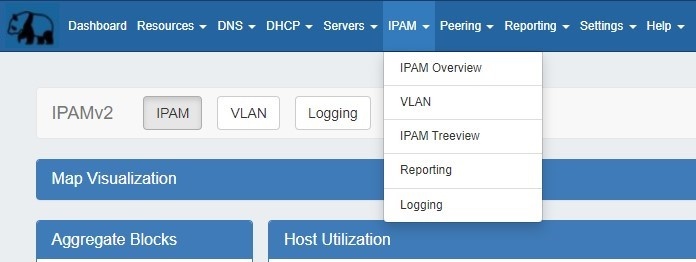
The IPAM tab contains three sub-tabs: IPAM ManagementOverview, VLAN, and Logging.
The IPAM tab (also accessible from the dropdown menu as IPAM ManagementOverview) provides a listing of top-level aggregate blocks, tools to add, merge, sparse allocate, and manage aggregates, as well as multiple data visualizations. The blocks under each aggregate may be individually assigned, edited, swip'ed, and managed from the IPAM Manage page for the aggregate. For detailed information on specific aggregate and block tasks, see Working with IP Aggregates, Working with IP Blocks, and Working with IP Rules. For administrative level tasks, see IPAM Administration.
...
Two additional options are available in the IPAM Dropdown Menu: IPAM Treeview and Reporting:
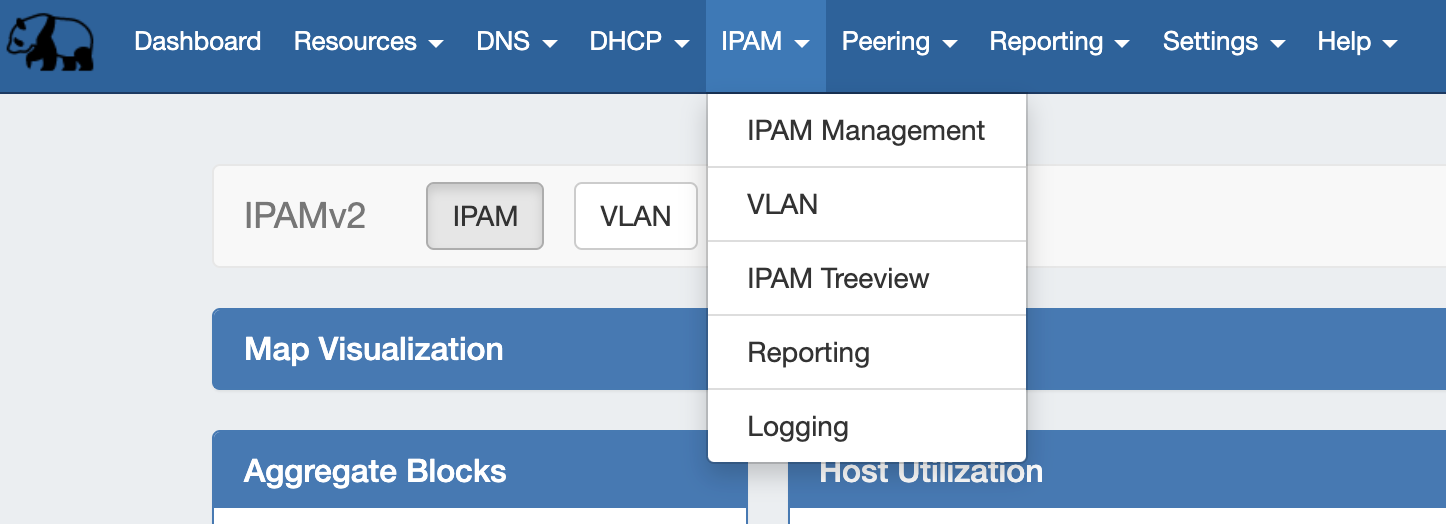
IPAM Treeview opens a new window containing a minimalist, searchable list of all IPv4 and IPv6 blocks in ProVision.
...
The "Add Aggregate" button opens a new page to add an aggregate block with options for RIR, VLAN, Tags, Region, Resource, and enabling Sub-Assignments. sub assignments. A resource must be selected to enable sub assignments.

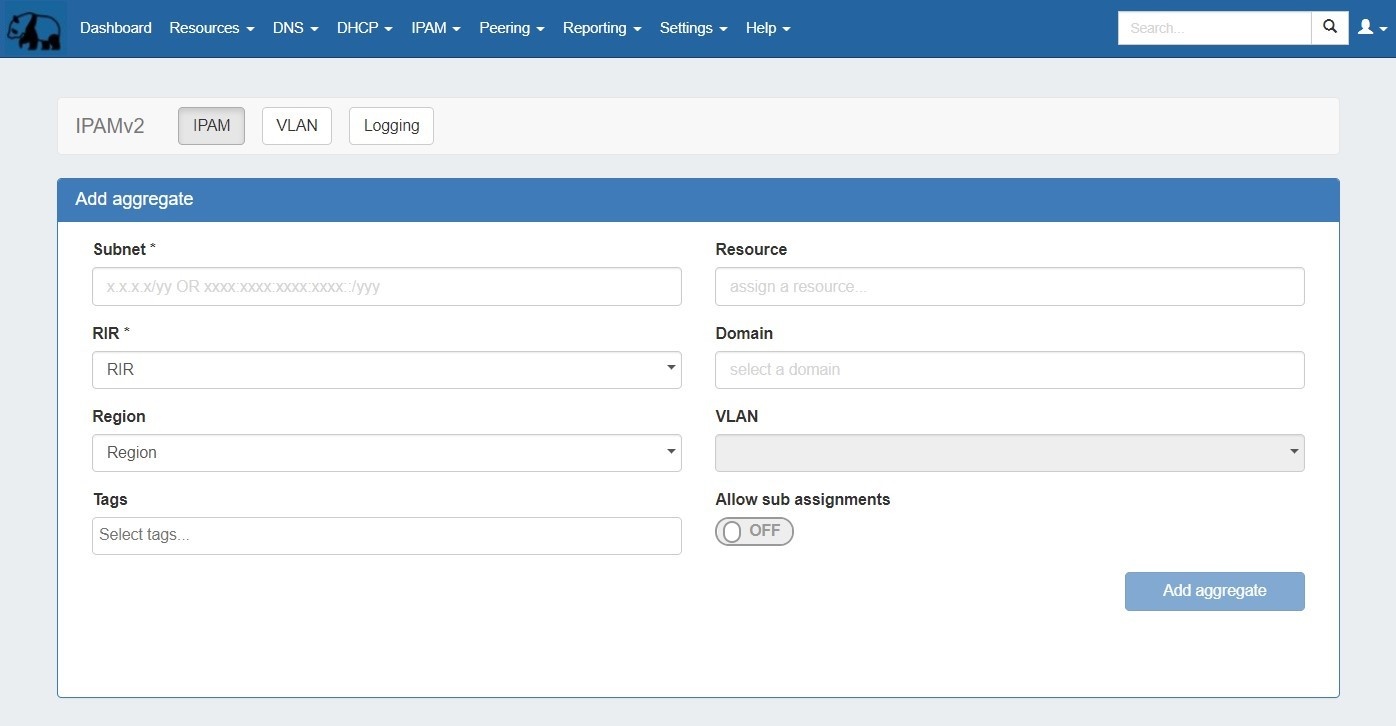
When done, click "Add Aggregate". The IPAM Tab home page will automatically load, and the new aggregate A link to the newly created aggregate will be available or you may hit "Clear" and create another aggregate. New aggregates will be listed under the Host Utilization and Aggregate Blocks list of the IPAM Tab for further management.
...
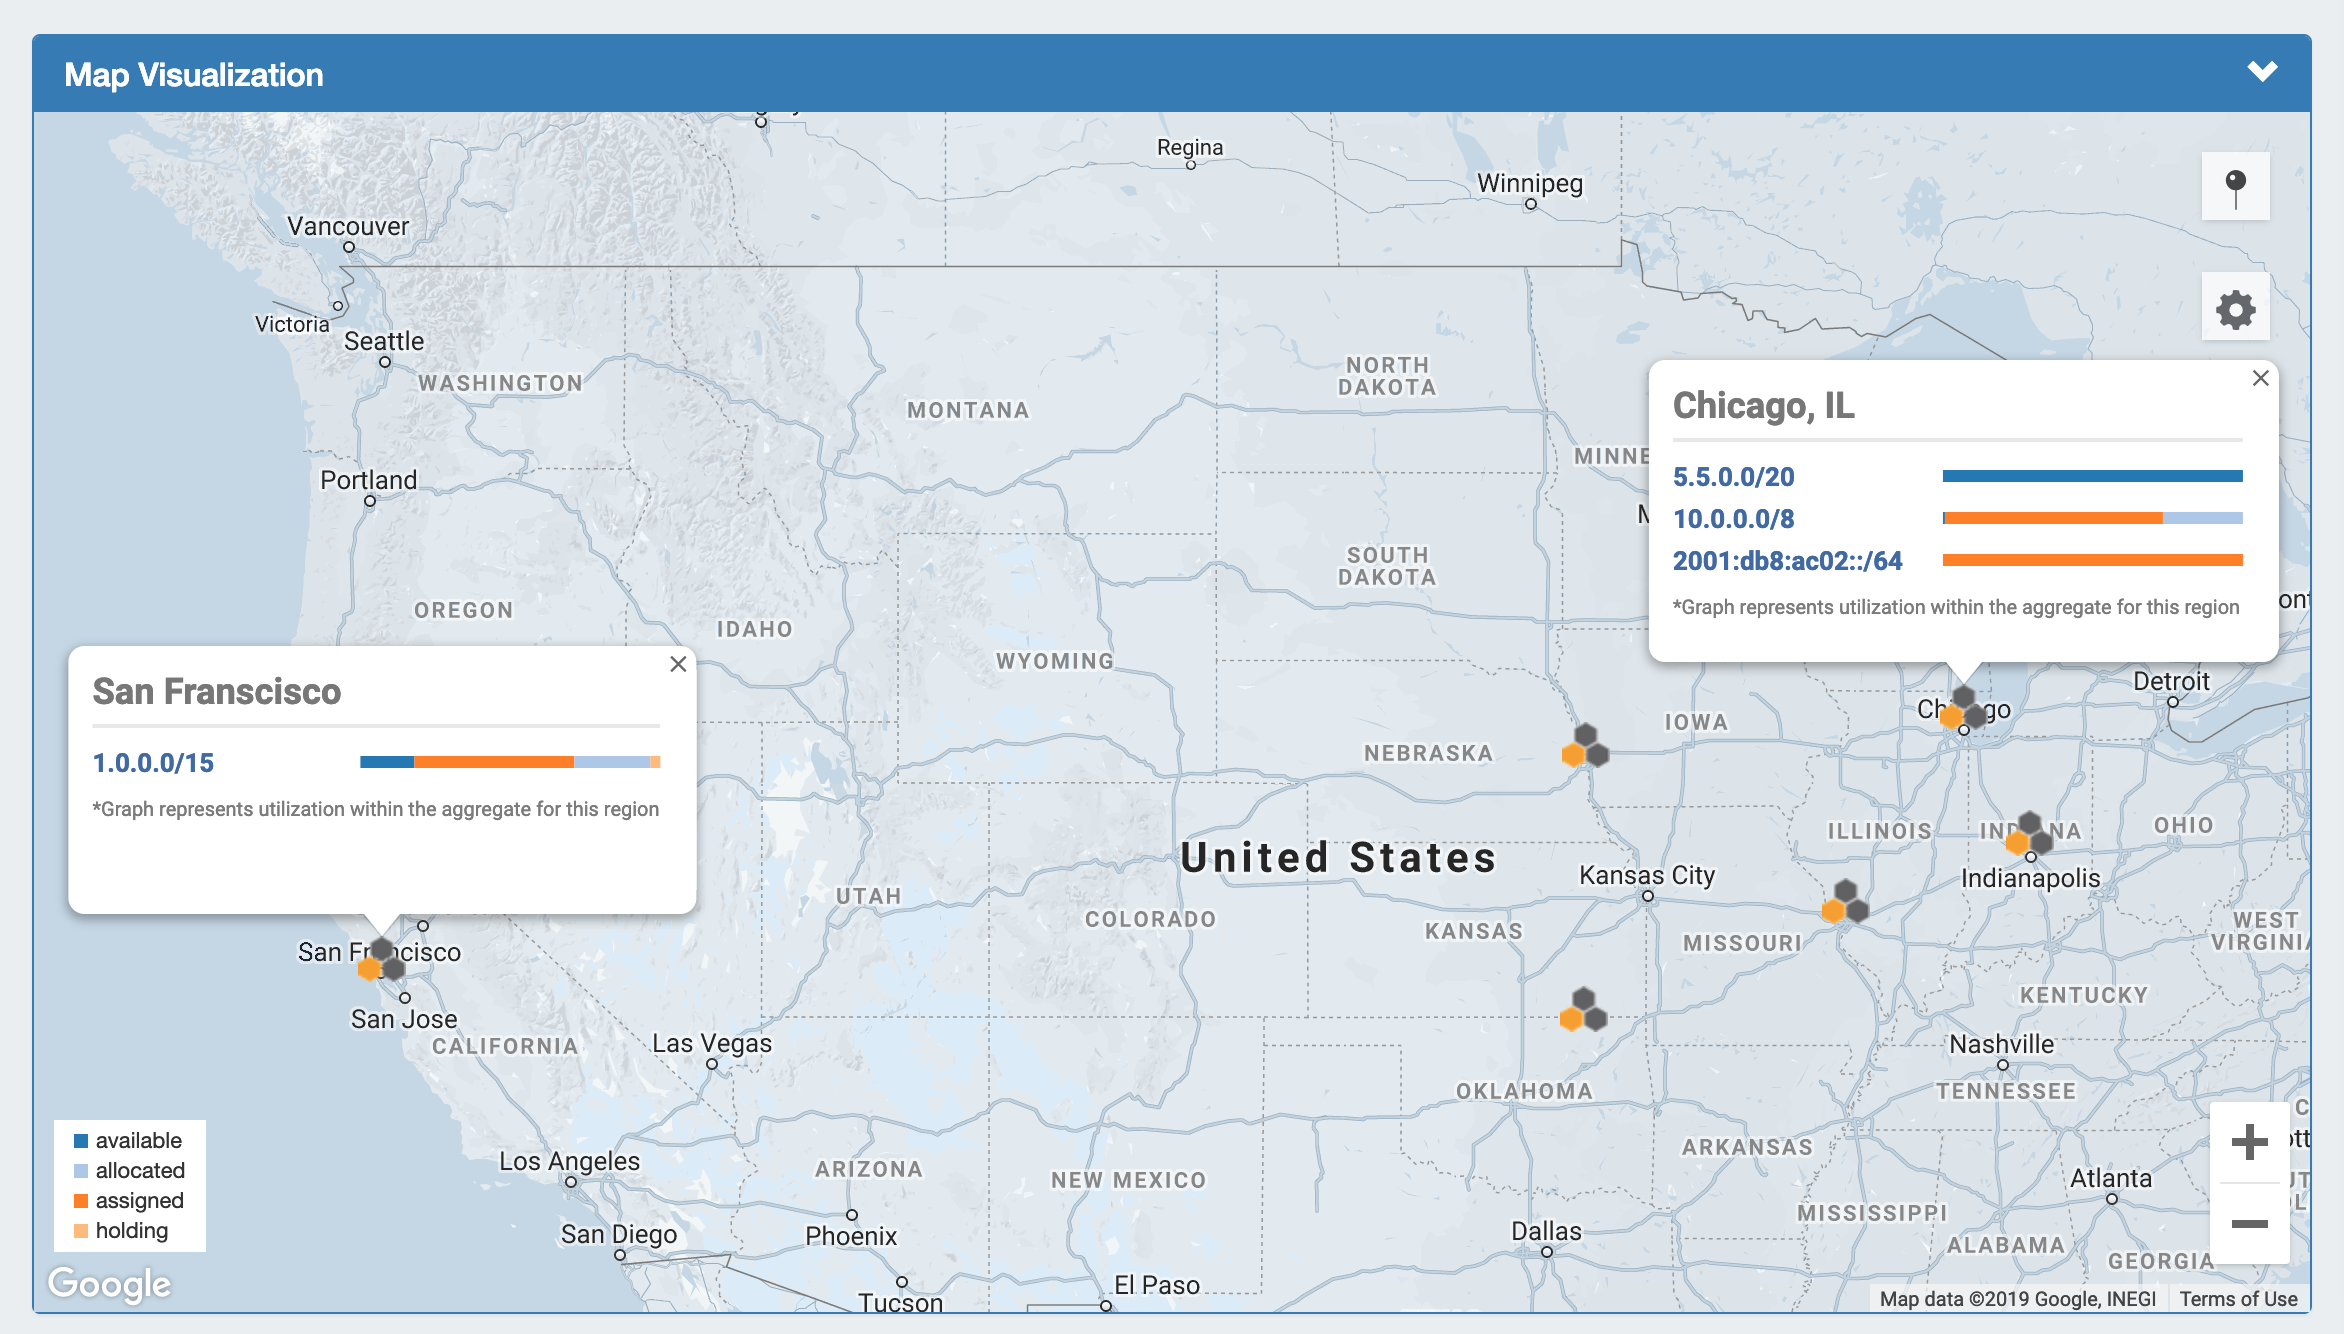
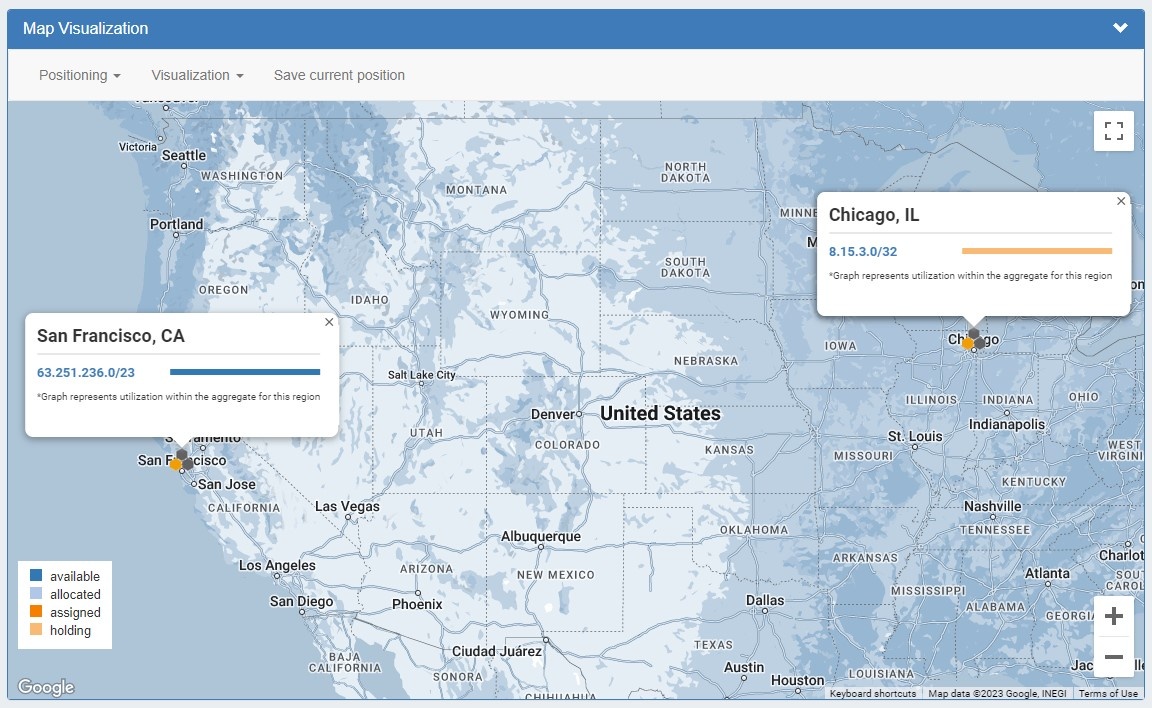
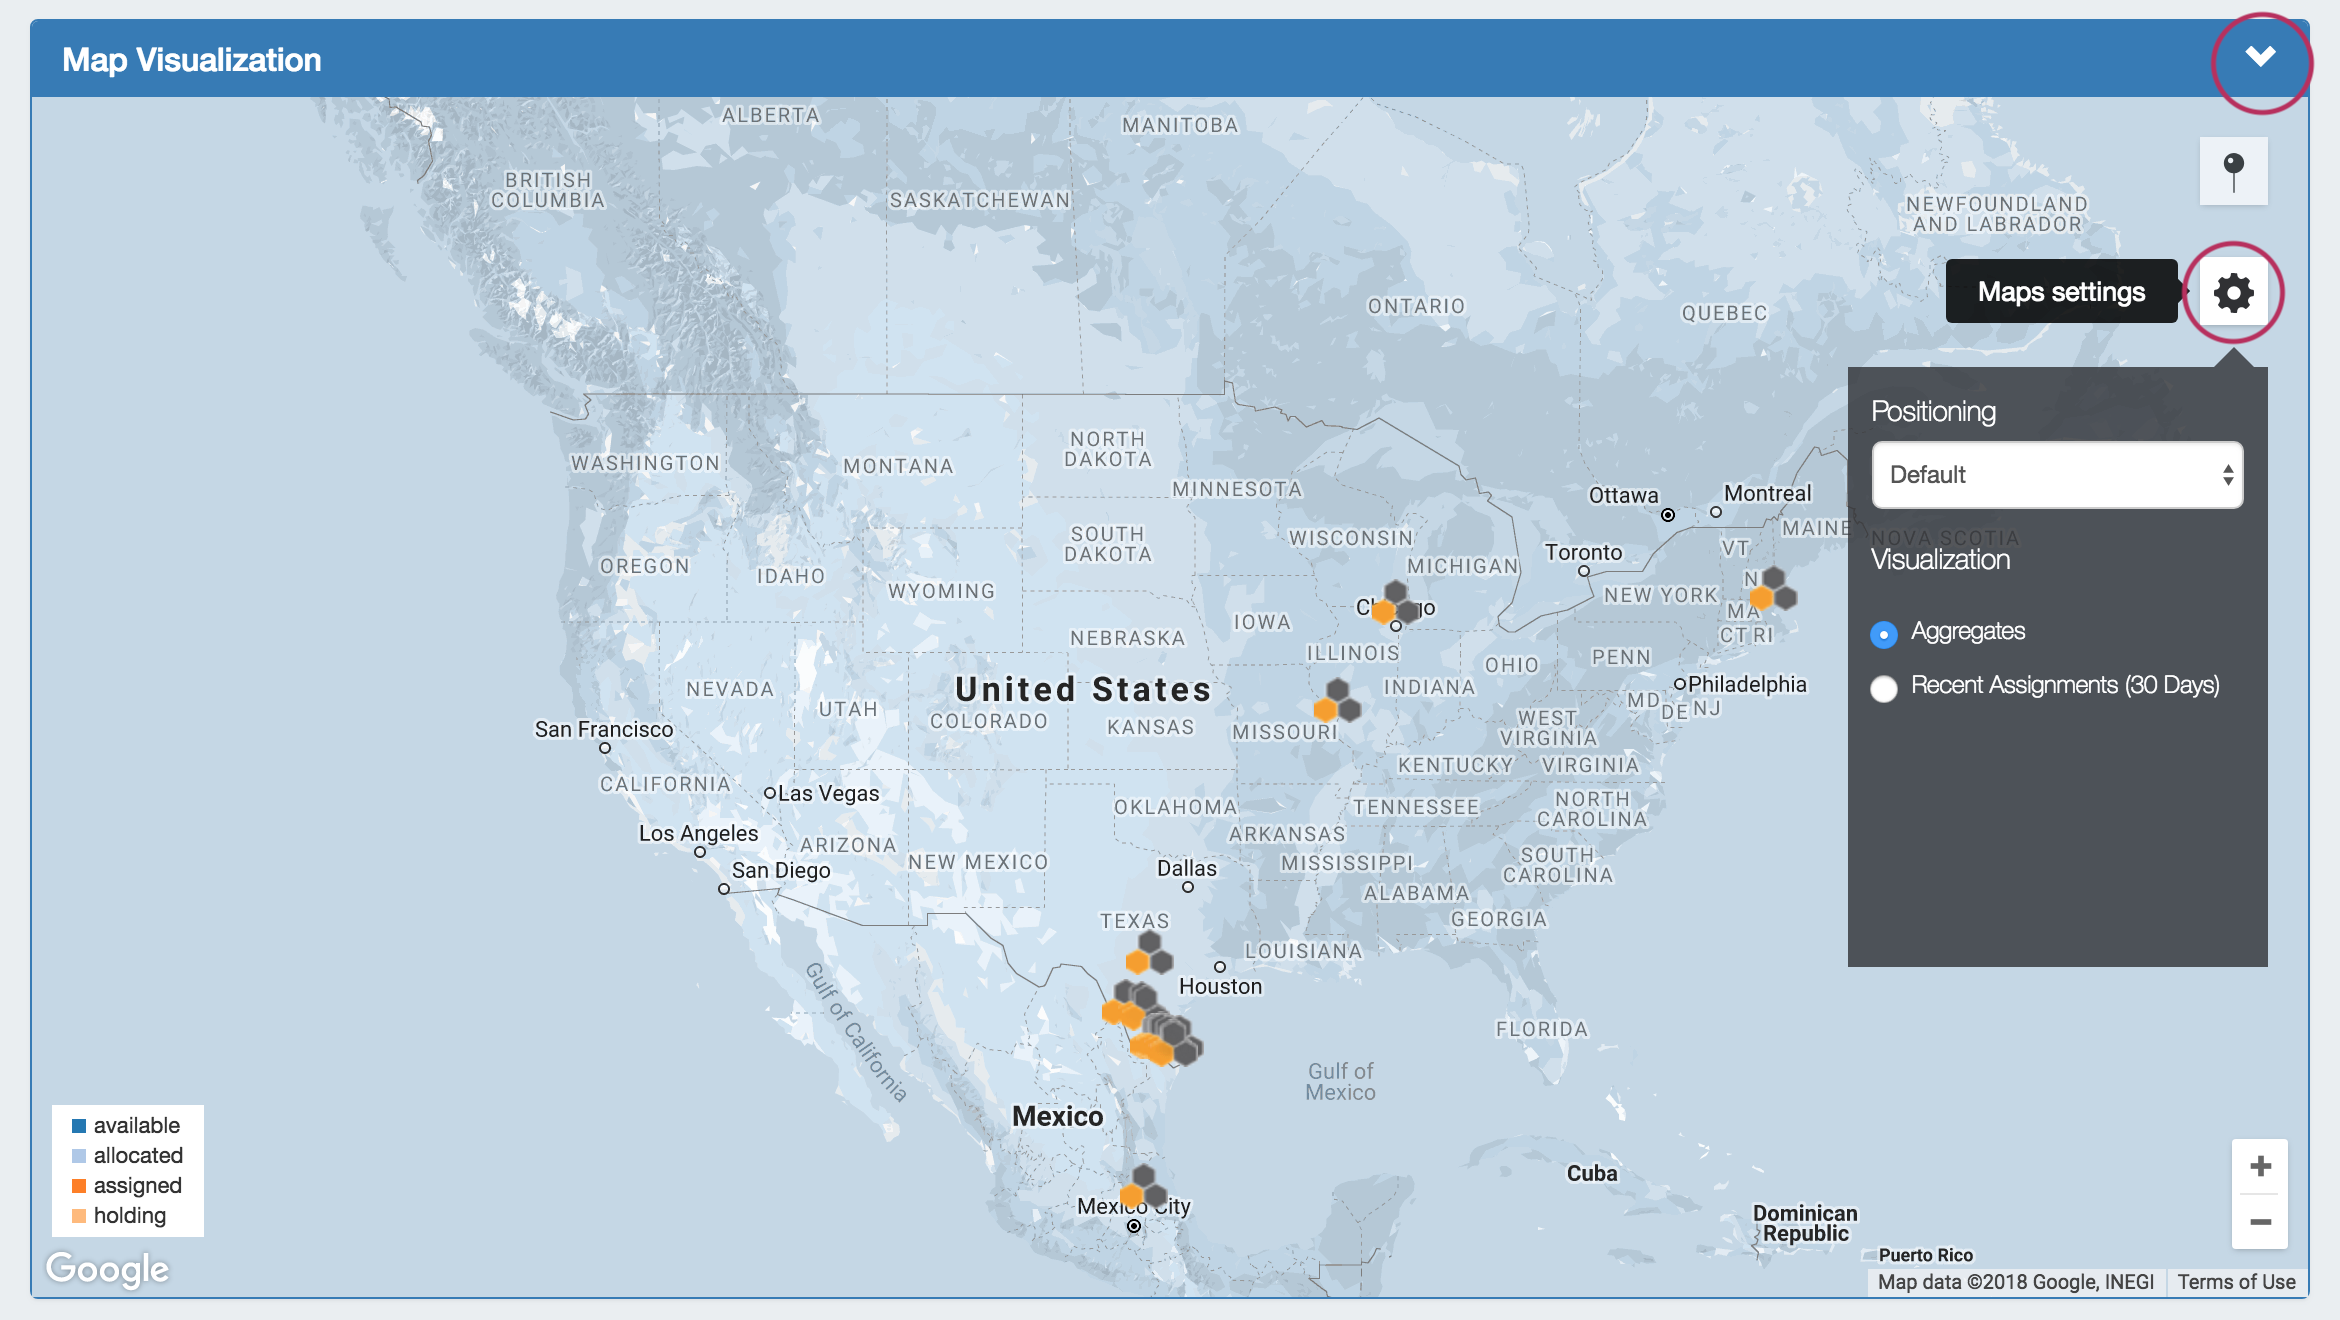
Map View shows aggregate locations / recent assignments in geographical format, based on the region assigned to those aggregates. Clicking on a location icon will bring up a current utilization graph and a link to that aggregate's IPAM Manage page if in Aggregates view, or recent assignment details if in Recent Assignments view.
| Note | ||
|---|---|---|
| ||
Due to changes in Google's licensing and Geocoding API, the geolocation method used for Map View in ProVision versions pre-v7.1.0 is no longer supported. A Google Geocoding API Key is now required for geolocation data to be accessible by ProVision, and for IPAM Maps to properly determine a Region's location. As a result, IPAM Map View in versions older than 7.1.0 may not accurately display or update location information. 6connect is exploring adding additional map integration options for ProVision. Any customers who require an alternative geocode option supported apart from Google Geocode API key, please contact us at feedback@6connect.com. |
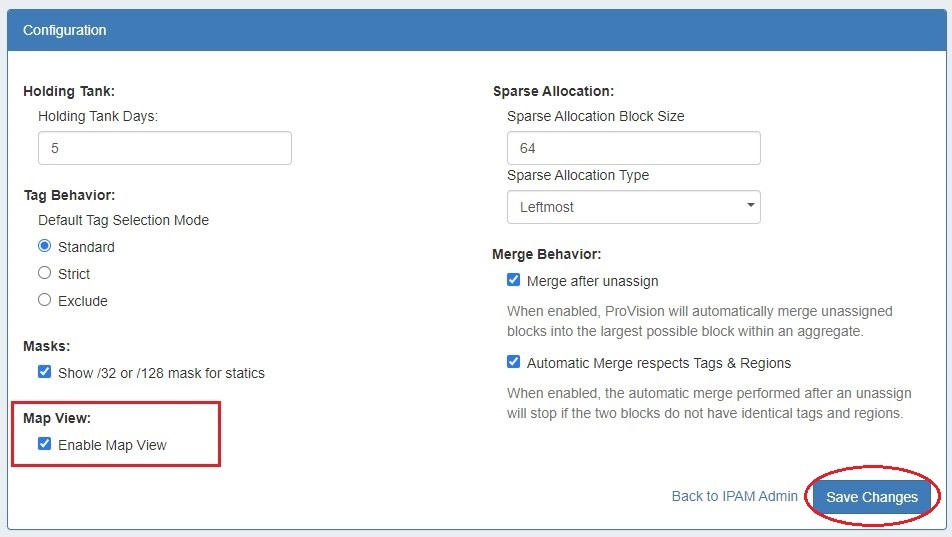
Enabling Enabling Map View
The IPAM aggregate map view may be enabled / disabled from the IPAM Configuration page. Once enabled, a map module will be able to be expanded in the IPAM Tab.
...
Map View enabled on the IPAM Configuration page
Expand 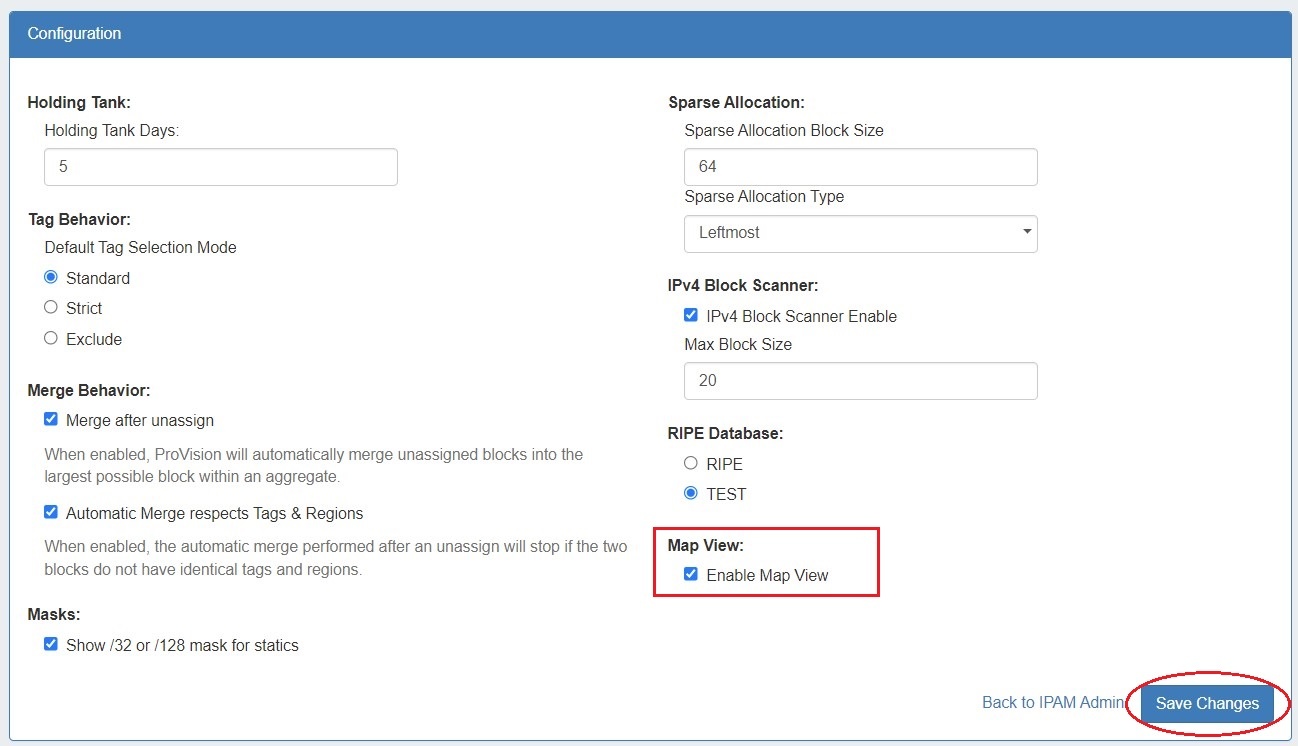
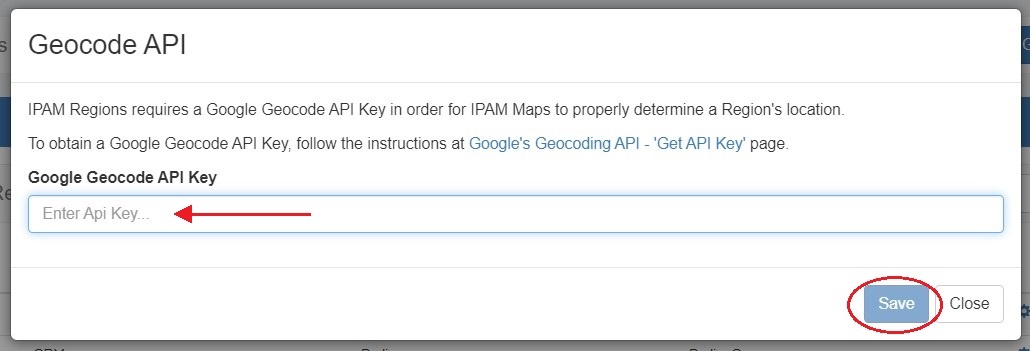
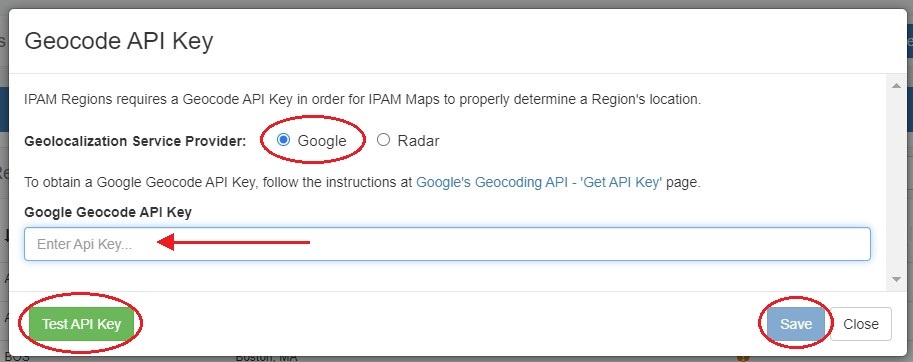
A Google Geocoding API Key provided provided in the Edit Regions page. See Edit Regions for additional detail.
Expand title How to Get and Apply a Google Geocoding API Key Step 1: Obtain a Google Geocoding API Key
To get a Google Geocoding API Key, follow the instructions listed here:
How to get a Google Geocoding API Key
Note: In order to obtain a Google Geocoding API Key, a company must have a subscription enabled to Google Cloud Platform Console.
Step 2: Assign the API Key to IPAM Regions
Once assigned a Google Geocoding API Key, from the Edit Regions page, click "Google Geocode API Key". Then, paste the Then select the Google radio button, paste the API key into the Geocode API dialog, and click "Save" . You can test the API Key by clicking the Test button at lower left.
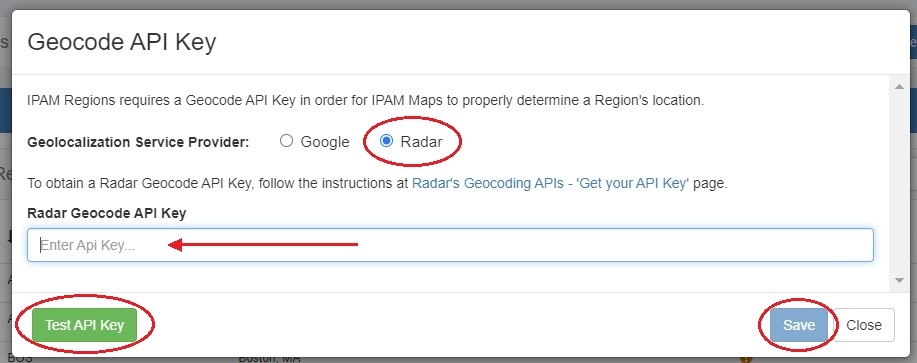
Expand title How to Get and Apply a Radar Geocoding API Key Step 1: Obtain a Radar Geocoding API Key
To get a Radar Geocoding API Key, follow the instructions listed here:
How to get a Radar Geocoding API Key
Step 2: Assign the API Key to IPAM Regions
Once assigned a Radar Geocoding API Key, from the Edit Regions page, click "Geocode API Key". Then select the Radar radio button, paste the API key into the Geocode API dialog, and click "Save". You can test the API Key by clicking the Test button at lower left.
Regions created with a valid "Address" (location) field. The "Address" field may be a street address, city, airport code, or geo-coordinates. See Edit Regions for additional detail.
Note title Miscellaneous Terms as Addresses Being that the validity of the "Address" field is determined by the Geocoding API, unexpected location mapping may occur if a company name or other non-location
Regions created with a valid "Address" (location) field. The "Address" field may be a street address, city, airport code, or geo-coordinates. See Edit Regions for additional detail.
Note title Miscellaneous Terms as Addresses Being that the validity of the "Address" field is determined by Google's API, unexpected location mapping may occur if a company name or other non-location specific term is used in the Address field.
Google treats the item as a search term and returns the most likely location result back - but it might not be what you were expecting! When in doubt, check the address term by pasting it into Google Search, and verify that the top result returns your desired location.
- Regions enabled in IPAM Columns and assigned to aggregates / blocks for the IPAM Map view to populate data. See Edit IP Block Attributes for additional detail.
...
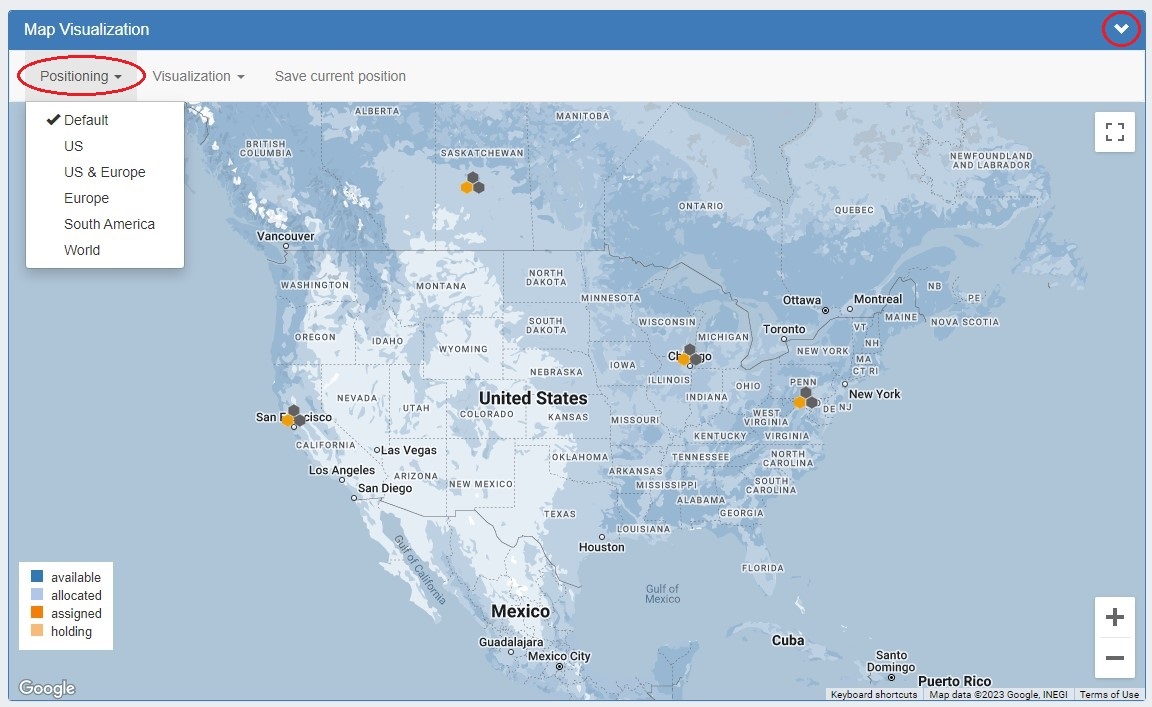
The map view may be set by either selecting a predefined map area from the "Maps Settings" → "Positioning" dropdown dropdown (US, US & Europe, Europe, South America, AllWorld), or chose a custom area set by zooming / navigating to the desired map area.
To save the currently viewable area as the Default view, click the pin icon to ""Save current position as Default" at top.


Map View Settings:
Visualization Dropdown: Select "Aggregates" to view all available aggregates with region data, or "Recent Assignments" to view block assignments made within the past 30 days.
Positioning Dropdown: Select a predefined area for the map view range: US, US & Europe, Europe, South America, or AllWorld.
Save current Position as Default: Click the pin icon to save the current map view range as the default view.
Toggle Full Screen: Click to view full screen map.
Aggregate Detail Box:
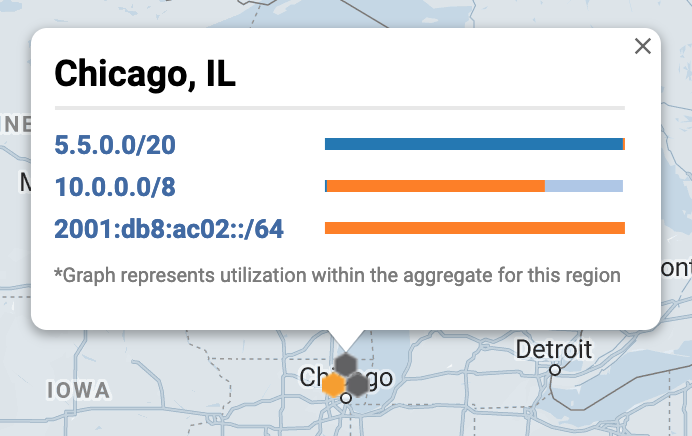
Provides utilization data and a shortcut link to the IPAM Manage screen for that aggregate if in "Aggregates" view, or assignment details if in "Recent Assignments" view.
...
Top-Level Aggregate / Host Utilization Box Overview
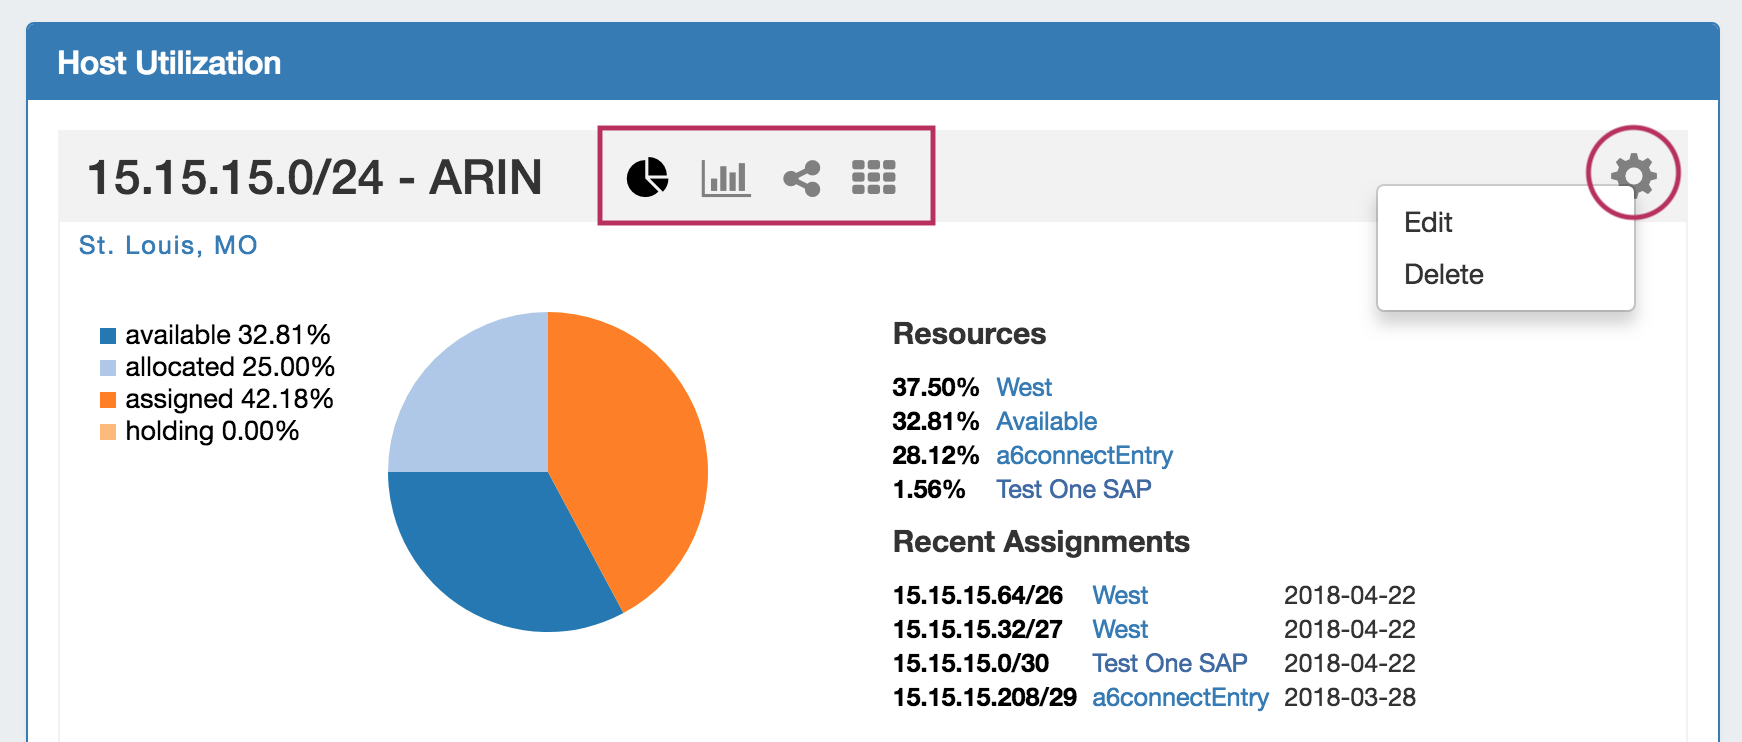
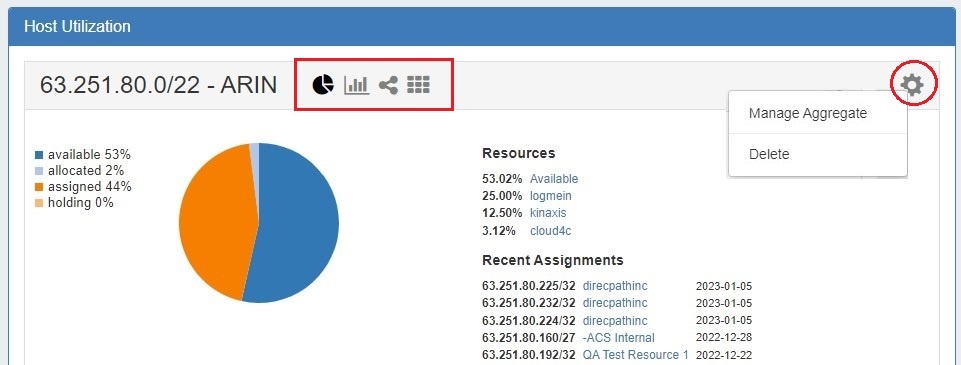
The Top-Level Aggregate Host Utilization box provides detailed information on that aggregate, including:
- CIDR: Single-click to IPAM Manage for the aggregate
- RIR information: displays the aggregate's RIR, as set at creation (1918, ARIN, RIPE, LACNIC, AfriNIC, APNIC)
- Aggregate Chart Views: Four Aggregate chart views are available, - Pie, Bar, Tree, and Grid view. Switch between each chart by clicking on the respective icons in the Aggregate header (marked above).
- Aggregate Actions (Gear Icon):
- EditManage Aggregate: Opens IPAM Manage for the aggregate. See Working with IP Blocks for information on working in IPAM Manage. Clicking on the Block CIDR in the header also opens the IPAM Manage page.
- Delete: Deletes the Aggregate (provides a warning).
- Enable / Disable Sparse Allocation (IPv6 only): Enable or disable Sparse Allocation for an IPv6 aggregate. Enabling will automatically generate a Numbering Authority Sparse Allocate Domain for use with the aggregate.
- Sparse Allocate (IPv6 only): Appears only when Sparse Allocation is enabled for an IPv6 aggregate. Opens a menu to select or create a resource to assign a block to, using the sparse allocate algorithm to disperse the assignment(s) throughout the aggregate. See: Working with IP Aggregates
- Region(s): Displays the primary region(s) associated with the aggregate, either at aggregate creation or from regions associated with blocks under that aggregate. Clicking on the region link for an aggregate will open IPAM Manage for the aggregate, filtered to view blocks associated with that region.
- Utilization: Utilization displayed as both a pie chart and detailed percentages. Utilization statuses include:
- Available: A status of "Available" indicates the block is free and able to immediately be assigned or allocated to a resource.
- Allocated: Allocated blocks have been assigned to an overarching resource, but have subassignments enabled and may have smaller blocks assigned out of them to other Resources, such as customers or DHCP Pools.
- Assigned: A status of "Assigned" indicates that the block has been assigned to a Resource, with no subassignment capability, and is unavailable.
- Holding: Blocks in "Holding" have recently been unassigned, and are held for a set duration in the IPAM Holding Tank, unless otherwise overridden, reassigned, or reclaimed from Holding.
- Resources: The top five Resources assigned under that aggregate with the most assigned block space.
- Recent Assignments: The five most recent block assignments under that aggregate, with the CIDR, assigned resource link, and assignment date.
...
This feature provides an alternate route to provide ProVision data to legacy workflows on your network. If a team is used to query WHOIS, they can query Provision. If a system needs to talk to WHOIS, it can talk to ProVision-as-WHOIS.
Setup
Setup
| Expand |
|---|
The ProVision WHOIS Server is a thin client for our REST API that listens on port 43 and accepts WHOIS requests that gets forwarded to our API. It is written in Python 3 using the socketserver module, and uses the ProVision endpoint /api/ipam/whois to receive all requests from the WHOIS server. The main business logic is located in services/WhoisService.php Running the Server manuallyThe Python requests library must first be installed: Ubuntu:sudo apt install -y python3-pip CentOS / Alma Linux:sudo yum install python3-pip OR sudo dnf install python3-pip The server is located at whois_server/main.py in the ProVision repository. Open main.py and update these variables: |
| Expand |
The ProVision WHOIS Server is a thin client for our REST API that listens on port 43 and accepts WHOIS requests that gets forwarded to our API. It is written in Python 3 using the socketserver module, and uses the ProVision endpoint /api/ipam/whois to receive all requests from the WHOIS server. The main business logic is located in services/WhoisService.php Running the Server manuallyThe server is located at whois_server/main.py in the ProVision repository. Running the server can be done with: sudo python3 main.py (We need root because we are binding to port 43) Quering the WHOIS server
Installing the WHOIS server as a serviceDifferent Linux distributions might have different ways to setup a service that runs on startup. systemdThere is a Unit file for systemd in the repository: whois_server/provision_whois.service that is used when a service is created in systemd env. 1) Edit the file to setup the proper path to the python server/file ExecStart=/usr/bin/python3 /root/whois_server/main.py WorkingDirectory=/root/whois_server/ 2) Copy the file to /etc/systemd/system (on CentOS this directory should be: /lib/systemd/system/) - sudo cp whois_server/provision_whois.service /etc/systemd/system/provision_whois.service 3) Start the service with service provision_whois start 4) Verify that is working with service provision_whois status and making a test query whois -h 127.0.0.1 ﹤query﹥ The systemd services are run as root, so there shouldn't be issues with binding to port 43. init.dThere is also init.d file located at whois_server/provision_whois 1) Edit the file to setup the proper path to the python server/file DAEMON_OPTS="/var/www/projects/whois/app.py" 2) Copy the file to /etc/init.d/ 3) chmod +x /etc/init.d/provision_whois -v 4) Verify that is working with service provision_whois status and making a test query whois -h 127.0.0.1 ﹤query﹥ |
...
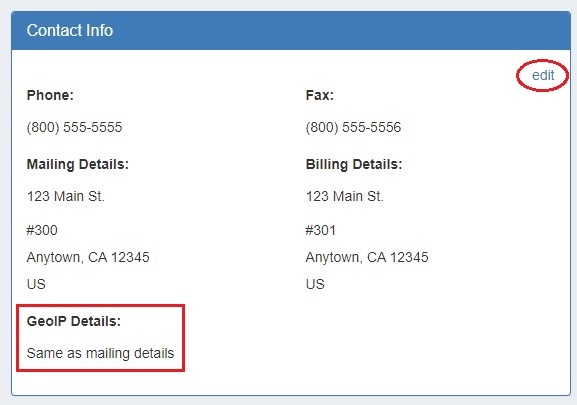
If a resource has an assigned a non-1918 IP address, and either Geo IP location data or a Mailing Address entered in the Contact Info Gadget, then the data will be included in the .csv output. If an IP address is not associated with the resource, or if neither Geo IP / Mailing Address has been provided, the resource will be skipped.
...
| Expand | ||
|---|---|---|
| ||
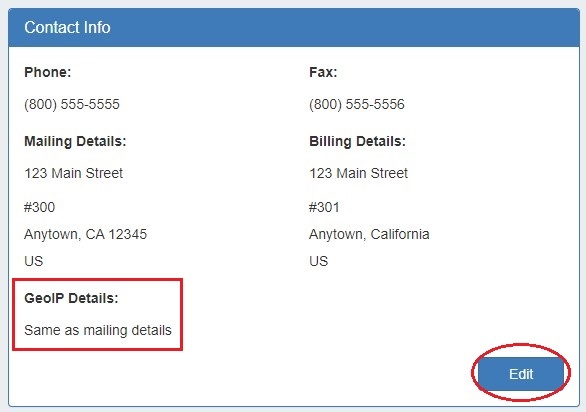
1) Enter GEO IP data to Resources Add GEO IP location data to a Resource by selecting "Edit" for the Contact Info Gadget.
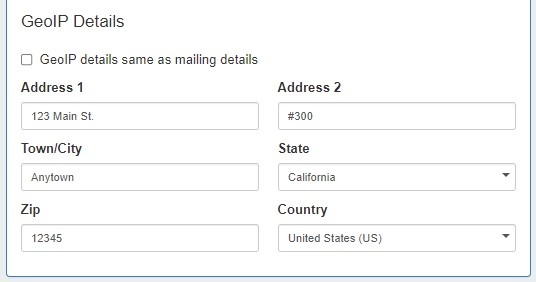
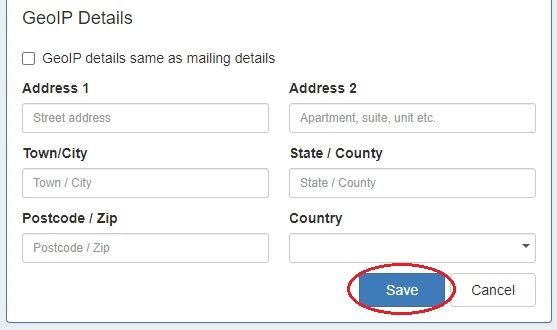
Enter a separate address to denote as the GEO IP location, or you may select "Same as Mailing Address":
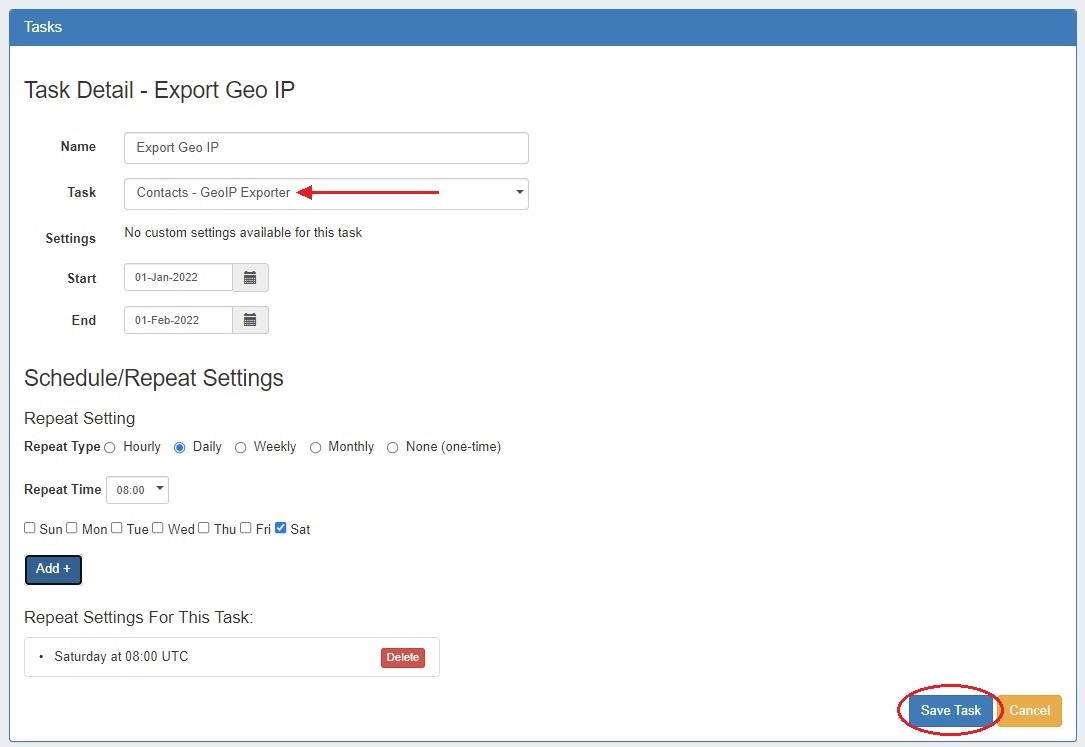
2) Set up the Geo IP Export Scheduler Task Create a Scheduler task to export GEO IP data:
3) Run the Scheduler Task / File Access Run the GEO IP scheduler task, either via "Run Now" or as a scheduled run - the task will search for resources with an assigned IP address, and either Geo IP location data or a Mailing Address entered in the Contact Info Gadget, and add the data to the .csv output.
Once the task has completed, the GEO IP data will be written to the ProVision root directory as "geoip_feed.csv":
|


...