IP Block Management

Managing
...
IP Blocks
| Table of Contents |
|---|
Adding/Deleting IP Address Aggregates
On the standard IPAM page there is an option to "Add Aggregate". Click on the green "Add" icon.

Once clicked, you get a more detailed screen to add an aggregate block.

When a block is added, you will be able to see it on the IPAM page.

To delete the aggregate - click on the Action Menu (wrench icon) for the aggregate in the top right corner of the box, and you will have the option delete the aggregate.
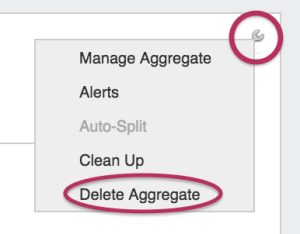
After selecting the "Delete Aggregate", a message will show up in the aggregate box verifying that you would like to delete. Deleting will remove all data and existing assignments from the aggregate and its child blocks. If certain you want to delete, click the "Delete" button. Otherwise, select "Cancel".

Set Aggregate Alerts
Aggregate alerts allows you to set up an email notification to send once an aggregate's available space hits a chosen percentage threshold.
| Info |
|---|
| Prior to setting the alert, verify that an IPAM Alerts task has been created in the Scheduler, detailing the alert schedule / frequency. Alerts will not send unless the scheduled task has been created to set the desired alert frequency. |
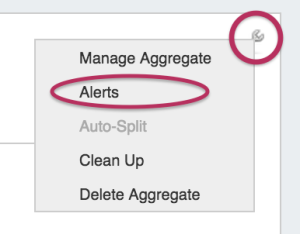
To set the alert, select the Action Menu (wrench icon) for an aggregate, and click on "Alerts".
This brings up the "Manage Alerts" dialog. Enter the email address for the alert recipient and the available space percentage at which the alert is triggered.
When done, hit "Save Alert". You may also cancel at any time.
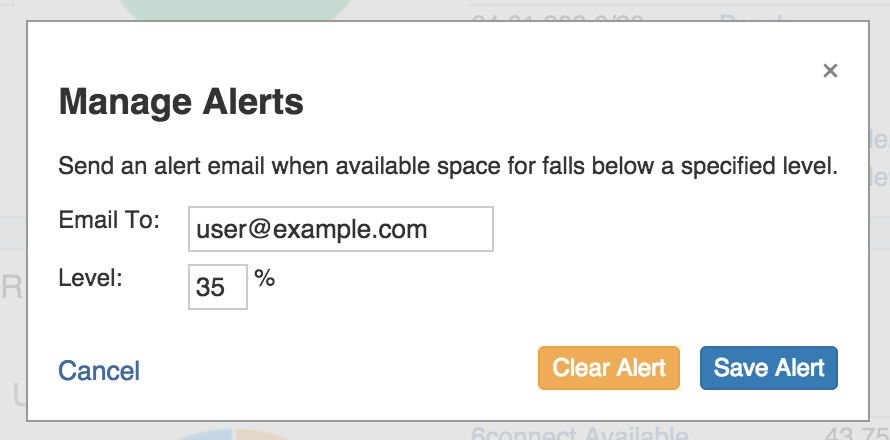
To clear an existing alert, hit "Clear Alert", and the alert information will be removed and status saved.
Architecting IP Address Blocks
Splitting/Merging blocks manually
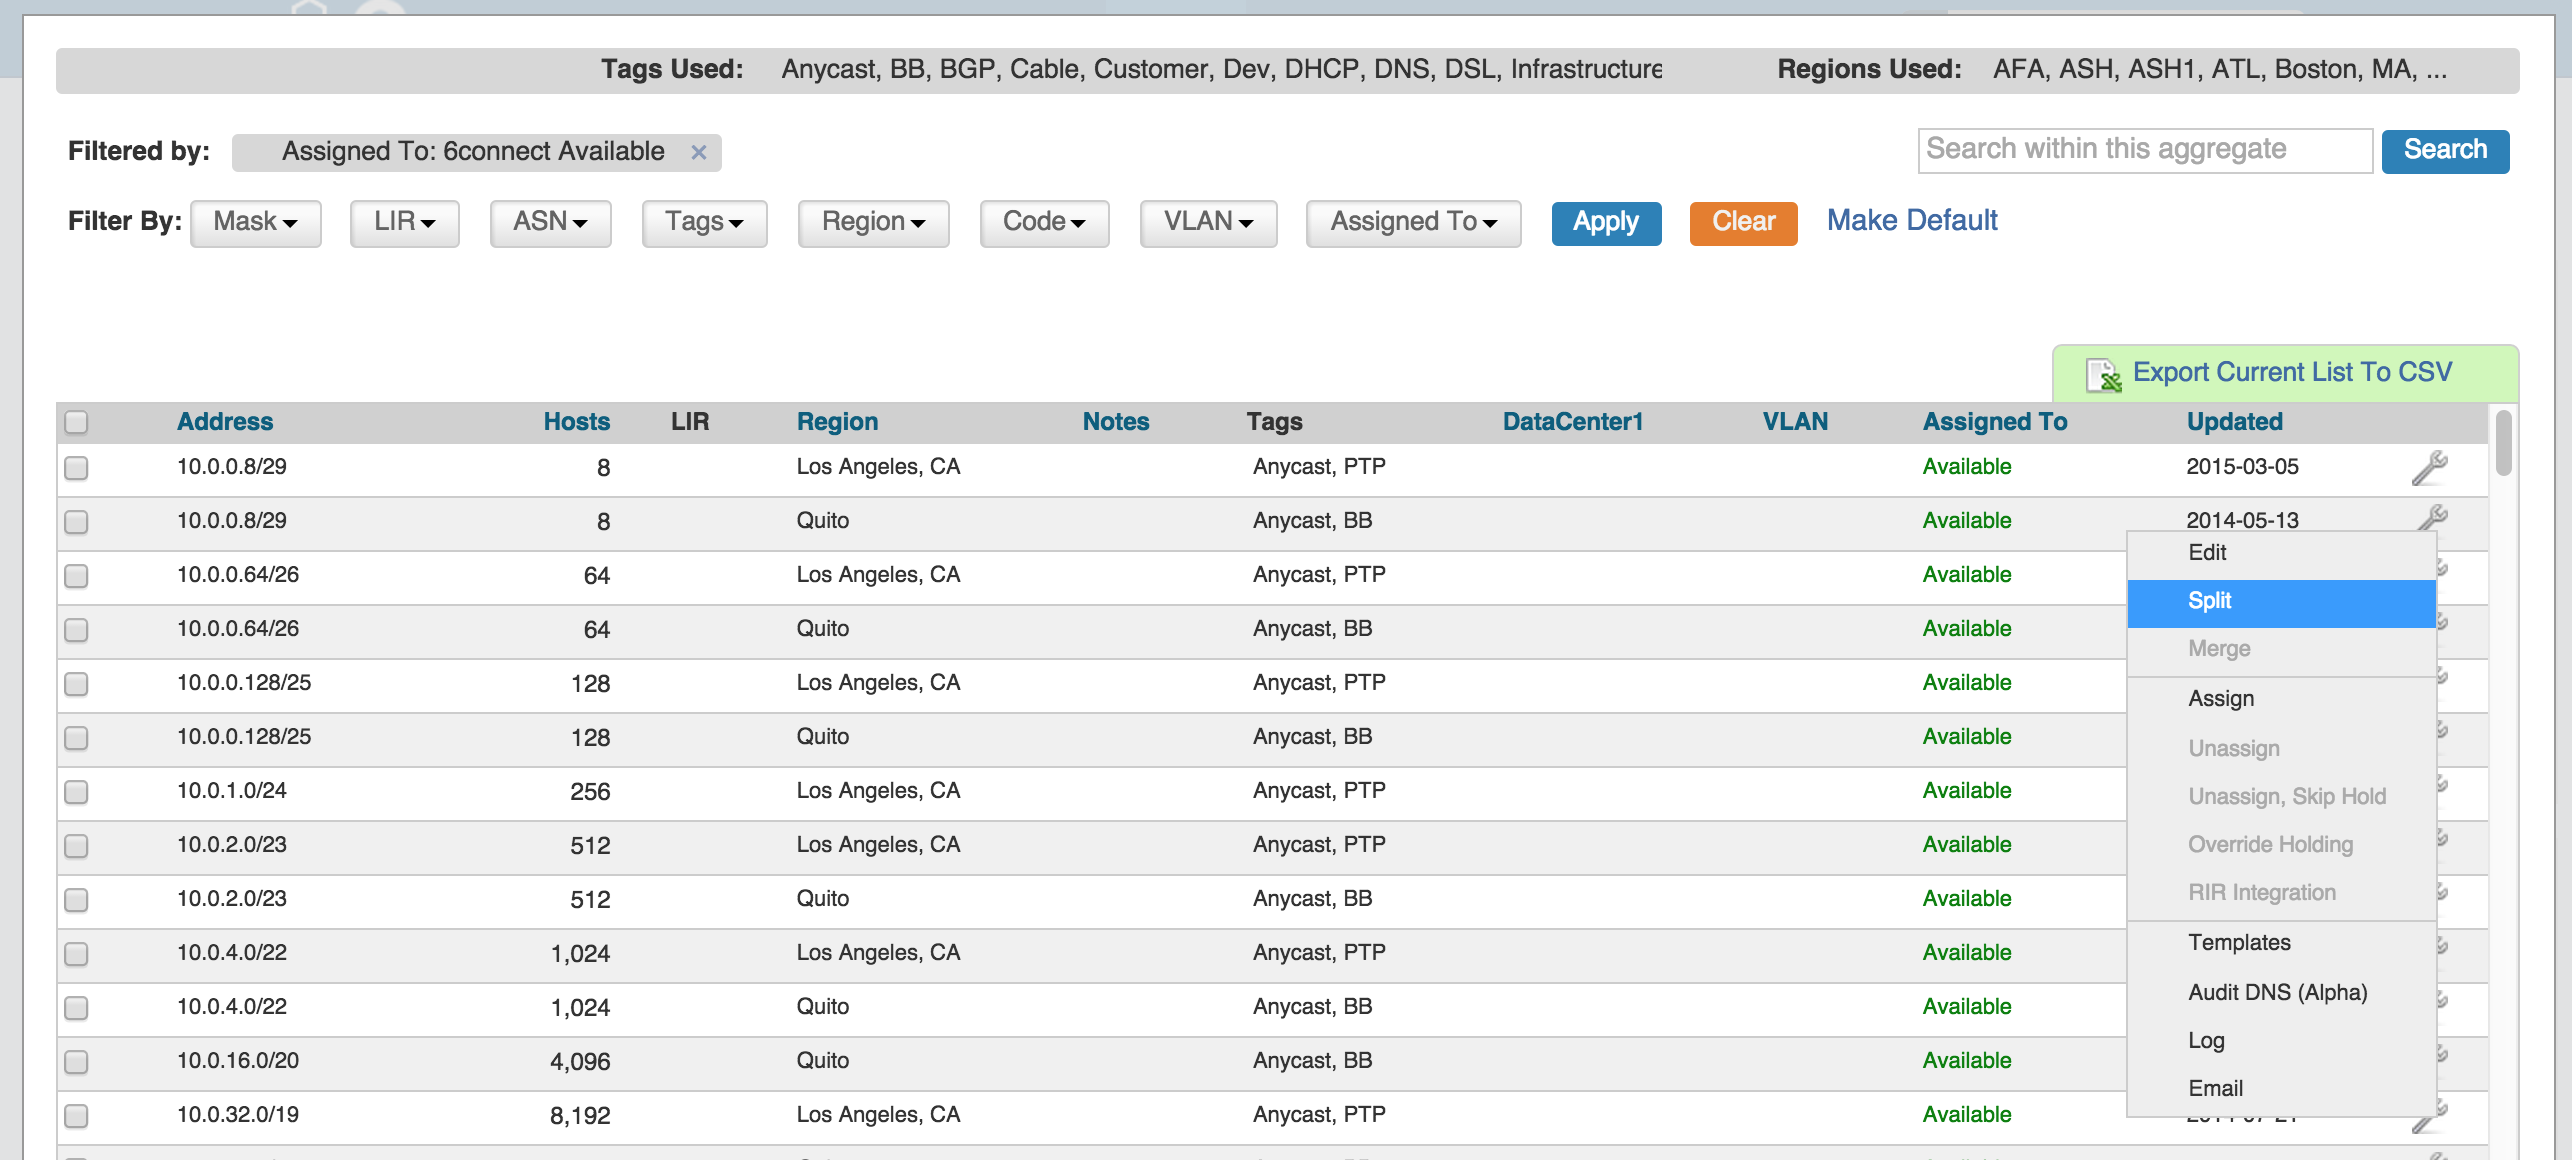
To split a block manually - While in the IPAM Mange screen, click on the Action Menu (wrench icon) for the block you wish to modify. Then select the "Split" function. To aggregate blocks, select "Merge" from the same menu.
Splitting/Aggregating blocks with Templates
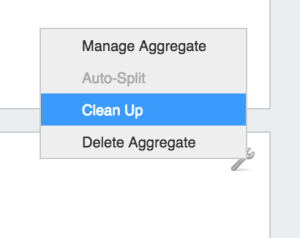
Templates for a block are available under the Action Menu (wrench icon) for that block. There are two templates available: Cleanup, which auto-aggregates the block, and Auto-split.
Select the desired template from the action menu.
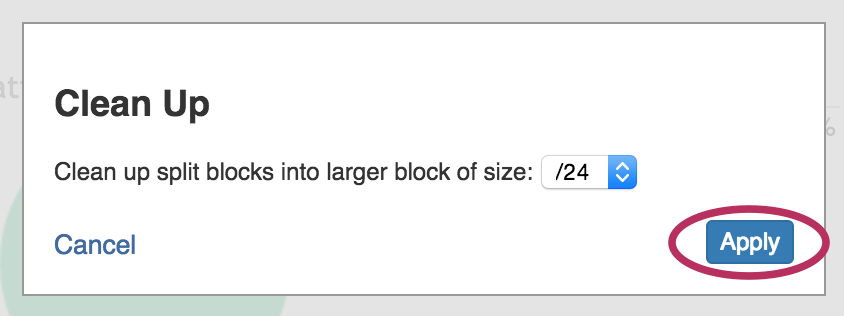
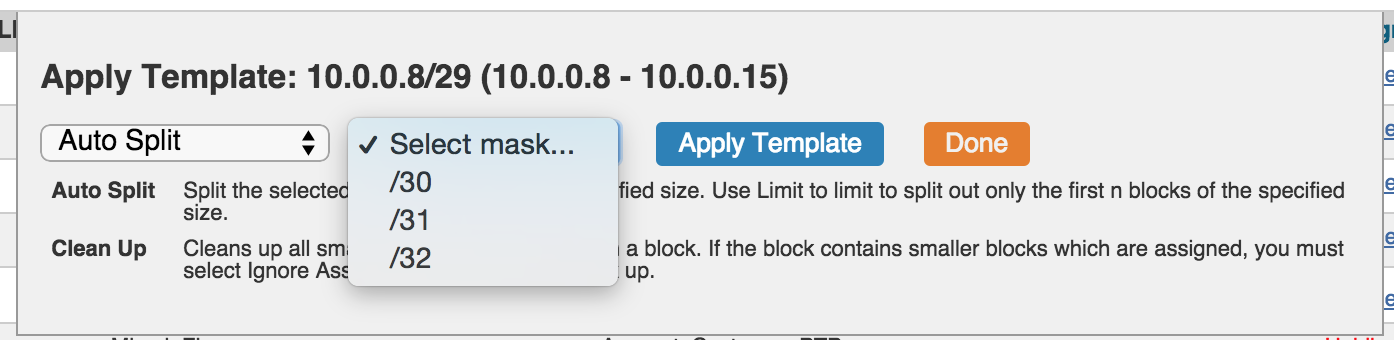
Select the Split / Clean Up size desired, and hit "Apply".
You can also use the "Templates" option from the Action Menu on the IPAM Manage screen for the specific block.
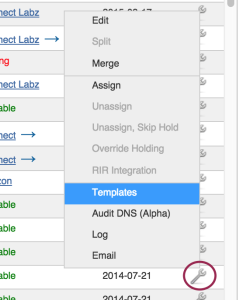
Then, select the auto split parameters from there, and hit "Apply Template".
IP Block parameters and Editing Attributes
When you have your IP blocks laid out, you can then modify their attributes, split them further, assign them, etc. Select the "Edit" option from the Action Menu for a given block to get the Edit Attributes menu.
From here you can set a variety of attributes for a given block. These values are also customizable from the Admin screen - IPAM Admin. For more information on IPAM management , see IPAM Administration and IPAM Parameters.

Edit Attributes Overview:
Allow Subassignments: When editing a block that has been assigned, checking this box allows for further subassignments, indicated by a blue arrow next to the assignment in the Manage screen. Note: Subassign status cannot be changed if a block has children.
RIR / LIR / Region: Select the information from the drop down menus. LIR and Regions can be customized in the IPAM Admin section of ProVision - see IPAM Administration and IPAM Parameters.
Generic Code (here, DataCenter1): This is a customizable text field that can be used to track information specific to your needs. It can be filtered in the IPAM Manage screen. The header, display, and enabling settings for this field are set under IPAM Configuration in the IPAM Administration section.
VLAN: Numerical VLAN information for the block. Settings to enable this field are set under IPAM Configuration in the IPAM Administration section.
ASN: ASN information for the block.
Notes: Freeform text field for additional information you wish to capture.
Tags: Tags can be set under Edit Tags in the IPAM Administration section.
Propagate Attributes to Children: Select this box when editing a parent block to carry through attribute changes to all children of that block. To view parent blocks, simply ensure that top level or all masks are selected in the Filter menu in the IPAM Manage screen.
Note: The VLAN of a child cannot be different from that of its parent, so for mutil-level situations (Parent -> Child -> Grandchild), VLAN should be updated at the top tier parent level.
After editing the desired attributes for the block, simply hit "Save".
Assigning IP Space
There are two areas where you can assign IP Space: in the IPAM Gadget for the particular Resource, or through IPAM Manage for manually assigning a block to a resource. The IPAM Gadget allows for more detailed assignment options including Direct Assign, Smart Browse, and Smart Assign with advanced options, and is the primary tool for space assignment.
Assigning Space from the IPAM Gadget
The IPAM Gadget is accessed from a Resource Entry page, once enabled for the Section (to add Gadgets, see Customizing Sections and Add Gadgets to your Section).
You have three options for assigning IP space using the IPAM Gadget:
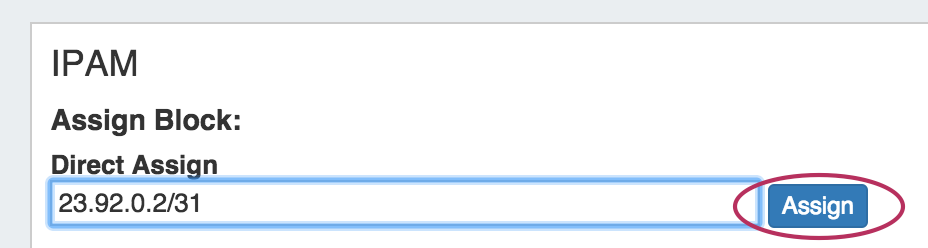
Direct Assign
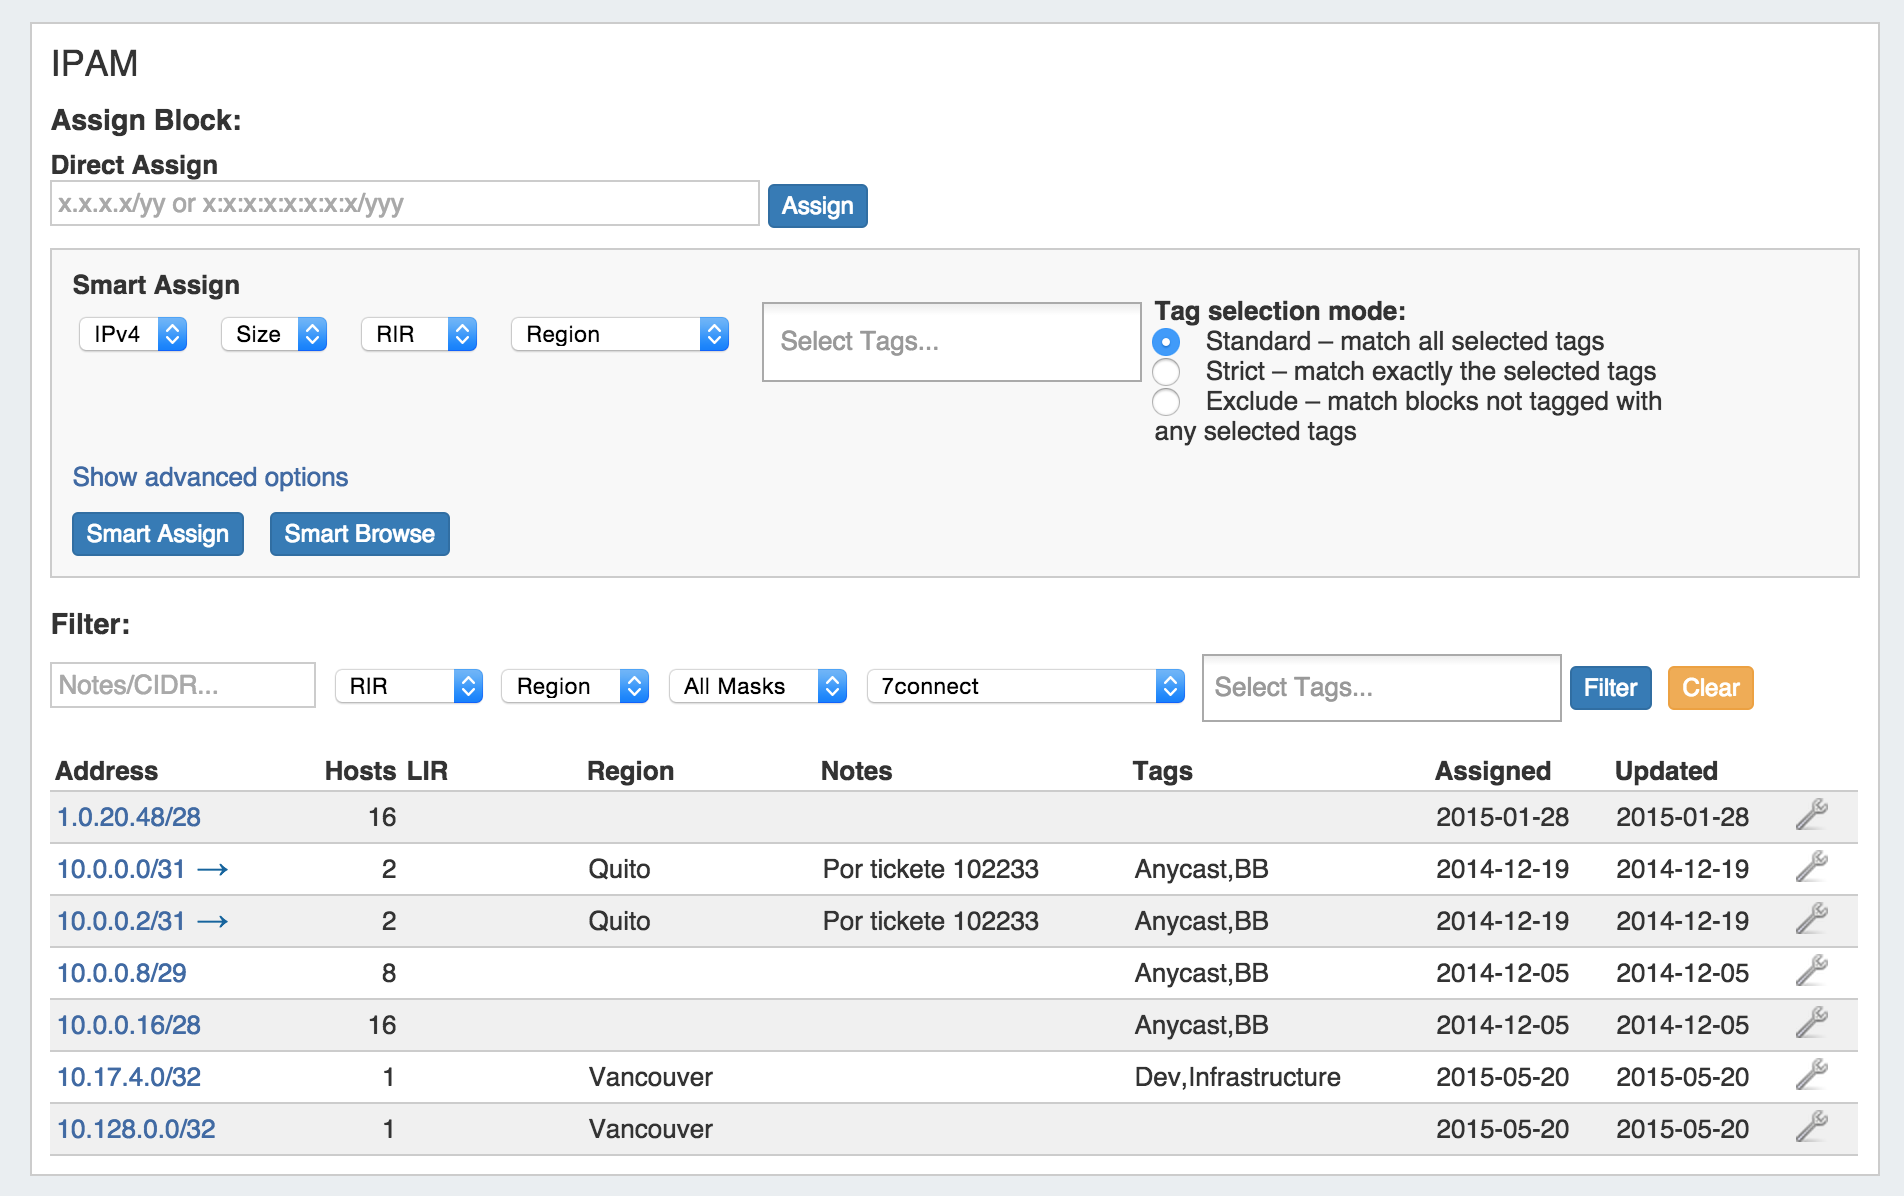
This field allows you to manually enter an IP block to assign. Enter an IPv4 or IPv6 block, and then click "Assign".
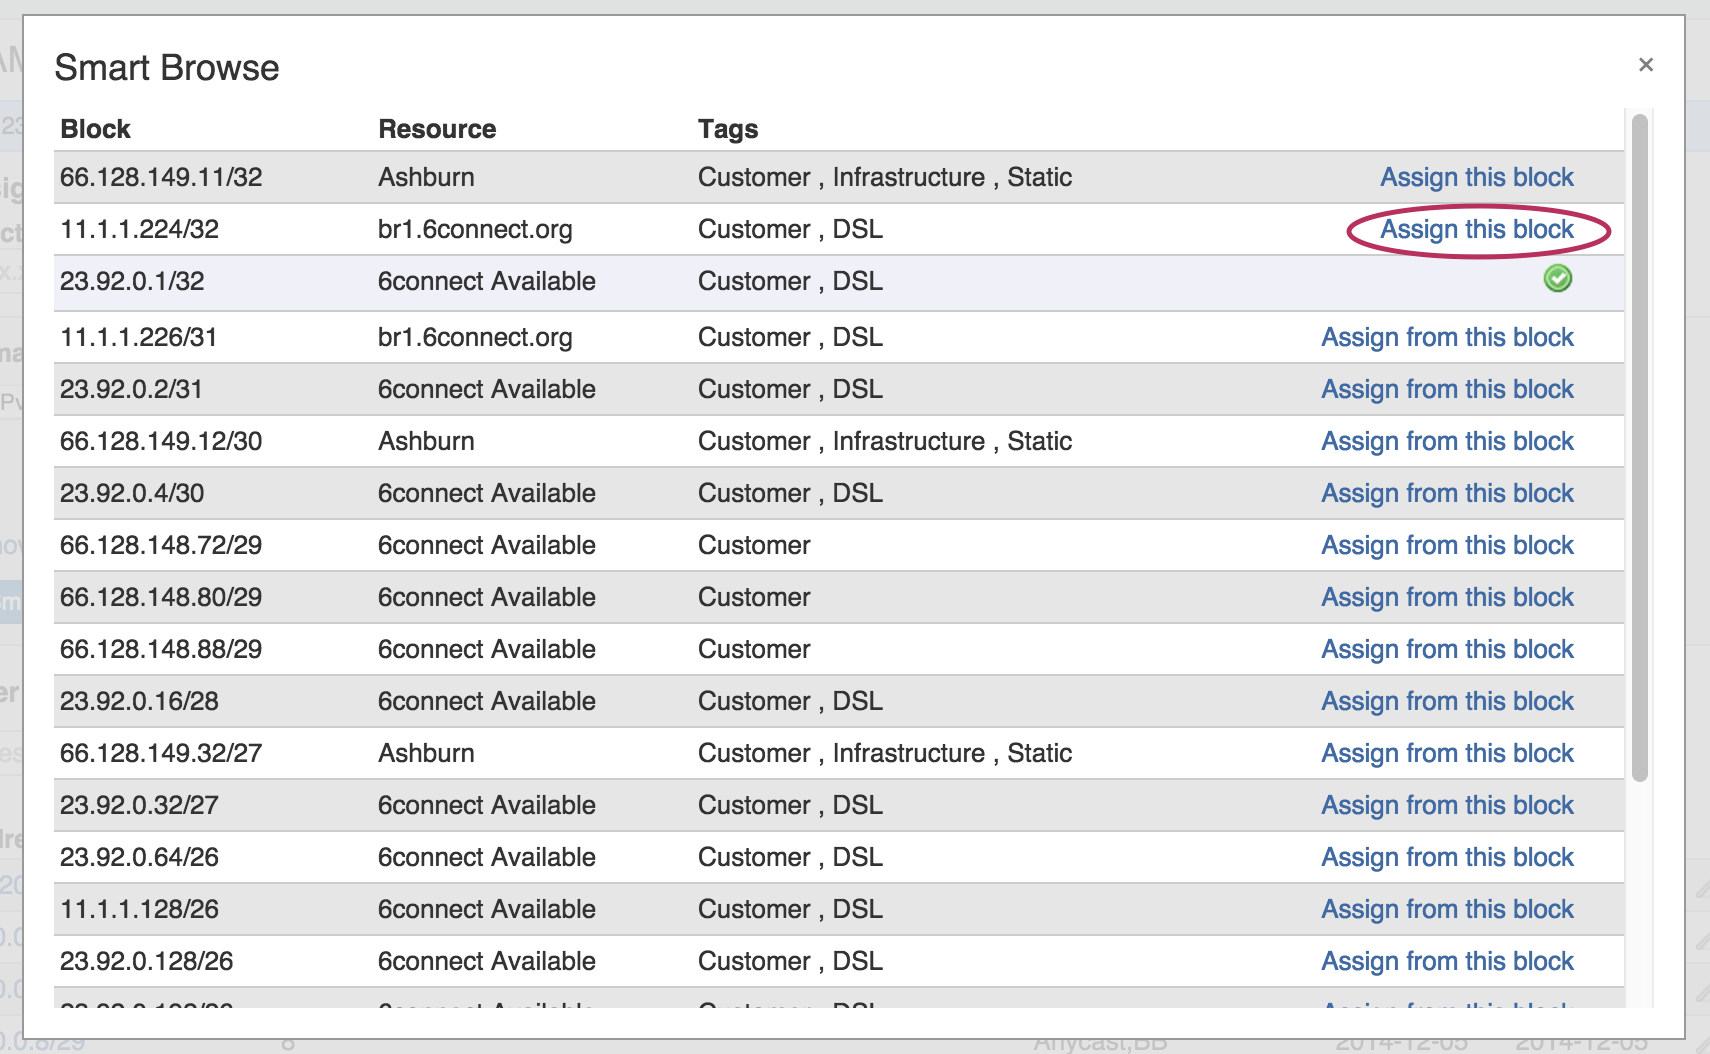
Smart Browse
Smart Browse utilizes the smart assign parameters as search filter criteria. Under the "Smart Assign" area, select the IPv4/IPv6, Size, RIR, Region, and/or Tags that you wish to filter the available blocks list.

Click on "Smart Browse" to bring up a list of IP aggregates meeting that criteria, which you can select the block(s) to assign. A green check will show next to the block once assigned. You may assign multiple blocks per browse session.
Smart Assign
This series of dropdowns allows you to specify the parameters for the type of IP block you want to assign, as well as tag selection modes. Then it will look at the IPAM blocks that match your criteria to find the correct IP assignment based on availability and relevant parameters.
Additional advanced Smart Assign options are available under "Advanced Options", including VLAN and LIR.
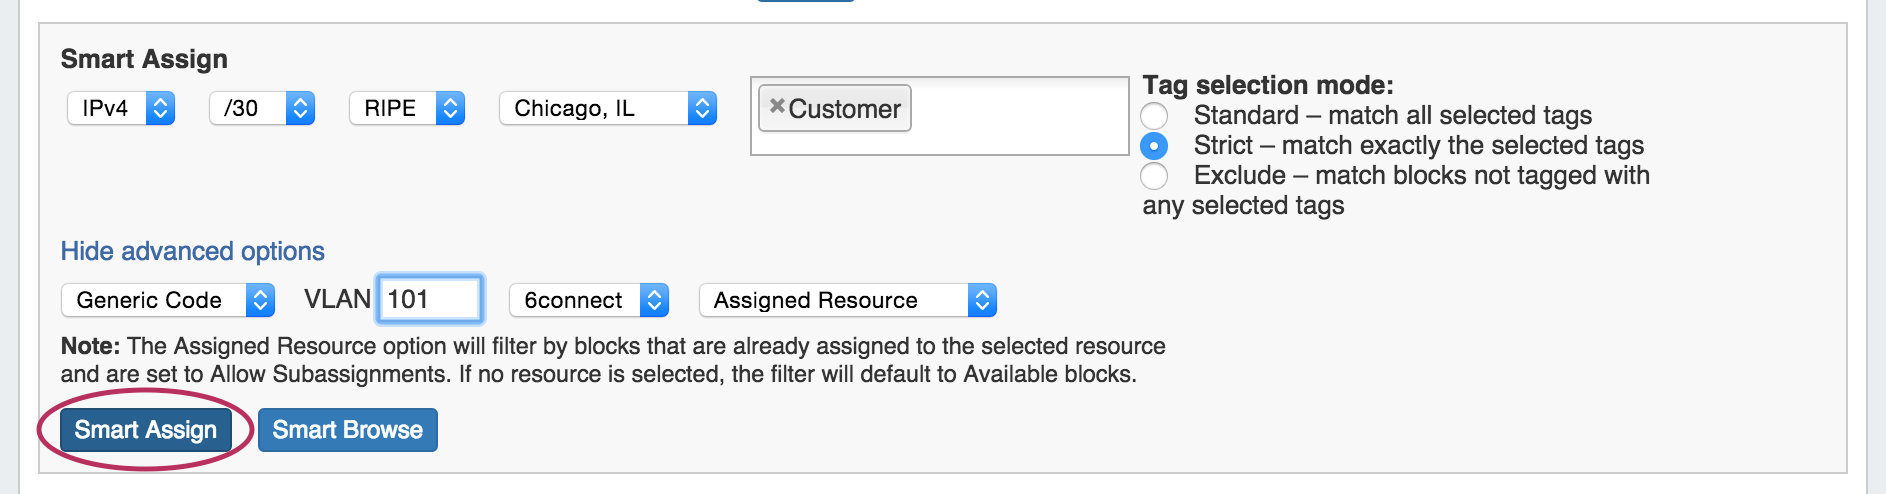
Once your criteria has been set, click the "Smart Assign" button.
Manually Assigning Space from the IPAM Manager
You can also assign blocks manually using the "Assign" function from the IPAM Manager screen (accessible from the IPAM Tab). Click the Action Menu (wrench icon), then select "Assign".
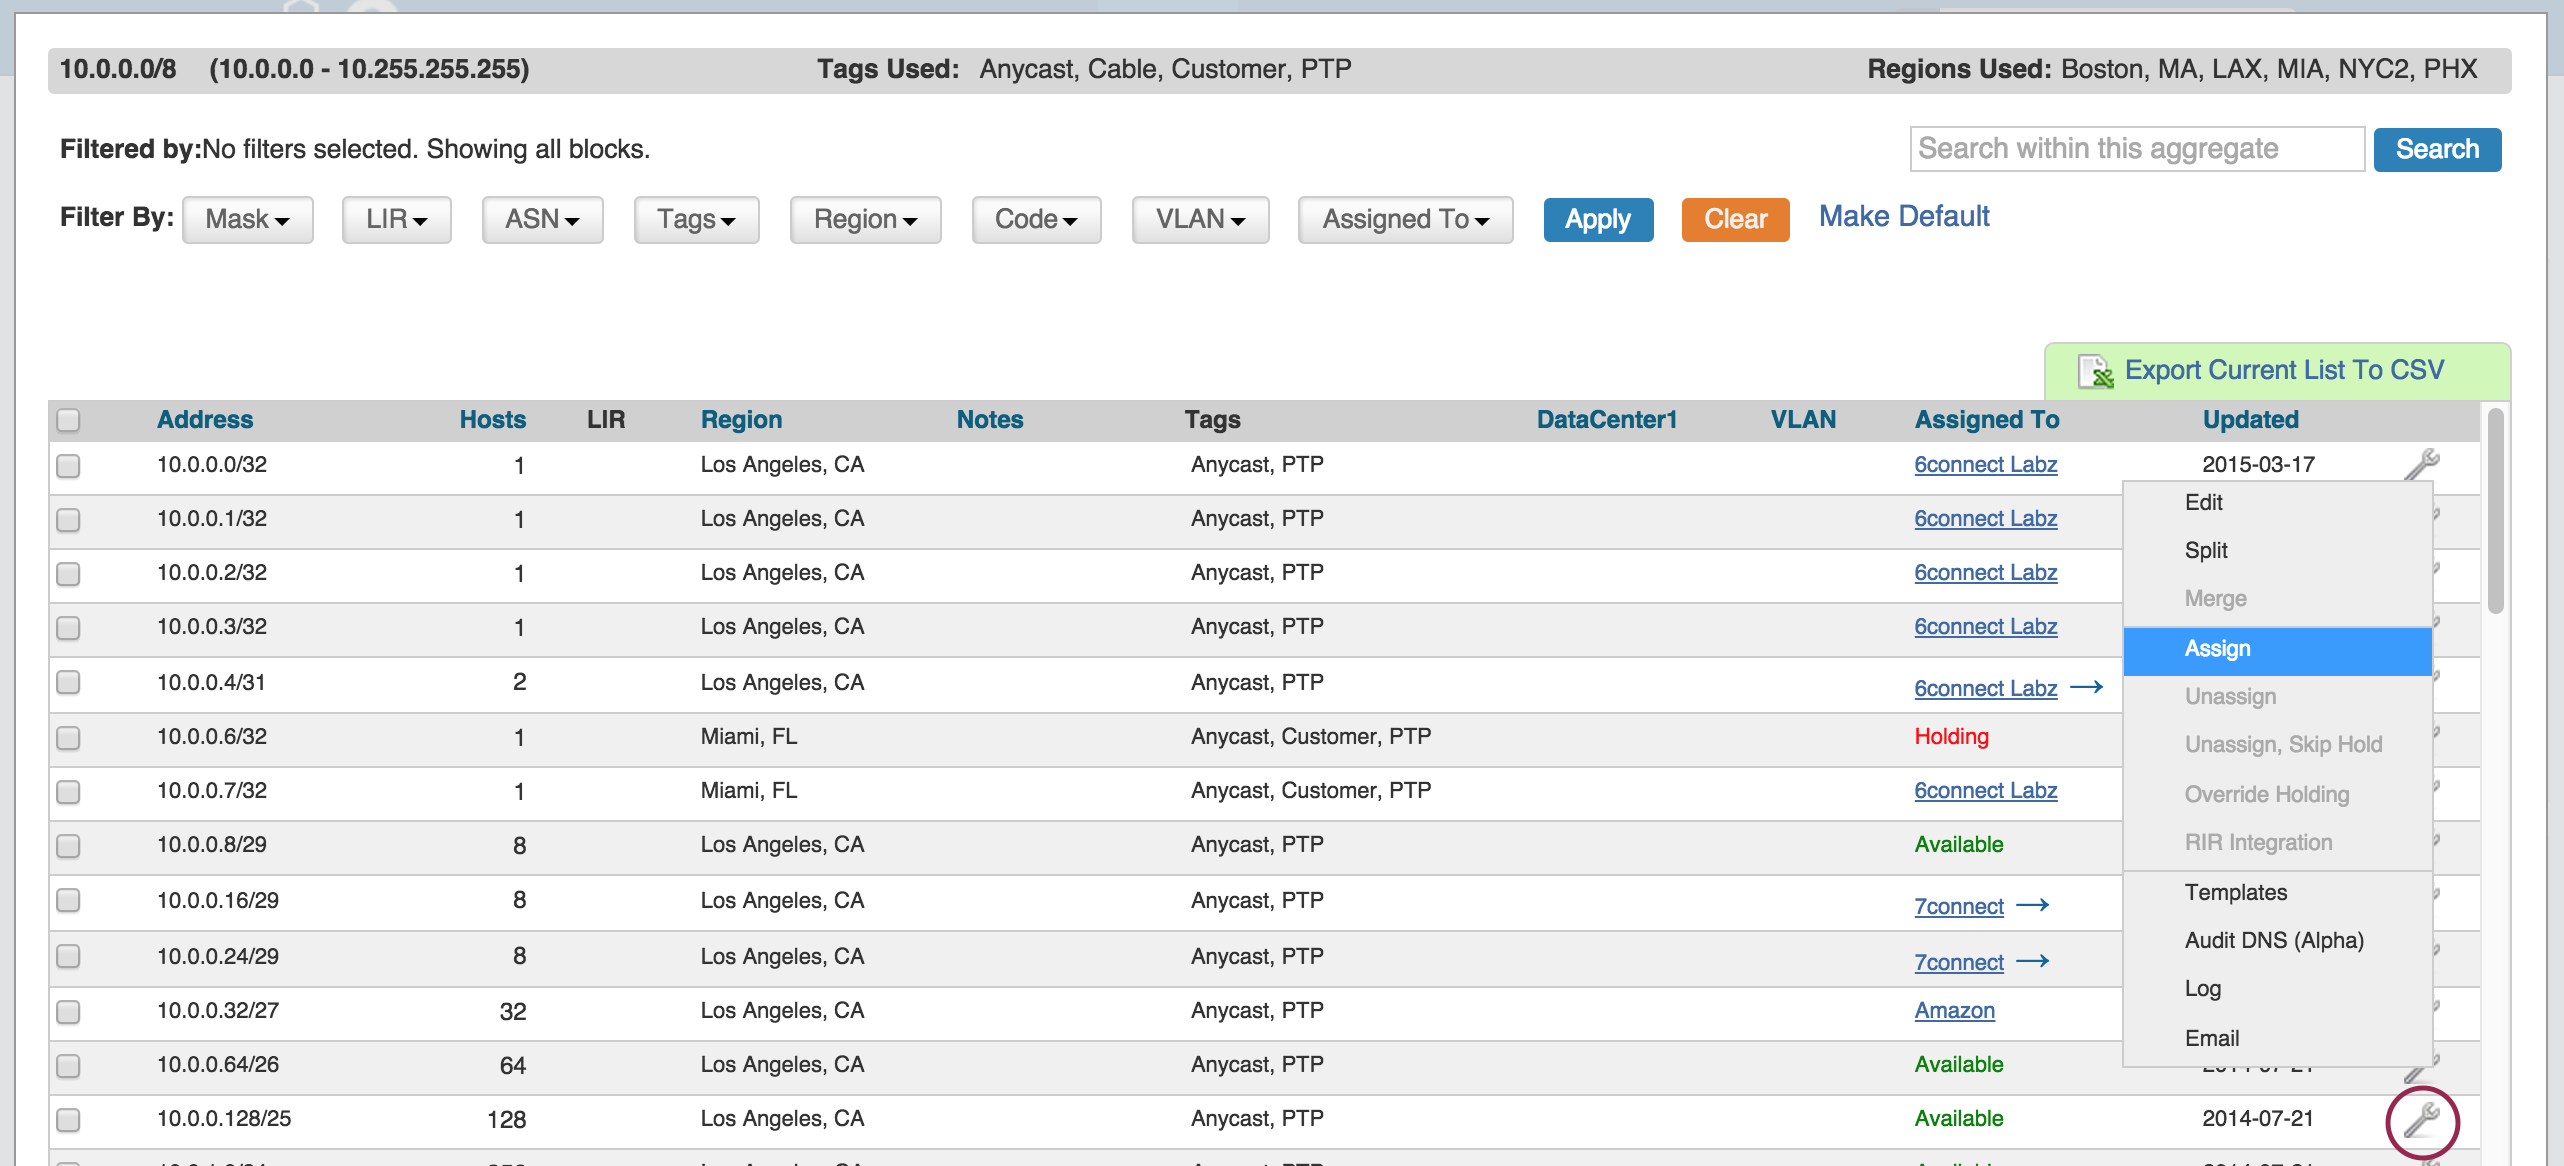
Then, select the Resource to assign the block. A filter tool is provided to narrow the list to a particular Section type.
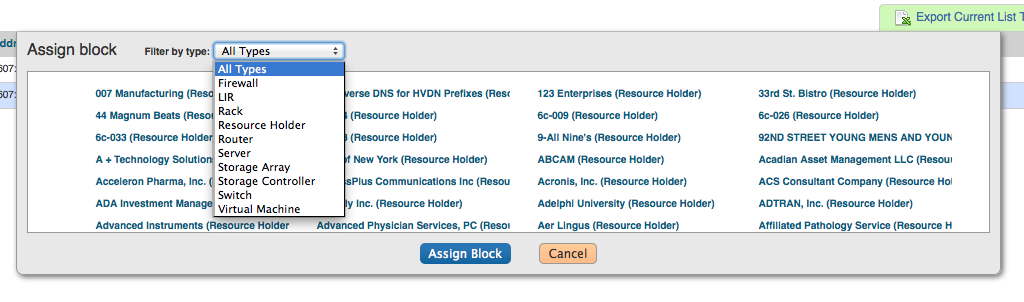
After assigning, you can further edit the block attributes or subassign space.
Sub Assigning IP Space
To allow sub assignments, just check the "Allow sub assignments" check box under Edit. Once the allow sub assignments box is checked, the block may be further split and assigned to other resources. Split blocks may also be re-claimed to the originally assigned resource and re-aggregated. When allow sub assignments is checked, the block is counted as allocated, but not assigned - various statistics in IPAM, on the dashboard, and reporting will reflect this. Sub assignments can be useful for tracking IPs assigned to a customer with multiple subsidaries, or locations.
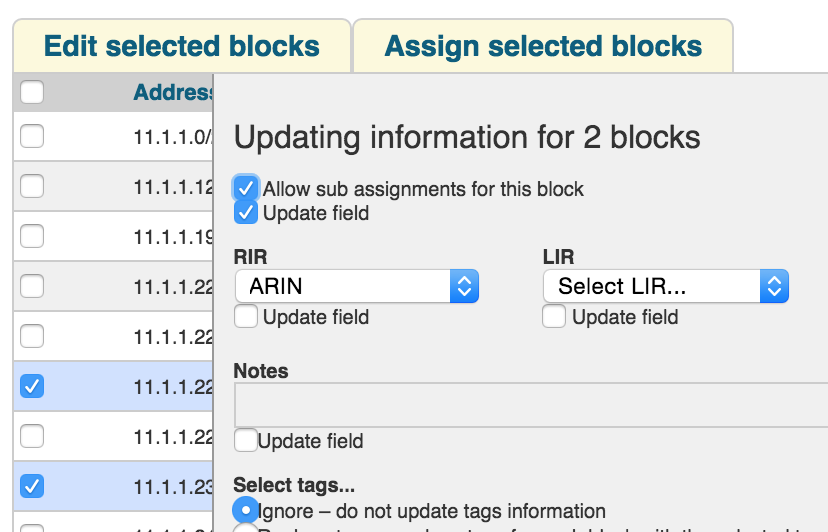
To allow sub assignments for multiple blocks at once, open the Manage screen for the aggregate. Then, select the desired blocks and click "Edit Selected Blocks". The Multi-block edit interface will open. In that interface, select the check boxes next to "Allow sub assignments for this block" and the "Update field" below it. Lastly, save your changes.
Unassigning IP Space
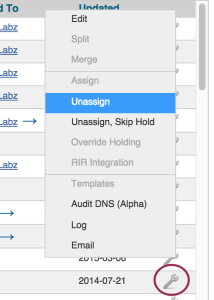
When a block is assigned, you will have the option of unassigning the block from the resource and returning it to the Holding Tank.
To unassign the block, simply click on the Action Menu (wrench icon) for the block and select "Unassign". You may also chose "Unassign, Skip Hold", which unassigns the block and immediately returns it to available, bypassing the holding tank. After unassigning blocks / overriding holding, newly available blocks will be merged upon next page refresh.
To return IP space in the Holding Tank to the Available Pool - there are two methods:
1) Manually override the holding tank
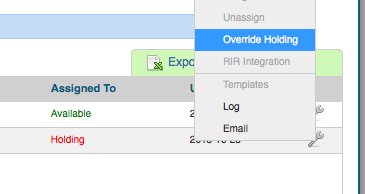
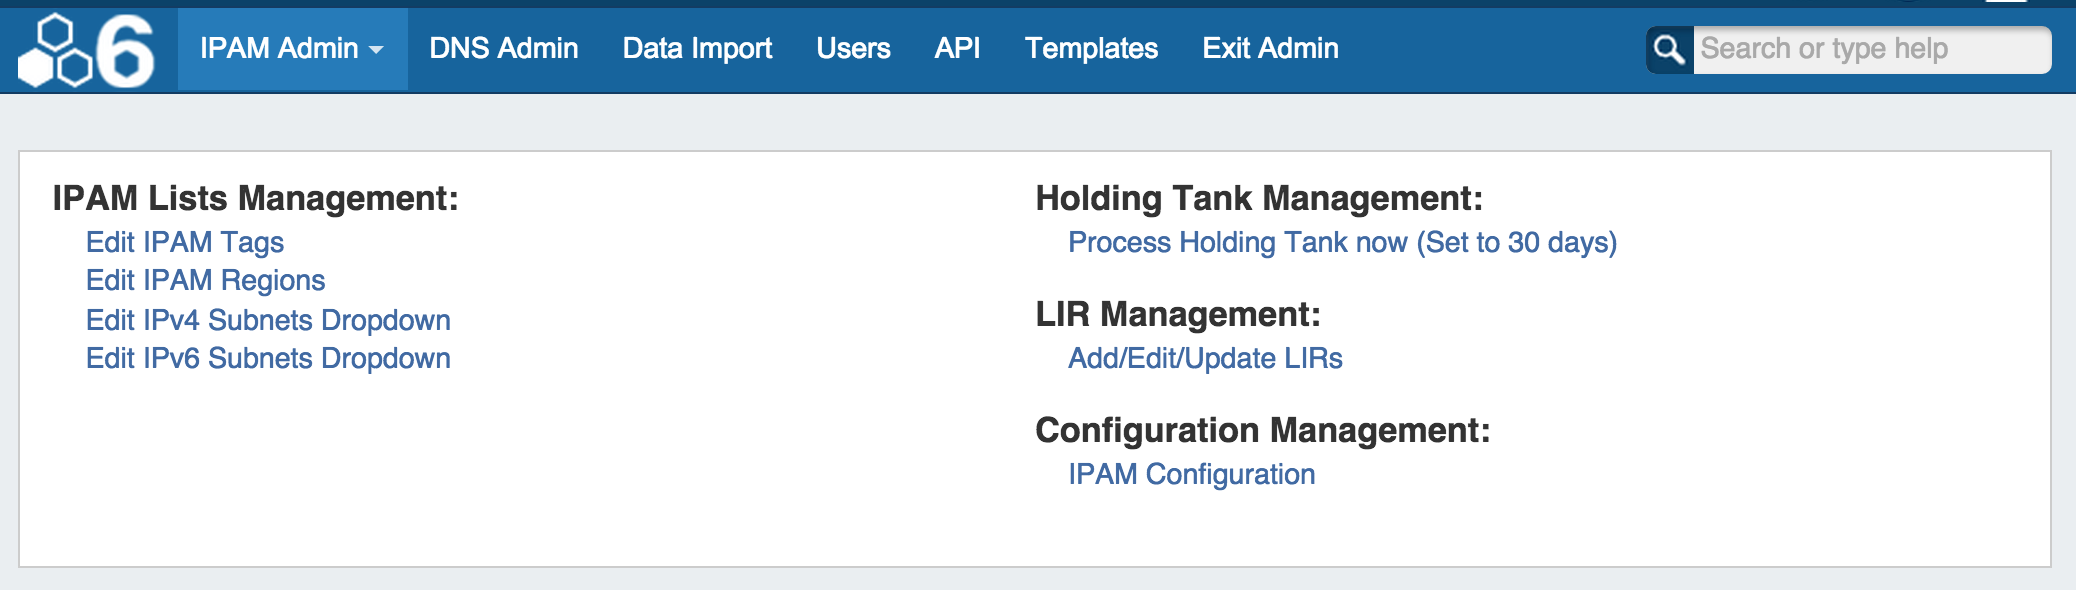
2) Process the Holding Tank via the Admin screen under IPAM Admin (this will only process blocks that were present for the specified number of days).
For more information on the Holding Tank, see Holding Tank Management.
View Parent Blocks in IPAM Manage
On the IPAM Manage screen, you have an option to Filter the view by selected Subnet Mask (dropdown). By default, blocks in ProVision are displayed at their child size, the lowest point in the block tree available for that block.
With the Filter By Masks enabled, and multiple or all masks selected, the view changes to include the "Parent" blocks, showing all masks throughout the assignment tree.
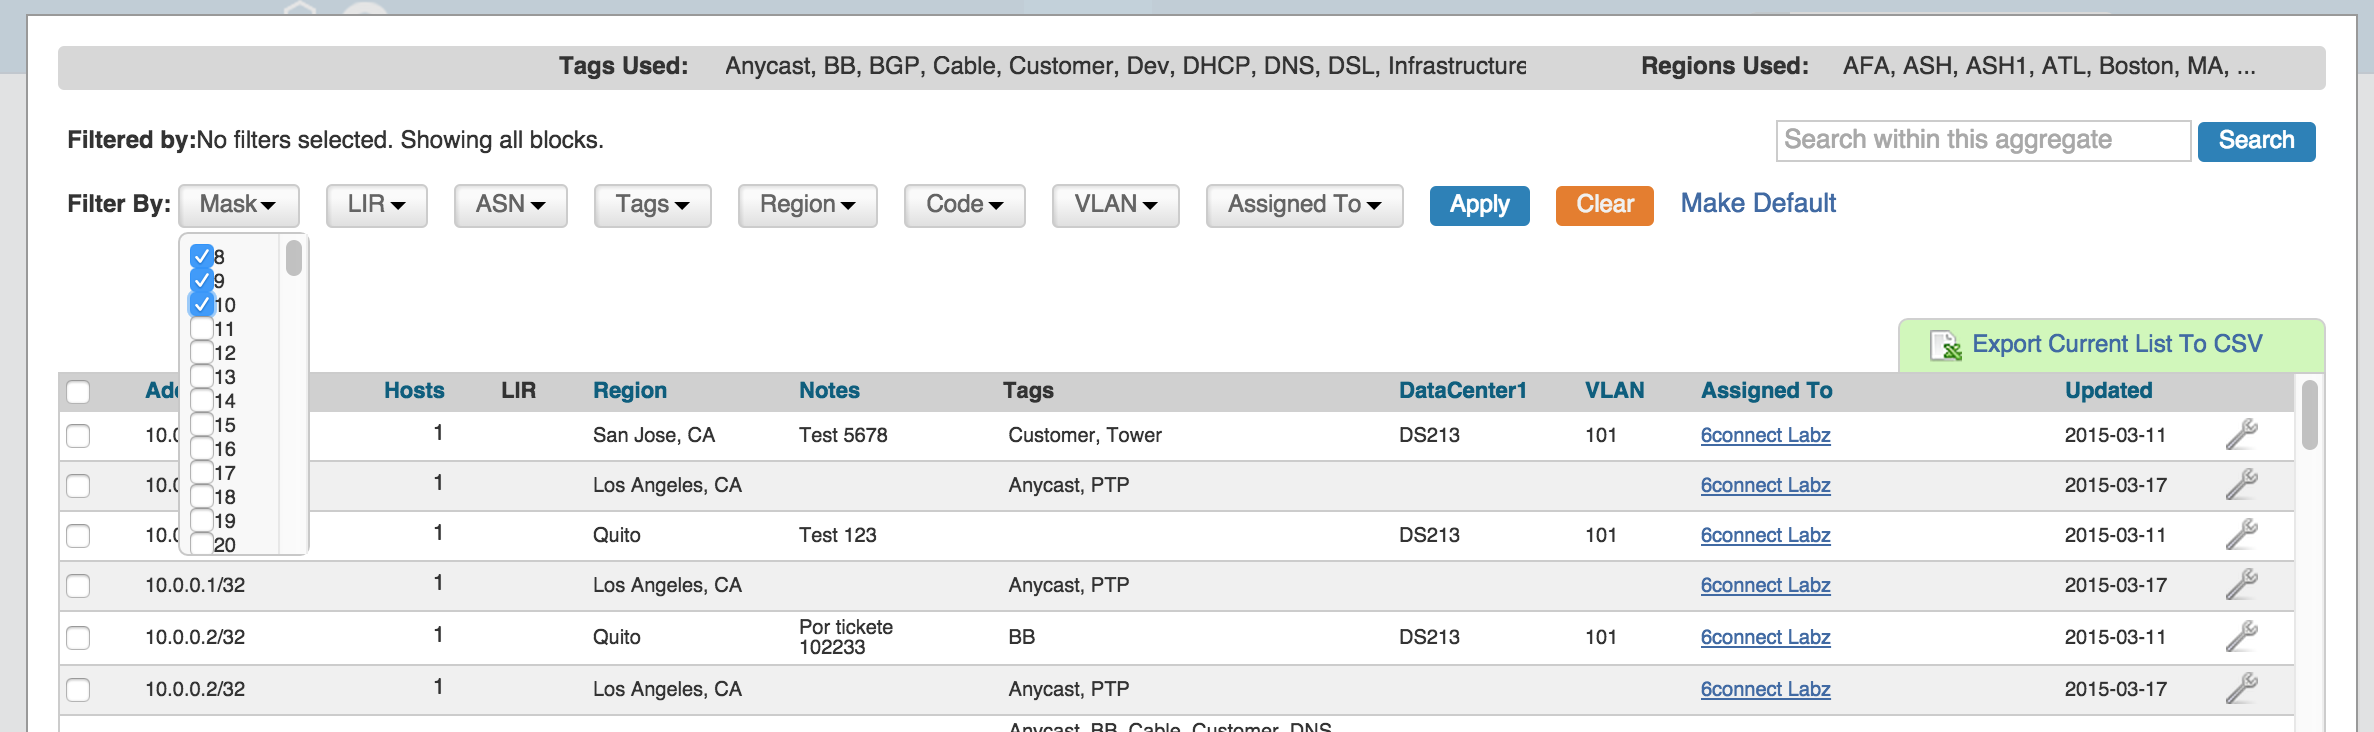
A parent block with children will show "Has Children" in the column where assignment status is shown, and the block CIDR will show as a clickable link.
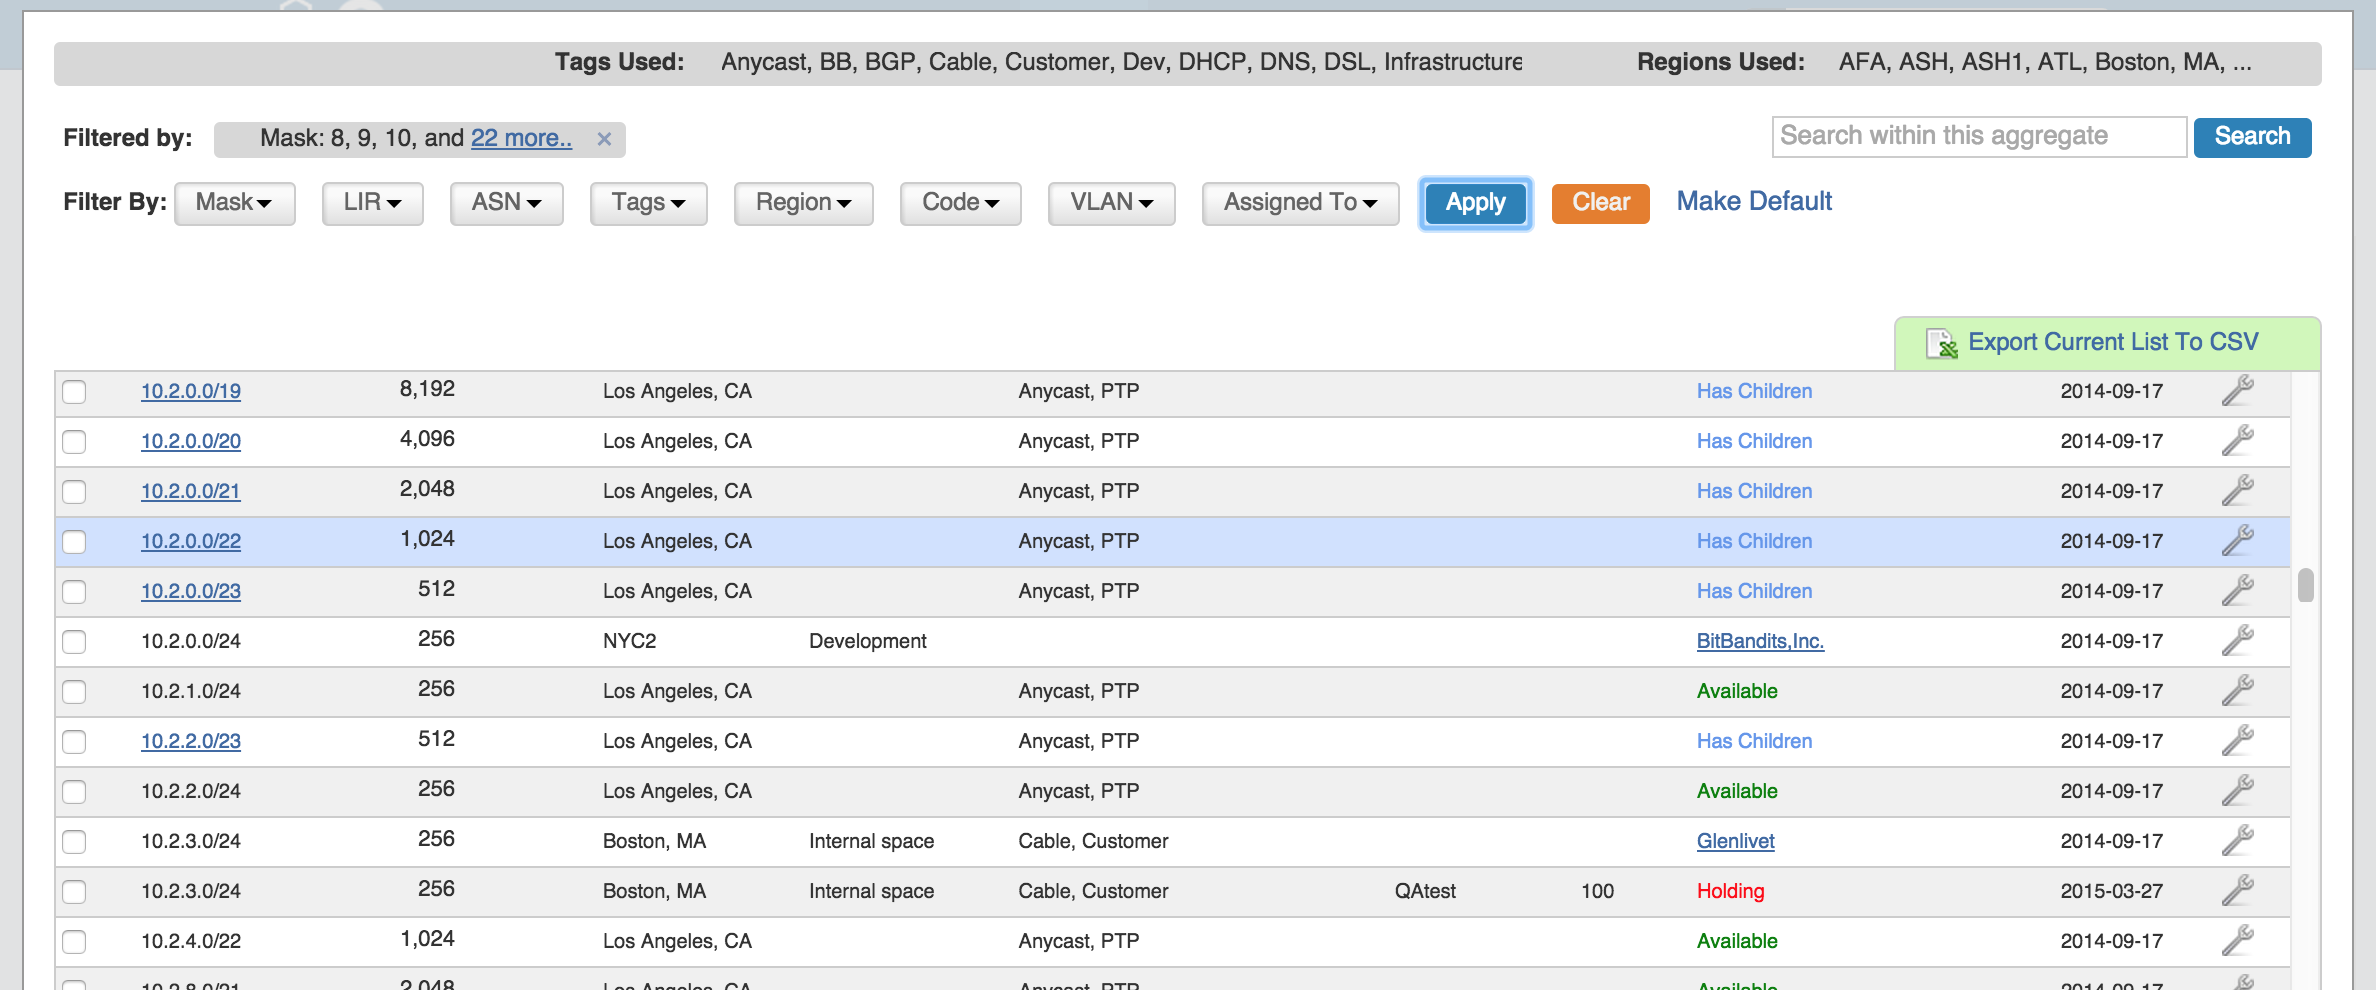
Then, the user can click on the block link once to view the additional assignments/allocations underneath it.
IP Blocks are edited and managed in either IPAM Manage or the IPAM Gadget.
From either area, you can perform standard block-level actions such as assign, unassign, split, merge, edit attributes, track NAT associations, and more.
The primary difference between the two areas is that IPAM Manage shows all blocks (or all blocks under an aggregate), regardless of assignment or status, where the IPAM Gadget shows only the blocks assigned to the specific resource that you are currently viewing on the Resource Entry Page. However, the IPAM Gadget has more advanced assignment options and criteria available (Direct Assign, Smart Assign, Smart Browse).
| Expand | ||
|---|---|---|
| ||
IPAM Manage Features
IPAM Manage is accessed from:
In IPAM Manage, you can:
|
| Expand | ||
|---|---|---|
| ||
IPAM Gadget Features
The IPAM Gadget is accessed from the Resource Entry Page → IPAM Gadget, once it has been enabled for the section. Here, you can:
Both IPAM Manage and the IPAM Gadget have customizable column names, order, and visibility, as well as options for user-defined meta columns (for details on setting up customization of the IPAM Manage / IPAM Gadget block list, see IPAM Parameters → Edit Columns). |
Aggregate-Level Actions
Some aggregate-level actions are performed in IPAM Manage, such as setting IPAM alerts and using Aggregate Templates.
These actions are detailed on the IPAM Tab page under Working with IPAM Aggregates. This page will focus primarily on block-level actions and management.
| Table of Contents |
|---|
Working in IPAM Manage
In IPAM Manage, you can manage aggregate level actions, such as Split , Clean Up, Alerts, and Export, as well as viewing and managing individual blocks. In IPAM Manage - Advanced, aggregate-level actions are not available.
Open IPAM Manage for a specific Aggregate
Open the IPAM Manage screen for a block or aggregate by:
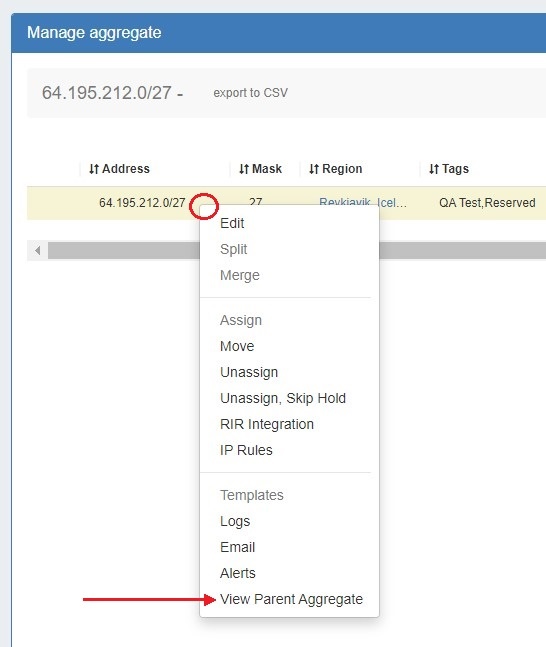
- Searching for the block in the Global search, and clicking on the resulting CIDR
View the parent aggregate for a Global search / IPAM search result by right clicking to open the action menu for the block, then select "View Parent Aggregate".
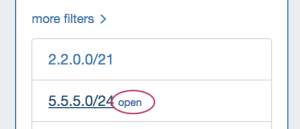
- Clicking the "Open" link in the aggregate blocks list from the IPAM tab.
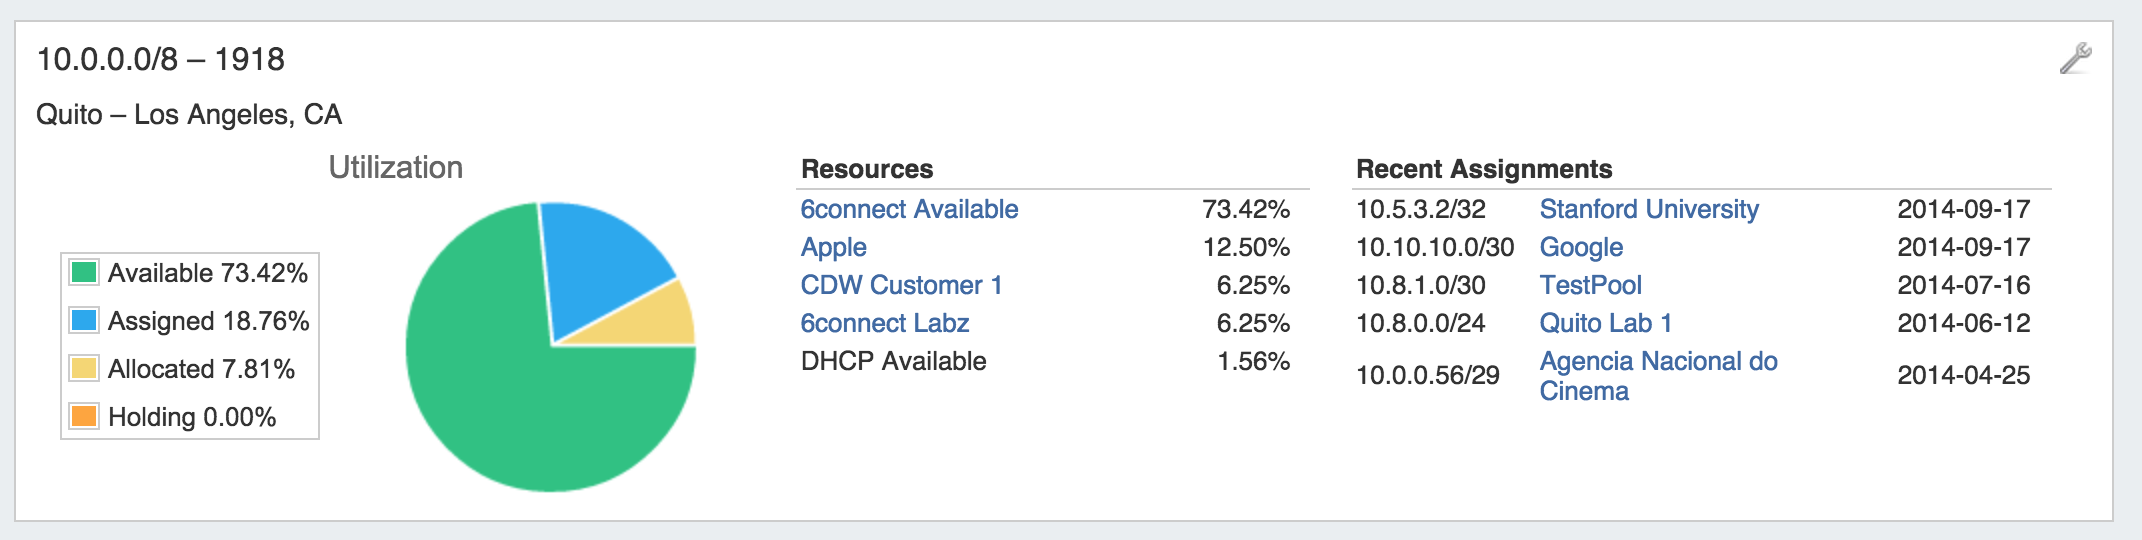
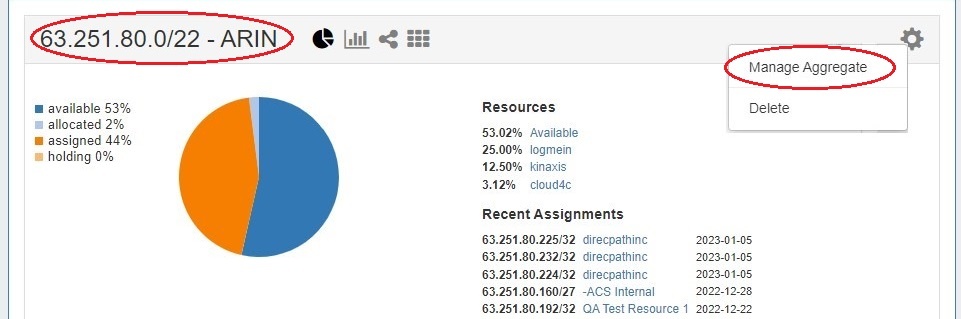
- Clicking on the CIDR header of the Aggregate Block Host Utilization module, or selecting "Manage Aggregate" from the module's Gear Icon from the IPAM tab.
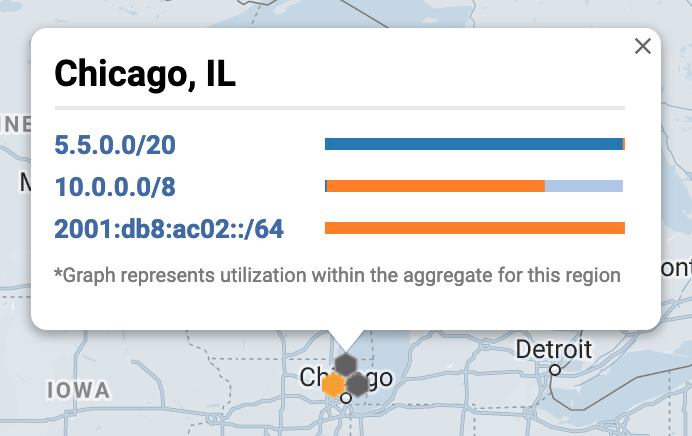
- Clicking on the CIDR displayed in the IPAM Map - Aggregates view.
Open IPAM Manage for all Aggregates/Blocks
Open IPAM Manage for all blocks under all aggregates by clicking the "Advanced" button at the top of the IPAM tab.

This will open IPAM Manage for all blocks in ProVision, with all the same filters, block edit functions, and search capabilities as in 'standard' IPAM Manage for an aggregate, but with no aggregate-level actions available.
| Info |
|---|
When working in IPAM Manage - Advanced, be aware of the following:
|
IPAM Manage Views
There are multiple view options in IPAM Manage to view and/or edit blocks: Block View, Parent View, and Netblock Tree.
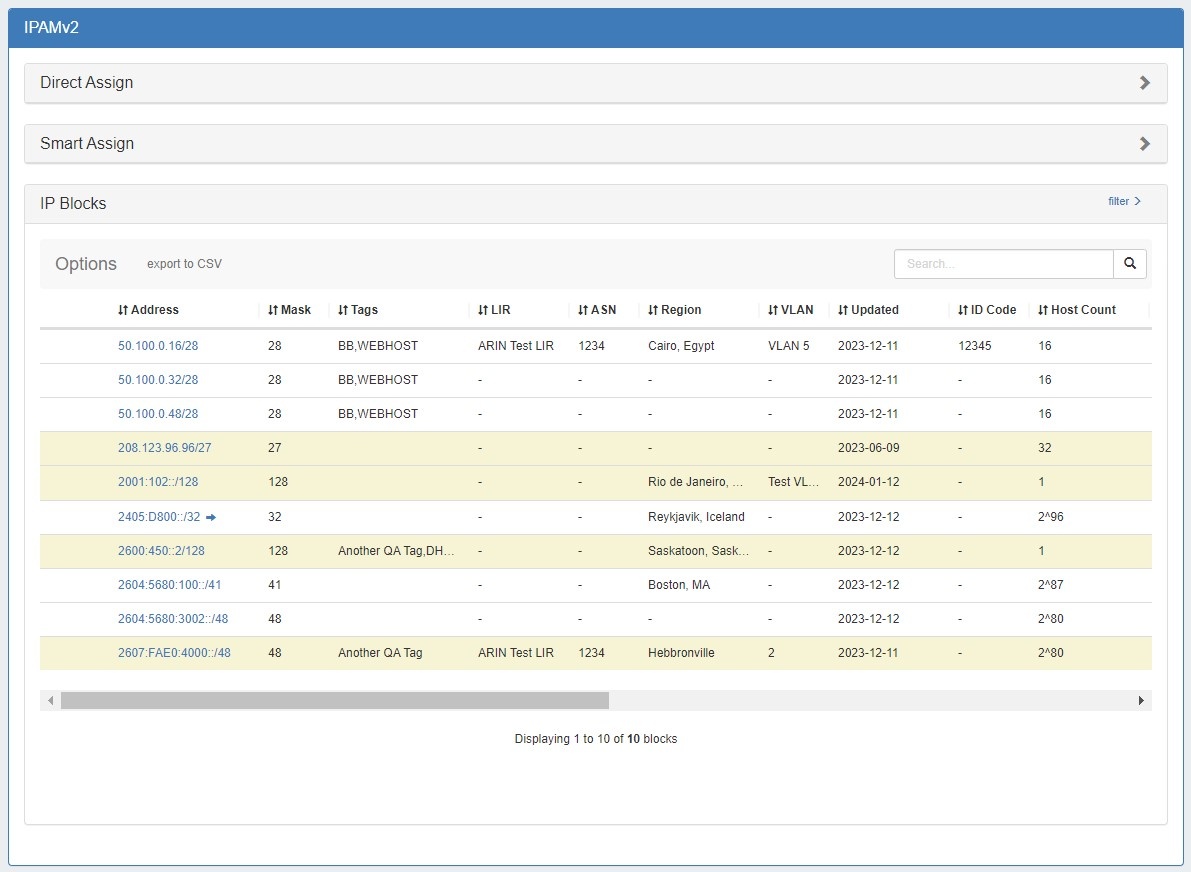
Block View (Default)
Block View is the default IPAM Manage Aggregate screen. Block View displays only the lowest level leaf nodes of aggregates / blocks that exist in ProVision. In this view, all blocks displayed are ProVision objects able to be edited or managed.
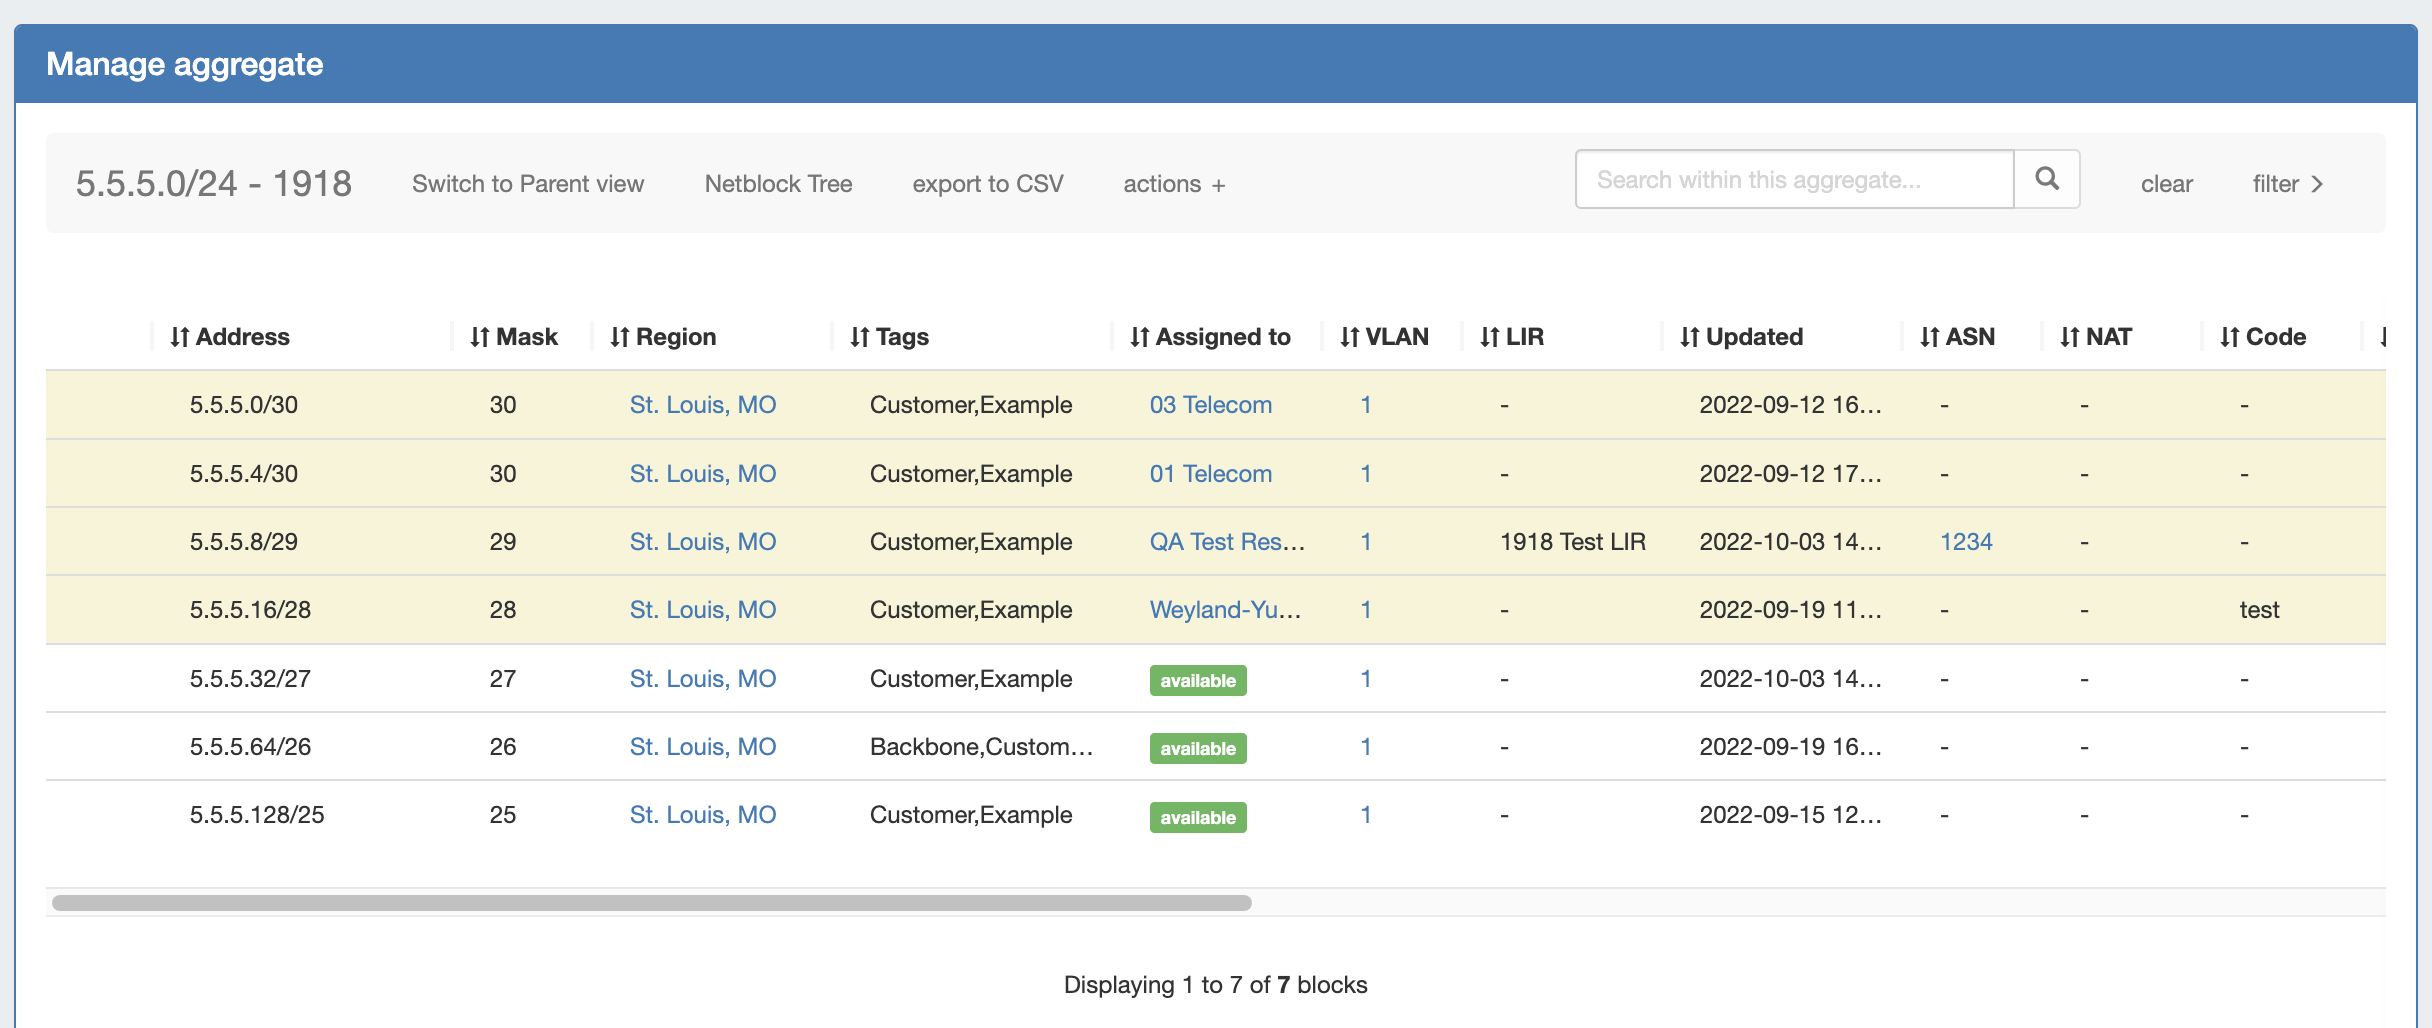
Parent View / Blocks Tree
Parent View shows both low level child blocks and the parent blocks that contain them.
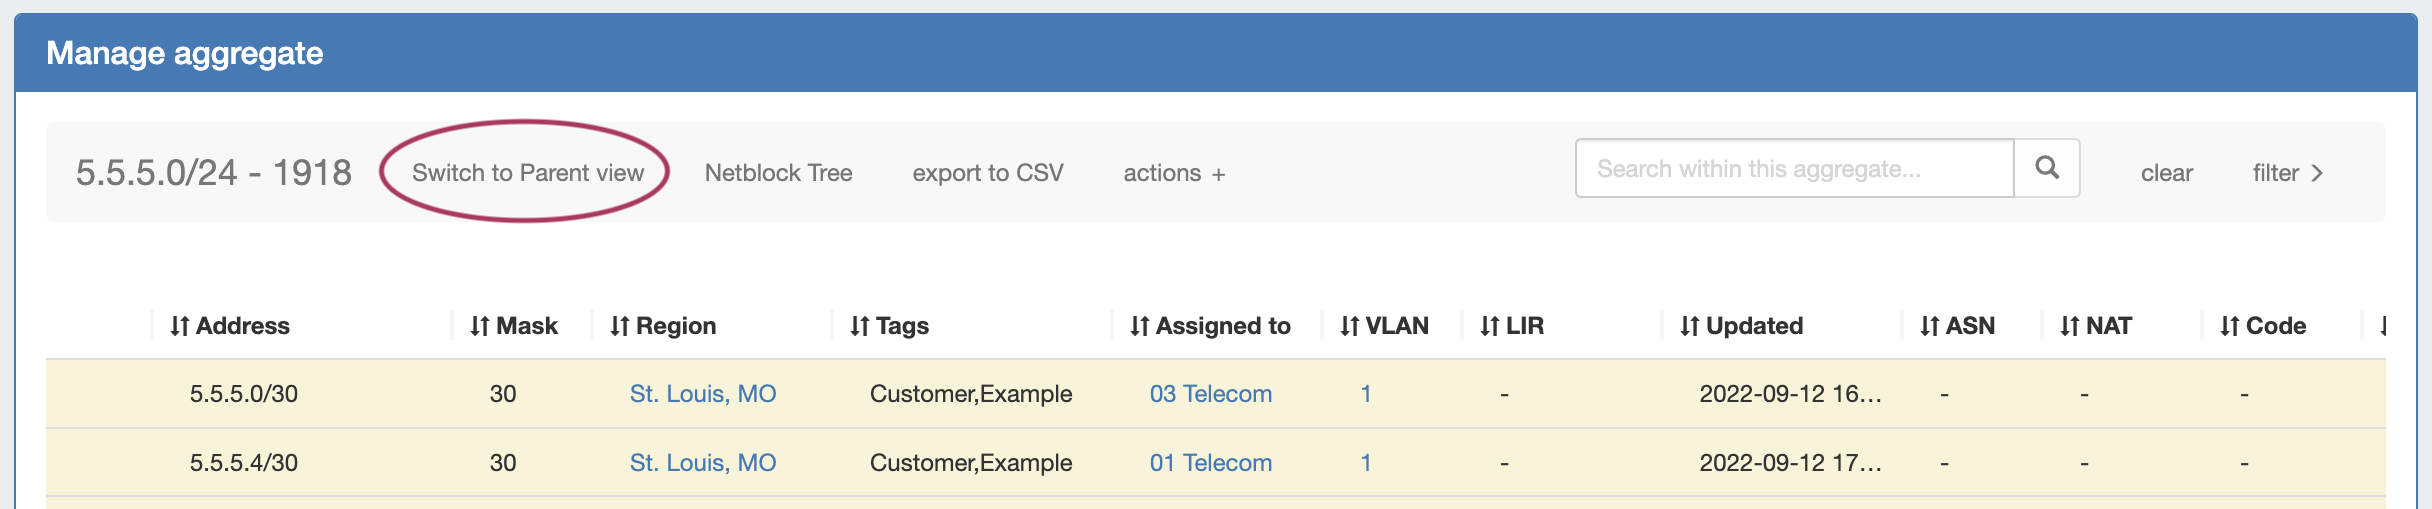
While in Manage aggregate, view parent blocks / IP block hierarchy, click on "Switch to Parent View" at the top of the block list.
You may also enter Parent View via the "Filter" menu, by checking the "Select All Masks" checkbox and clicking "Apply", to show all masks and parent blocks.
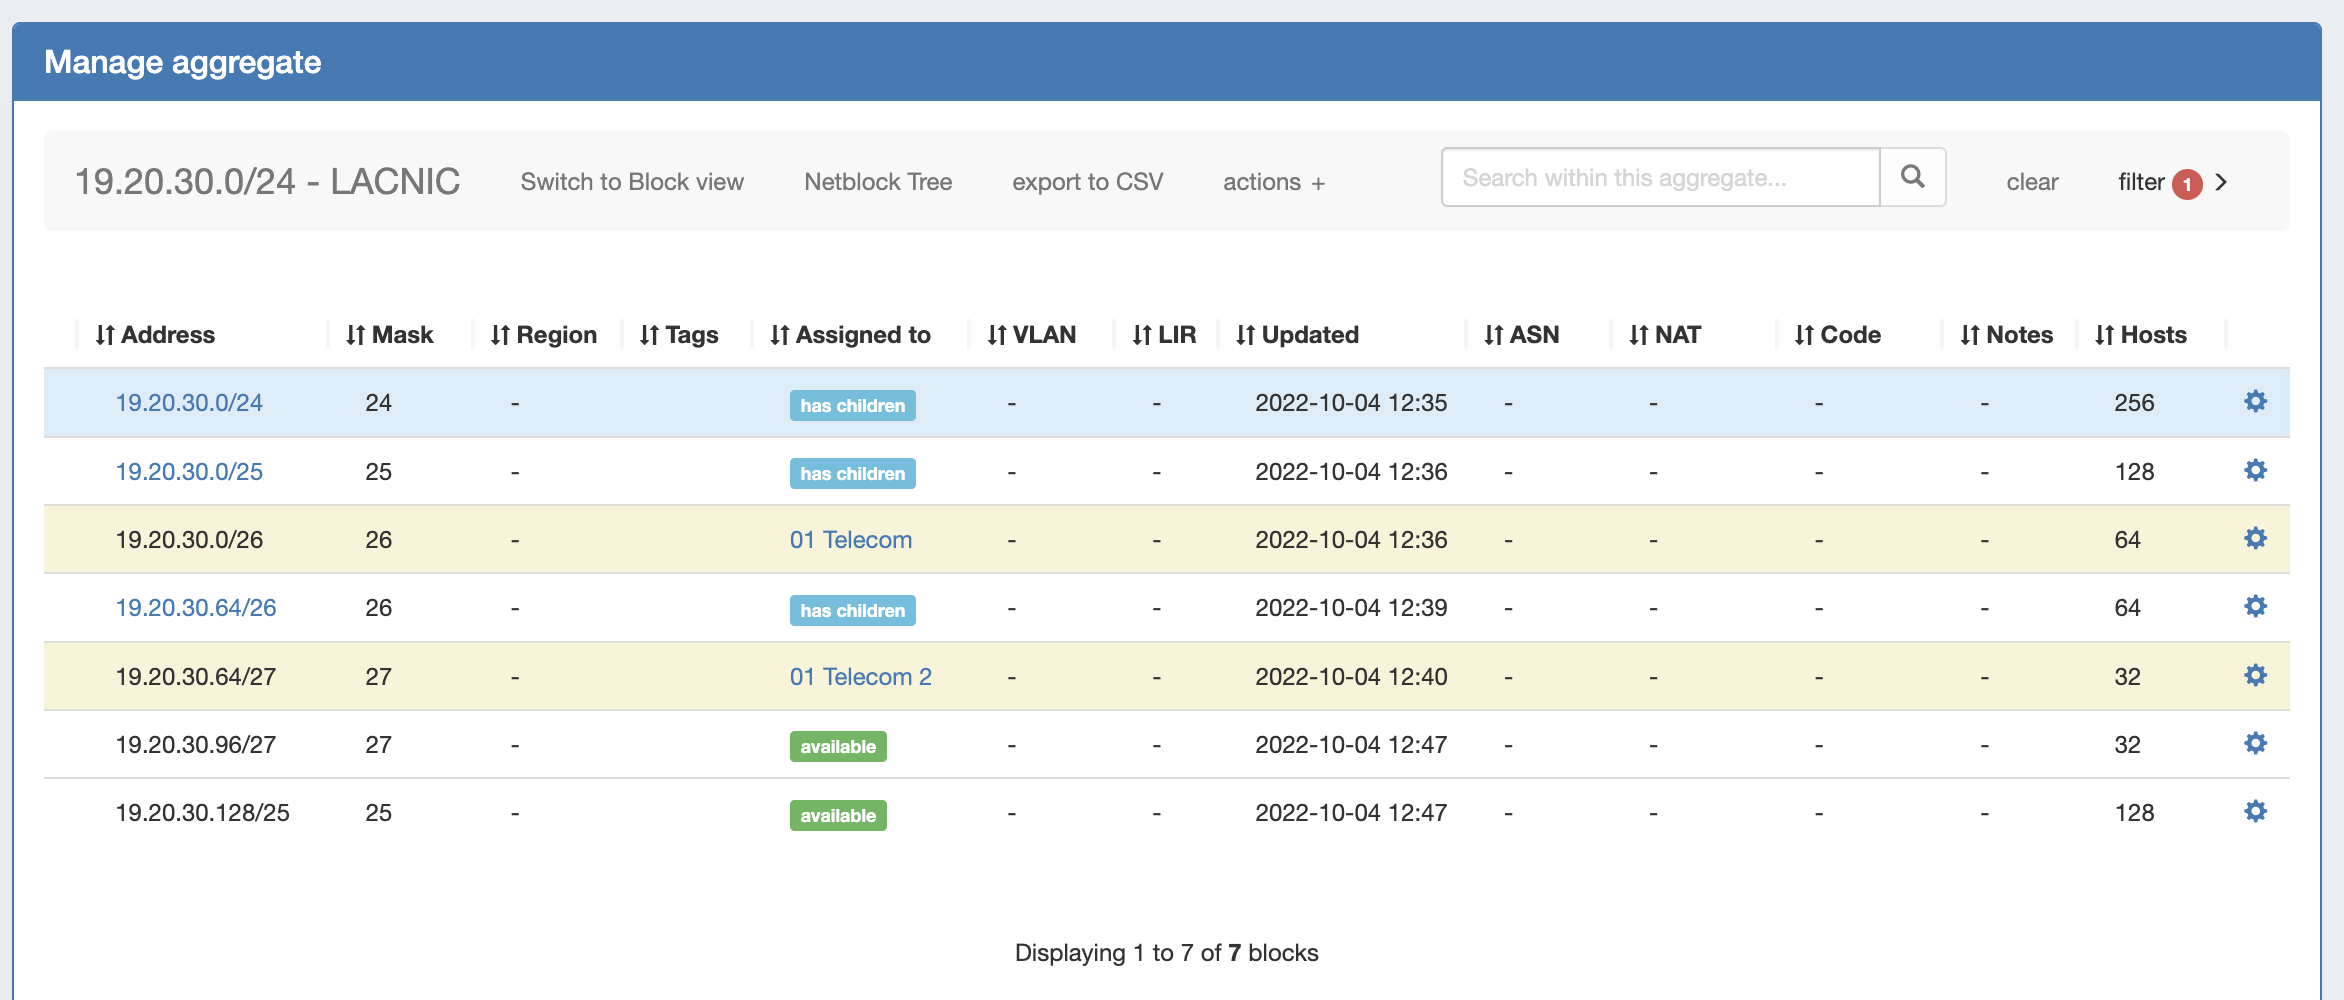
Parent Blocks are distinguished by having a CIDR address link, and displaying a blue bar denoting "Has Children" under the "Assigned to" column.
Both Parent and Child blocks may be edited in this view.
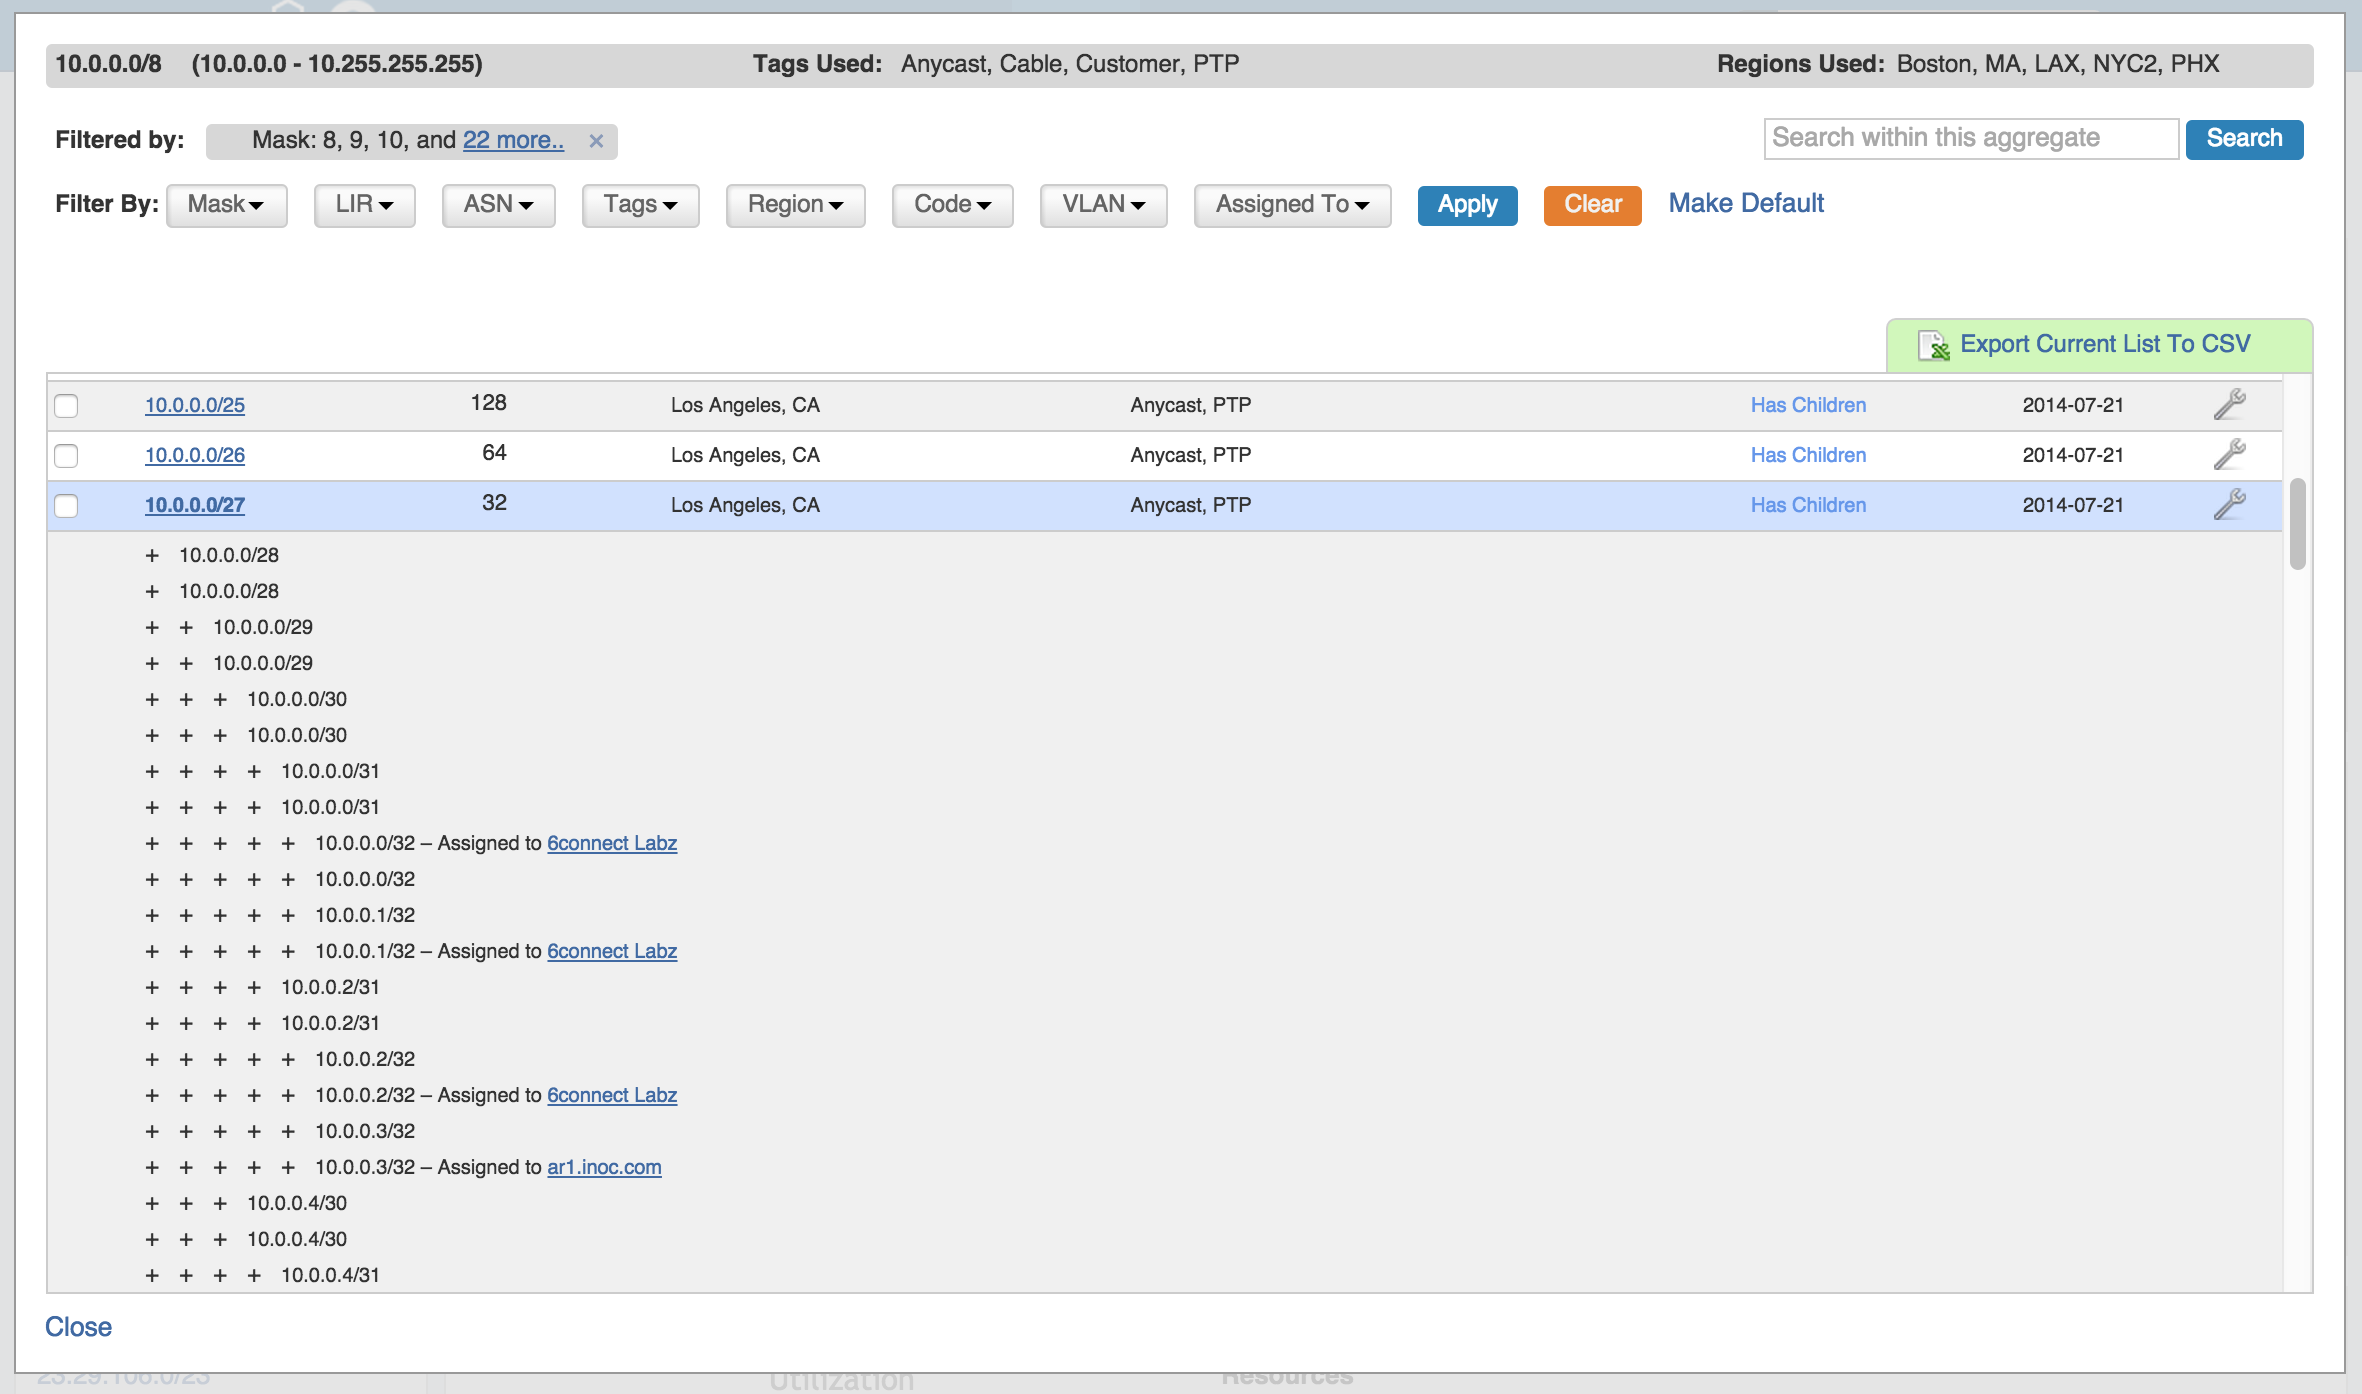
Clicking on the Parent Block blue CIDR link will display the Parent View Blocks Tree, providing a simplified hierarchy view.
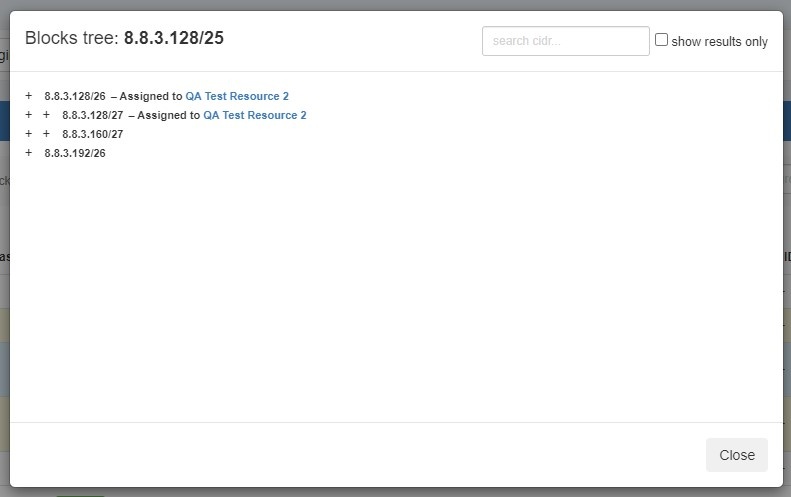
To search blocks by CIDR use the searchbox at upper right. This will highlight the specific block. For larger trees, you can limit the view to search results only by enabling the checkbox for "show results only".

Netblock Tree
Netblock Tree View displays the hierarchy organization of Parent / Child blocks under a Top Level Aggregate, but eliminates intermediate "bookkeeping" / allocated blocks, and prioritizes masks with assigned blocks. This provides a more effective view at the specific hierarchy levels used for assignments and management.
The Netblock Tree view detects which subnet masks have changes in assignments applied, and then automatically builds branches or displays individual addresses at those levels. This view includes the display of theoretical blocks which do not currently exist as ProVision objects, providing a more holistic working overview of the netblock structure.
While in Netblock Tree View, click on the expansion caret to expand / close a hierarchy branch parent block. Only blocks which exist in ProVision will be able to be edited or expanded.
Netblock Tree Logic:
- The top level at which an assignment exists denotes the top starting mask of the Netblock Tree View
- Proceeding down the tree, if one of the following conditions are detected, a new branch is created showing all blocks with a prefix at that level - regardless of of whether they exist as editable ProVision block objects.
- A change in assignment is detected (a block is assigned to a different resource than its parent )
- A manual split has been performed at the assignment level of a sibling/cousin block
- If no more changes in assignment are detected down the block tree, the lowest branch will display as containing individual addresses (/32s or /128s). The addresses may be both theoretical and those existing in ProVision.
- Expandable branches display with blue arrows, and denote that the block with that prefix also exists in ProVision → Block View
- Blocks and addresses which exist in ProVision will be editable in Netblock Tree View, but theoretical blocks at any level are not editable unless created in ProVision.
Example Walkthrough:
| Expand | ||
|---|---|---|
| ||
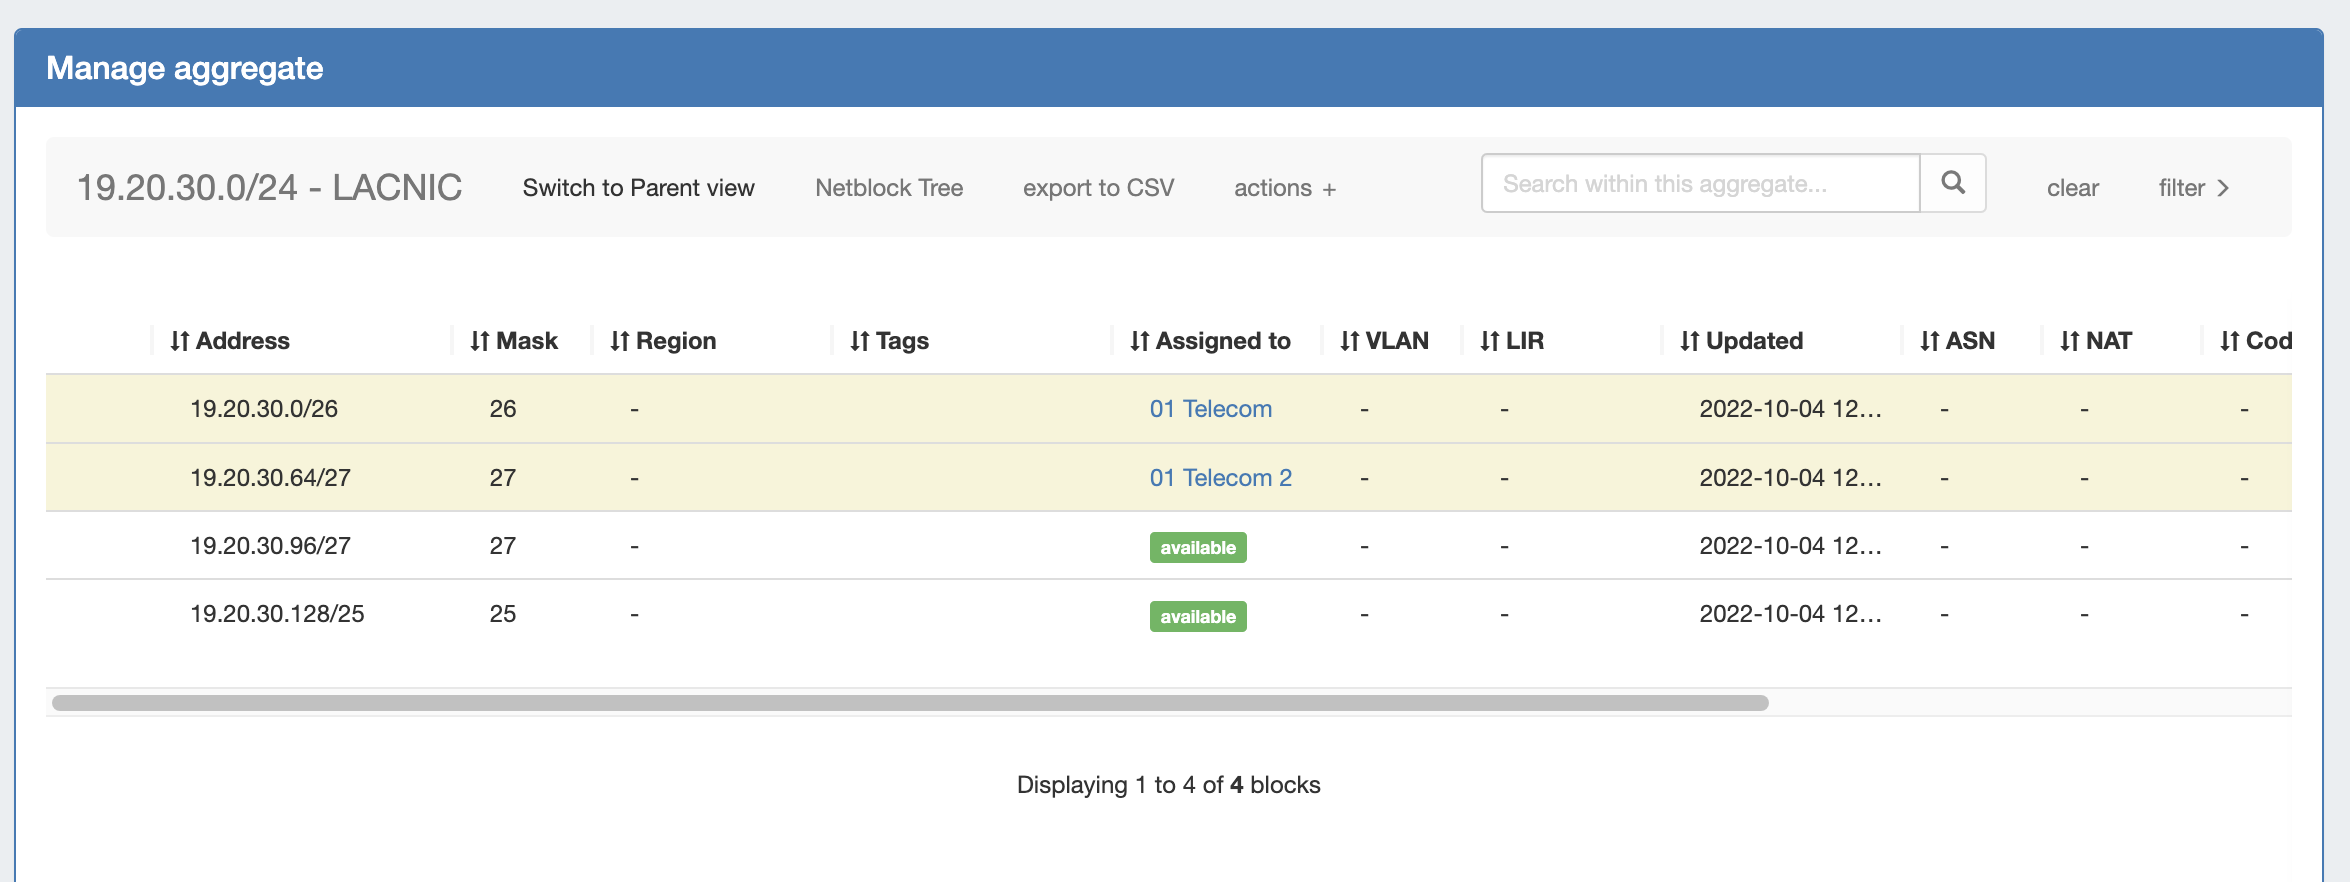
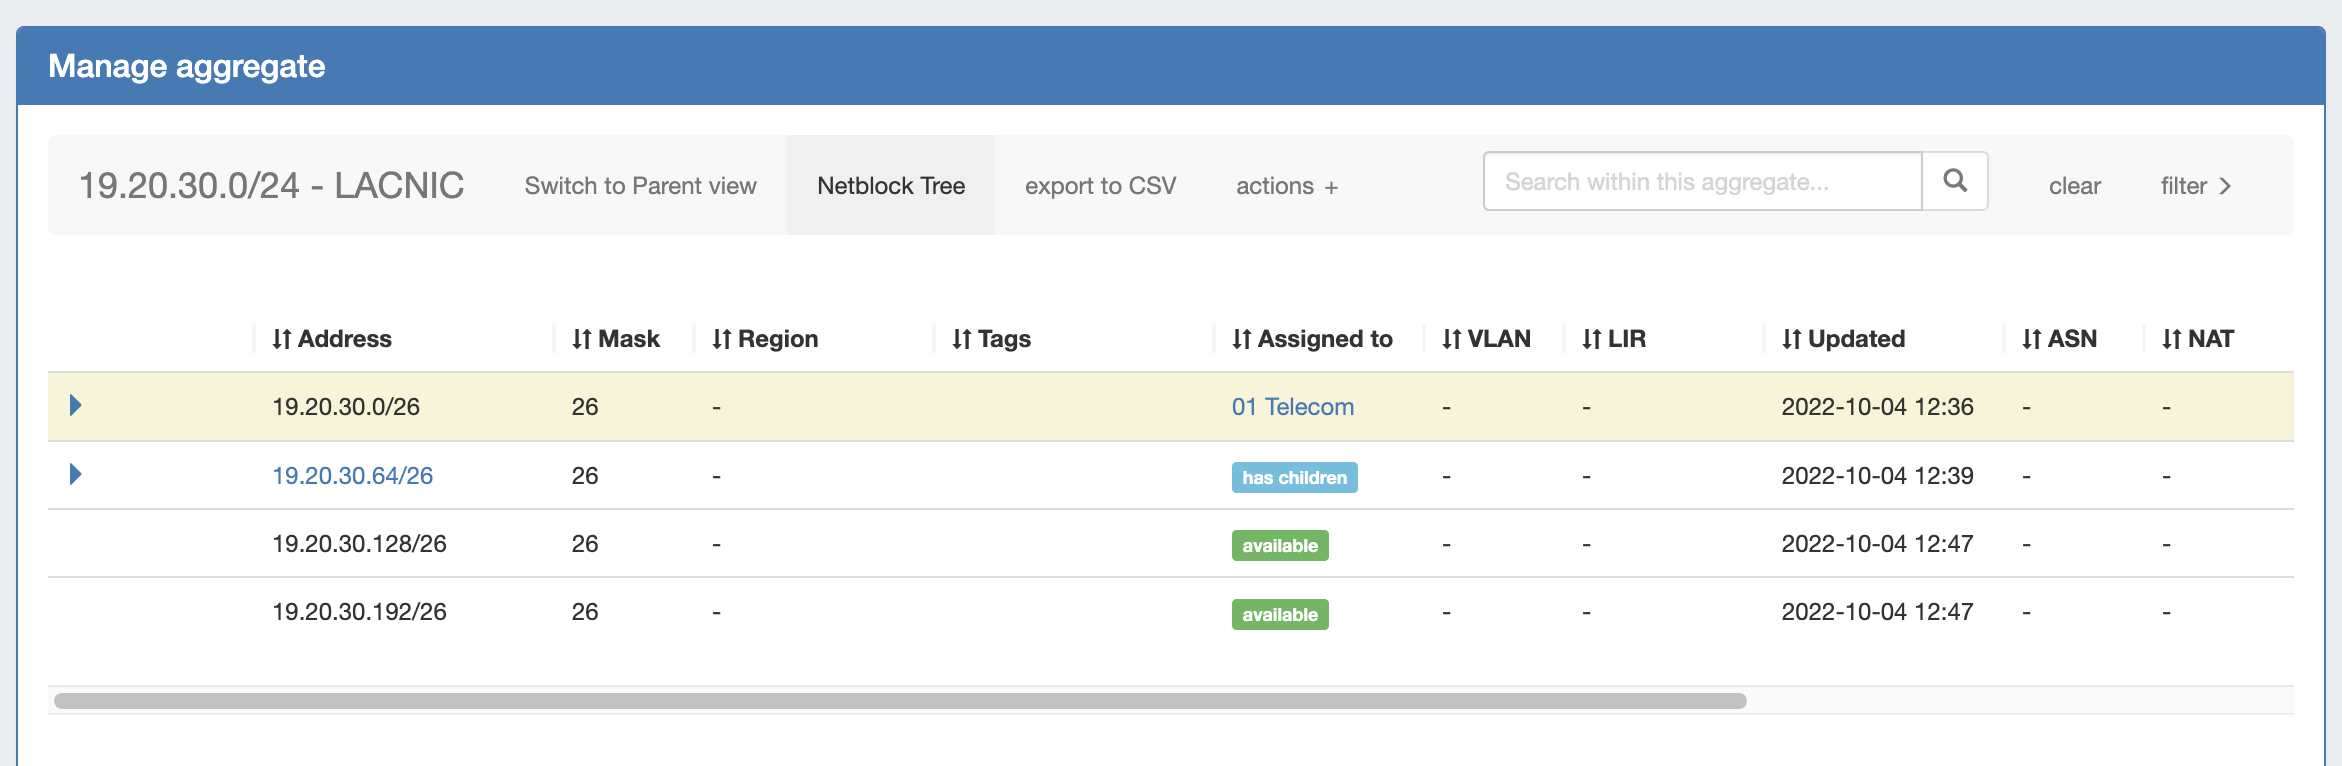
For a simplified example of the how Netblock Tree View displays compared to Block View, we will be using an example aggregate of 19.20.30.0/24 (assigned to 'Available'). The standard Block View for this aggregate shows it has been split to contain a /25, a /26, and two /27s. The /26 and one of the /27s have been assigned to different resources. In Block View, we only see the lowest child blocks that exist in ProVision:
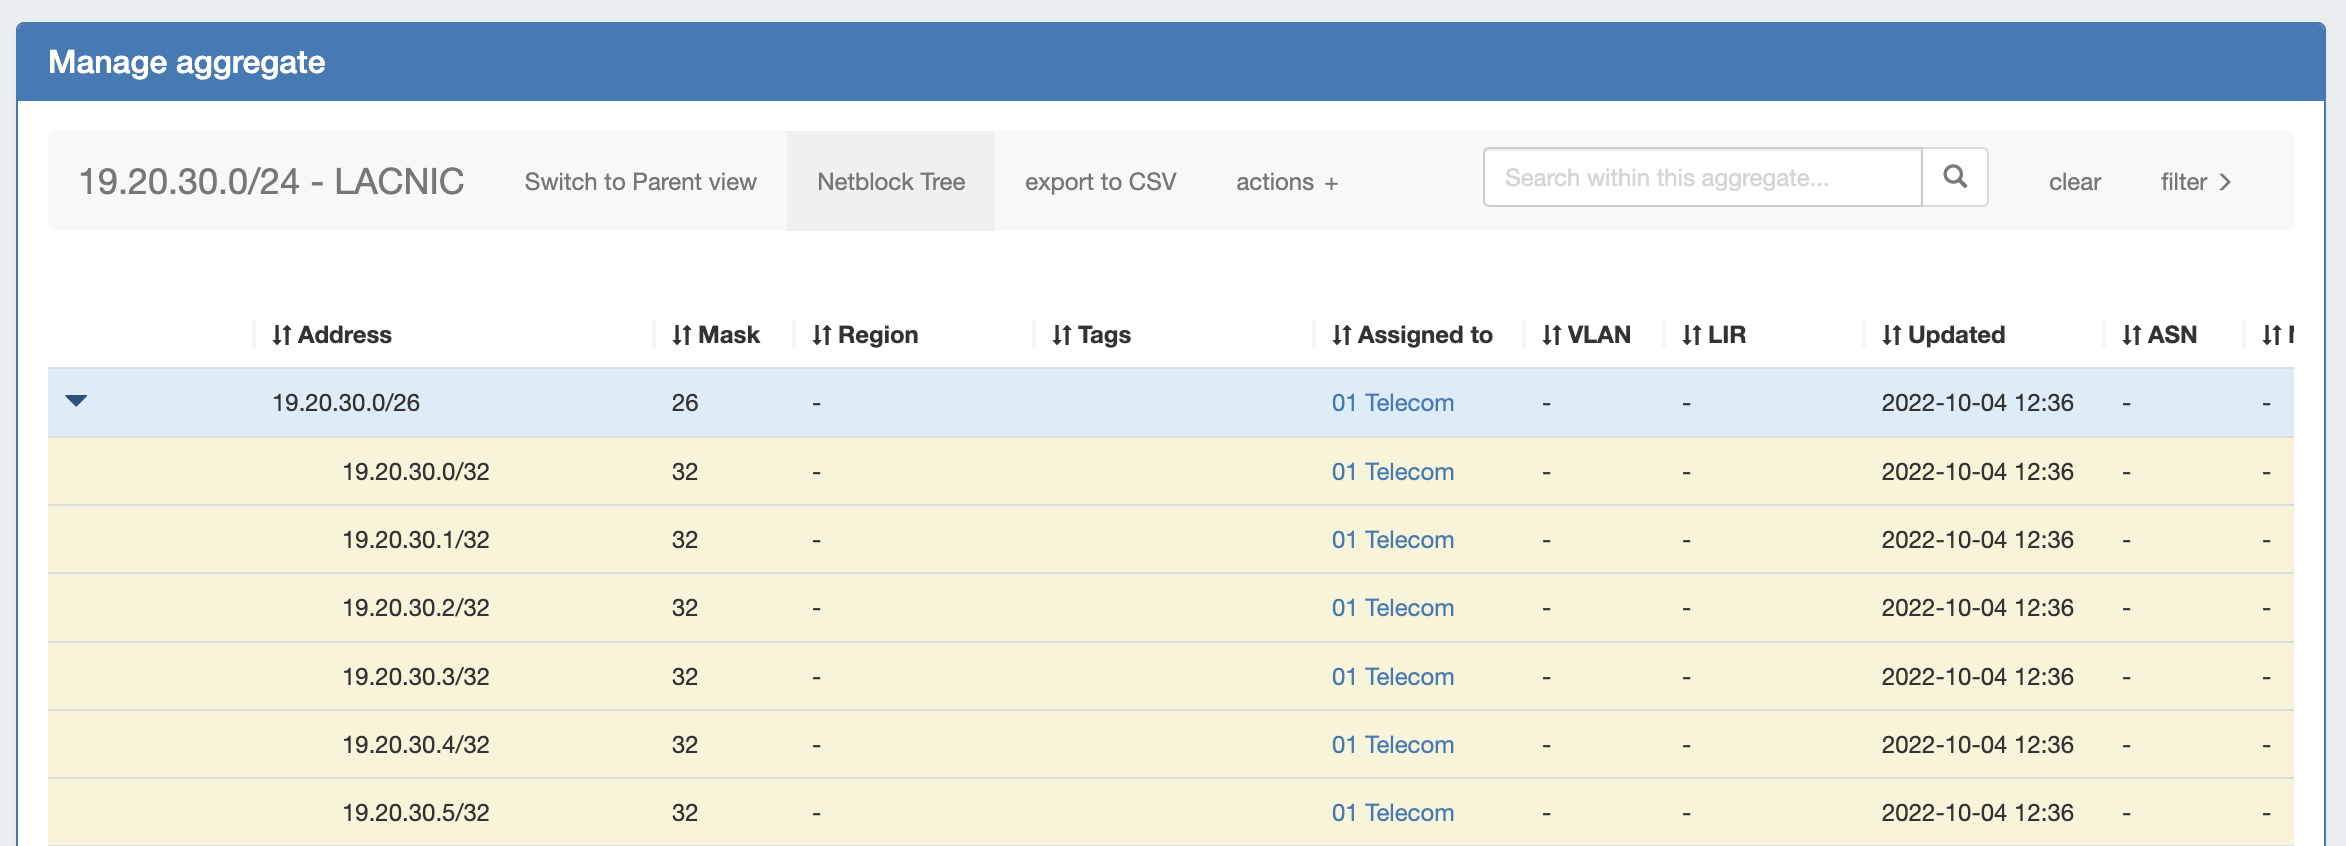
When we switch to Netblock Tree View (by clicking "Netblock Tree") we see only /26s in the top level of the view. This is because 19.20.30.0/26, assigned to '01 Telecom', is the first assigned block encountered. Netblock Tree View will ignore 19.20.30.0/25 and 19.20.30.128/25 because they are assigned to the same resource as 19.20.30.0/24 ('Available').
There are no different assignments under this 19.20.30.0/26. Thus, when you expand it you will see only /32 addresses. As these /32s have not yet been created in ProVision → Block View, they only exist as "theoretical" blocks and are not editable, but aid in viewing the totality of available addresses under that prefix.
If you would like these addresses to be assigned or editable in ProVision, you may split the /26 down to the desired number of /32 addresses using templates or manual splits. This will create the addresses in ProVision and allow those addresses to be edited.
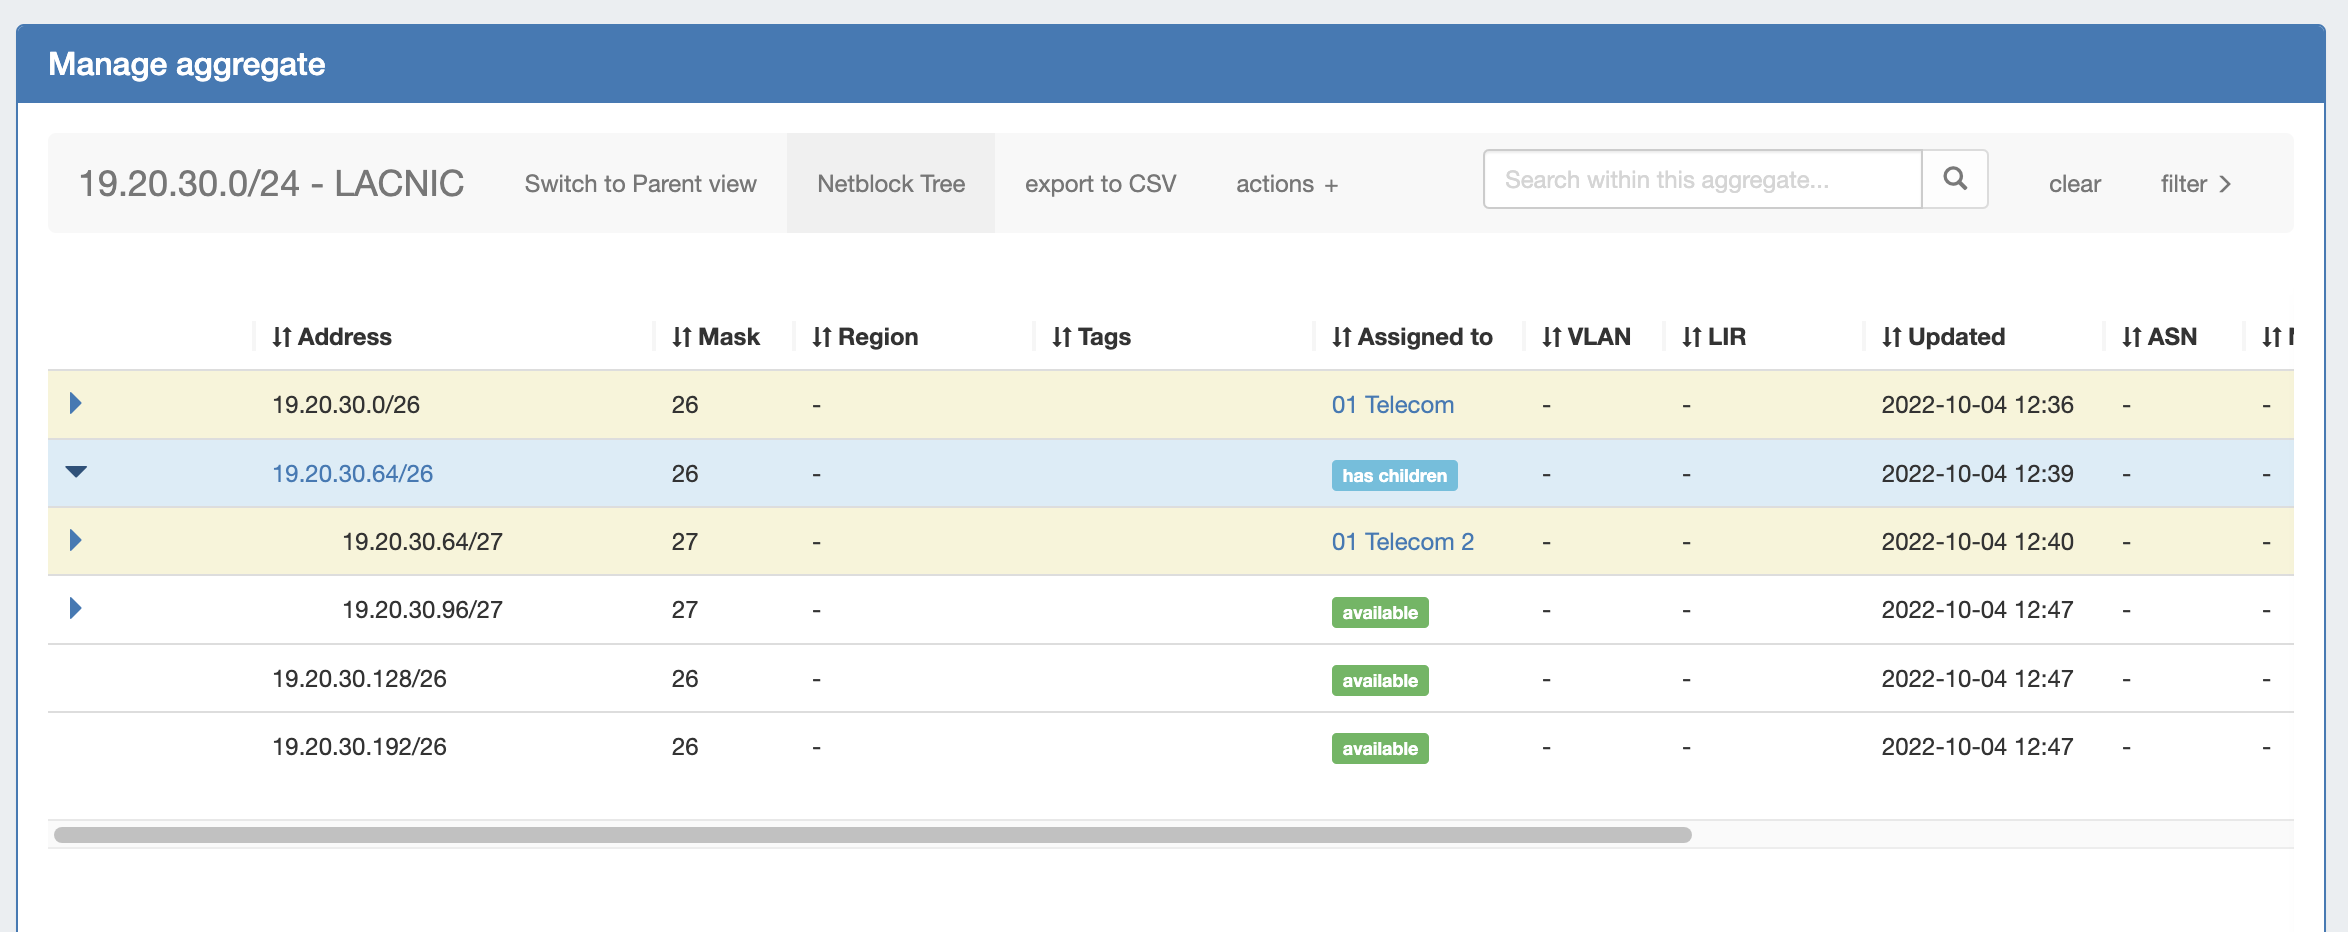
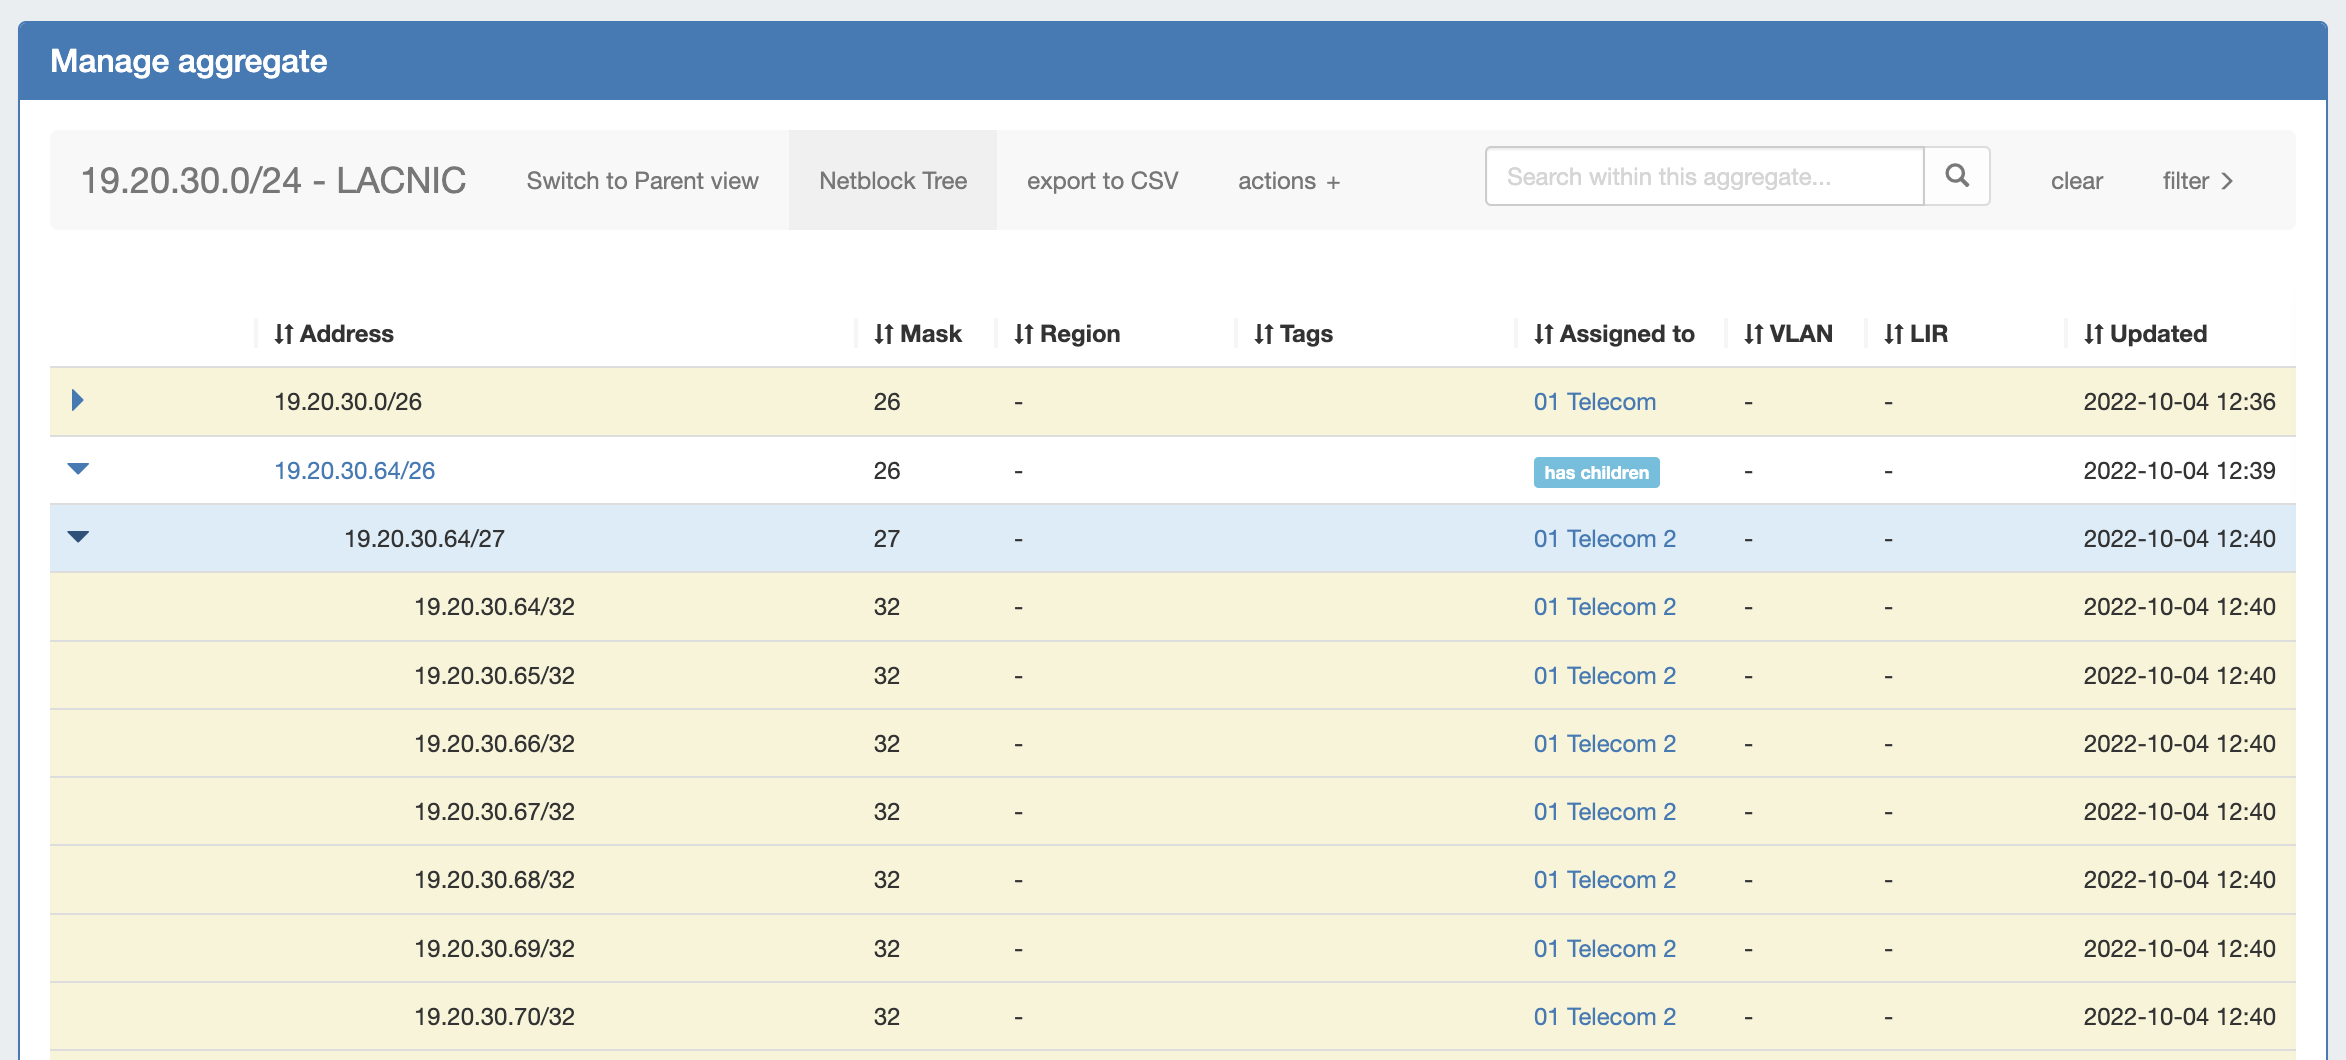
Under those branches display individual /32 addresses, because the /27 is assigned.
However, if 19.20.30.128/25 is split into two /26s in ProVision, the previously theoretical blocks of 19.20.30.128/26 and 19.20.30.194/26 become 'real' objects, and will display as expandable and editable. |
Working in IPAM Manage Views
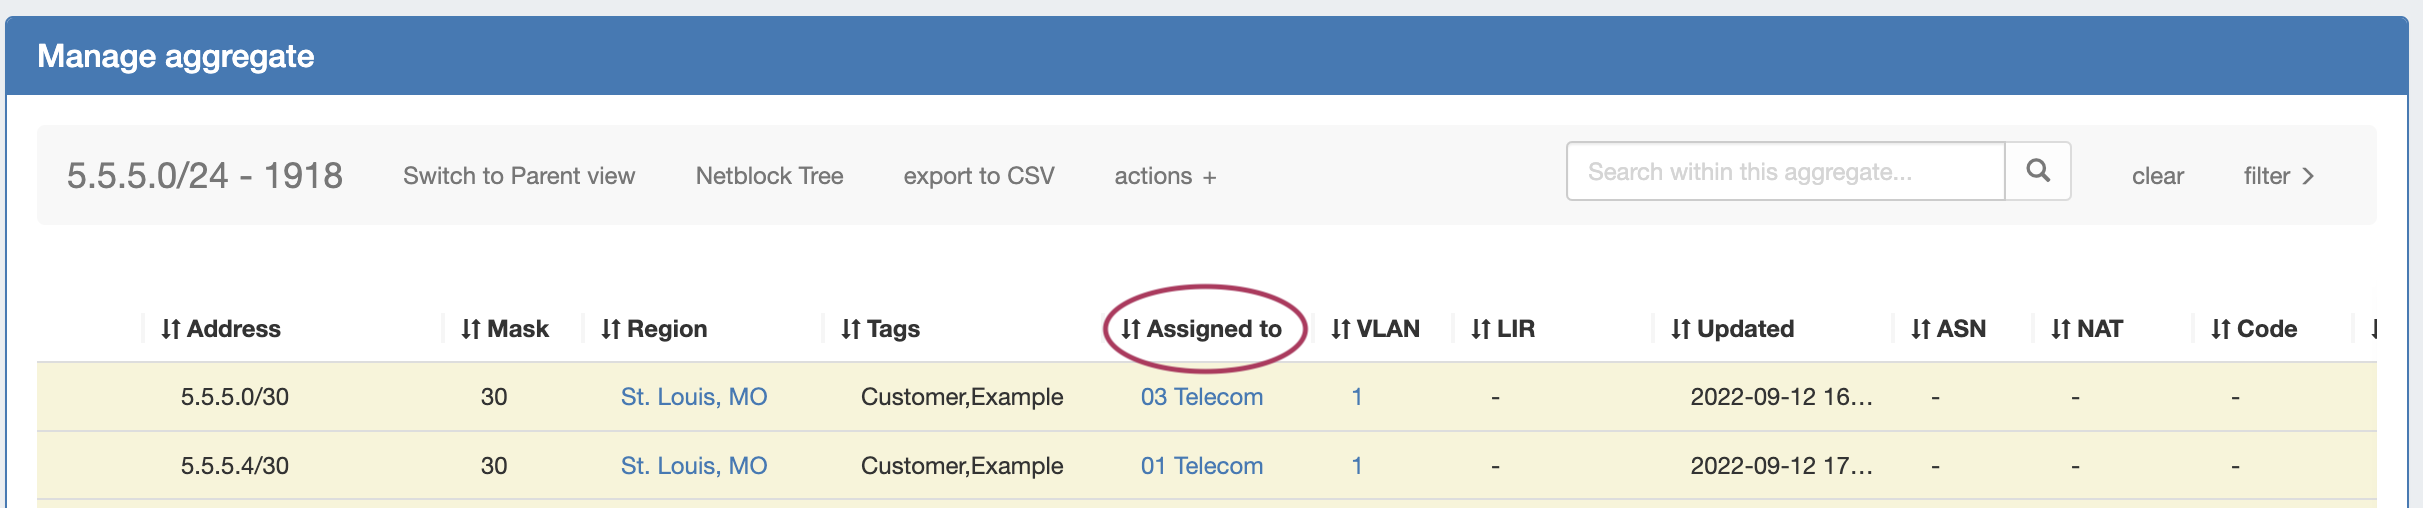
Sort Blocks
Sort the IPAM Manage blocks list by clicking on any column name the in list with the up-down arrows icon (↓↑).
The list will sort between ascending and descending order for that field.
Filter / Search Blocks
Filter the block list in IPAM Manage by toggling the "Filter +" link in the top right corner of the aggregate header.
A flyout will appear with filter criteria options. Select or type the option under your desired field, and hit "Apply". A red filter flag indicates the number of filters applied to the list. When done, click "clear". To hide the filter flyout, just click the "filter -" link again.
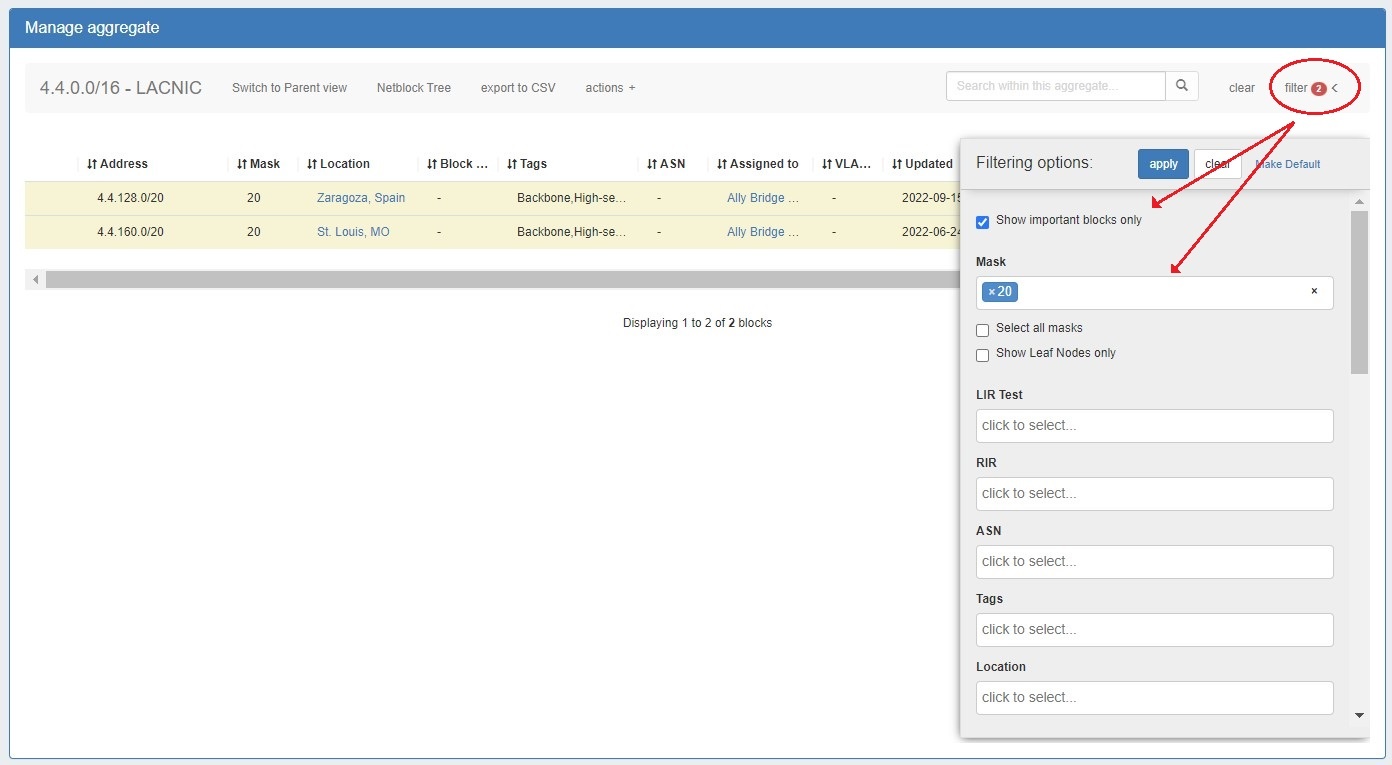
Once a filter(s) has been applied, click on "Make Default" and the filtered block list will be saved as the default view for that aggregate. When a filtered view is saved as the default the filter flag will continue to display.
You may also search for a specific block entering a full or partial CIDR, assigned resource name, or other search term into the search box at the top of the list.
Important Blocks
"Important" IP blocks display with a yellow background highlight. By default, any block that has been manually assigned, unassigned, or had other high-level manual interactions performed will be automatically marked as "Important".

Blocks may be manually marked or unmarked as "Important" from either the "Edit Block" interface or from the API.
To edit the important flag, open Edit block, then select / deselect the toggle for "Mark this block as important", and save your changes.
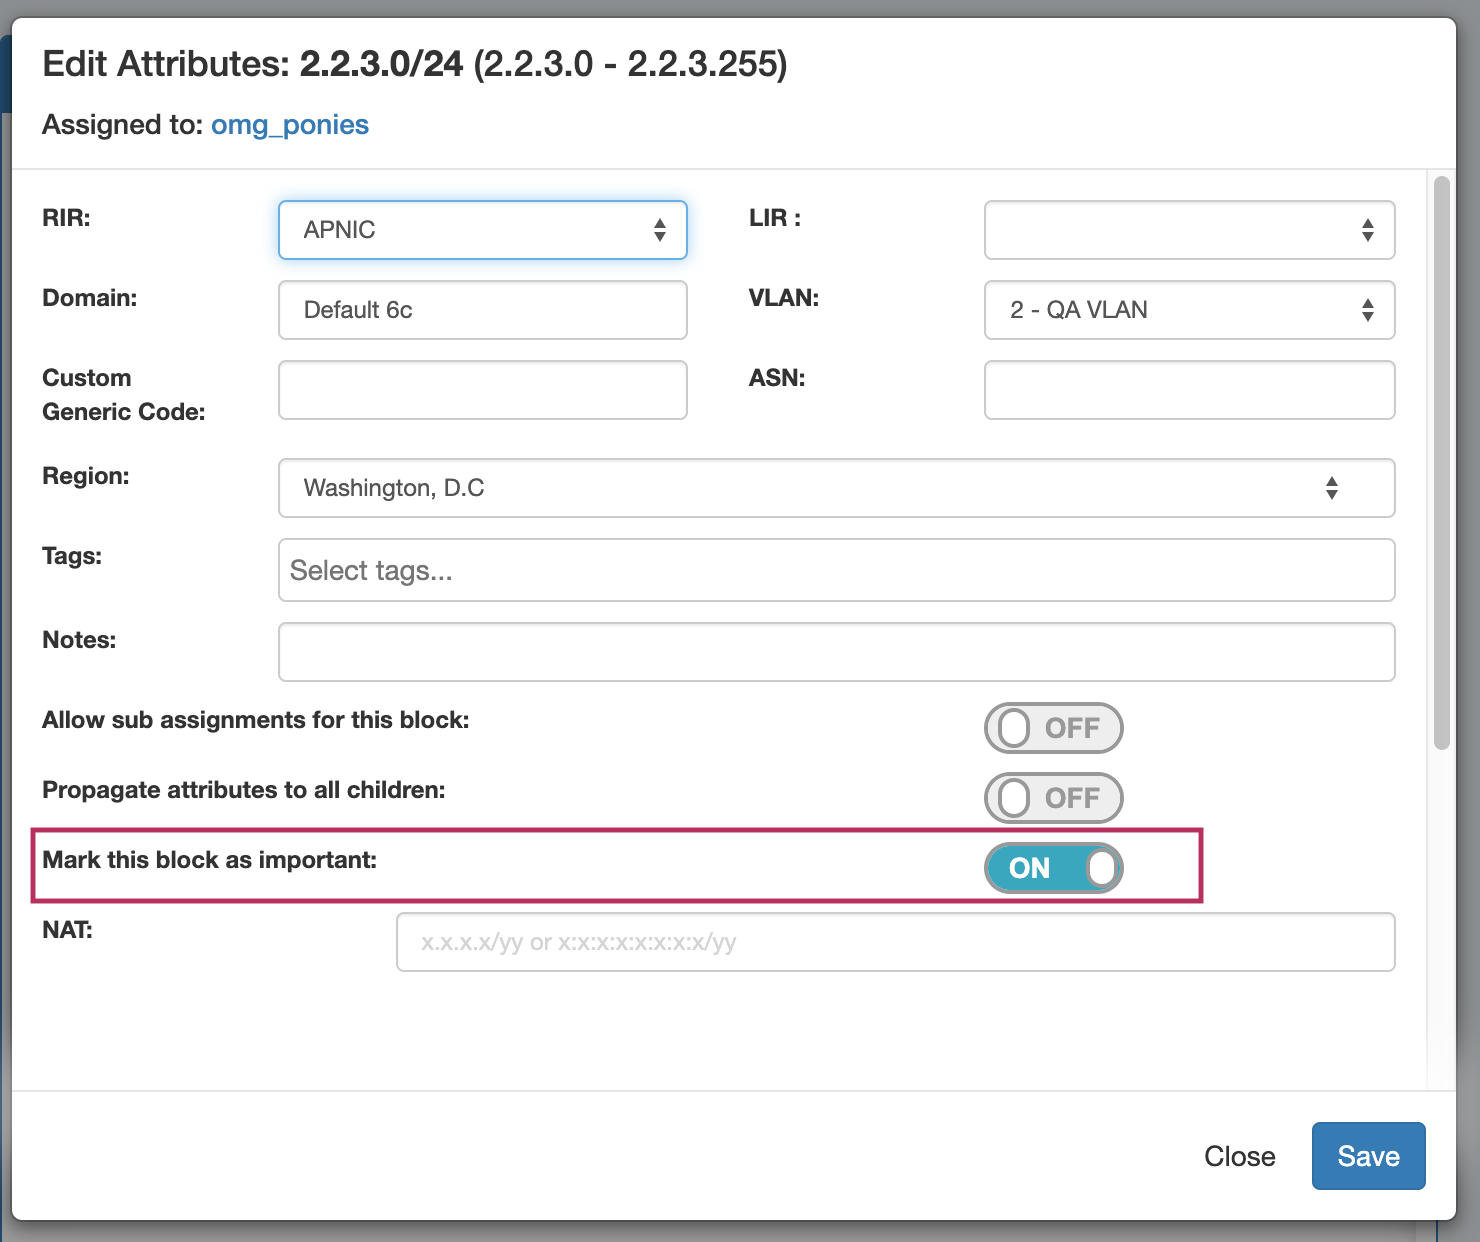
If multiple blocks are selected with mixed "important" statuses, then the toggle will display in the "Off" position.
To update all selected blocks to flag as important, switch the toggle to "On", and save changes. To switch all to the "Off" position, you may either toggle all blocks to "On", save changes, then switch all blocks back to "Off" and re-save, or adjust your selection to only include the blocks that need the Important Flag removed. (Tip: Use the list filter to show only "important" blocks!)
Working with IP Blocks - Common Tasks
Individual Blocks may be managed from either IPAM Manage, or the IPAM Gadget. (if assigned to a resource, and the IPAM Gadget is enabled on the Resource's Entry Page).
In general, standard actions from the Action Menu will be performed the same in either area, with "Assign" being the exception.
For details on some common tasks to perform with IP Blocks, see the next section: Working with IP Blocks - Common Tasks:
Additional Information
For additional information on working with the IPAM system, see the following areas:
...