1) Add Router(s)Adding a router is the fundamental base and first step of working with peering in ProVision. Routers may be added through the "Add Router" button in the Peering Tab. For a detailed breakdown of this task, see Peering Routers. 2) Add Peer GroupsAssociating the router with a peer group is necessary to link the router to a particular exchange. You may add the Peer Group information either in the "Router Details" page in Peering, or in the Peer Group Gadget prior to adding sessions.
| Expand |
|---|
From Peering → "Router Details" Page:Go to Peering Tab → Routers. Click on the desired router to view the Router Details page. (See Peering Routers) Here, you may add and delete and Peer Groups associated with the router - select the Exchange, Add the Peer Group Name, select the IP type, and click "Add Group". 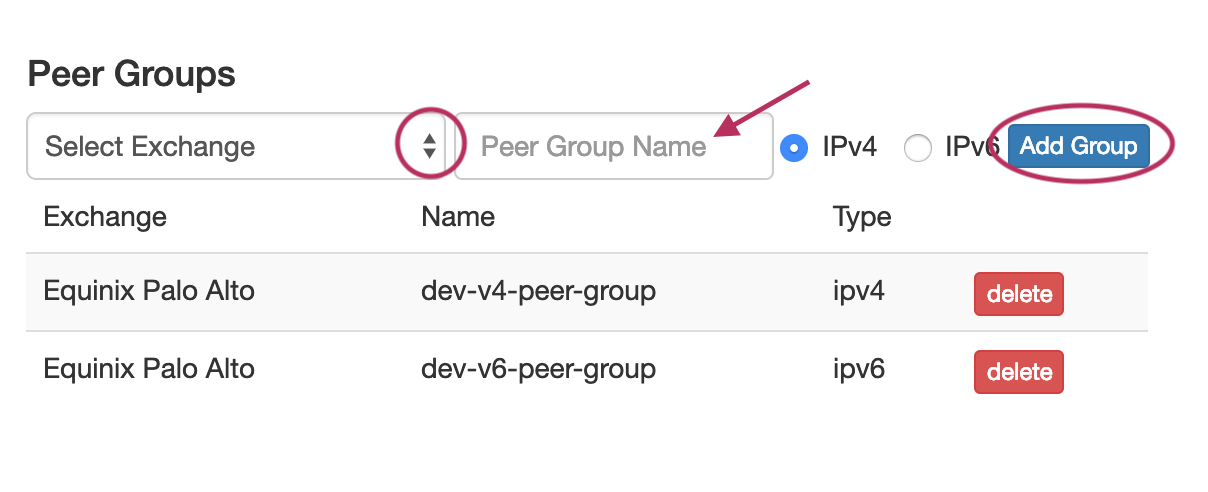
From the Peer Group Gadget:If you need to add a Peer Group to an existing router, you may use the Peer Group gadget. The Peer Group Gadget allows you to add peer groups for IPv4 and IPv6 for a selected exchange from a router's Resource Entry page. To do this, simply select the exchange, type in a Peer Group name in the text box, select IPv4 or IPv6, the click "Add Group". 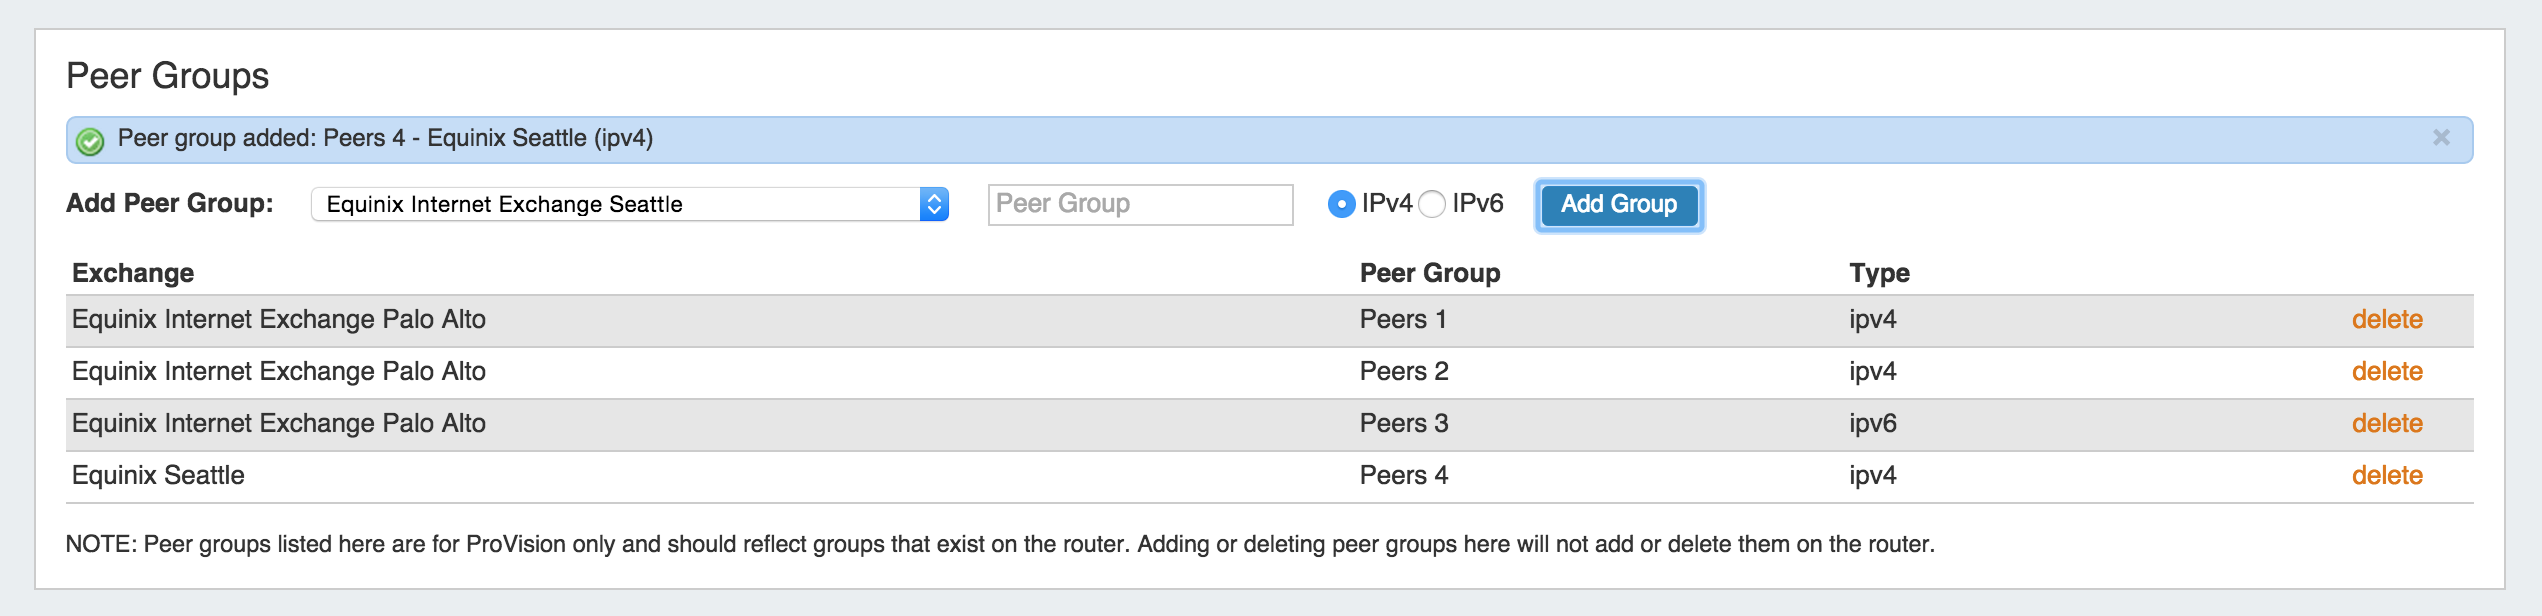
Peer Groups added from this gadget will be then be available to select in the "Add Session" dialog box in the Peering tab. |
3) Add Session(s)After Routers and Peer Groups have been set up, the next step is Adding Sessions to ProVision. You may add a new session through the "Add Session" button in the Peering tab, or you may Import Sessions from an existing router. Importing sessions requires Admin level permissions, and is accessed through the Data Import Tab in the Admin section of ProVision. Once a session has been added, you will see it in the session list. For a newly added session, the status will show as "Not Configured". There are a few options to configure sessions:
| Expand |
|---|
You may configure the session through 1 click config or the Config Manager, accessed by clicking session and opening the Session Details page. 1 click config uses the default config settings, while the Config Manager allows you to manually create one time use unique settings. From the Peer Details Page, you can choose to create or configure multiple sessions. With this option, you can view and configure all sessions for that Peer from one menu (as opposed to the Sessions list configure option, which configures individual sessions by Exchange). Clicking on "Configure Multiple Sessions" button opens a page showing the available exchanges with routers and options to change the router, peer group, and Peer type. Select the checkmarks for the desired sessions to configure. As a shortcut, you may also check the "Select all exchanges" option to select all sessions under all exchanges, or, check "Select all networks" next to the exchange header to select all sessions in that exchange. From there, deselect items as needed. When your selections have been made, click "Configure Now" to immediately configure all selected sessions, or you may select "Schedule" to automatically create sessions and schedule a configuration to occur in one hour (by default). The scheduled configuration may configuration may be edited through edited through the Scheduler Tab. |
5) Manage CommunicationsOnce a session has been added with a peer, you will see the peer listed Peer List under the Peers tab. You'll also be able to manage communications from Exchange Communications. You will see the list of Peers, their ASNs, Name, Request Status, Notes (log), and the Action Menu (wrench icon). From here, you may send peer requests, mark peer status, and view notes on previous actions. The available options and flow depends on the Peer Status and whether a request is Outgoing or Incoming. | Expand |
|---|
New Peer:| Expand |
|---|
For an existing peer that was just added, you can mark the peer as: a) Mark Existing Peer, or, b) Mark Not Qualified You may also choose to send an outgoing peer request. |
Outgoing Peer Request:| Expand |
|---|
To send out a peer request, select "Send Request" from the Action Menu (wrench icon) . This sends an initial peering request email to the peering coordinator for that peer. The email template pre-populates data based on peeringdb data (To address, Subject line and Peering exchange information). You have the chance to edit the email prior to sending. If Peering Emails are set up in ProVision with the same email address, a copy of the request will be saved to the Sent box. Once a Request has been sent out, it can proceed two ways: a) The request is accepted and Peering is established (becomes current peer) b) The request is not accepted / responded to, and the "Resend Request" option becomes available, allowing you to repeat the request. |
Incoming Peer Request:| Expand |
|---|
If a request is received, you have a few options from which you may mark the peer from the Action Menu: a) If you accept the request, you may "Mark Approved" and Peering is established (becomes current peer). b) You may "Mark Rejected", in which case a peer status is marked rejected. c) "Reset Status" is available at various points in the communications process, if you want to reset the peer back to the beginning state and re-establish a different status condition. This reopens the initial options from which you may select a different peer mark. d) "Resend Request" may be available to resend a request If Peering Emails are set up in ProVision, and the message was sent to the account as set there, the incoming request will be recieved to received to the ProVision inbox. |
|
6) Repeat for new Routers, Sessions, and Peers. To add additional Routers, Sessions, and Peers repeat steps 1, 2, or 3, and manage your newly added sessions and peer communications similarly with steps 4 and 5. |