Working with the VLAN Manager (Standard Flow)
| Table of Contents |
|---|
Step 1) Add Domain
Users will already have a non-editable Default Domain created, which may house VLANs entered under the previous VLAN text field, however, you may choose to create new domains. To create a new VLAN domain, navigate to the VLAN Admin Tab, in the Admin area of ProVision, and click on "Add Domain".
...
Enter the domain name, and select whether it is standard or extended - Standard has a range of VLAN IDs from 1-1005; Extended from 1006-includes up to 4094.
| Info |
|---|
| NOTE: The ProVision UI and API has restricted usage of VLANs 1 and 1002-1005 in tagging and selecting or searching VLANs. |
...
Click "Add", and your new domain will be added to the Domain list below.
Viewing the Domain List

If a domain already has VLANs enabled for it, clicking on the "+" sign in front of the domain name will expand the domain list to show enabled VLANs.
The numbers in parentheses under the domain name (shown as 21/1000 in the above image for a standard domain; an extended domain would show as 21/4089) indicate the quantity of enabled VLANs over the available pool of VLANs to select from. There There are 5 VLANs (1, 1002-1005) which are reserved, and not included in the count.
Edit a Domain
The Default Domain is not editable, however users may edit the name of user-created domains. Once a domain has been created, users may not edit the range (standard / extended) of a domain - if a domain is created with a mistaken range, it must be deleted and re-created.
...
Then, edit the name as desired and hit "Save".

Remove a Domain
To edit a domain, click on the "Manage" button next to the domain name.
...
Then, edit the name as desired and hit "Save".
Step 2) Add VLANs to a Domain (Enable)
After creating domains, VLANs need to be added (enabled) for that domain out of the pool of available VLANs.
The IPAM VLAN Page
Go to the IPAM Tab, and then either select VLAN from the IPAM dropdown menu, or click "VLAN" from the radio buttons that appear on the IPAM page.
...
This takes you to the IPAM - VLAN page, which shows an overview of Domains and VLANs on the left sidebar (click the + next to the domain names to see the enabled VLANs under each domain), and similar to the IPAM page, shows IPAM Utilization data for each Domain / VLAN pair. Clicking on the wrench will open "VLAN Manage", which has the same type of functionality for IP blocks as IPAM Manage, but organized under the scope of that VLAN.
Add VLANs to a Domain (Enable)
In the IPAM - VLAN page VLAN sidebar, click "Add".
...
When done selecting the VLANs, click "Enable Selected VLANs". The selected VLANs will now be enabled for the domain, show in Domain / VLAN lists, and be available to edit or add blocks to. To add more VLANs to another domain, click "Reset" and repeat the process. If done, hit the "Cancel" button at the top of the Add VLAN module, and you will return to the main IPAM - VLAN page view.
Edit a VLAN
You can edit a VLAN by clicking on the VLAN in the VLAN List sidebar, then selecting "Edit".
...
After making your changes, click the "Save" button. The named VLAN will now show both VLAN number and name when viewing Domain / VLAN lists or when working with blocks.
Step 3) Add Blocks to VLANs
After VLANs have been enabled for domains, you can associate those VLANs with IP blocks.
Add / Update Blocks to VLAN from VLAN - Manage IPs:
While in the IPAM Tab -> VLAN Page, expand the desired domain and click on a VLAN. Then select "Manage IPs".
...
This opens up a window where IP Blocks may be associated to the VLAN. From here, you can "Direct Assign" a block to the VLAN, "Browse Assign" blocks, or Search for a block to add to the VLAN.
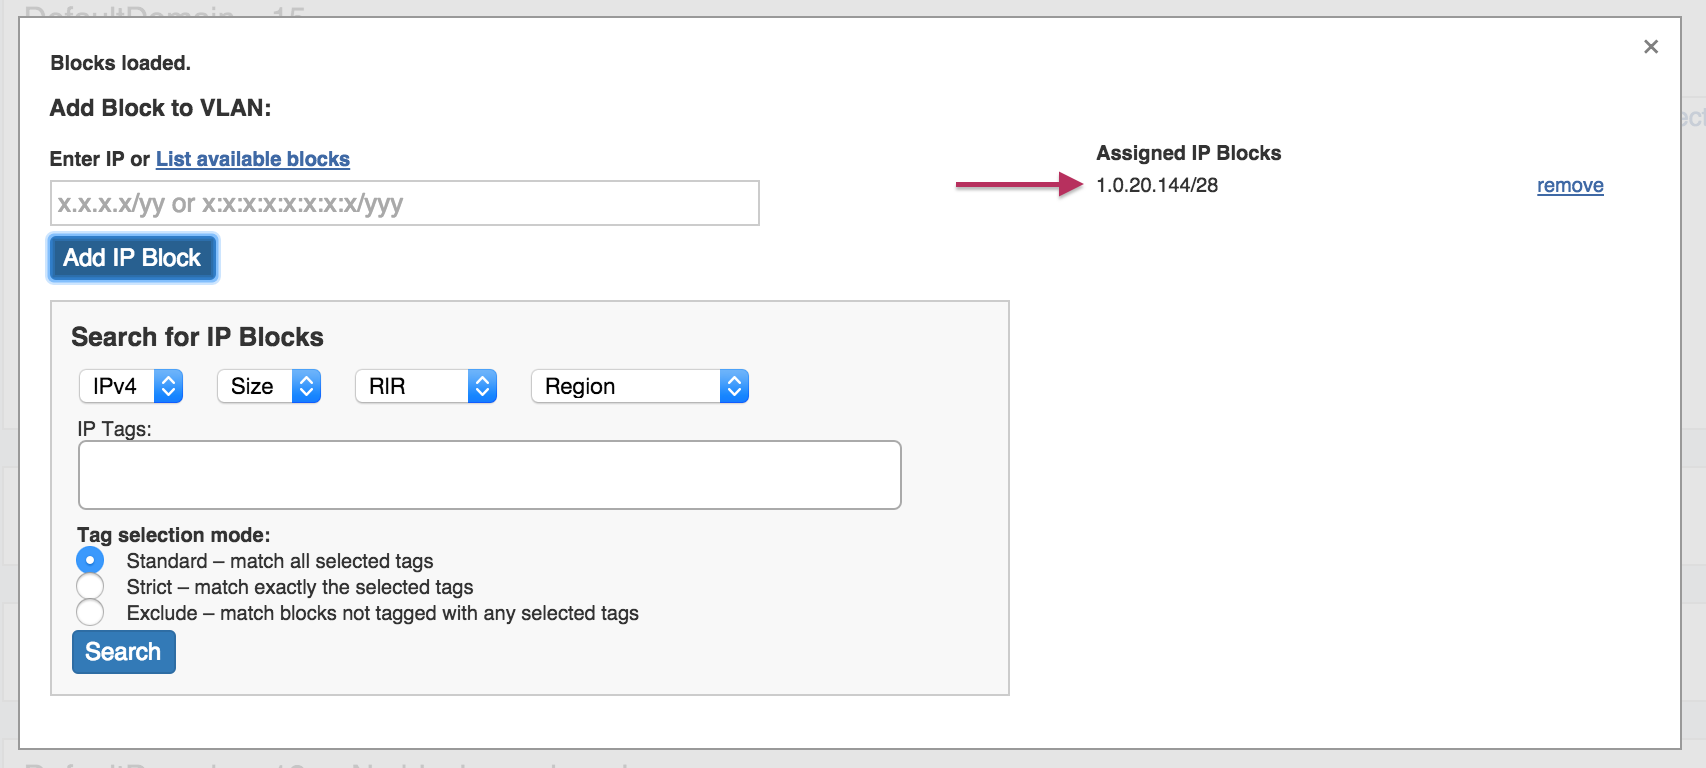
Direct Add Block to VLAN:
Directly add a known, available IP Block by typing in the CIDR, then hitting "Add IP Block".
...
When complete, the block will be added to the "Assigned IP Blocks" list on the right of the window, with the option to remove if desired.
Browse IP Blocks to add to VLAN:
Browse blocks available to add to the VLAN by clicking on the "List available blocks" link above the IP block input box.
...
When complete, the block will be added to the "Assigned IP Blocks" list on the right of the window, with the option to remove if desired.
Search IP Blocks to add to VLAN:
Select search criteria of IPv4 / IPv6, size, RIR, Region, or Associated Tags / Tag selection mode to create a filtered list of IP blocks meeting that criteria. Then, click "Search".
...
When complete, the block will be added to the "Assigned IP Blocks" list on the right of the window, with the option to remove if desired.
Add / Update VLAN to Blocks from IP Manage or VLAN Manage:
When editing a block in either IP Manage (IPAM Tab -> Action Menu (wrench) -> Manage), or VLAN Manage (IPAM Tab - VLAN -> Action Menu (wrench)) , you can select an existing domain and VLAN to associate to the block.
...
| Info | ||
|---|---|---|
| ||
NOTE: Child blocks whose Parent blocks already have an assigned Domain / VLAN, may not have domains and VLANs changed to be different than the Parent Block's values. If you attempt to save domain / VLAN changes to a child block under this situation, an error will occur. i.e., Parent and Child IP Blocks must have matching Domain / VLAN values. |
Add / Update VLAN to Blocks from IPAM Gadget:
You may also add / edit Domain /VLAN information when editing a block in the IPAM Gadget. From the IP block's Action Menu (wrench icon), select "Edit".
...
Then, in the Edit Attributes menu that pops up, select the desired Domain / VLAN information, and click "save".

Working with VLAN Tags - OPTIONAL
VLAN tags provide further organizational / search criteria when searching for VLANs to enable.
Creating VLAN Tags
Create VLAN Tags from the VLAN Admin Tab, in the Admin area of ProVision, and select "Edit Tags" from the dropdown.
...
Once VLAN tags have been created, they will be available to add to VLAN ranges and use in the "Add VLAN" search function.
Add VLAN Tags to VLANs
VLAN tags may be added to VLANs in two ways: Editing an already-enabled VLAN (VLAN Edit), or by assigning the tag to a range of VLANs from the Domain VLAN pool (un-enabled VLANs, which are then available to search by VLAN tag to enable).
Add Tag to an Enabled VLAN
Edit an existing, already enabled VLAN by clicking on the VLAN in the VLAN List sidebar, then selecting "Edit".
...
After making your changes, click the "Save" button. Tagged VLANs will be viewable in the VLAN Chart a single tag points under VLAN Admin - Domain Manage.
Add Tag to a Range of the VLAN Pool
You can also tag a range of the (un-enabled) VLANs in a domain's VLAN pool. Then, when moving on to enable a set of VLANs for a Domain, you can select those VLANs by tag.
...