| HTML |
|---|
<div id="google_translate_element"></div>
<script type="text/javascript">
function googleTranslateElementInit() {
  new google.translate.TranslateElement({pageLanguage: 'en'}, 'google_translate_element');
}
</script>
<script type="text/javascript" src="//translate.google.com/translate_a/element.js?cb=googleTranslateElementInit"></script> |
DNSv3
ProVision's DNSv3 combines server management, group organization, and zone management under the DNS
...
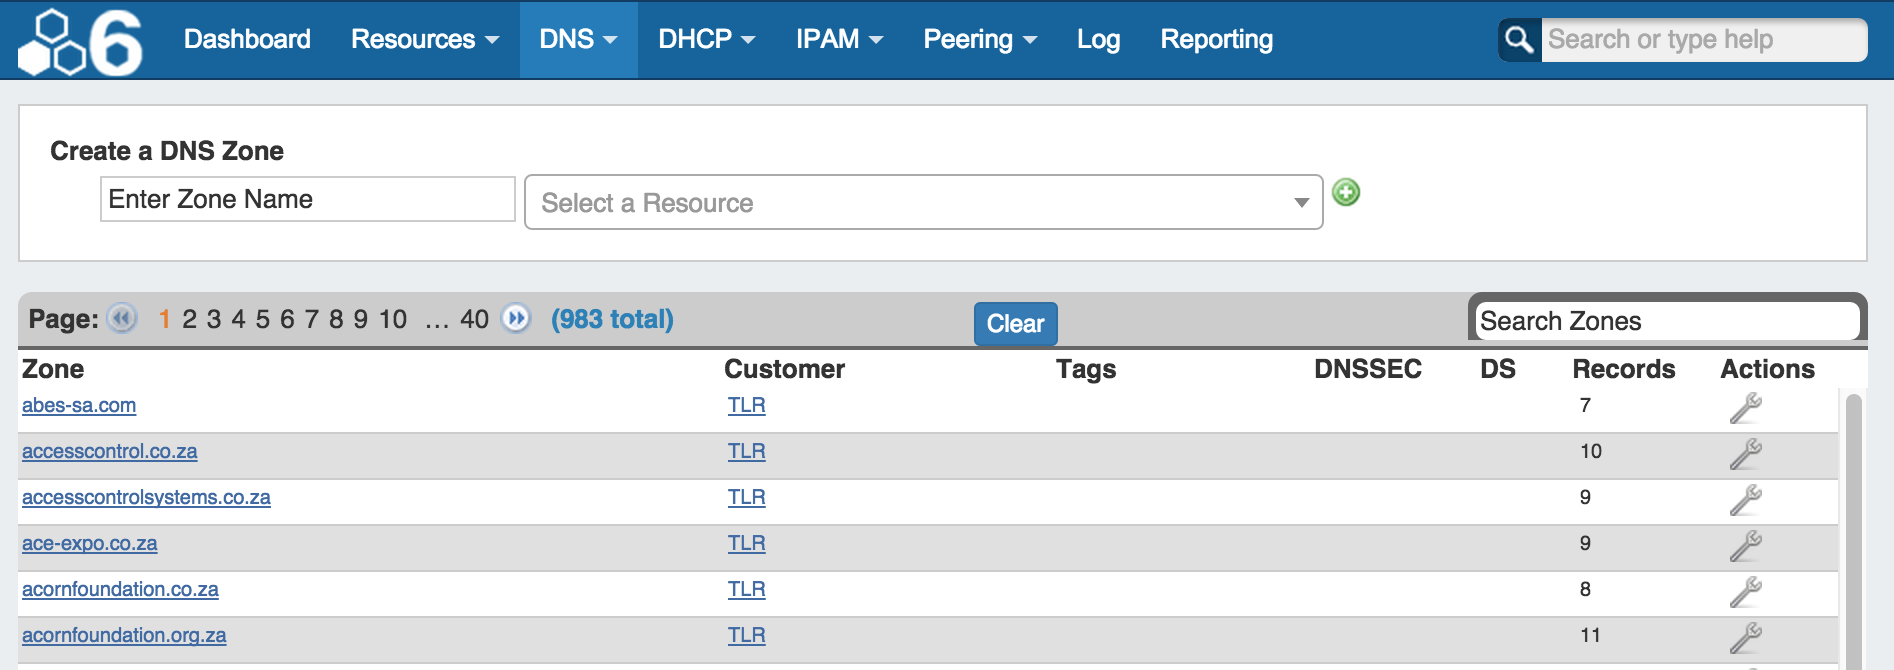
The DNS tab allows you to add new Zones as well as view and manage existing zones.
| Table of Contents |
|---|
DNS Tab User Interface
1) Create Zone Interface: Dialog for creating a DNS zone
2) Paging: this allows for easier browsing of large lists of DNS zones
3) Clear Button: Clears out the search box text
4) Search: this text box allows the user to enter in criteria to filter the list of zones
5) The Zone list: A click-able list of zone names - if clicked, the user will be directed to the DNS zone editing page
6) The Customer list: iA click-able list of Resource names that the zone is assigned to
7) Tags: lists the tags associated with the zone
8) DNSSEC / DS Status: The DNSSEC column will show green if the zone has been signed and pushed successfully, the DS column will provide a status "X" to acknowledge that the zone was verified by an authenticated DNS server
9) Records: The records value is the number of zone records in the given zone
10) Action Menu: The Action Menu (wrench icon) gives a list of additional actions to perform on the zone
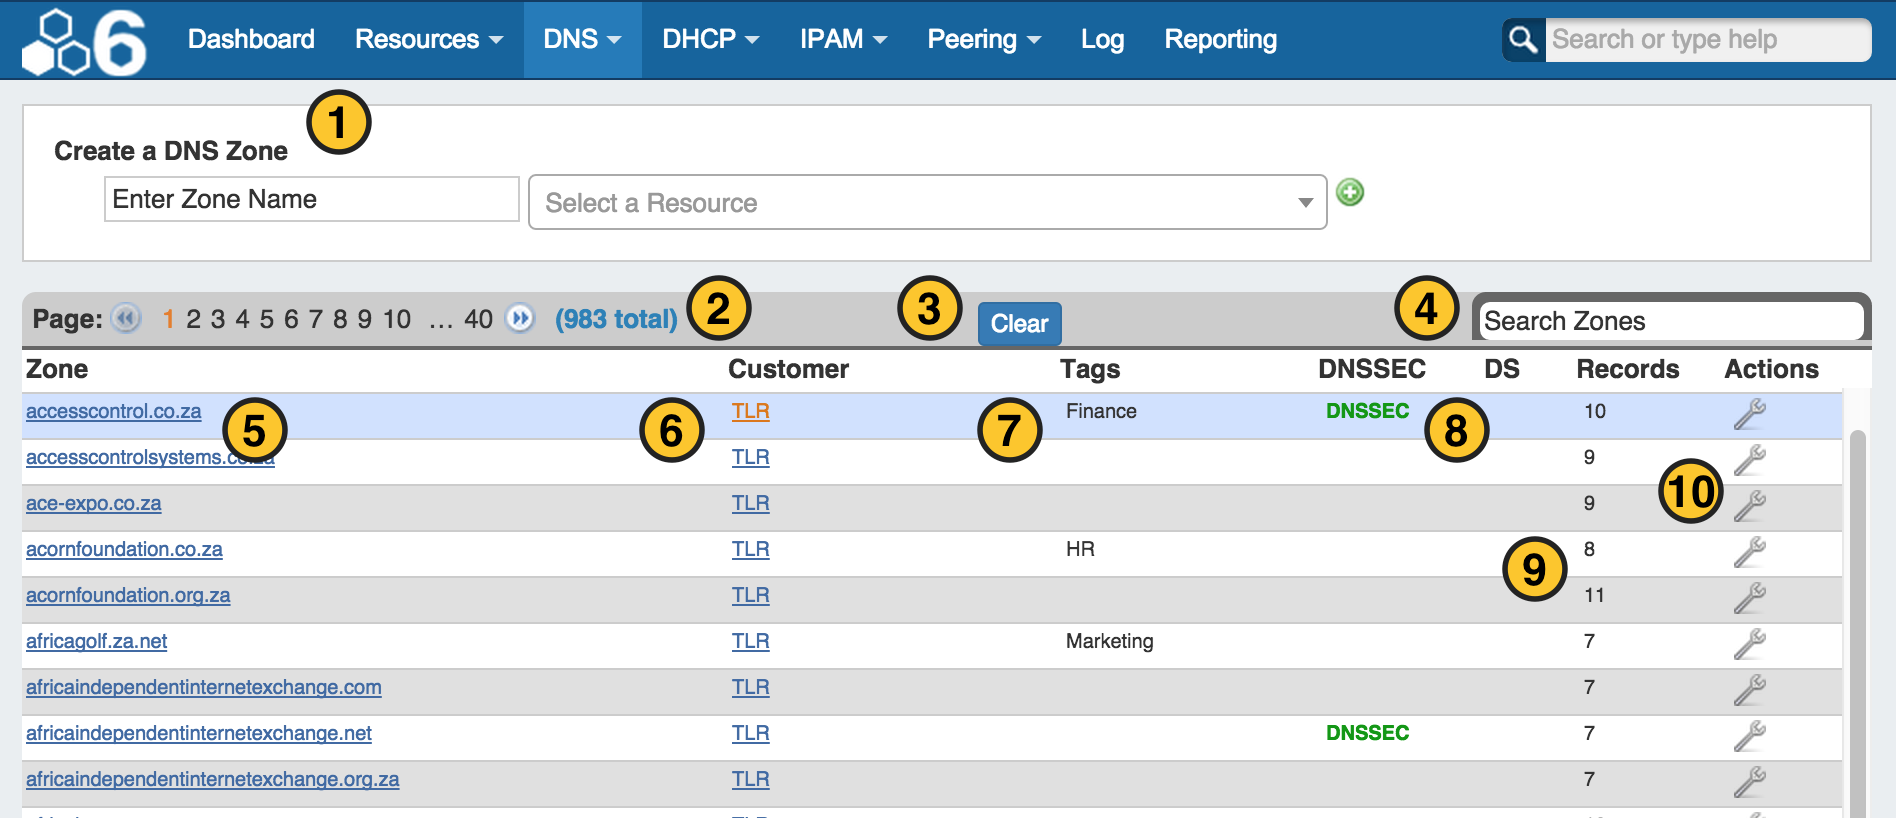
DNS Zone Action Menu
The Action menu provides a list of options that the user can select for any given zone.
1) Edit Tags: This allows to assign tag values to a zone for easier filtering.
2) View: Brings you to the View/Edit screen for the zone
3) Delete: Deletes the zone from ProVision and removes the entry in ProVision conf file on the remote server(s) (the user will also receive a prompt to confirm they wish to complete the action)
4) Delete & Push: Deleted the zone from ProVision, removes the entry in ProVision conf file on the remote server(s) AND deletes the individual zone file from the remote server(s) (the user will also receive a prompt to confirm they wish to complete the action)
5) Reassign: Brings up a screen to assign the zone to a new Resource
tab.
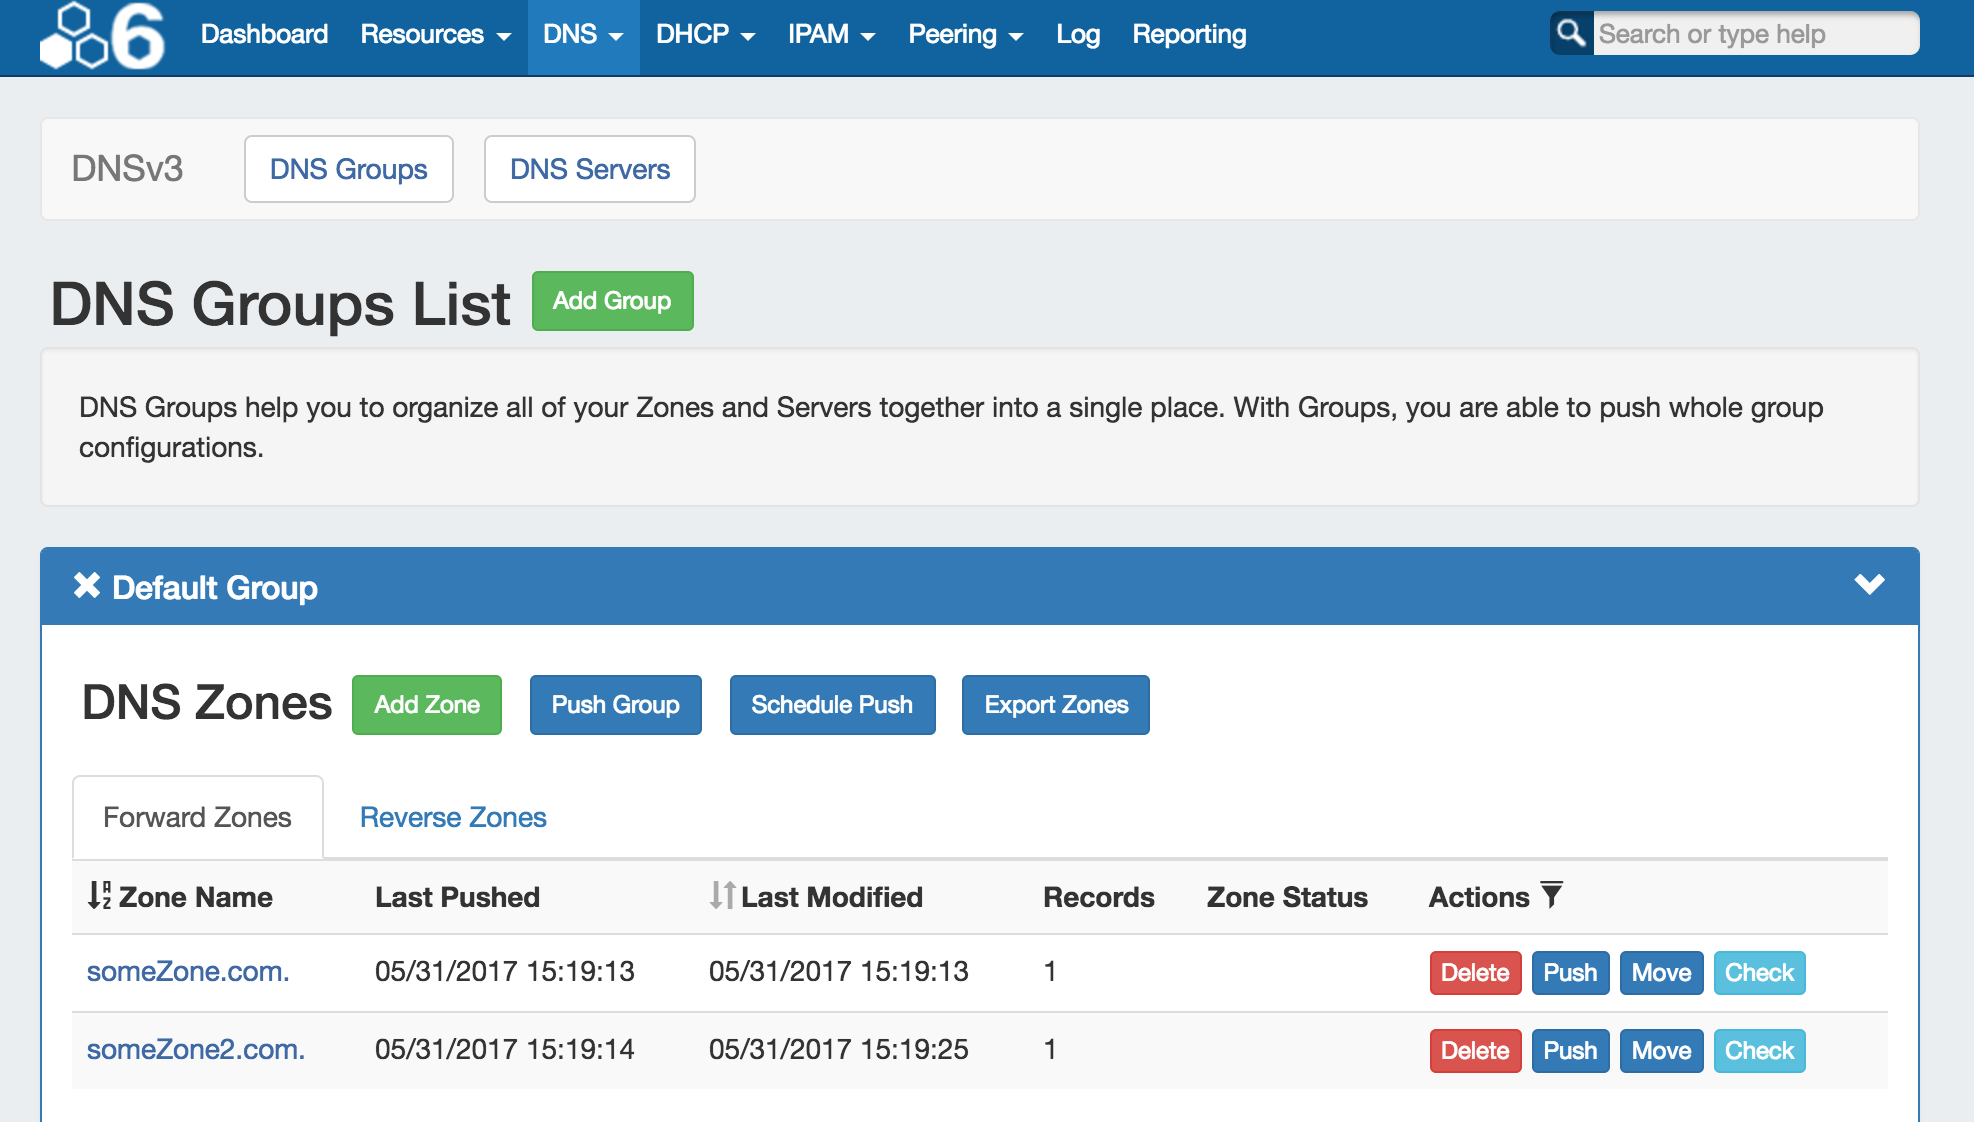
The DNS tab contains two sub-tabs: DNS Groups and DNS Servers.
The DNS Groups tab is where DNS Groups, zones, ACL's, and default SOA values are managed. The DNS tab Groups List allows you to create, view, and manage groups of DNS Servers and Zones. Using groups, you can configure and push selected combinations of zones at one time.
The DNS Servers tab is only accessible to Admin users, and contains functions for adding, updating, and managing DNS servers as well as scheduling server tasks. For Admin-level DSN tasks, see DNS Administration and Working with DNS Servers.
| Table of Contents |
|---|
DNSv3 Overview
DNSv3 reorganizes ProVision's DNS system into a more unified and accessible interface, combining both admin and non-admin DNS tasks together under the DNS tab.
In DNSv3, zones are gathered under DNS Groups, servers are attached to those Groups, and Nameservers, Default SOA values, and ACLs are managed at a per-Group level. Users can then view and manage Groups, individual zones, default SOA values, ACLs, attach servers, and perform pushes all on the same page.
DNSv3 Permissions
DNSv3 (6.0.0 release), restructures DNS to incorporate DNS zones and Groups into ProVision's Resource System. Zones and Groups are Resources just like Customers, Servers, Routers, or Contacts (See Resource Concepts for a more detailed explanation of Resources in ProVision).
This allows for DNS zones and Group permissions to be managed similarly to other ProVision resources, where users with Resource permissions (Create / Read / Update / Delete) on the parent resource of the DNS Group can create groups and zones, manage those groups and zones, push (if a server is attached), and delete.
A user with full Resource permissions on a DNS Server, as well as the parent resource of a Group, may view and attach that server to a Group.
Users with Admin permissions can access the DNS Servers area under the DNS tab manage DNS server creation, edits, and deletion.
For more information on setting up permissions groups in ProVision, see Users & Permissions.
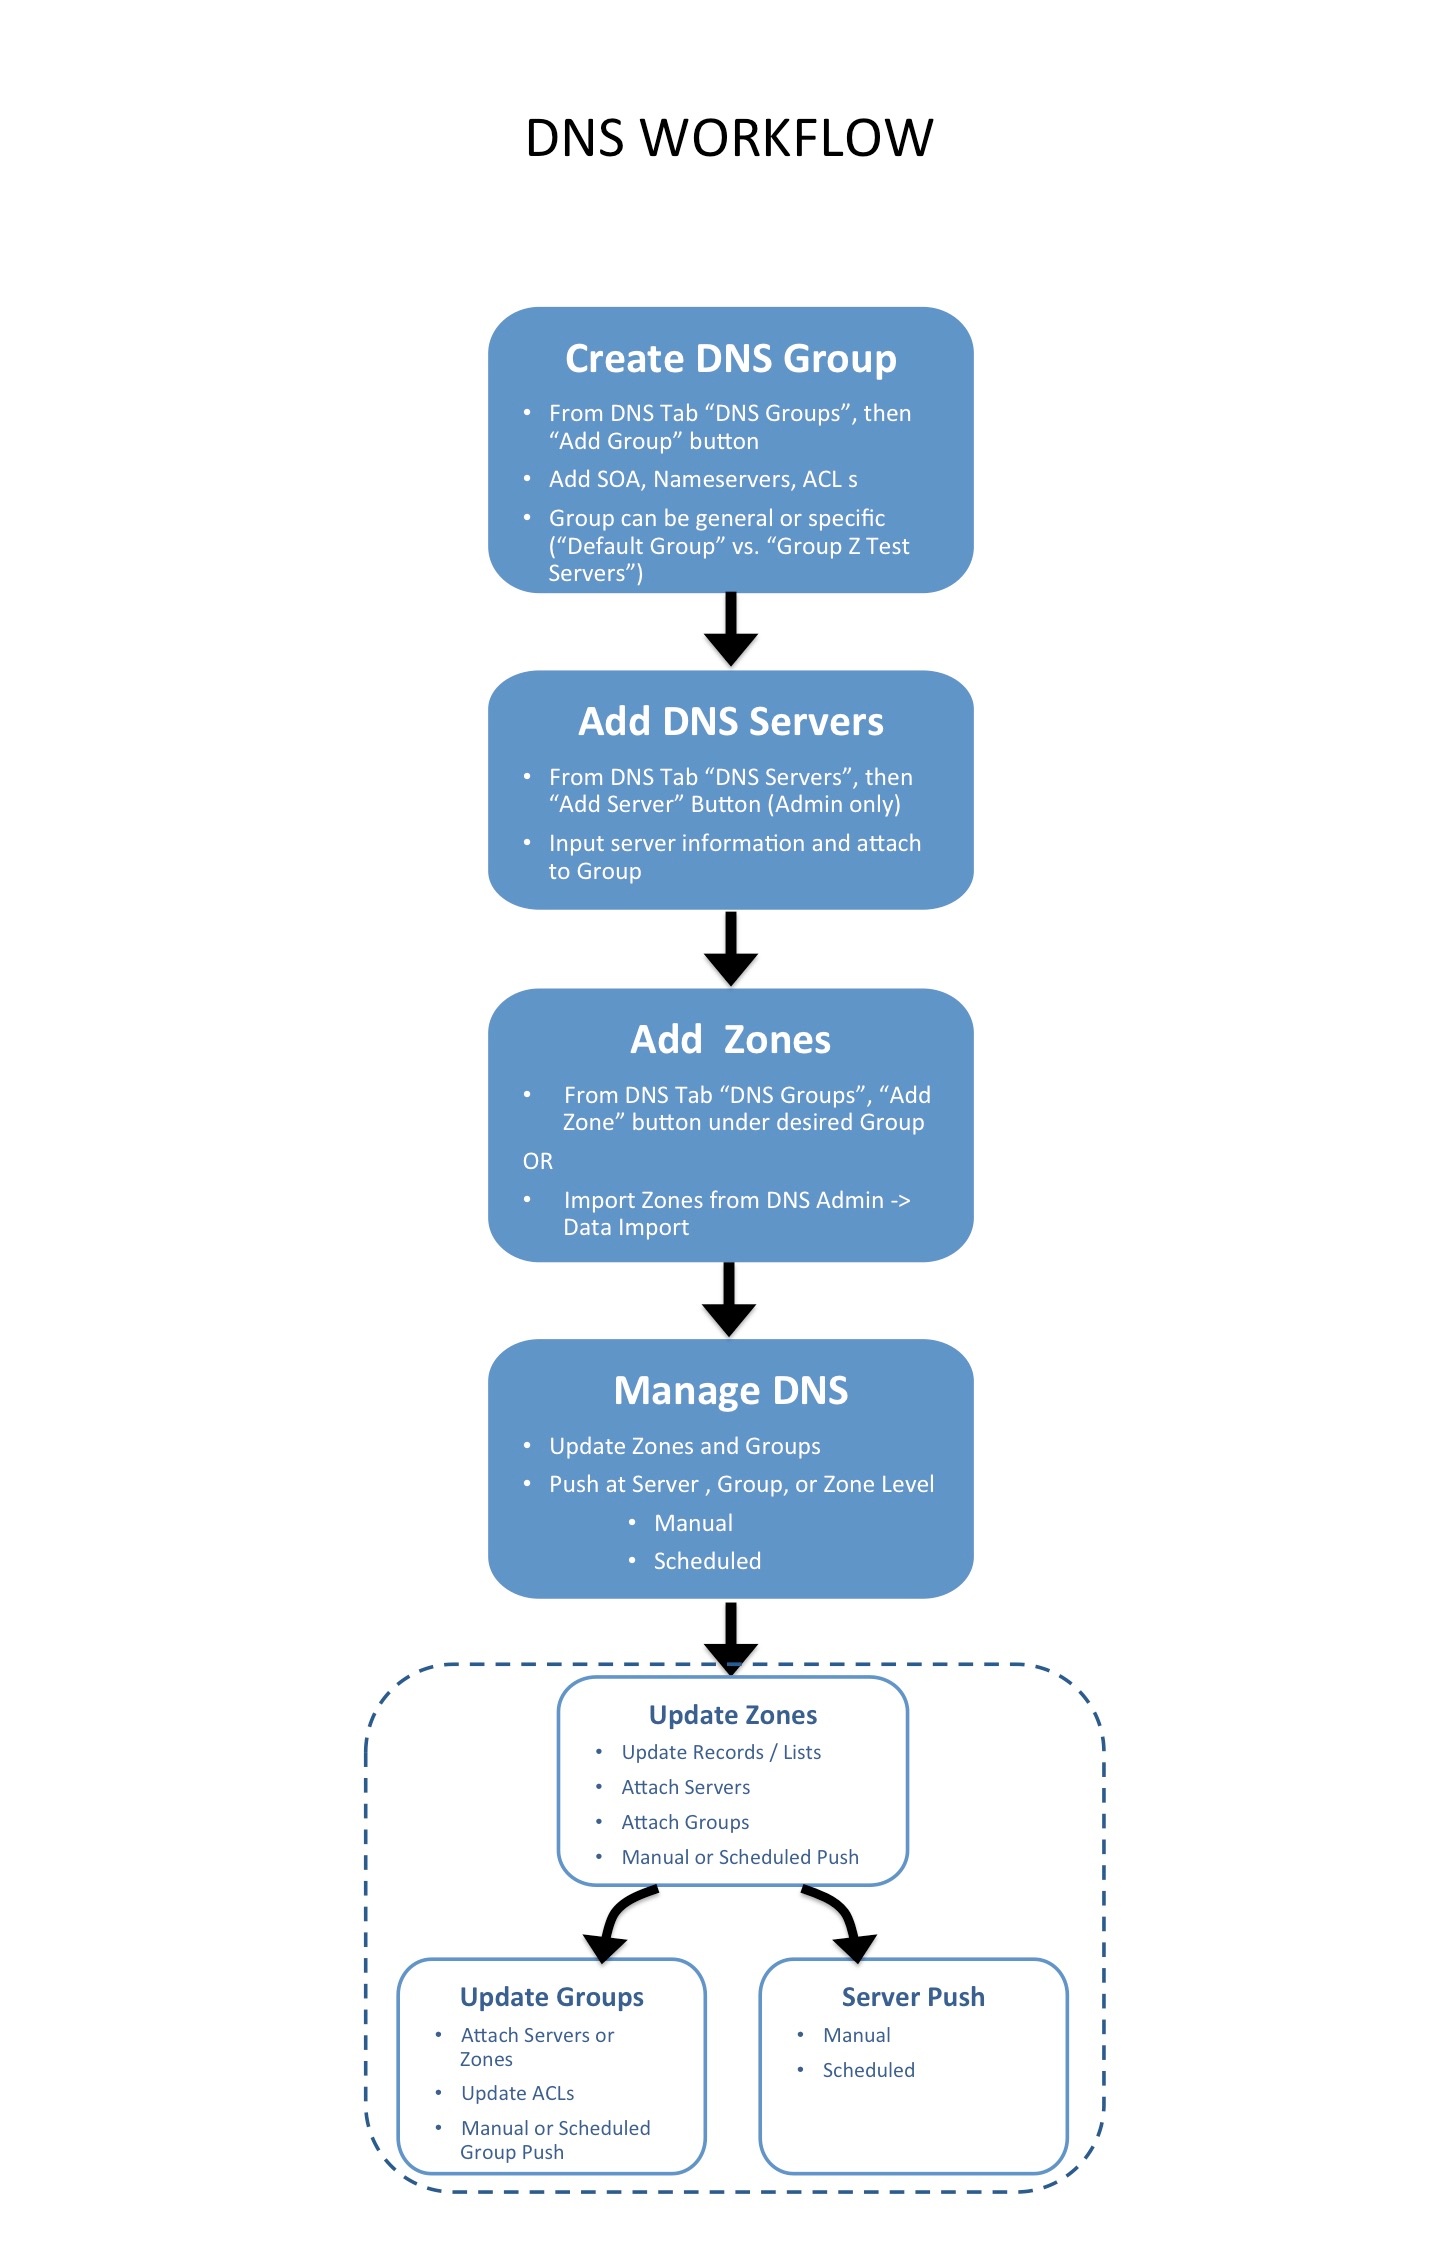
DNSv3 Workflow
DNSv3 revolves around Groups. Zones are gathered under Groups, servers attached to Groups, and pushes may be done on a per Group level. Thus, the first workflow step in DNSv3 is to set up one or more DNS Groups. A "Default Group" is automatically provided in ProVision, but other Groups may be desired to organize zones and default values.
To create a new DNS Group, click the "Add Group" button from the DNS Groups tab. Enter the desired default values for the Group, and save. If only using the Default Group, ensure the default parameter values are set as needed. For more information, see Working with DNS Groups.
After Groups have been set up, DNS servers should be added or settings verified. Admin users may add DNS servers from the DNS Servers tab "Add Server" button. Input the server information and save. Existing servers may be reviewed and edited by clicking on the server name in the DNS Server List. Once a server is created in ProVision, it may be attached to any DNS Group under the Group's "Attached Servers" module. Attaching a server to a Group will allow for zones in that group to be pushed to the attached server(s). See Working with DNS Servers.
Next, add zones to your groups. Zones may be manually added under each group by clicking the "Add Zone" button, or it may be imported via DNS Importers into a selected Group. Add the zone and record information, and save. See Working with DNS Zones - Common Tasks for additional information.
Zones may be only exist once per Group, but may be duplicated under multiple Groups. Zones may also be moved from Group to Group as needed.
At this point, all major components of the ProVision DNS system have been added - from here management tasks take over. Zones may be updated and moved to or from Groups; Groups may be edited with different default values or servers, and pushes maybe be performed for an individual zone, a full Group, or for an entire server. Pushes may be manual or scheduled for a future time through the Scheduler.
 6) Log: Brings the user to the Log Tab with the results filtered for the specific zone
Additional Information
| Children Display |
|---|