...
Peering Templates allow users to create their own reusable session configuration files. When the default ProVision session configuration template doesn't do everything required for your specific use case, you can create your own template that does. Revisions to Peering Templates are tracked, and a template may be reverted to a previous version at any time.
| Expand | ||
|---|---|---|
| ||
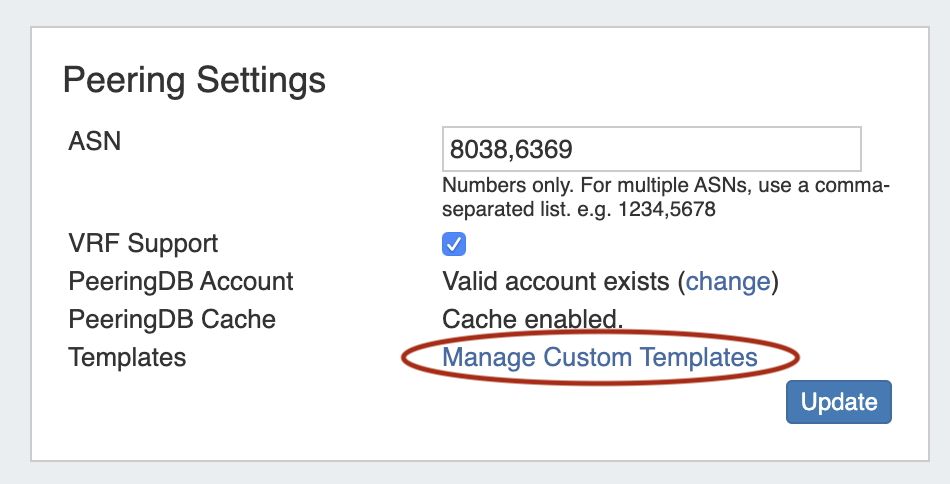
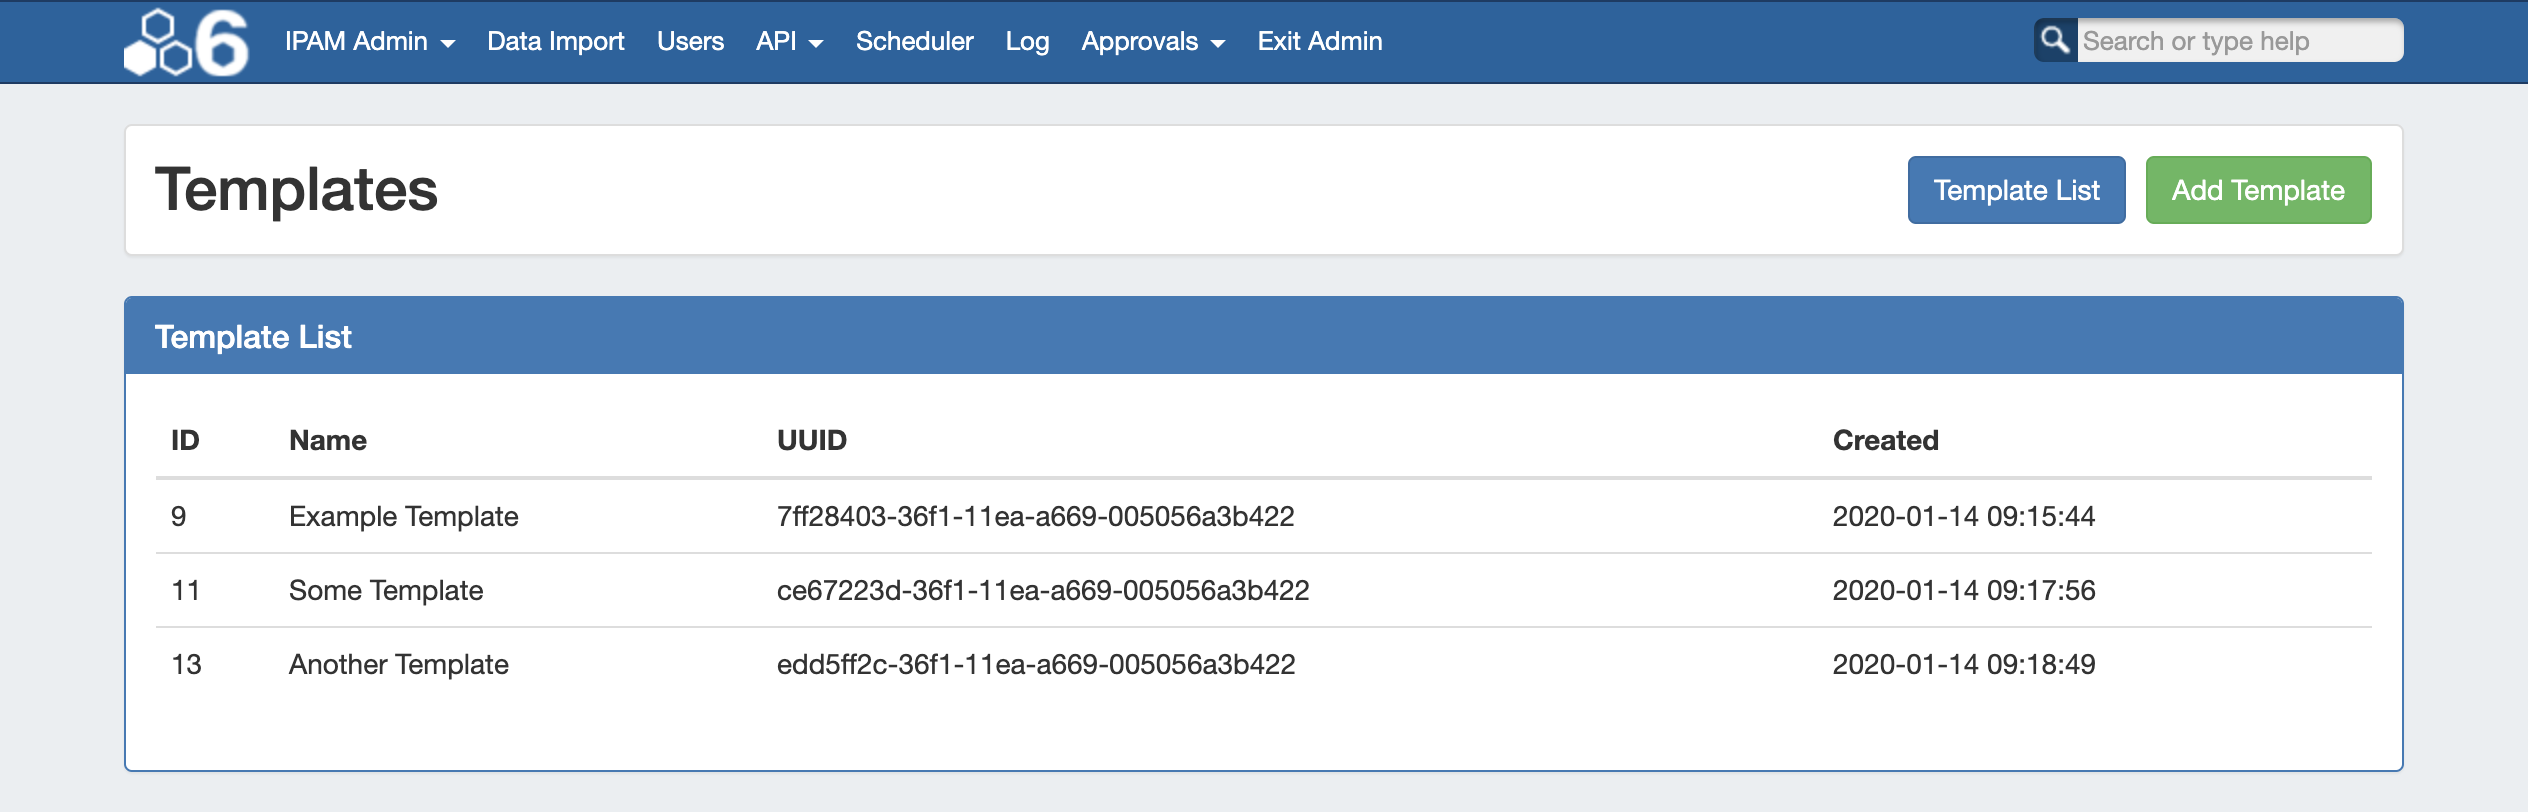
Viewing TemplatesView the Template List by navigating to the Admin Preferences page, in the Admin area of ProVision. From there, scroll to the Peering Settings section. Next to "Templates", click "Manage Custom Templates".
The Template List will open, displaying all existing Peering Templates.
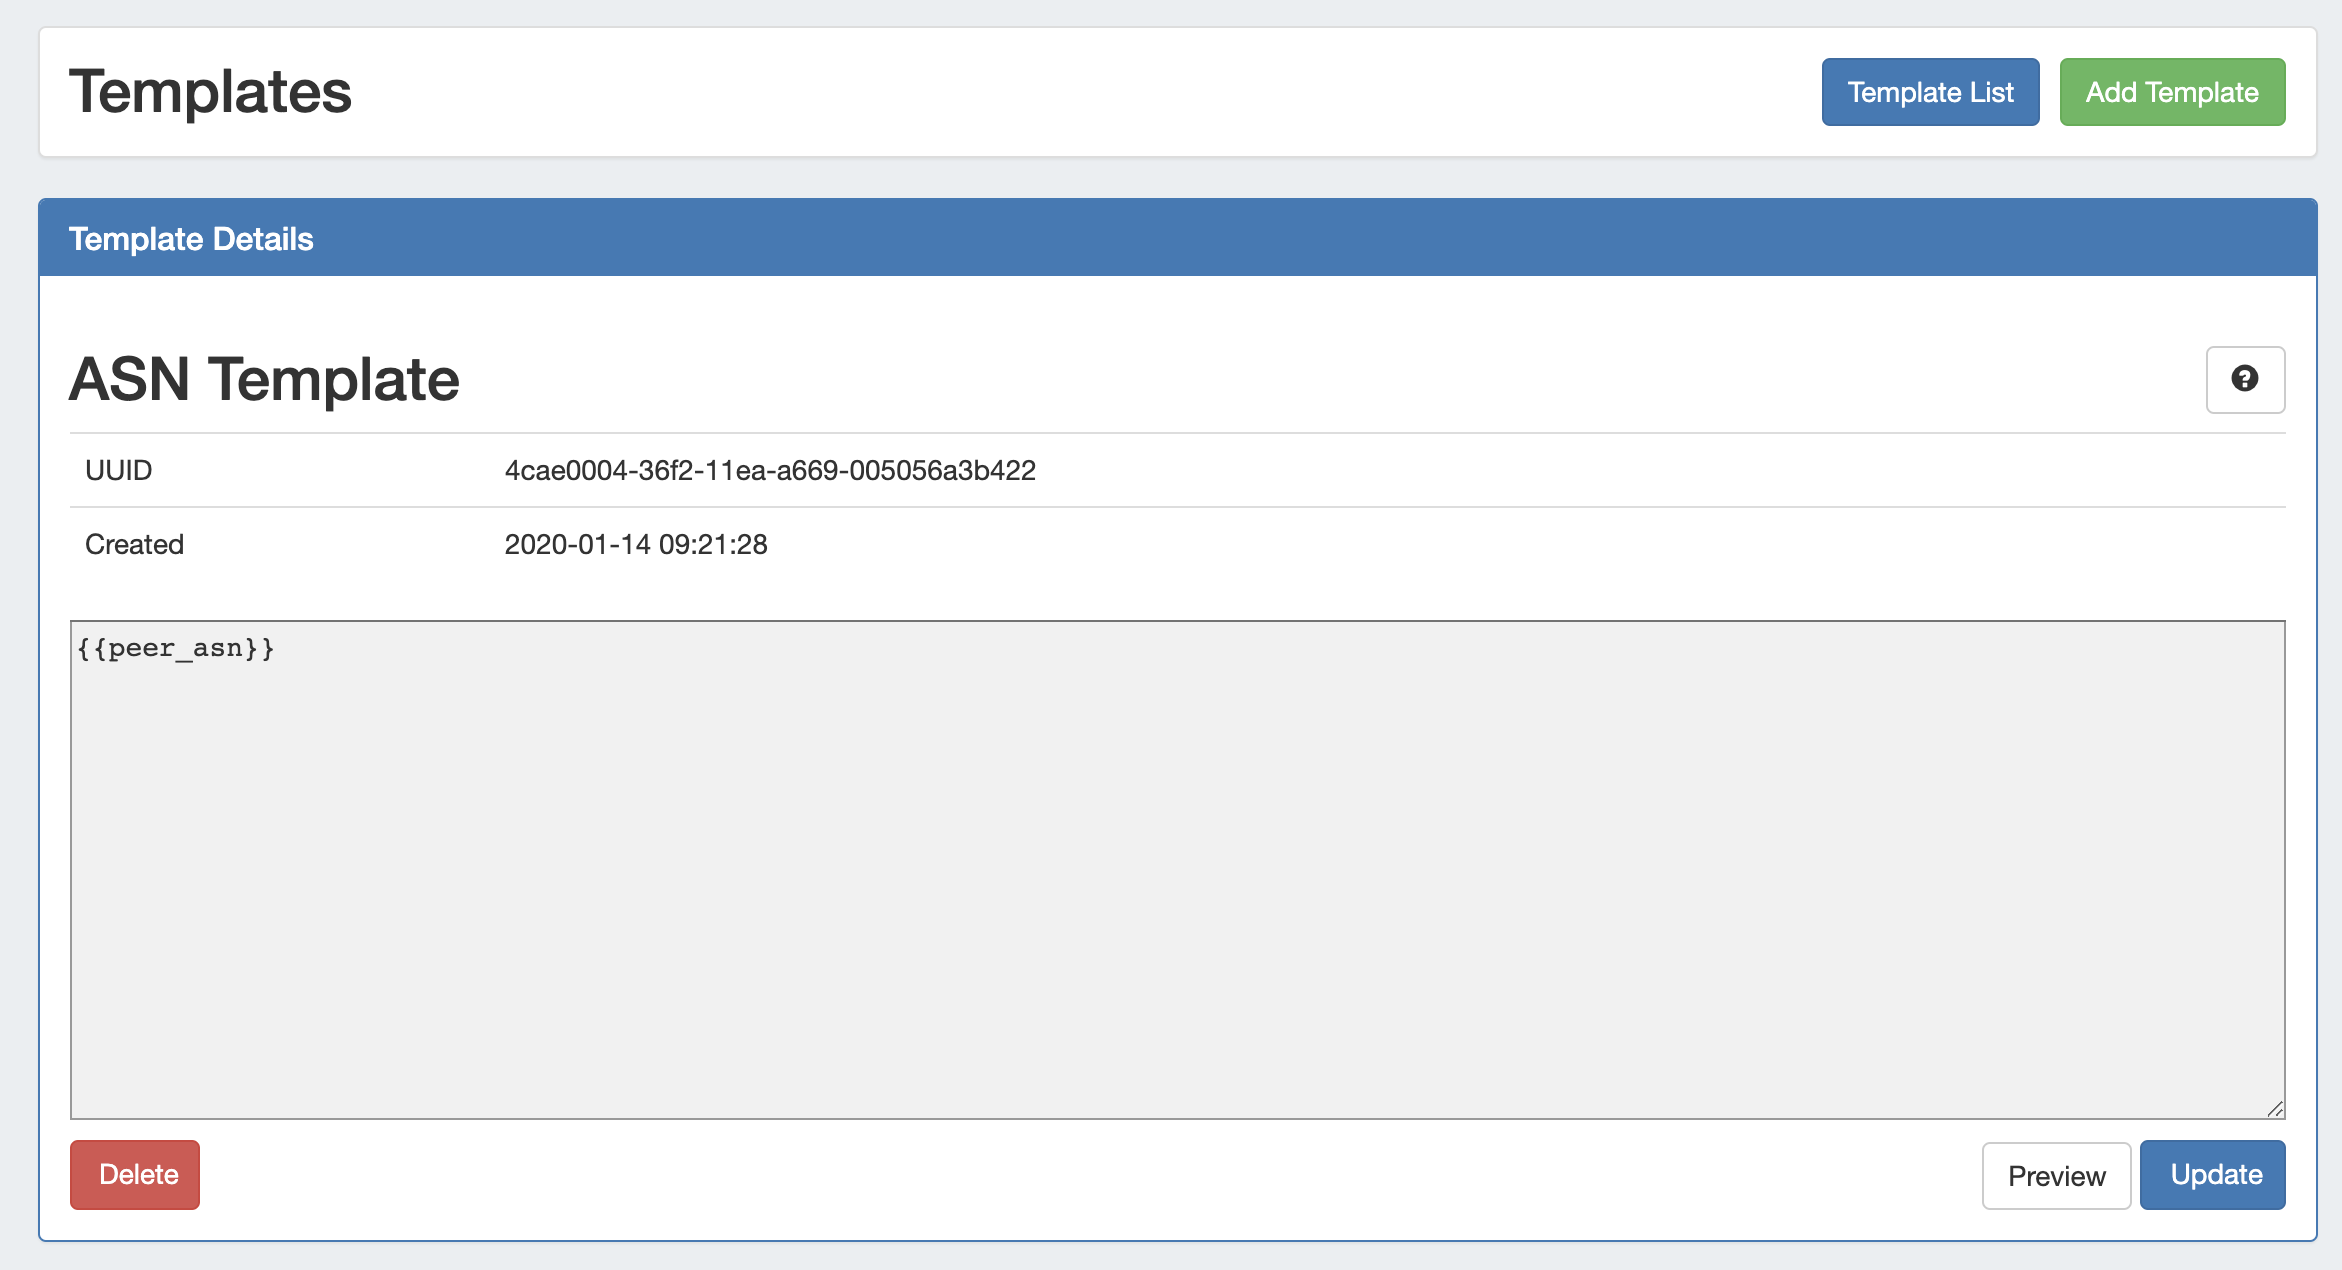
Click on any template to open Template Details, where you can edit, delete, or preview the template.
|
...
For additional information, see Import Peering Sessions, or expand the link below.
Improved Peering Import / Peering DB Coordination
IM - 3290: Improved peering import to suggest Peer Names that match PeeringDB for existing sessions.
If the ASN of a session belongs to a Peer which is in PeeringDB, that name is now suggested as the name to use when importing the session.
Peering Cache Check
IM - 3470: Added a PeeringDB cache status check to Admin Preferences → Peering Settings
Peering Settings now displays a status notification to show whether Peering DB cache is enabled or disabled.
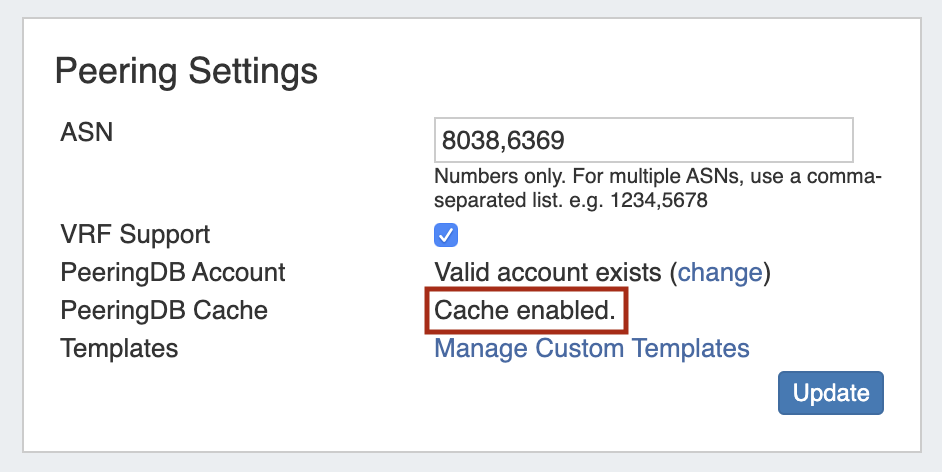
For additional information, see link here.
Resource Export to .csv
IM - 3324: Added the ability to export a Resource's field information to .csv
Resource Entry pages now have an "Export As CSV" button, which generates a .csv file containing the Resource's basic field information.
To export the Resource, click the "Export as CSV" button in the header on the Resource Entry Page.

The downloaded .csv file will contain the fields containing values from the Resource Info, Contact Info, Tech Info, and Resource Field Gadget(s), with the field name in the first column, and the field values in the second column.
Resource Linkage Gadget Updates
IM / CFR - 156: Added "Export to .csv" option for linked resources
The Resource Linkage Gadget → Action Menu (wrench icon) now includes an option to export resource field information for the linked resource(s).
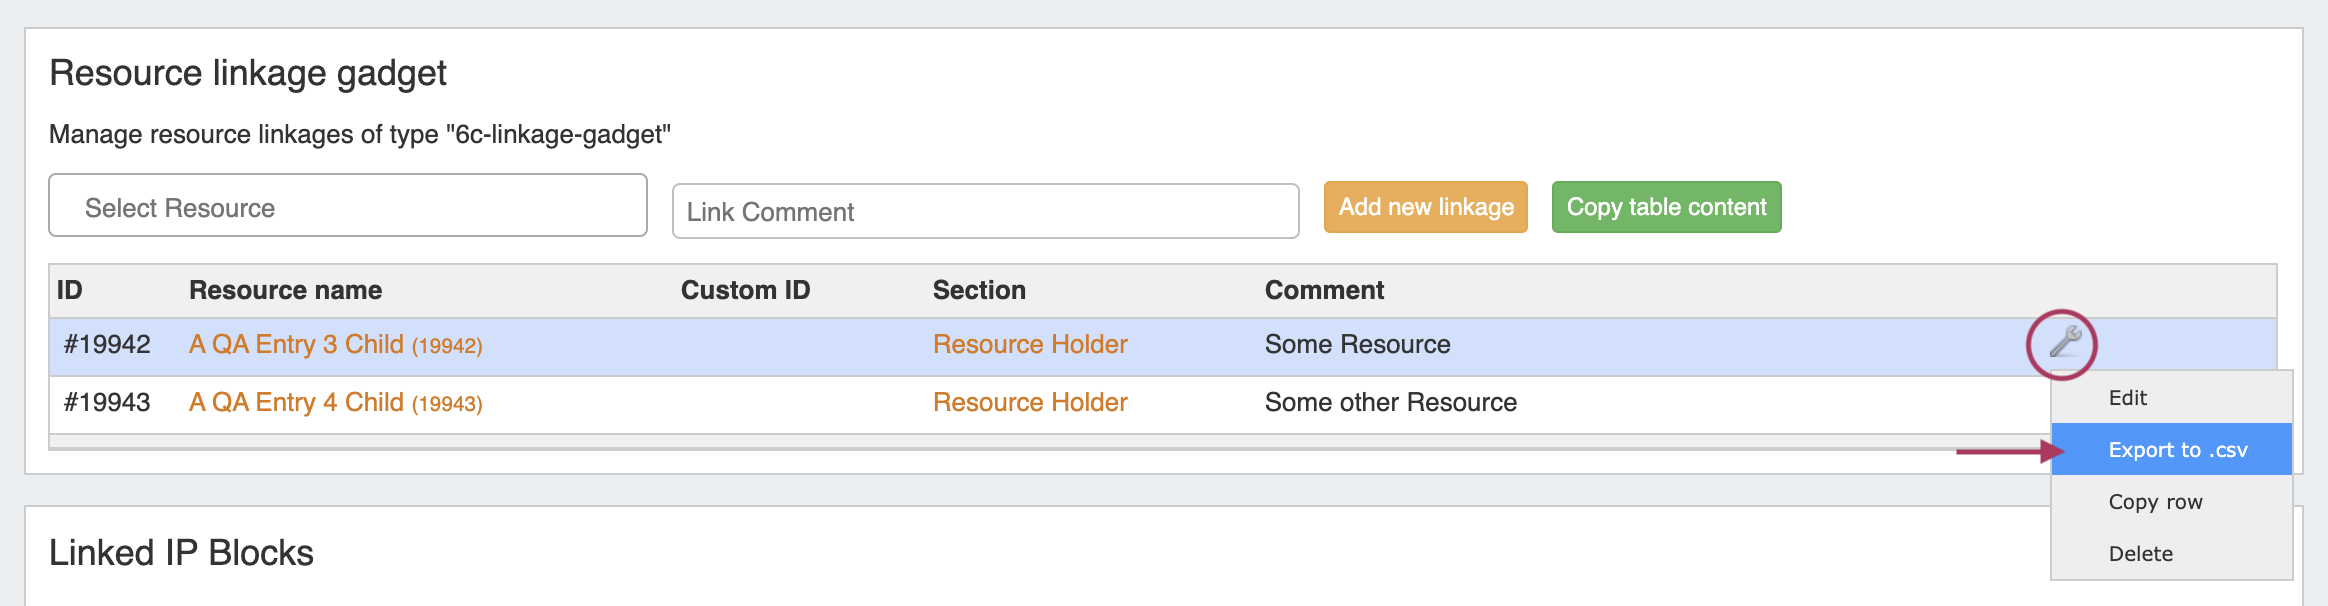
To export .csv information for the linked resource, click on the wrench icon for the desired resource, then select "Export to .csv".
A .csv file will download, containing resource metadata and available resource field data.
For additional information on adding fields to Sections, the Resource Field Gadget, and the Resource Linkage Gadget, see: Customizing Sections , Customizing Fields, and Gadgets.
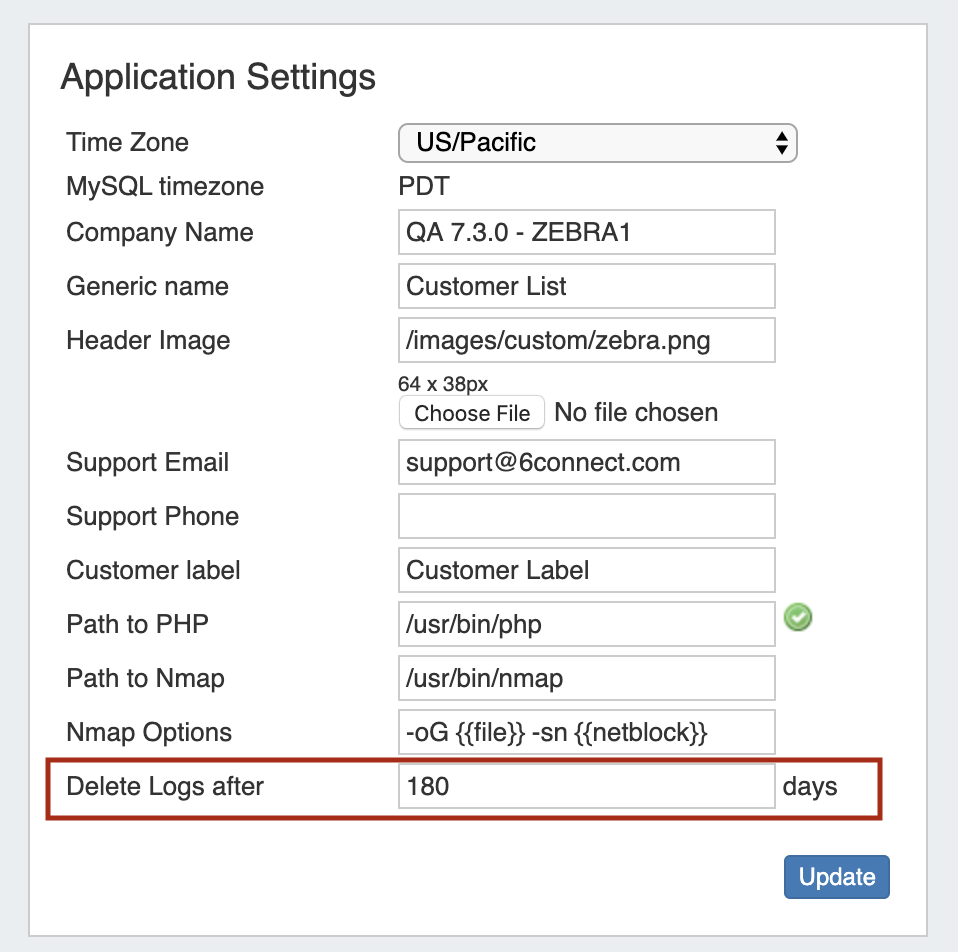
Log Rotation (Admin Settings / Scheduler Task)
CFR - 127 / IM - 3469: Added automatic log rotation
The Admin Preferences page now contains an option under Application Settings to "Delete Logs after X days". By default, this field is set to 180 days.
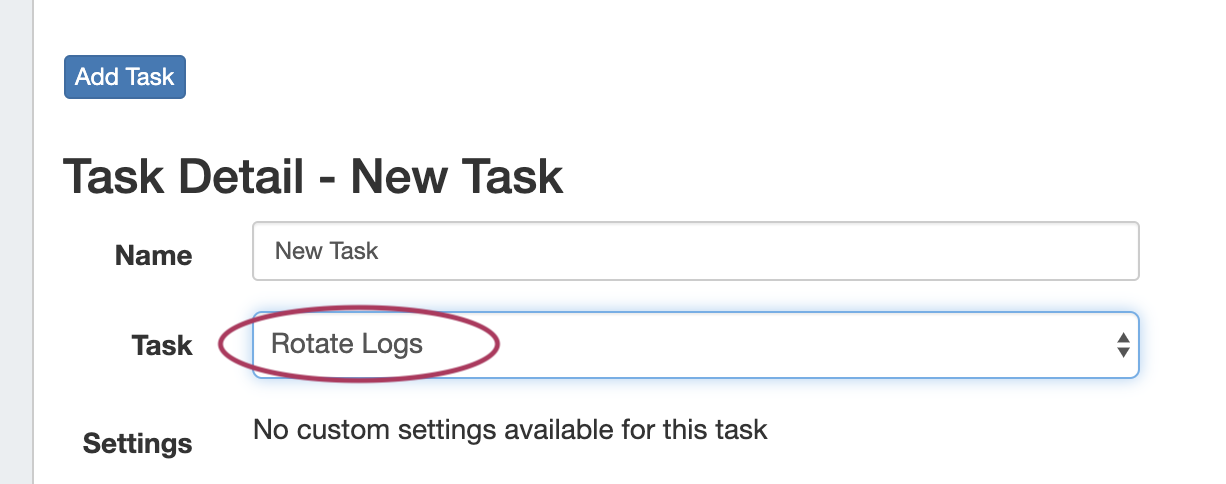
To support this, a new default Scheduled Task has been added - "Rotate Logs" - that removes all logs older than the number of days set (default is 180 days).
For additional information on how to edit Admin Preferences or Scheduler Tasks, see Admin Preferences and Scheduler Tab.
ACP Improvements
For detailed information on 6connect ACP (API Composer Platform), see ACP Overview Documentation or request a demo at info@6connect.com.
Admin ACP Settings
IM - 3472: Added ACP Instance Settings to Admin Preferences
Admin → Admin Preferences has been updated to include a section for ACP Settings. Users may enter the URL for an ACP instance and associated login credentials.
Once settings have been entered, the ACP Workflow Form Gadget will load the available Workflows from that instance/provided user.
ACP Workflow Form Gadget Updates
IM - 3473: Updated the ACP Workflow Form Gadget to integrate with Admin ACP Settings, updated ui, and added a JSON Response option
...
| Expand | |||
|---|---|---|---|
| |||
Using Router File ConnectorsStep 1Generate a router response data text file (it should be named “cisco_router_data.txt”, “juniper_router_data.txt” or “arista_router_data.txt”) and place it in ProVision's /data directory. To generate the router response, run the following commands:
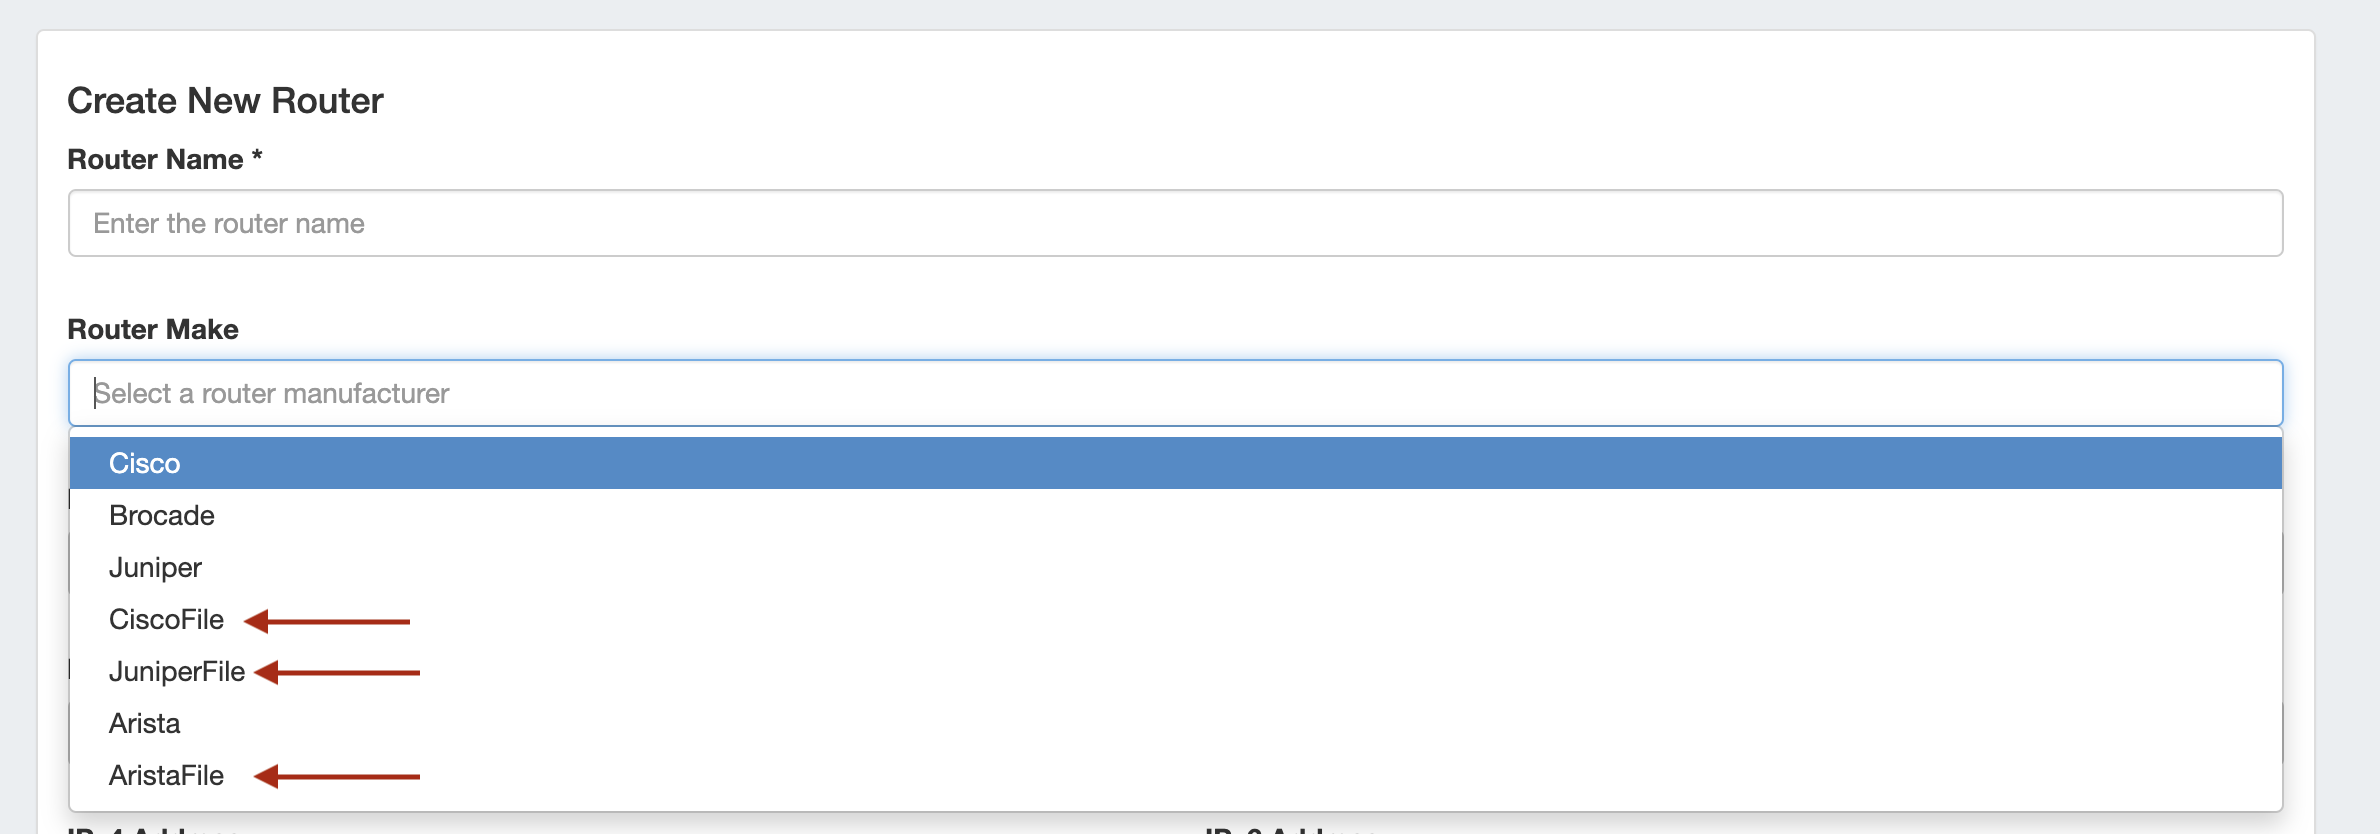
Step 2Create a new 'Router' in ProVision, selecting the appropriate file connector as the Router Make type - CiscoFile, JuniperFile, or AristaFile.
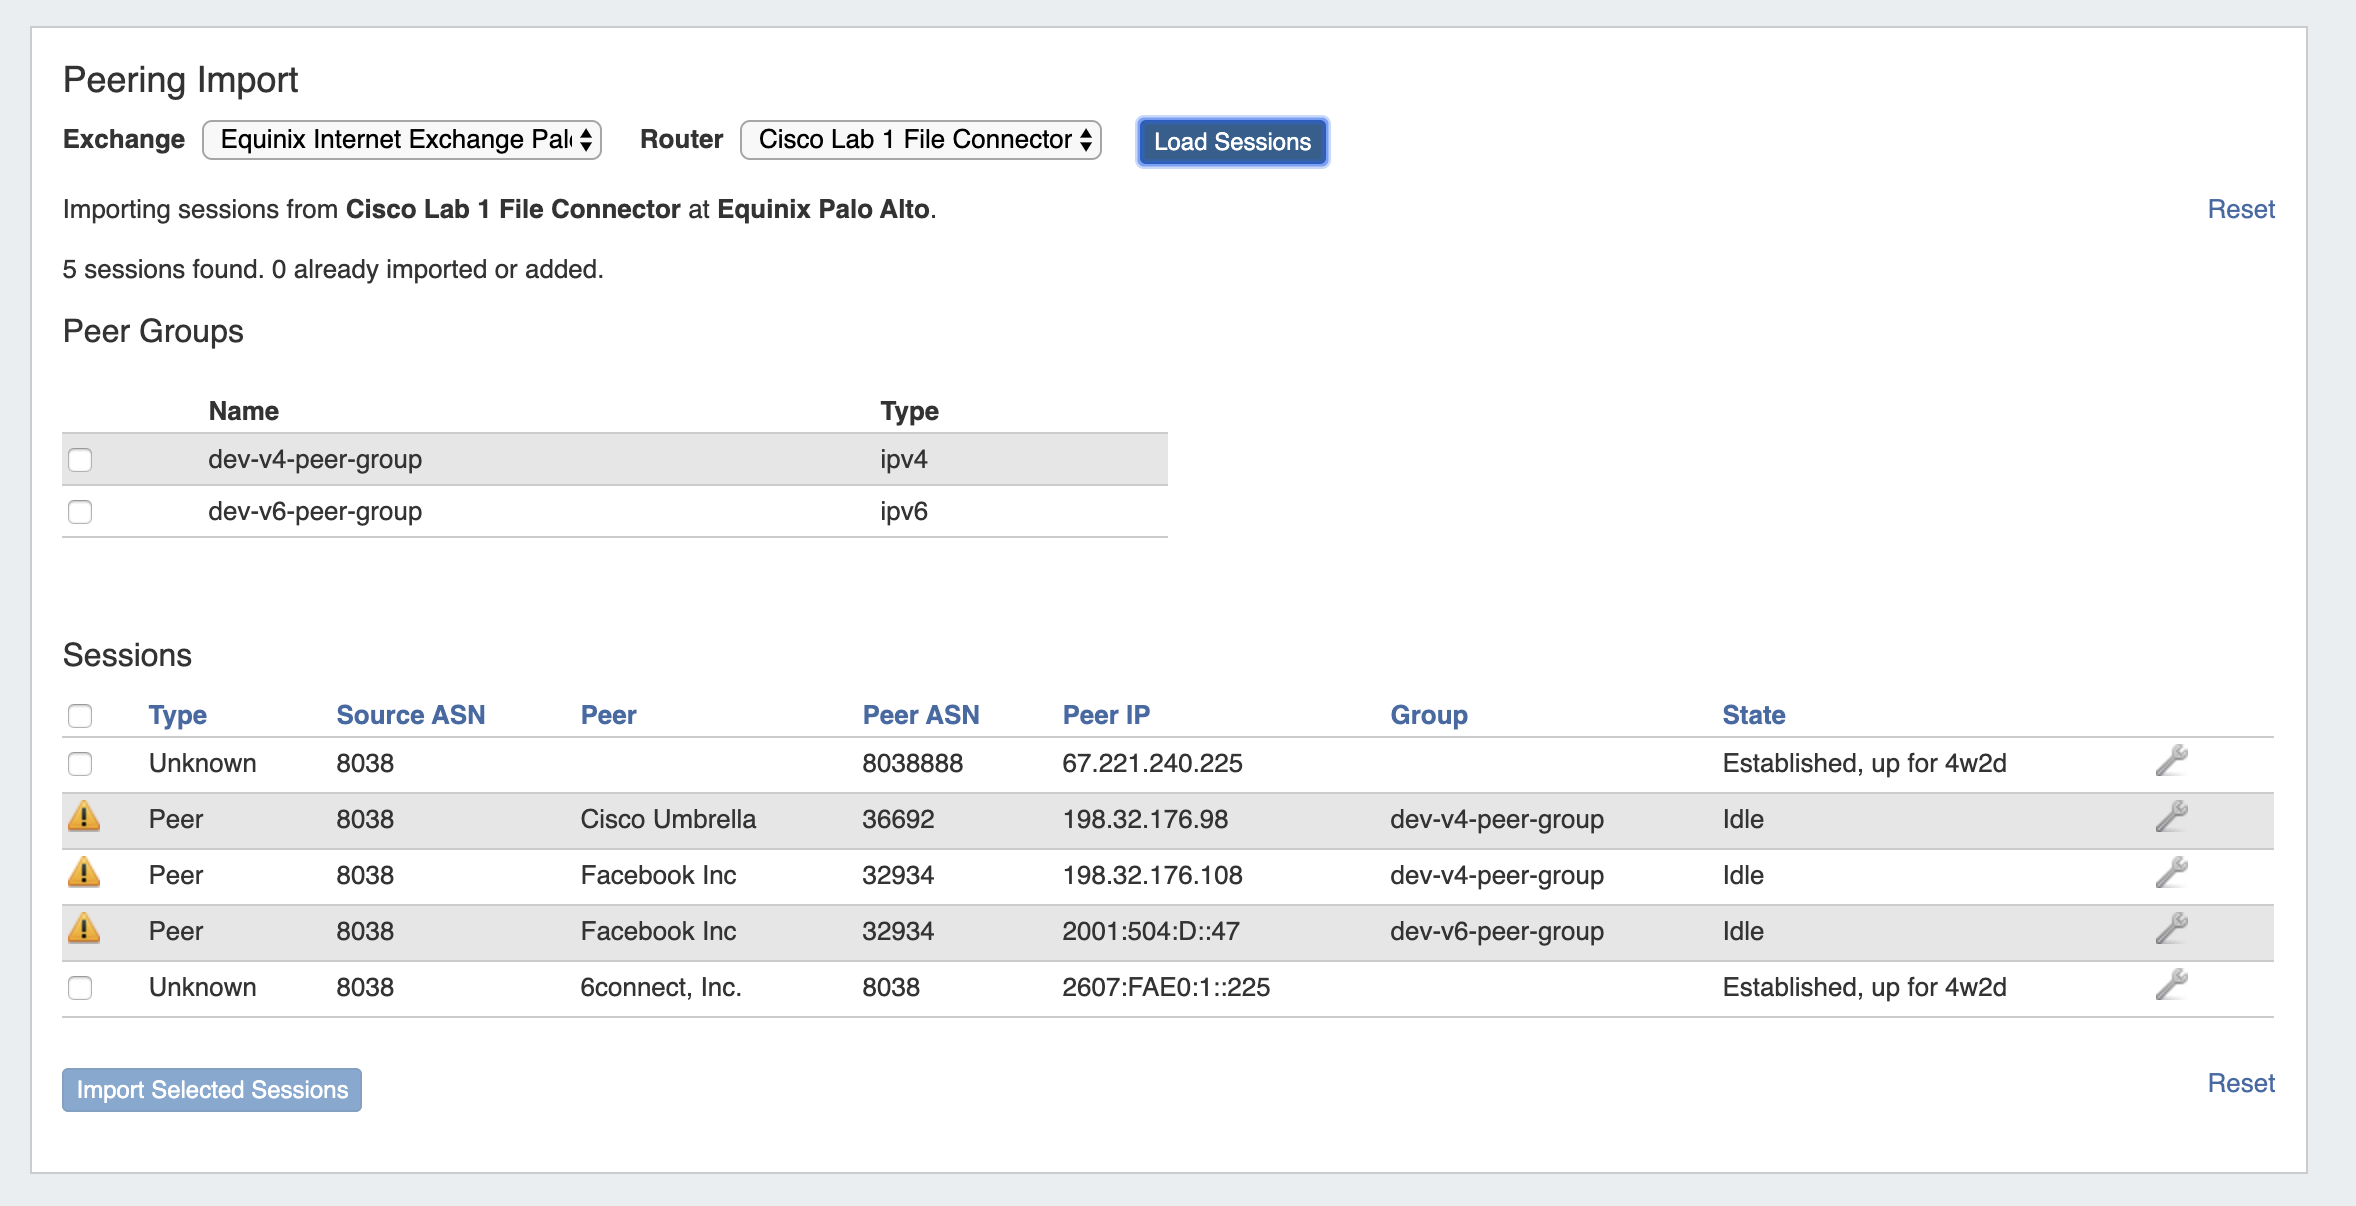
Note: These connector types are only used for this direct data import process - do not select these for standard ProVision router/session creation, as management functions (config pushes, session states, etc) do not obtain a router connection while using File Connectors. Step 3Navigate to Admin → Data Import → Peering BGP Import. Select the appropriate exchange, then the File Connector Router that you created.
Click "Load Sessions", and the sessions contained within the router data file will be available to review, select, and/or import into ProVision.
Via APIv2The same import process may also be performed via APIv2, using the following information: 1) "router id" contained within the URL for an already-created File Connector Router 2) "ix_id" (the ID of the exchange) in the body 3) "router_response" (the output from the router) in the body The APIv2 details can be view from ProVision swagger documentation at ['instance']/dev/swagger/spec.php?family=peering#/default/single_parse_bgp_info That command will parse the router output and return an array of detected sessions and groups. The sessions and groups then need to be individually added using POST /peering/sessions and POST /peering/peergroups. |

Improved Peering Import / Peering DB Coordination
IM - 3290: Improved peering import to suggest Peer Names that match PeeringDB for existing sessions.
If the ASN of a session belongs to a Peer which is in PeeringDB, that name is now suggested as the name to use when importing the session.
Peering Cache Check
IM - 3470: Added a PeeringDB cache status check to Admin Preferences → Peering Settings
Peering Settings now displays a status notification to show whether Peering DB cache is enabled or disabled.
For additional information, see link here.
Resource Export to .csv
IM - 3324: Added the ability to export a Resource's field information to .csv
Resource Entry pages now have an "Export As CSV" button, which generates a .csv file containing the Resource's basic field information.
To export the Resource, click the "Export as CSV" button in the header on the Resource Entry Page.
The downloaded .csv file will contain the fields containing values from the Resource Info, Contact Info, Tech Info, and Resource Field Gadget(s), with the field name in the first column, and the field values in the second column.
Resource Linkage Gadget Updates
IM / CFR - 156: Added "Export to .csv" option for linked resources
The Resource Linkage Gadget → Action Menu (wrench icon) now includes an option to export resource field information for the linked resource(s).
To export .csv information for the linked resource, click on the wrench icon for the desired resource, then select "Export to .csv".
A .csv file will download, containing resource metadata and available resource field data.
| Expand | ||||||||||||||||||||||||
|---|---|---|---|---|---|---|---|---|---|---|---|---|---|---|---|---|---|---|---|---|---|---|---|---|
| ||||||||||||||||||||||||
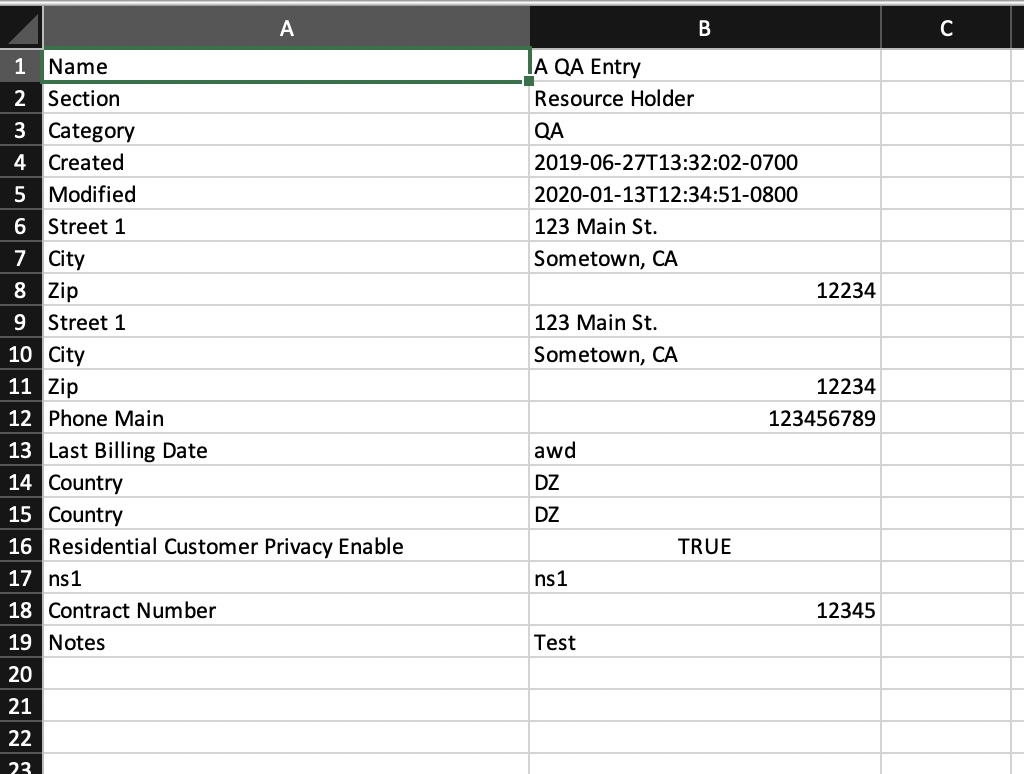
Example .csv OutputTo export .csv information for the linked resource in the Resource Linkage Gadget, click on the wrench icon for the linked resource, then select "Export to .csv". The file will download from your browser. The .csv outputs data in two columns, arranged as Field Name (column 1) and Field Data (column 2). Standard resource metadata fields ("Name", "Section","Category", "Created", "Modified") will always be exported for a resource. Additional custom fields - those that have been added to the Section / Resource Field Gadget and contain data - will also be exported if they exist, and included after the standard metadata information. In this example, "Hostname", "Resource Holder ID", "Contract Number", "URL", "Text Area", "Text Input", and "Status" are custom fields.
|
For additional information on adding fields to Sections, the Resource Field Gadget, and the Resource Linkage Gadget, see: Customizing Sections , Customizing Fields, and Gadgets.
Log Rotation (Admin Settings / Scheduler Task)
CFR - 127 / IM - 3469: Added automatic log rotation
The Admin Preferences page now contains an option under Application Settings to "Delete Logs after X days". By default, this field is set to 180 days.
To support this, a new default Scheduled Task has been added - "Rotate Logs" - that removes all logs older than the number of days set (default is 180 days).
For additional information on how to edit Admin Preferences or Scheduler Tasks, see Admin Preferences and Scheduler Tab.
ACP Improvements
For detailed information on 6connect ACP (API Composer Platform), see ACP Overview Documentation or request a demo at info@6connect.com.
Admin ACP Settings
IM - 3472: Added ACP Instance Settings to Admin Preferences
Admin → Admin Preferences has been updated to include a section for ACP Settings. Users may enter the URL for an ACP instance and associated login credentials.
Once settings have been entered, the ACP Workflow Form Gadget will load the available Workflows from that instance/provided user.
ACP Workflow Form Gadget Updates
IM - 3473: Updated the ACP Workflow Form Gadget to integrate with Admin ACP Settings, updated ui, and added a JSON Response option
The ACP Workflow Form has been updated to automatically integrate with and load the workflows available for the instance/user specified in Admin ACP Settings. Additionally, the option "Display JSON Response" has been added to the form, along with minor ui improvements.
| Expand | ||
|---|---|---|
| ||
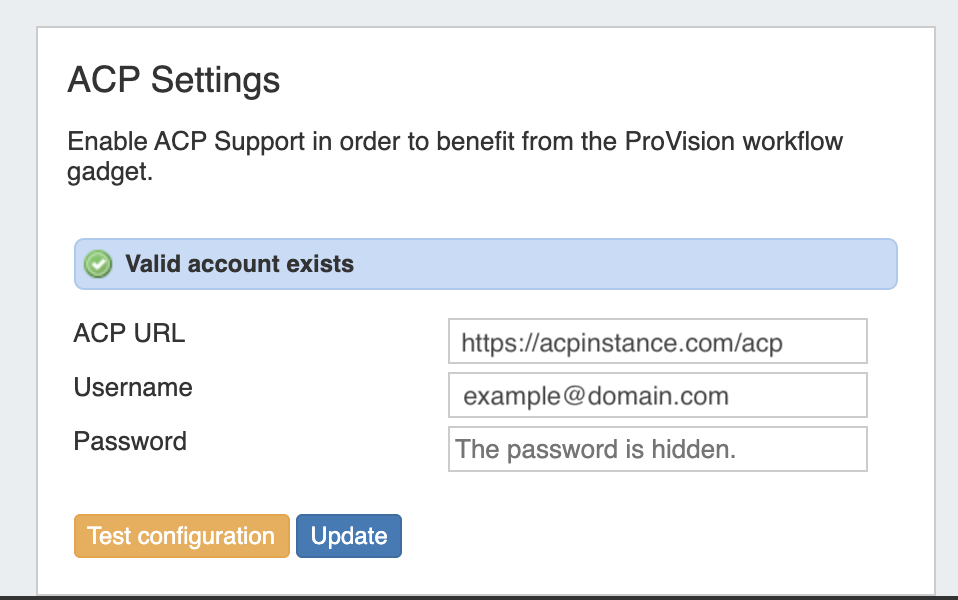
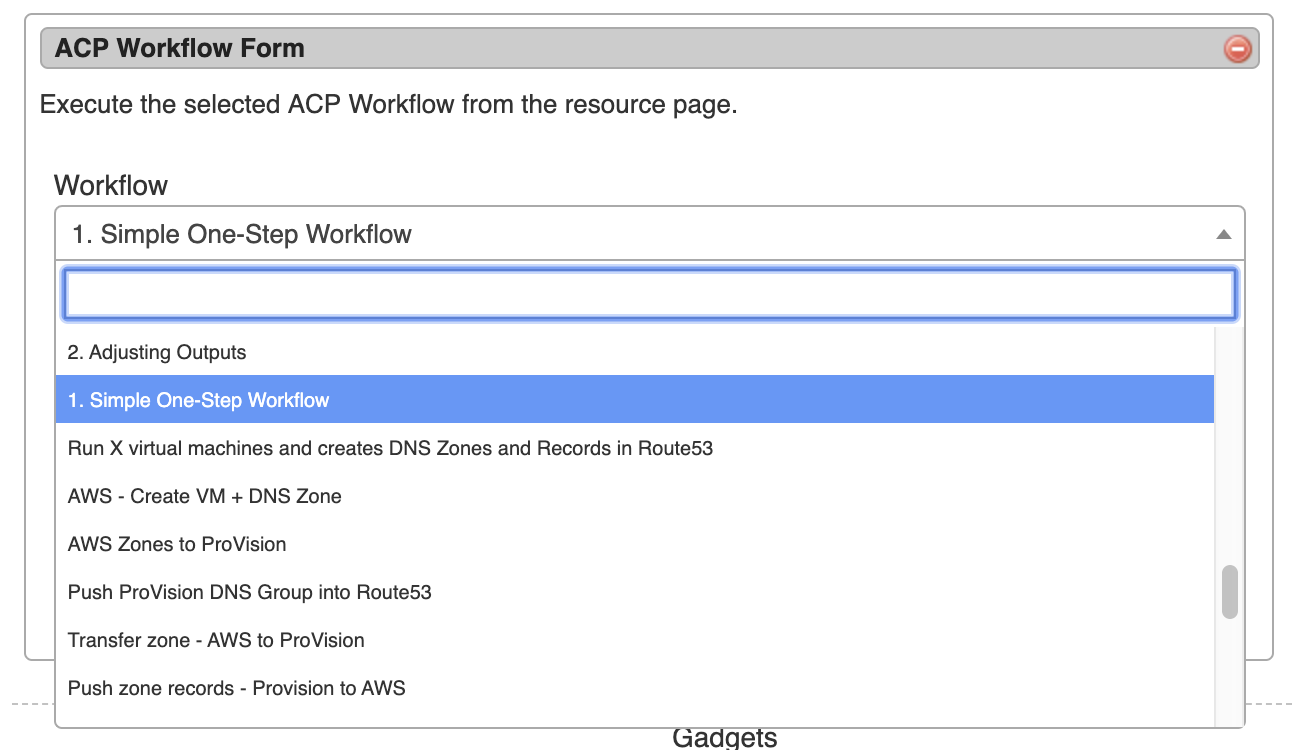
Setting up ACP Access in ProVision Before using the ACP Workflow Gadget, you must set the ACP URL and user credentials in Admin → Admin Preferences.
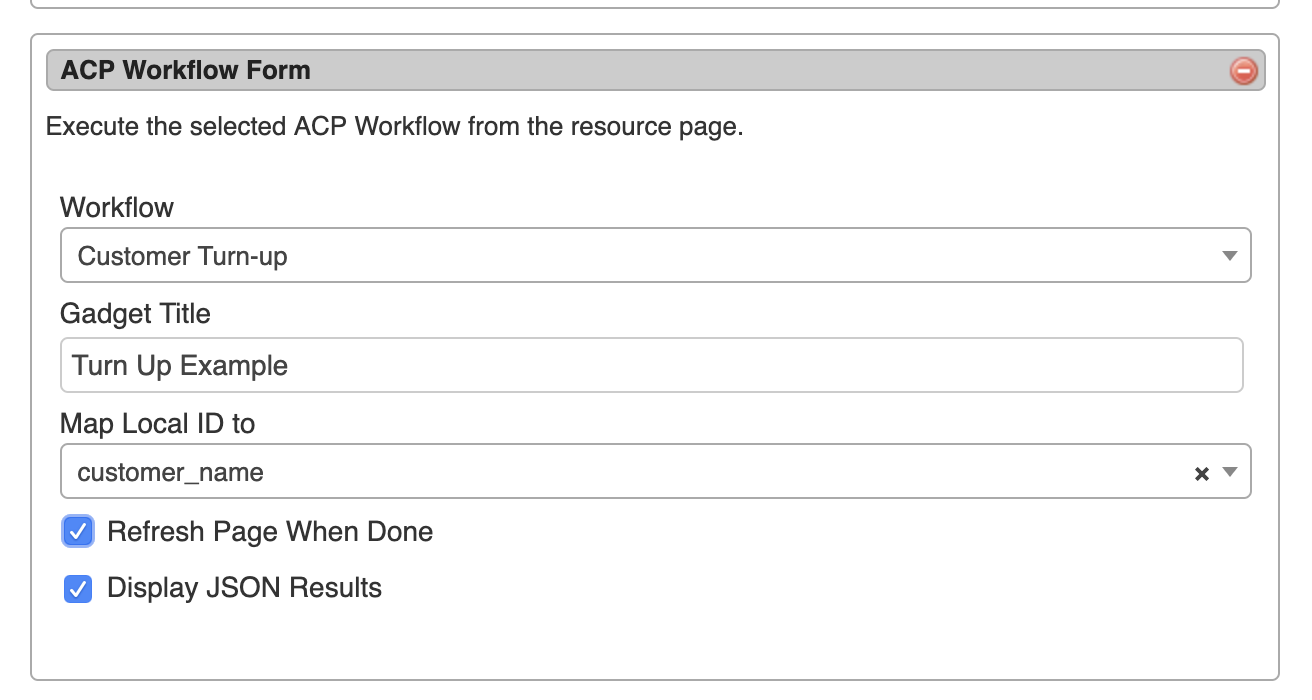
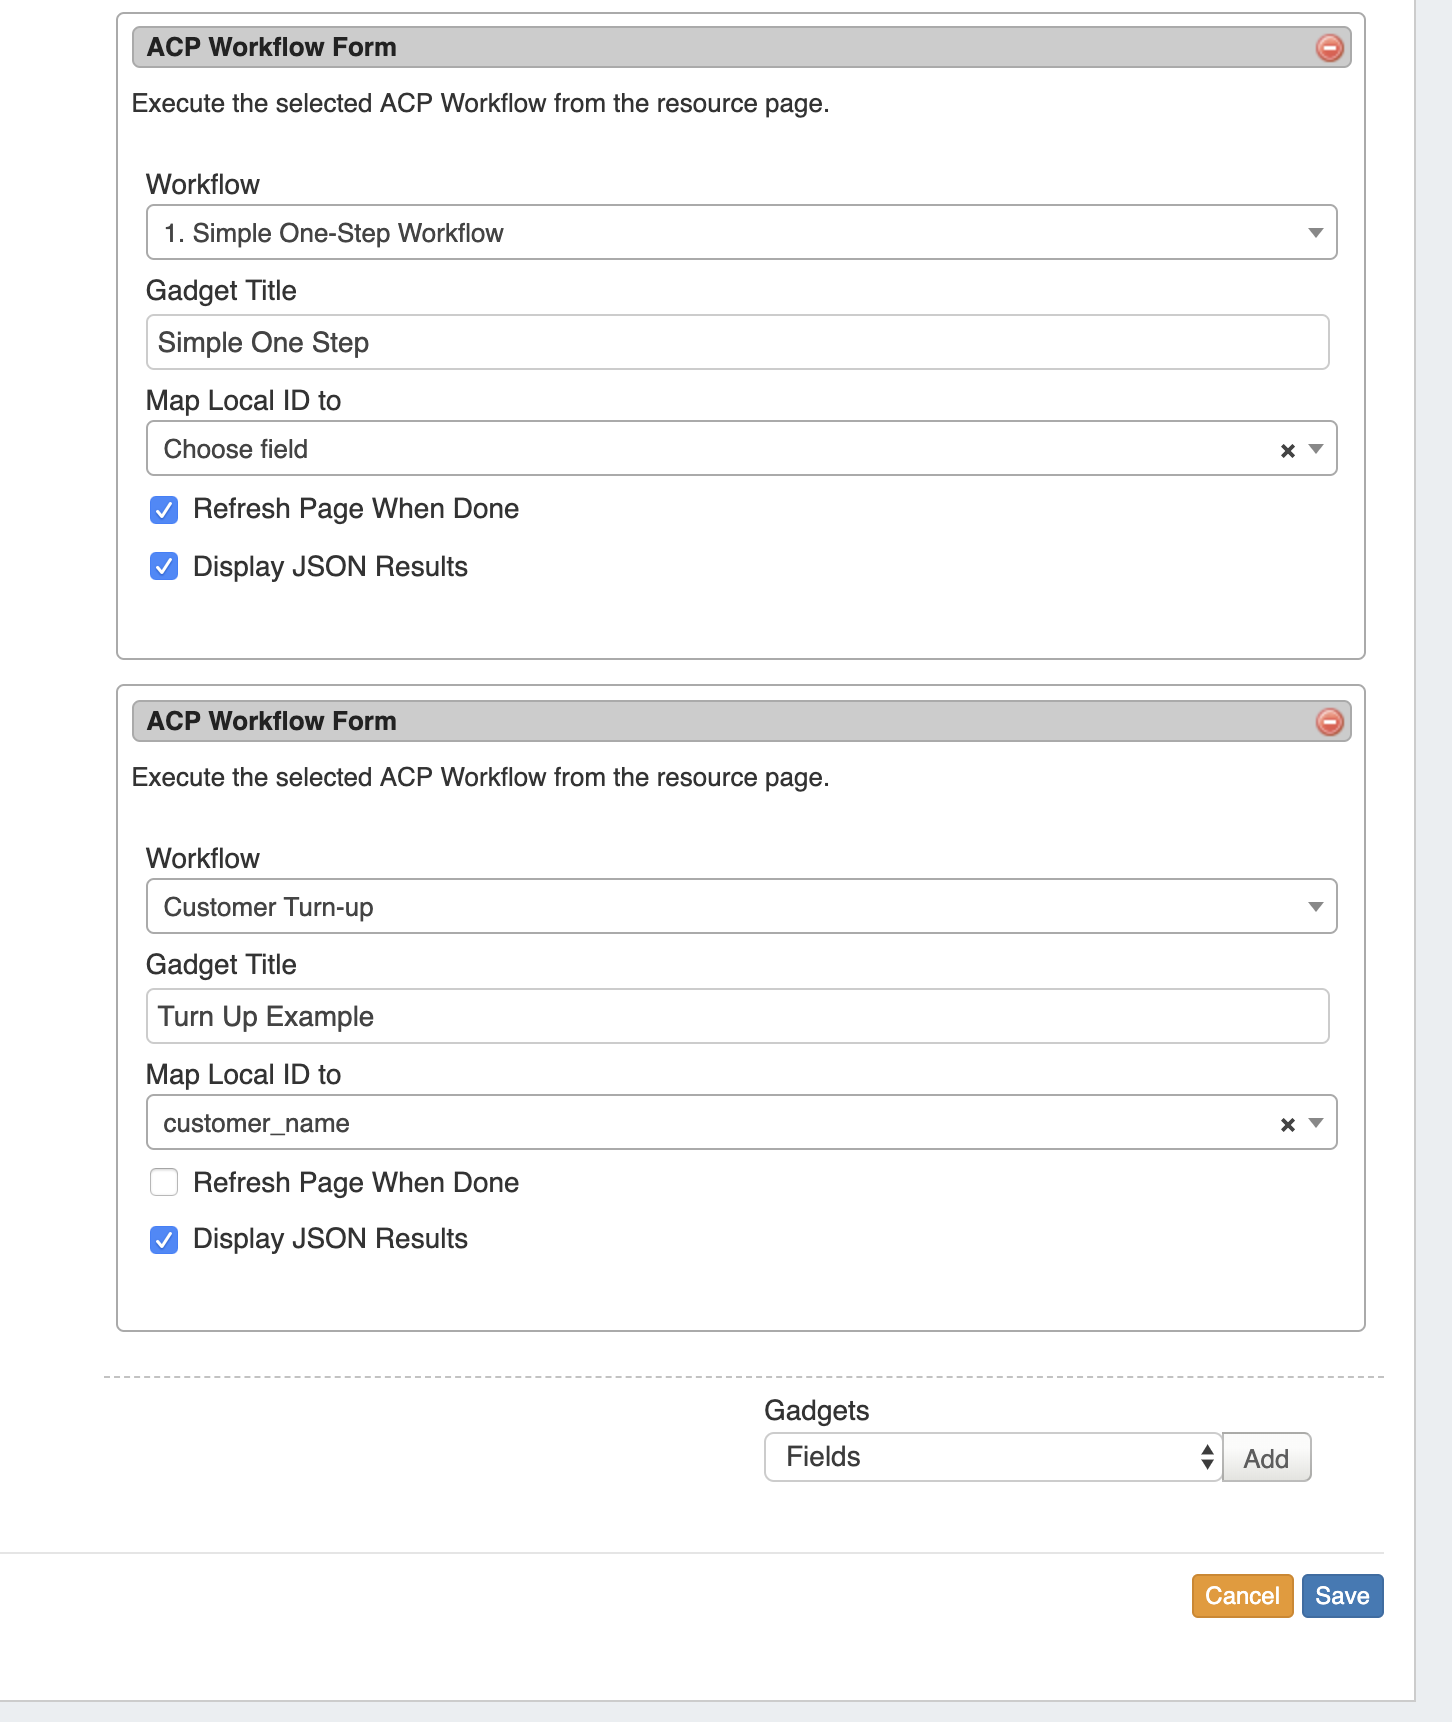
Enter the ACP URL for a licensed ACP instance, then provide the ACP Username and Password for the user that should be used to execute Workflows. To verify the account, click "Test Configuration" - you will be notified whether the account is valid. When done, click "Update". After setup, the ACP Workflows Gadget will load with the available Workflows from your ACP instance, and can be configured to select which Workflow and inputs you wish to use. Configuring the ACP Workflow Form The ACP Workflow form is access from the Edit Section page, under "Manage Gadgets". Once ACP settings have been added to Admin Preferences, the "ACP Workflow Form" Gadget can be added to a Section, and Workflows from the associated ACP instance will be available to select. containing fields to select the desired Workflow to Run, Title, and map input options.
Select a Workflow, then edit the title to display on the gadget and map input options. Input options will vary according to the selected Workflow. You may also choose to refresh the page once the workflow execution is complete, and/or show JSON results.
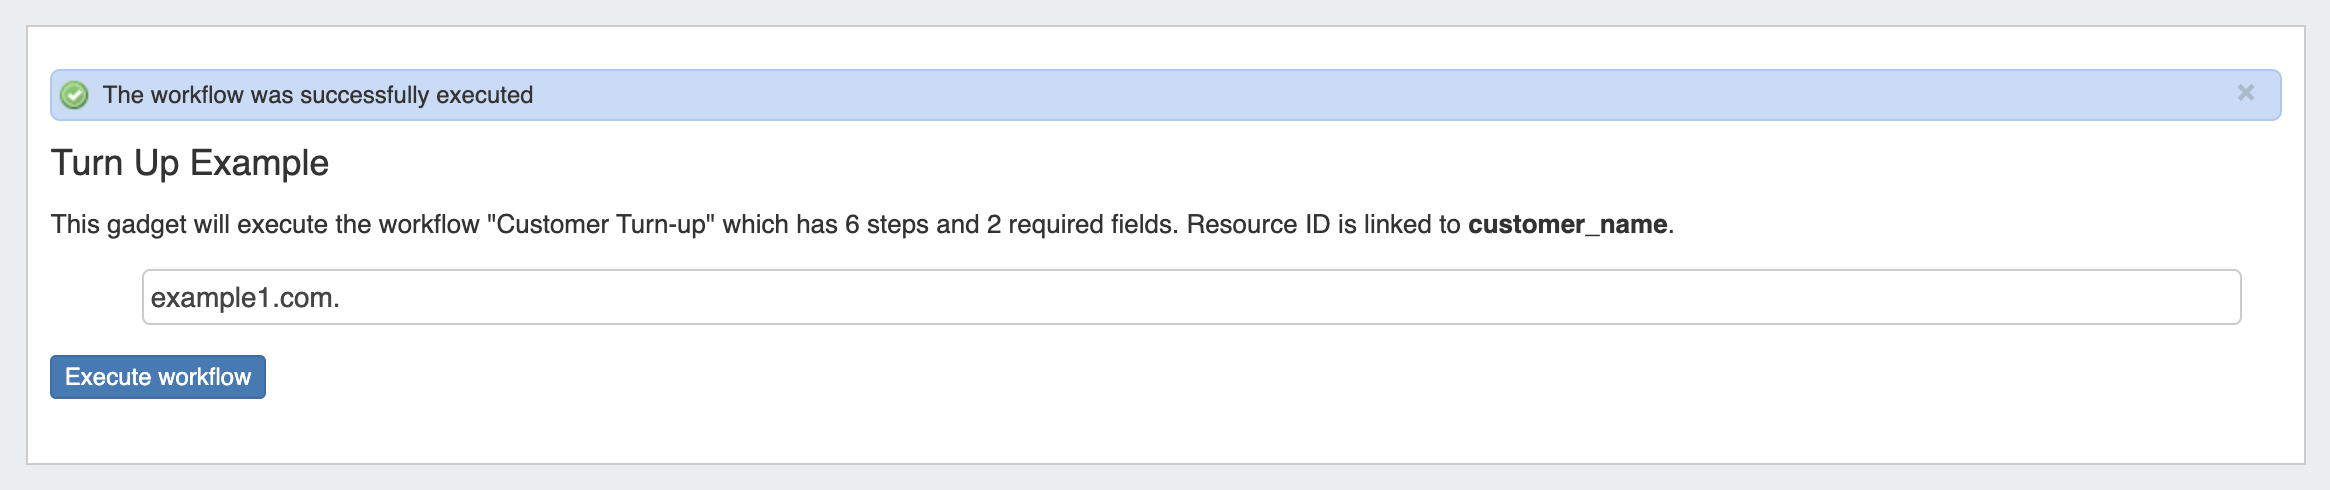
Multiple Forms may be added to a Section, in order to run additional Workflows or option settings. When complete, click "Save". Working with the ACP Workflow Form Once enabled, the Gadget will show on the resource page for any resource of the section type. Input the field data necessary for the Workflow - here, it's adding a hostname - then click "Execute Workflow" to process the chain of workflow calls.
If "Display JSON Results" has been enabled, a display modal will appear showing the JSON response of the executed workflow.
When done reviewing the response, click "Close". If the page has not refreshed, you will see a message informing you whether the Workflow has successfully executed.
In this example, a "Customer Turn-Up" Workflow was selected (created in ProVision's ACP product) that performed six functions with one button click. The successful "Execute" for "Customer Turn-Up" created a new customer resource entry, assigned IPv4 and IPv6 blocks to them, created a DNS zone for the hostname, and lastly created 'A' and 'AAAA' records for the zone. |


API Updates
...
APIv2 Updates
Endpoint links / references for APIv2 Swagger documentation are updated once each release is live, and may not be available prior to release.
...