APIv2
| Table of Contents |
|---|
API v2 Overview
APIv2 is ProVision's currently supported RESTful API version. APIv2 improvements include:
- HTTP Basic Authentication
- Use of HTTP Methods (GET, PUT, POST, etc.)
- Supports JSON payloads
- Additional endpoints and ProVision functionality
APIv2 Access Options
To test or execute APIv2 queries, you may:
- Use a browser extension / desktop REST client, such as Postman
Postman is the current industry standard: Go to https://www.getpostman.com/ to install, and visit the Postman Learning Center for user documentation, training videos, and support help.
- Access ProVision's APIv2 Swagger documentation from your ProVision instance ( instance/dev/swagger), which provides the ability to test inputs and responses using your ProVision instance data.
- Continue to the section below: "APIv2 - Using Swagger" for more details, or see the ProVision Developer Tools page for a broader overview.
- Use CURL in the command line to authenticate and execute APIv2 endpoints. See cURL documentation at https://curl.haxx.se/.
- Continue to the section below: "APIv2 - Using cURL" for more details, examples, and tips.
APIv2 - Using Swagger
Accessing Swagger
Public APIv2 documentation is located at https://cloud.6connect.com/APIv2/.
APIv2 documentation includes:
- IPAM API
Includes actions for LIRs, IP aggregate and block management, VLAN, IP Rules, and SWIP. - Resource API
Includes actions for managing the ProVision Resource System.
The resource API provides CRUD endpoints for resources, resource attributes, resource attachments and resource backups. - DNS API
ProVision DNS API allows you to manage DNS Zones, Records, Servers, Groups and ACLS. - Users API
Includes actions for ProVision Users, permissions and actions. - Usergroups API
Includes actions for ProVision Groups, permissions and actions - Scheduler API
The API Allows you to easily schedule tasks. - API Composer Platform
API Composer Platform (ACP) is an additional module in ProVision to help automate frequently used combinations of calls.
Existing customers may access APIv2 documentation from your ProVision instance (user must have Admin permissions):
- Log into your ProVision instance.
- Go to the Admin area of ProVision and click on the API Tab.
Under "OpenAPI 3.0 Specification" click the Swagger link provided.
Expand 
Viewing APIv2 Information
On the 6connect Provision API Swagger home page, click on the name link for the API family that you wish to browse (IPAM, Resource, DNS, etc).
Expand 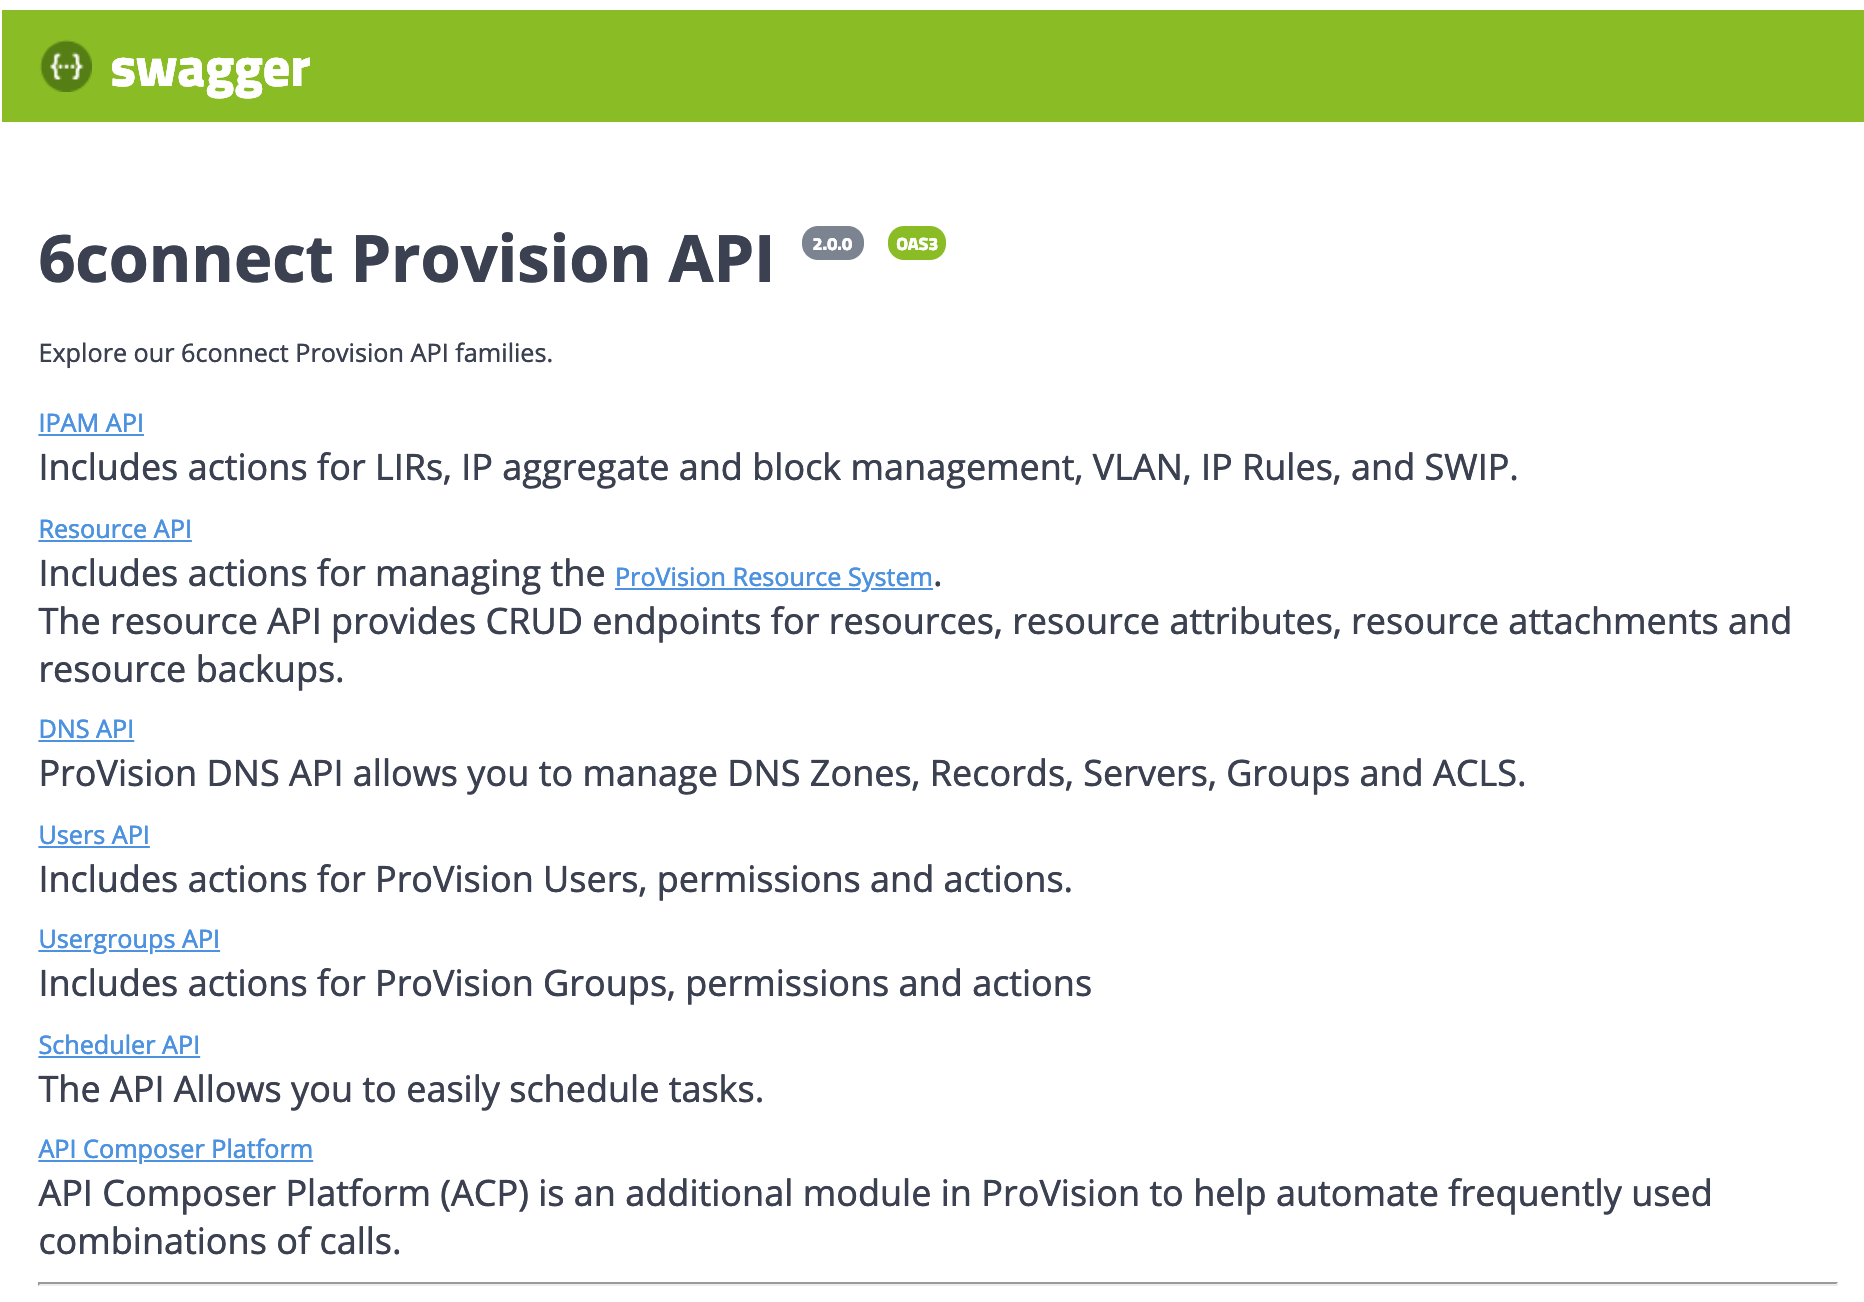
Once on an API Family page, verify that the displayed server name is correct for your instance/local server.
Expand In most situations, only one ProVision instance/server will be displayed, with authentication already provided from your ProVision login. If your ProVision session has ended, or the server changed, you may need to re-provide ProVision credentials by clicking the "Authorize" button. 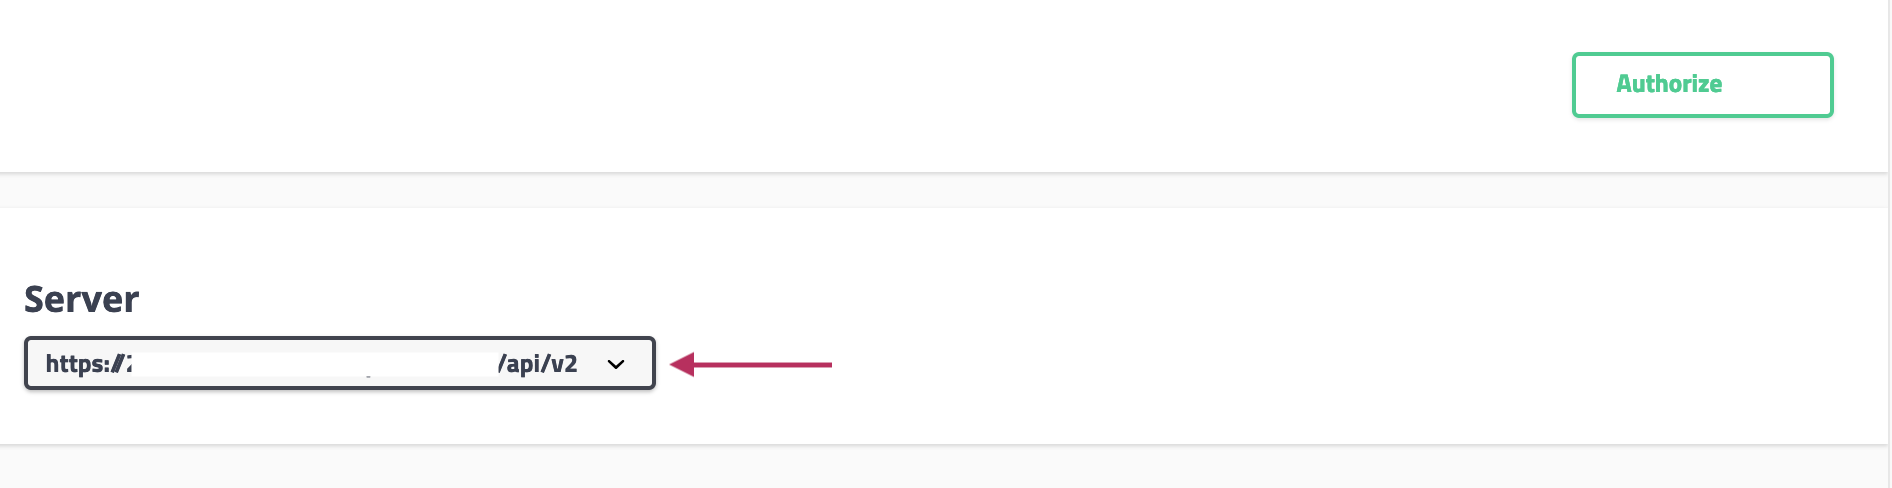
Scroll further down the page and begin reviewing available APIv2 calls and details. Clicking on any call will expand it to view parameter details - you can even test call responses (using your instance data) by clicking "Try it Out"!
Expand
The detail information includes a description, parameter list (required parameters are marked with a *), and response information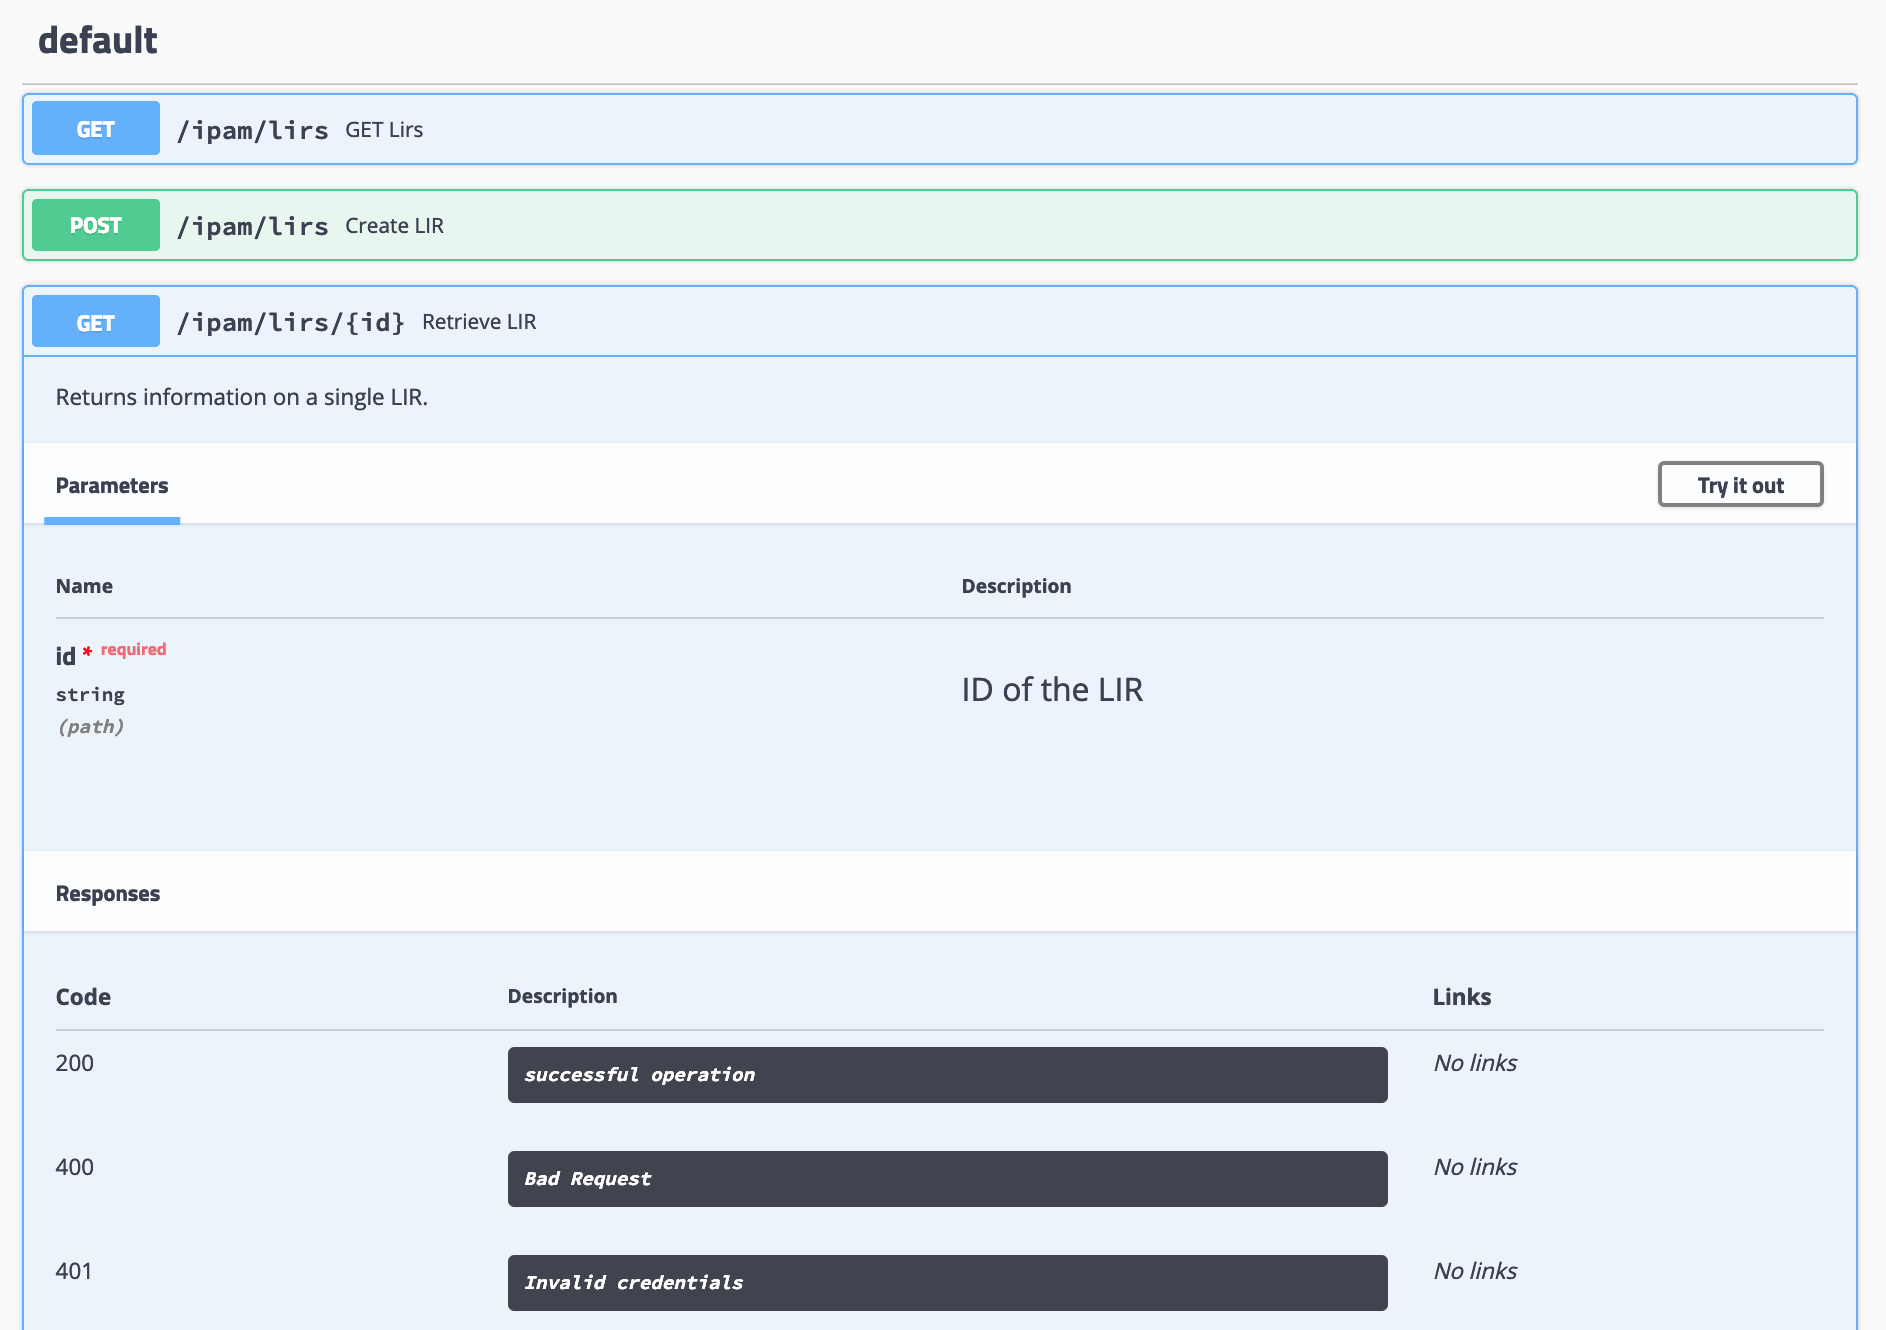
Some calls that involve a JSON request body payload (PUT, PATCH, etc) will display "Example Value" and "Model" information under a "Request Body" section - additional parameter descriptions may be displayed under "Model" Information.
Expand
Clicking on "Example Value" will show an example of a JSON request body for that call.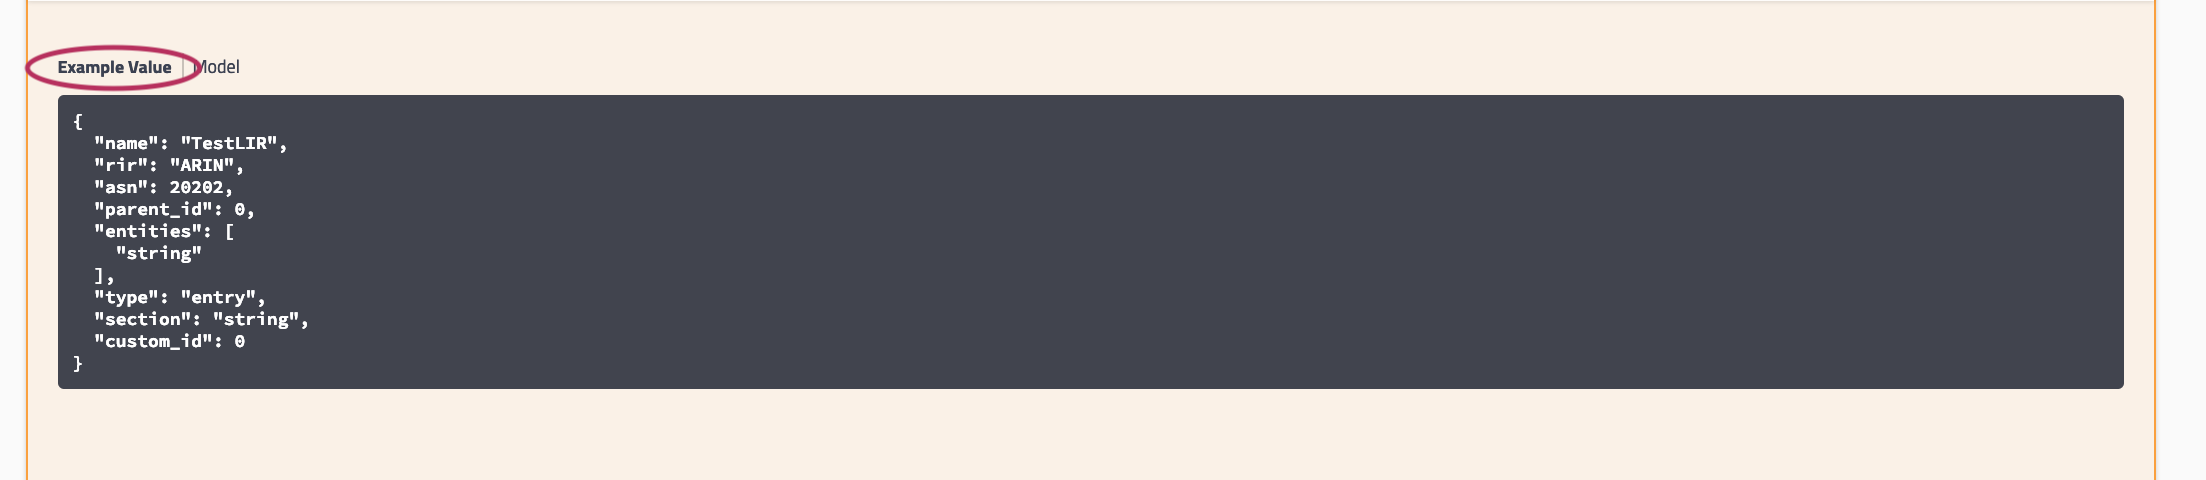
Clicking on "Model" will display details and descriptions of the request body parameters, if available.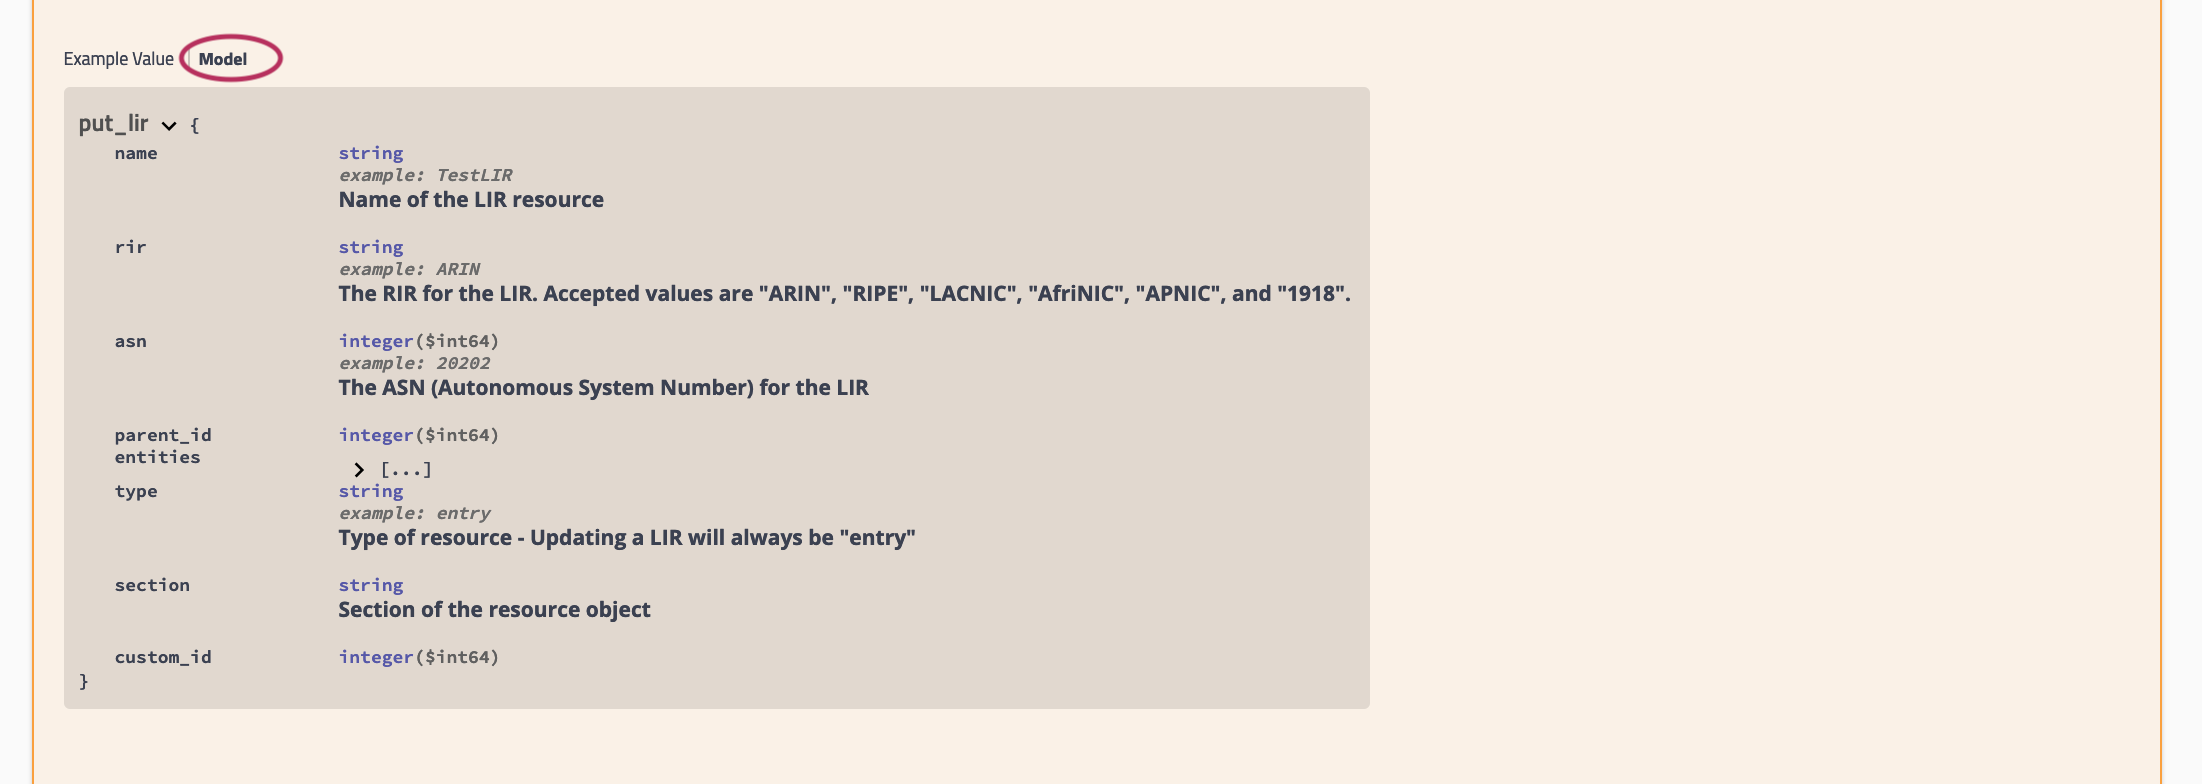
Additional "Model" examples are available at the bottom of the page with additional descriptive information.
Expand At the bottom of the page, click on "Models".  Then, click on the "Model" you wish to view. Some models may contain additional information that you can expand to view, such as valid values for a parameter. In the example below, the circled "array" will display valid RIR values.
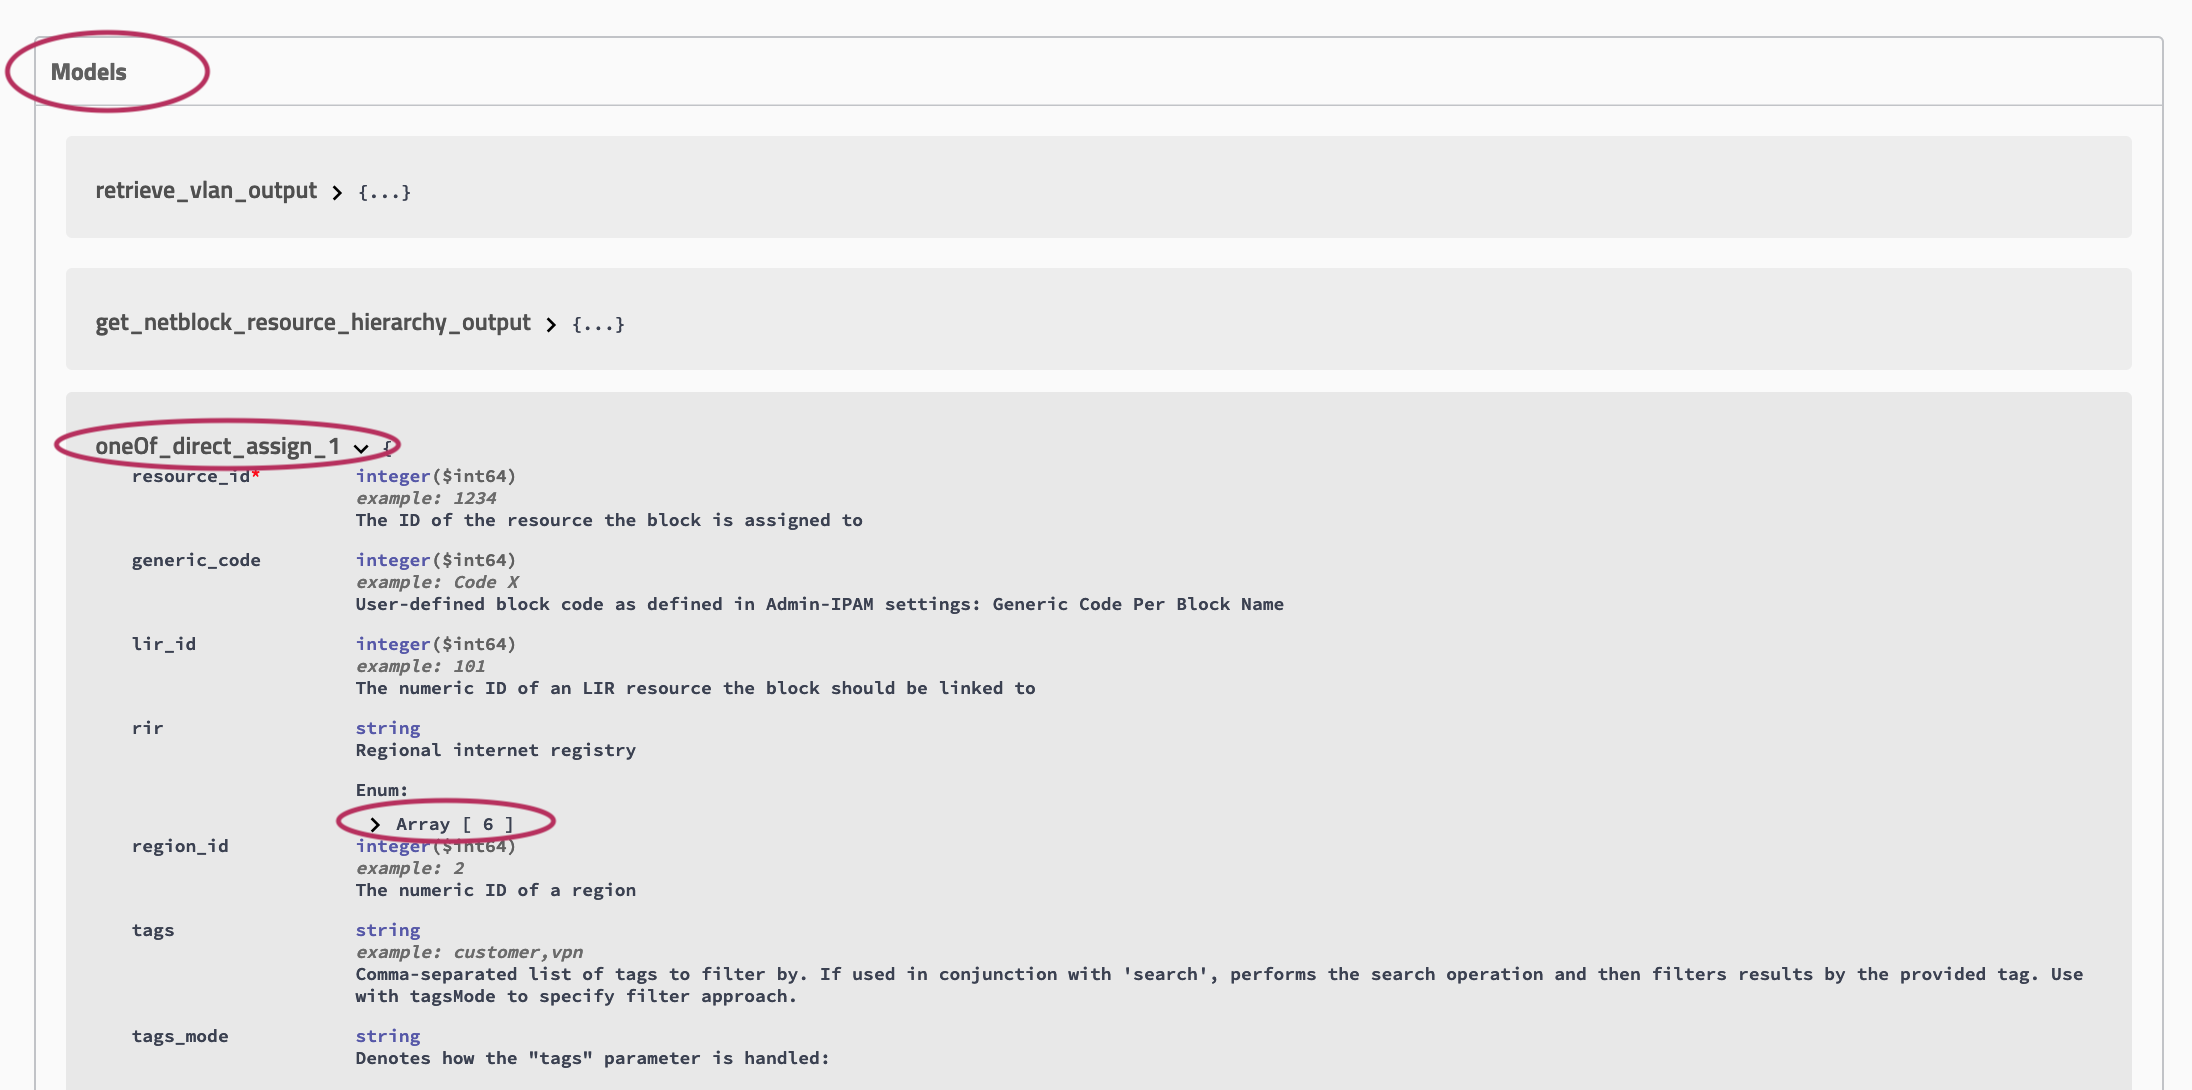
Testing/Executing Endpoints in Swagger
You may execute endpoints in Swagger by using the "Try it out" button for any call.
- Navigate to the call that you want to try out.
Expand the call to view its details, then click the "Try it out" button.
Expand 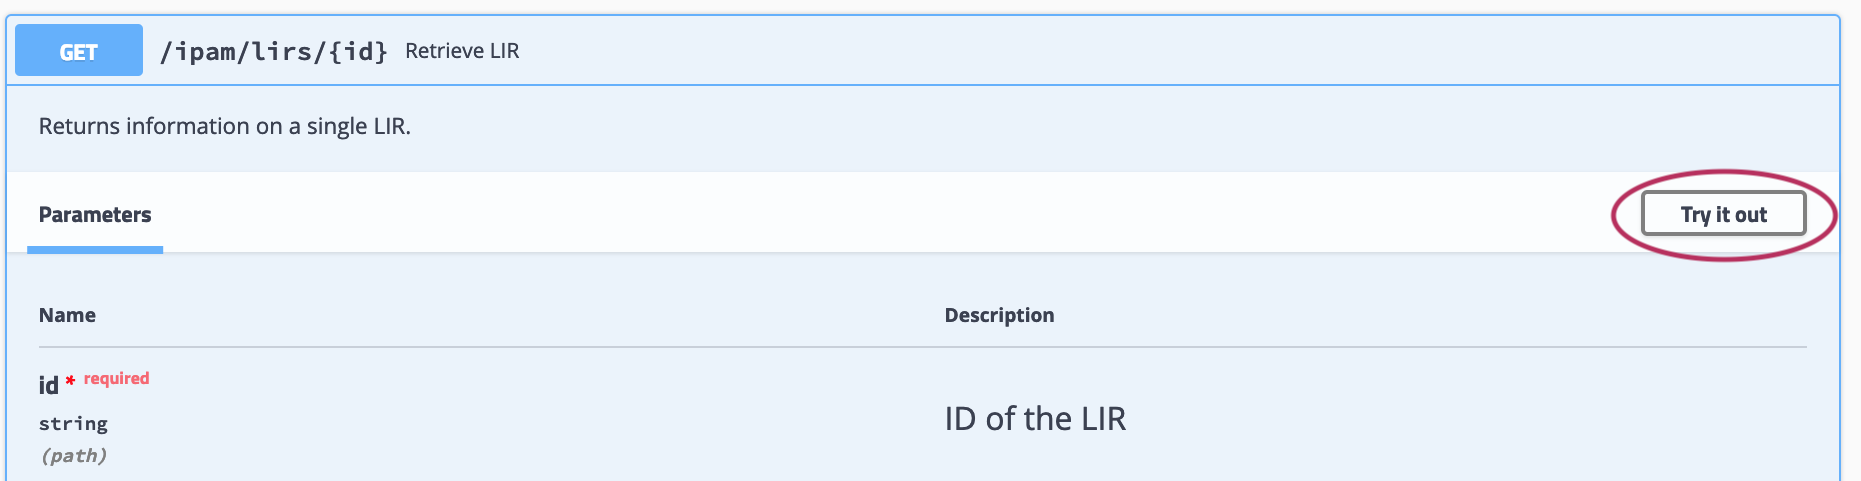
Input the desired parameters to test, and click "Execute".
Expand 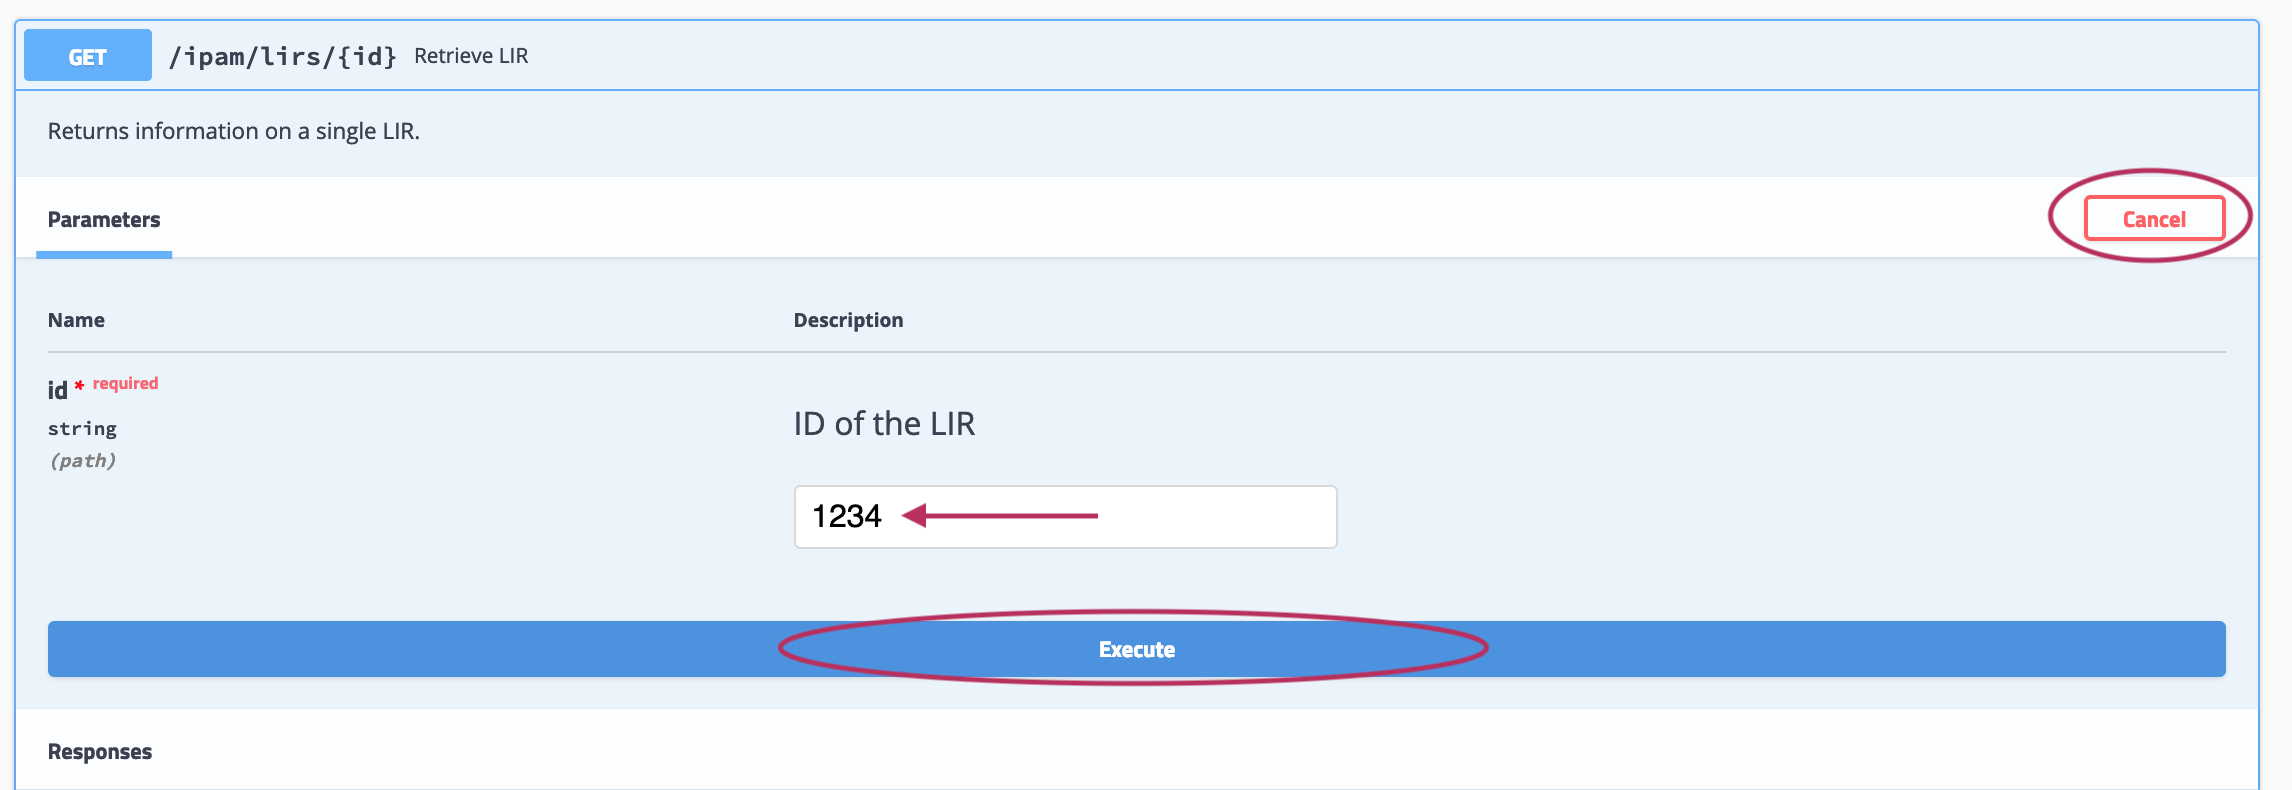
If the call is a method that uses a JSON request body, you will have the option to edit the body text in the "Example Value" box - when done, click "Execute".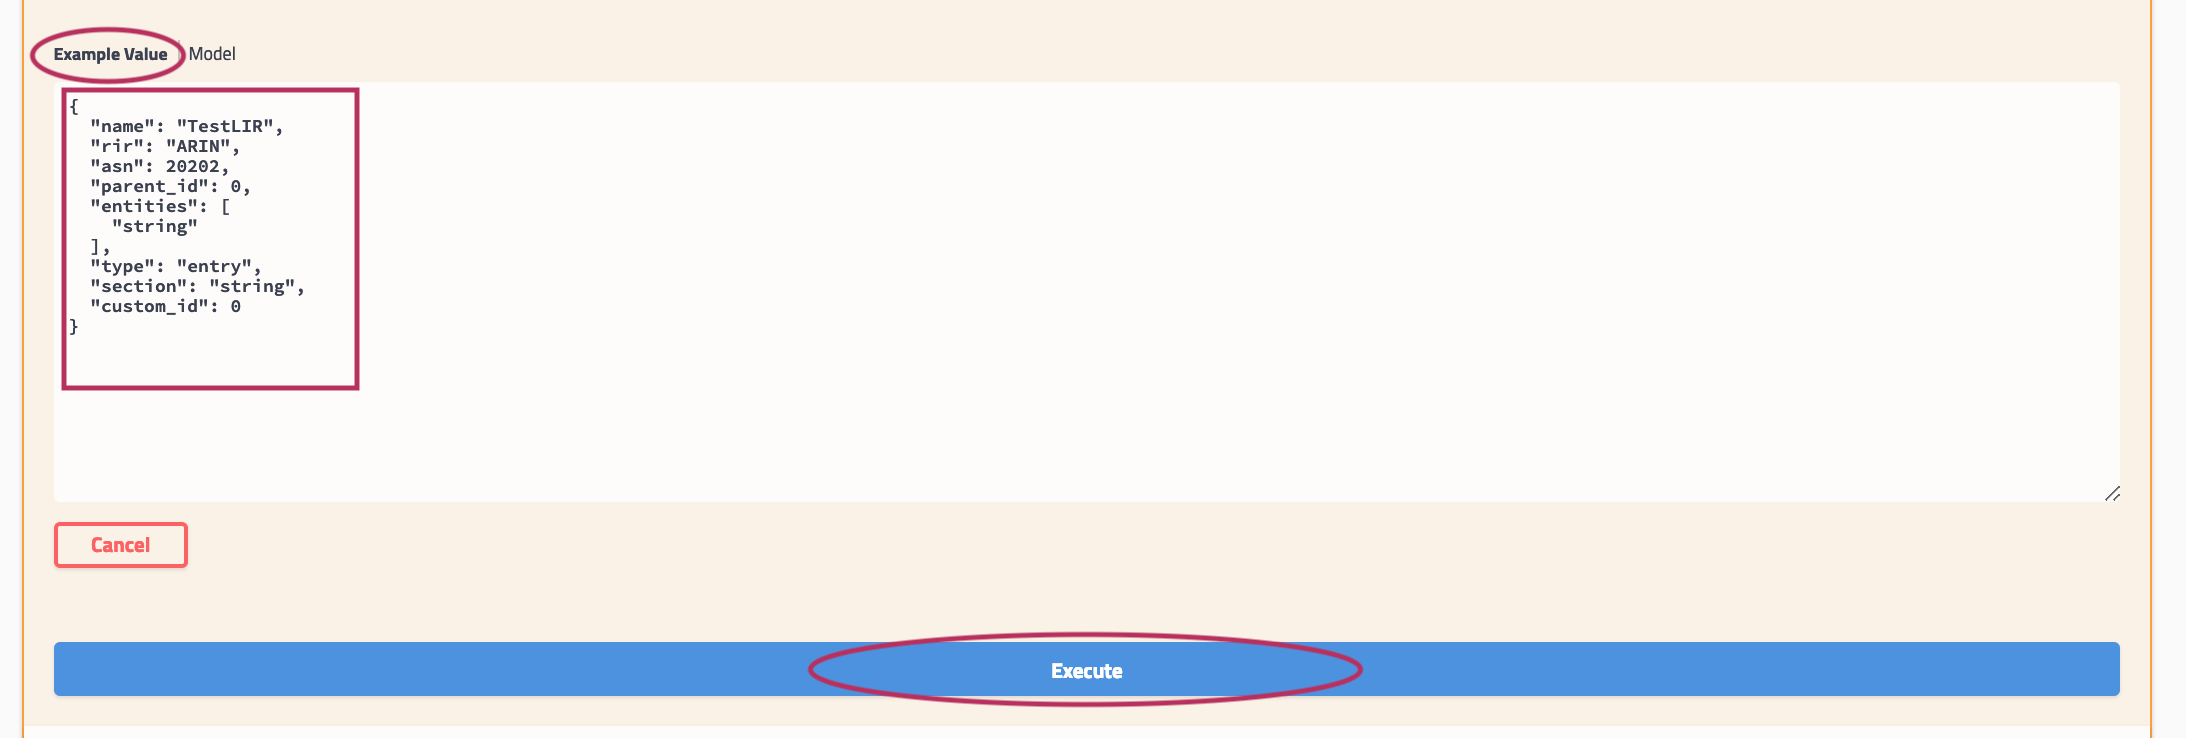
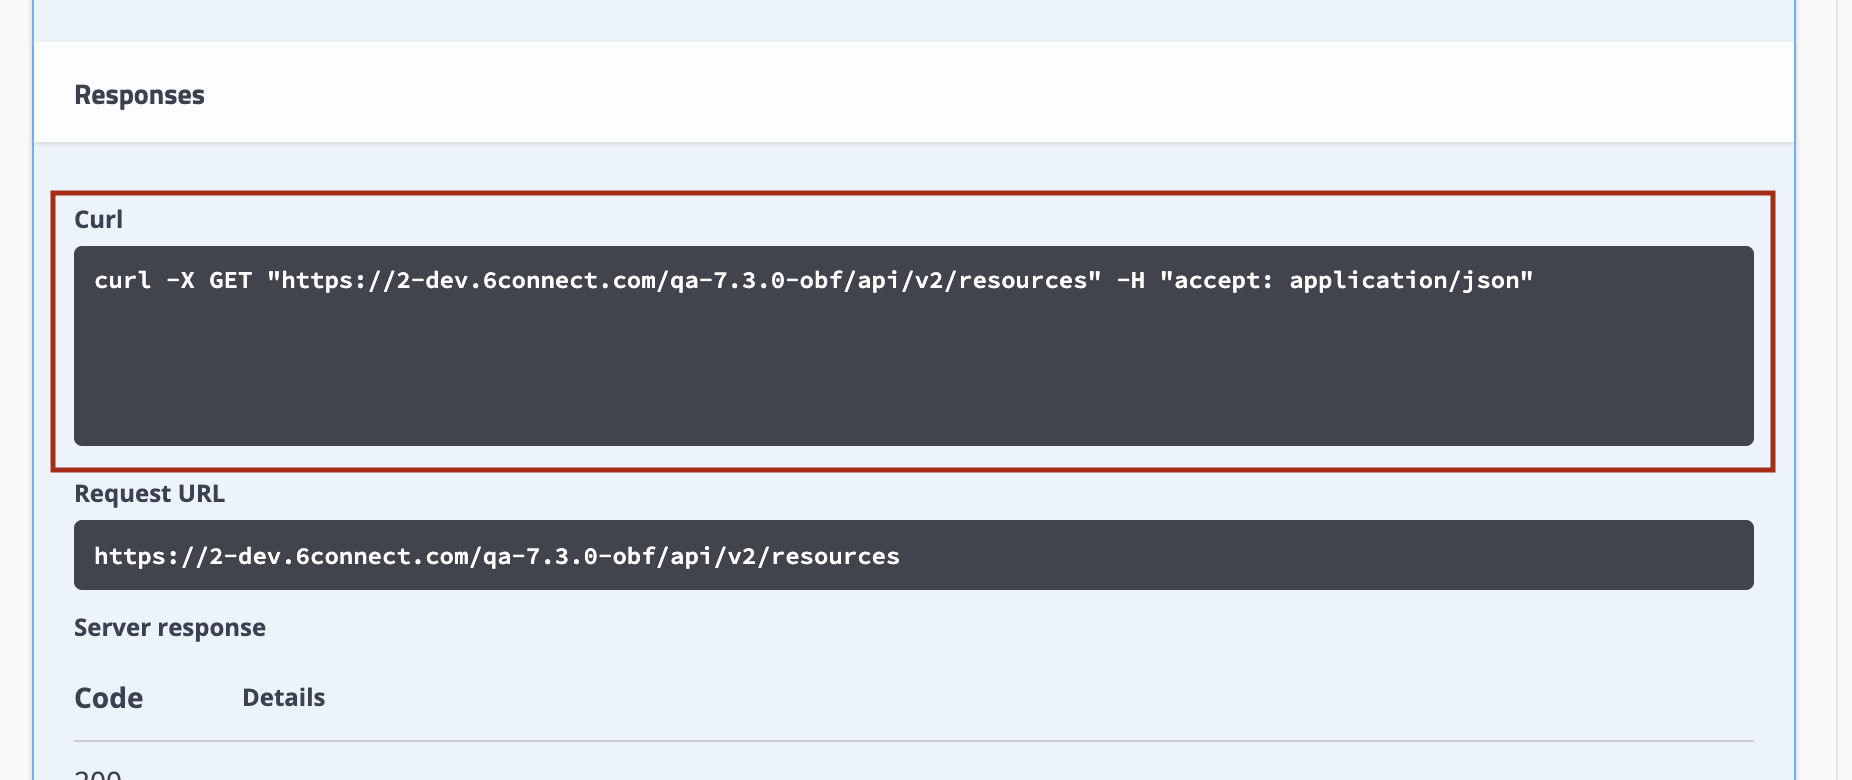
The example response will display under "Responses" after being executed. The "Response" section also includes the cURL command, Request URL, and Response Headers.
Expand 
APIv2 - Using cURL
One option to execute an APIv2 call is to use CURL from the Command Line.
If you do not already have cURL installed, you may download it and access its documentation at https://curl.haxx.se/.
cURL syntax template for APIv2:
When using cURL, the general layout of the cURL command will be as follows:
- Invoke cURL:
curl -X PATCH "https://your-instance-domain/instance-name/api/v2/config" -H "Content-Type:application/json;charset=utf-8" -u testing@6connect.com:password -d "{\"auto_merge_limits\":\"10\"}"
- Use the Request Flag (-X):
curl -X PATCH "https://your-instance-domain/instance-name/api/v2/config" -H "Content-Type:application/json;charset=utf-8" -u testing@6connect.com:password -d "{\"auto_merge_limits\":\"10\"}"
- This specifies a custom request method to use when communicating with the HTTP server. The specified request method will be used instead of the method otherwise used (which defaults to GET)
- Specify the HTTP Action:
curl -X PATCH "https://your-instance-domain/instance-name/api/v2/config" -H "Content-Type:application/json;charset=utf-8" -u testing@6connect.com:password -d "{\"auto_merge_limits\":\"10\"}"
- In quotes, specify the URL of the APIv2 endpoint you are executing. This should be similar to: "https://[ProVisionInstance]/api/v2/[endpoint family-action]"
curl -X PATCH "https://https://your-instance-domain/instance-name/api/v2/config" -H "Content-Type:application/json;charset=utf-8" -u testing@6connect.com:password -d "{\"auto_merge_limits\":\"10\"}"
- Use the Header Flag (-H):
curl -X PATCH "https://https://your-instance-domain/instance-name/api/v2/config" -H "Content-Type:application/json;charset=utf-8" -u testing@6connect.com:password -d "{\"auto_merge_limits\":\"10\"}"
- Denotes an extra header to include in the request when sending HTTP to a server. You may specify any number of extra headers. Note that if you should add a custom header that has the same name as one of the internal ones curl would use, your externally set header will be used instead of the internal one. This allows you to make even trickier stuff than curl would normally do.
- Add endpoint-specific data, such as specifying a JSON payload or attribute setting. This may involve one or more additional flags or information sets, depending on the endpoint:
curl -X PATCH "https://https://your-instance-domain/instance-name/api/v2/config" -H "Content-Type:application/json;charset=utf-8" -u testing@6connect.com:password -d "{\"auto_merge_limits\":\"10\"}"
| Info | ||
|---|---|---|
| ||
Swagger displays cURL commands and request URLs in the execution response! Use the "Try it Now" feature from your instance's Swagger page (Accessed from Admin → API Tab → APIv2 Swagger Documentation) for the endpoint/attribute changes you wish to make, and view the cURL command for that change. Copy the command text, and use it as a template for your next cURL execution of the command!
For help using Swagger to test endpoints, see "Testing Endpoints in Swagger" in this APIv2 documentation page. |
cURL Examples
Example: cURL APIv2 Authentication
This example authenticates a ProVision user, so that you may perform APIv2 commands as that user.
| Code Block | ||
|---|---|---|
| ||
curl -X GET "https://2-dev.6connect.com/qa-7.3.0/api/v2/config" -H "accept: */*" -u testing@6connect.com |
This will ask for a password. To hard-code it with a password, add it to the end like so:
| Code Block | ||
|---|---|---|
| ||
curl -X GET "https://2-dev.6connect.com/qa-7.3.0/api/v2/config" -H "accept: */*" -u testing@6connect.com:password |
APIv2 commands are executed as the user provided, so their permissions must be set appropriately. The Swagger "execute" feature produces CURL strings that can be used to test specific API commands.
Example: cURL APIv2 POST Command
This example illustrates how to provide POST/PATCH data to an APIv2 command via cURL. This command updates the ProVision automerge configuration setting:
| Code Block | ||
|---|---|---|
| ||
curl -X PATCH "https://2-dev.6connect.com/qa-7.3.0/api/v2/config" -H "Content-Type:application/json;charset=utf-8" -u testing@6connect.com:password -d "{\"auto_merge_limits\":\"10\"}" |
Review the general CURL documentation at https://curl.haxx.se/ can offer greater insight into what other flags can be used.
Additional Information
See the following areas for additional information:
- ProVision Developer Tools
- Public APIv2 Swagger documentation: https://cloud.6connect.com/APIv2/.