...
Major Features and Improvements in this release:
| Table of Contents |
|---|
Contact 6connect at info@6connect.com to schedule Schedule a demo or get more information here.
New Features
DNS Managed Servers
...
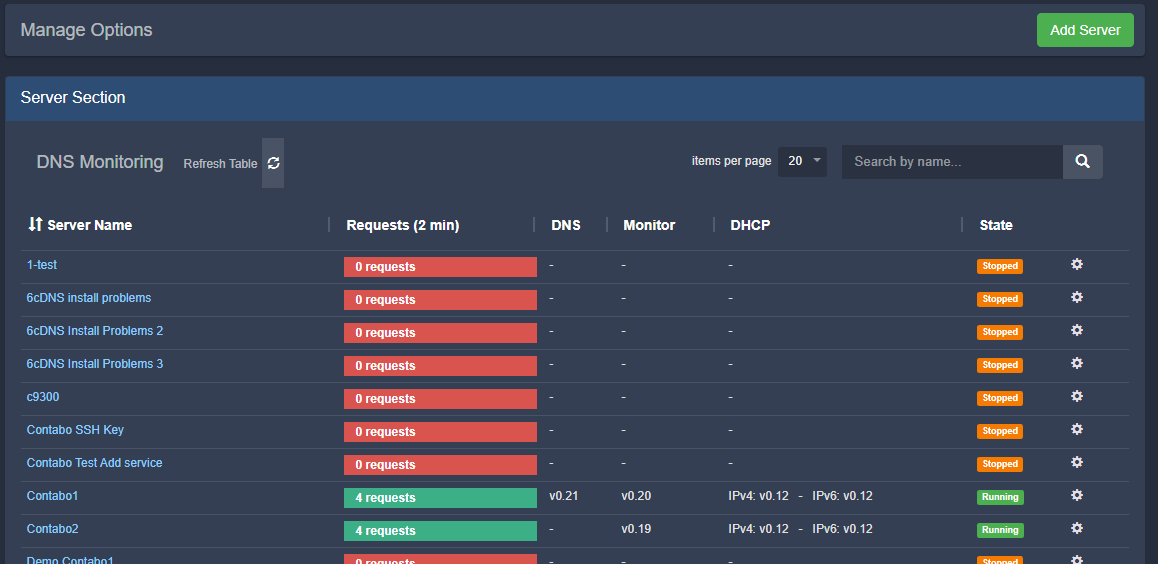
The Managed Servers tab allows for DNS servers to be created, installed, managed, and monitored from within ProVision.
Managed Servers includes updates to the following areas of ProVision:
- New "Servers" Tab → "Managed Servers" page. This page is where managed servers may be created, viewed, and monitored
- A "Managed Servers" sub-tab has been added to Admin → Admin Settings, including settings for monitoring, updates, and RabbitMQ
Expand The "Managed Servers" sub-tab under Admin Settings includes modules for Monitoring Settings, Update Settings, Monitoring Services, and RabbitMQ settings.
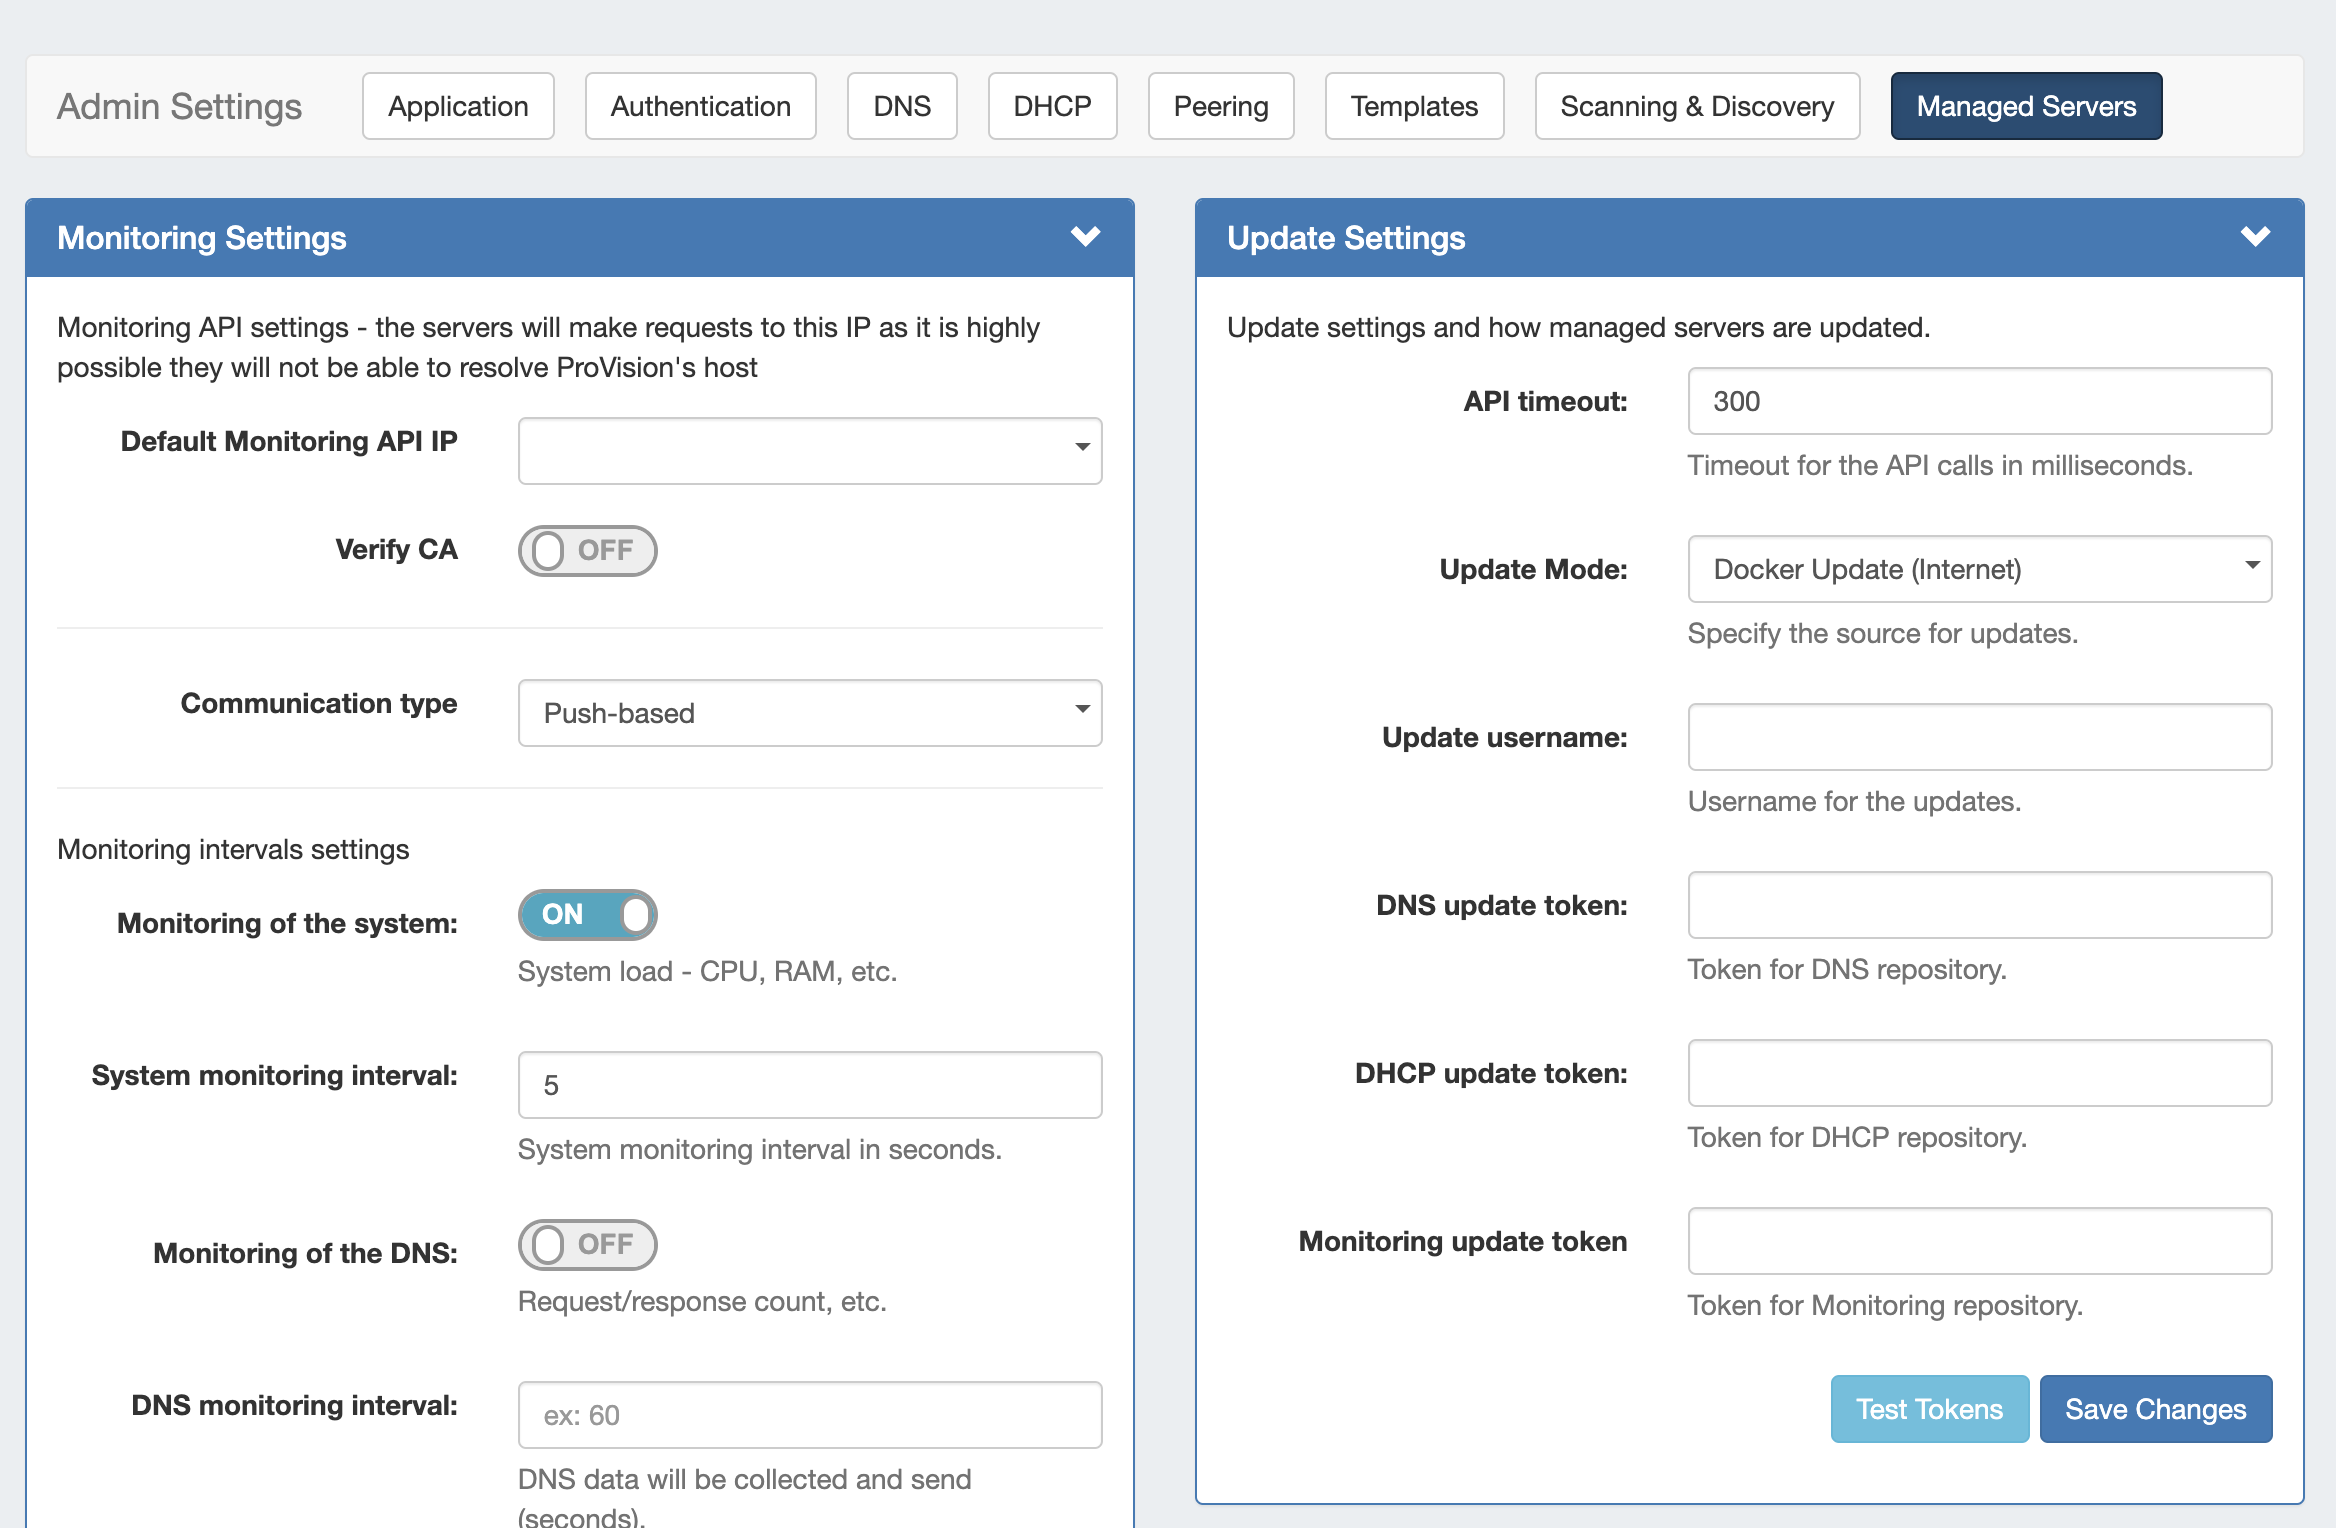
After making any settings updates, be sure to click "Save Changes" under the updated module.
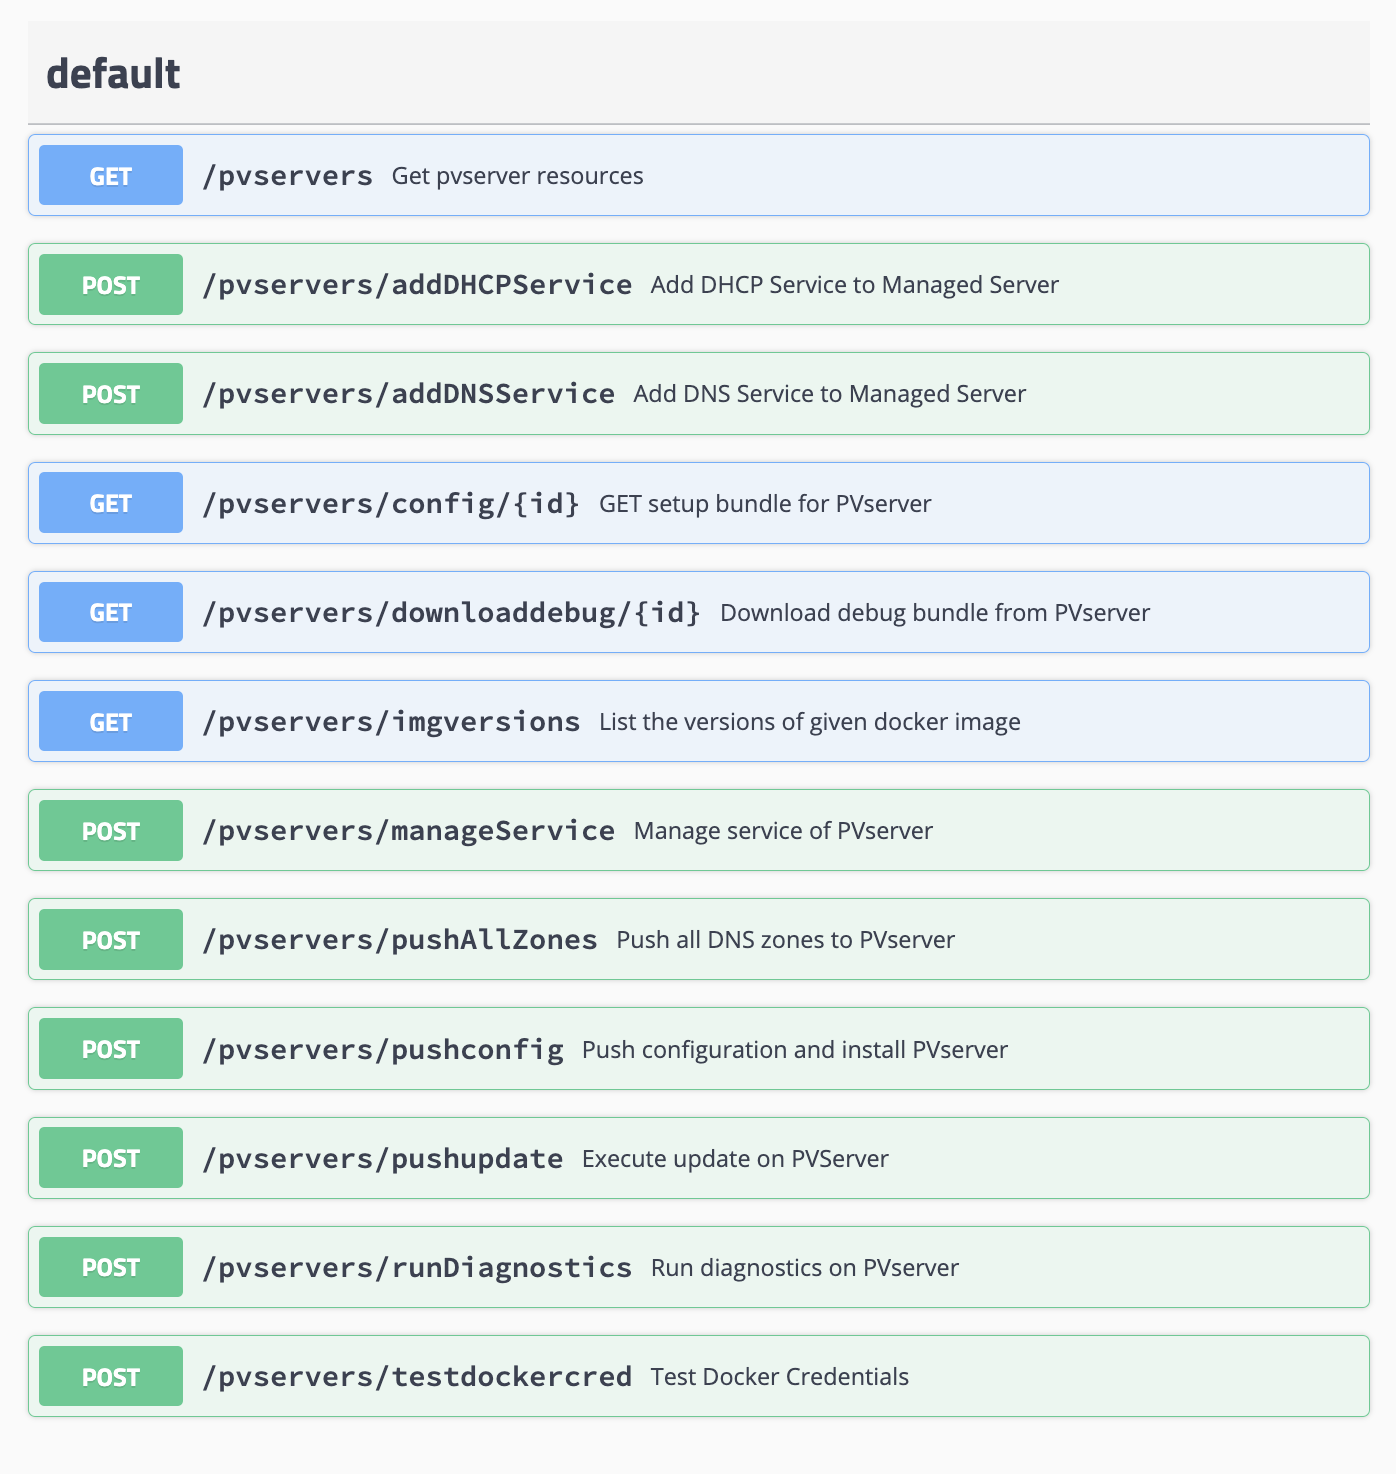
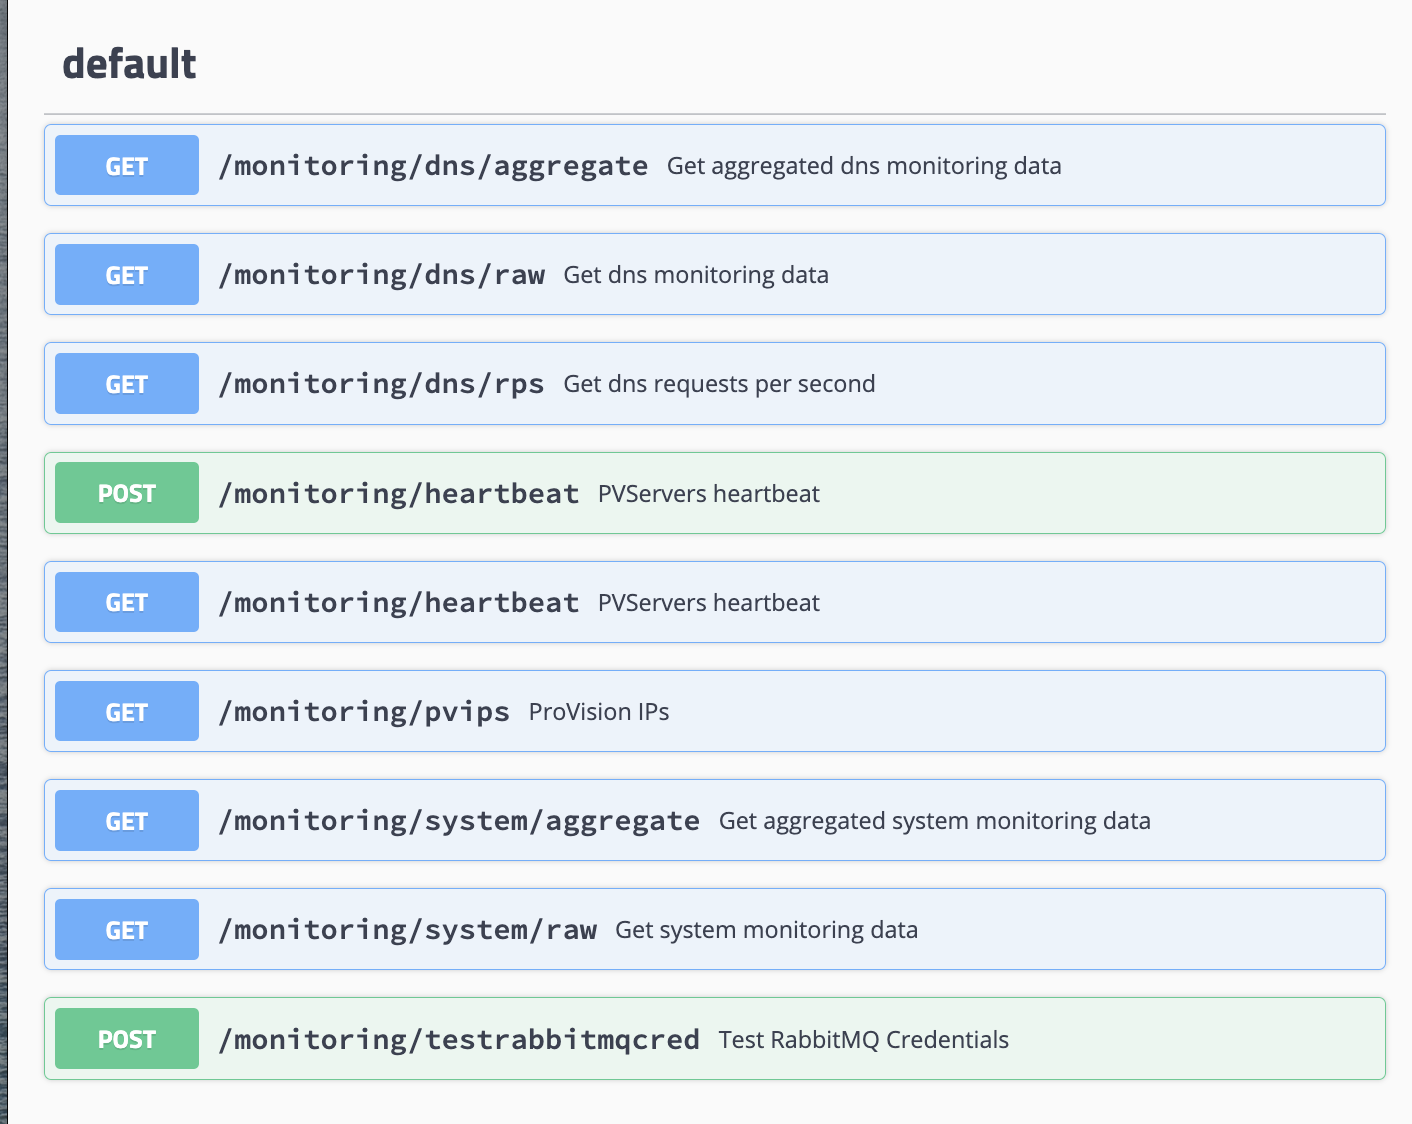
APIv2 has been extended with new endpoints to support Managed Servers and Monitoring
Additional Features
Sub-features of DNS Managed Servers include:
...
These are available from the API Tab → APIv2 Swagger Documentation, under the family categories "Monitoring" and "PVServers".
Expand
Smart Assign Templates
title Click here to view Managed Servers endpoints... - Managed Servers Endpoints:
Expand title Click here to view Monitoring endpoints... - Monitoring Endpoints:
Smart Assign Templates
CFR - 248: Added Smart Assign Templates to CFR - 248: Added Smart Assign Templates to IPAM Admin and IPAM Gadget
...
| Expand | ||||||||||
|---|---|---|---|---|---|---|---|---|---|---|
| ||||||||||
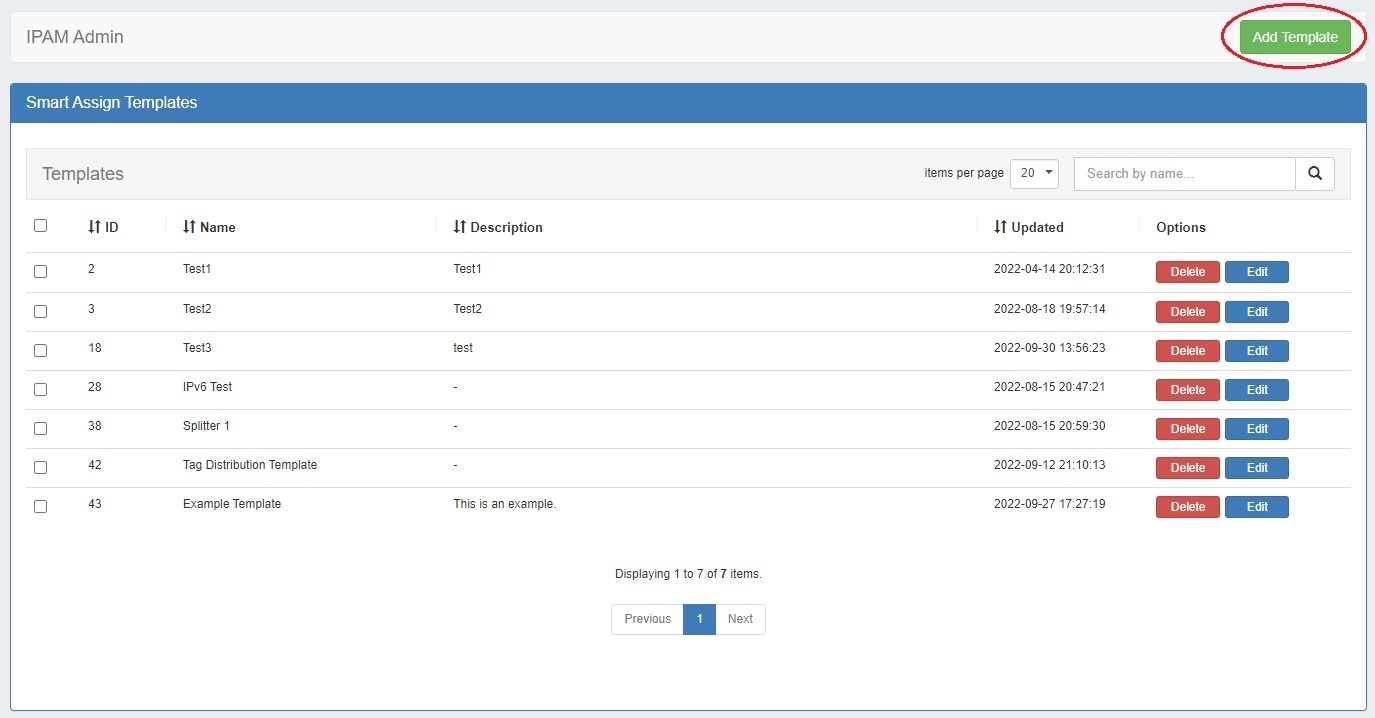
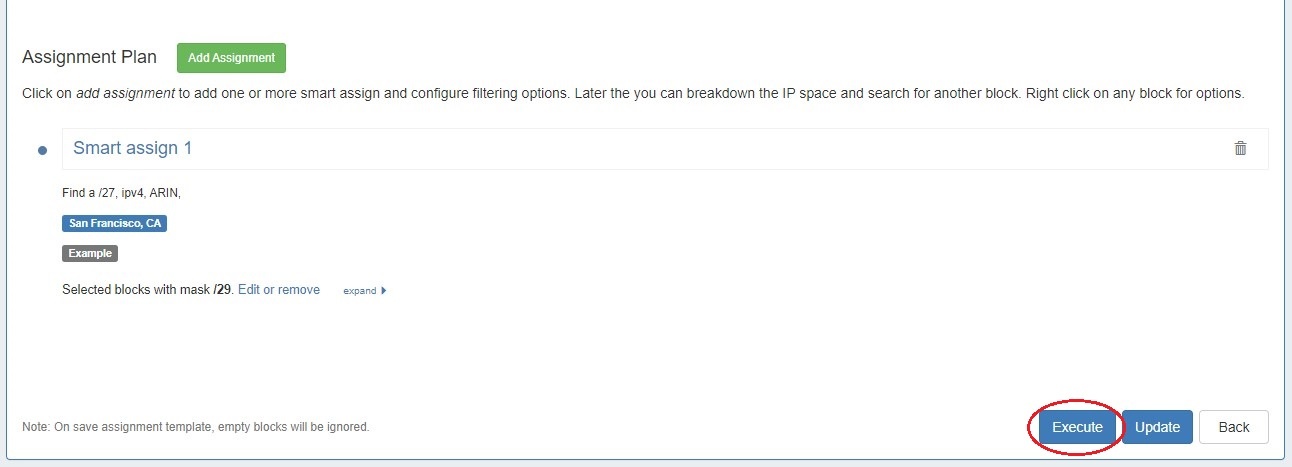
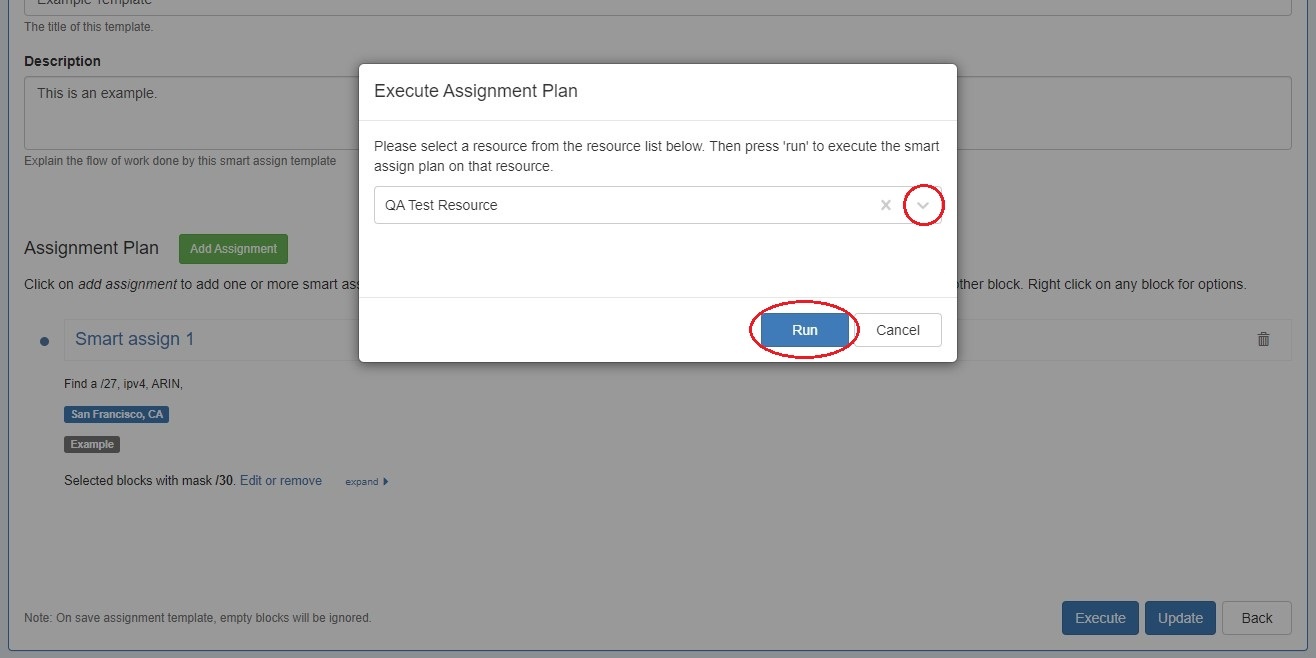
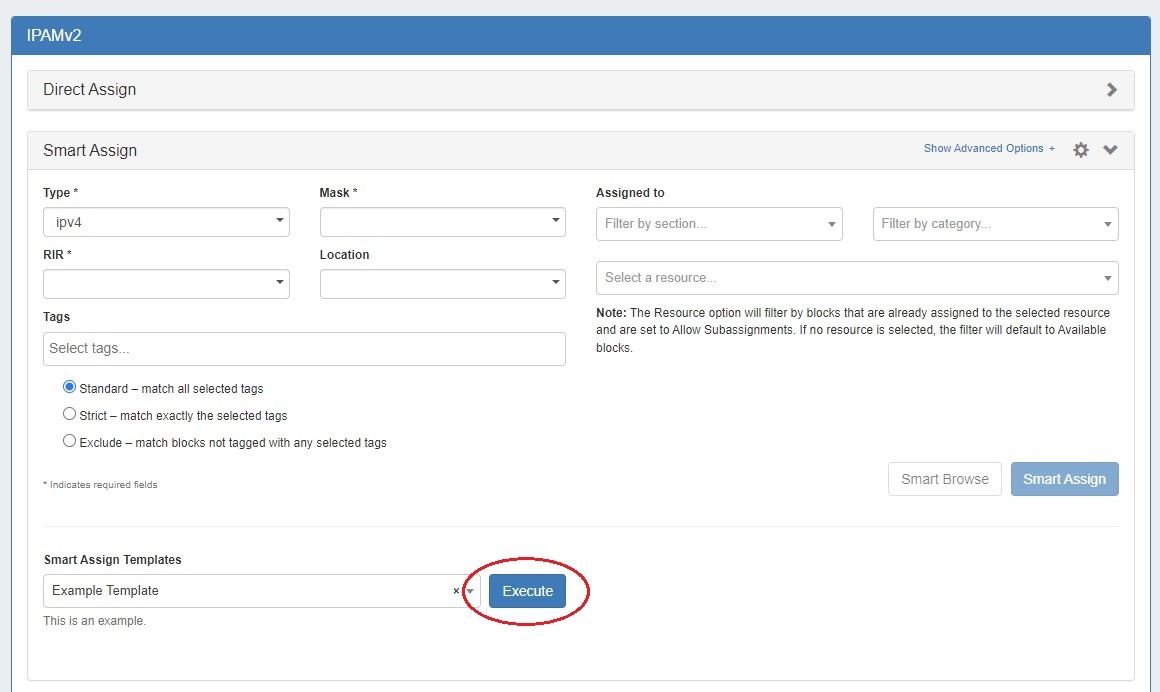
Creating a Smart Assign Template: To access Smart Assign Templates from the Admin section, select "Smart Assign Templates" from the IPAM Admin tab dropdown menu.
To create a new template click "Add Template" at upper right.
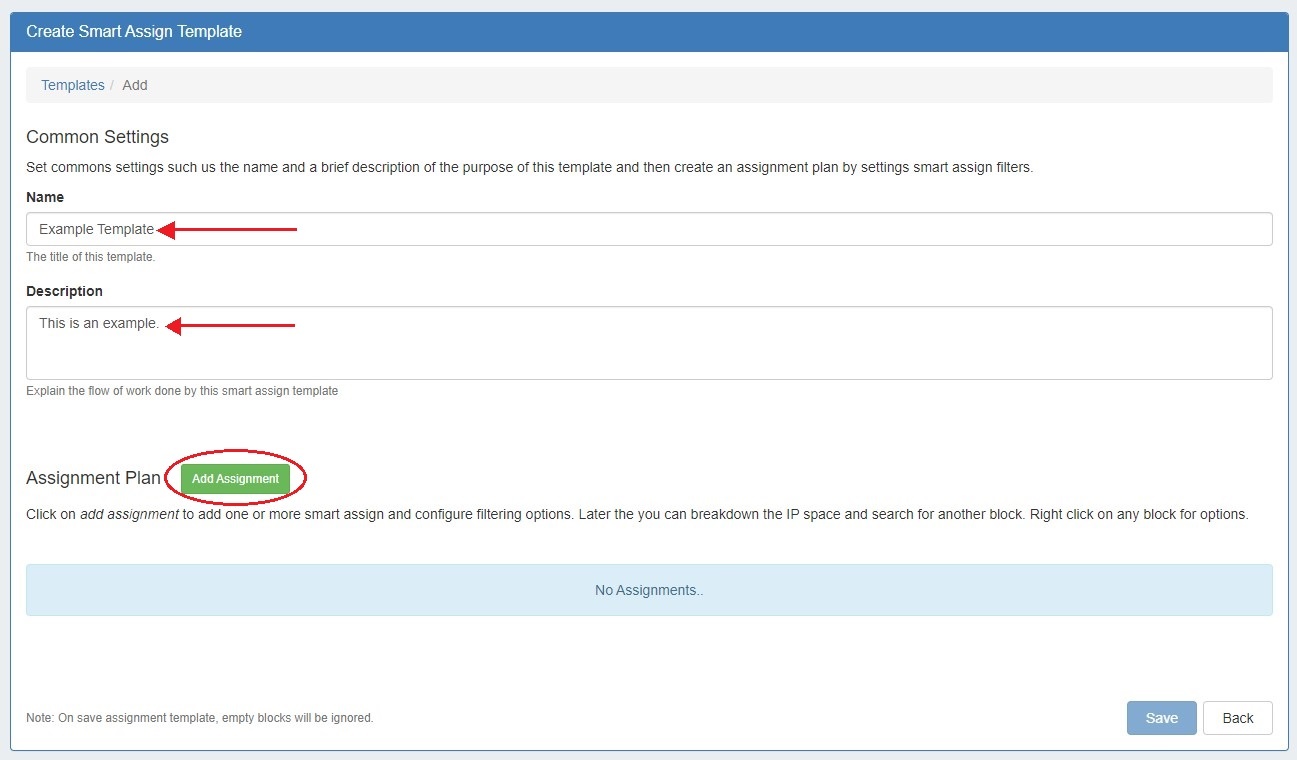
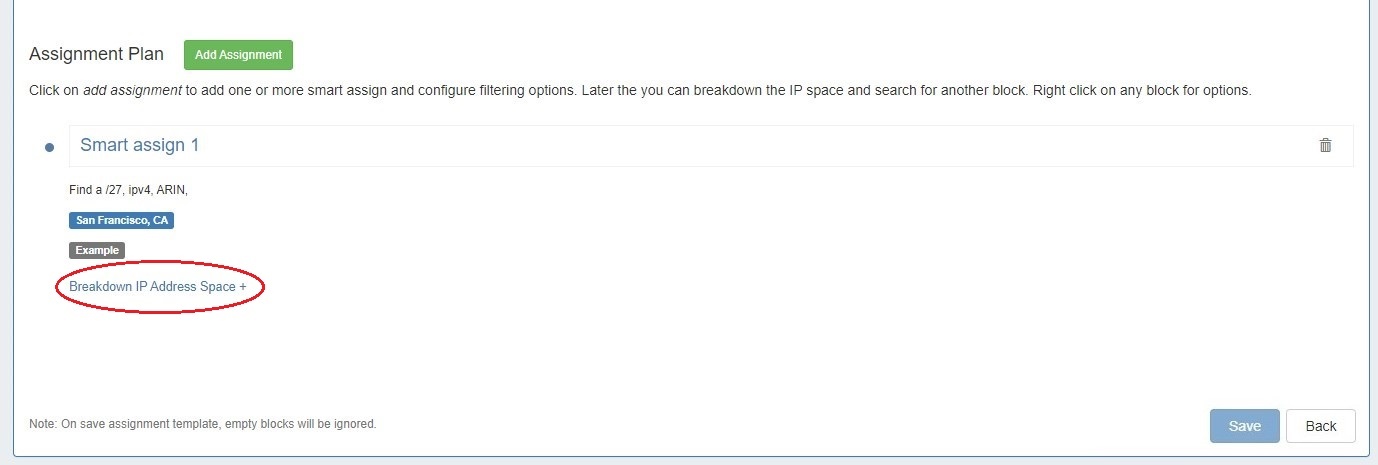
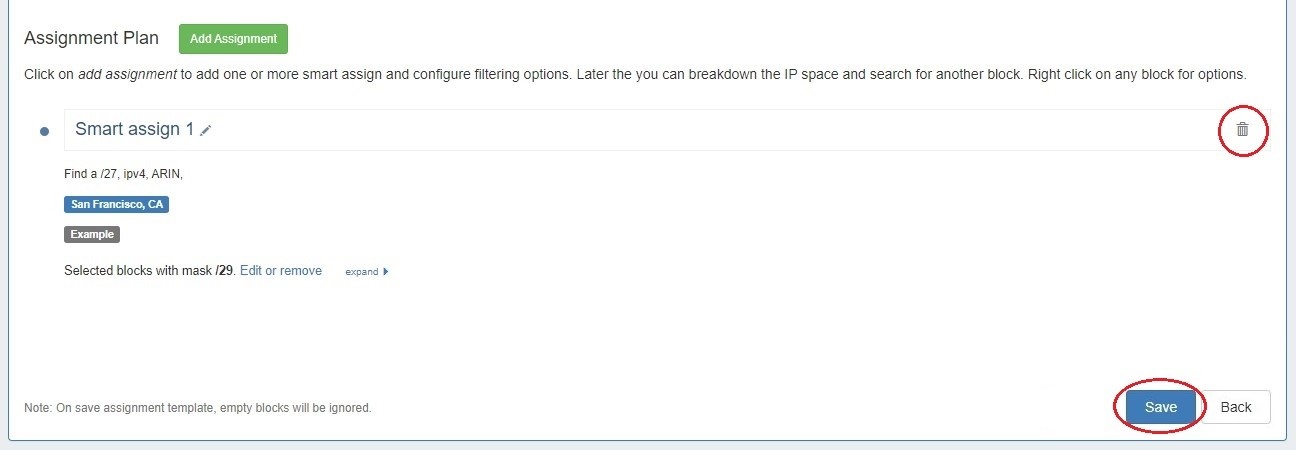
Enter a name and description for the new template then click "Add Assignment" to select Smart Assign criteria.
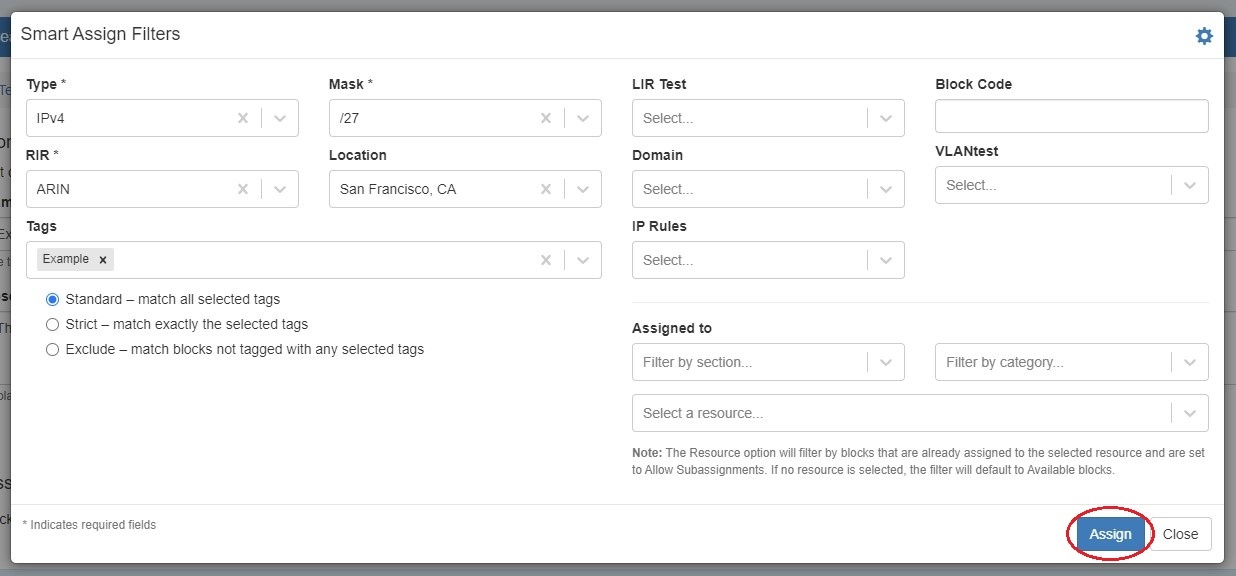
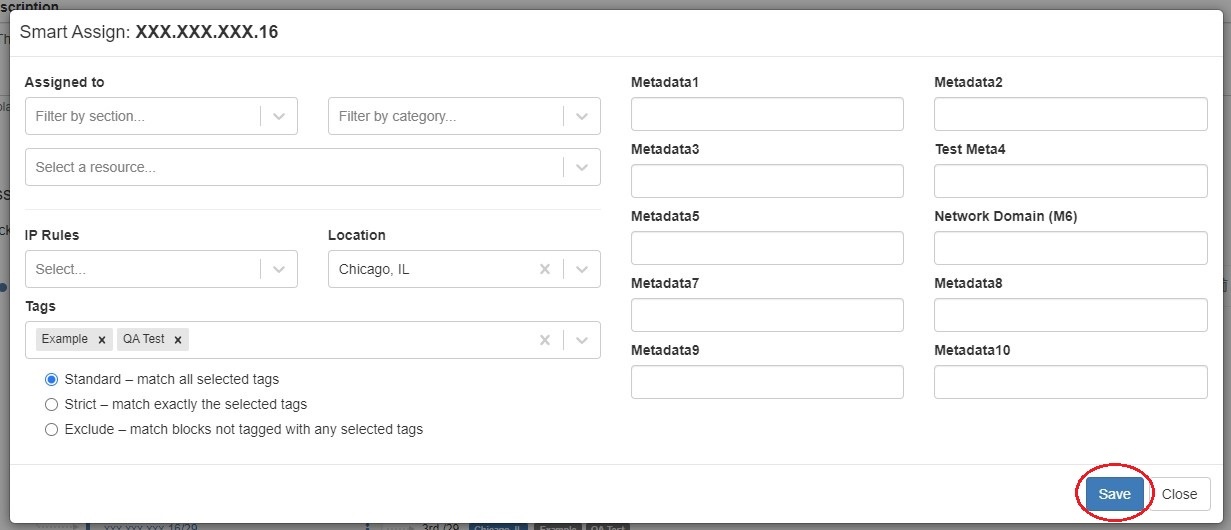
Select Smart Assign filter criteria and click "Assign".
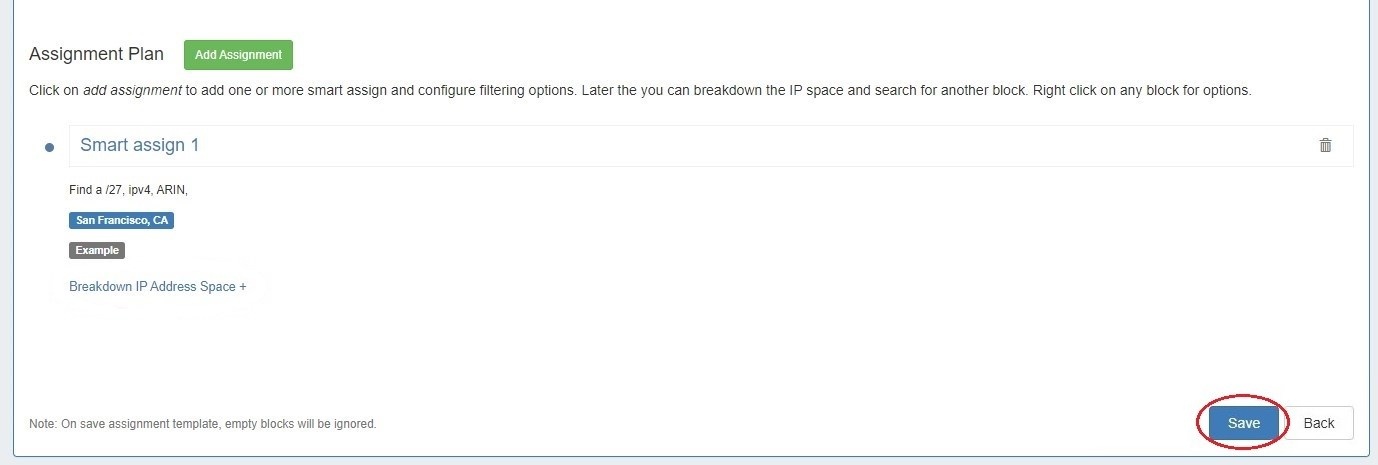
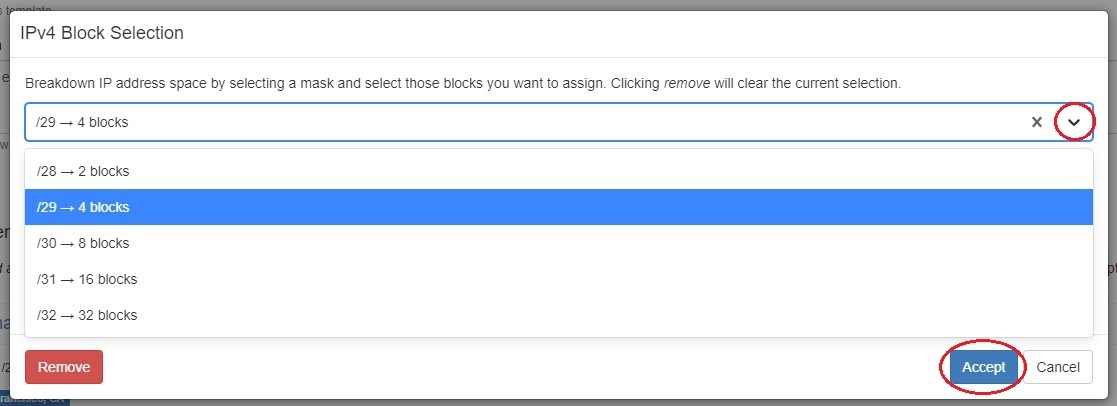
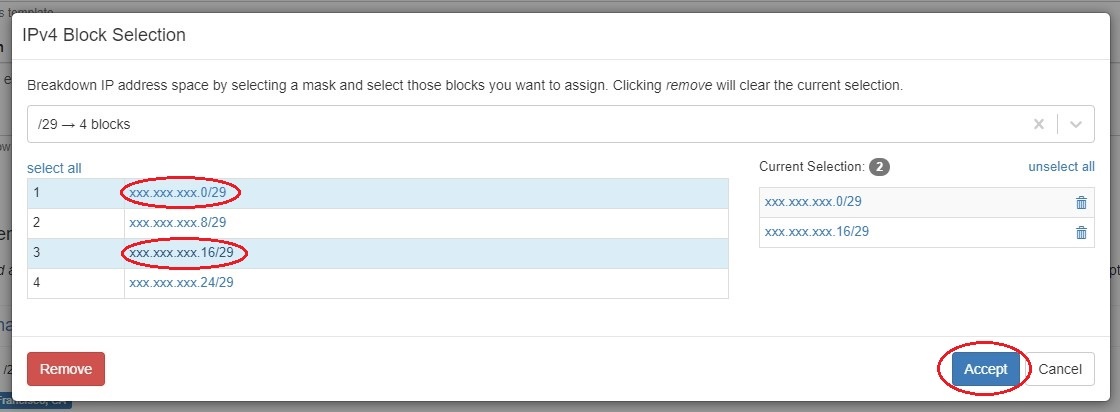
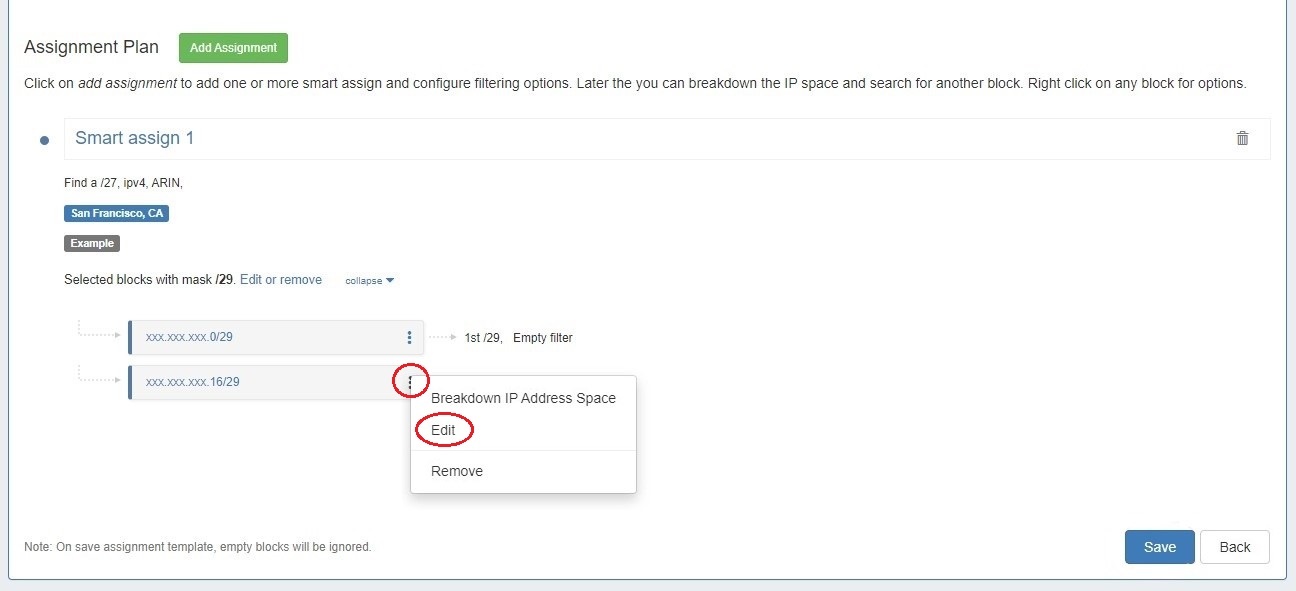
The template may be saved at this point by clicking "Save" at lower right. IP space may be broken down prior to saving or at a later time by editing the template.
|

IPAM Netblock Tree View
CFR - 251: Added "Netblock Tree" view to IPAM Manage
The "Netblock Tree" view in IPAM Manage displays the hierarchy organization of all Parent / Child blocks under that Top Level Aggregate. To open/close a parent block, click the expansion caret at the left side of the row.Note: Only blocks that also exist as leaf nodes in the Standard IPAM Manage view are editable in Netblock Tree view. , with levels denoted by assignment prefix.
Netblock Tree View displays the hierarchy organization of Parent / Child blocks under a Top Level Aggregate, but eliminates intermediate "bookkeeping" / allocated blocks, and prioritizes masks with assigned blocks. This provides a more effective view at the specific hierarchy levels used for assignments and management.
The Netblock Tree view detects which subnet masks have changes in assignments applied, and then automatically builds branches or displays individual addresses at those levels. This view includes the display of theoretical blocks which do not currently exist as ProVision objects, providing a more holistic working overview of the netblock structure.
While in Netblock Tree View, click on the expansion caret to expand / close a hierarchy branch parent block. Only blocks which exist in ProVision will be able to be edited or expanded.
Netblock Tree Logic:
- The top level at which an assignment exists denotes the top starting mask of the Netblock Tree View
- Proceeding down the tree, if one of the following conditions are detected, a new branch is created showing all blocks with a prefix at that level - regardless of of whether they exist as editable ProVision block objects.
- A change in assignment is detected (a block is assigned to a different resource than its parent )
- A manual split has been performed at the assignment level of a sibling/cousin block
- If no more changes in assignment are detected down the block tree, the lowest branch will display as containing individual addresses (/32s or /128s). The addresses may be both theoretical and those existing in ProVision.
- Expandable branches display with blue arrows, and denote that the block with that prefix also exists in ProVision → Block View
- Blocks and addresses which exist in ProVision will be editable in Netblock Tree View, but theoretical blocks at any level are not editable unless created in ProVision.
Expand the walkthrough below for a more detailed explanation the Netblock Tree View:
| Expand | ||
|---|---|---|
| ||
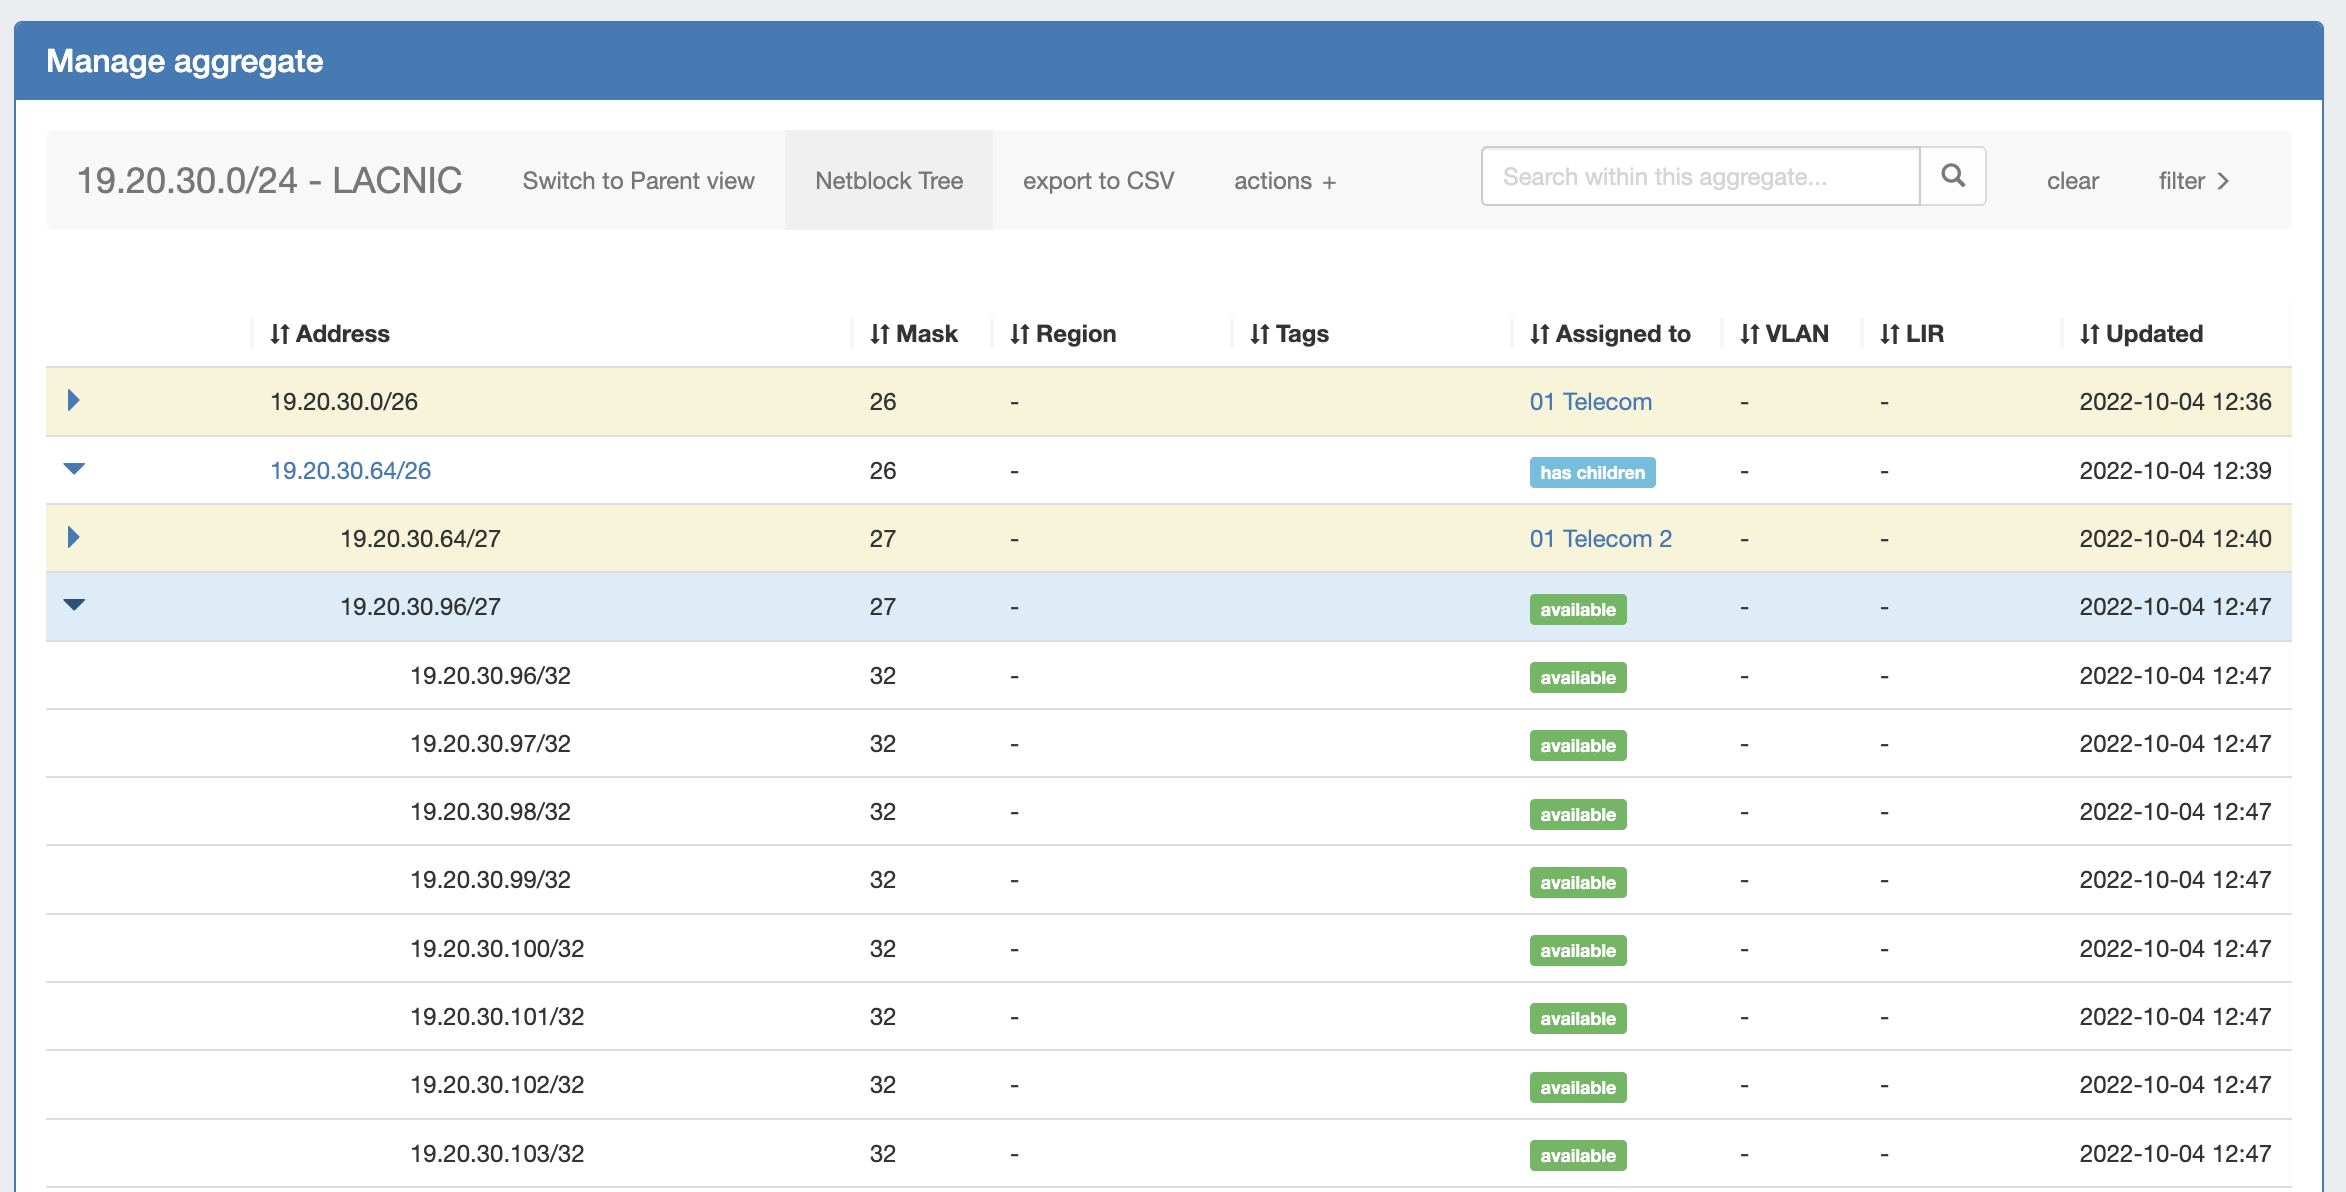
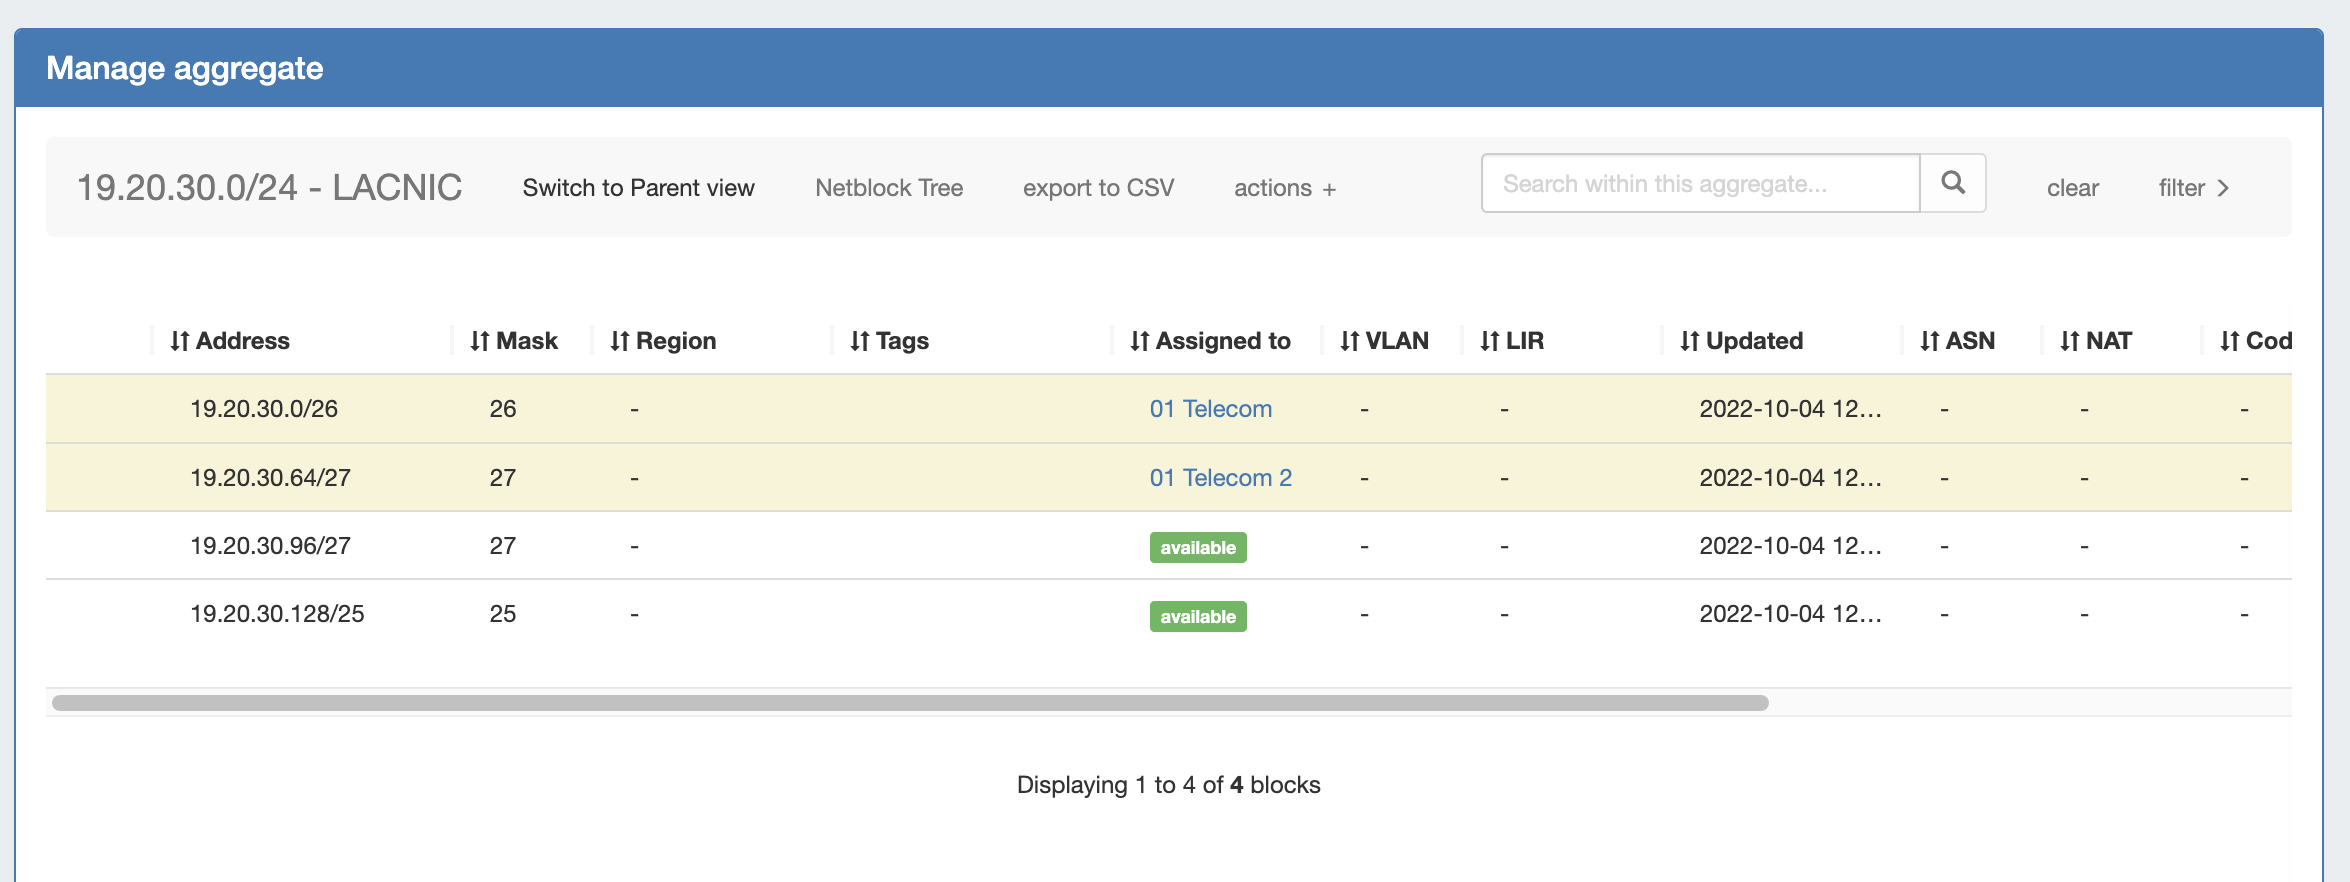
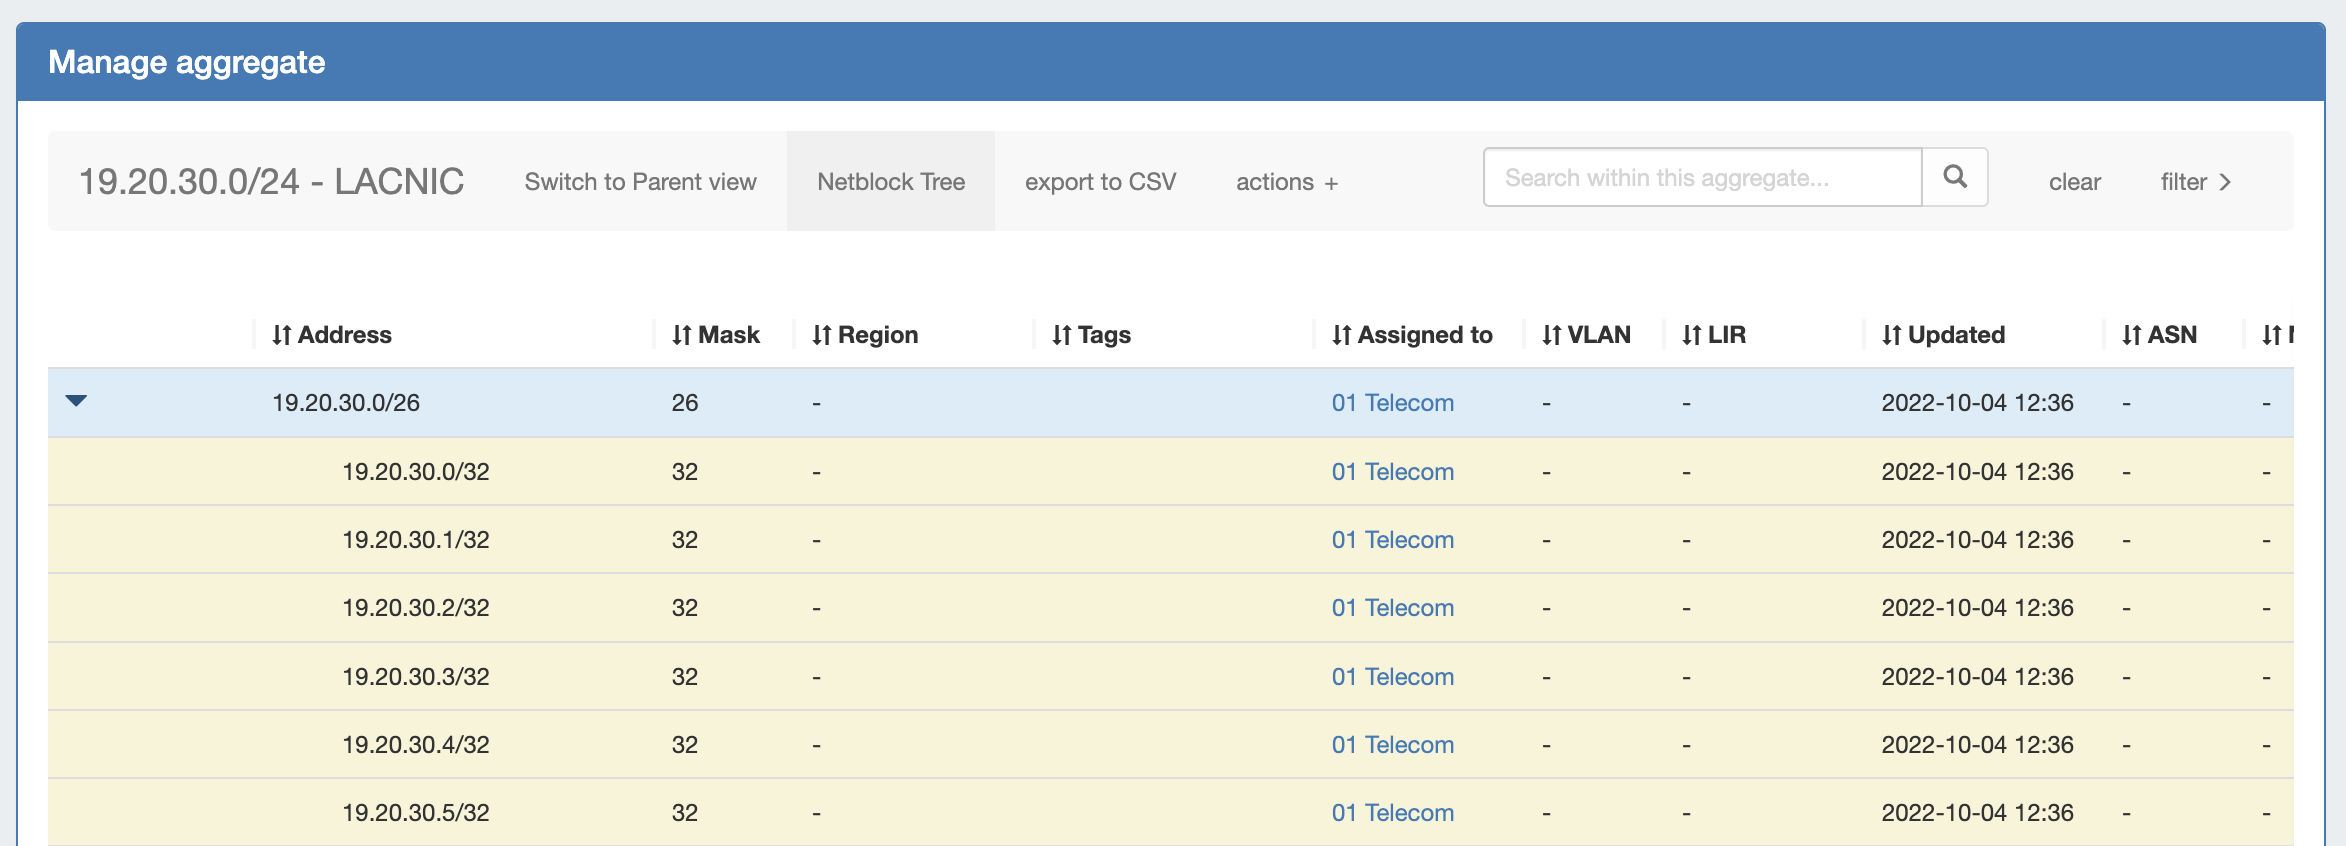
For a simplified example of the how Netblock Tree View displays compared to Block View, we will be using an example aggregate of 19.20.30.0/24 (assigned to 'Available'). The standard Block View for this aggregate shows it has been split to contain a /25, a /26, and two /27s. The /26 and one of the /27s have been assigned to different resources. In Block View, we only see the lowest child blocks that exist in ProVision:
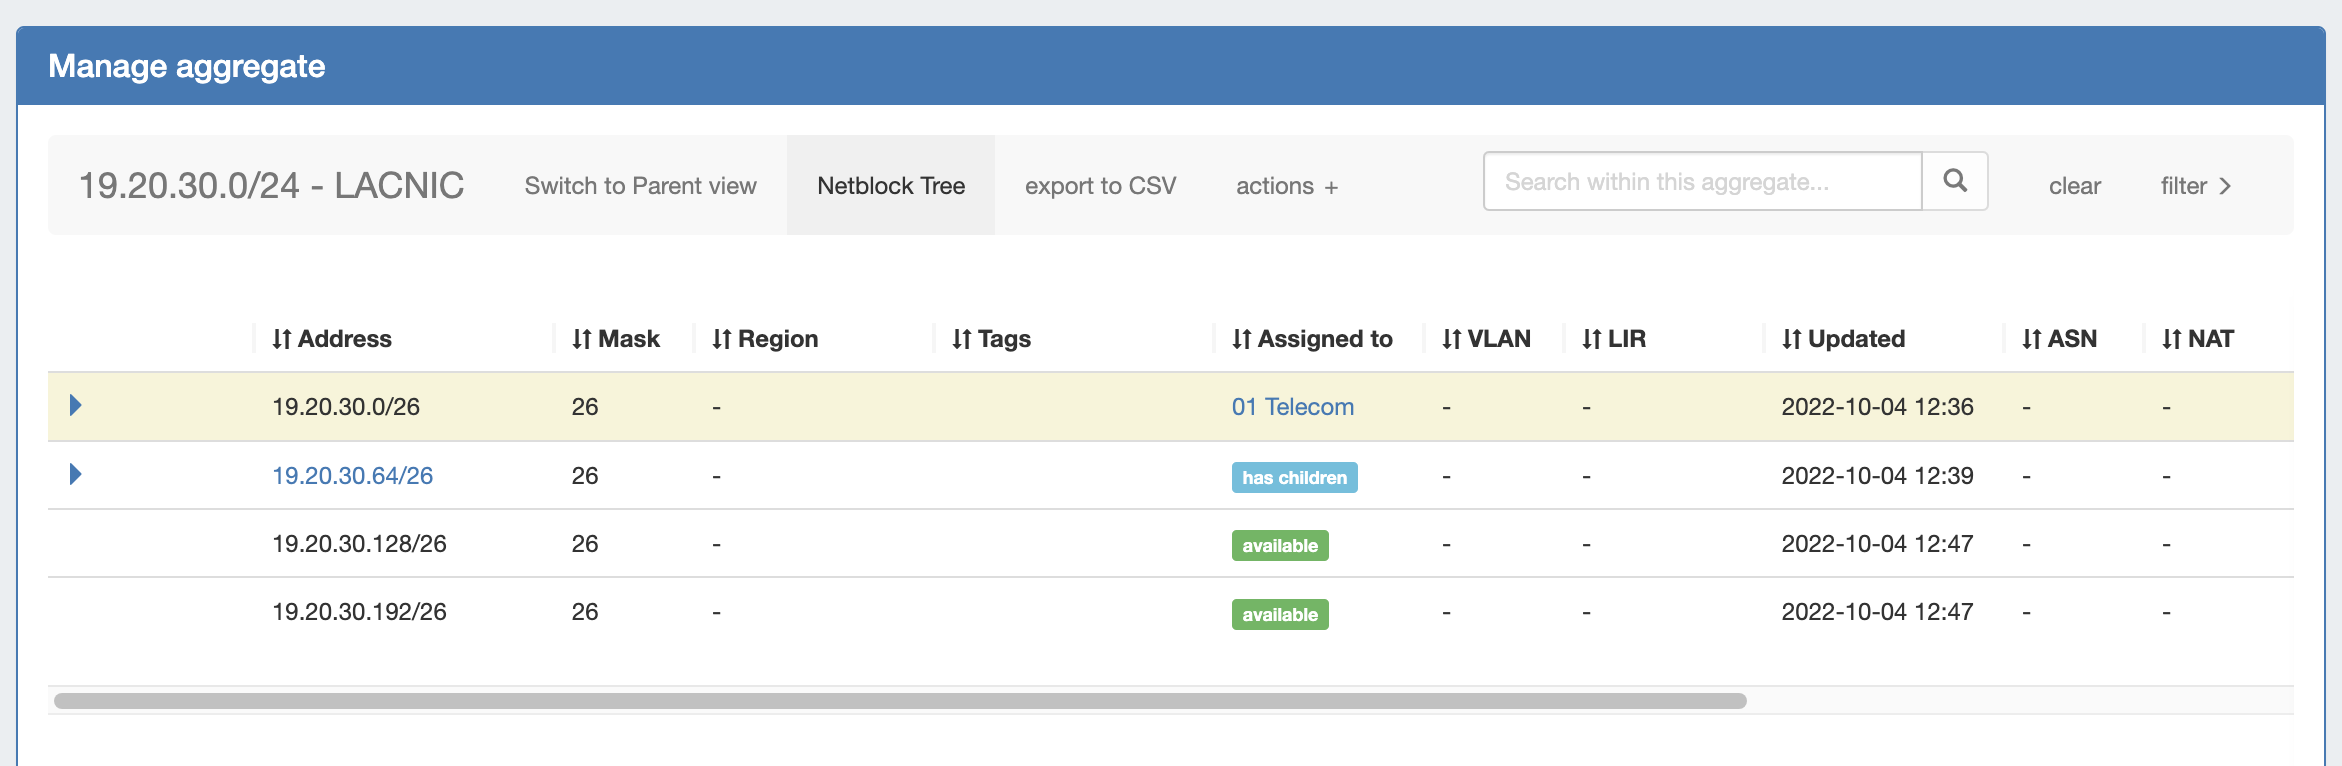
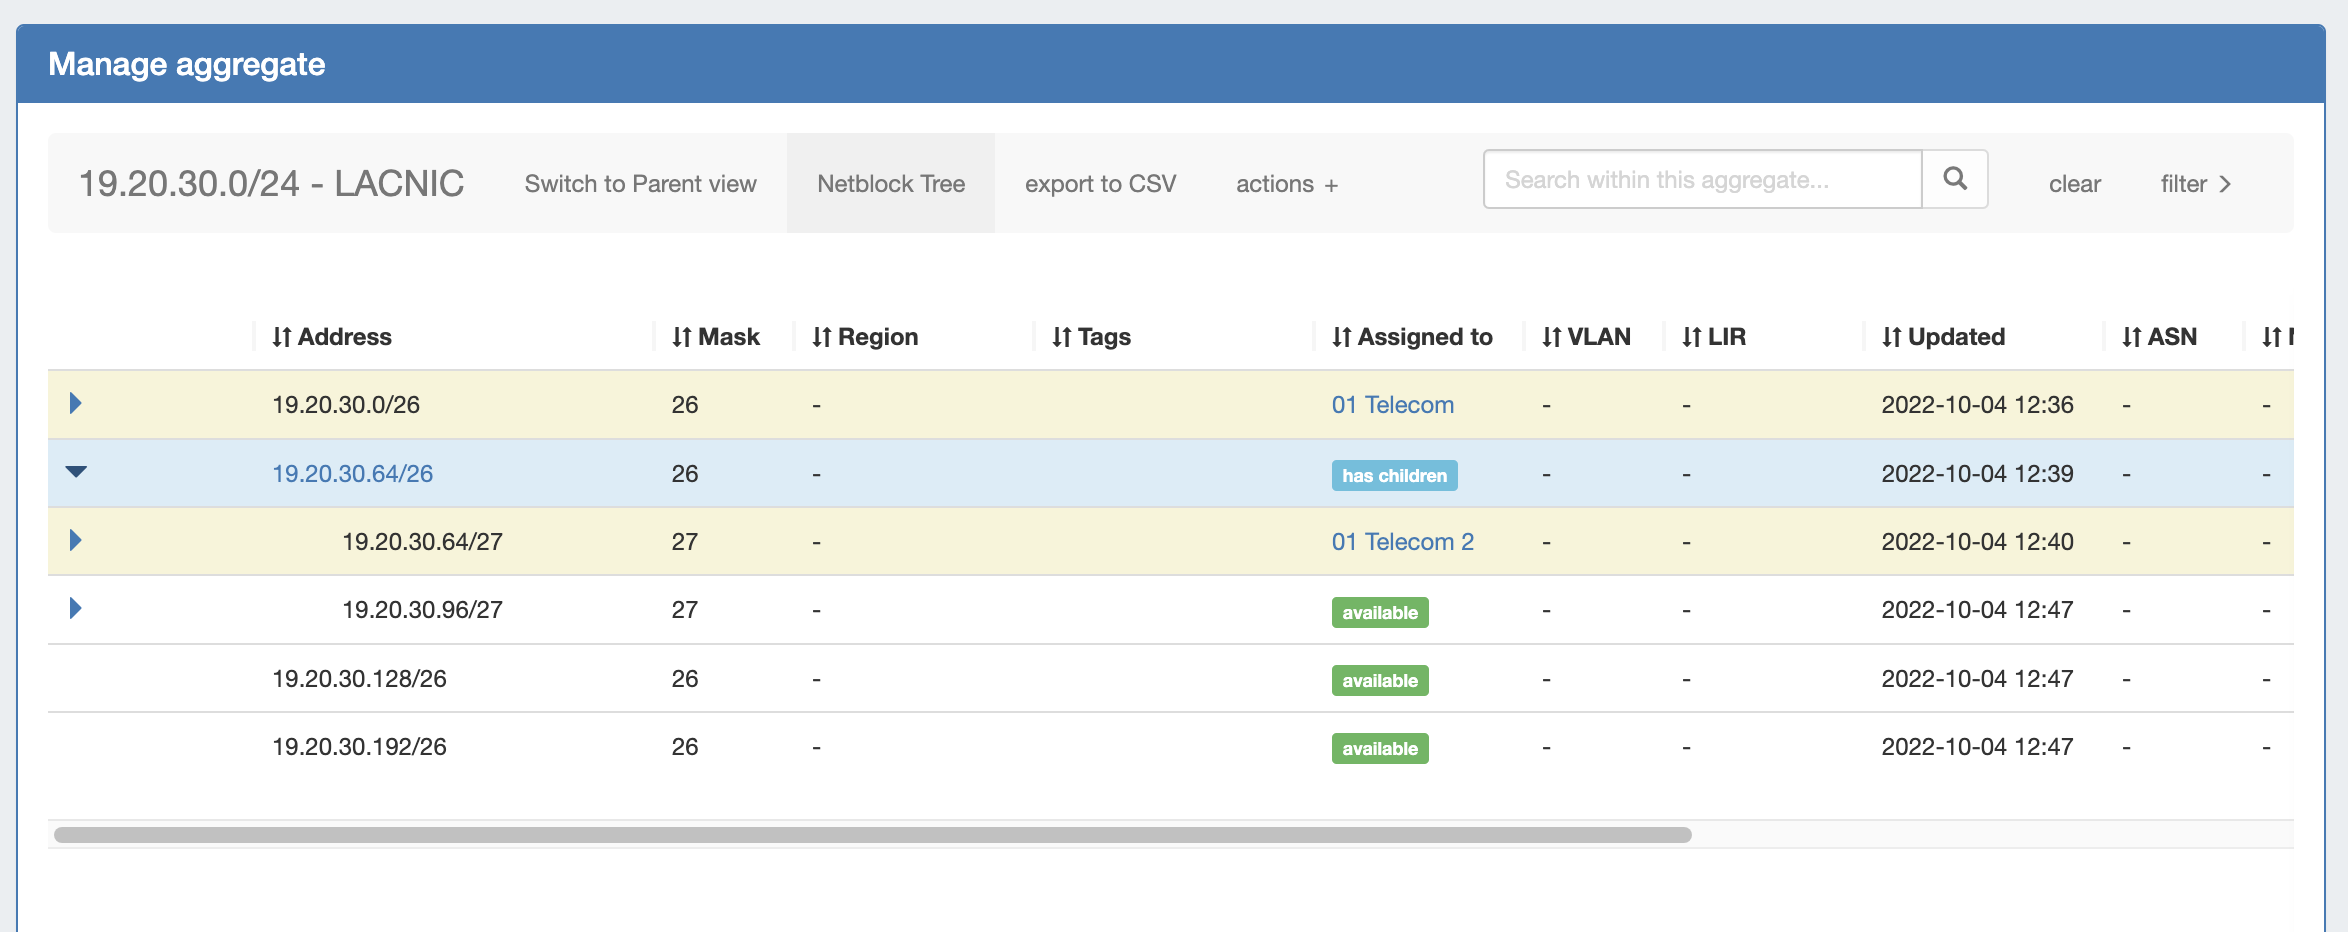
When we switch to Netblock Tree View (by clicking "Netblock Tree") we see only /26s in the top level of the view. This is because 19.20.30.0/26, assigned to '01 Telecom', is the first assigned block encountered. Netblock Tree View will ignore 19.20.30.0/25 and 19.20.30.128/25 because they are assigned to the same resource as 19.20.30.0/24 ('Available').
There are no different assignments under this 19.20.30.0/26. Thus, when you expand it you will see only /32 addresses. As these /32s have not yet been created in ProVision → Block View, they only exist as "theoretical" blocks and are not editable, but aid in viewing the totality of available addresses under that prefix.
If you would like these addresses to be assigned or editable in ProVision, you may split the /26 down to the desired number of /32 addresses using templates or manual splits. This will create the addresses in ProVision and allow those addresses to be edited.
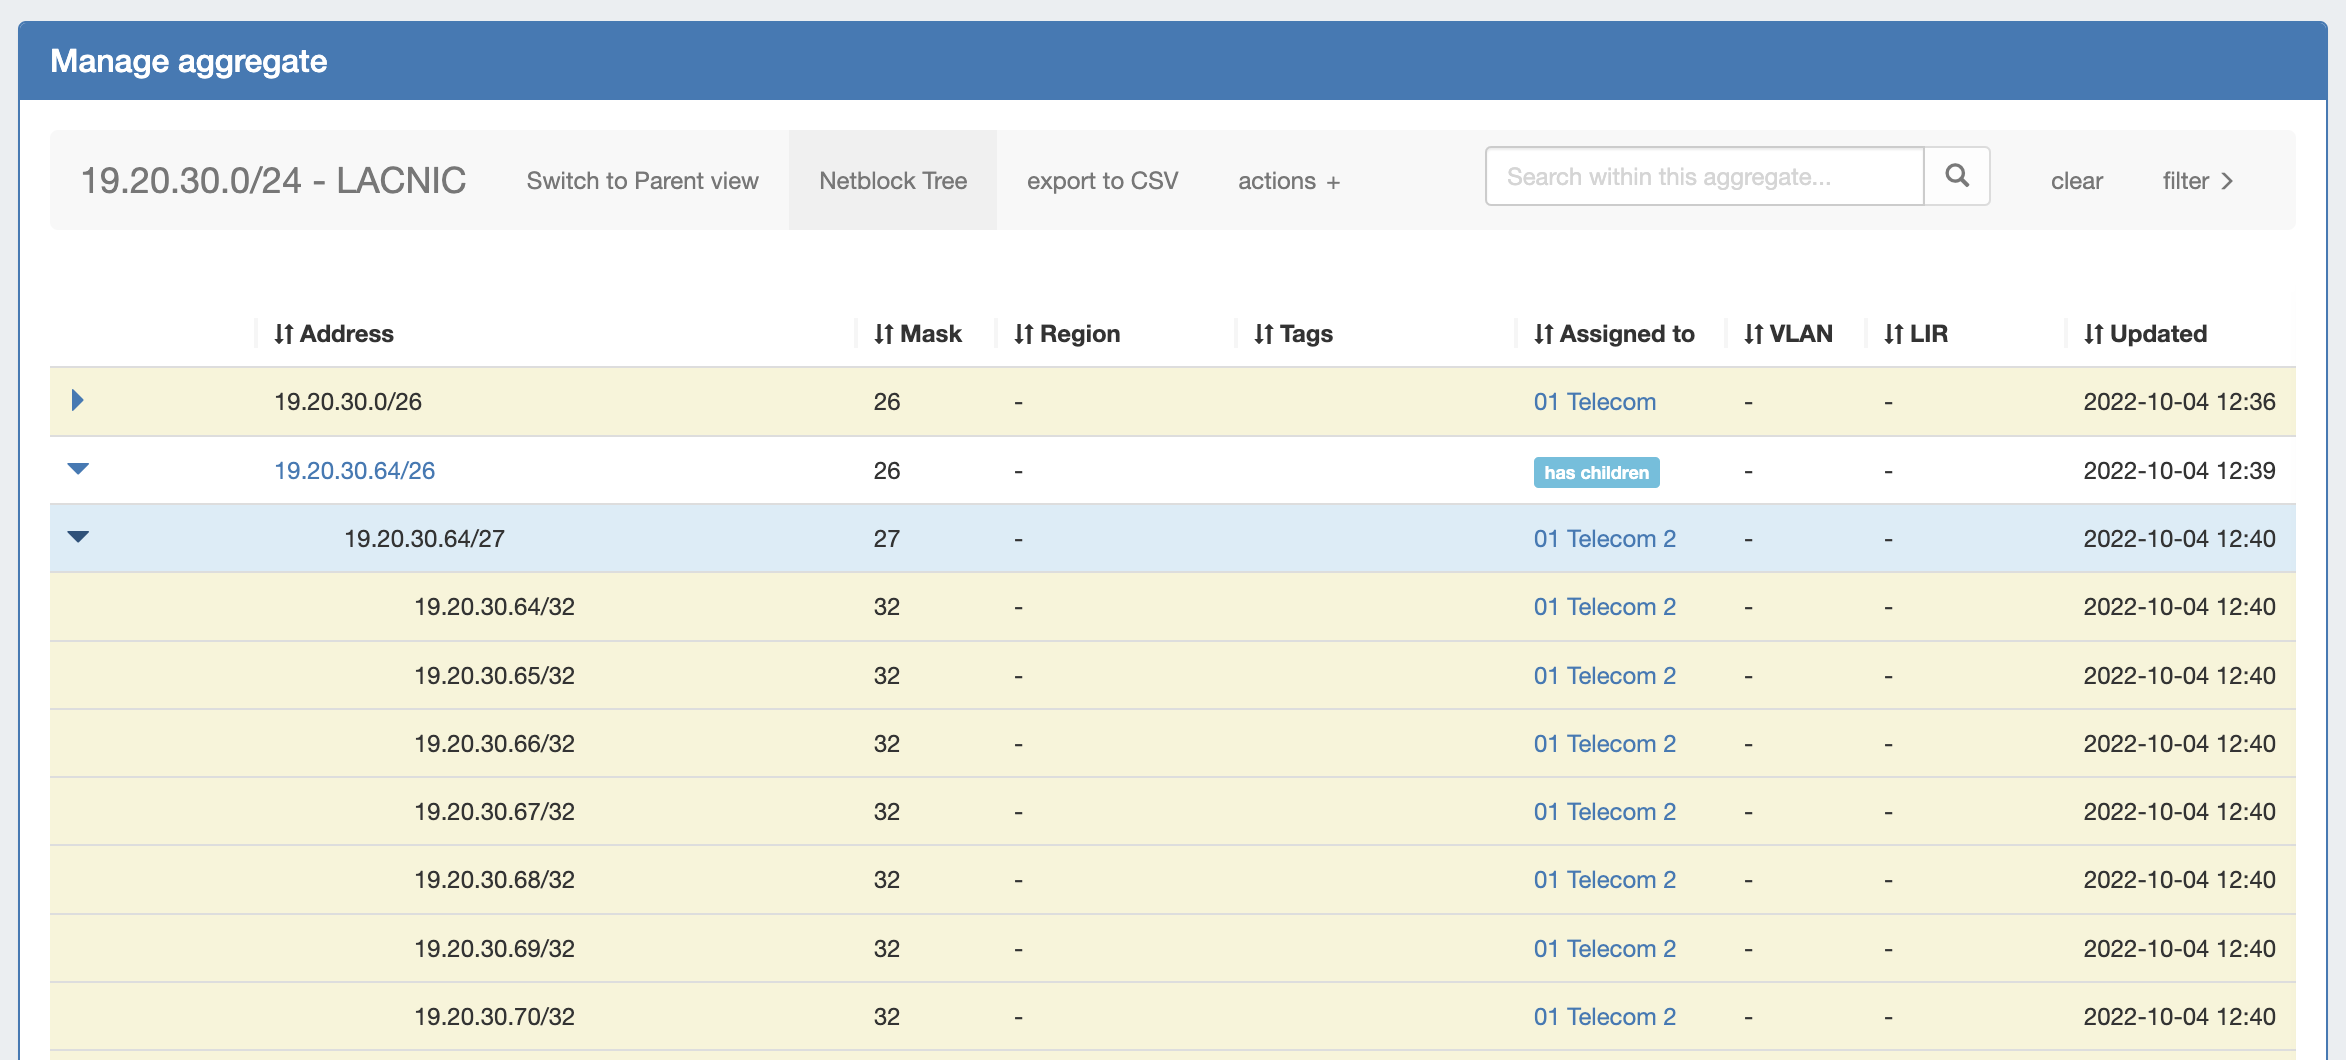
Under those branches display individual /32 addresses, because the /27 is assigned.
However, if 19.20.30.128/25 is split into two /26s in ProVision, the previously theoretical blocks of 19.20.30.128/26 and 19.20.30.194/26 become 'real' objects, and will display as expandable and editable. |
Additional Features / Improvements
...
| Expand | ||
|---|---|---|
| ||
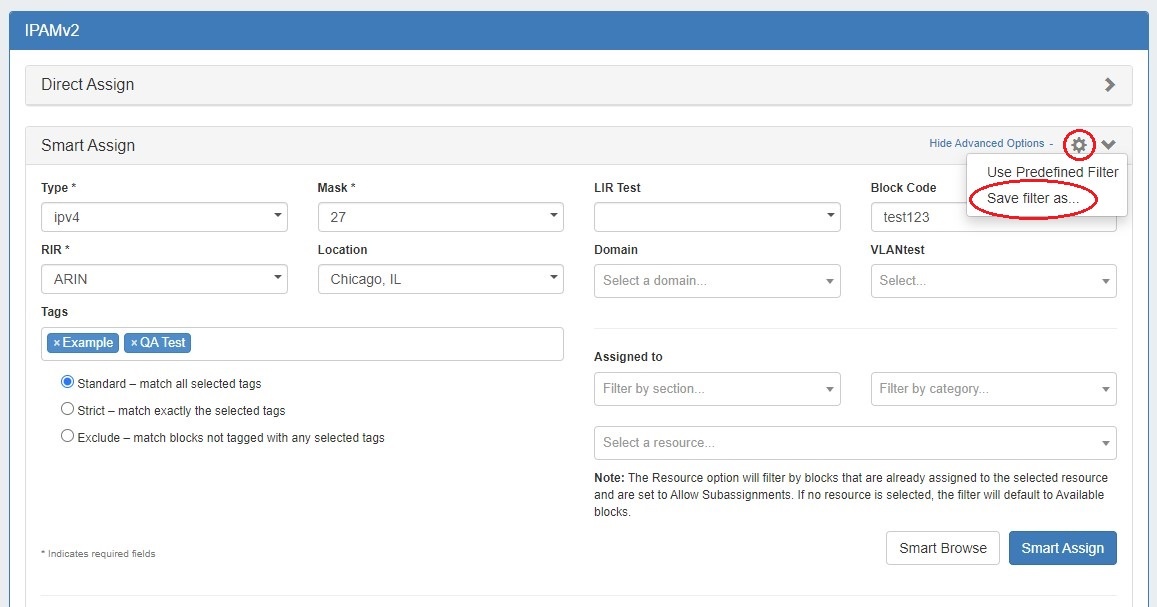
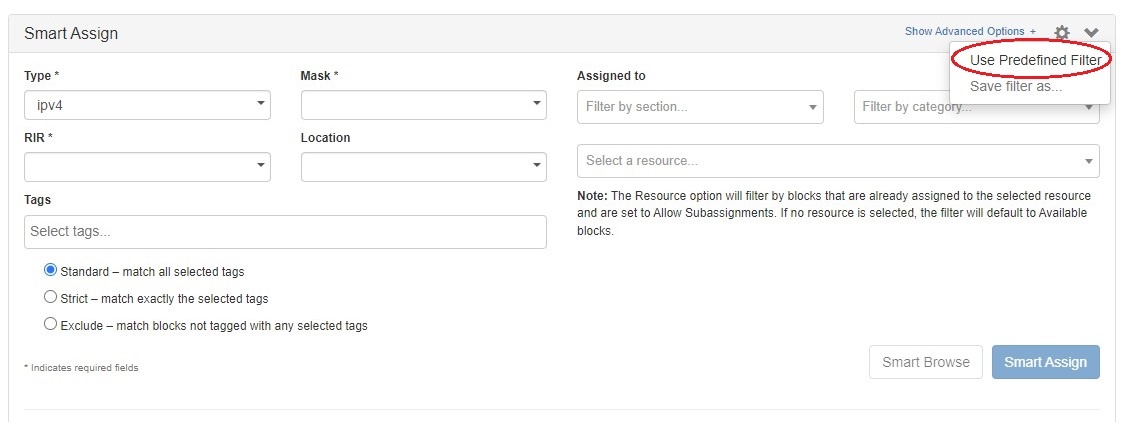
Predefined Filters are accessible from the IPAM Gadget Smart Assign section. To create a Predefined Filter, select Smart Assign filter criteria. Click on the gear icon at upper right and select "Save filter as..."
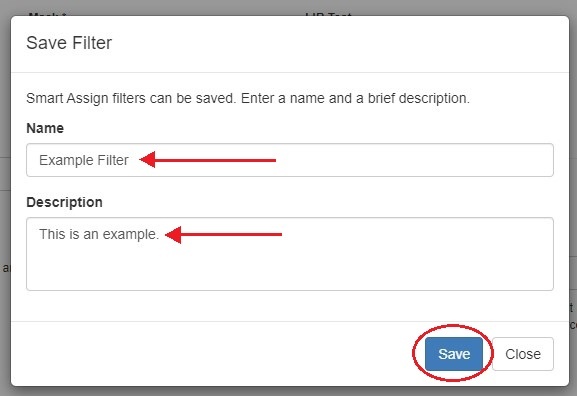
Enter a name and brief description for the filter and click "Save".
To use a saved filter, click on the gear menu and click "Use Predefined Filter".
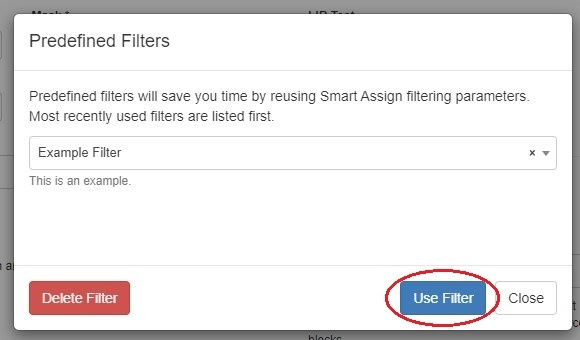
Select a filter from the dropdown and click "Use Filter". A saved filter may be deleted by selecting "Delete Filter".
Once the filter is applied, click "Smart Browse" or "Smart Assign" as normal.
|

...
IM - 4681: Added a background call to Smart Assign and Direct Assign that checks for additional sub-assignable blocks.
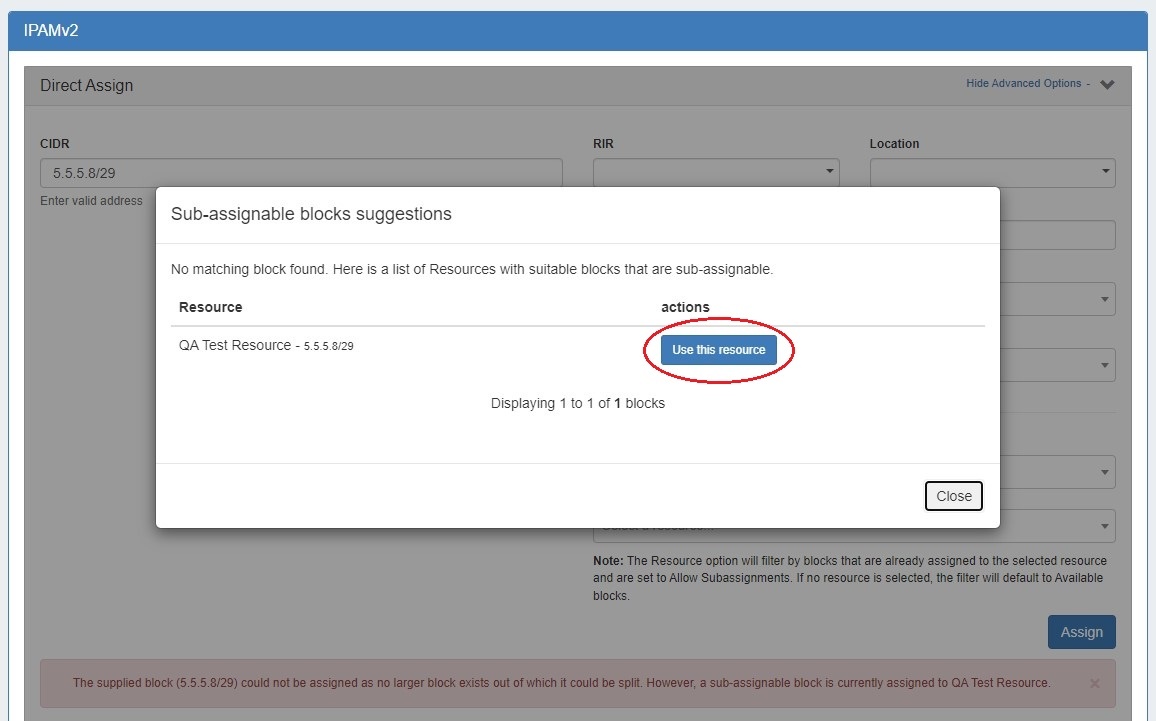
If no available blocks are found meeting the Direct / Smart Assign filter conditions, but one or more subassignable blocks are found, a modal will inform the user and suggest resources with allocations that meet that criteria. To assign the suggested block, simply click "Use this resource"..
Smart Assign Resource Filter Updates
...
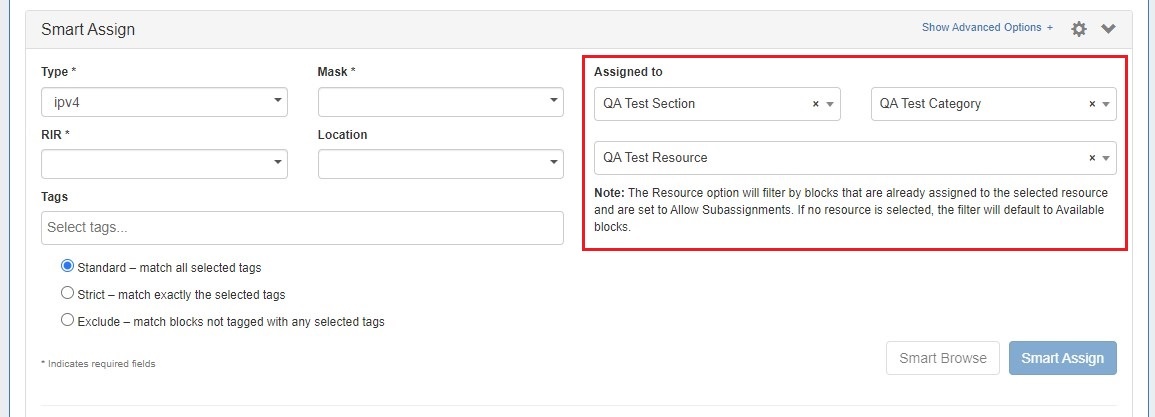
CFR - 268: Smart Assign Filters now include options to filter the assigned resource by Section or Category
It is now slightly easier and faster to find and specify a resource for Smart Assign criteria. The Resource selector has been relocated to display by default, and may be filtered by Section / Category to limit results.
Edit After Assign
CFR - 253: Added an "Edit Now" link to successful Smart Assign / Direct Assign assignments, to facilitate immediate edits.
...
Global search has multiple improvements to increase the handling and scope of search results.
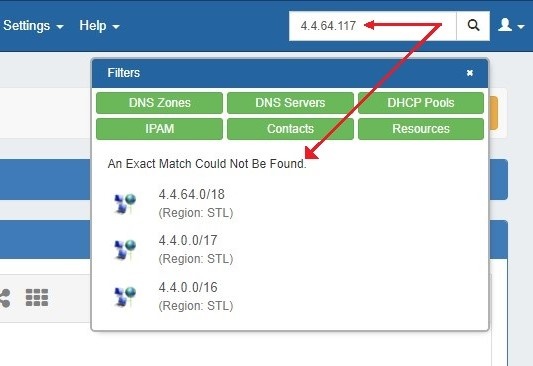
CFR - 223: Improved Global Search handling of IPs under larger blocks.Global Search handling of IPs under larger blocks.
When an exact match is not found, Global Search will inform the user and provide a list of blocks, ordered from smallest to largest, into which the queried block may fit.
CFR - 228: Updated Global Search to fully index all resource attributes.
...
| Expand | ||
|---|---|---|
| ||
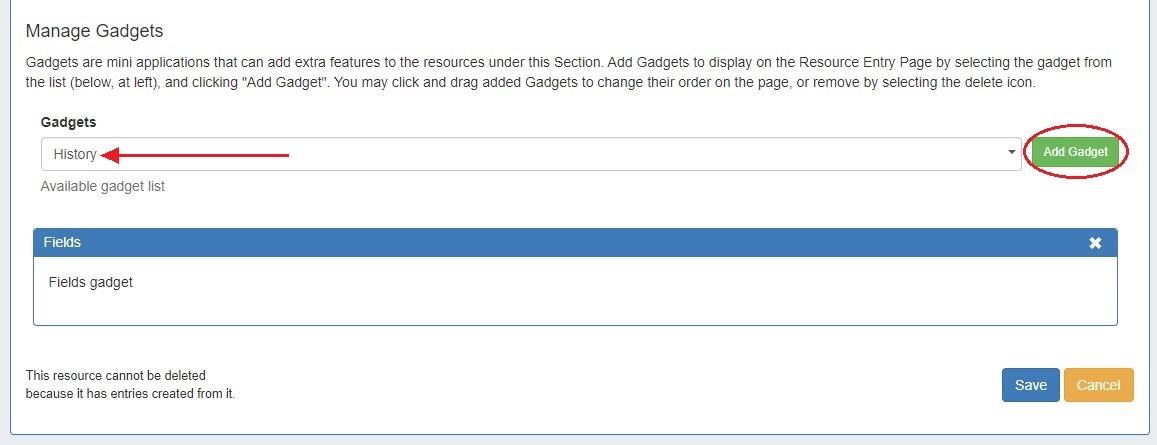
To enable the gadget for a section go to edit section and select it from the Manage Gadgets dropdown menu and click "Add Gadget".
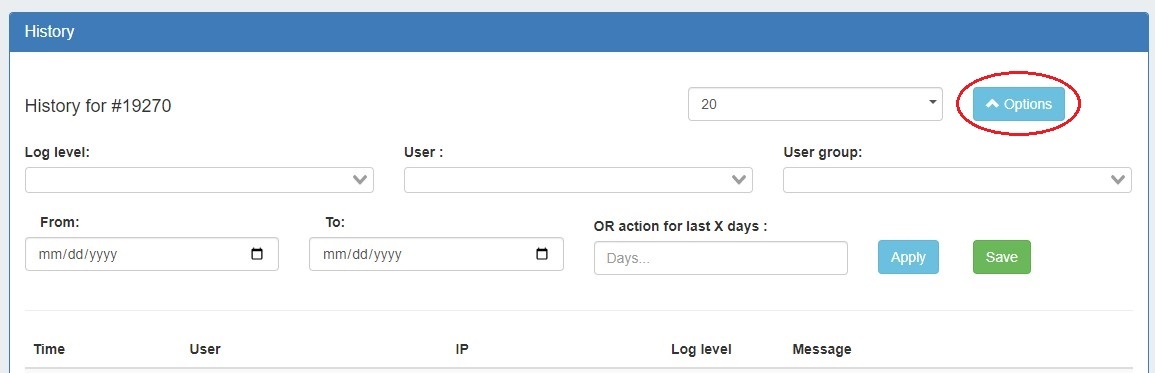
Once the gadget is enabled on a Resource, log activity can be filtered by clicking "Options". Logs may be filtered by log level, user, user group, and date. Filters can be saved as the default gadget view by clicking "Save".
|
...
Peering Improvements
PeeringDB API Key
...
| Info |
|---|
| For information on PeeringDB API keys, please refer to: https://docs.peeringdb.com/howto/api_keys/ |
Session Quick Actions
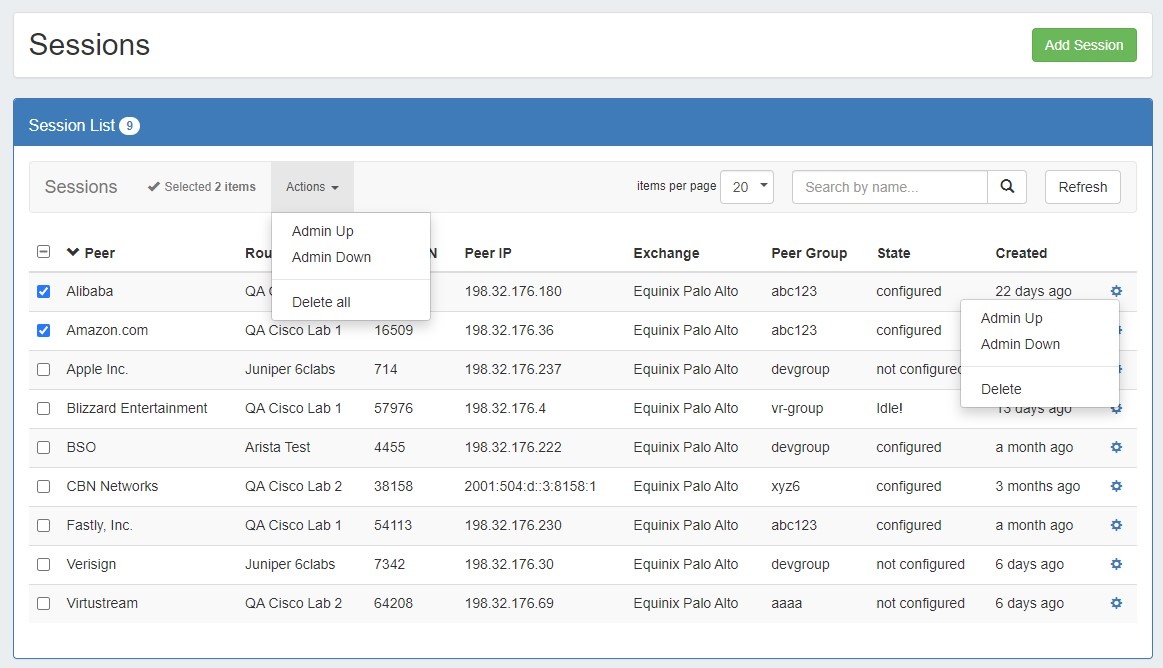
IM - 4747: Added quick actions and multi-select actions to session list.
Configure Multiple Sessions Updates
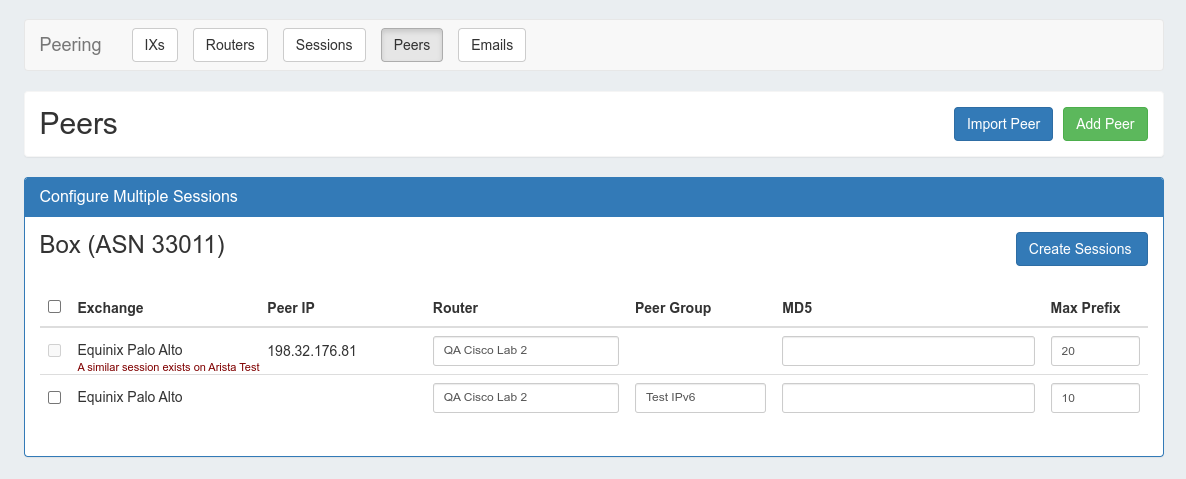
IM - 4746: Added detection for similar sessions
Users will now be alerted to potential duplicate sessions, via a notice under the "Configure Multiple Sessions" list if similar sessions are detected.
| : https://docs.peeringdb.com/howto/api_keys/ |
Session Quick Actions
IM - 4747: Added quick actions and multi-select actions to session list.
A Sessions List action menu now allows for quickly selecting Admin Up, Admin Down, and Delete for either a single or multiple sessions.
Configure Multiple Sessions Updates
IM - 4746: Added detection for similar sessions
Users will now be alerted to potential duplicate sessions, via a notice under the "Configure Multiple Sessions" list if similar sessions are detected.
(8.1.1 Peering Update)
Peering Maintenance Email
IM - 4851: Added the ability to bulk send a Maintenance Email to Peers
Peering now allows you to send a mass Maintenance Email to all Peers from a single form.
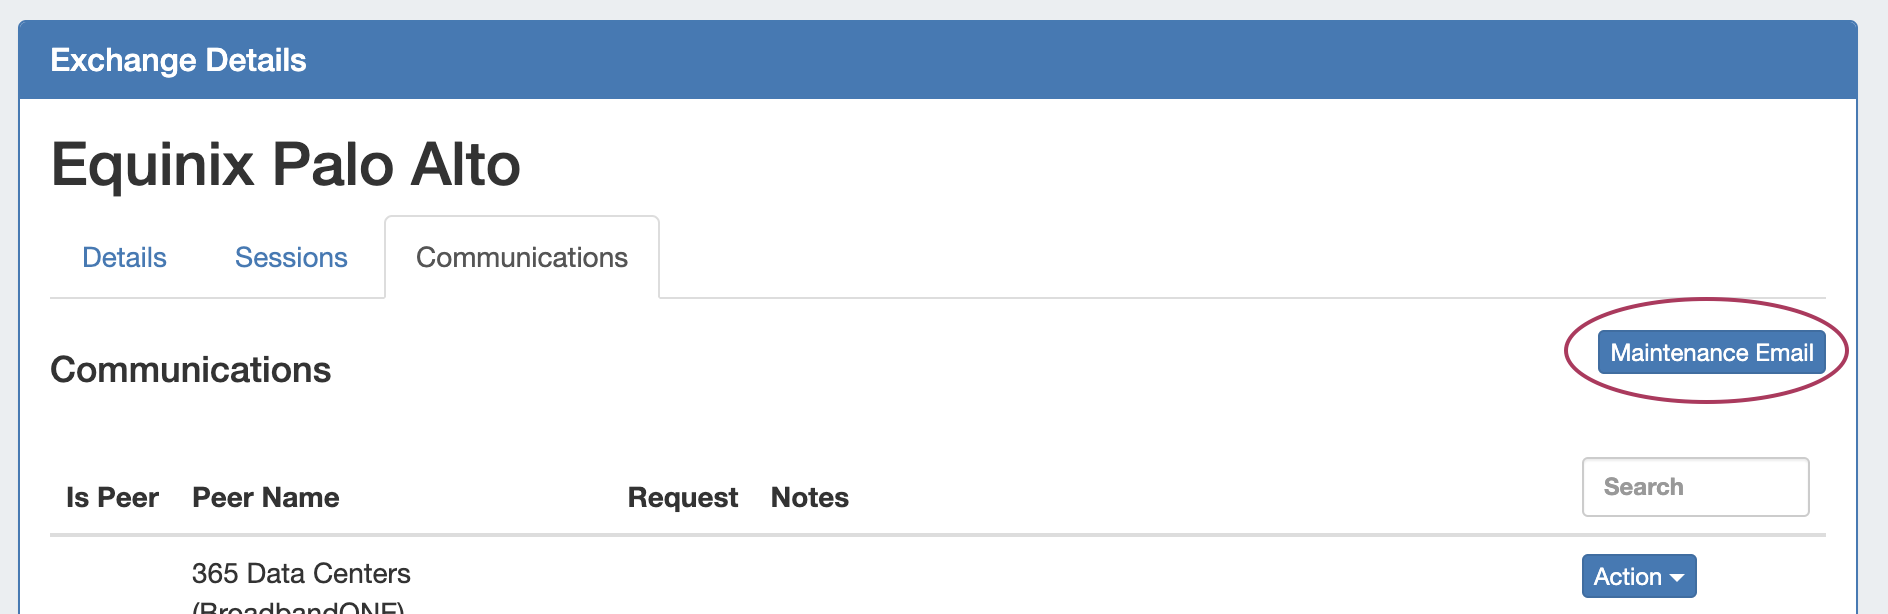
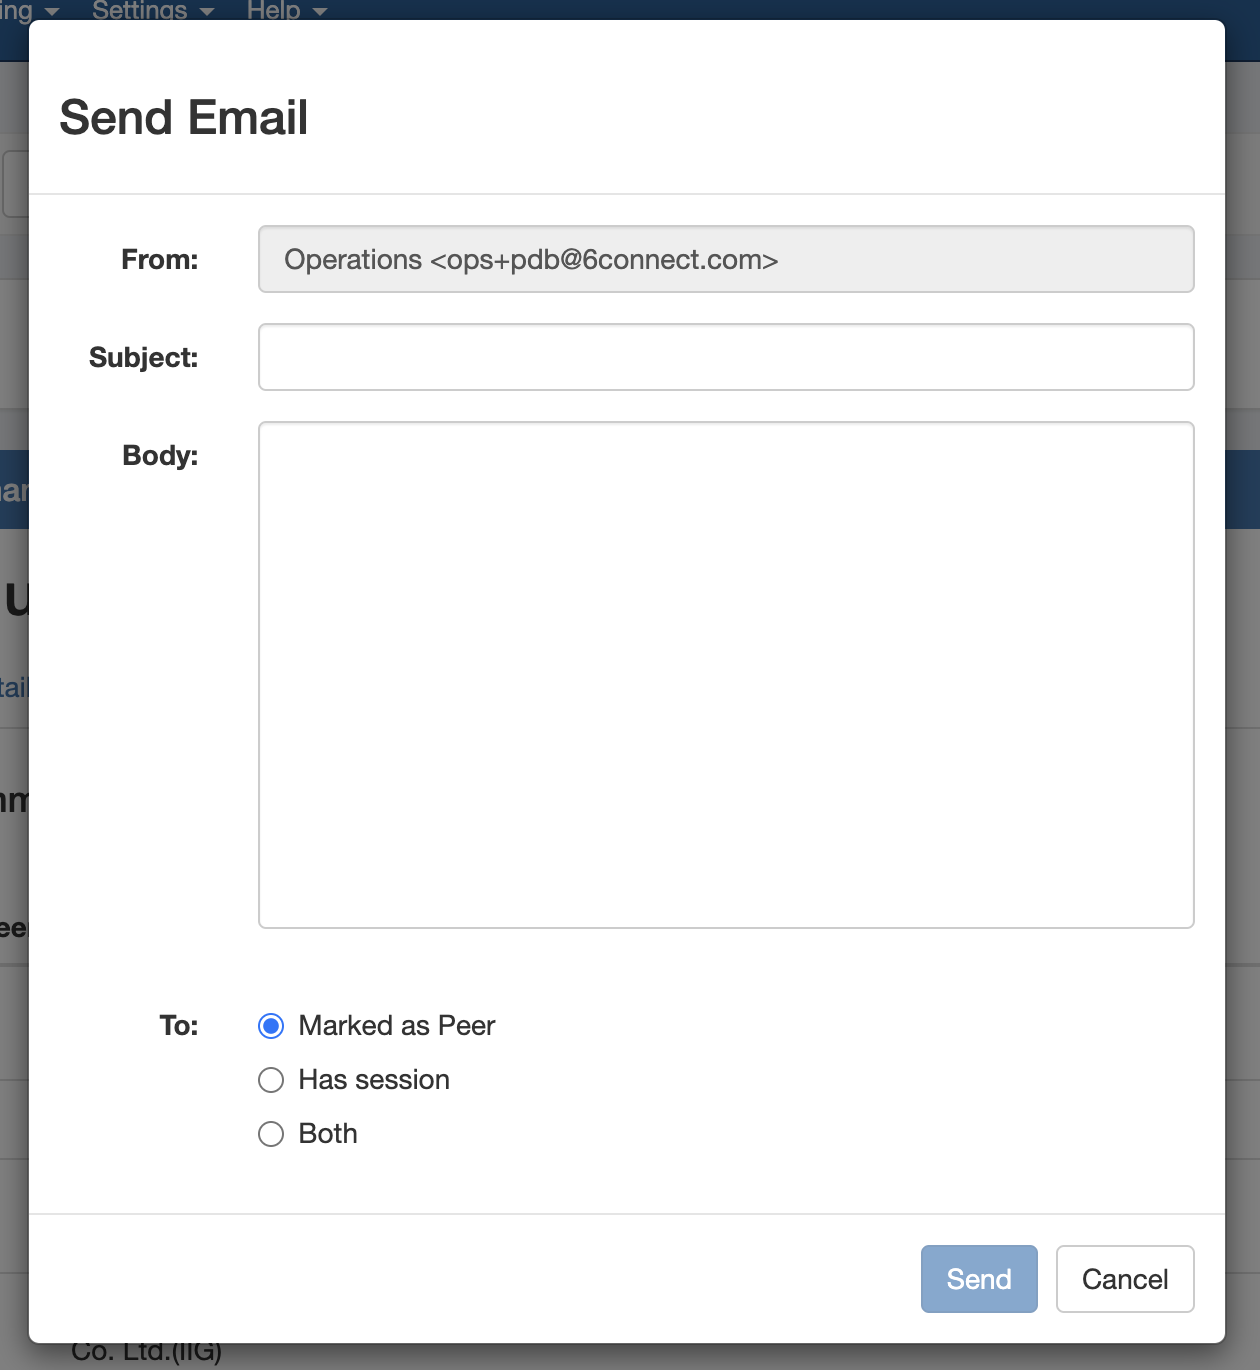
Go to Peering Tab → Selected Exchange → Communications, and then click the "Maintenance Email" button.
Add a subject line and message body, and select whether to send the email to all "Marked as Peer", those with sessions, or both.
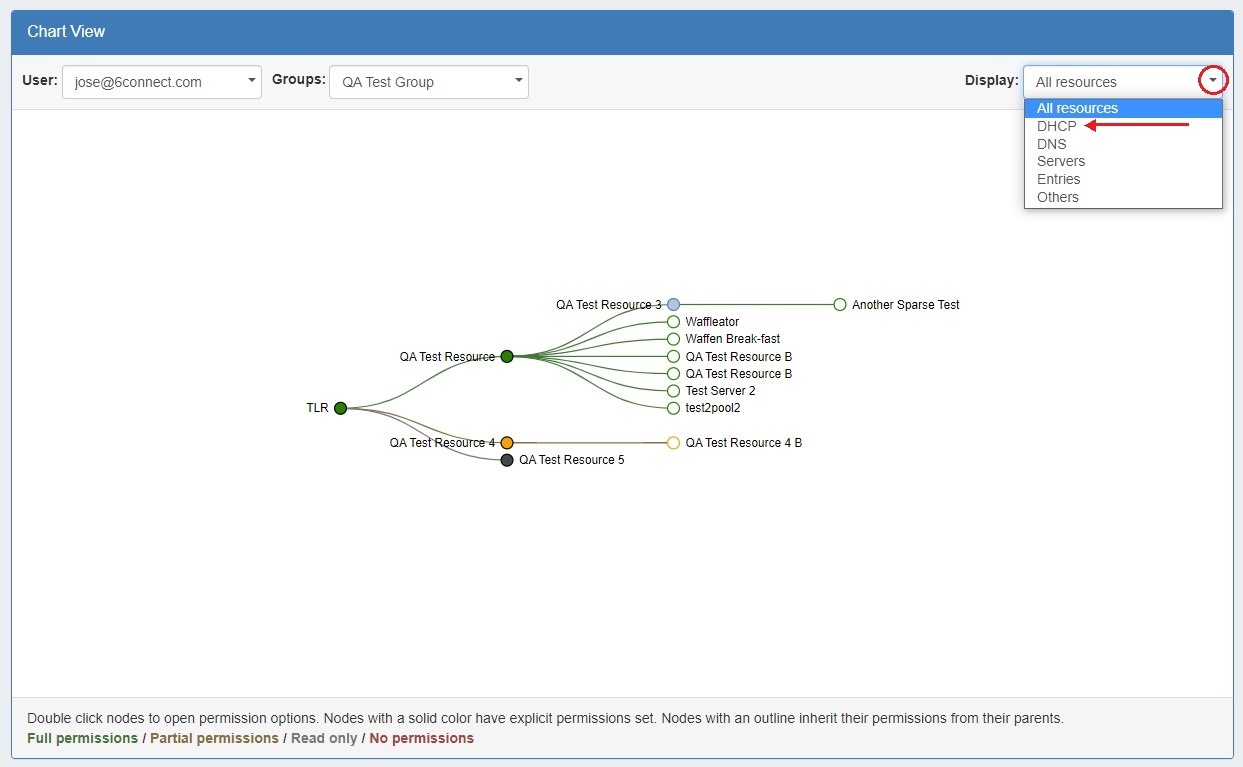
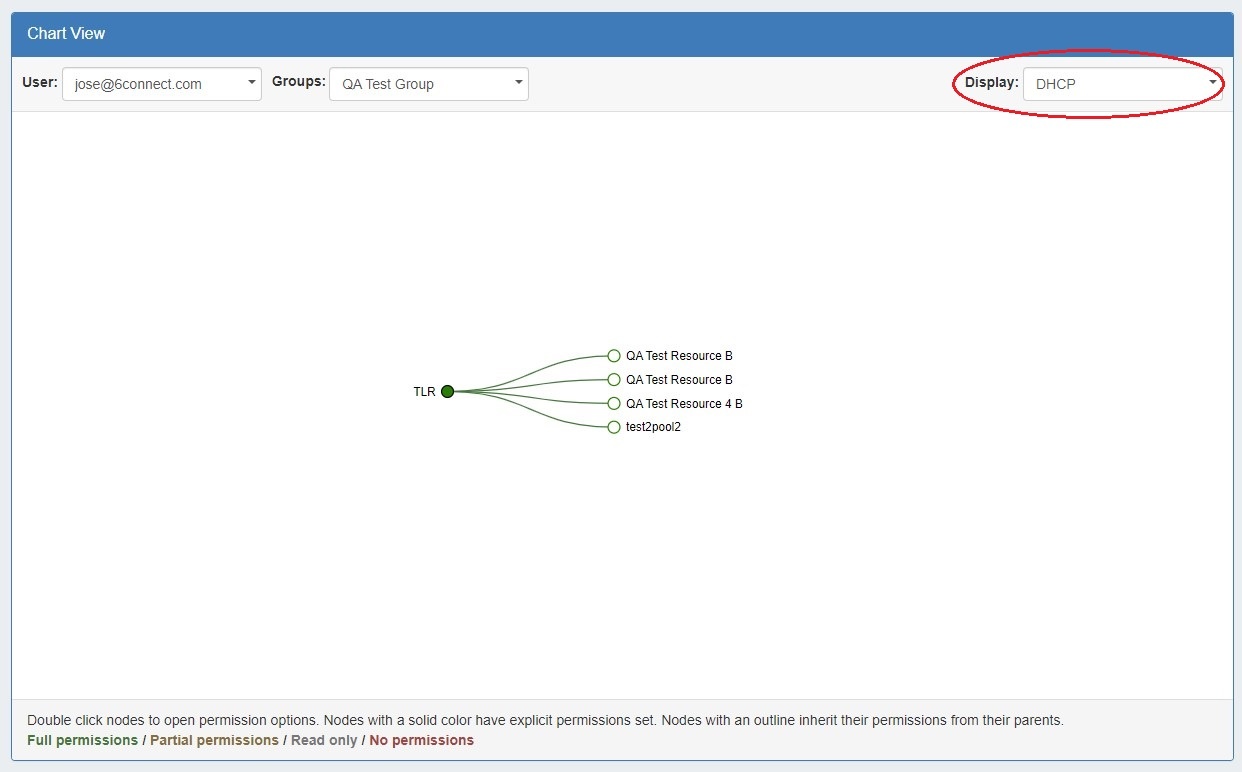
Users Chart View Improvements
IM - 4477: Added option to limit viewable data for a user.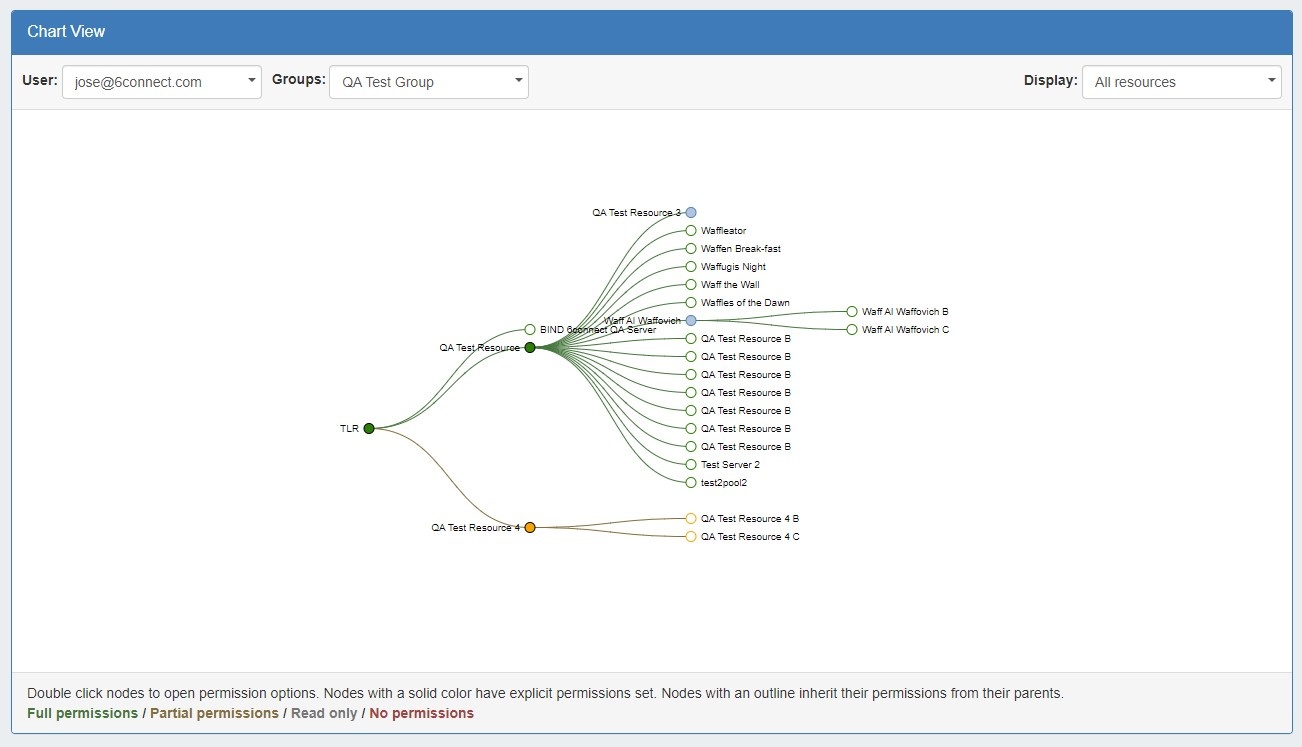 data for a user.
| Expand | ||
|---|---|---|
| ||
Click on the "Display" dropdown menu and select the resource type you would like to view.
The permissions tree will then show only the selected resource type.
|
IPAM Regions Updates
Geocoding Improvements
...
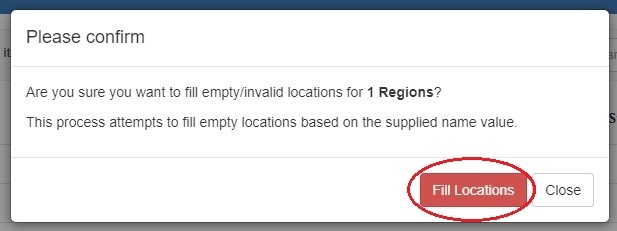
An optional multi-select option has been added to IPAM regions to fill empty location values with the Region's "Name" value. This may assist in post-import cleanup and map display for imported regions.
Select a region and then select "Fill Empty Locations" from the Actions menu.
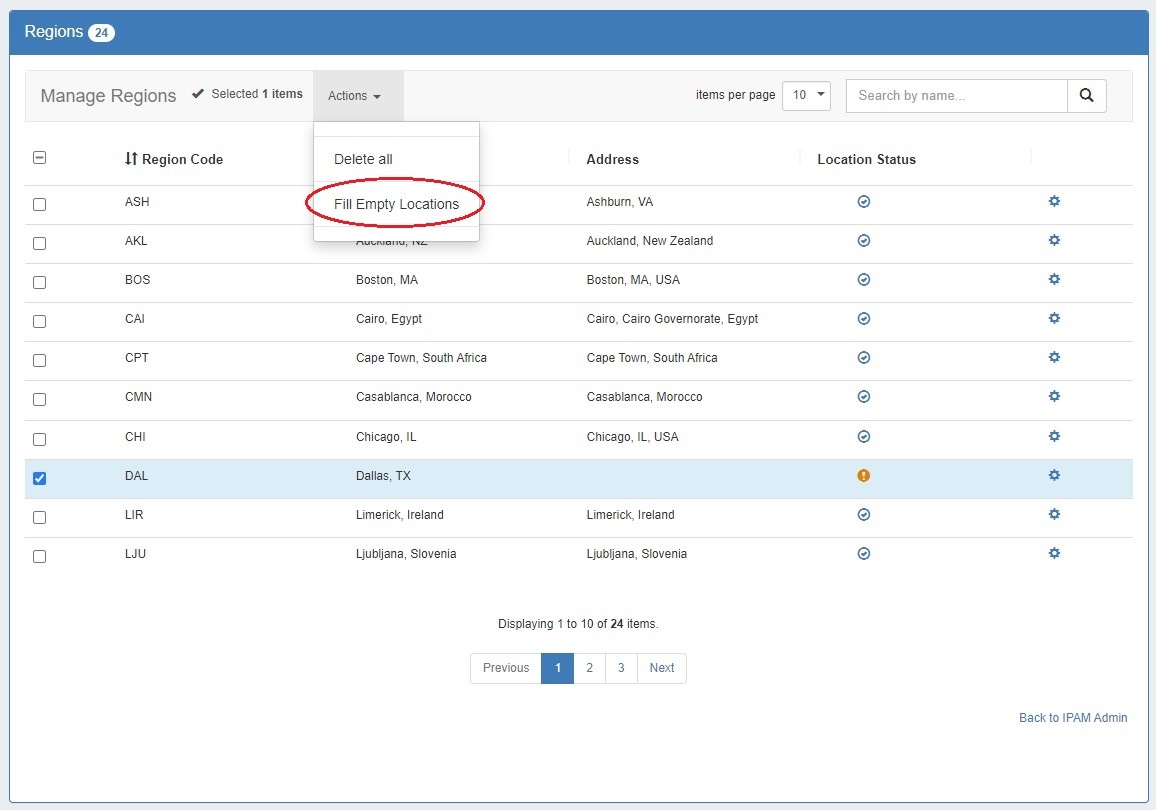
Click "Fill Locations" from the confirmation modal.
Auto Region Resource Generation
IM - 4868: Added automatic resource generation for IPAM Regions
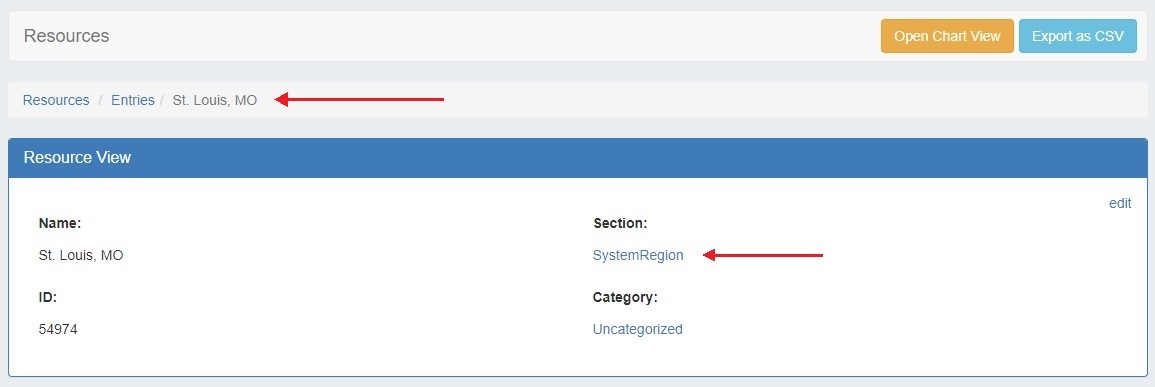
Clicking on a region link from IPAM Manage will now automatically generate a resource entry for that region, under the "SystemRegion" section.
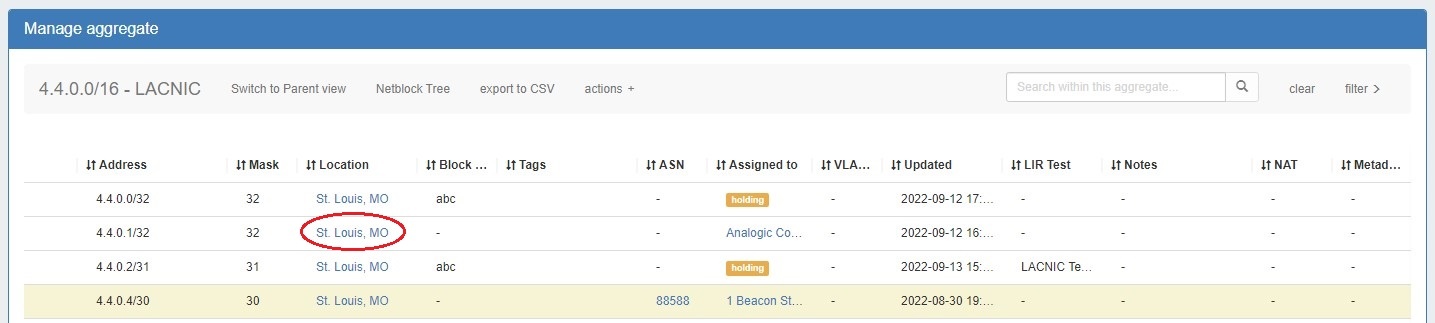
Users may then use the region resource to associate contacts, notes, and custom fields to that region.
The (non-editable) SystemRegion section includes the following Gadgets: Resource View, IPAMv2, Contacts, Resource Linkage, Notes, Document Storage, and Fields.
IPAM Manage
IPAM Manage Filter Improvements
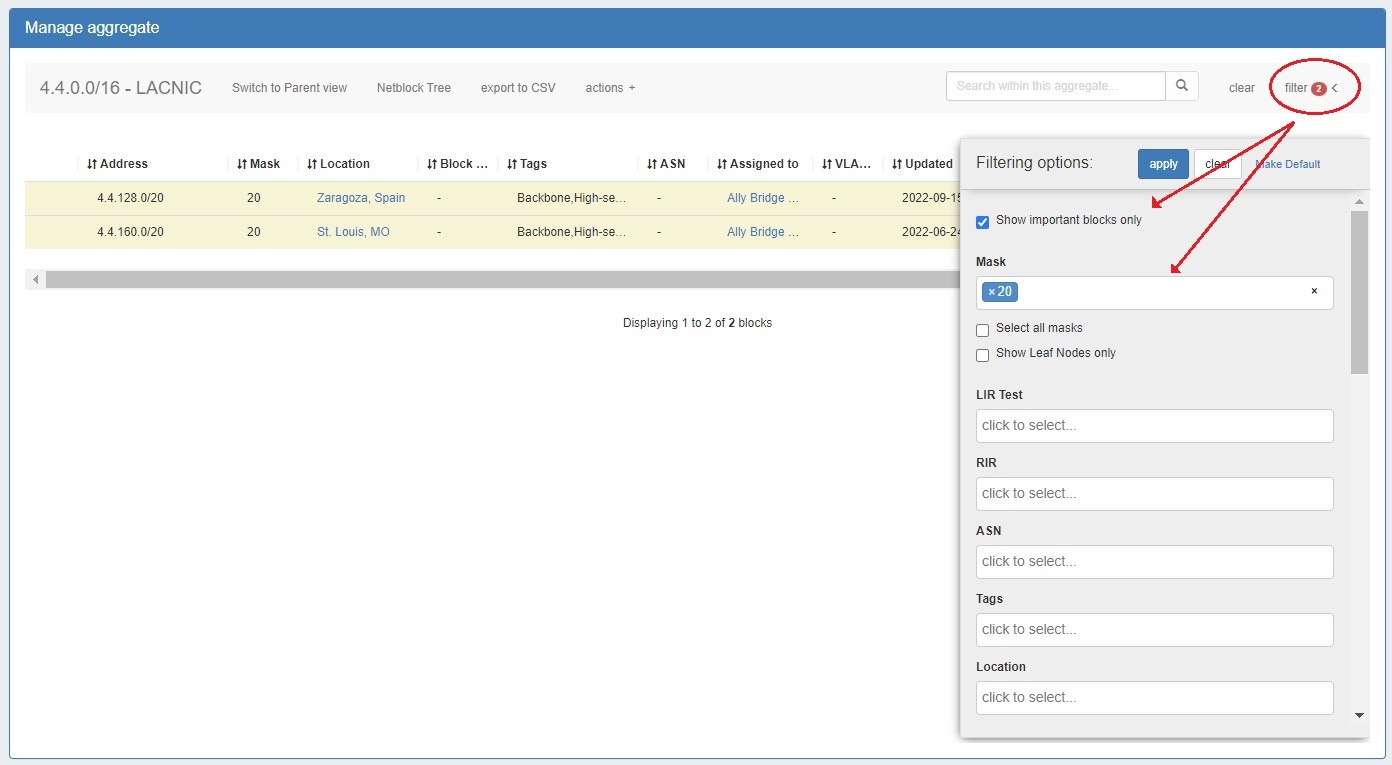
IM - 4807, CFR-252: Expanded Filter flags in IPAM Manage to alert the user to the number of active filters, including temporarily applied filters
The number of currently applied filters and column sorts in IPAM Manage now display as an alert icon next to "Filters". Both default filters and temporarily filters will display a flag.
for imported regions.
Select a region and then select "Fill Empty Locations" from the Actions menu.
Click "Fill Locations" from the confirmation modal.
Auto Region Resource Generation
IM - 4868: Added automatic resource generation for IPAM Regions
Clicking on a region link from IPAM Manage will now automatically generate a resource entry for that region, under the "SystemRegion" section.
Users may then use the region resource to associate contacts, notes, and custom fields to that region.
The (non-editable) SystemRegion section includes the following Gadgets: Resource View, IPAMv2, Contacts, Resource Linkage, Notes, Document Storage, and Fields.
IPAM Manage
IPAM Manage Filter Improvements
IM - 4807, CFR - 252: Expanded Filter flags in IPAM Manage to alert the user to the number of active filters, including temporarily applied filters
The number of currently applied filters and column sorts in IPAM Manage now display as an alert icon next to "Filters". Both default filters and temporary filters will display a flag.
IPAM Alerts Expansion
CFR - 250: Fine grained per netblock IPAM Alerts
Users can now set IPAM Alerts for individual IP blocks, in addition to top level aggregate alerts.
To set an alert for a block, from IPAM Manage, select "Alerts" from the right-click Action Menu.
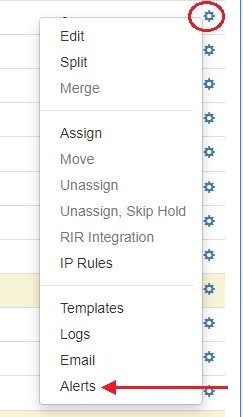
Enable or clear alert emails for the block by setting an email address and utilization percentage level. When the block is utilized to the set percent, an email alert will be sent to the provided address.
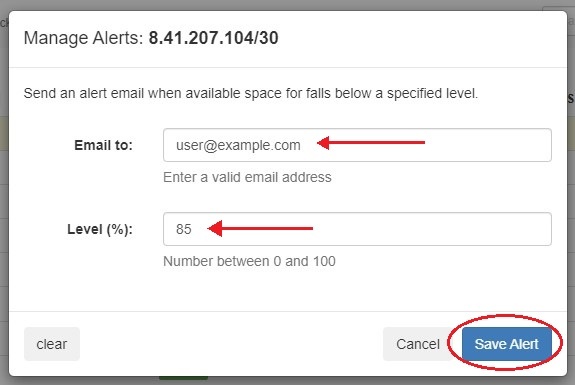
When done, click "Save Alert". To clear an existing alert, hit "Clear Alert", and the alert information will be removed and status saved.
Reporting Improvements
...
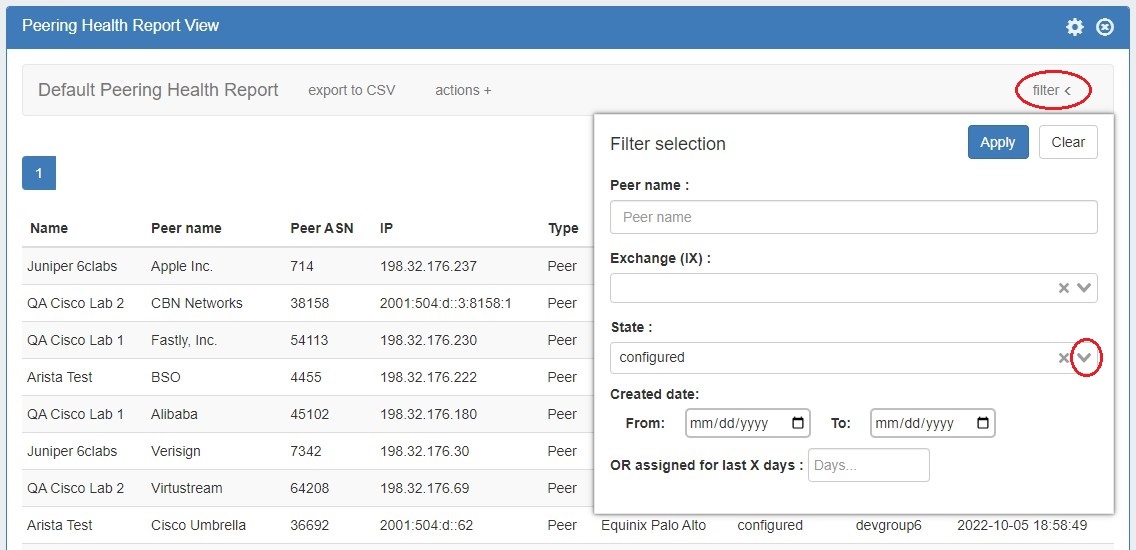
CFR - 254: Added session state as a filter option for Peering Health reports
CFR - 264: Users may now edit the default "From:" field for Scheduled Reports
...
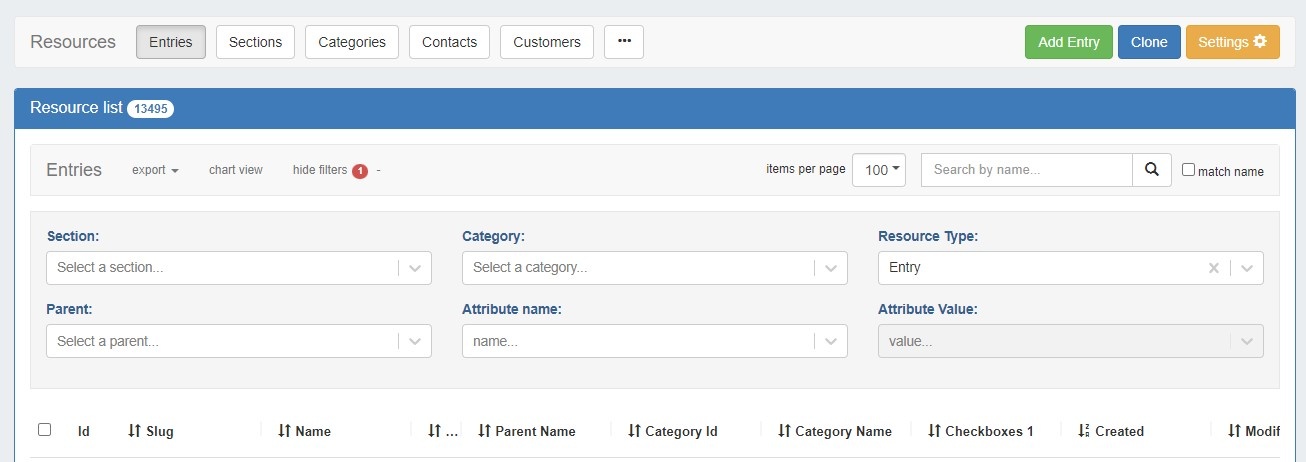
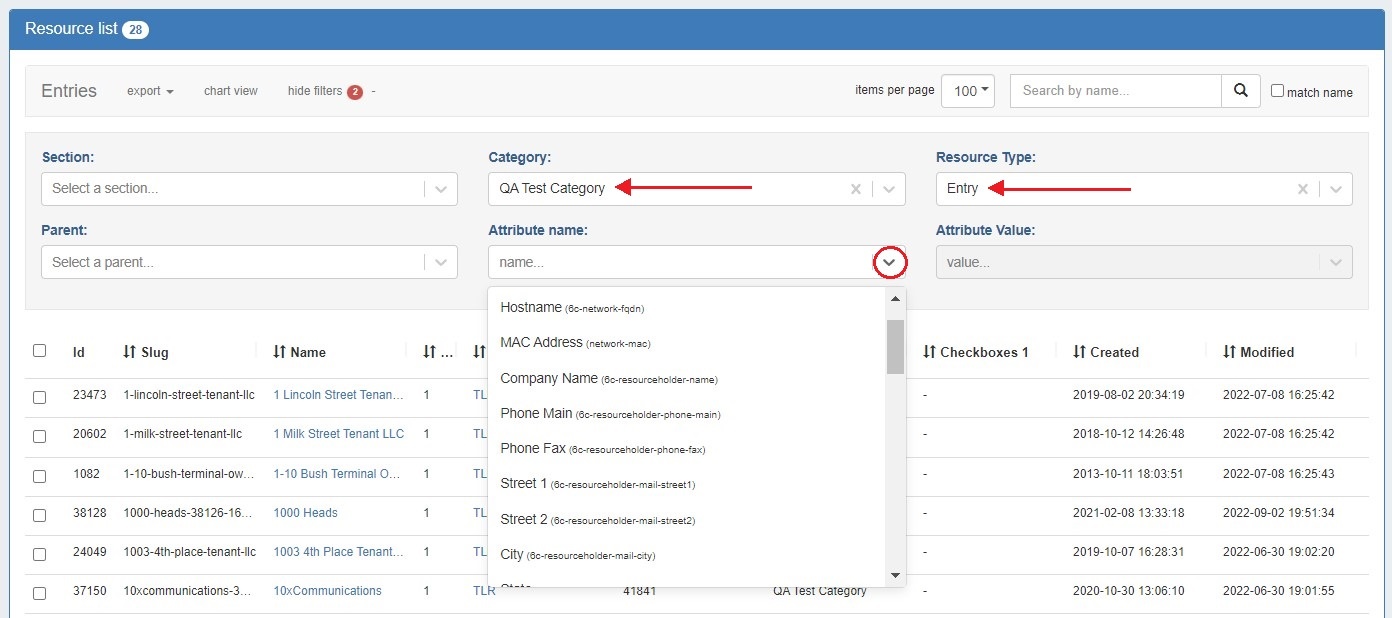
Only attributes and values relevant to the currently loaded resources will be available for selection.
| Expand | ||||
|---|---|---|---|---|
|

| Info |
|---|
Encrypted fields, such as "Password" and "Encrypted Data" can be searched via the Attribute Name filter, but the Attribute Value filter is disabled and will not return results for encrypted fields. |
Resources - Chart View
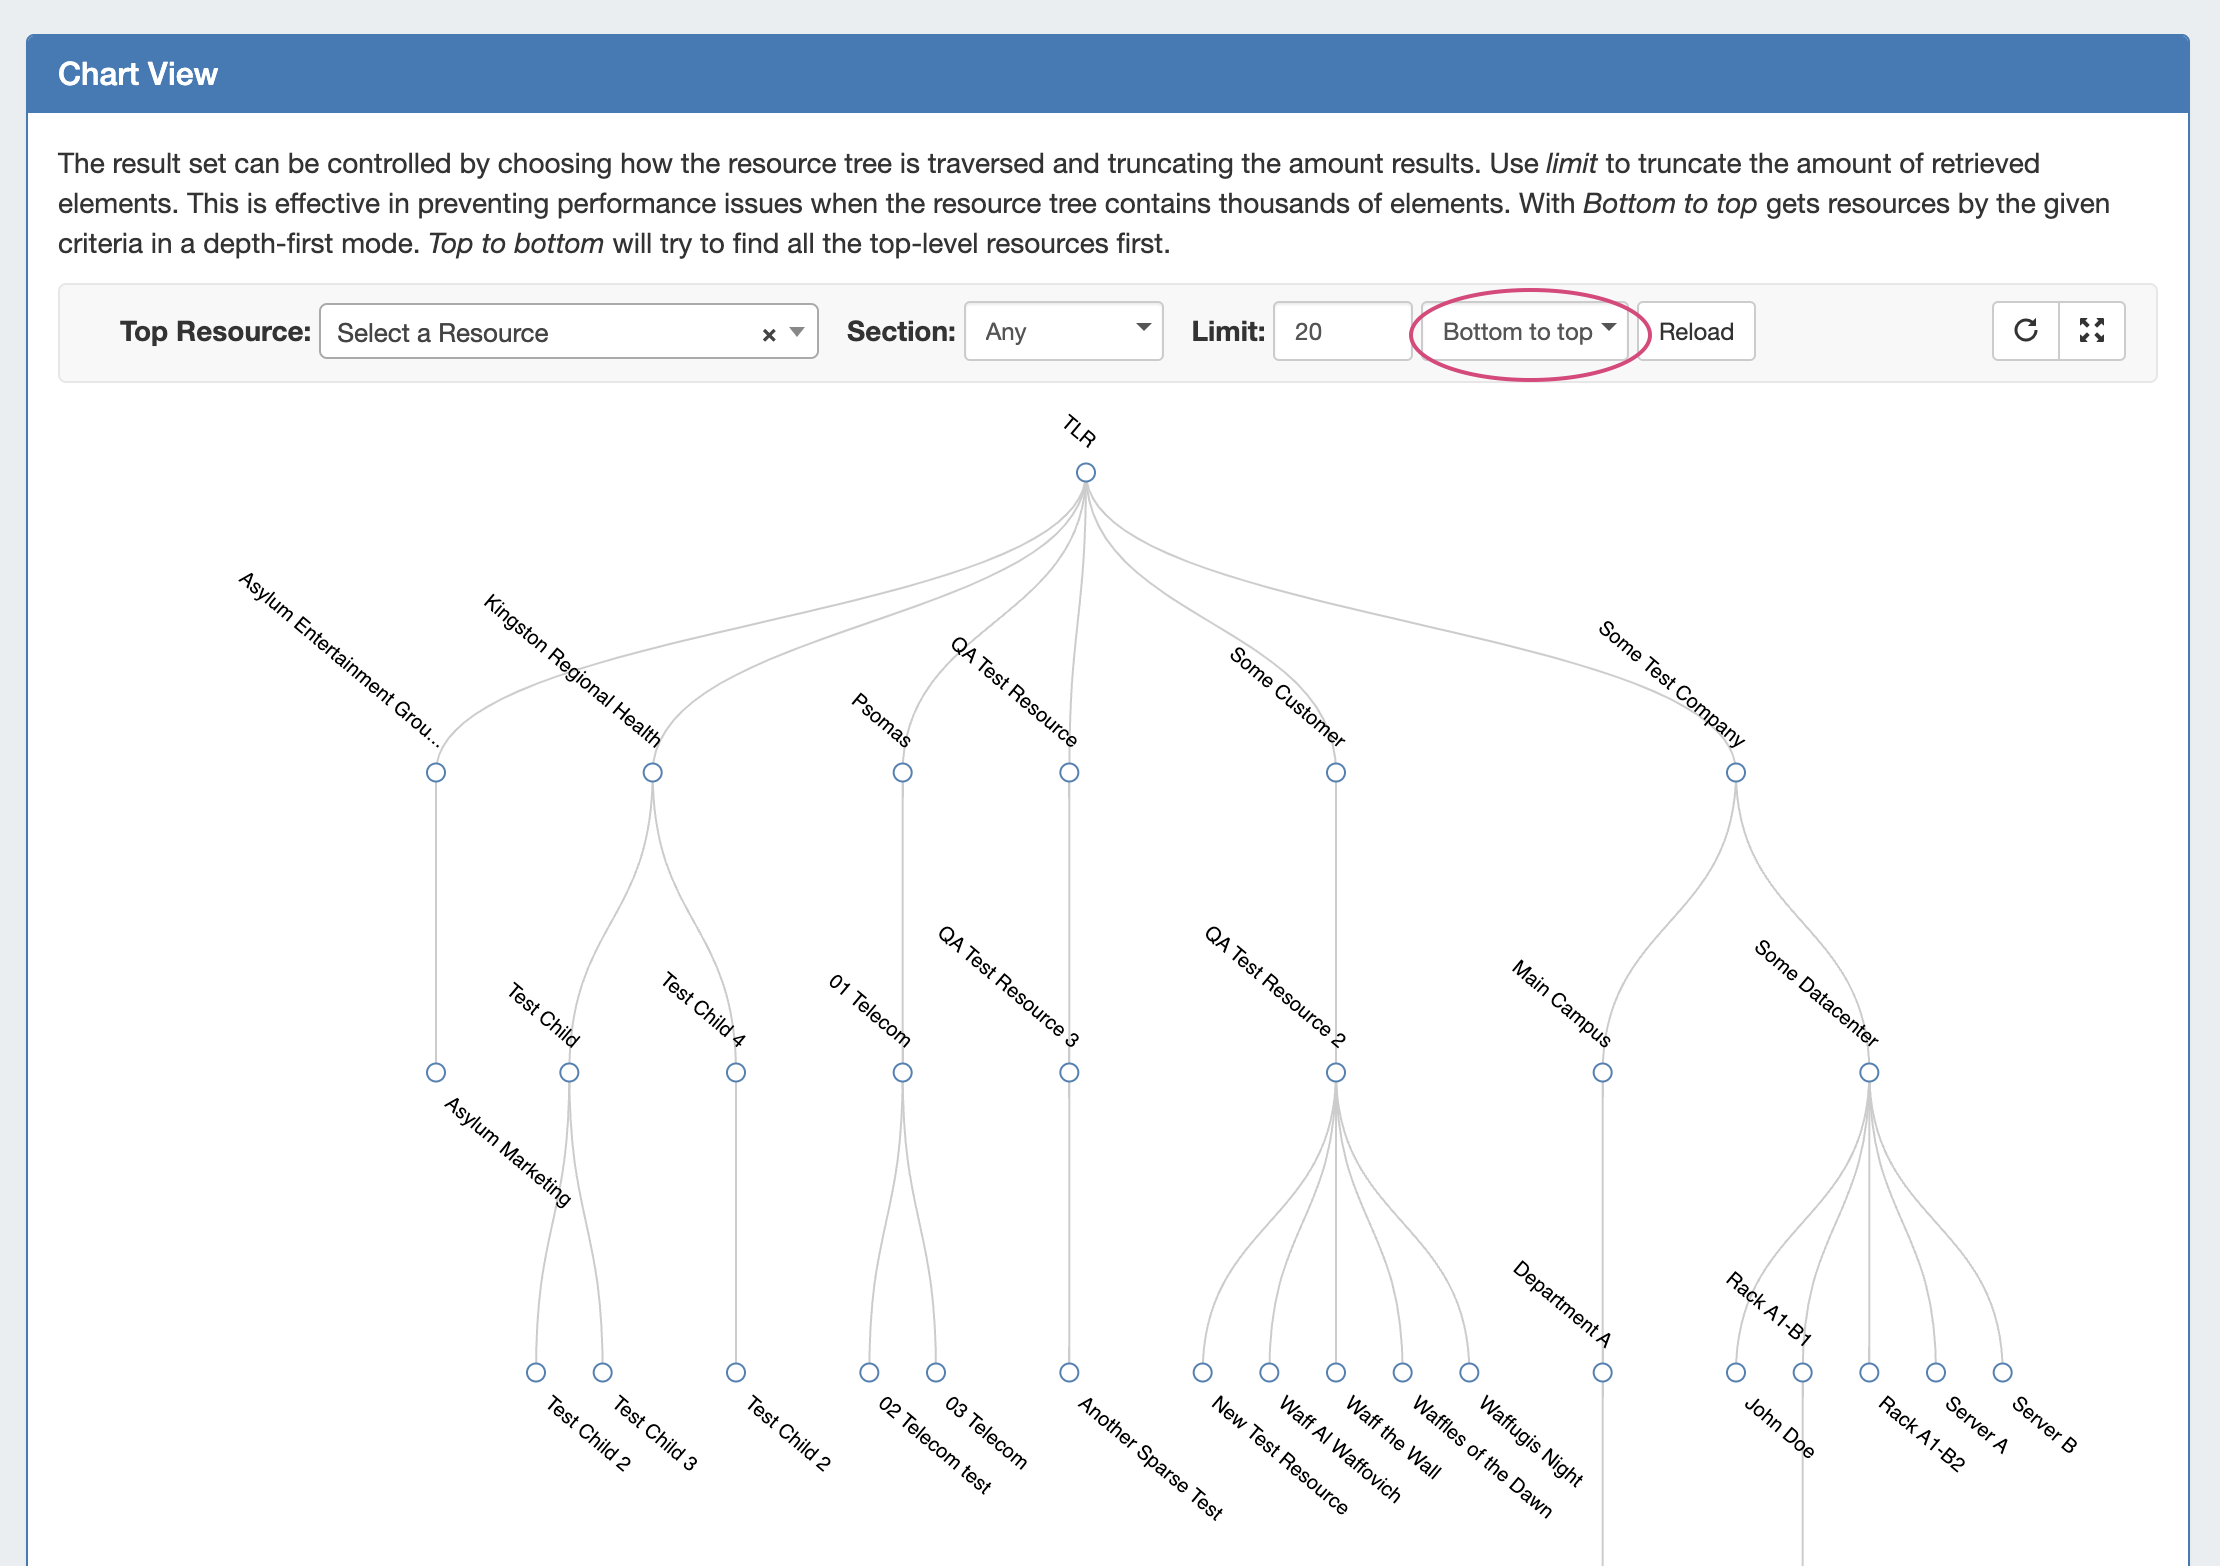
IM - 4750: Improved Resources → Chart View handling options in cases where the number of resources is greater than the loading limit
Chart View has been updated to provide users with an option to prioritize either Top-to-bottom loading or Bottom-to-top loading in relation to the resource loading limit.
Top-to-bottom loading will prioritize the first-level of resources under TLR, resulting in a "shallow but wide" tree.
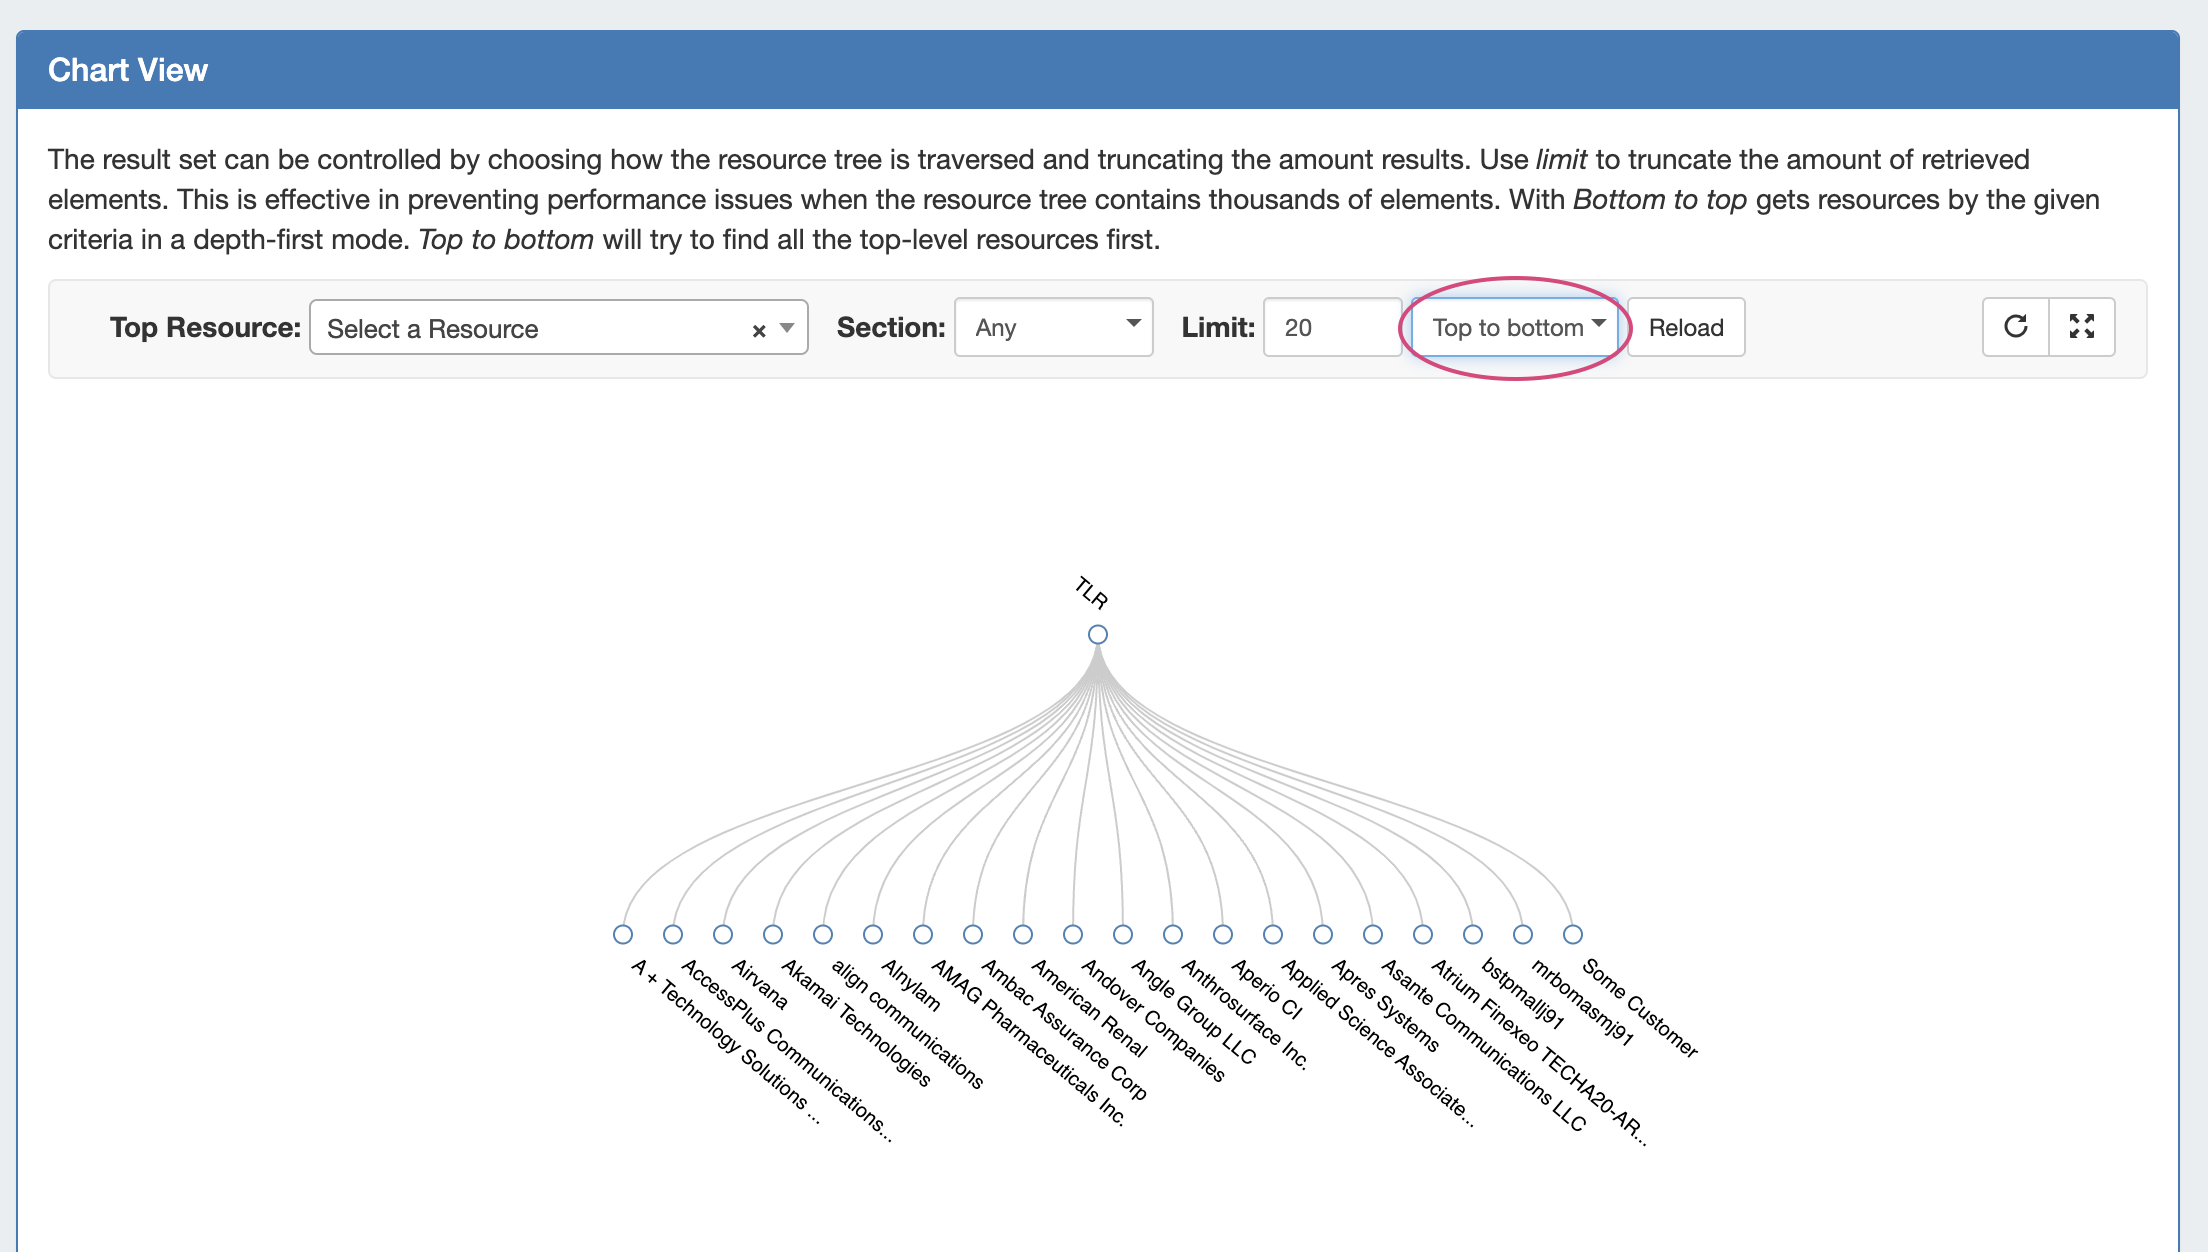
Bottom-to-top loading will prioritize loading the lowest level of child resources and their parent hierarchy first, resulting in a narrower but deeper tree.
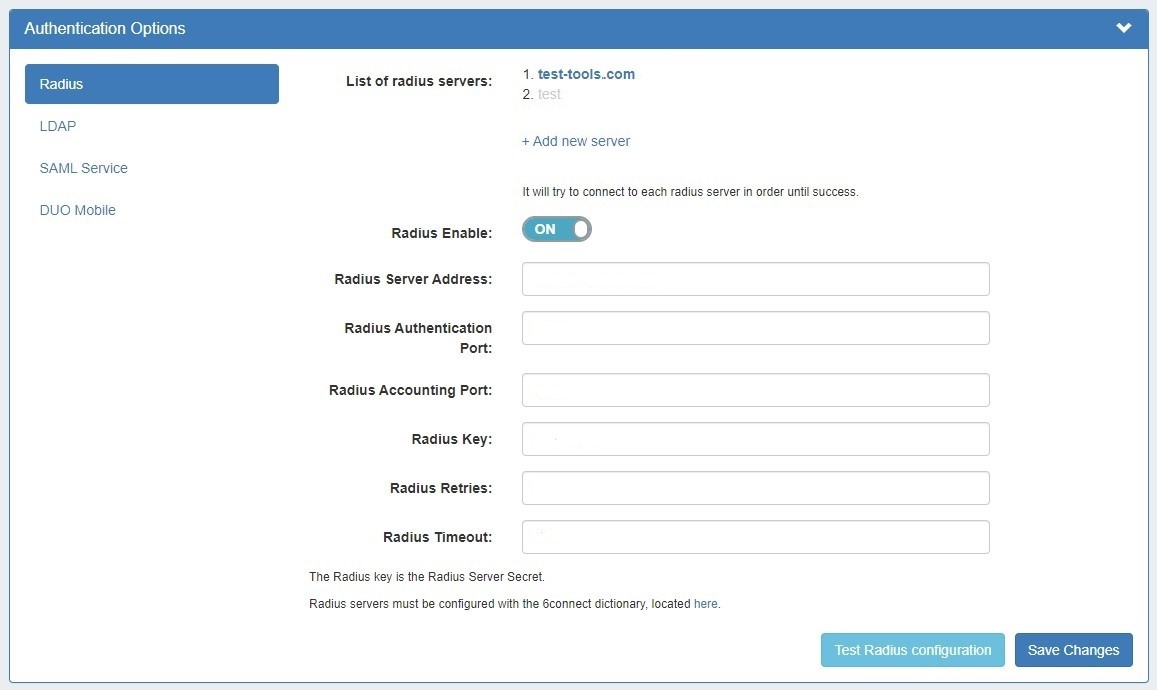
Radius Authentication Improvements
CFR - 243: Added support for secondary/tertiary Radius servers
ProVision now supports the addition additional Radius servers to Admin → Authentication Options → Radius.
ProVision will try to connect to each radius server listed in the order listed, until a success is returned. Disabled servers will display in grey, and the currently selected server will display in bold.
...
| ||
The Attribute Name filter dropdown loads only the attributes relevant to the selected filter criteria. In this example, the attributes contained in Entries under the category "QA Test Category" determine the contents of the Attribute Name filter dropdown.
Selecting an Attribute Name will limit the results returned in the Attribute Value filter to only the values contained in that Attribute for the filtered Resources.
|
Resources - Chart View
IM - 4750: Improved Resources → Chart View handling options in cases where the number of resources is greater than the loading limit
Chart View has been updated to provide users with an option to prioritize either Top-to-bottom loading or Bottom-to-top loading in relation to the resource loading limit.
Top-to-bottom loading will prioritize the first-level of resources under TLR, resulting in a "shallow but wide" tree.
Bottom-to-top loading will prioritize loading the lowest level of child resources and their parent hierarchy first, resulting in a narrower but deeper tree.
Radius Authentication Improvements
CFR - 243: Added support for secondary/tertiary Radius servers
ProVision now supports the addition additional Radius servers to Admin → Authentication Options → Radius.
ProVision will try to connect to each radius server listed in the order listed, until a success is returned. Disabled servers will display in grey, and the currently selected server will display in bold.
DHCP Improvements
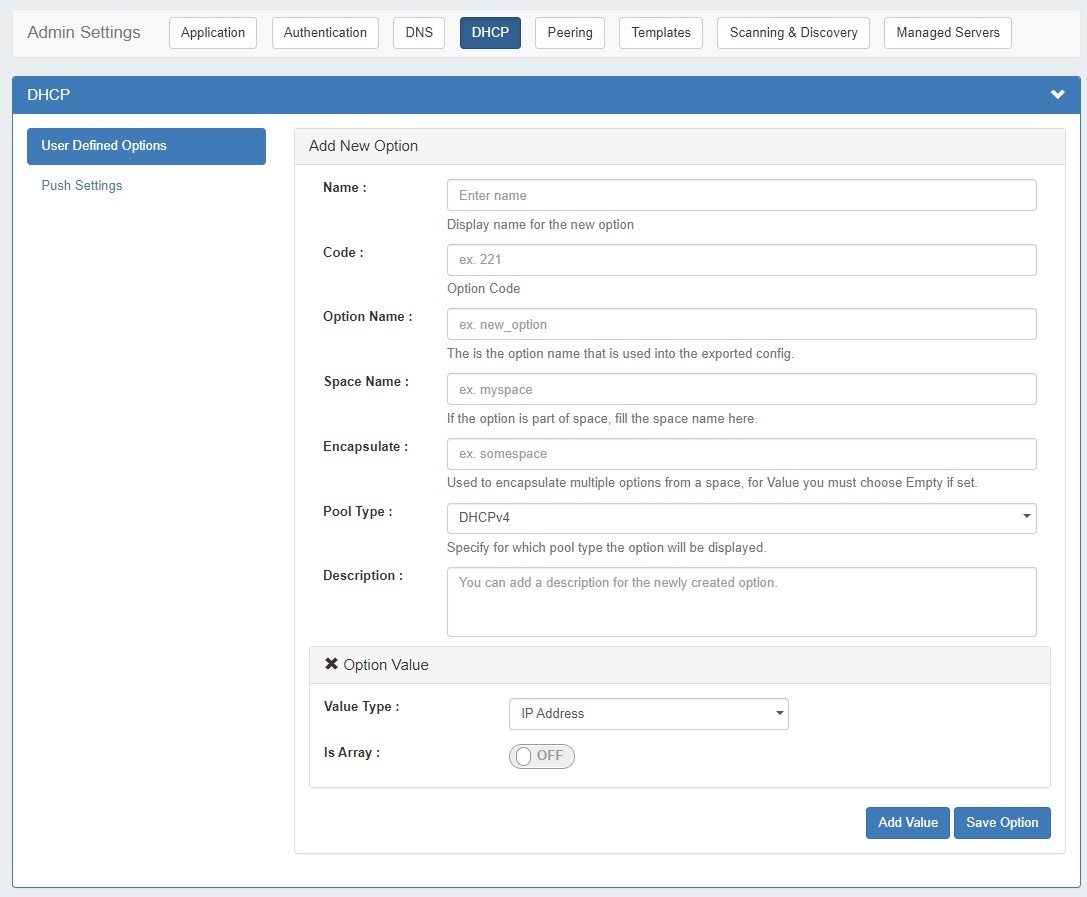
IM - 4898: Added ability to assign DHCP Options to subnet pools and Admin DHCP Settings subtab to define custom DHCP Options and adjust push settings.
Users can now assign DHCP Options to subnet pools. The Admin Settings DHCP subtab allows Admins to define their own custom DHCP Options.
| Expand | ||
|---|---|---|
| ||
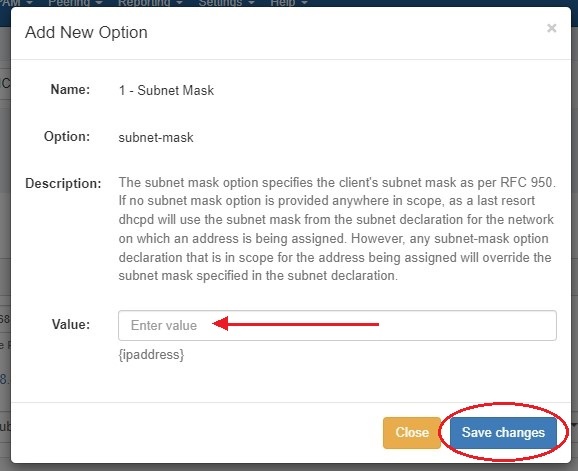
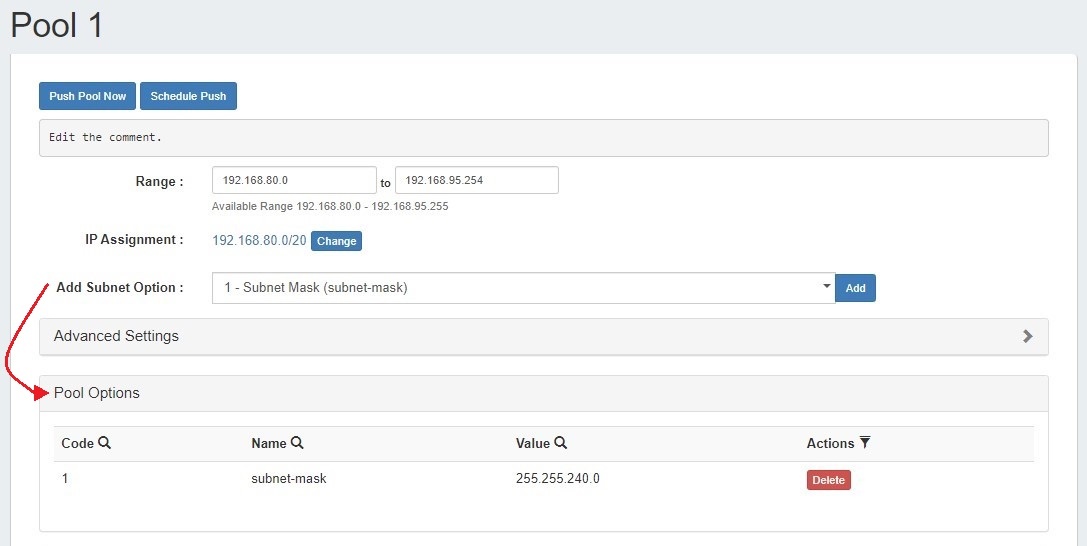
From a DHCP Pool View, select an Option from the dropdown and click "Add".
Enter a value for the option and hit "Save changes".
When an option is added, a new "Pool Options" module will be added to the pool view.
To delete an option click the "Delete" button next to it.
|


Bug Fixes/Minor Improvements
...
IM - 4813: Corrected IPAM Sparse Assign to new resource modal "Parent" field that was static to a selectable dropdown.
IM - 4817: Fixed a Log time filter calendar/clock that searchbox was visible throughdisplay issue.
IM - 4818: Fixed issue with DNS / DHCP Push Scheduler date / time picker not loading in Safari browser.
...
IM - 4843: Added "Execute the project asynchronously" checkbox option to Scheduler ACP Run Workflow task.
IM - 4853: Disallowed duplicate IPAM Regions.
IM - 48454855: Corrected Constraints "Name" and "Compare" column sorts that did not sort correctly.IM - 4853: Disallowed duplicate IPAM Regions.
IM - 4856: Fixed issue when adding a new enum constraint that did not save the constraint "Control Type".
...