VLAN
To access the VLAN pages, go to the IPAM Tab, and then either select VLAN from the IPAM dropdown menu, or click the VLAN sub-tab button.
VLAN Management is located under the IPAM Tab, and has three main VLAN sub-areas: VLAN Home, VLAN Manage, and VLAN Advanced.
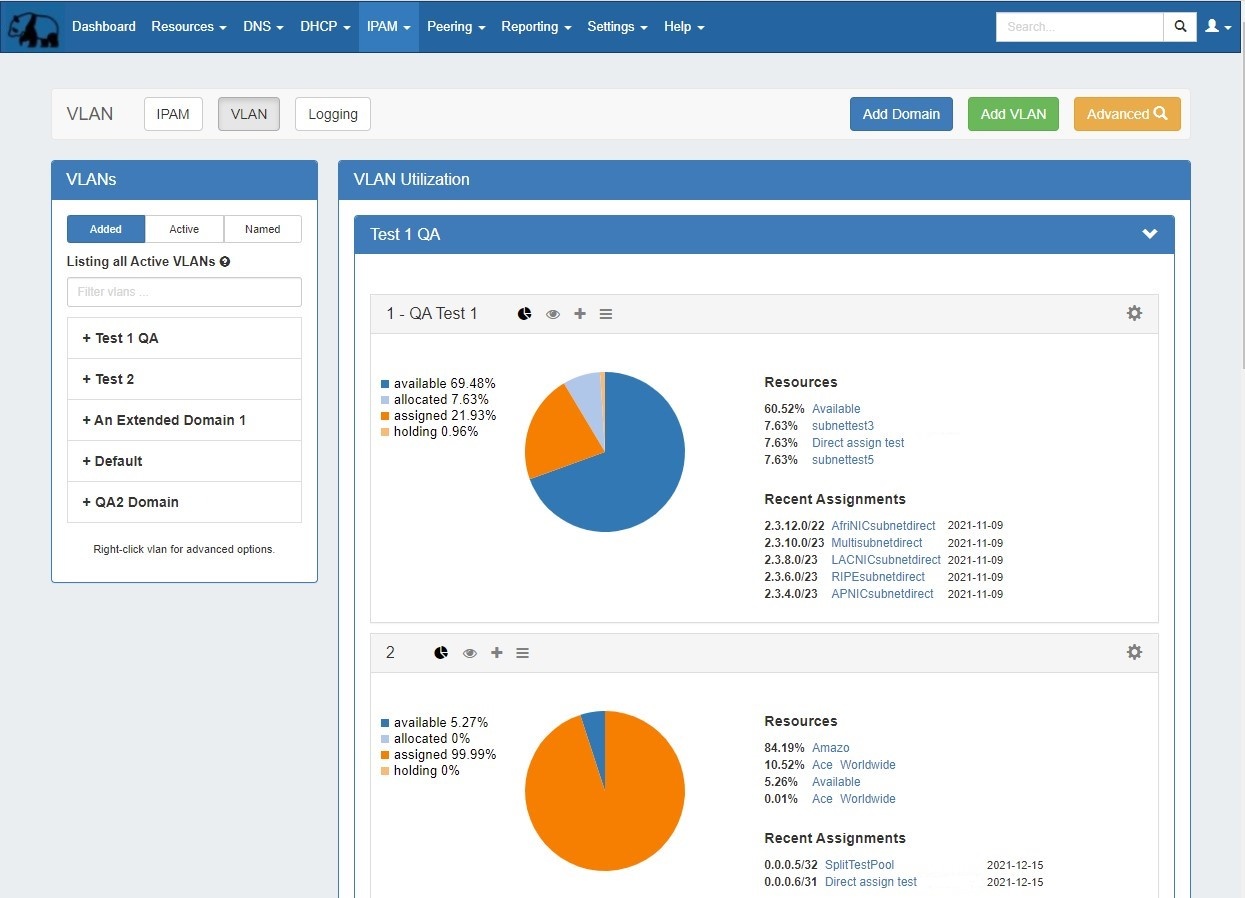
The VLAN Home page shows an overview of domains and VLANs on the left sidebar, and IPAM Utilization data organized by each domain / VLAN pair. From here, users may add domains, VLANs, add/remove VLAN associations with blocks, perform domain / VLAN management tasks, and access additional VLAN areas - VLAN Manage and VLAN Advanced.
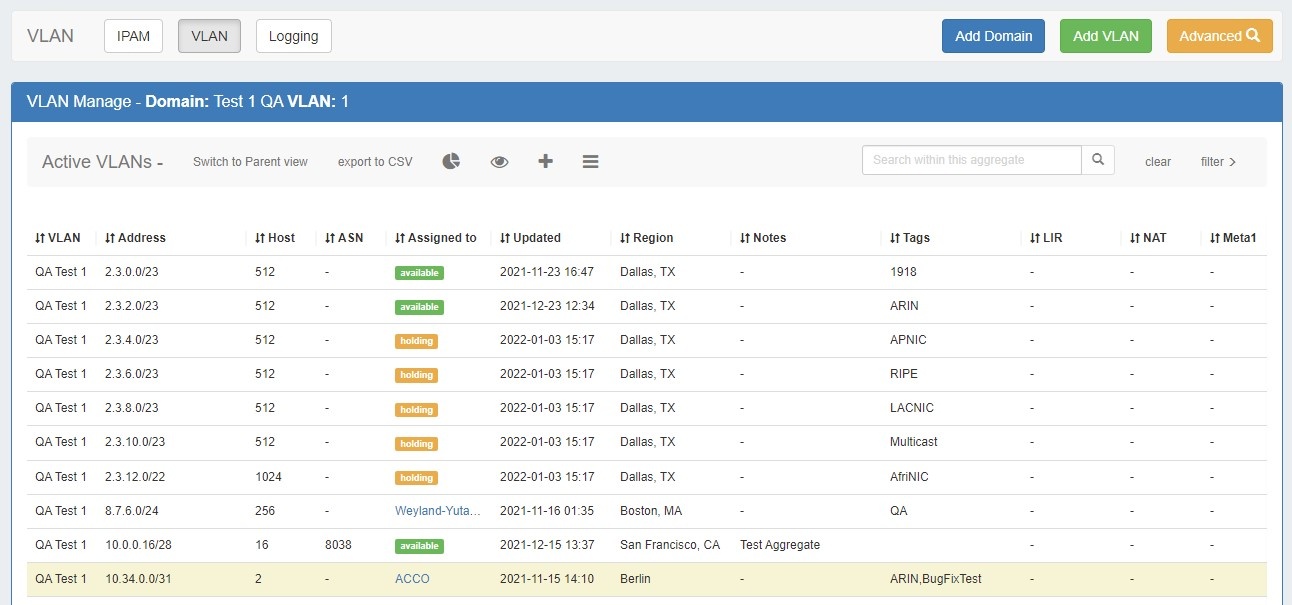
VLAN Manage lists all of the IP blocks currently associated with that VLAN, and allows you to perform all of the IP block actions available in IPAM Manage for those blocks. For information on working with individual blocks and using IPAM Manage functions inside VLAN Manage, please refer to Working with IP Blocks.
VLAN Advanced shows a global view of all domains and VLANs and the associated metadata. VLAN advanced is the primary area from which to manage domains (edit / delete domain), and concisely view VLAN data side-by-side. It also provides access to manage VLANs, add domains, and add vlans to a domain.
VLAN Feature Overview:
- Supports custom domain ranges and exclusions, using the Numbering Authority
- Create domains and add VLANs directly from the VLAN Home page
- Customizable VLAN Metadata Columns (IPAM Admin → VLAN Columns)
- Action shortcut panels in VLAN Utilization and VLAN Manage - Utilization View, Quickview, Assign IP, and Edit VLAN
- Integrates administrative functions directly into the VLAN Tab.
VLAN Manager Overview
The VLAN Manager allows users to add domains and VLANs and associate them with IP Blocks. Customizable VLAN columns - including up to ten user-defined metadata columns - allow you to rename column headers, set the display order, select which columns are visible, and display your own information fields.
Permissions and VLAN
The Permissions structure in VLAN includes the following items of note:
The following VLAN tasks requires Admin-level permissions:
- Adding new Numbering Authority ranges for VLAN use
- Editing IPAM / VLAN Columns
Non-Admin users may:
- View the VLAN Home page and utilization data, however, only resources that the user has view permissions for will display under the "Resources" and "Recent Assignments
- Add, edit, and remove domains with appropriate IPAM CRUD permissions
- Add, edit, and remove VLANs with appropriate IPAM CRUD permissions
VLAN Workflow:
1) Create Domain(s)
The workflow starts with creating a domain in the IPAM Tab → VLAN section, by clicking the "Add Domain" button and entering domain information.
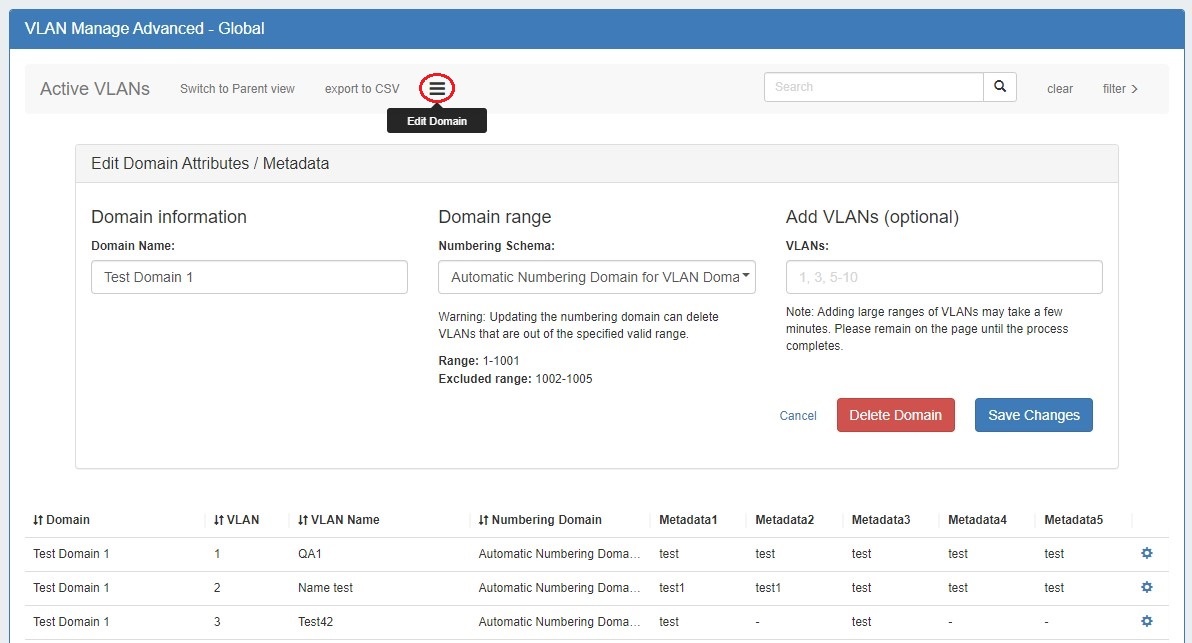
VLAN domains may be created as pre-set Numbering Authority ranges, or defined manually. Two default Numbering Authority VLAN ranges are provided, one for a Cisco Standard domain, and another for a Cisco Extended domain. Admins may create new Numbering Authority ranges at any time to support other router types, range extents, or exclusions. Those ranges will then be available as options when adding a new domain from the VLAN area. If you select to create a new domain by defining a manual range, you may enter the range extents and any exclusions.
2) Add / Edit VLANs
VLANs may be added to the domain at the time the domain is created (via the "Add VLANs" input area) or added to an existing domain later via the "Add VLANs" button. You can add one VLAN, multiple VLANs, a large range of VLANs, or a mixed selection at the same time.
Once a VLAN has been added to a domain, the VLAN may be edited to add a VLAN name or metadata information, and have IP blocks associated with it.
3) Add IP Blocks to VLANs
Once a VLAN has been added to a domain, IP blocks may be associated with ('assigned to') that VLAN. There are multiple methods to set the VLAN for a block:
- Individual block edit - Edit one or more blocks and set the domain and VLAN fields to the desired values. Direct edit may be performed from IPAM Manage, VLAN Manage, and the IPAM Gadget, by selecting Edit Block.
- Direct Assign a block - Open the Assign Blocks panel, expand Direct Assign, and type in the CIDR to assign to the VLAN. Advanced options are available to distinguish between duplicate blocks. The Assign Block panel is available from the VLAN's Utilization Box, and/or the VLAN Manage header bar.
- Smart Browse for blocks - Open the Assign Blocks panel, expand Browse Assign, and enter filter criteria to create a list of blocks meeting that criteria. Then, select one or blocks from the list to assign to the VLAN. The Assign Block panel is available from the VLAN's Utilization Box, and/or the VLAN Manage header bar.
After assigning a block to the VLAN by any method, that block will immediately display in VLAN Manage for that VLAN, in the VLAN's Quickview panel, and the VLAN Utilization display panel will be updated to include the new block.
4) Manage Domains and VLANs
Managing VLANs and blocks under the VLANs may include standard IPAM tasks, such as editing blocks, splitting / merging blocks, or allocating/ assigning / unassigning the blocks to a resource. All of these functions, and more, may be performed from either VLAN Manage or IPAM Manage.
Other tasks, such as editing VLAN names, metadata, or adding/removing VLANs from a domain are performed from the VLAN action panels on the VLAN Home page, or from VLAN Manage.
Editing domains - including renaming, adding metadata, and deleting - may be performed from VLAN Advanced.
VLAN Home Page
The VLAN Home page is accessible from the IPAM Tab. Navigate between IPAM, VLAN, and Logging by clicking on the sub-tab buttons at the top of the page.
- Navigate between IPAM, VLAN, and Logging by clicking on the sub-tab buttons at the top of the page
- Open VLAN Advanced (Global View), by clicking the Advanced button
- Add new domains or VLANs by clicking Add Domain or Add VLAN
- Domains and VLANs are listed in a searchable, filterable, paginated sidebar with access to additional navigation and common tasks
- Expand or collapse domains in the VLAN Utilization area, and view pages of VLANs
- Access common VLAN management tasks from the VLAN Utilization box - either from action panels or the gear menu
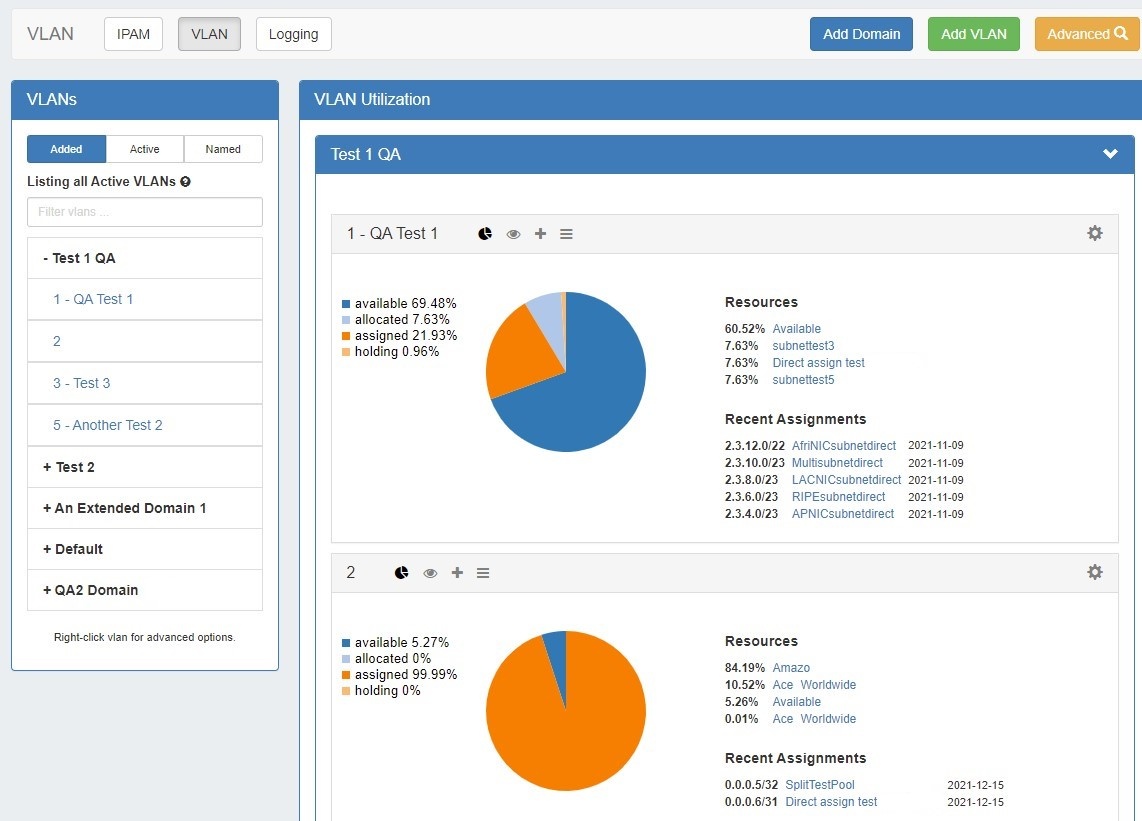
VLAN Sidebar
The VLAN Sidebar lists domains and the VLANs under those domains, and is similar to the IPAM aggregate sidebar. The VLAN sidebar provides options for searching and filtering domains and VLANs, as well as menu options for navigation shortcuts to perform basic actions.
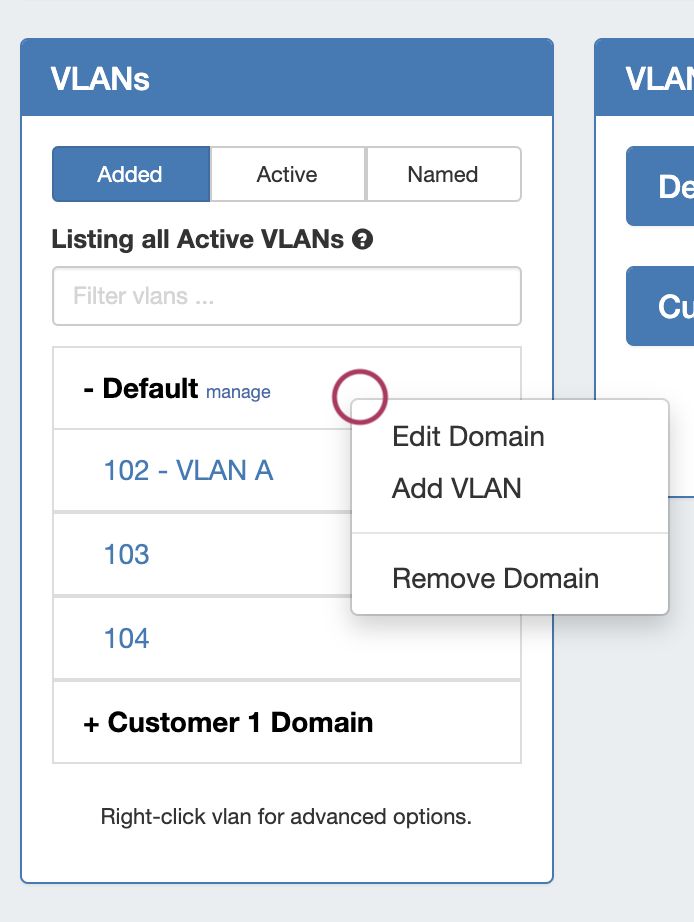
Above: VLAN Sidebar - Domain Menu
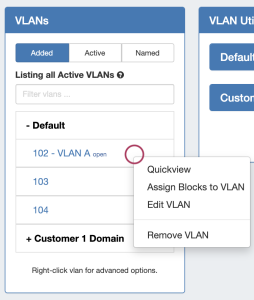
Above: VLAN Sidebar - VLAN Menu
- The VLAN sidebar contains search, filters, and right-click menu options
- Filter the VLAN sidebar to display either "Added" VLANs, "Active" VLANs that have blocks assigned, or "Named" VLANs with user-provided names
- Search the VLAN sidebar for a particular domain, VLAN Number, or VLAN name by typing into the search/filter field "Filter VLANs"
- Right click to open context menus for both domains and VLANs
- Domain Sidebar Actions
- Click on a domain name to show/hide the VLANs contained under that domain
- Click "manage" next to the domain name to open VLAN Advanced for that domain
- Right click on a domain to open options to:
- Edit Domain- Opens VLAN Advanced → Edit Domain panel for that domain
- Add VLAN - Opens the Add VLAN page for that domain
- Remove Domain - Deletes the domain and all VLAN data under it
- VLAN Sidebar Actions
- Click on a VLAN number/name to navigate to its location( QuickNav) in the VLAN Utilization area of the page
- Click on "open" next to a VLAN to open VLAN Manage for that VLAN
- Right click on a VLAN to open options to:
- QuickView - QuickNavs to the VLAN's Utilization area listing, and opens the VLAN's Quickview panel
- Assign Blocks to VLAN - QuickNavs to the VLAN's Utilization area listing, and opens the VLAN's Assign Blocks panel
- Edit VLAN - QuickNavs to the VLAN's Utilization area listing, and opens the VLAN's Edit VLAN panel
- Remove VLAN - deletes the VLAN, removing the VLAN assignment from any blocks assigned to it
VLAN Utilization Area
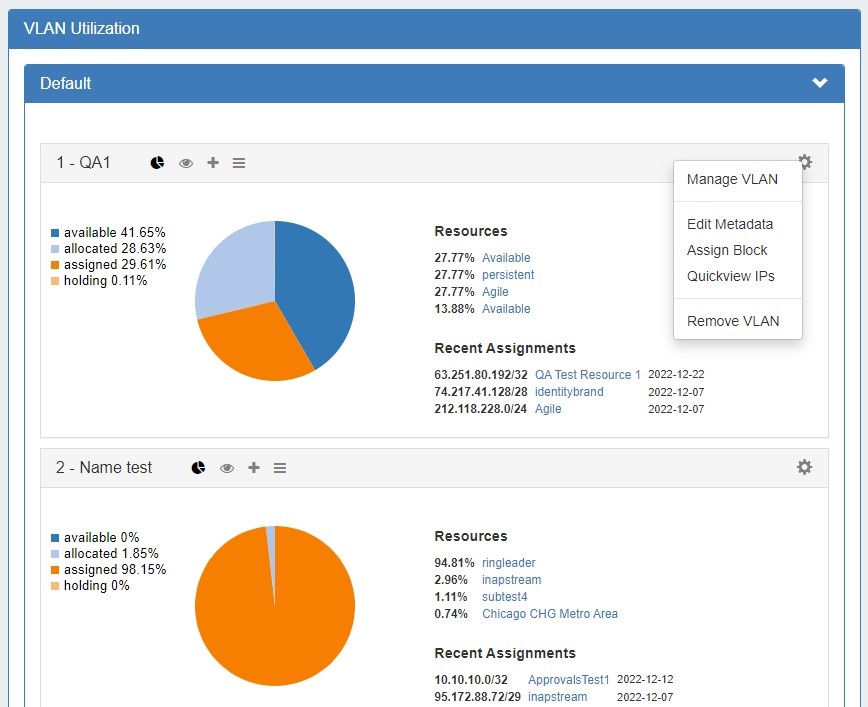
The VLAN Utilization area lists domains and the VLANs under those domains (both able to be expanded/collapsed), with each active VLAN (one that has assigned blocks) displaying the Utilization panel by default.
Inside the Utilization Box for each VLAN, you may do the following:
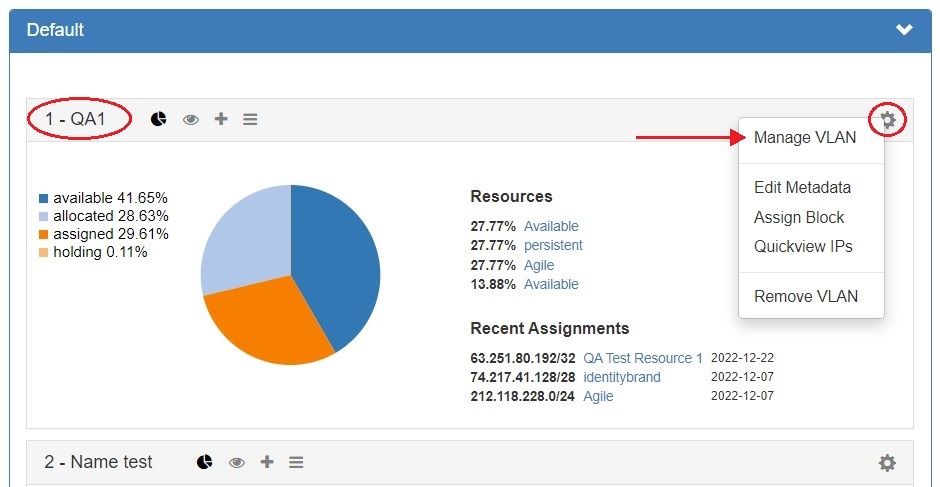
Open VLAN Manage
Open VLAN Manage for the VLAN by either clicking on the VLAN Name in the header, or clicking on the gear icon and selecting "Manage VLAN" from the menu.
View VLAN Panels
The four VLAN panels (Utilization, Quickview, Assign Block, Edit VLAN Metadata) may be open or closed by clicking on each respective icon in the header bar. Additionally, you may open any non-default panel by going to gear icon and selecting the action option from the menu. These panels are also available in VLAN Manage.
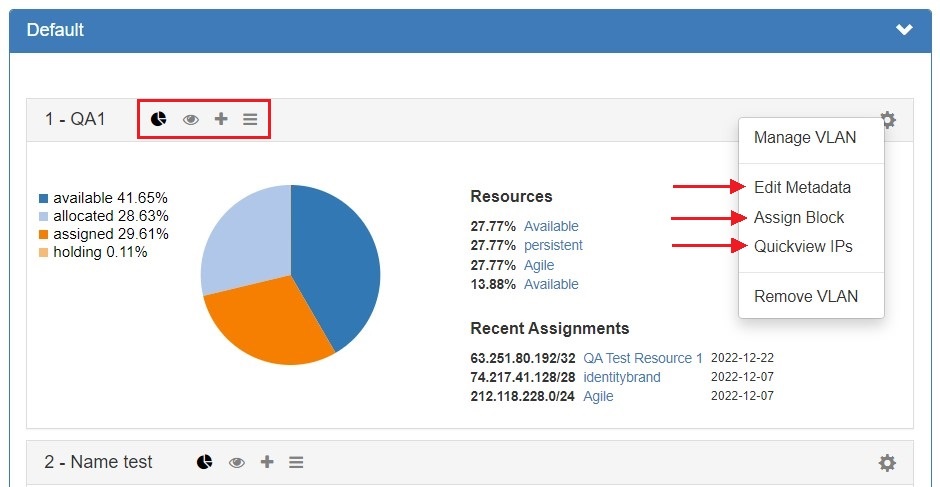
For detail on each panel, see the following section on this page: VLAN Manage / VLAN Utilization Action Panels
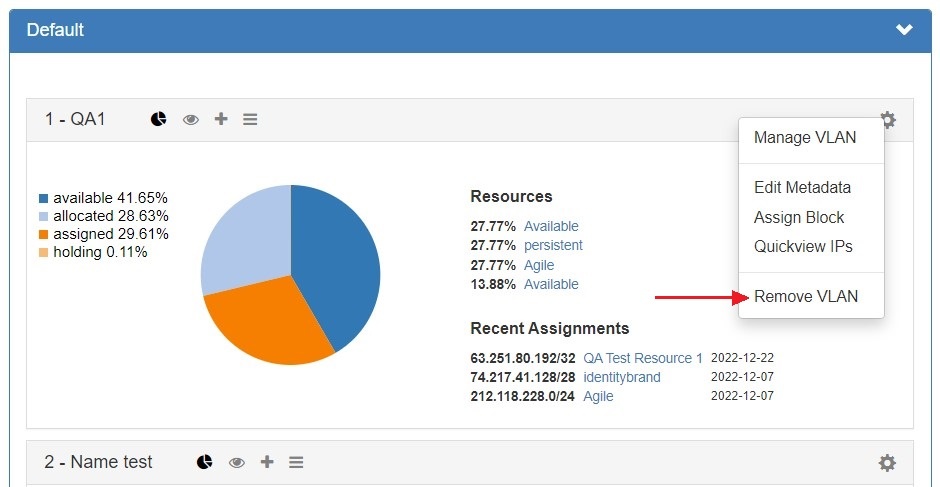
Remove VLAN
Remove (delete) the VLAN by clicking on the gear icon and selecting "Remove VLAN". This removes the VLAN from the domain, removes the VLAN association from any blocks assigned to that VLAN, and permanently deletes the VLAN's metadata. VLANs may also be deleted from the VLAN sidebar and VLAN Advanced areas.
VLAN Manage / VLAN Utilization Action Panels
These action panels are available from both the VLAN Home page Utilization Boxes and VLAN Manage, and may be opened or closed by clicking on the associated header bar icons. Each panel allows you to view data specific to that VLAN, or perform common management actions.
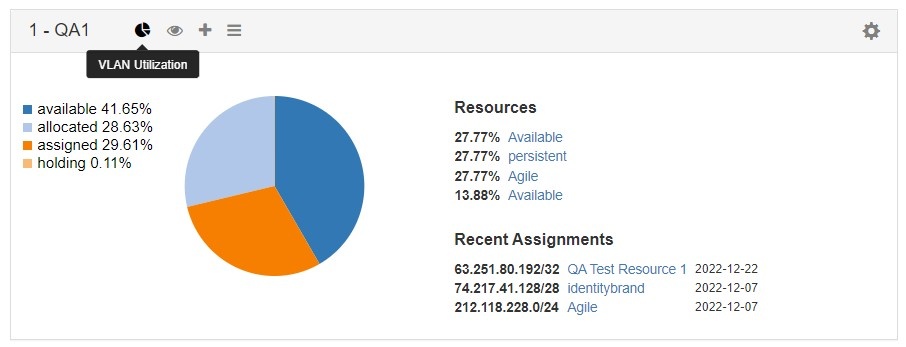
Utilization
The Utilization panel displays breakdowns for all blocks assigned to the VLAN by both status (available, allocated, assigned, holding) and by resource. Recently assigned blocks are noted under the "Recent Assignments" section, and links are provided to the Resource Entry page for each resource listed. To open or close the Utilization panel, click on the "Pie" icon in the grey header bar.
Quickview
The Quickview panel provides a condensed, filterable list of all blocks assigned to that VLAN, separated into three columns - IPv4 blocks, IPv6 blocks, and grouped by resource.
To open or close the Utilization panel, click on the "Eye" icon in the grey header bar.
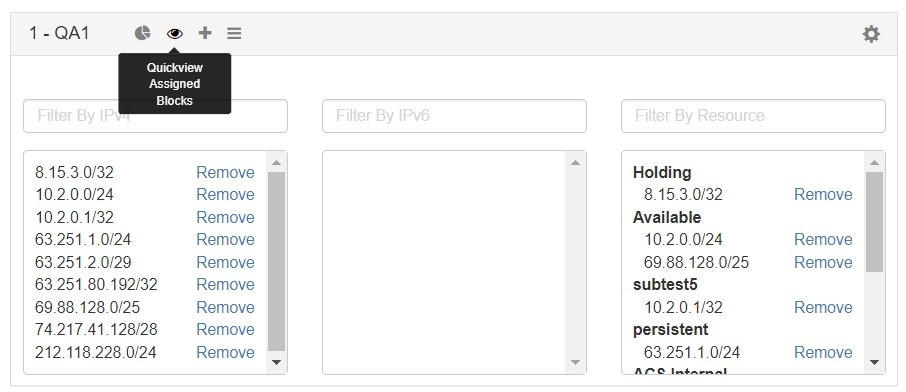
While in the Quickview panel, you may easily search for a block by typing the all or part of the CIDR into the IPv4 or IPv6 Filter boxes - useful for verifying an assignment or quickly scanning ranges.
You may also remove a block from the VLAN with a single click of the "Remove" button.

Assign Blocks to VLAN
Blocks may be assigned to the VLAN from the Assign Blocks panel, opened or closed by clicking on the plus-sign icon. Two assignment options are available - Direct Assign to VLAN, if you know the specific block to assign, and Smart Browse to VLAN, where you can specify filter conditions and select one of more blocks meeting those conditions.
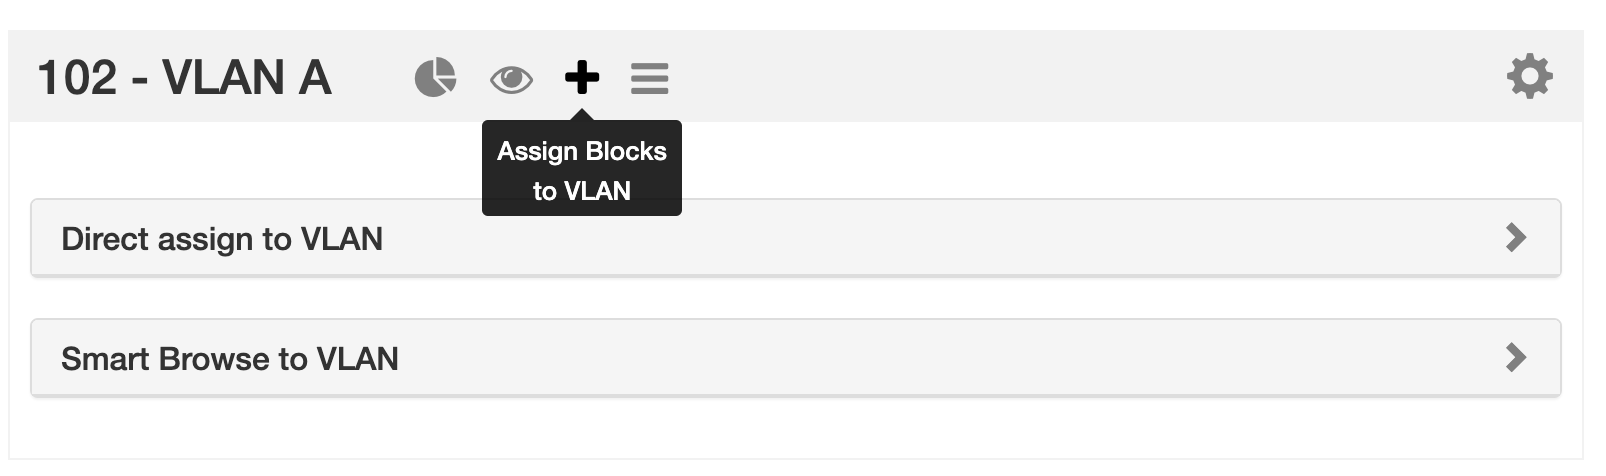
To open either option, click on the appropriate header bar to expand the module. Expand the area below for more details on Direct Assign to VLAN and Smart Browse to VLAN:
Direct Assign to VLAN
To Direct Assign a specific block to the VLAN, expand the "Direct Assign to VLAN" module, then enter the CIDR to assign into the "CIDR" box, and click "Add IP Block" .

If blocks exist with the same CIDR (such as in duplicate 1918 space), you may differentiate between the two by clicking on the "Advanced Options" link and providing additional filter criteria to use to assign a specific block.
Smart Browse to VLAN
Smart Browse to VLAN is used to search for a general list of blocks available to assign to the VLAN that meets certain criteria.
Expand the "Smart Browse" module by clicking on the header bar .
Then, enter your filter criteria. At minimum, block "Type", "Size", and "RIR" must be provided; "Region" and "Tags" are optional.
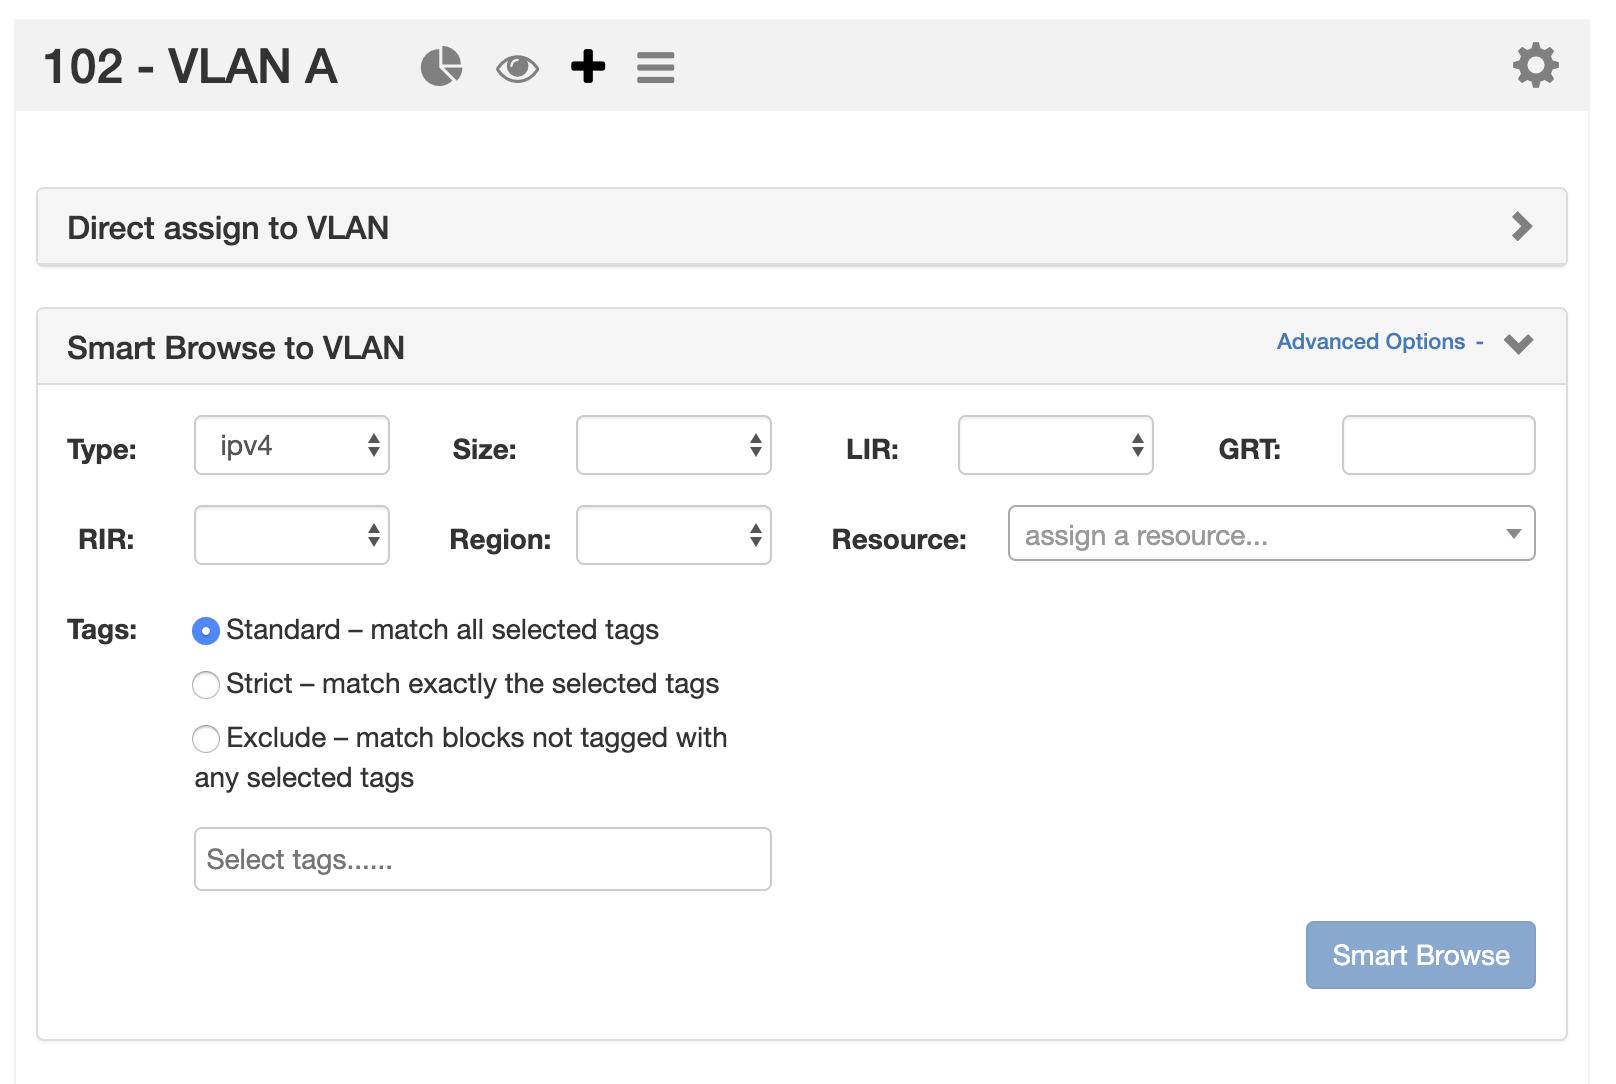
If further filtering is needed, you may click on "Advanced Options" to open the "LIR", "Custom Code" (here: as "GRT"), and assigned "Resource" fields to use.
Once you have entered your filter criteria, click on the "Smart Browse" Button to display your results.
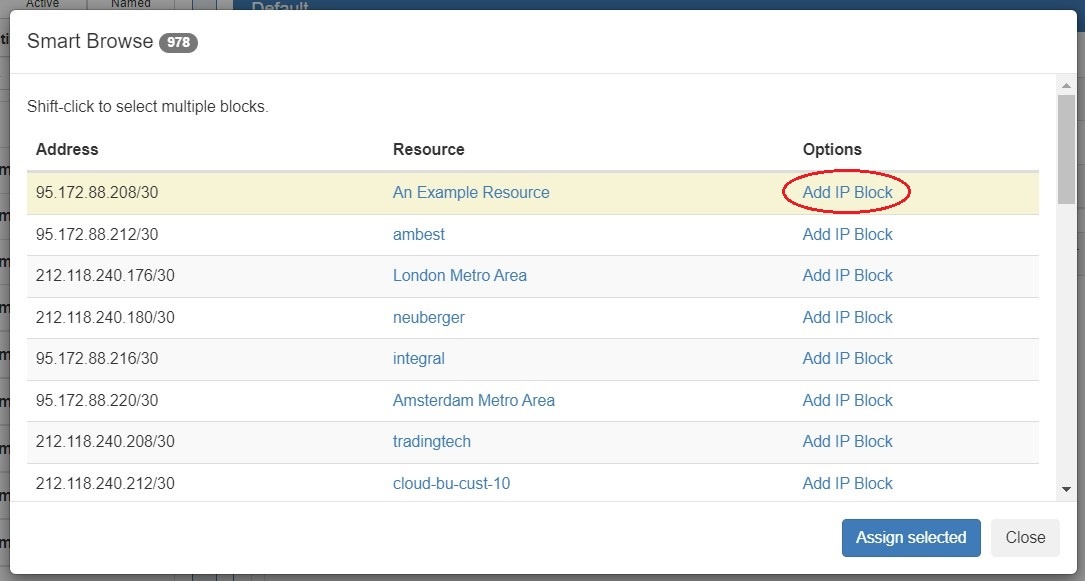
Assigning from Smart Browse
The Smart Browse results list will display a list of blocks that a) meet your filter criteria, and b) do not already have a VLAN assigned.
You may assign individual blocks immediately ("Add IP Block"), or select multiple blocks and delay assignment until after your final selections are complete ("Assign Selected").
Immediate Assignment:
To assign an individual block immediately from the list to the VLAN, click "Add IP Block" for the desired block.
After clicking "Add IP Block", the block will immediately be assigned to the VLAN, and an "Assigned" status will display for the block in the Smart Browse list.
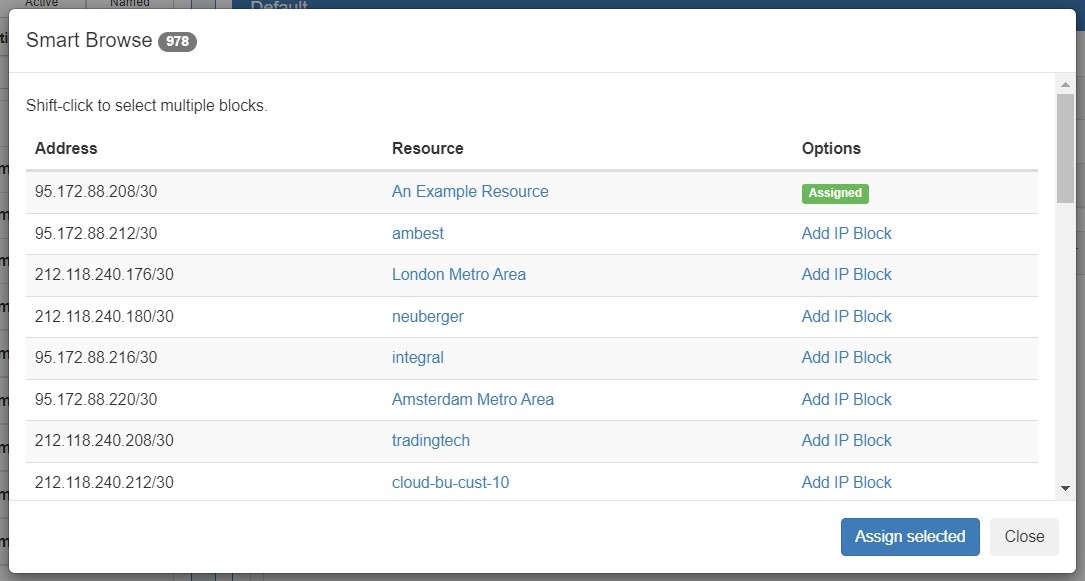
From here, you may assign additional blocks, clicking "Close" to exit when complete.
Delayed Assignment / Selecting Multiple Blocks:
If you wish to assign multiple blocks to the VLAN at the same time, or mark a single block to assign later while continuing to browse the list, you may select a block to mark for later assignment and then assign all selected blocks at once.
To select a single block, left click on row for the block, taking care not to accidentally click on a blue link. Note that the row will have a yellow highlight indicating it is selected:
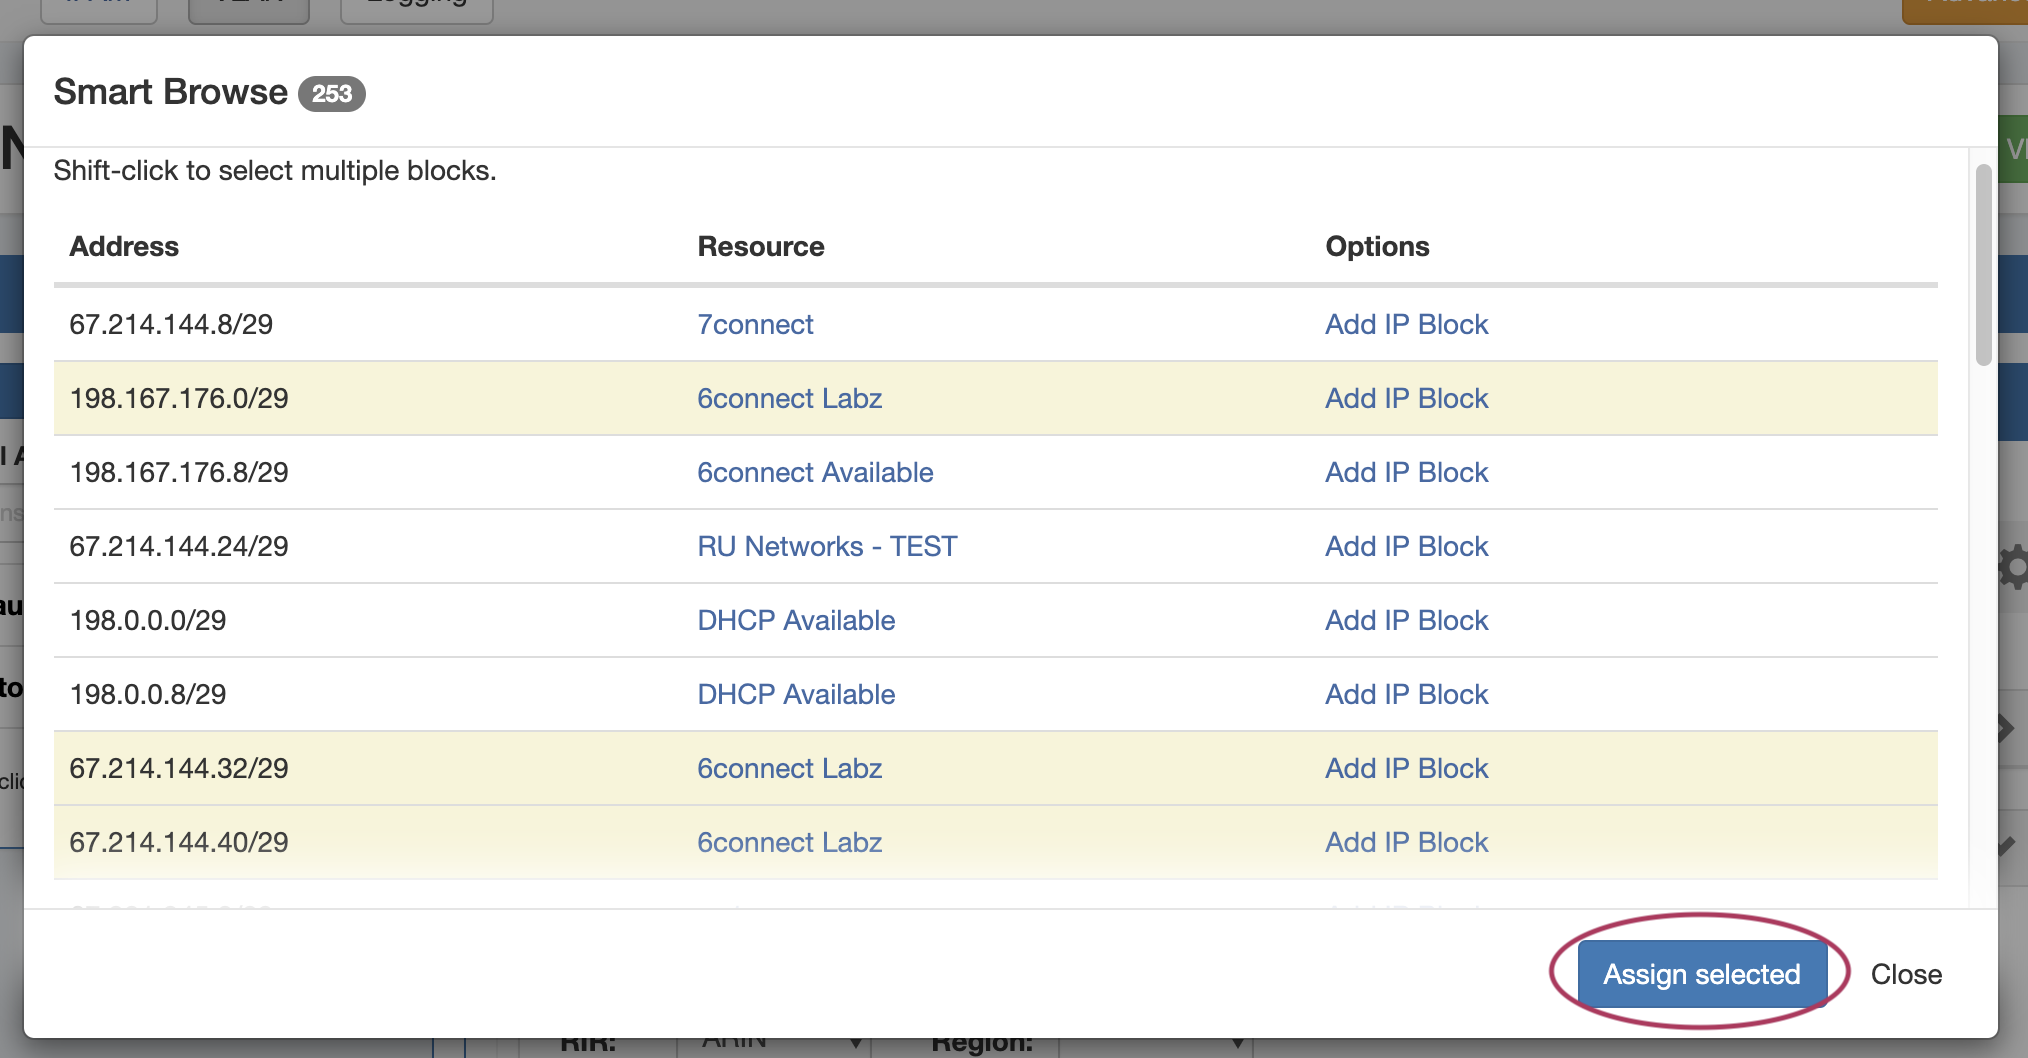
To select additional blocks, shift-click on each row you wish to mark for assignment. You may freely scroll through the results to review your selection.
When done, click Assign Selected. All highlighted blocks will be assigned to the VLAN at the same time, and the Smart Browse window will close.
Edit VLAN
The Edit VLAN panel allows you to view and edit the data associated with the VLAN (Note: not all VLAN fields may be editable).
To open or close the Edit VLAN panel, click on the "List" icon in the grey header bar.
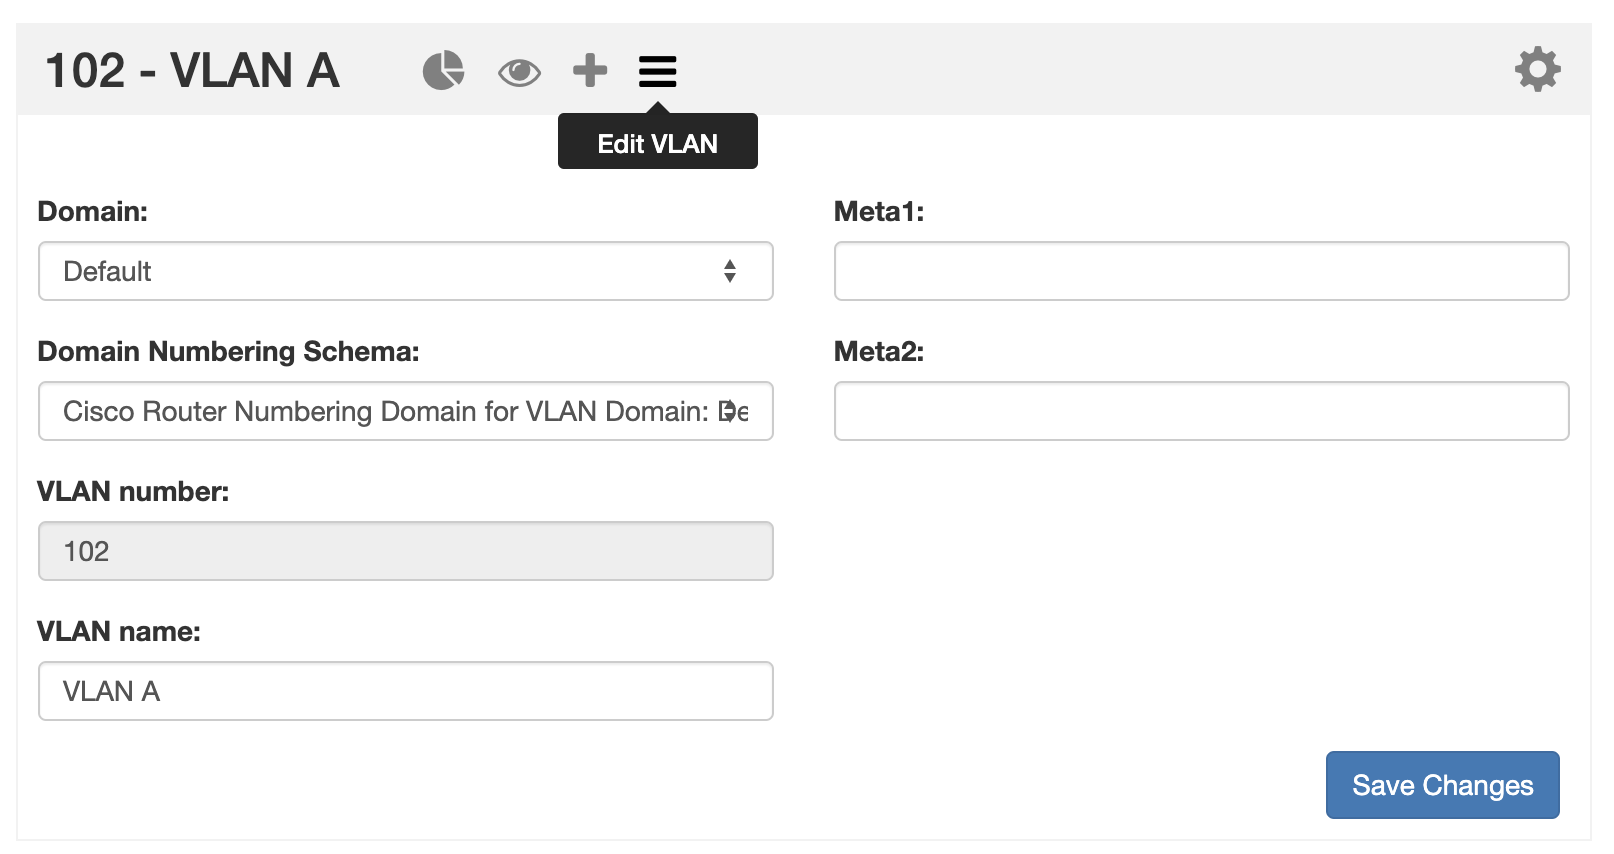
Typically, editable VLAN fields include the VLAN Name and any enabled VLAN "Metadata 1-10" fields enabled in VLAN Columns. To change the information in these fields, click inside the relevant box, type your change, and then click "Save Changes". The information provided in these fields will also display in the "VLAN Advanced" Global View.
VLAN Manage Page
VLAN Manage lists all blocks associated with a VLAN, using an interface that matches IPAM Manage and provides the same block management functionality as in IPAM Manage.
In addition, you can access common VLAN management areas, such as Add Domain and Add VLAN, and manage the VLAN through four action panels - Utilization, Quickview, Assign Block, and Edit VLAN.
VLAN Manage has the same interface options as IPAM Manage:
- Sort the block list by clicking on column names
- Resize columns by dragging the vertical divider between column names to the left or right
- Edit column order, visibility, names, or add custom metadata columns from IPAM Admin → VLAN Columns
- Double-click to open the Edit Block dialog for any block in the list
- Right-click on a block (or click on the gear icon) to open the IPAM Action Menu
- Shift-click to select multiple blocks, and then right-click for multi-block menu options
- Filter the block view by clicking on "filter >", then selecting filter criteria. When done, click Apply.
- Export the list to .csv
- View "Parent View", showing the parent blocks with an option to display the block's tree
VLAN Manage also has the same action panels as in the VLAN Home page - Utilization Boxes:
- Open VLAN Action panels from inside VLAN manage to review data or perform standard tasks, including:
- VLAN Utilization Charts (Pie Icon)
- Quickview (Eye Icon)
- Assign Blocks to VLAN (Plus Sign)
- Edit VLAN (List icon)
VLAN Advanced (Global View)
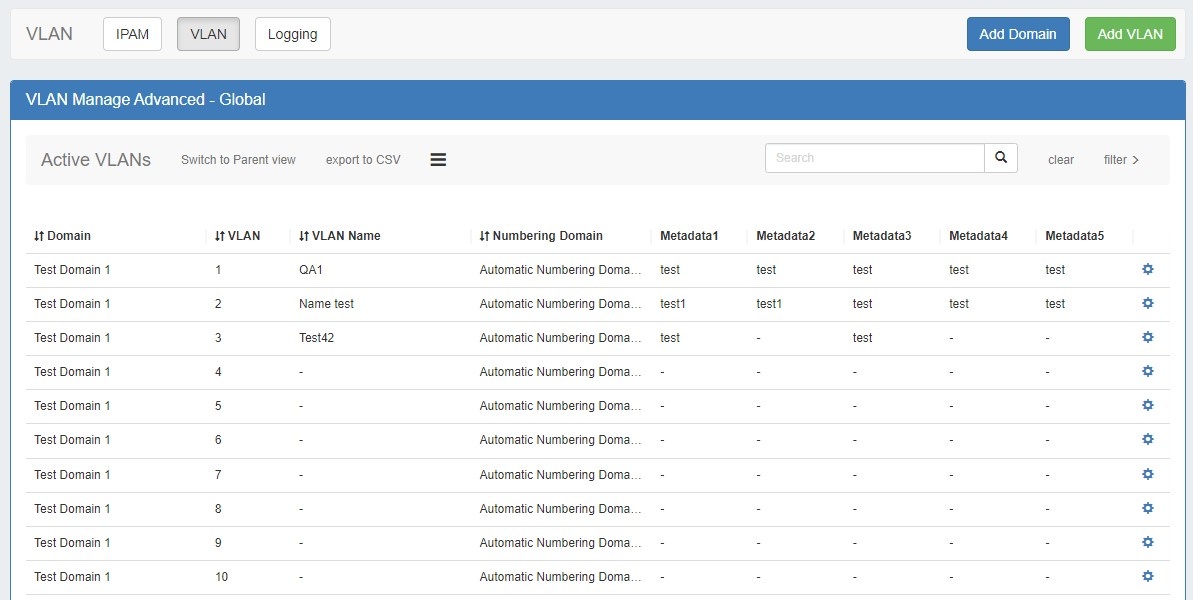
VLAN Advanced displays a list of all domains / vlans. Here, you can perform domain level management tasks, view data on added VLANs, including domain, VLAN Name, applied numbering domains, and any enabled VLAN metacolumn data.
From this page, you may add domains or vlans, edit a domain (by clicking the "List" icon), and perform various actions from the VLAN Action Menu (right click on a VLAN entry).
VLAN Advanced (Global View) Actions
- Sort the list by clicking the column header(s)
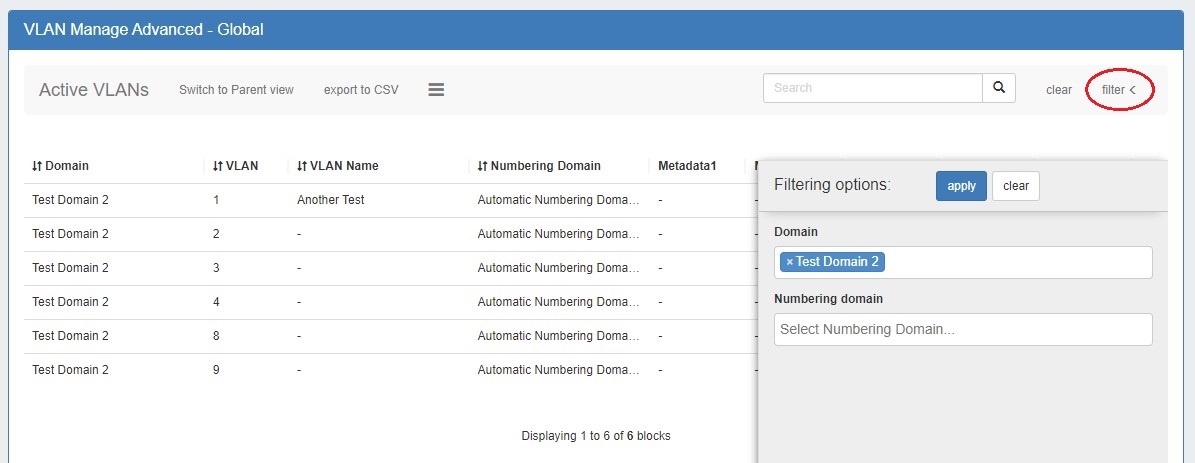
- Filter the list by clicking on the "filter >" link on the rightmost side of the grey list header, then select the filter criteria and click Apply.
- Search for a specific domain name, vlan name, vlan number, or metadata field value by typing the search term into the search box, then hit enter or click the Search icon.
- Export the list to .csv by clicking "export to CSV" in the list header
- Edit or remove a domain by clicking on the Edit Domain panel (list icon)
- Add domains or VLANs by clicking Add Domain or Add VLAN buttons at the top right of the page
Additionally, you may right click on any VLAN while in this view to open a VLAN action menu with the following options:
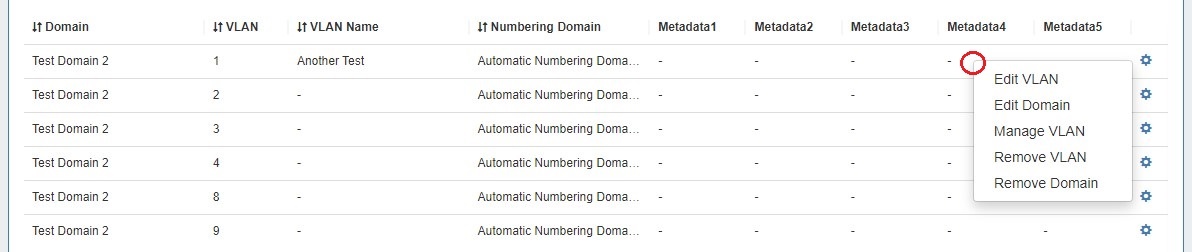
- Edit VLAN (opens the Edit VLAN panel for that VLAN)
- Edit domain (opens the Edit Domain panel for the VLAN's domain)
- Manage VLAN (links to the VLAN Manage page for the VLAN)
- Remove VLAN
- Remove domain
System VLAN Resources
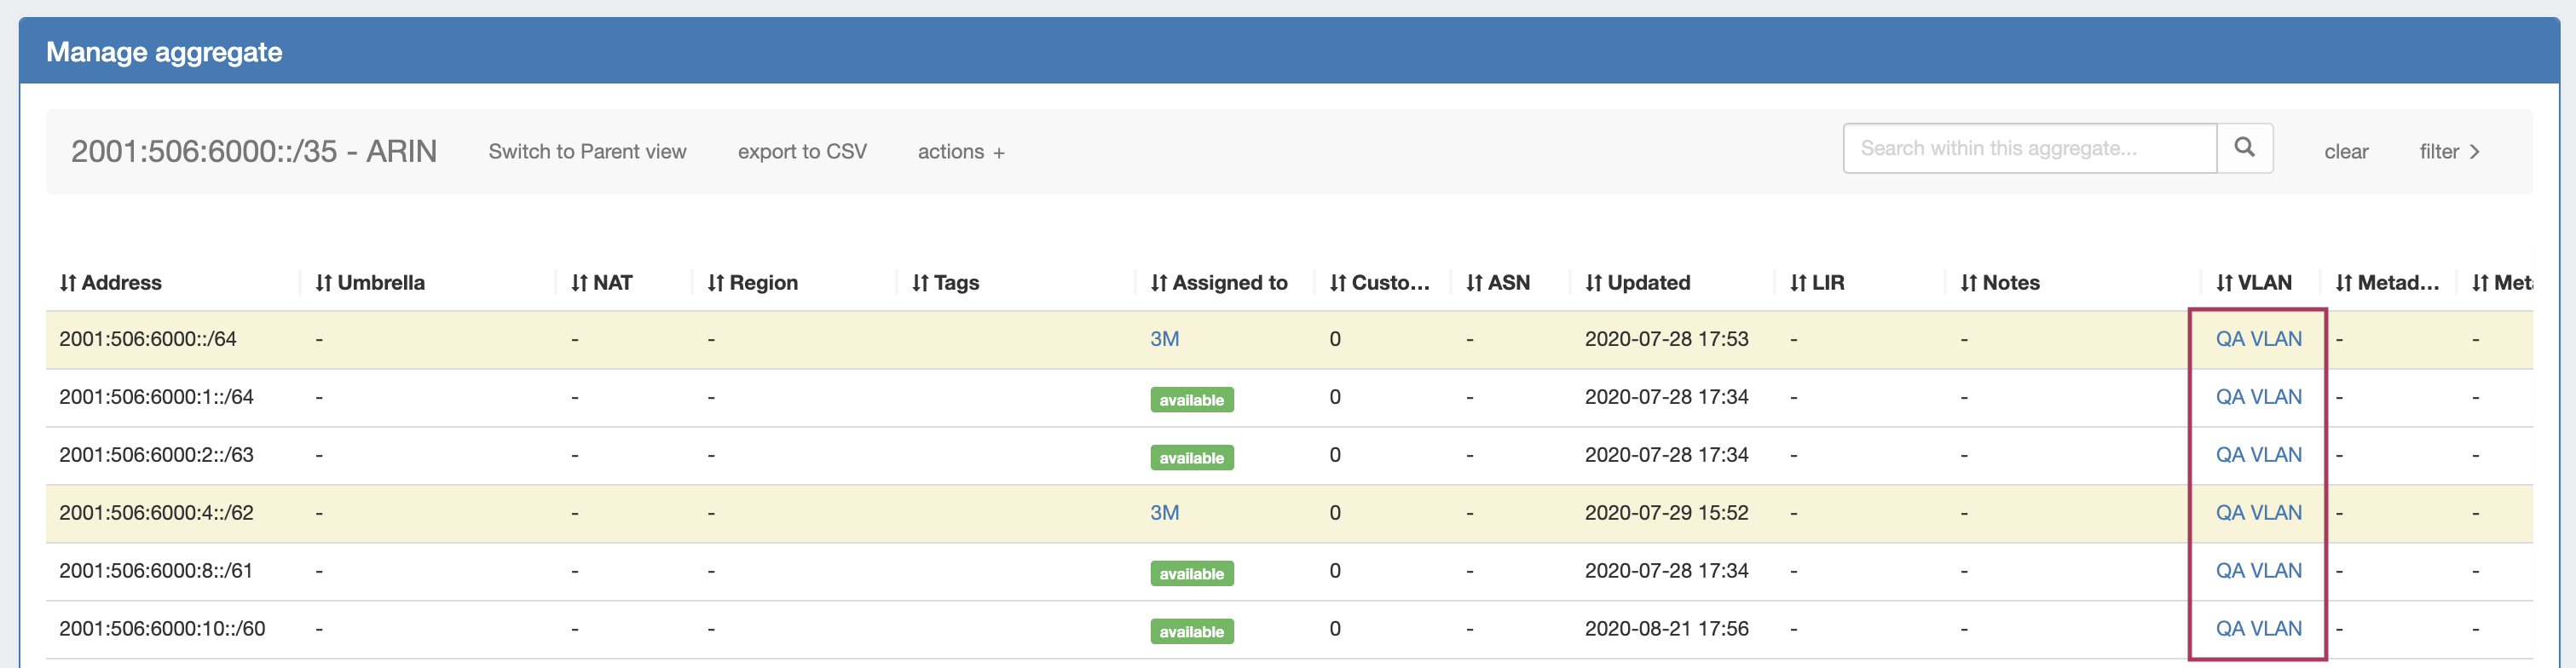
ProVision auto-generates a SystemVLAN resource for Domain-VLAN pairs associated with IPAM blocks.
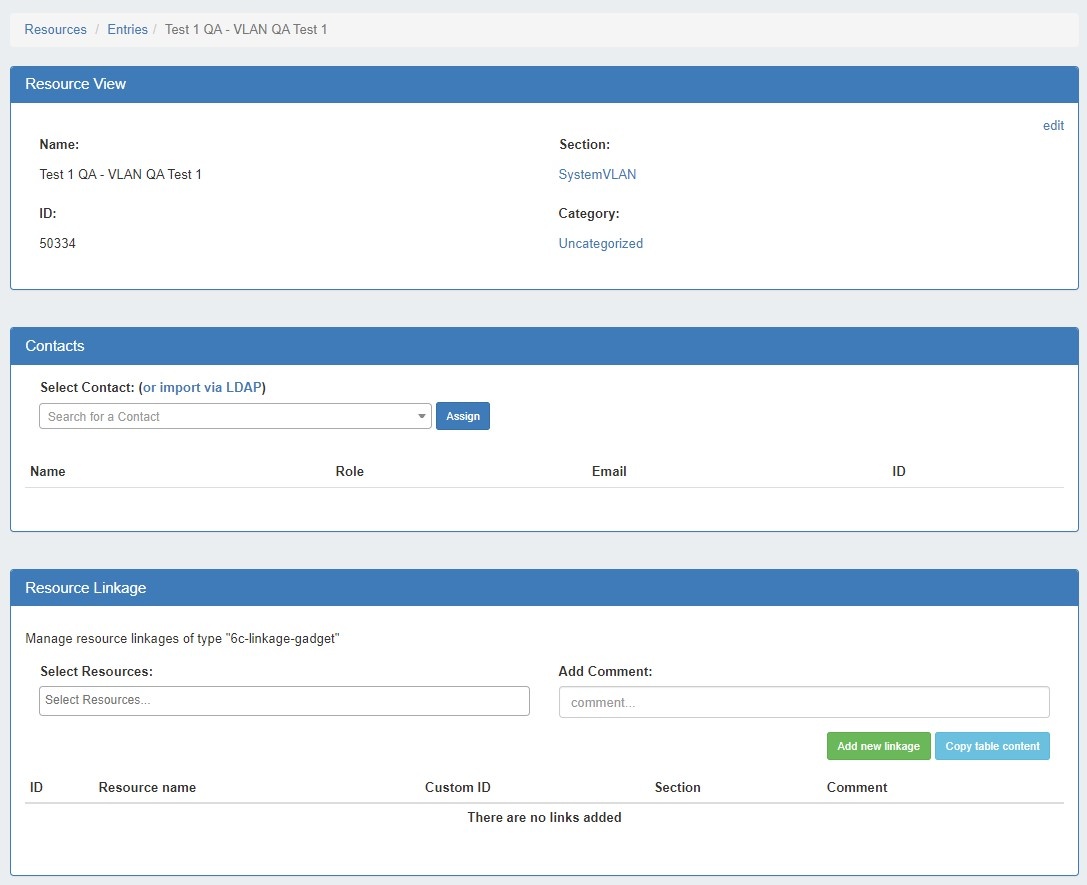
After associating an IPAM Block with a Domain and VLAN, save the changes and a new resource link will appear for the VLAN. Click on the link to navigate to the VLAN resource.
This allows users to document additional information for the VLAN, such as POC / Contacts, Linked Resources, Notes, and create or edit Custom Resource Fields. The Resource Assignment Gadget displays all IP blocks associated with a VLAN. SystemVLAN sections may not be edited.
Additional Information
For detailed information on working with domains and VLANs, continue on to: