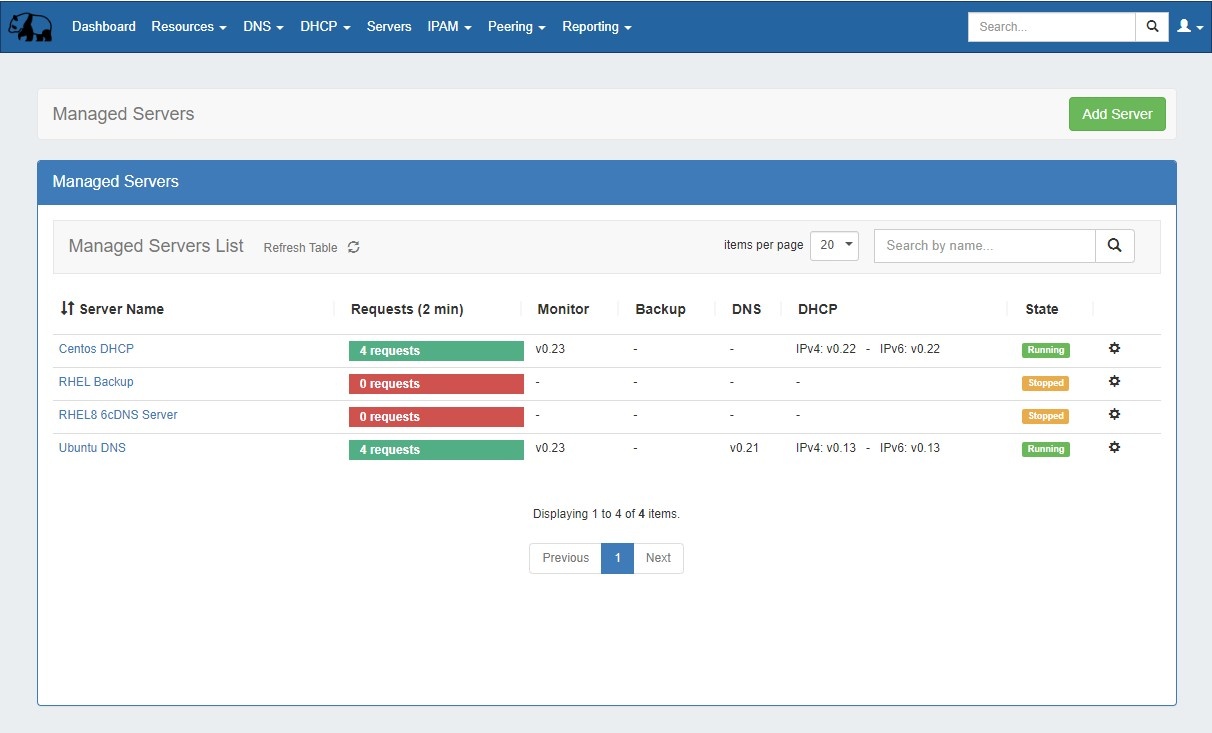

The Managed Servers tab allows for DNS, DHCP, and Backup VM servers to be created, installed, managed, and monitored from within ProVision.
Managed Servers is handled via two main areas of the GUI: the Managed Servers Tab and in Admin → Admin Settings - Managed Servers sub-tab. Managed servers actions are also available via APIv2 and the command line.
Note: Python3, Docker, and Rabbit MQ services are used to support and run Managed Servers. Local customers planning on utilizing managed servers will need to either install these services, or contact support@6connect.com for assistance to accommodate specific network needs. Required installations are already included for hosted customers. |
ProVision's Managed Servers tab allows for DNS (Knot-based), DHCP(Kea-based), and Backup VMs to be created, managed and monitored from within ProVision, either from the GUI or command line.
Managed Server Features include:
Monitoring Features include:
Managed Backup Features include:
Managed Servers uses a "6c servers" user group, under which automatic or manual "server users" are created. The "6c servers" user group gives permissions to all 6c server resources.
The "server users" are necessary to allow access and permissions for the managed server(s). When new server is created with an empty user (instead of a user-provided existing user) a random new user is automatically created under that group. Only that server user has permission to update the associated managed server.
The "Managed Servers" sub-tab under Admin Settings includes modules for global setup of Monitoring Settings, Update Settings, Monitoring Services, RabbitMQ settings, and Managed Backups Settings.
These settings provide the "default" values for servers created from the Managed Servers Tab.
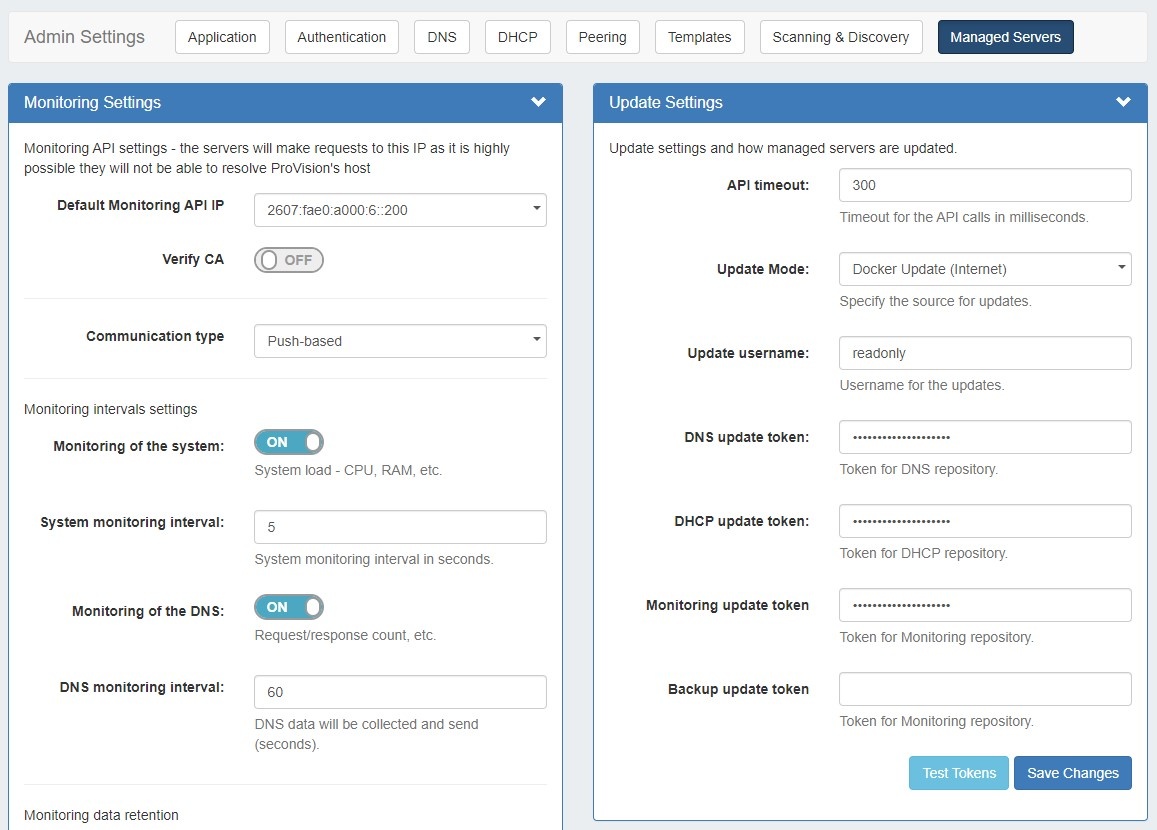
After making any settings updates, be sure to click "Save Changes" under the updated module.
For additional details, see Managed Servers Settings.
APIv2 endpoints are available for Managed Servers and Managed Server Monitoring.
To view these endpoints from your instance, go to the API Tab → APIv2 Swagger Documentation, then click the Swagger links for the family categories "PVServers" and "Monitoring". For information on using the API, see APIv2.
Managed Servers Endpoints: |
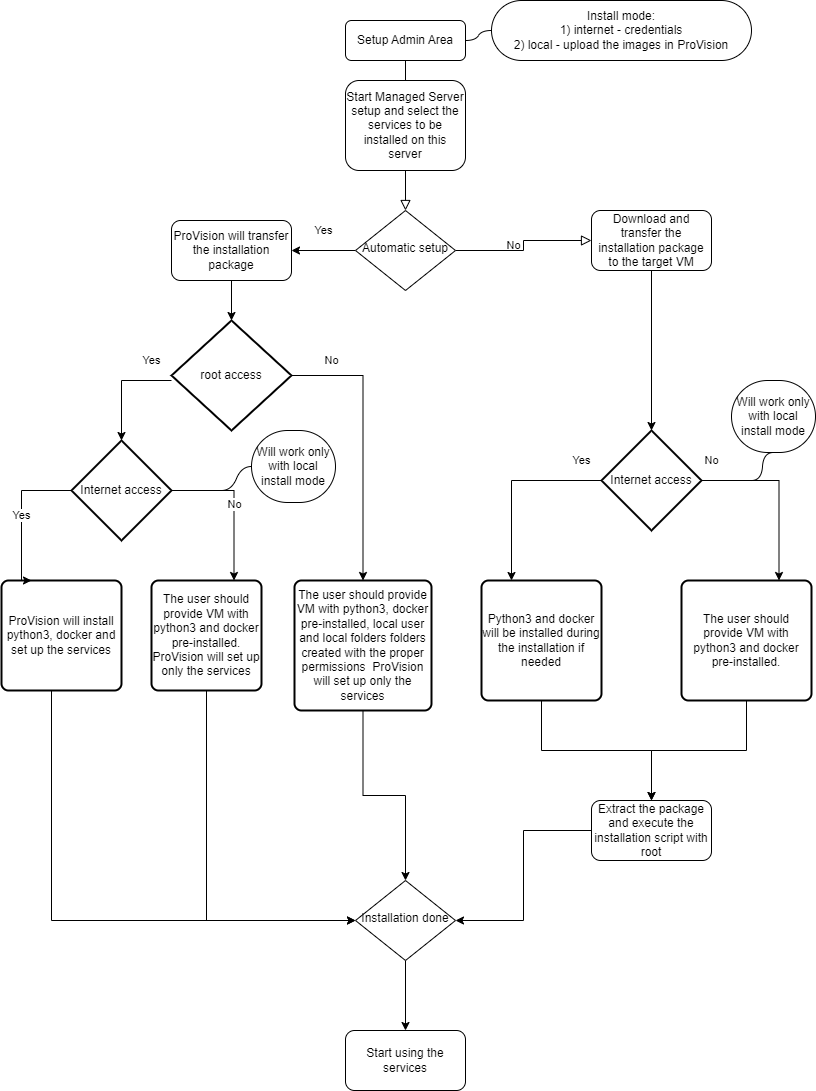
Install necessary packages (RabbitMQ, Python 3.6+, Docker), if not already installed with your ProVision instance.
Python 3.6+ and Docker should be installed on the target VM for the managed server in advance, prior to starting the managed server installation.
If an internet connection is established, Docker will be automatically installed by ProVision scripts.
If RabbitMQ has not already been installed on your ProVision instance / VM, you will need to install it by running the included shell script (Note: Installing RabbitMQ requires internet access.):
1) Run install_rabbitmq.sh.
/usr/bin/sh /path_to_provision/tools/install_rabbitmq_{OS}.sh |
Ubuntu RabbitMQ installation script:
#!/usr/bin/sh # https://www.rabbitmq.com/install-debian.html#apt-quick-start-cloudsmith sudo apt-get install curl gnupg apt-transport-https -y ## Team RabbitMQ's main signing key curl -1sLf "https://keys.openpgp.org/vks/v1/by-fingerprint/0A9AF2115F4687BD29803A206B73A36E6026DFCA" | sudo gpg --dearmor | sudo tee /usr/share/keyrings/com.rabbitmq.team.gpg > /dev/null ## Launchpad PPA that provides modern Erlang releases curl -1sLf "https://keyserver.ubuntu.com/pks/lookup?op=get&search=0xf77f1eda57ebb1cc" | sudo gpg --dearmor | sudo tee /usr/share/keyrings/net.launchpad.ppa.rabbitmq.erlang.gpg > /dev/null ## PackageCloud RabbitMQ repository curl -1sLf "https://packagecloud.io/rabbitmq/rabbitmq-server/gpgkey" | sudo gpg --dearmor | sudo tee /usr/share/keyrings/io.packagecloud.rabbitmq.gpg > /dev/null ## Add apt repositories maintained by Team RabbitMQ sudo tee /etc/apt/sources.list.d/rabbitmq.list <<EOF ## Provides modern Erlang/OTP releases ## ## "bionic" as distribution name should work for any reasonably recent Ubuntu or Debian release. ## See the release to distribution mapping table in RabbitMQ doc guides to learn more. deb [signed-by=/usr/share/keyrings/net.launchpad.ppa.rabbitmq.erlang.gpg] http://ppa.launchpad.net/rabbitmq/rabbitmq-erlang/ubuntu focal main deb-src [signed-by=/usr/share/keyrings/net.launchpad.ppa.rabbitmq.erlang.gpg] http://ppa.launchpad.net/rabbitmq/rabbitmq-erlang/ubuntu focal main ## Provides RabbitMQ ## ## "bionic" as distribution name should work for any reasonably recent Ubuntu or Debian release. ## See the release to distribution mapping table in RabbitMQ doc guides to learn more. deb [signed-by=/usr/share/keyrings/io.packagecloud.rabbitmq.gpg] https://packagecloud.io/rabbitmq/rabbitmq-server/ubuntu/ focal main deb-src [signed-by=/usr/share/keyrings/io.packagecloud.rabbitmq.gpg] https://packagecloud.io/rabbitmq/rabbitmq-server/ubuntu/ focal main EOF ## Update package indices sudo apt-get update -y ## Install Erlang packages sudo apt-get install -y erlang-base \ erlang-asn1 erlang-crypto erlang-eldap erlang-ftp erlang-inets \ erlang-mnesia erlang-os-mon erlang-parsetools erlang-public-key \ erlang-runtime-tools erlang-snmp erlang-ssl \ erlang-syntax-tools erlang-tftp erlang-tools erlang-xmerl ## Install rabbitmq-server and its dependencies sudo apt-get install rabbitmq-server -y --fix-missing sudo rabbitmq-plugins enable rabbitmq_management sudo rabbitmq-server start -detached sleep 5 sudo rabbitmqctl add_user pv_rabbitmq S3curePassW0rd! sudo rabbitmqctl set_user_tags pv_rabbitmq administrator sudo rabbitmqctl set_permissions -p / pv_rabbitmq ".*" ".*" ".*" sudo systemctl enable rabbitmq-server echo "RabbitMQ user is: pv_rabbitmq" echo "RabbitMQ password is: S3curePassW0rd!" echo "RabbitMQ port is: 5672" echo "RabbitMQ management port is: 15672" |
CentOS RabbitMQ installation script:
#!/usr/bin/sh # https://www.rabbitmq.com/install-debian.html#apt-quick-start-cloudsmith sudo yum install curl gnupg apt-transport-https -y ## Team RabbitMQ's main signing key curl -1sLf "https://keys.openpgp.org/vks/v1/by-fingerprint/0A9AF2115F4687BD29803A206B73A36E6026DFCA" | sudo gpg --dearmor | sudo tee /usr/share/keyrings/com.rabbitmq.team.gpg > /dev/null ## Launchpad PPA that provides modern Erlang releases curl -1sLf "https://keyserver.ubuntu.com/pks/lookup?op=get&search=0xf77f1eda57ebb1cc" | sudo gpg --dearmor | sudo tee /usr/share/keyrings/net.launchpad.ppa.rabbitmq.erlang.gpg > /dev/null ## PackageCloud RabbitMQ repository curl -1sLf "https://packagecloud.io/rabbitmq/rabbitmq-server/gpgkey" | sudo gpg --dearmor | sudo tee /usr/share/keyrings/io.packagecloud.rabbitmq.gpg > /dev/null ## Add apt repositories maintained by Team RabbitMQ #sudo tee /etc/apt/sources.list.d/rabbitmq.list <<EOF ## Provides modern Erlang/OTP releases ## ## "bionic" as distribution name should work for any reasonably recent Ubuntu or Debian release. ## See the release to distribution mapping table in RabbitMQ doc guides to learn more. #deb [signed-by=/usr/share/keyrings/net.launchpad.ppa.rabbitmq.erlang.gpg] http://ppa.launchpad.net/rabbitmq/rabbitmq-erlang/ubuntu focal main #deb-src [signed-by=/usr/share/keyrings/net.launchpad.ppa.rabbitmq.erlang.gpg] http://ppa.launchpad.net/rabbitmq/rabbitmq-erlang/ubuntu focal main ## Provides RabbitMQ ## ## "bionic" as distribution name should work for any reasonably recent Ubuntu or Debian release. ## See the release to distribution mapping table in RabbitMQ doc guides to learn more. #deb [signed-by=/usr/share/keyrings/io.packagecloud.rabbitmq.gpg] https://packagecloud.io/rabbitmq/rabbitmq-server/ubuntu/ focal main #deb-src [signed-by=/usr/share/keyrings/io.packagecloud.rabbitmq.gpg] https://packagecloud.io/rabbitmq/rabbitmq-server/ubuntu/ focal main #EOF ## Update package indices sudo yum update -y ## Install Erlang packages sudo yum install -y erlang-base erlang-asn1 erlang-crypto erlang-eldap erlang-ftp erlang-inets erlang-mnesia erlang-os-mon erlang-parsetools erlang-public-key erlang-runtime-tools erlang-snmp erlang-ssl erlang-syntax-tools erlang-tftp erlang-tools erlang-xmerl ## Install rabbitmq-server and its dependencies sudo yum install rabbitmq-server -y sudo rabbitmq-plugins enable rabbitmq_management sudo rabbitmq-server start -detached sleep 5 sudo rabbitmqctl add_user pv_rabbitmq S3curePassW0rd! sudo rabbitmqctl set_user_tags pv_rabbitmq administrator sudo rabbitmqctl set_permissions -p / pv_rabbitmq ".*" ".*" ".*" sudo systemctl enable rabbitmq-server echo "RabbitMQ user is: pv_rabbitmq" echo "RabbitMQ password is: S3curePassW0rd!" echo "RabbitMQ port is: 5672" echo "RabbitMQ management port is: 15672" |
This script is taken from Installing on Debian and Ubuntu — RabbitMQ and may need an update in future.
2) You may verify the installation is working by opening http://your.host:15672
3) Once confirmed working, go to ProVision Admin Settings → Managed Server Settings. Then, enter the RabbitMQ IP, port, username, and password into the RabbitMQ Settings section. When done, click "Save Changes".
In ProVision, navigate to Admin Settings → Managed Servers and enter or verify settings in the following areas:
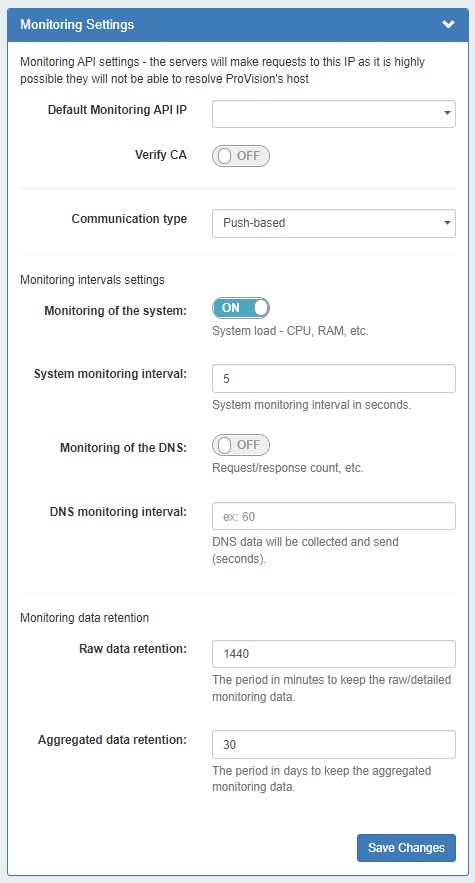
Under Monitoring Settings, select the "Default Monitoring API IP", and enter any additional setting options as follows:
If in use, enter the password for Managed Backup Servers and click "save changes".
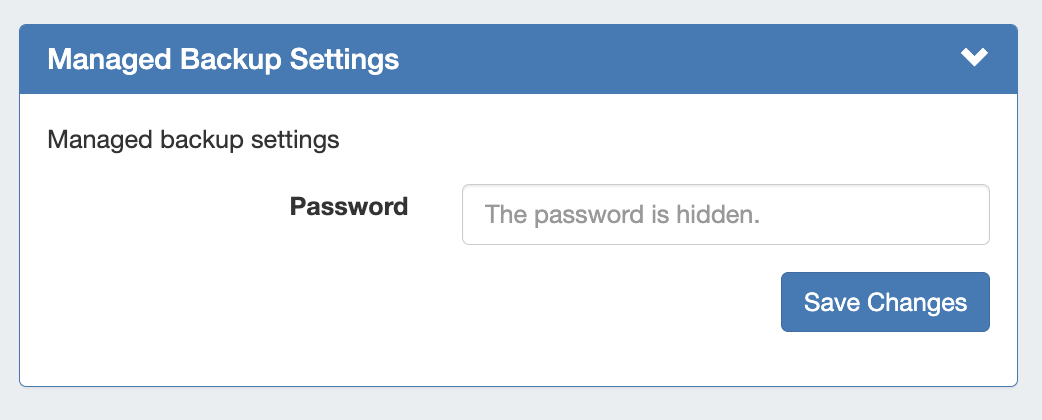
Enter Update settings to use for Managed Servers, starting with API timeout (in milliseconds) and Update Mode.
Fill in the remaining update settings as applicable to the selected update mode:
| For assistance obtaining repository tokens, please contact support@6connect.com. |
Update Settings - Docker Update Mode (Internet)
API timeout: Timeout for API calls in milliseconds. Update Mode: Enter the source for updates, depending on internet accessibility. Two options are available:
|
Update Settings - Image Download (Local)If Update Mode is set to "Image Download (Local)", the following settings will display to enter:
Image file: Attach the Image file for upload to ProVision.
API timeout: Timeout for API calls in milliseconds. Update Mode: Enter the source for updates - Image Download (Local), or opt to change to Docker Update (Requires Internet). Images history: Available only after saving changes. Once a history is available, it will display at the top of the module.
Test Tokens: Click to test the applied tokens for DNS, DHCP, and Monitor. |
Enter the RabbitMQ IP, port, username, and password into the RabbitMQ Settings section. To verify the settings, click "Test Credentials".
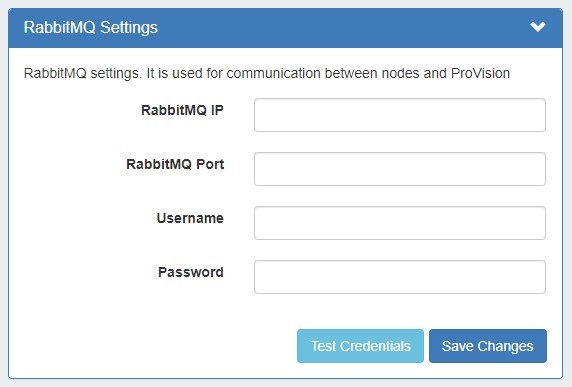
When done, click "Save Changes".
Setup the necessary services:
python3 /path_to_provision/pvservers/setup/pv_install/setup_services.py |
At this point, initial setup is complete and you may begin to create new managed servers in ProVision.
For instructions on creating a new managed server, see Working with Managed Servers.
For information on creating a new managed server, working with the managed server list, and viewing monitoring, see the following sections:
For Admin-level managed server setting information, see: