DNS Administration
DNS Administration in DNSv3 is primarily handled under the DNS tab DNS Servers sub-tab.
The DNS Servers tab is only accessible to Admin users, and contains functions for adding, updating, and managing DNS servers as well as scheduling server tasks.
Additional DNS Admin tasks occur in other ProVision areas, and not all management tasks require Admin-level permissions - some only require appropriate resource permissions on the DNS Groups, Zones, and servers involved. See additional sections on this page for more detailed information:
DNSv3 Overview
DNSv3 reorganizes ProVision's DNS system into a more unified and accessible interface, combining both admin and non-admin DNS tasks together under the DNS tab.
In DNSv3, zones are gathered under DNS Groups, servers are attached to those Groups, and Nameservers, Default SOA values, and ACLs are managed at a per-Group level.
Users can then view and manage Groups, individual zones, default SOA values, ACLs, attach servers, and perform pushes all on the same page.
DNSv3 Zone Name Response Change
Note: In DNSv3, zone name responses will enforce and return a trailing period (i.e., "example.com" will be converted and returned as "example.com.").
DNSv3 is designed to reflect RFC 1035 standards for valid data formats and will return error messaging for data not meeting those formats.
DNSv3 Permissions
DNSv3 (6.0.0 release), restructures DNS to incorporate DNS zones and Groups into ProVision's Resource System. Zones and Groups are Resources just like Customers, Servers, Routers, or Contacts (See The Resource System for a more detailed explanation of Resources in ProVision).
This allows for DNS zones and Group permissions to be managed similarly to other ProVision resources, where users with Resource permissions (Create / Read / Update / Delete) on the parent resource of the DNS Group can create groups and zones, manage those groups and zones, push (if a server is attached), and delete.
A user with full Resource permissions on a DNS Server, as well as the parent resource of a Group, may view and attach that server to a Group.
Users with Admin permissions can access the DNS Servers area under the DNS tab manage DNS server creation, edits, and deletion.
For more information on setting up permissions groups in ProVision, see Users & Permissions.
DNSv3 Administrative Tasks
Admin-only tasks in DNSv3 include setting DNS Globals, importing zones, scheduling pushes, and managing DNS Servers.
These tasks may be accessed in the following areas:
- DNS Global Settings (Local Installs): Admin Preferences page.
- Importing DNS Zones: the Data Import tab, see Import DNS Zones.
- Scheduling DNS Pushes:
- May be set up from the Scheduler Tab or,
- Set by server from the DNS Servers page, or
- Set by DNS Group from the DNS Groups page, or
- Set by individual zone from the View Zone page
- Managing DNS Servers: The DNS Servers page
Tasks such as working with zones, DNS Groups, adding ACLs, attaching servers to Groups, and manually pushing zones do not require ProVision Admin permissions.
Instead, these tasks simply require that the user be included in a User Group that has appropriate permissions (either direct, or inherited) on the DNS zones, Groups, and servers involved.
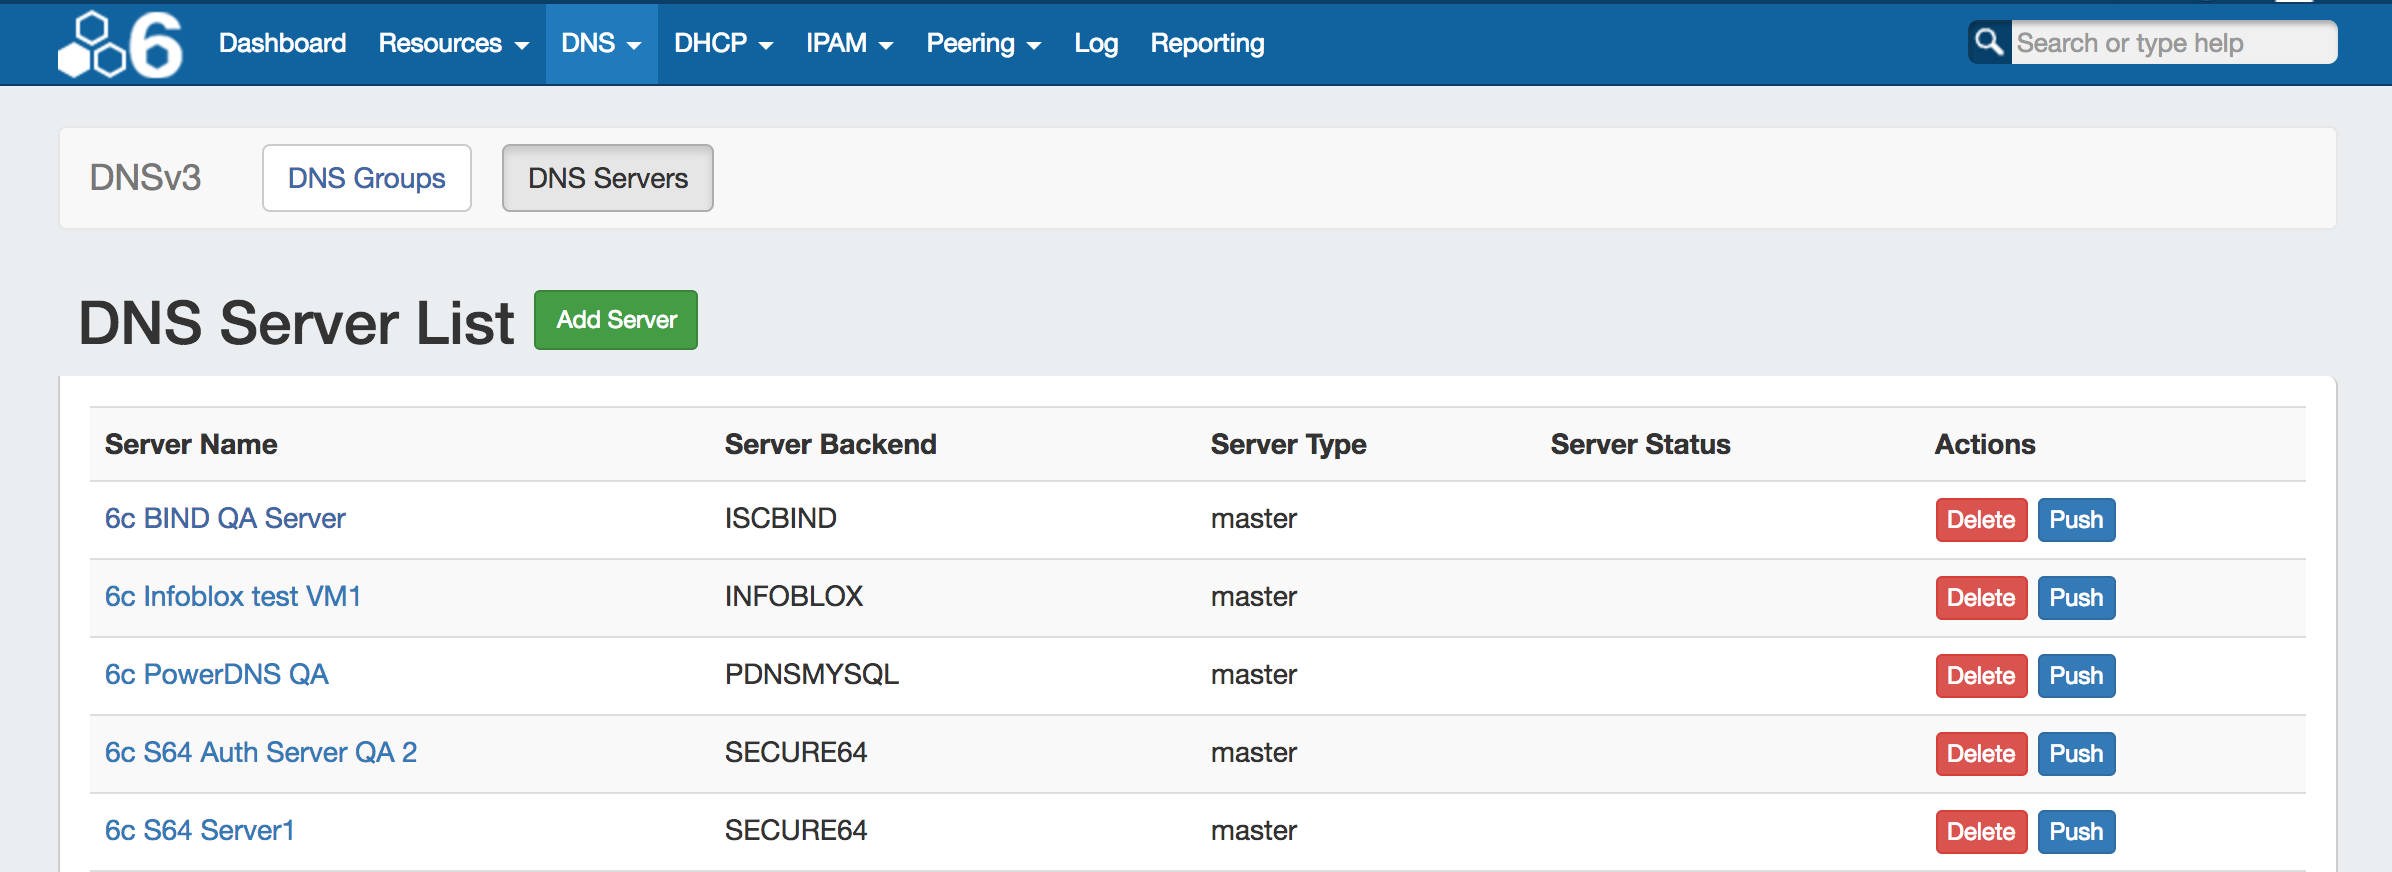
Manage DNS Servers
Adding, configuring, and managing DNS Servers occurs in the Admin-only DNS Servers page under the DNS Tab.
Supported DNSv3 server types include:
- ISC BIND
- Secure 64 (Authority, x86 Authority, KNOT Authority, Cache, Signer)
- PowerDNS (BIND and MySQL)
- InfoBlox
- Knot DNS
- NS ONE
- DynDNS
- DNSMadeEasy
- Dummy (a fake server entry used for servers outside of ProVision access, in order to manage master / slave configurations)
For detailed information on adding, editing, and deleting DNS Servers, see Working with DNS Servers.
ACLs / Views
In DNSv3, Views may be created by selecting the "Export Groups as Views" toggle and selecting a DNS Group under the server details sections "DNS Group Settings".
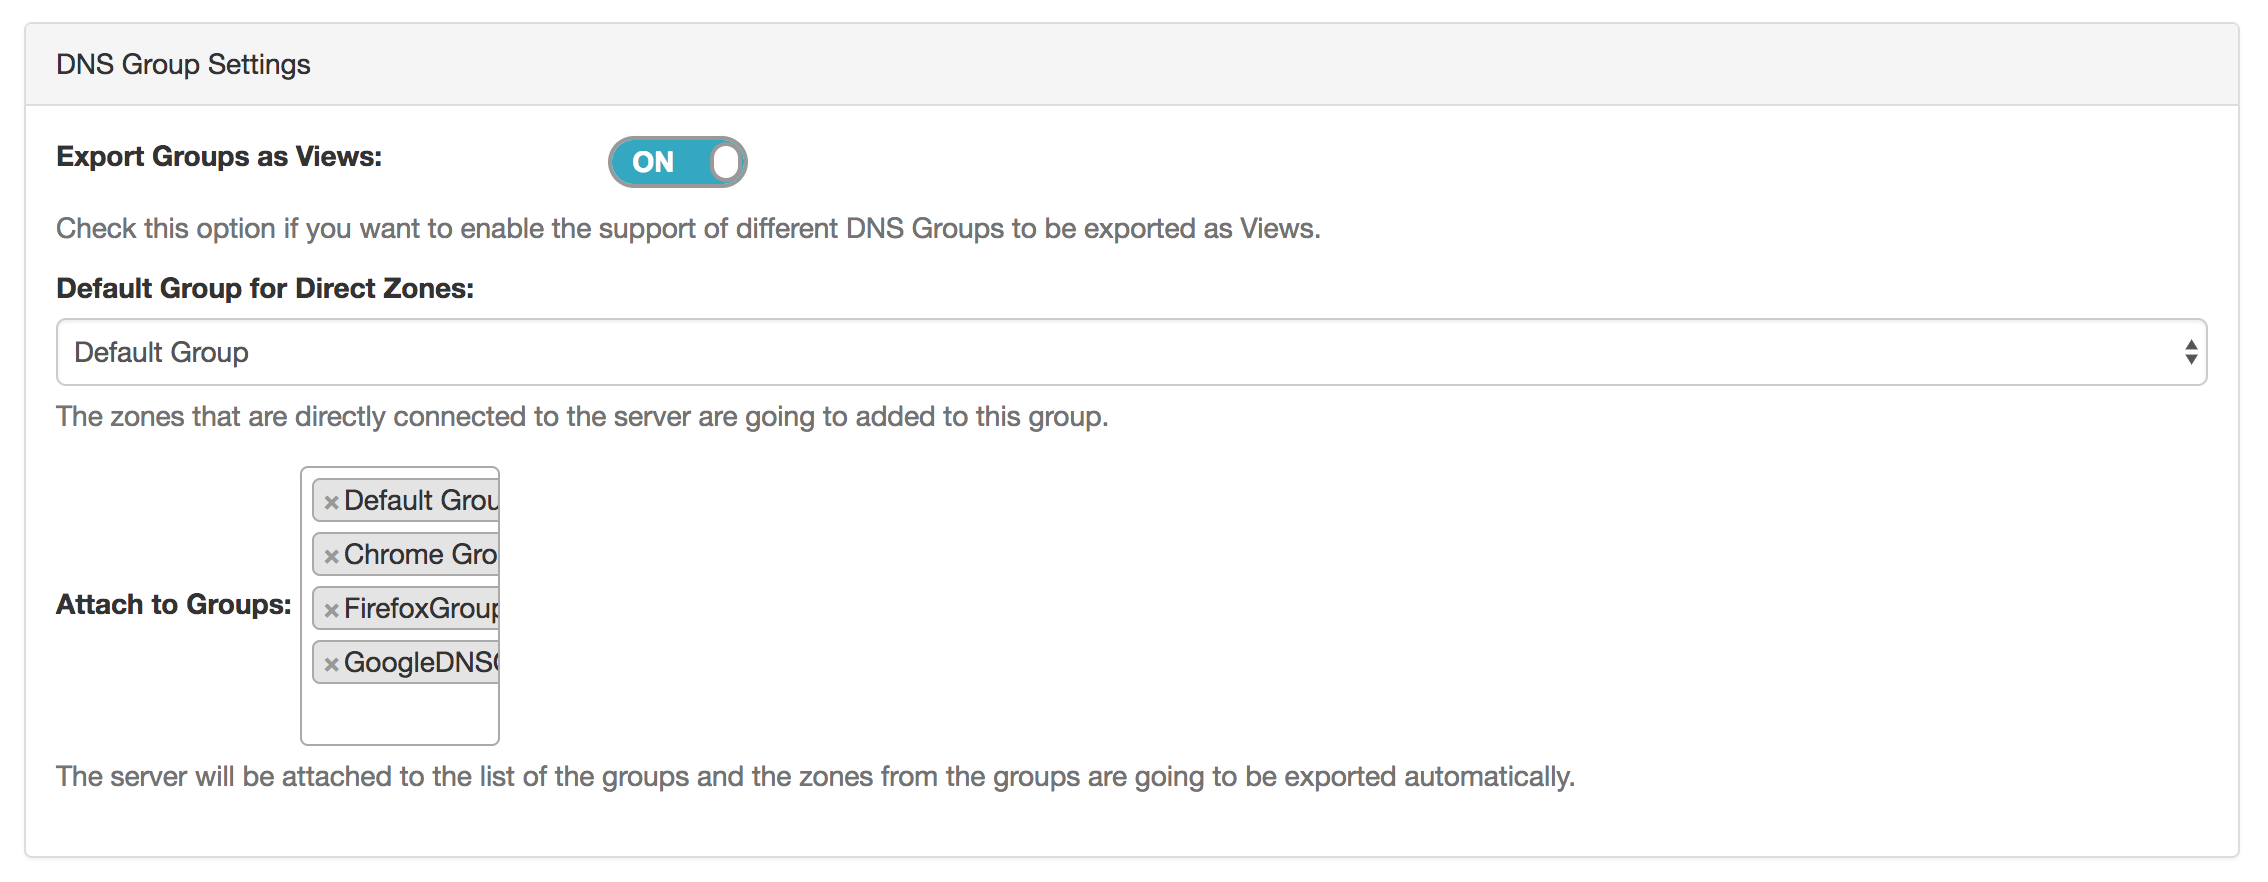
ACLs are managed on a per-DNS Group level, and may be added, edited, or removed by any user with appropriate resource permissions on the DNS Group.
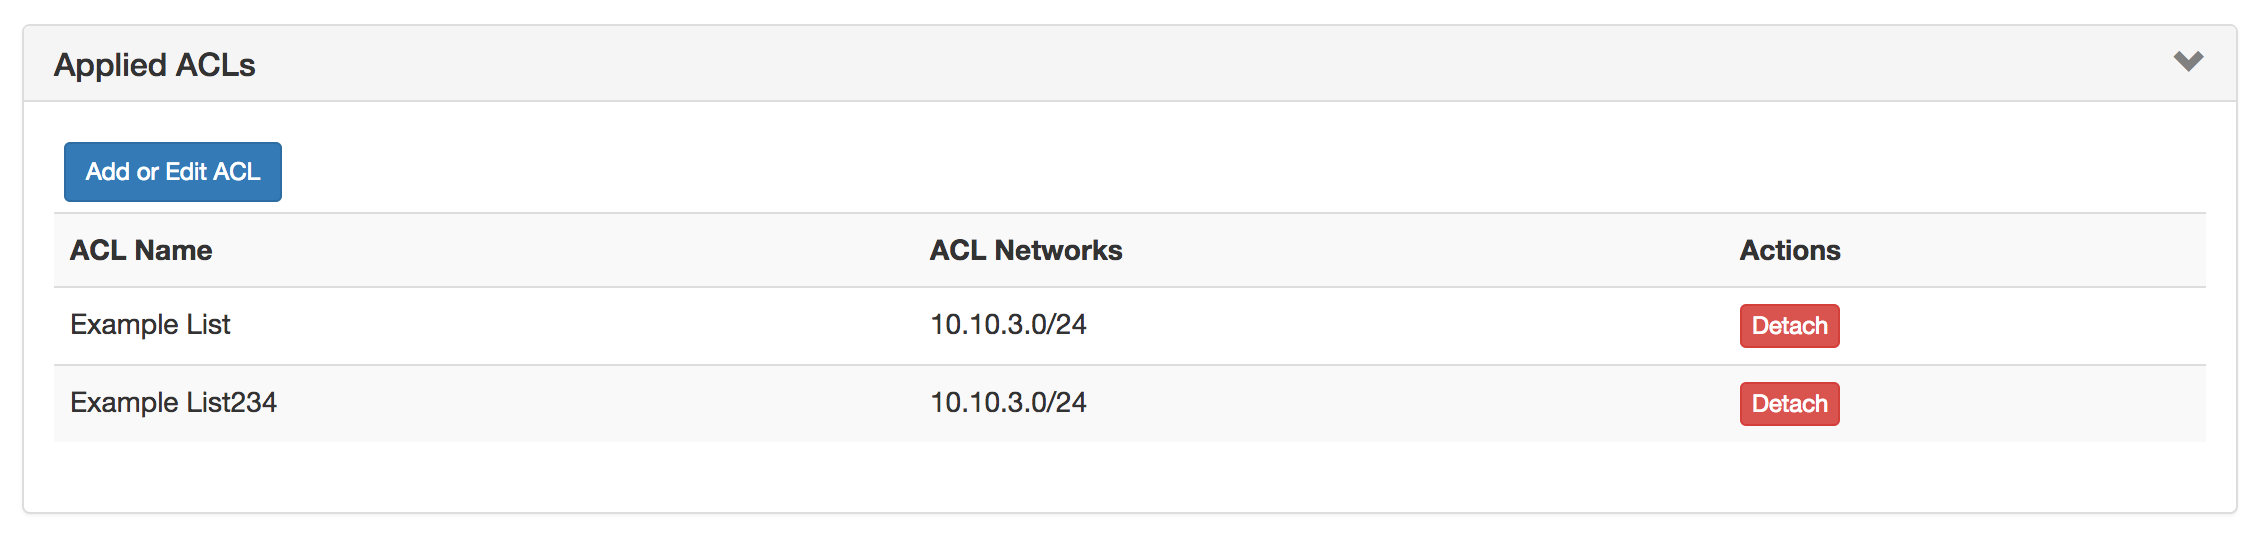
For details on working with ACLs, see Configuring Split Horizon/Views.
DNS Zone Transfers (Pushes)
In DNSv3, zones may be pushed manually or scheduled for a future time, and may be performed for a single zone, all zones in a DNS Group, or all zones on a server.
Scheduling DNS pushes requires administrative access, but manual pushes only require permissions on the DNS Group / DNS Zone, and the server(s) attached.
Manual DNS Pushes:
Manual pushes may be performed from the following locations in ProVision:
- Single Zone: From the DNS Groups Zone list "Push" button. See Working with DNS Zones - Pushing Zones
- Single Zone: From the DNS View Zone page "Push Zone Now" button. See Working with DNS Zones - Pushing Zones
- Group: From the DNS Groups Zone list "Push Group" button. See Working with DNS Groups - Pushing a Group
- Server: From the DNS Servers list "Push" button. See Working with DNS Servers - Pushing a server
- Server: From the DNS Server Settings page "Push Zones" button. See Working with DNS Servers - Pushing a server
Scheduled DNS Pushes:
Scheduled pushes may be performed from the following locations in ProVision:
- May be set up from the Scheduler Tab for single zones, all zones in a Group, or all zones on a server.
- Set by server from the DNS Servers page, or
- Set by DNS Group from the DNS Groups page, or
- Set by individual zone from the View Zone page
DNS Record Types
DNSv3 Record Types are a static list comprised of:
- A, AAAA, CNAME, DNAME, DNSKEY, DS, MX, NAPTR, NS, PTR, SOA, SRV, SPF, HINFO, TXT.
Any user with appropriate resource permissions on the DNS Zone / DNS Group may add, edit, or delete DNS Records.
See Working with DNS Zones - Common Tasks for detailed information on managing DNS Records.
Global DNS Settings (Local Installation Only)
DNS Global Settings is accessible from the Admin Preferences page by users with Admin level permissions.
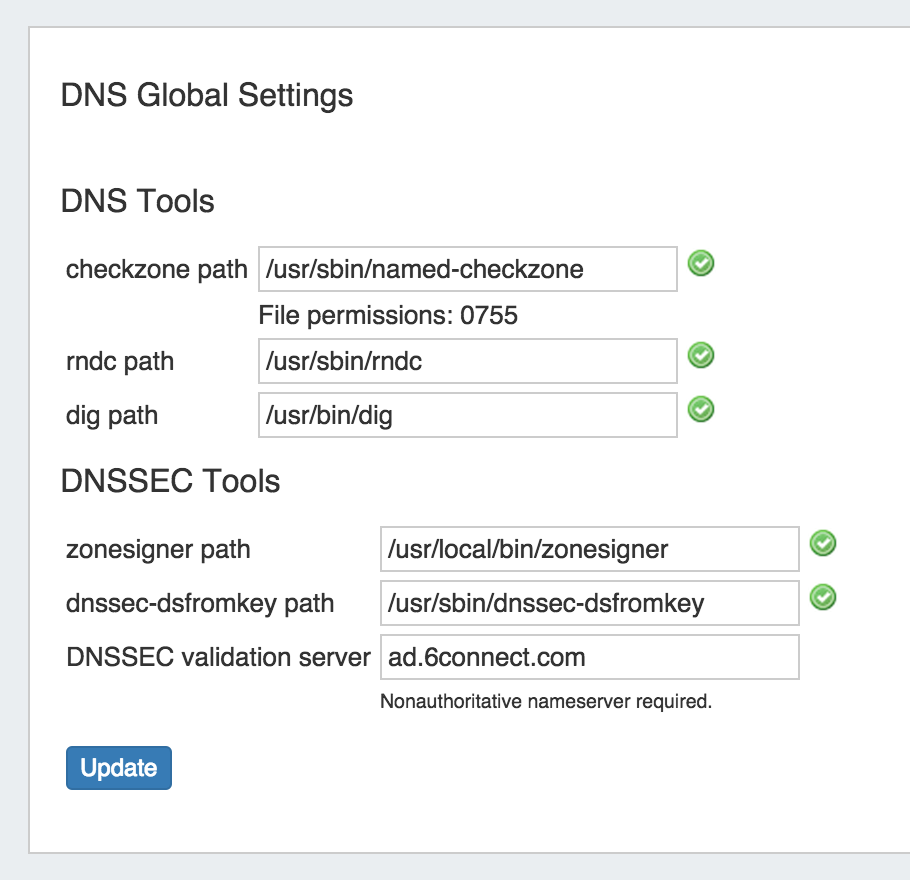
Checkzone path: Path to checkzone
rndc path: Path to rndc
dig path: Path to dig
zonesigner path: Path to zonesigner
dnssec-dsfromkey path: Path to dnssec-dsfromkey
DNSSEC validation server: Address of DNSSEC validation server, required to be a non-authoritative name server.
DNS Export Functions
Exporting Zones
Individual Zones:
DNS zones may be exported individually from the zone's View Zone page "Export Zone" button, by any user with appropriate zone permissions (see: Editing DNS Zones).
Zones in a DNS Group:
All zones under a DNS Group may be exported from the DNS Group "Export Zones" button, by any user with the appropriate group permissions (see: Working with DNS Groups).
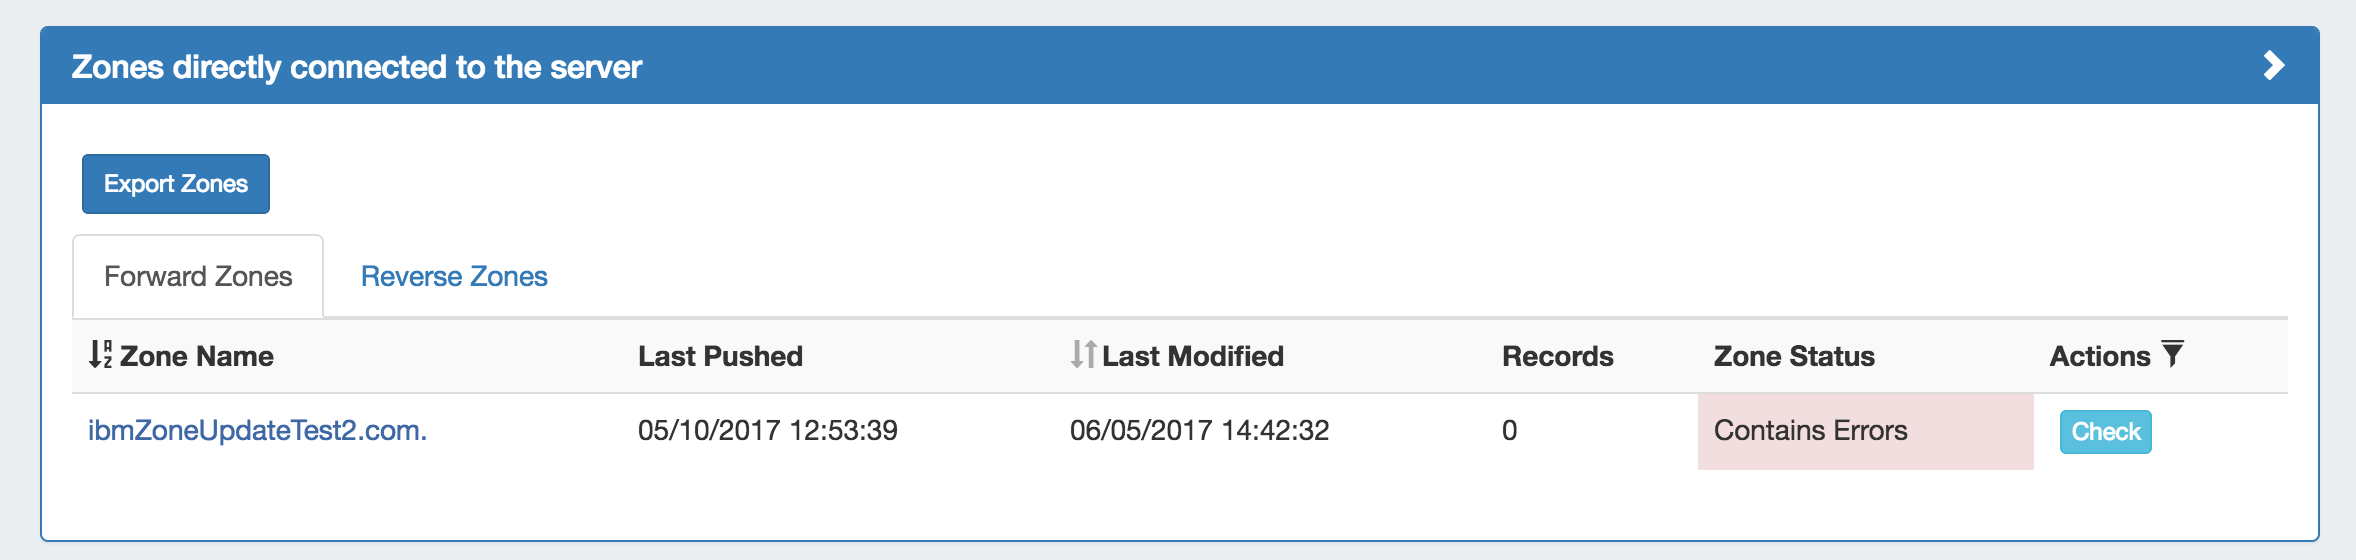
Zones directly connected to a server:
Zones directly connected to a server may be exported by Admin users from the DNS Server Details page, under the section "Zones connected directly to the server".
Expand the module by clicking the (>) arrow, and then click the "Export Zones" button.
Importing DNS Zones:
ProVision offers six DNS zone import options, available under the Data Import tab in the Admin section. For more information on importing DNS zones, see Importing your Data and Import DNS Zones.
BIND Zone Upload / Import: Imports DNS zones using the named.conf configuration file tied to the zones you are uploading, a .zip or .tar file of the zones themselves, and an optional .csv file mapping zones to customers and DNS Servers. This is the simplest and most commonly used import method. Refer to Import DNS Zones for more information.
PowerDNS Zone Import: This tool is available after configuring a PowerDNS server with a MySQL backend. The PowerDNS Import connects to the selected server and imports all zones.
InfoBlox Zone Import: Imports DNS zones using a provided Host, Username, and Password. The InfoBlox import pulls all zones on the InfoBlox LOCAL grid and adds them to a designated Group. It is advised to create a DNS Group prior to the import with default parameters and NS records to be inherited by the imported records.
NS ONE Zone Import: Imports DNS zones using a NS One API Key. It is advised to create a DNS Group prior to the import with default parameters and NS records to be inherited by the imported records.
Dyn DNS Zone Import: Imports DNS zones using a Dyn DNS Customer Name, Username, and Password. It is advised to create a DNS Group prior to the import with default parameters and NS records to be inherited by the imported records.
DNSMadeEasy Zone Import: Imports DNS zones using a DNSMadeEasy API Key and API Secret. It is advised to create a DNS Group prior to the import with default parameters and NS records to be inherited by the imported records.
Additional Information:
System Information for Local Installations
Zones are stored in the 6connect web root under /zones.
DS keys are stored in the 6connect web root under /keys.
Global DNS Settings may be set from the Admin Preferences page.
Additional Sections:
For more information on DNS and configurations, see the following sections: