Dashboard Customization
The Dashboard is your first stop when logging into 6connect Provision, giving you a quick graphical status overview as well as convenient links for reference and support. The Dashboard is comprised of modular "Widgets" that show different types of information. These Widgets may be added, moved, edited, and customized to create personalized Dashboards.
There are two levels of Dashboards:
Default Dashboard: The Default Dashboard is a shared dashboard for all users of the ProVision instance. It may only be edited by admin level users, but it is viewable by all users.
Individual Users' Dashboards: Additional personal dashboards may be created by individual users. These dashboards are tied to the user logged in, and are only viewable / editable by that user.
Dashboards and Permissions
Browser Compatibility
It is recommended to use the most recent versions of the Chrome or Firefox browsers when working with the dashboard. Due to incompatibilities with Internet Explorer / Edge, the dashboard is set to read-only mode and is not editable when accessed from IE at this time.
Working with Dashboards
Viewing an Existing Dashboard
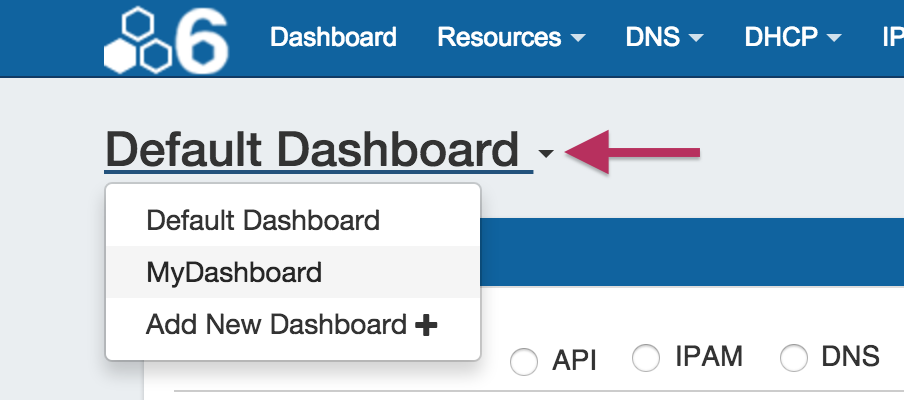
The Default Dashboard will be the primary dashboard that appears when clicking on the Dashboard Tab. To view another, already created dashboard, click on the dashboard name at the top left of the Dashboard page. This will open the list of existing dashboards. From there, click on the name of the dashboard you wish to view.
Adding a Dashboard
To add a new personal dashboard, click on the dashboard name at the top left of the Dashboard page. This will open the list of existing dashboards.
Click on "Add New Dashboard"
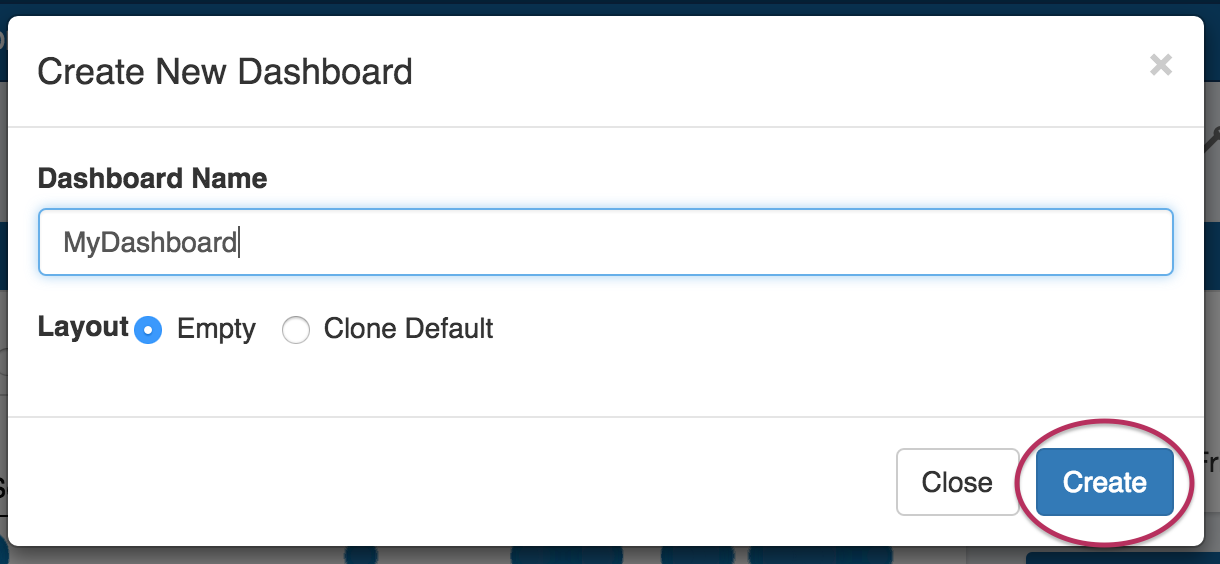
Fill out the desired dashboard name, and choose whether the dashboard will be empty or cloned from the default dashboard. Selecting "Empty" will provide a (mostly) blank canvas for selecting and placing Widgets from scratch; selecting "Clone" will duplicate the current state of the Default Dashboard, which the user can then edit as desired.
Note
Note: If "Empty" is selected, a default Widget will still show in the head of each page column, this is to assist in both visualizing the current page layout and to aid in placing new Widgets. These widgets may be edited or deleted as desired during the process of selecting layout and adding other Widgets.
For best performance of the dashboard, ensure that at least one Widget is placed in each column, or columns may be difficult to "detect" when moving Widgets to different page areas.
MyDashboard has now been created as an "Empty" dashboard, is accessible from the dropdown list of dashboards, and is ready to set up!
Editing a Dashboard
You can change the layout of your dashboard by selecting overall page layout options (for column size and location on the page), as well as move individual widgets around the page.
To Edit the Page Layout:
At the top of the page, click "Edit Layout".
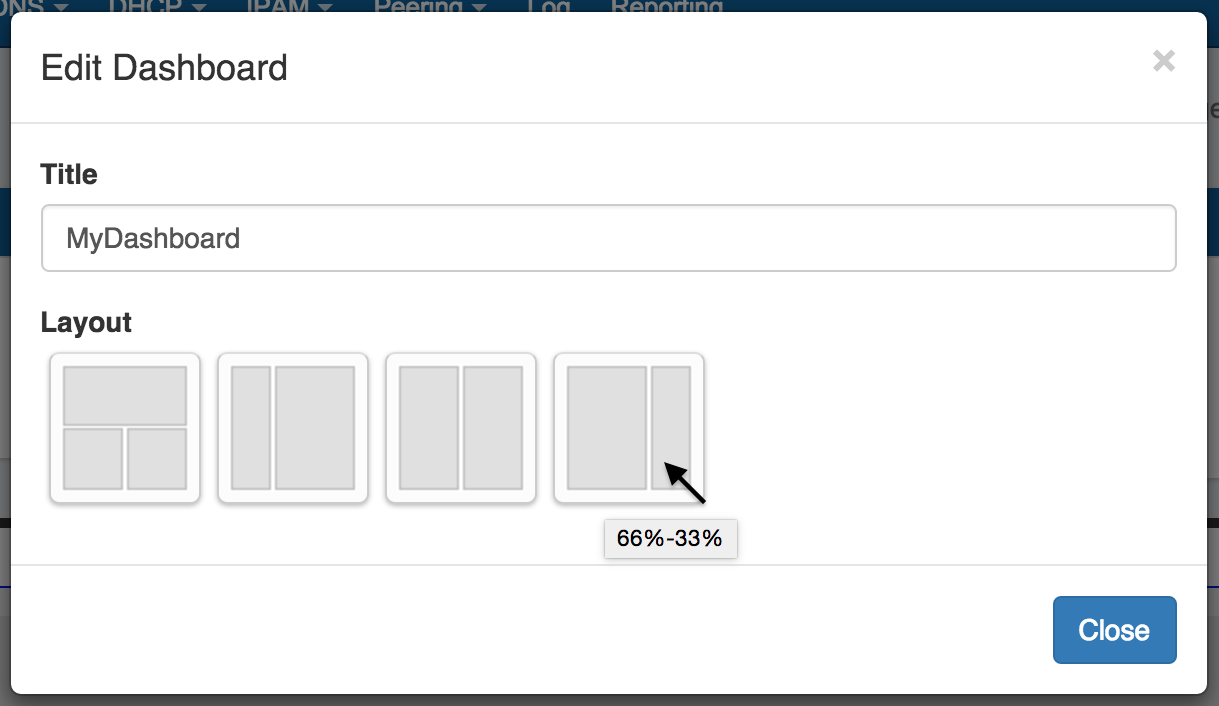
This will bring up an option box where you can choose to rename your dashboard, and / or select a column organization structure.
Title: Type in how you want your dashboard title to display.
Layout: Click on a layout option to immediately apply that layout to your dashboard. Hovering over the option will show the column width percentages.
100% / (50% / 50%): Creates a page with a full width section at the top, and two equal sized columns below that.
33% / 66%: Creates a page with two columns, with the left column being one-third of the page width, and the right column as two-thirds of the page width.
50% / 50%: Creates a page with two equal sized columns, split down the middle.
66% / 33%: Creates a page with two columns, with the left column as two-thirds of the page width, and the right column as one-third of the page width.
To Edit the Location of Individual Widgets:
Individual Widgets may be moved around the page by clicking and dragging on the "Move" icon on the right side of the Widget header.
While mousing over the move icon, when the cursor changes to a hand icon, click and hold your left mouse button, then drag the widget up or down to the desired location. To move the Widget to another column, drag the widget sideways to the column, then up to briefly hover over a Widget already in the desired column (this "selects" the column for the Widget). Then, drop the Widget in the desired location in that column.
Saving a Dashboard
Personal dashboards are automatically saved after making layout or Widget edits (the exception is that Widget resizing must be manually saved -see Working with Dashboard Widgets).
Default Dashboards must be manually saved after edits for those changes to apply to all dashboard users.
Admin users can save Default Dashboard changes by clicking "Save as Default Layout" at the top right section of the dashboard page, and the changes will be applied for all users.
Deleting a Dashboard
Personal dashboards may be deleted by clicking the "Delete Dashboard" button at the top right of the page. Default Dashboards may not be deleted.
Reset the Default Dashboard
The Default Dashboard may be reset to the ProVision default dashboard by clicking "Reset Dashboard".
This will remove any admin changes, and set the Default dashboard to its original state. This action may only be made by admin users.
Next Step: Widgets
Continue on to Working with Dashboard Widgets for information on each Widget, as well as how to add, move, update, and delete individual Widgets.


