IPAM
The IPAM tab contains three sub-tabs: IPAM, VLAN, and Logging.
The IPAM tab provides a listing of top-level aggregate blocks, tools to add, merge, sparse allocate, and manage aggregates, as well as multiple data visualizations. The blocks under each aggregate may be individually assigned, edited, swip'ed, and managed from the IPAM Manage page for the aggregate. For detailed information on specific aggregate and block tasks, see Working with IP Aggregates, Working with IP Blocks, and Working with IP Rules. For administrative level tasks, see IPAM Administration.
The VLAN tab shows an overview of domains and VLANs on the left sidebar, and IPAM Utilization data organized by each domain / VLAN pair. From here, Admins may add, remove, and edit domains and VLANs. Standard users may add/remove VLAN associations with blocks (as long as they have permissions on those blocks), and browse VLAN Manage (similar to IPAM Manage). See Working with VLANs for details.
Logging provides a quick link to ProVision's logging system, where you can filter to view IPAM-only logs.
IPAM Tab Overview
Advanced Button

Opens the IPAM Manage screen for all blocks under all aggregates. See Working with IP Blocks for more information on working in IPAM Manage.
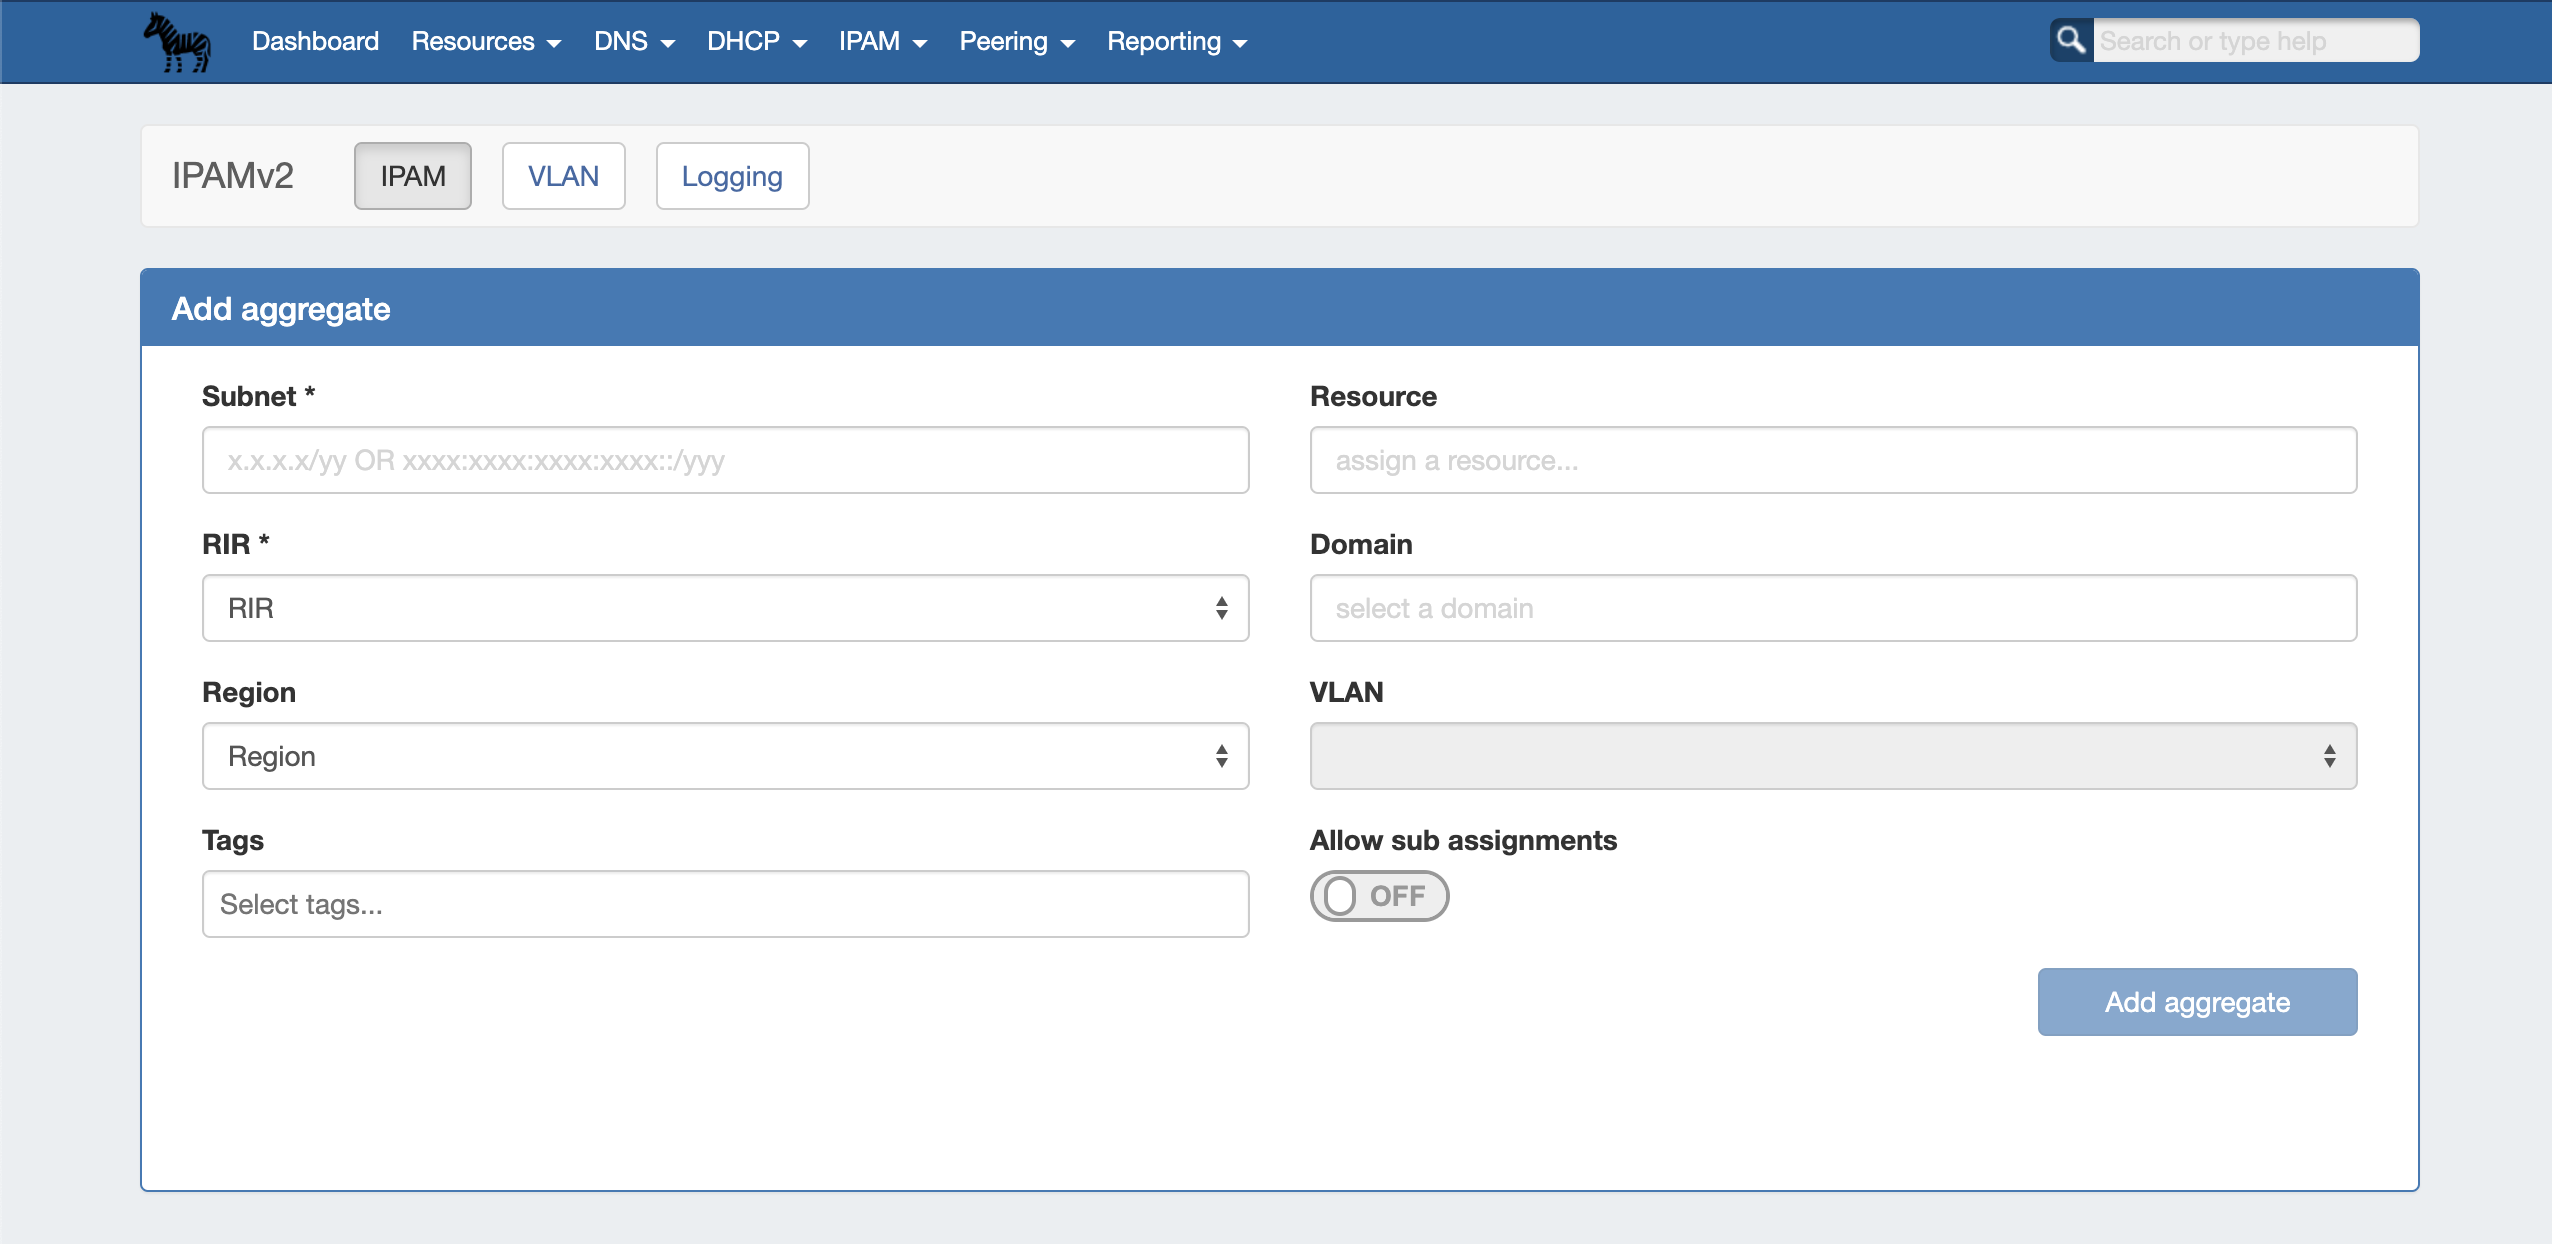
Add Aggregate
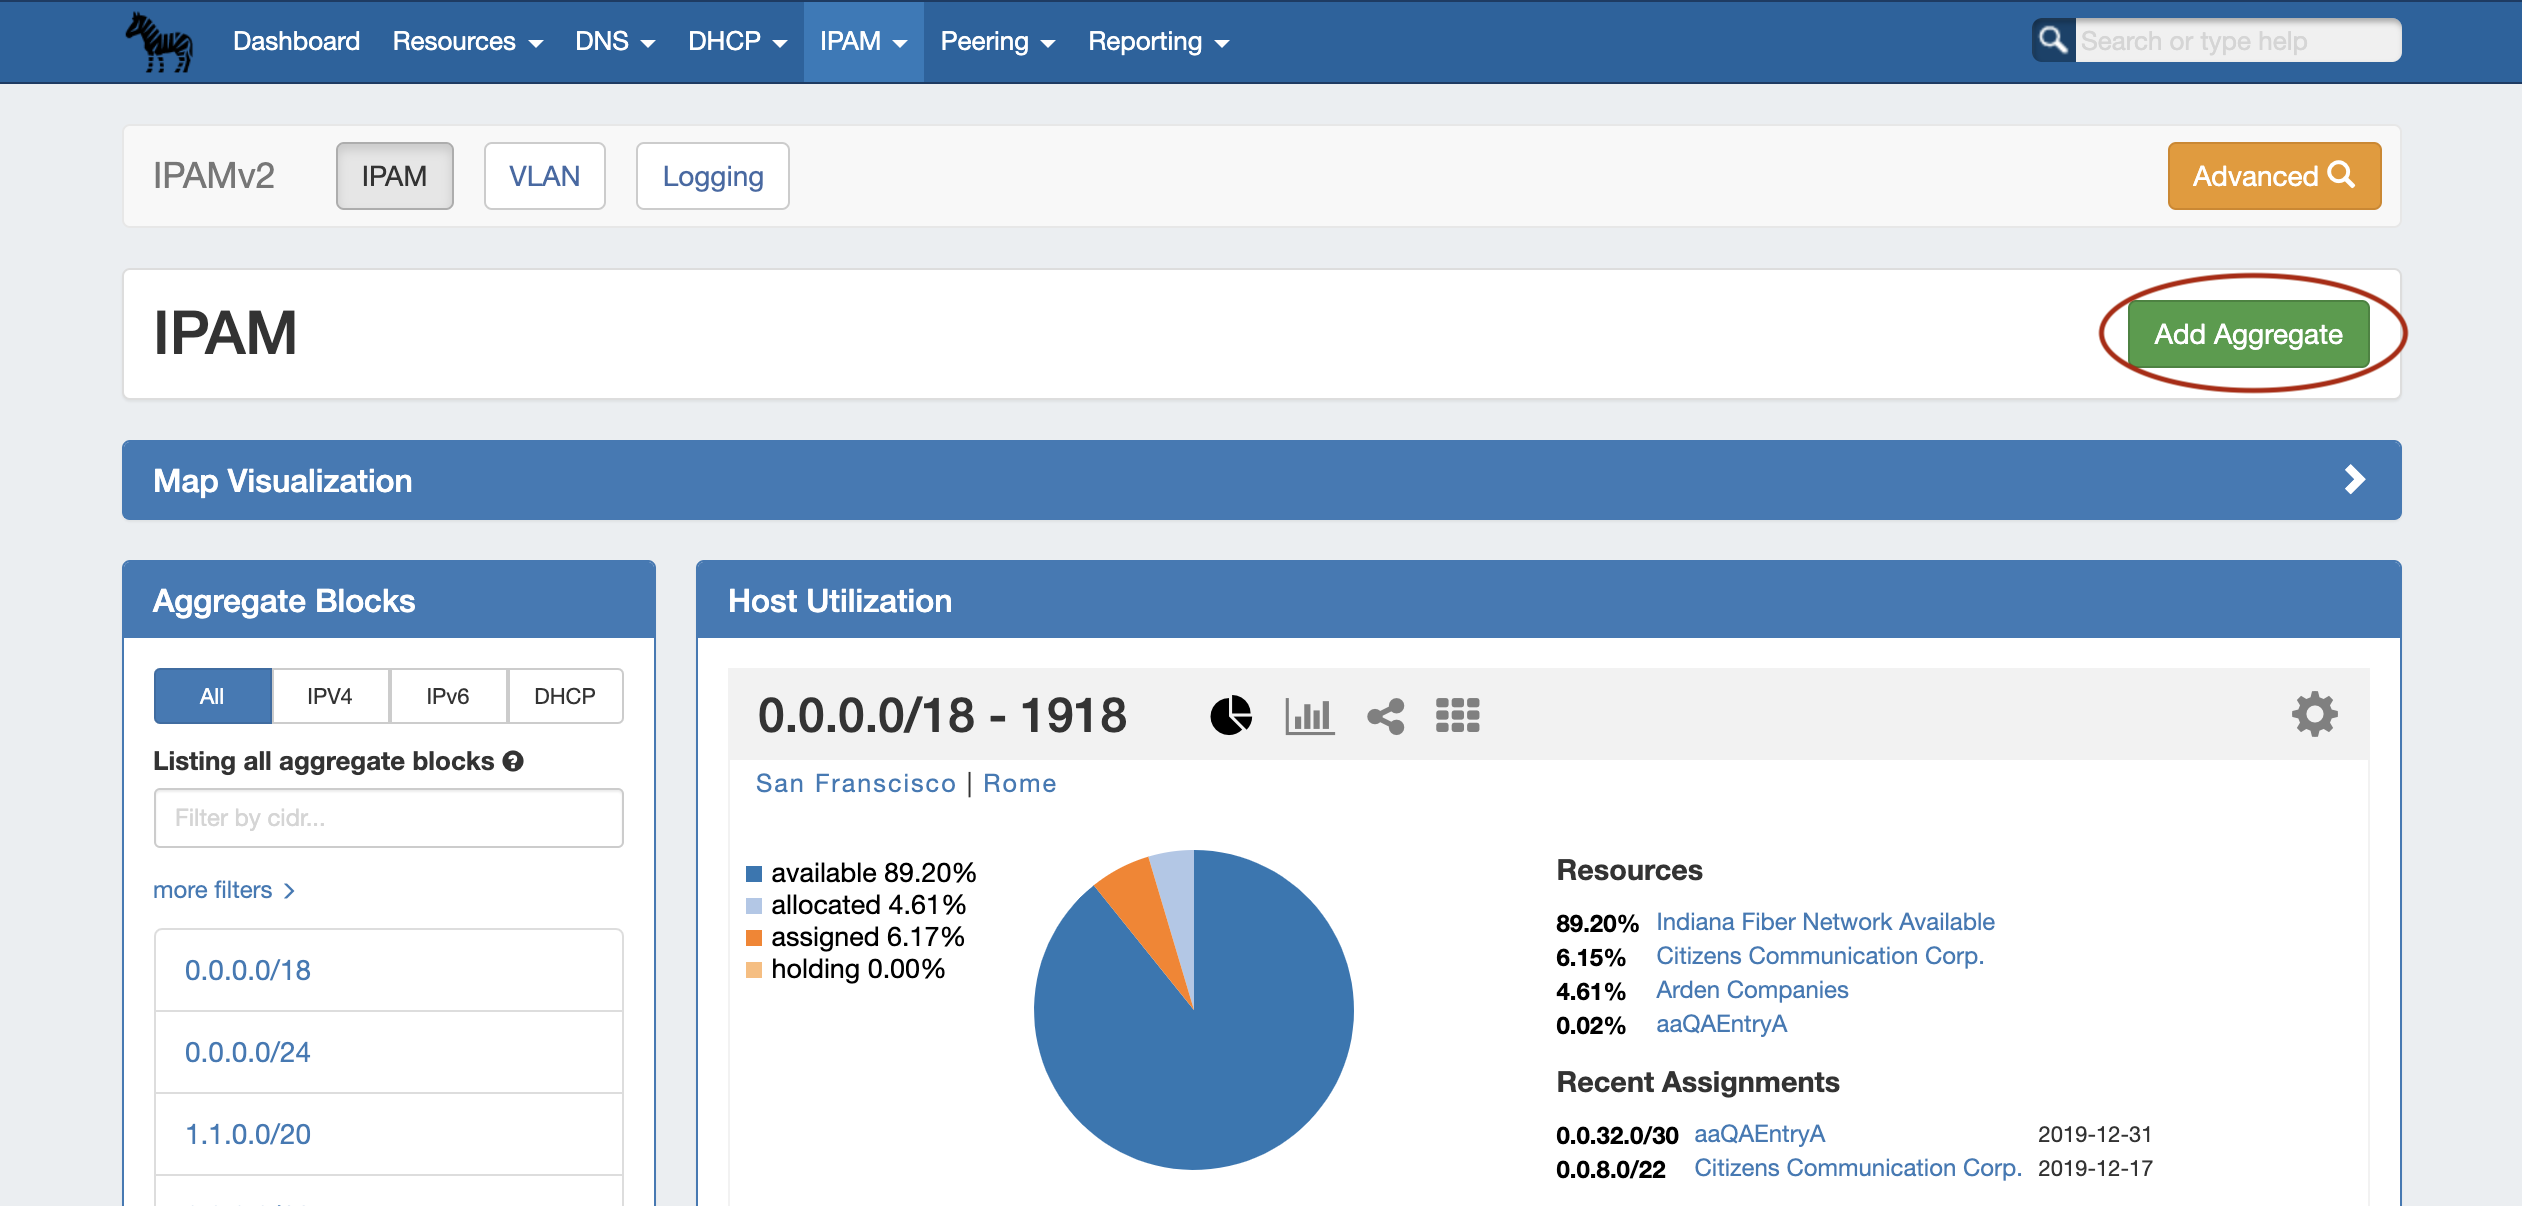
The "Add Aggregate" button opens a new page to add an aggregate block with options for RIR, VLAN, Tags, Region, Resource, and enabling Sub-Assignments.
When done, click "Add Aggregate". The IPAM Tab home page will automatically load, and the new aggregate will be listed under the Host Utilization and Aggregate Blocks list of the IPAM Tab for further management.
Map View
Map View Overview
Map View shows aggregate locations / recent assignments in geographical format, based on the region assigned to those aggregates. Clicking on a location icon will bring up a current utilization graph and a link to that aggregate's IPAM Manage page if in Aggregates view, or recent assignment details if in Recent Assignments view.

Google Geocode API Key Requirement for Map View
Due to changes in Google's licensing and Geocoding API, the geolocation method used for Map View in ProVision versions pre-v7.1.0 is no longer supported.
A Google Geocoding API Key is now required for geolocation data to be accessible by ProVision, and for IPAM Maps to properly determine a Region's location. As a result, IPAM Map View in versions older than 7.1.0 may not accurately display or update location information.
6connect is exploring adding additional map integration options for ProVision. Any customers who require an alternative geocode option supported apart from Google Geocode API key, please contact us at feedback@6connect.com.
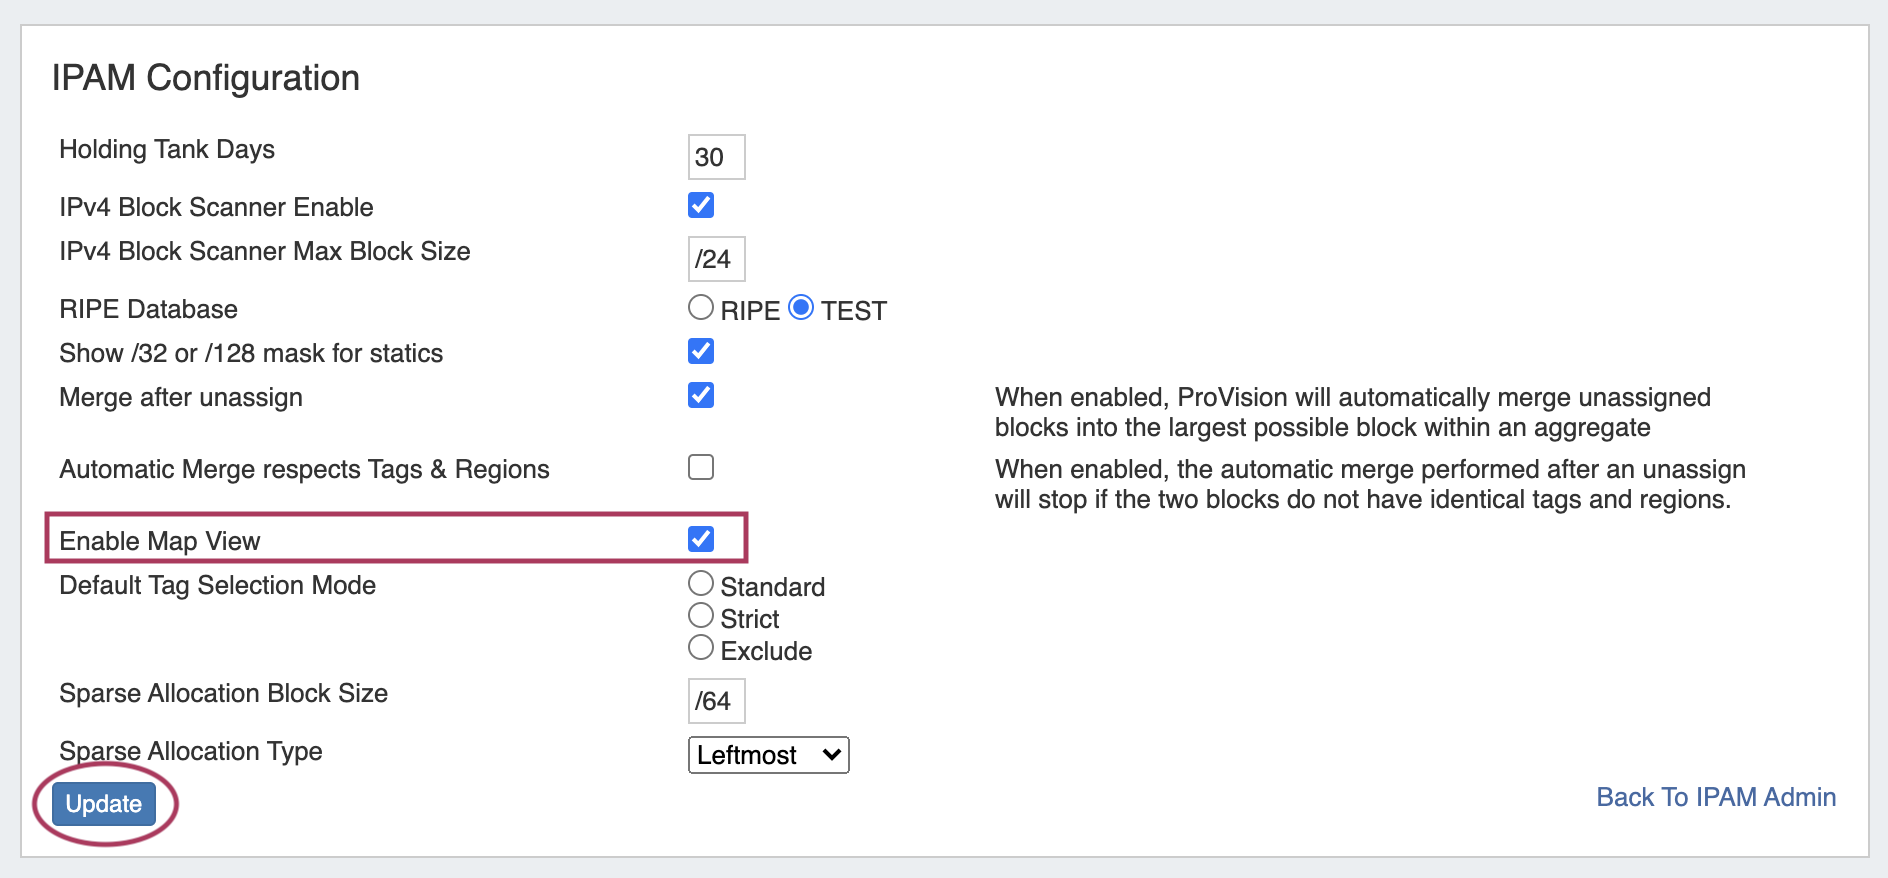
Enabling Map View
The IPAM aggregate map view may be enabled / disabled from the IPAM Configuration page. Once enabled, a map module will be able to be expanded in the IPAM Tab.
The following criteria must be met for Map view to correctly show data:
Map View enabled on the IPAM Configuration page
A Google Geocoding API Key provided in the Edit Regions page. See Edit Regions for additional detail.
Step 1: Obtain a Google Geocoding API Key
To get a Google Geocoding API Key, follow the instructions listed here:
How to get a Google Geocoding API Key
Note: In order to obtain a Google Geocoding API Key, a company must have a subscription enabled to Google Cloud Platform Console.
Step 2: Assign the API Key to IPAM Regions
Once assigned a Google Geocoding API Key, paste the API key into the IPAM regions page under "Google Geocode API Key" and click the "Apply" button.

Regions created with a valid "Address" (location) field. See Edit Regions for additional detail.
The "Address" field may be a street address, city, airport code, or geo-coordinates.
Valid addresses (according to Google's API) will show a green check mark next to the address field, invalid addresses (unable to be mapped) will show a yellow exclamation mark.
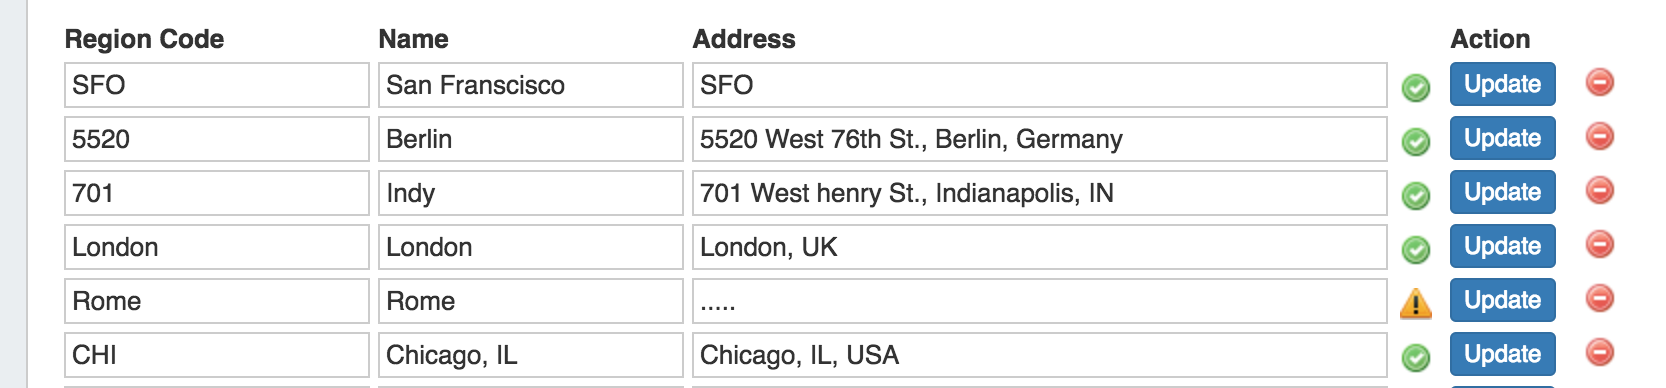
Miscellaneous Terms as Addresses
Being that the validity of the "Address" field is determined by Google's API, unexpected location mapping may occur if a company name or other non-location specific term is used in the Address field.
Google treats the item as a search term and returns the most likely location result back - but it might not be what you were expecting! When in doubt, check the address term by pasting it into Google Search, and verify that the top result returns your desired location.
- Regions enabled in IPAM Columns and assigned to aggregates / blocks for the IPAM Map view to populate data. See Edit IP Block Attributes for additional detail.
Working in Map View
The map view may be set by either selecting a predefined map area from the "Maps Settings" → "Positioning" dropdown (US, US & Europe, South America, All), or chose a custom area set by zooming / navigating to the desired map area.
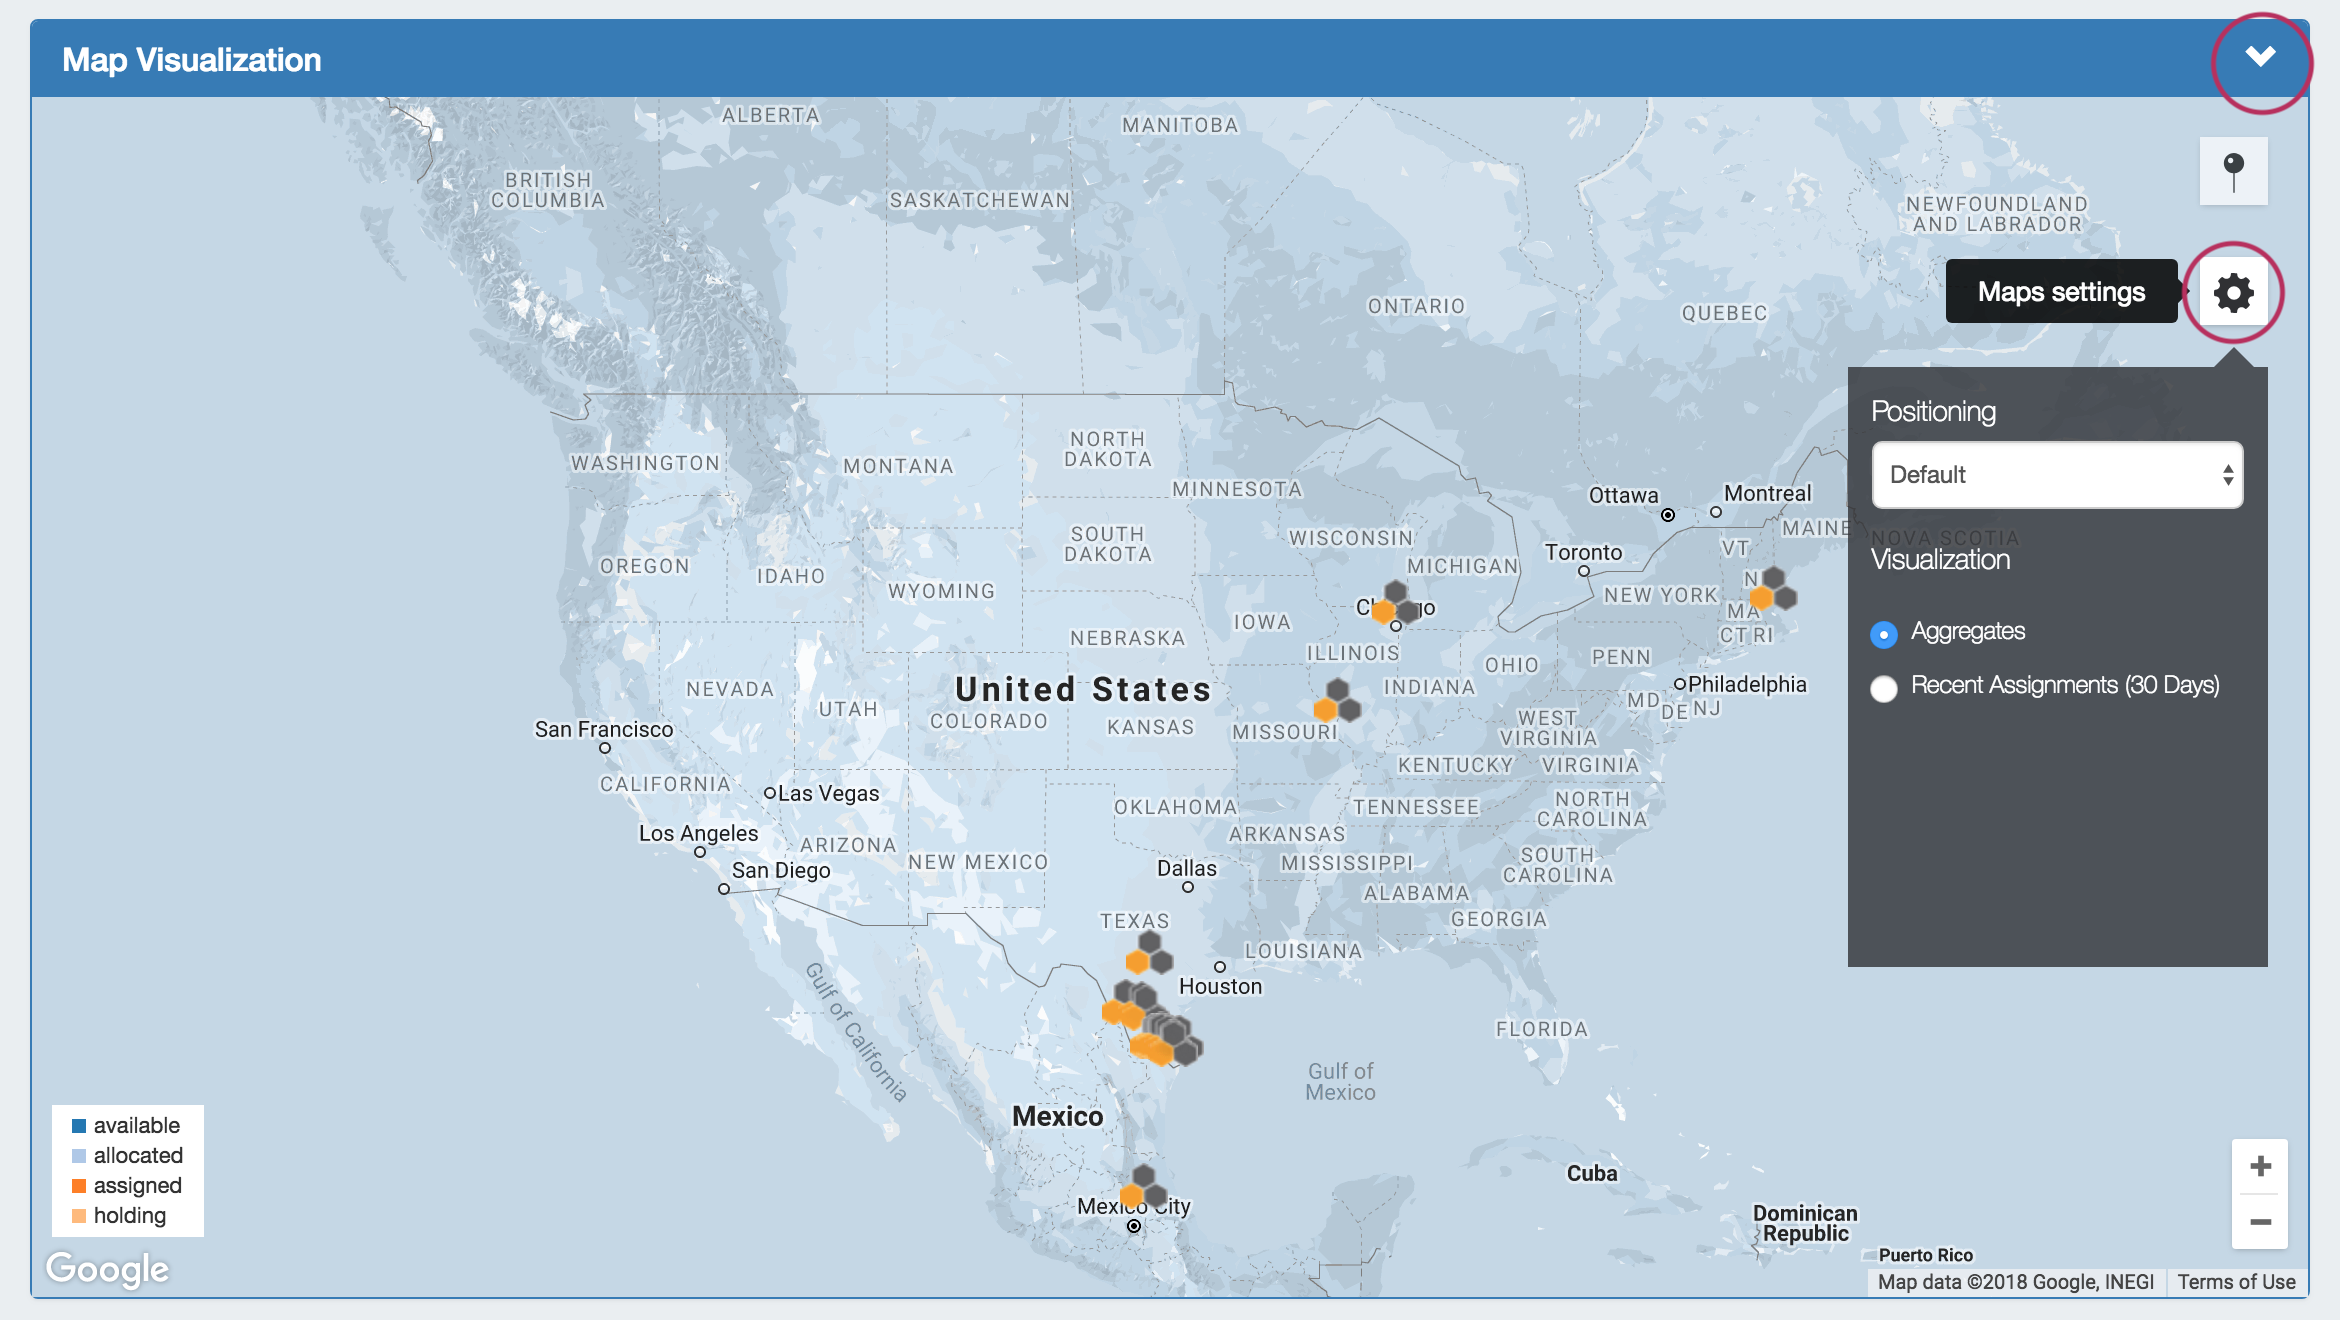
To save the currently viewable area as the Default view, click the pin icon to "Save current position as Default".

Map View Settings:
Visualization: Select "Aggregates" to view all available aggregates with region data, or "Recent Assignments" to view block assignments made within the past 30 days.
Positioning Dropdown: Select a predefined area for the map view range: US, US & Europe, South America, or All.
Save current Position as Default: Click the pin icon to save the current map view range as the default view.
Aggregate Detail Box:

Provides utilization data and a shortcut link to the IPAM Manage screen for that aggregate if in "Aggregates" view, or assignment details if in "Recent Assignments" view.
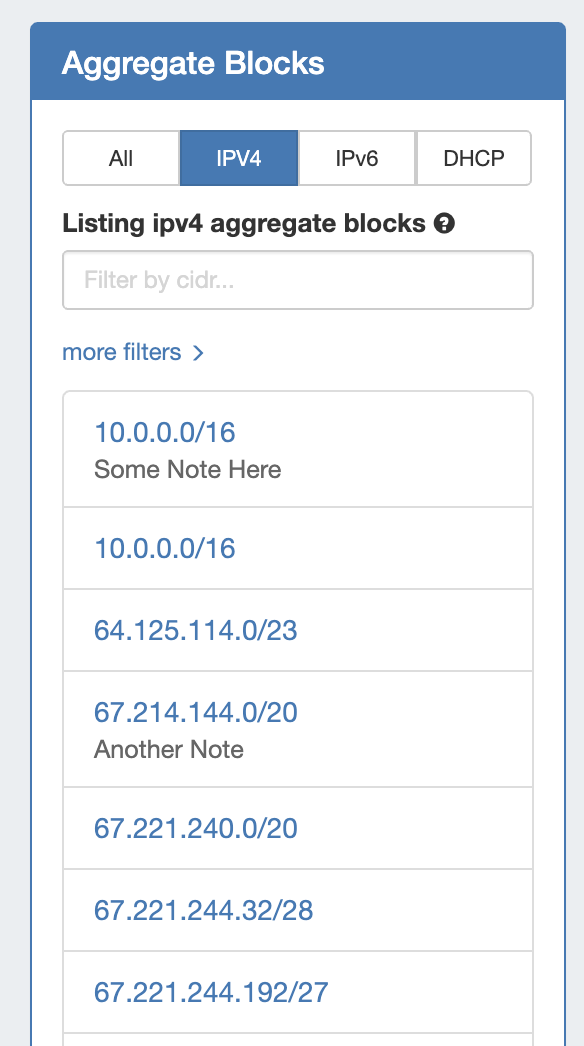
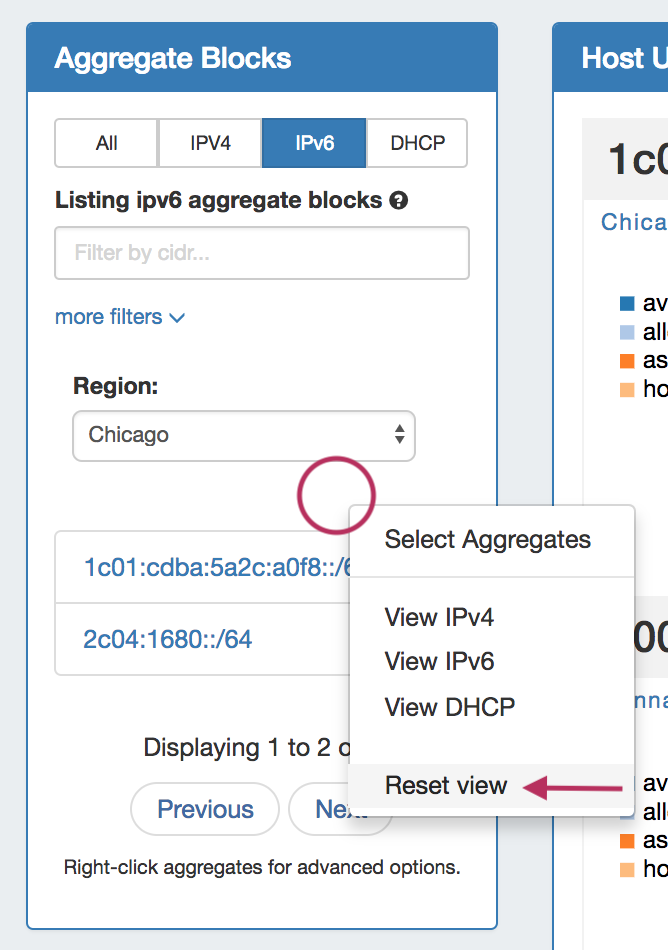
Aggregate Blocks List
Provides a searchable / filterable listing of all aggregate blocks in the left sidebar, links IPAM Manage for the aggregates, and Merge Aggregate functionality.
If a note has been entered for a top-level aggregate (the topmost parent block), the note will display under the aggregate listing.
Search / Filter Aggregates
Search for and filter IPAM Aggregates from the Aggregate Blocks List:
- Select "All", "IPv4", IPv6", or "DHCP" to sort the list by type (You may also access the type filters by right clicking anywhere in the Aggregate Blocks box)
- User the filter / search box to search by CIDR
- Filter by Region or RIR by clicking the "more filters" link, then selecting an item from the dropdown menus.
- Single click on the CIDR to zoom to the aggregate details in the Utilization list
- A shortcut to IPAM Manage for an aggregate is provided by clicking the "open" link that appears when hovering over an aggregate block in the list.
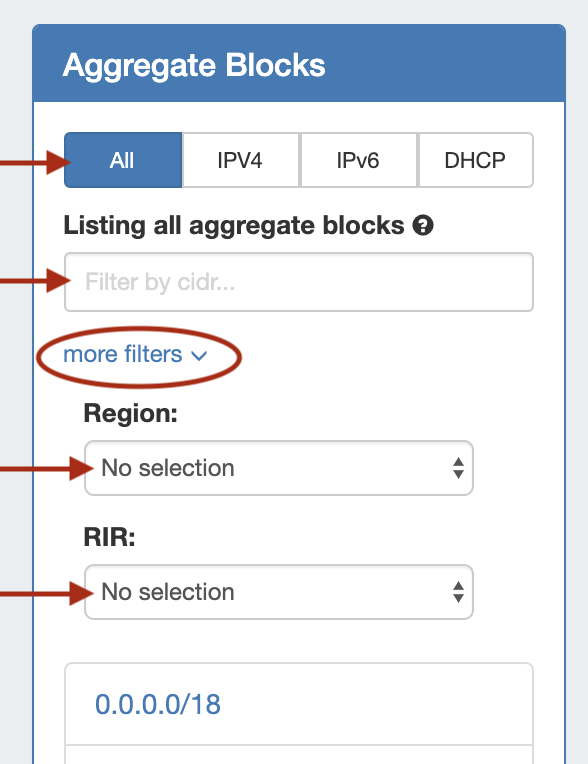
To reset the list, right click anywhere in the Aggregates Blocks list and select "Reset View".
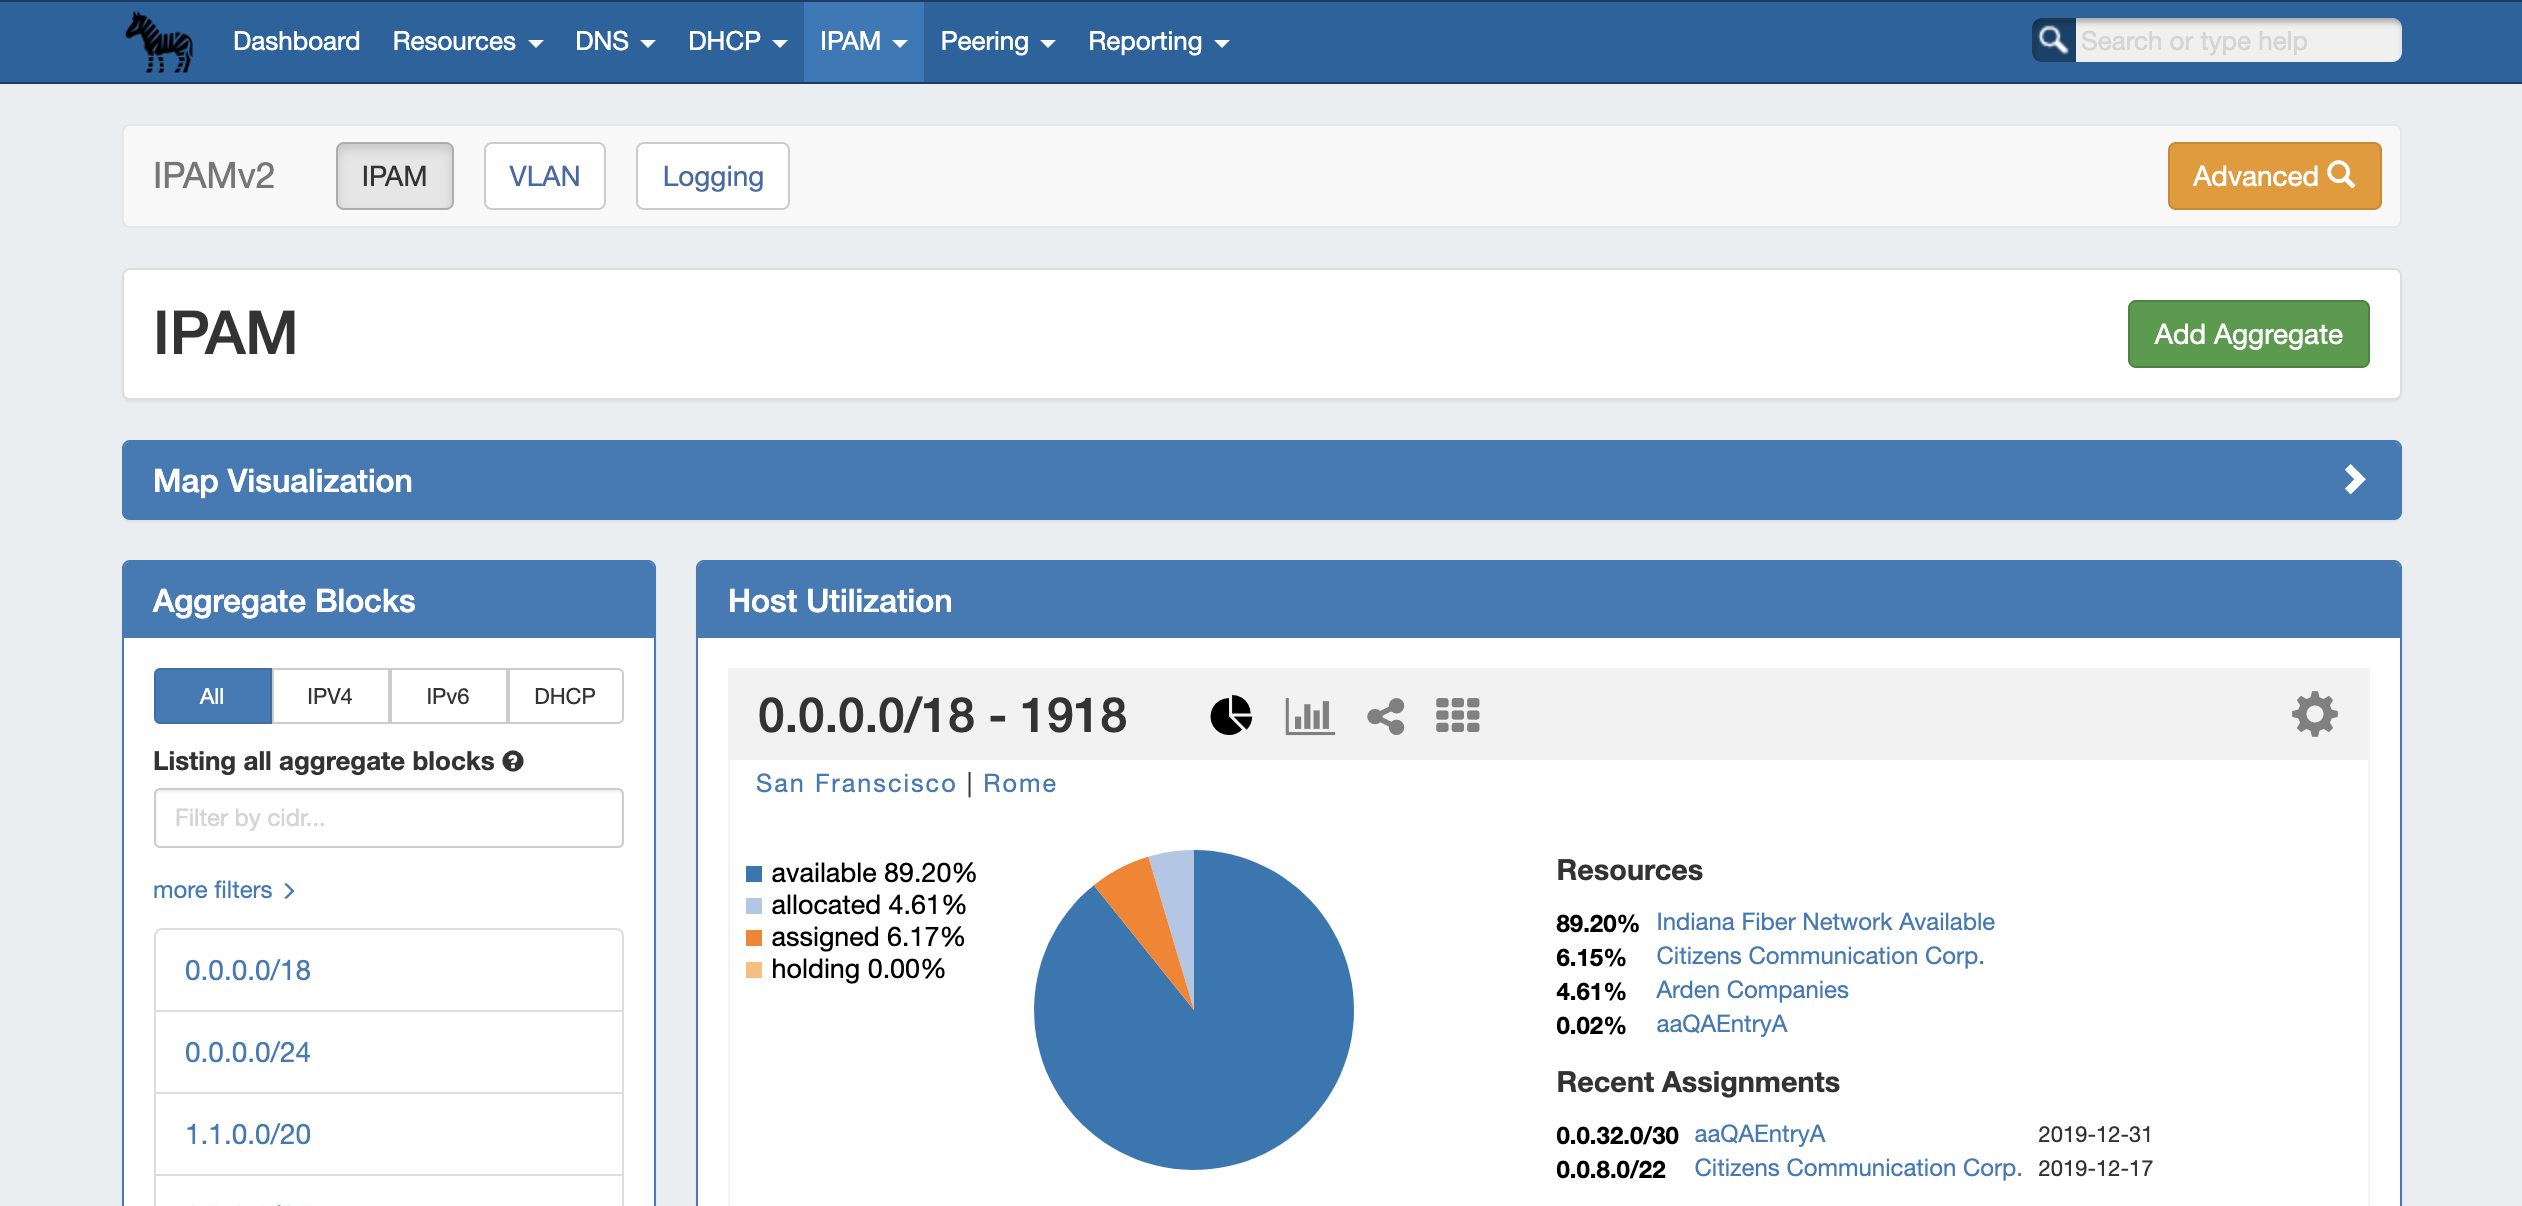
Top-Level Aggregate / Host Utilization Box Overview
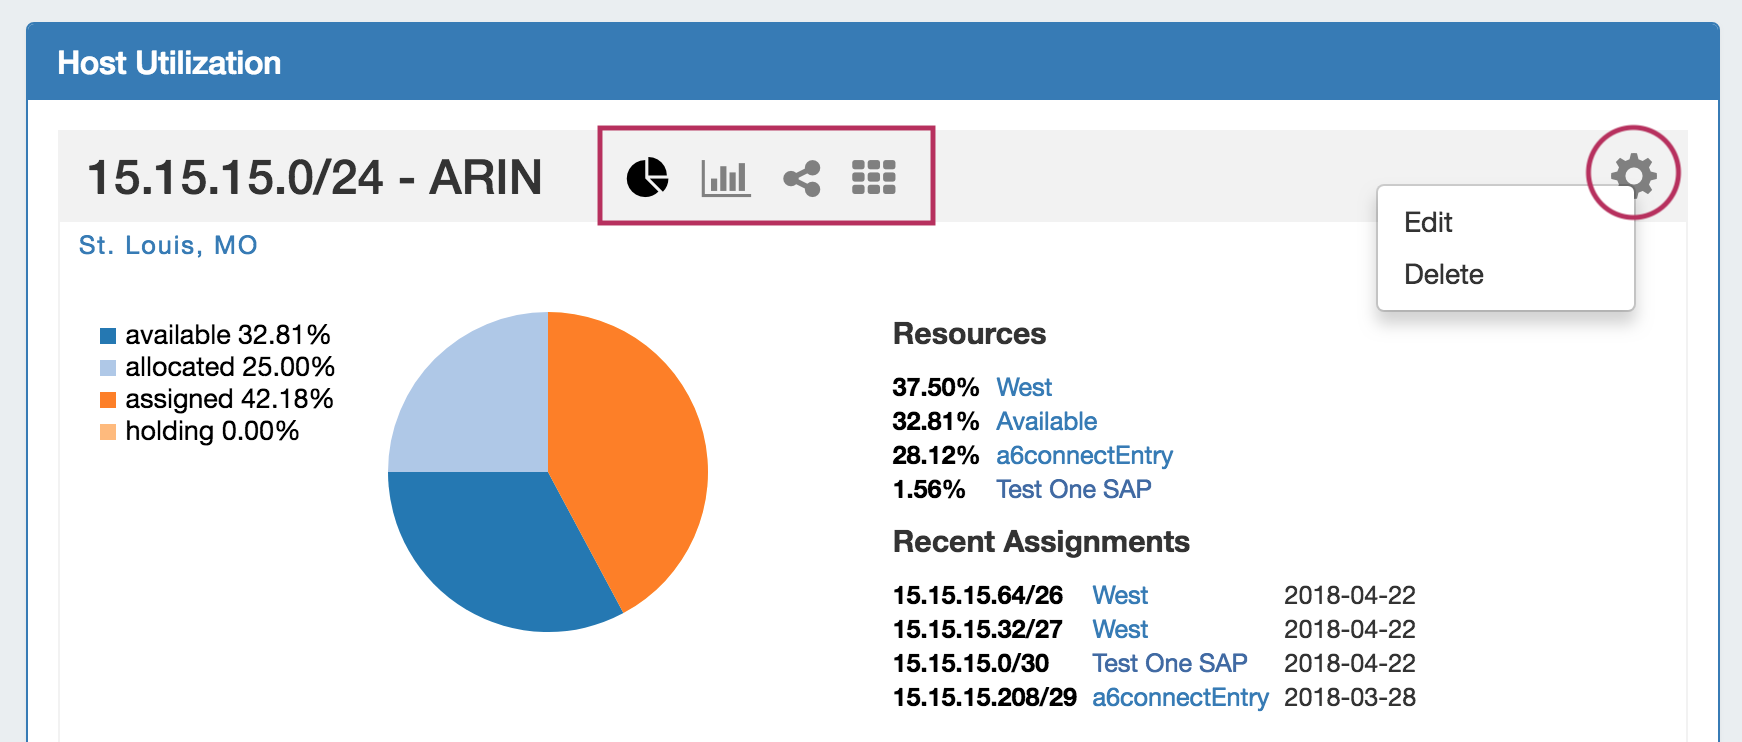
The Top-Level Aggregate Host Utilization box provides detailed information on that aggregate, including:
- CIDR: Single-click to IPAM Manage for the aggregate
- RIR information: displays the aggregate's RIR, as set at creation (1918, ARIN, RIPE, LACNIC, AfriNIC, APNIC)
- Aggregate Chart Views: Four Aggregate chart views are available, - Pie, Bar, Tree, and Grid view. Switch between each chart by clicking on the respective icons in the Aggregate header (marked above).
- Aggregate Actions (Gear Icon):
- Edit: Opens IPAM Manage for the aggregate. See Working with IP Blocks for information on working in IPAM Manage. Clicking on the Block CIDR in the header also opens the IPAM Manage page.
- Delete: Deletes the Aggregate (provides a warning).
- Enable / Disable Sparse Allocation (IPv6 only): Enable or disable Sparse Allocation for an IPv6 aggregate. Enabling will automatically generate a Numbering Authority Sparse Allocate Domain for use with the aggregate.
- Sparse Allocate (IPv6 only): Appears only when Sparse Allocation is enabled for an IPv6 aggregate. Opens a menu to select or create a resource to assign a block to, using the sparse allocate algorithm to disperse the assignment(s) throughout the aggregate. See: Working with IP Aggregates
- Region(s): Displays the primary region(s) associated with the aggregate, either at aggregate creation or from regions associated with blocks under that aggregate. Clicking on the region link for an aggregate will open IPAM Manage for the aggregate, filtered to view blocks associated with that region.
- Utilization: Utilization displayed as both a pie chart and detailed percentages. Utilization statuses include:
- Available: A status of "Available" indicates the block is free and able to immediately be assigned or allocated to a resource.
- Allocated: Allocated blocks have been assigned to an overarching resource, but have subassignments enabled and may have smaller blocks assigned out of them to other Resources, such as customers or DHCP Pools.
- Assigned: A status of "Assigned" indicates that the block has been assigned to a Resource, with no subassignment capability, and is unavailable.
- Holding: Blocks in "Holding" have recently been unassigned, and are held for a set duration in the IPAM Holding Tank, unless otherwise overridden, reassigned, or reclaimed from Holding.
- Resources: The top five Resources assigned under that aggregate with the most assigned block space.
- Recent Assignments: The five most recent block assignments under that aggregate, with the CIDR, assigned resource link, and assignment date.
IPAM Workflow
IP Management
IP Management is comprised of four basic functions: adding aggregates into ProVision, managing those aggregate blocks, assigning them to a resource, and deleting the aggregates.
ProVision provides multiple ways for you to achieve each step, depending on your needs. For example, if your organization currently uses spreadsheet data to track aggregates, ProVision provides tools that can import your existing spreadsheets for bulk updates, saving you time. Need to just quickly assign a single IP? Direct Assign will allow you to do so with just a few clicks.
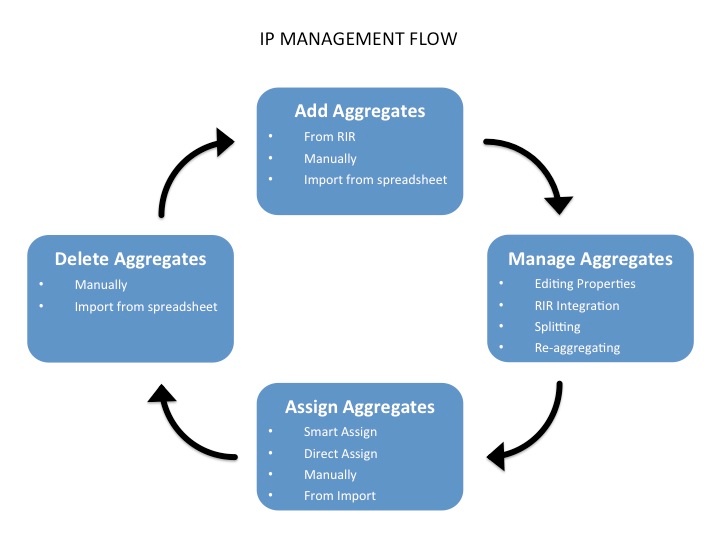
Add Aggregates
Adding new aggregate may be done manually, automatically from a RIR import, or imported from a .csv file.
- Manually: Create a new aggregate via the IPAM Tab. See: Working with IP Aggregates.
- Import from RIR: ProVision will automatically identify your RIR / organization and show available aggregates, or you can enter in an ORG ID or IP. See Import Aggregate .Blocks
- Import from .csv: Normalize your data as detailed in Importing Your Data - Normalize your Data, and then use ProVision's IP Import from .csv tool.
Manage Aggregates
Edit, Split, Merge, and connect with RIRs to architect the aggregates as needed and update WHOIS information, if applicable.
- For aggregate level actions, like splitting, merging, and editing, see Working with IP Aggregates - Common Tasks .
- RIR Integration requires LIR setup. See LIR Management and Use and RIR Integration: SWIP/RPSL .
- Editing individual blocks under an aggregate can be done from either IPAM Manage or the IPAM Gadget. See Working with IP Blocks and Working with IP Rules.
Assign Aggregates
Aggregates may be assigned to a Resource at their creation/import, or assigned later manually or via Smart / Direct Assign.
- To assign at manual aggregate creation, just select a resource from the dropdown in the IPAM Tab - Create Aggregate dropdown. See: Working with IP Aggregates.
- To assign during import, either include the resource assignment as a field in your .csv, or edit the import during the review step to assign a resource. See IP Import from .csv.
- Manual assignments may be done at any time in IPAM Manage or Smart/Direct Assign. See: Working with IP Aggregates and Working with IP Blocks.
Delete Aggregates
Delete an aggregate from the aggregate box in the IPAM Tab. See: Working with IP Aggregates.
IP Assignment Lifecycle
In ProVision, the IP assignment lifecycle starts with an available block which is free to be assigned to any IPAM-enabled resource holder. There are multiple methods that may be used to assign a block to a resource holder: Smart Assign, Direct Assign, or Manual Assign (Smart Browse). See Working with IP Blocks for details on assigning blocks.
Once an IP block is assigned, blocks can be further subassigned via the same methods, if desired, by using the "allow subassignments" toggle when editing an assigned block. If a block has subassignments enabled, but has not yet been subassigned, it is listed as "Allocated" - essentially held by the parent resource, but not fully assigned.
When an assigned block is un-assigned it proceeds into the Holding Tank: a special resource where blocks are held until either a set time has elapsed or until they are manually reclaimed to 'available' status. If a subassigned block is unassigned, it too proceeds to the Holding Tank if not overridden, and then reverts back to allocated to the original parent resource.
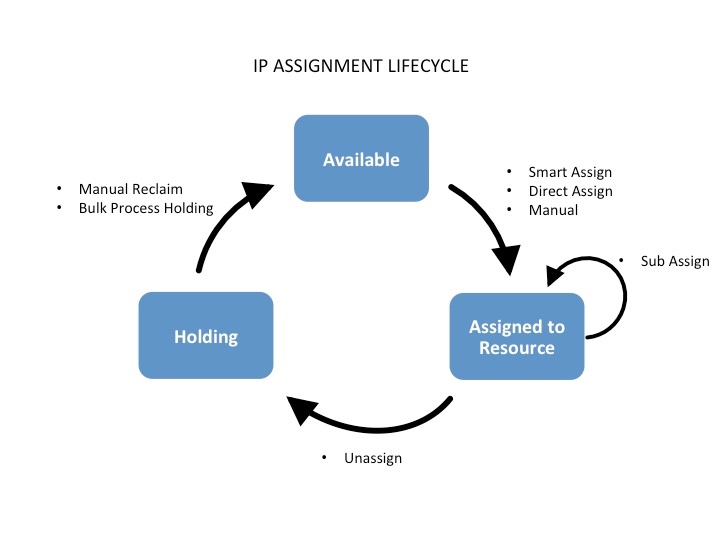
IP Block Status
- Available: A status of "Available" indicates the block is free and able to immediately be assigned or allocated to a resource. Available blocks may be assigned via any assignment method - manual, smart assign/browse, and direct assign.
- Assigned: A status of "Assigned" indicates that the block has been assigned to a Resource, with no subassignment capability, and is unavailable.
- Allocated: Allocated blocks have been assigned to an overarching parent resource, but have subassignments enabled and may have smaller blocks assigned out of them to other Resources, such as customers or DHCP Pools. Allocated blocks count as "Available" for reporting functionality until subassigned, but are shown as their own category on the IPAM Utilization charts. Once subassigned, the block is considered "Assigned".
- Holding: Blocks in "Holding" have recently been unassigned, and are held for a set duration in the IPAM Holding Tank, unless otherwise overridden, reassigned, or reclaimed from Holding.
For more information on performing tasks in this IP Assignment Lifecycle, see the following documentation sections:
Additional IPAM Features
ProVision IPAM-As-WHOIS
ProVision supports utilization as a WHOIS server via REST API requests. You can query Resources, Contacts, and IP Blocks, just like a traditional WHOIS server, only ours serves data from the ProVision database.
This feature provides an alternate route to provide ProVision data to legacy workflows on your network. If a team is used to query WHOIS, they can query Provision. If a system needs to talk to WHOIS, it can talk to ProVision-as-WHOIS.
Setup
GEO IP Exporter
ProVision supports the entering and export of IETF format-compliant GeoIP data for resources which have assigned IP blocks.
The Geo IP Exporter may be enabled as a scheduled task (See: Scheduler Tab) that, at run time, searches the ProVision instance for resources which have IP addresses and an address provided in the Contact Info Gadget, then saves the resulting .csv to the ProVision root directory.
If a resource has an assigned IP address, and either Geo IP location data or a Mailing Address entered in the Contact Info Gadget, then the data will be included in the .csv output. If an IP address is not associated with the resource, or if neither Geo IP / Mailing Address has been provided, the resource will be skipped.
This feature includes updates to the following areas:
- Updates to the Contact Info Gadget to provide Geo IP fields
- A Geo IP Export Scheduler Task
- Writes files to the ProVision root directory
For additional information, expand the walkthrough below:
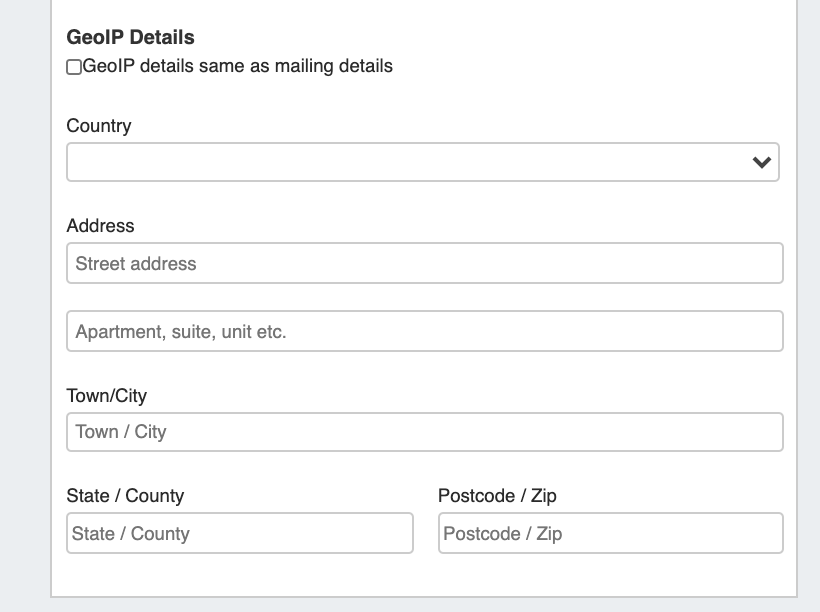
1) Enter GEO IP data to Resources
Add GEO IP location data to a Resource by selecting "Edit" for the Contact Info Gadget.
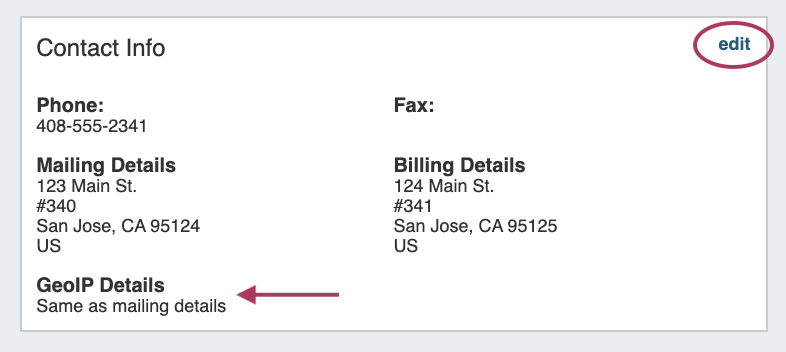
Enter a separate address to denote as the GEO IP location, or you may select "Same as Mailing Address":
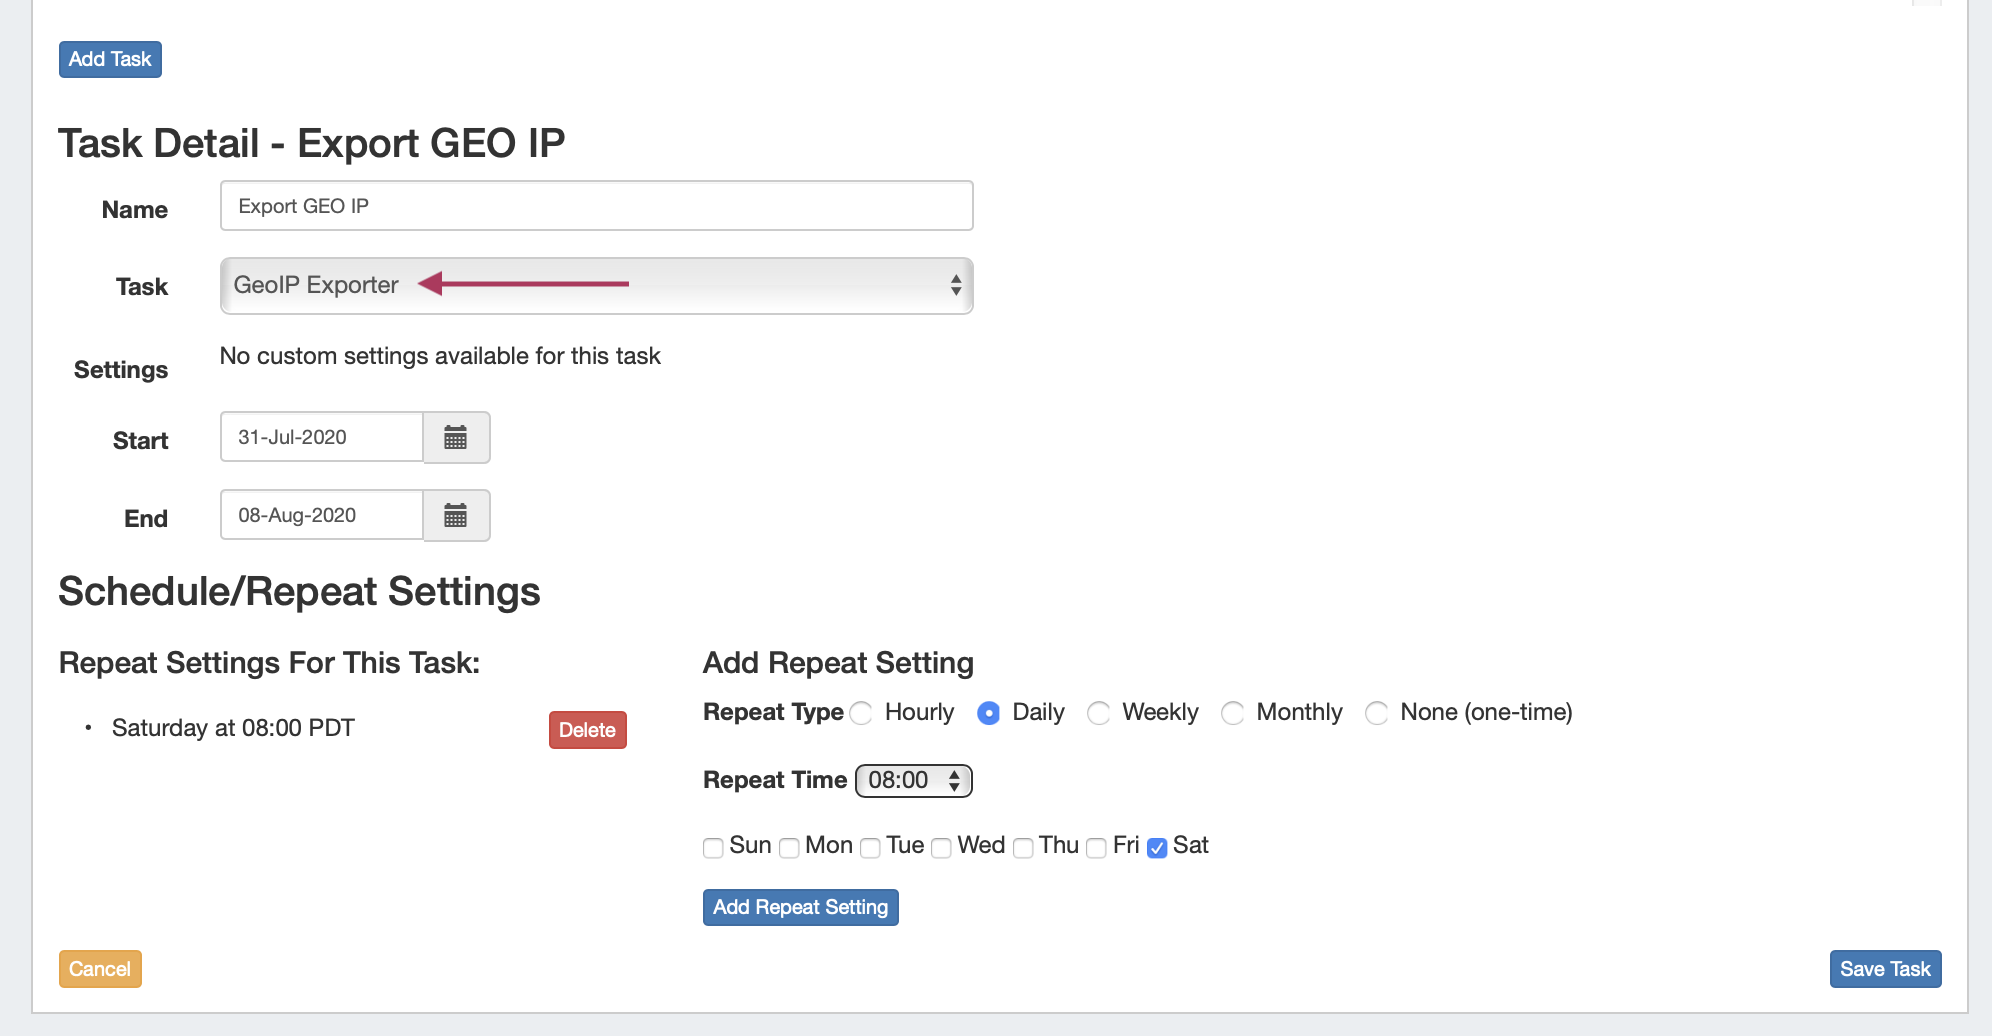
2) Set up the Geo IP Export Scheduler Task
Create a Scheduler task to export GEO IP data:
3) Run the Scheduler Task / File Access
Run the GEO IP scheduler task, either via "Run Now" or as a scheduled run - the task will search for resources with an assigned IP address, and either Geo IP location data or a Mailing Address entered in the Contact Info Gadget, and add the data to the .csv output.

Once the task has completed, the GEO IP data will be written to the ProVision root directory as "geoip_feed.csv":

Working with IPAM Aggregates
For additional information on performing IPAM tasks and working with aggregates and blocks, continue on to Working with IP Aggregates and Working with IP Blocks.