Customizing Resource Views
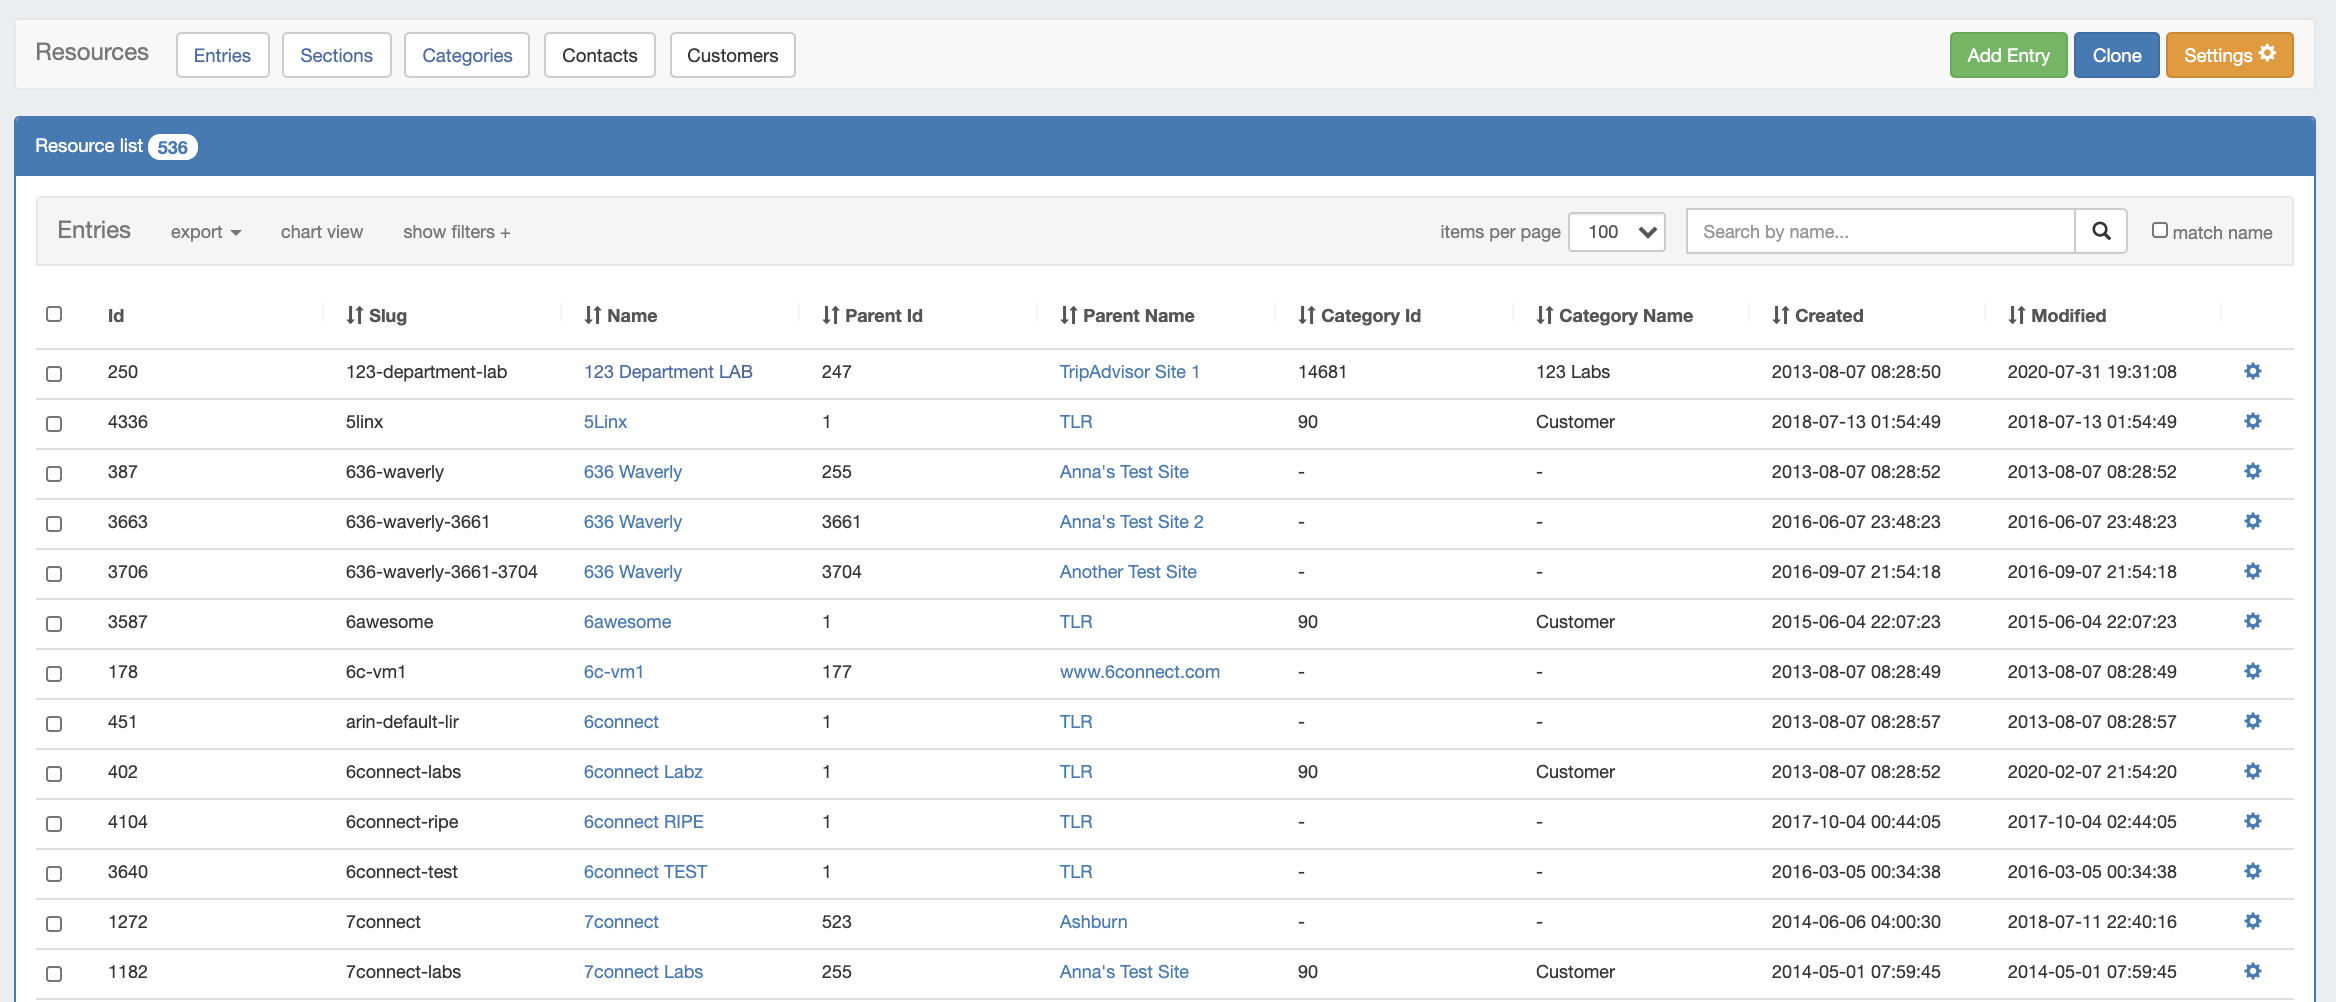
The list of Resource Entries is under the Resources Tab. To access it, you may either click on the Resources Tab, or select "Entries" from the Resource Tab dropdown menu.
Five resource view lists are provided by default, including "Entries", "Sections", "Categories", "Contacts", and "Customers", and users may either edit the provided views or create additional custom views from variety of filter and attribute column options.
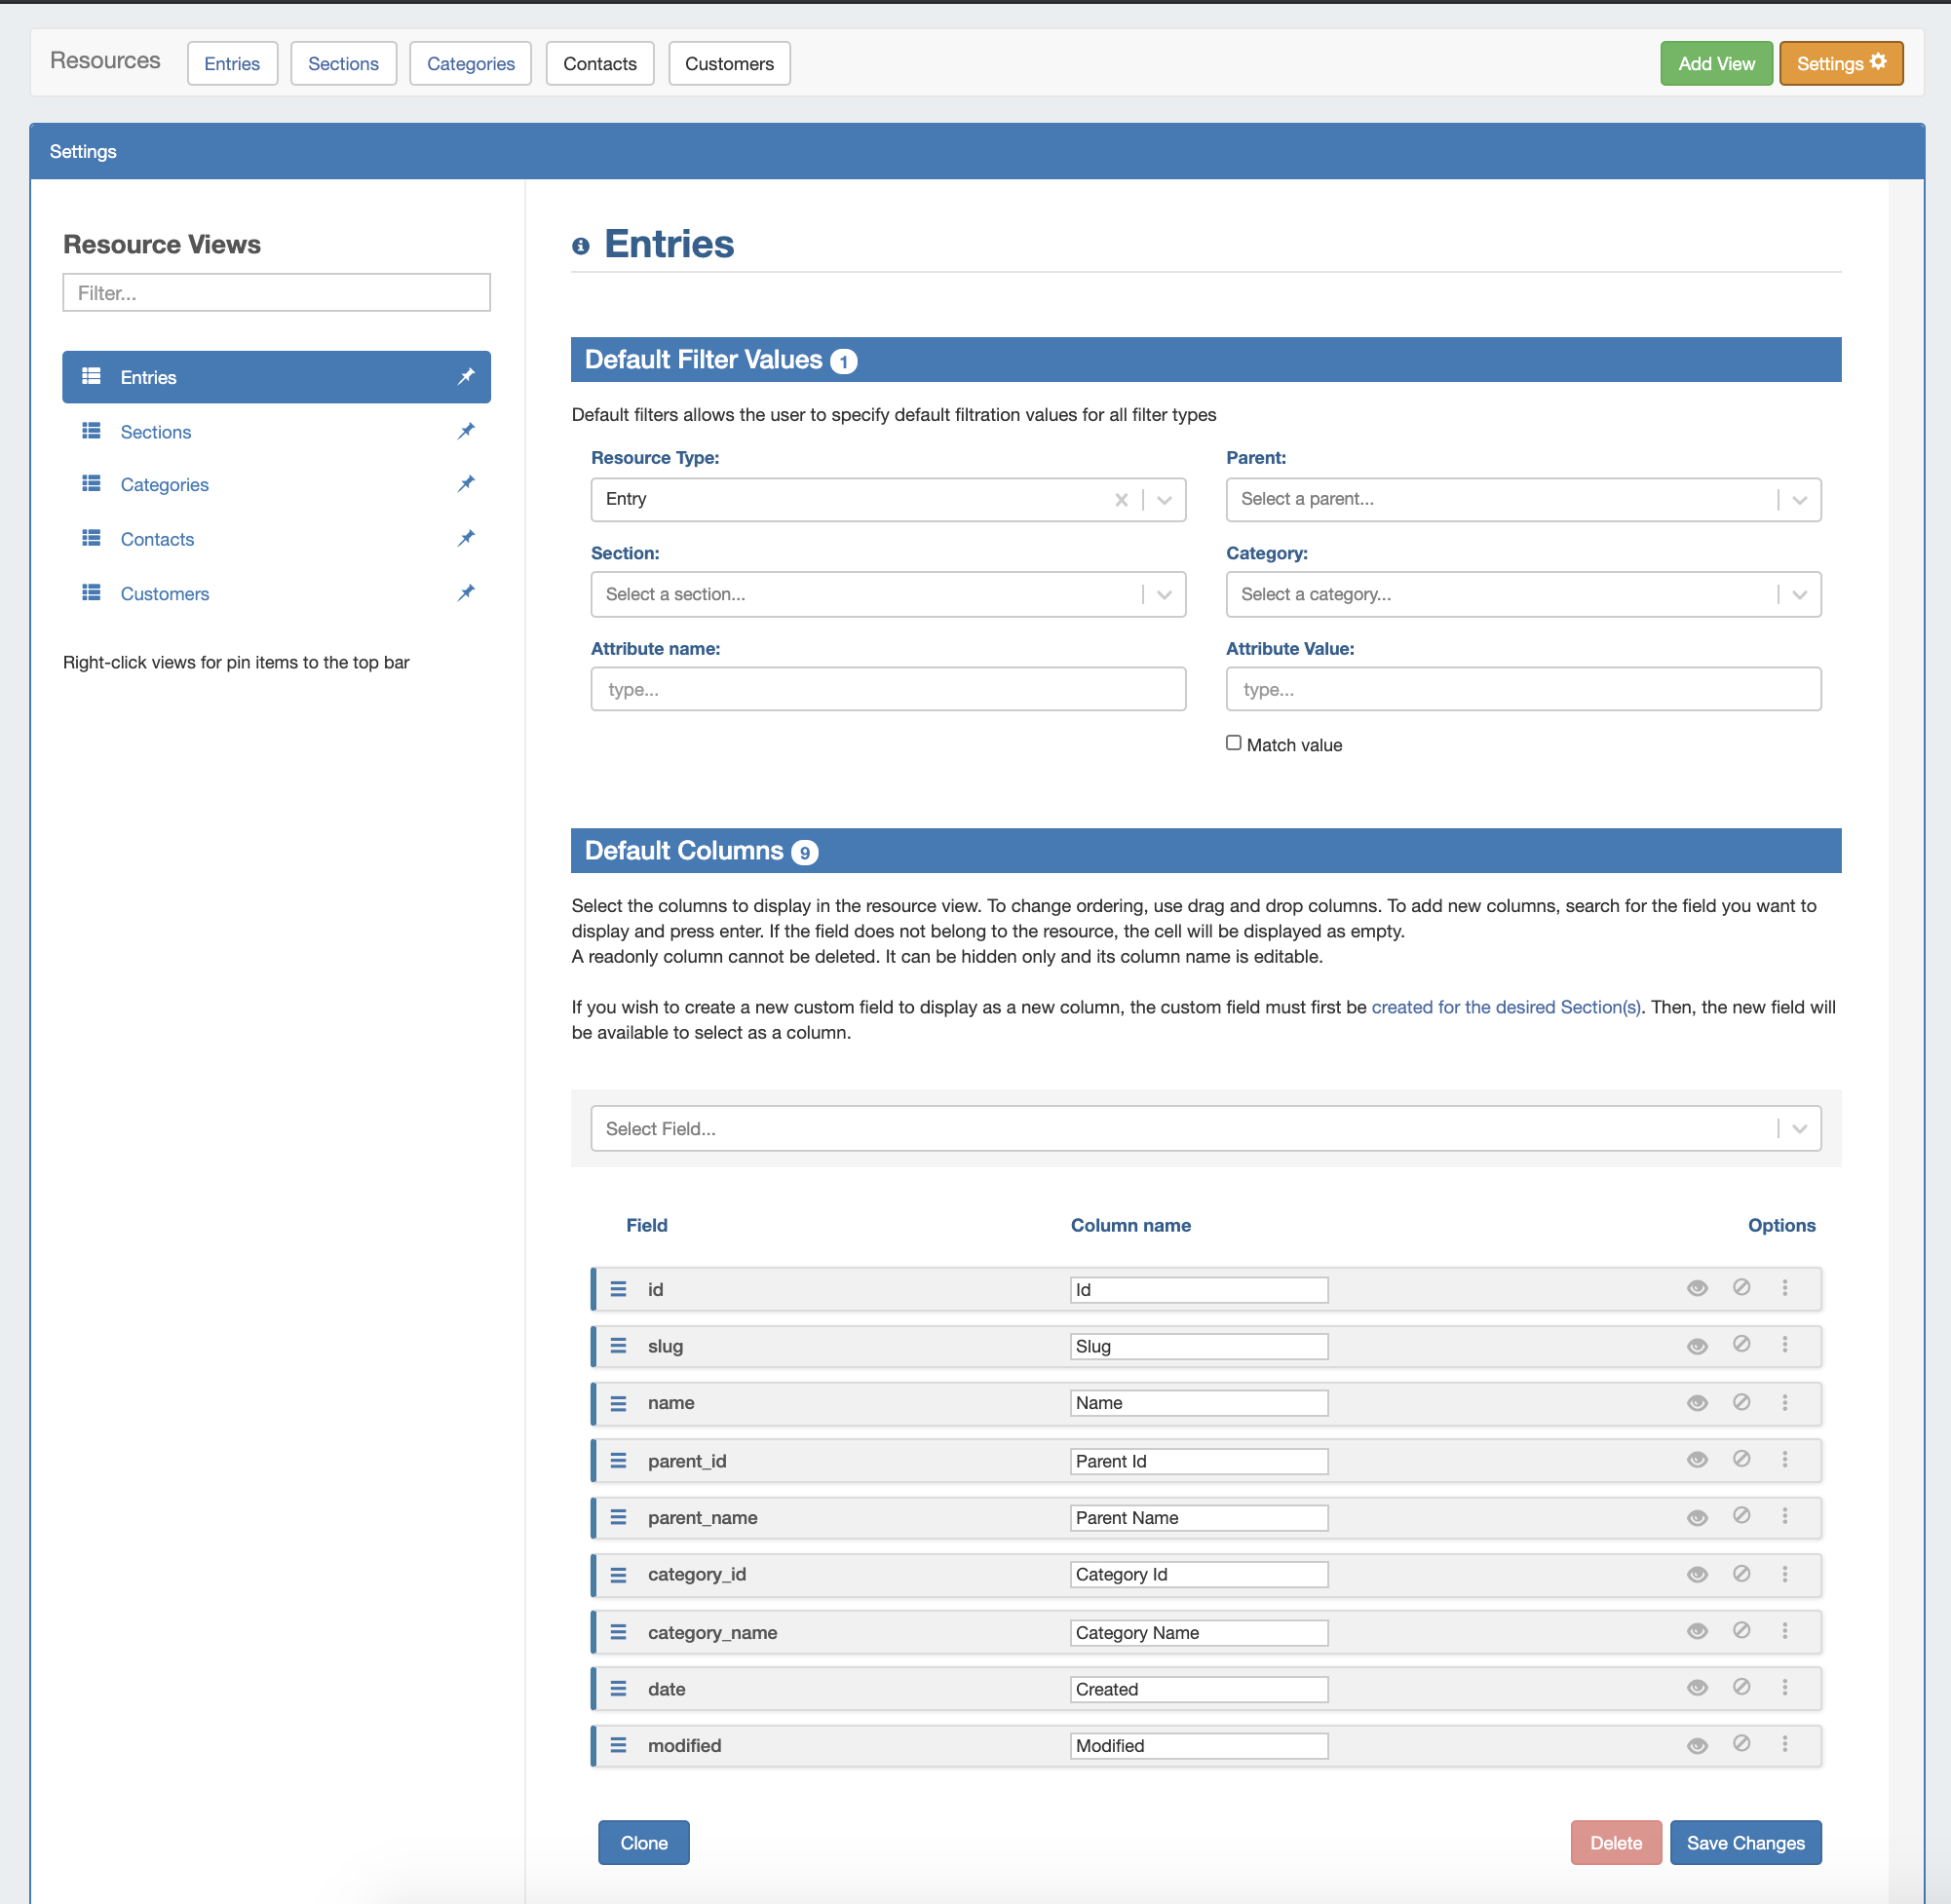
Resource List Views Settings
To view, edit, or create resource views, click on "Settings" from the Resource List header bar.

The settings page consists of three main areas: A list of existing resource Resource Views on the left sidebar, the Default Filter Values for the selected Resource View at the top center, and the Default Field/Column settings at the bottom center.
These settings may be changed for any Resource View, including the default Views. You may also create a new view at any time by clicking "Add View" at the top page header.
Default Views
Five default Resource Views are provided, and are automatically pinned to the top header bar for quick access:
Entries: Displays resource entries. Applied filter: Resource Type = Entry
Sections: Displays ProVision sections. Applied filter: Resource Type = Section
Categories: Displays ProVision categories. Applied filter: Resource Type = Category
Contacts: Displays ProVision contacts. Applied filter: Resource Type = Contact
Customers: Displays the customer list. Applied filter: Category = Customer
For all of the default views, the default column fields include:
- Id (id)
- Slug (slug)
- Name (name)
- Parent Id (parent_id)
- Parent Name (parent_name)
- Category Id (category_id)
- Category Name (category_name)
- Created (date)
- Modified (modified)
Users may edit the filters or default column settings to customize any of the default views, as well as pin/unpin the view to the header bar. However, the name may not be changed or the view deleted.
Resource View List
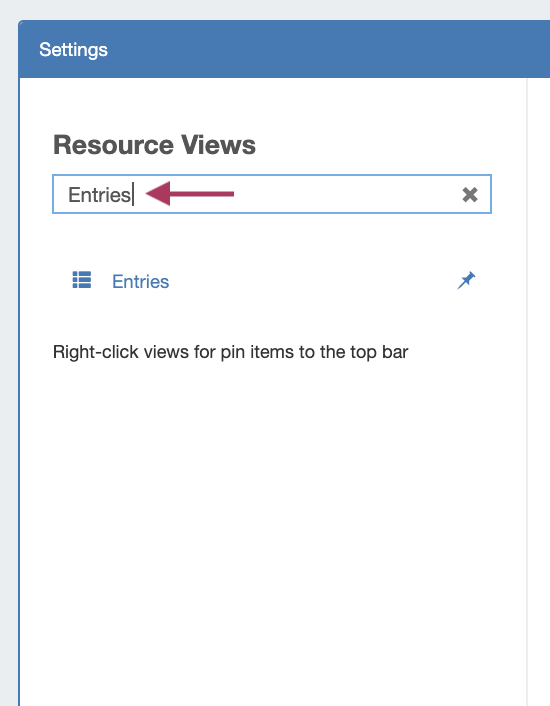
All existing views are listed on the left sidebar of the page under "Resource Views".
Filter
To filter the view list, type all or part of the view name into the search bar, and the list will filter down to relevant results.
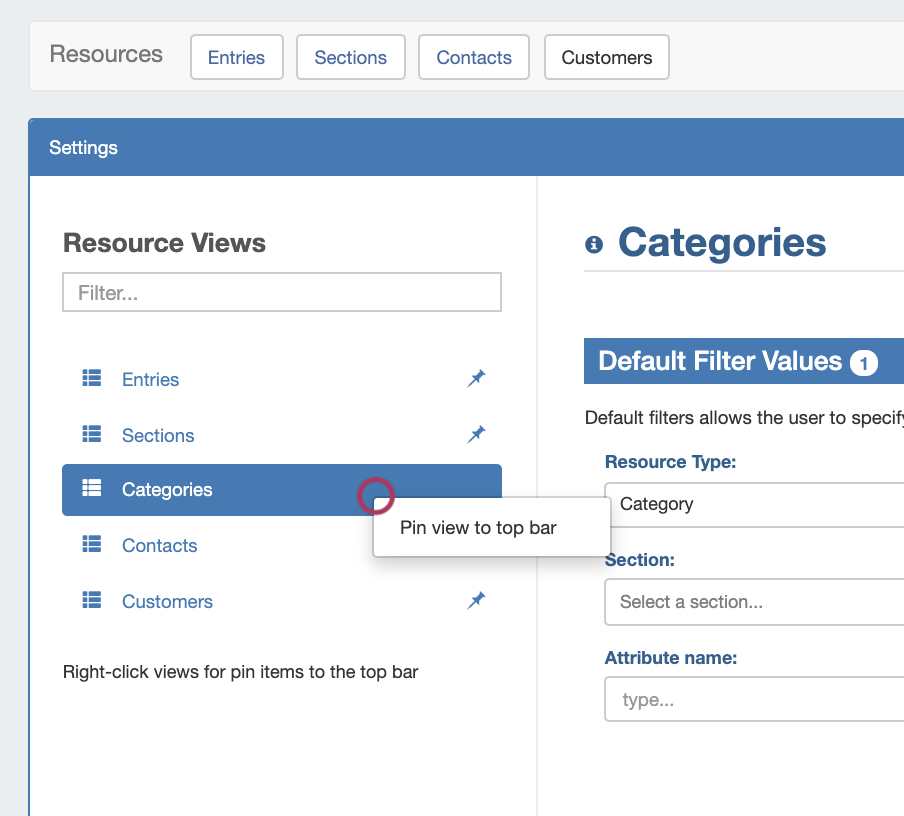
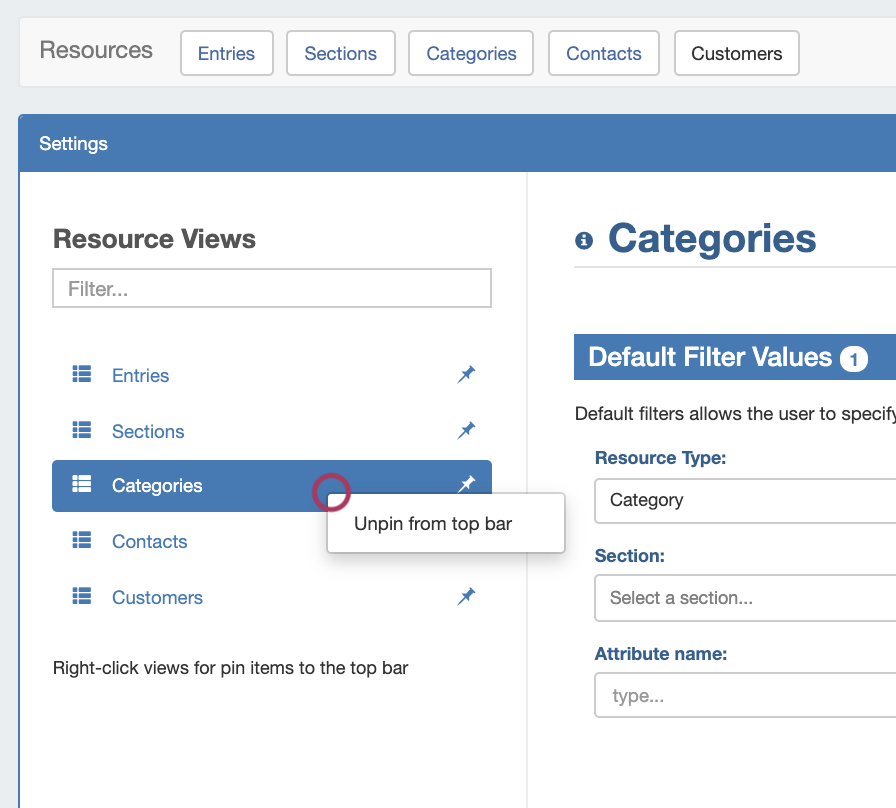
Pin / Unpin
To Pin / Unpin a Resource View to the top header bar (where it will display as a button), right-click on the view, then select:
"Pin to top bar" to add a bar button for the view, or "Unpin from top bar" to remove an existing header button.
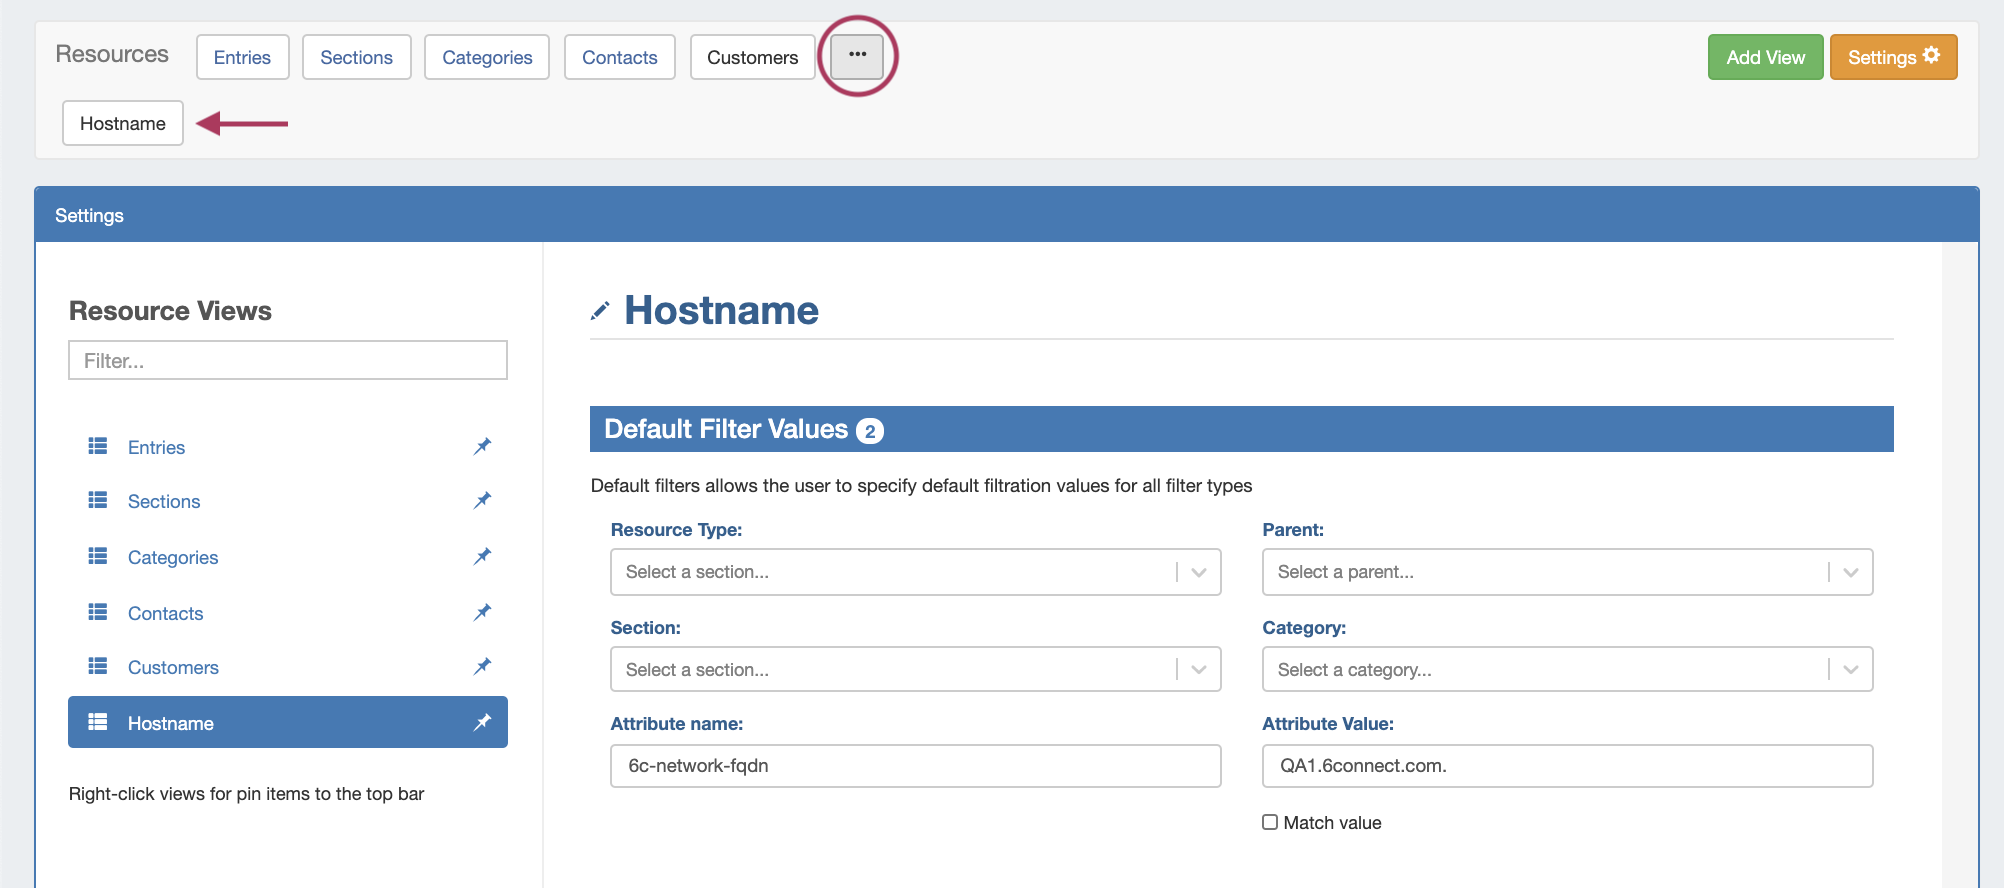
If custom views are pinned, they will be visible in a second button row by clicking the expand (...) button in the page header:
Create a New View
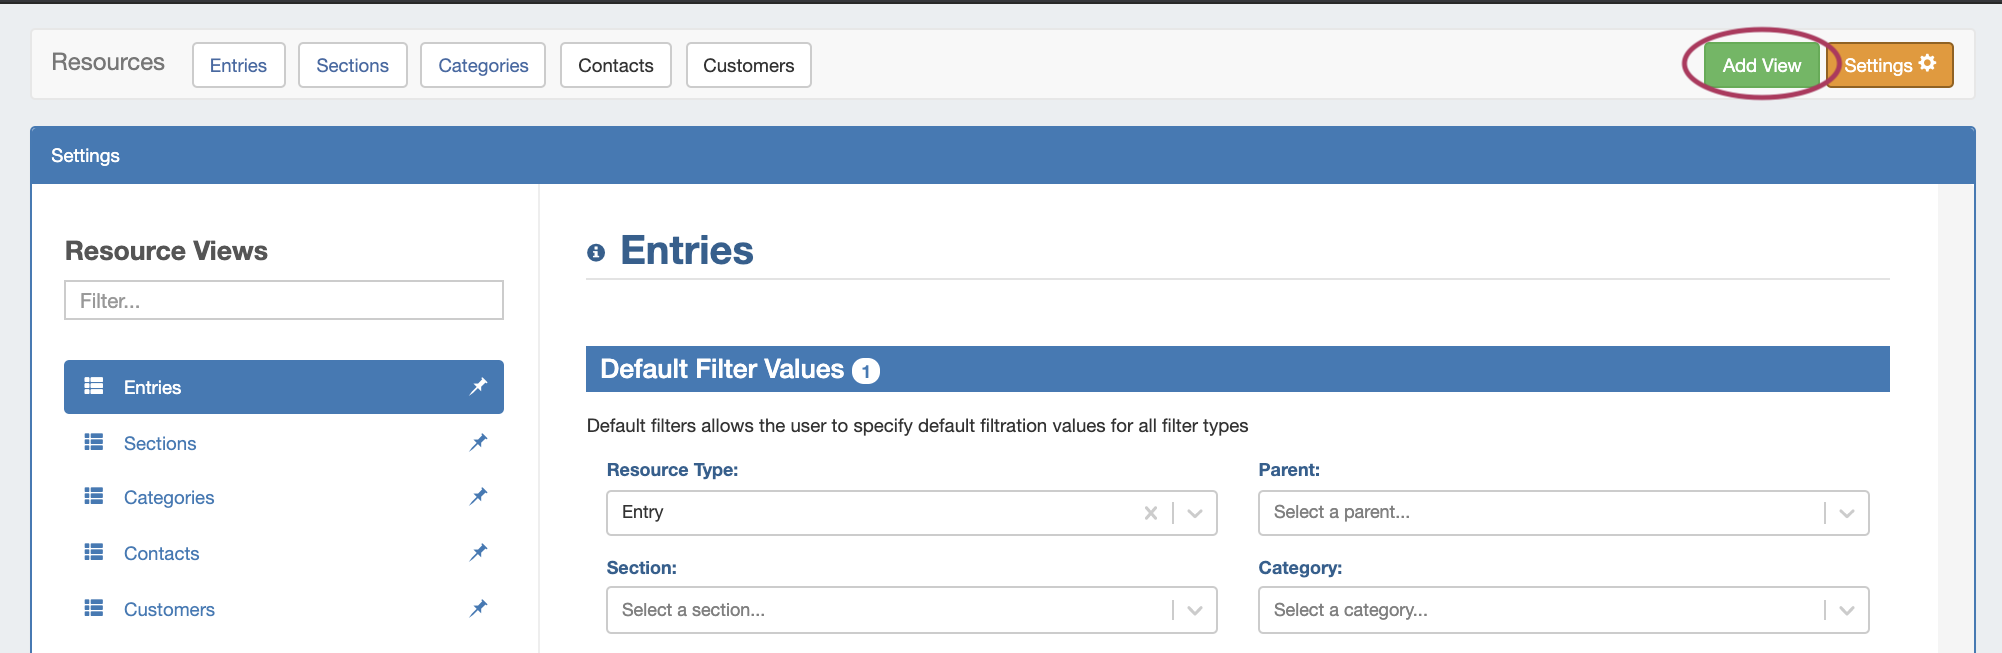
To add a new Resource View to the list, click "Add View" at the right side of the header bar.
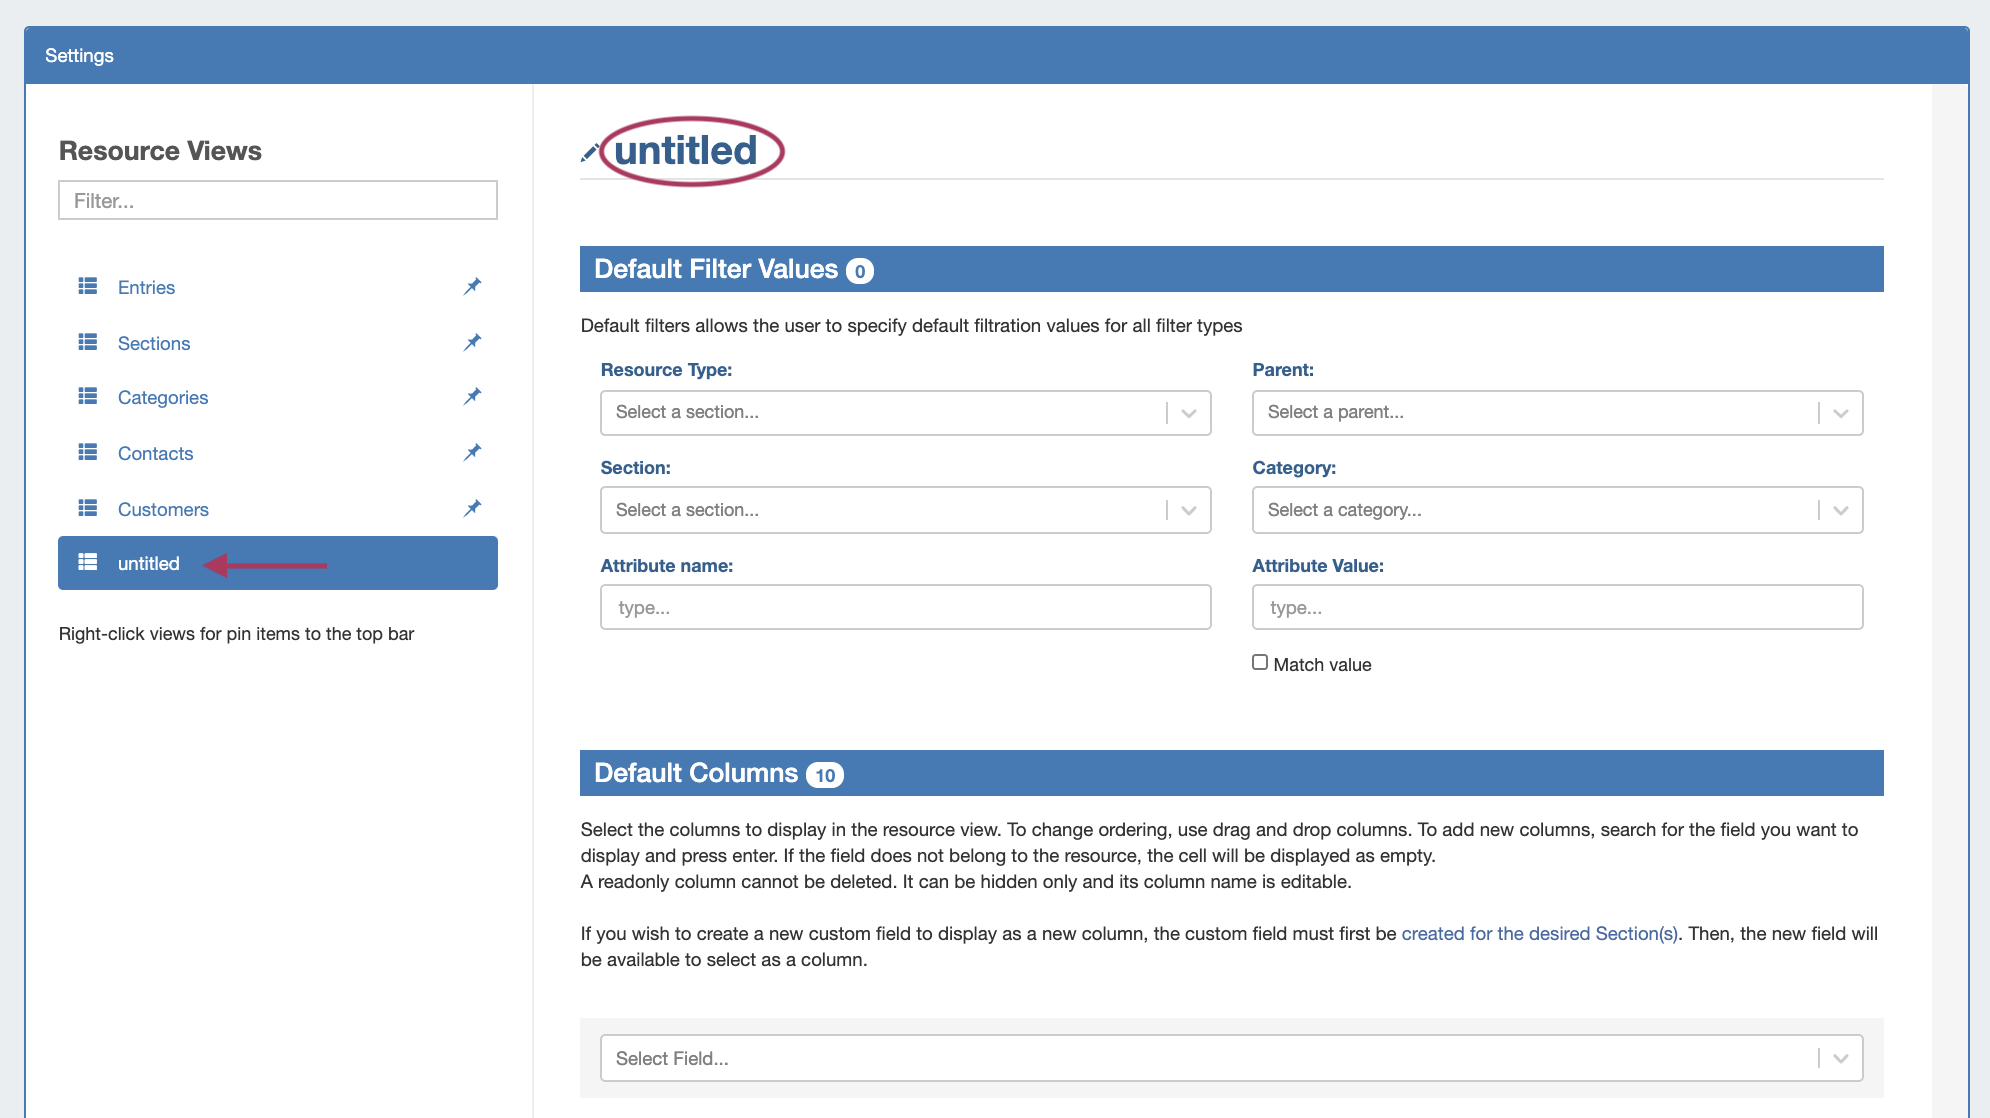
A new "untitled" view will be added to the view list, with no default filters applied and standard default columns enabled.
Click on the "untitled" view in the list to select it. To rename the view, click the view name above "Default Filter Values" and type the new name.
From here, you may either save the view and exit out, or continue on to apply specific filters to the view, display field attributes as columns, and adjust column order visibility.
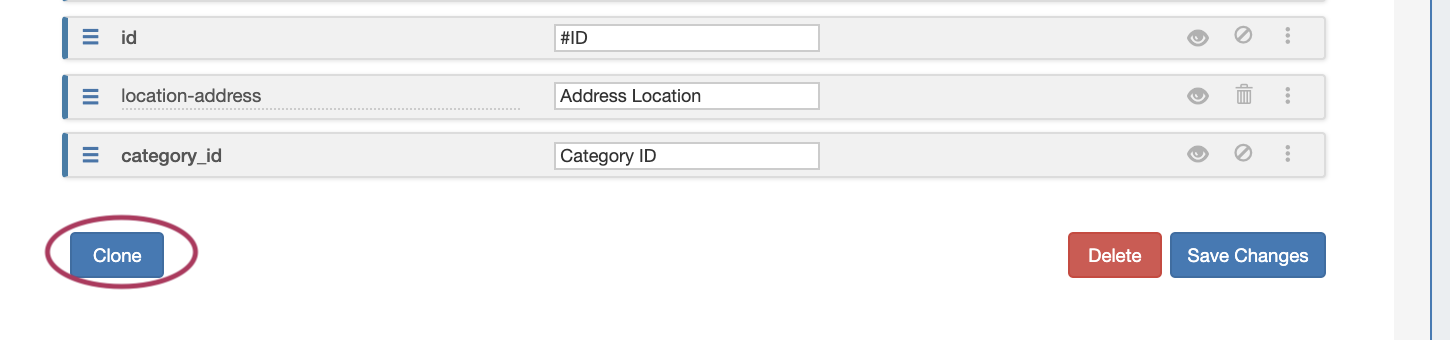
Clone an Existing View
You may clone an existing Resource View by opening the view, scrolling to the bottom of the view settings, then clicking "Clone".
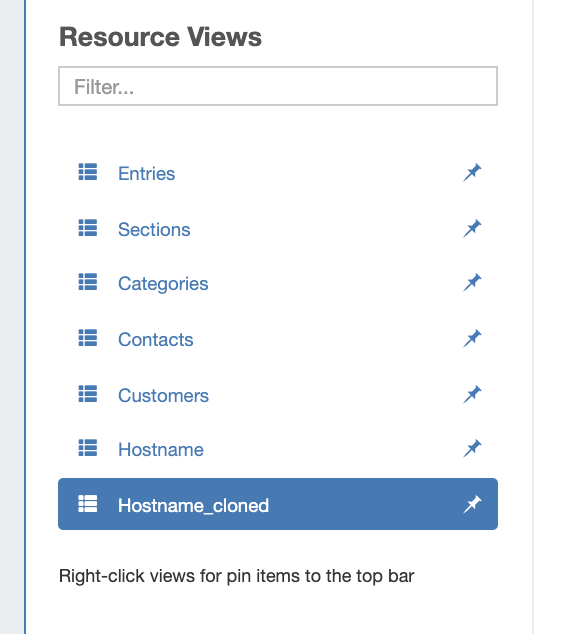
The view will be cloned, along with all of its existing filter and column settings.
The new view will be named "(Previous View Name)-cloned", and will immediately be added to the Resource View list.
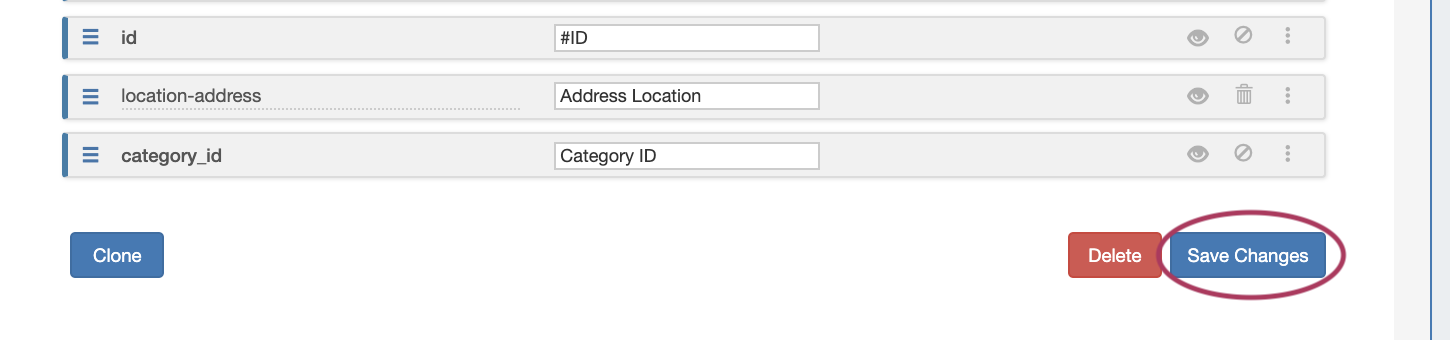
If further edits are needed to the view, edit the filters and/or columns as desired, and click "Save Changes".
Delete an Existing View
User-created Views may be deleted by clicking the "Delete" button at the bottom right of the view settings.

Default views may not be deleted.
Set Default Filter Values
Default filter values allow you to fine-tune which resources display in your Resource View. If you'd like to have all resources visible in your view, you may leave all fields blank, or enter any combination of filters to narrow down the resulting list.
You may even restrict your view to only show those resources that have a particular value for an attribute, by entering the attribute (field) name obtained from the resource's section setup, and the specific value for that attribute that the resource should have.
![]()
Available filter values include:
Resource Type: Chose from Section, Entry, Category, or Contact.
Parent: Enter a parent resource to limit the list to only resources with that parent.
Section: Select a resource section, such as Resource Holder, Server, Rack, VM, or any custom section from your ProVision instance.
Category: Select an existing category, such as Customer, Internal, or any custom category that has been created.
Attribute Name: Type an attribute name to limit the results to only resources with that attribute. See: "Find the Attribute Name information box, below".
Attribute Value: Type an attribute value to limit the results to only resources with that value for the attribute. Select "Match Value" to limit results to exact attribute value matches.
Once you have selected the desired filter(s) for your view, be sure to click "Save Changes" at the bottom of the page!
Finding the Attribute Name
Note: The attribute name is the system slug designation for the attribute, not the display name shown in column headers or field labels.
Slugs are unique ids entirely in lower-case lettering, and use dashes or underscores instead of spaces.
To find the attribute slug, go to the Edit Section page, and look for either of the following areas for the desired field:
1) Click on the field name label (here: "Hostname") for a field that has already been added to the section, to open the field details information box:
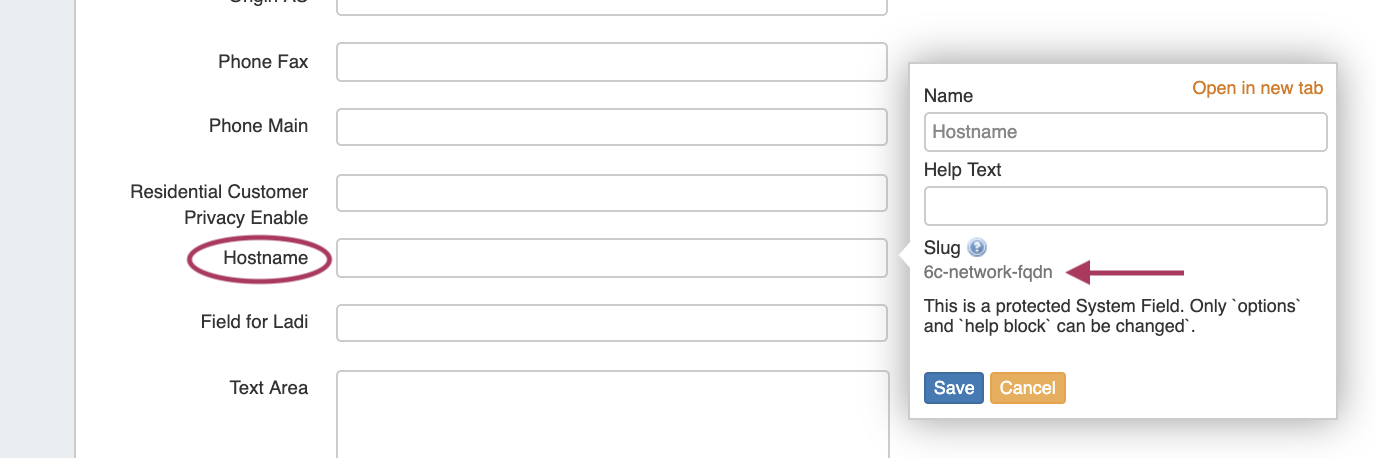
The field attribute slug will be listed under "Slug" - here, the slug for "Hostname" would be "6c-network-fqdn"
2) If the field has not yet been added to the section, you may view the field name with field slug after it, in parentheses, in the "Add Existing Fields" selection box:

Here, the slug displayed for "2nd Email" is "6c-contact-email2".
Once the attribute name and value has been entered as filter conditions, it should look like this:
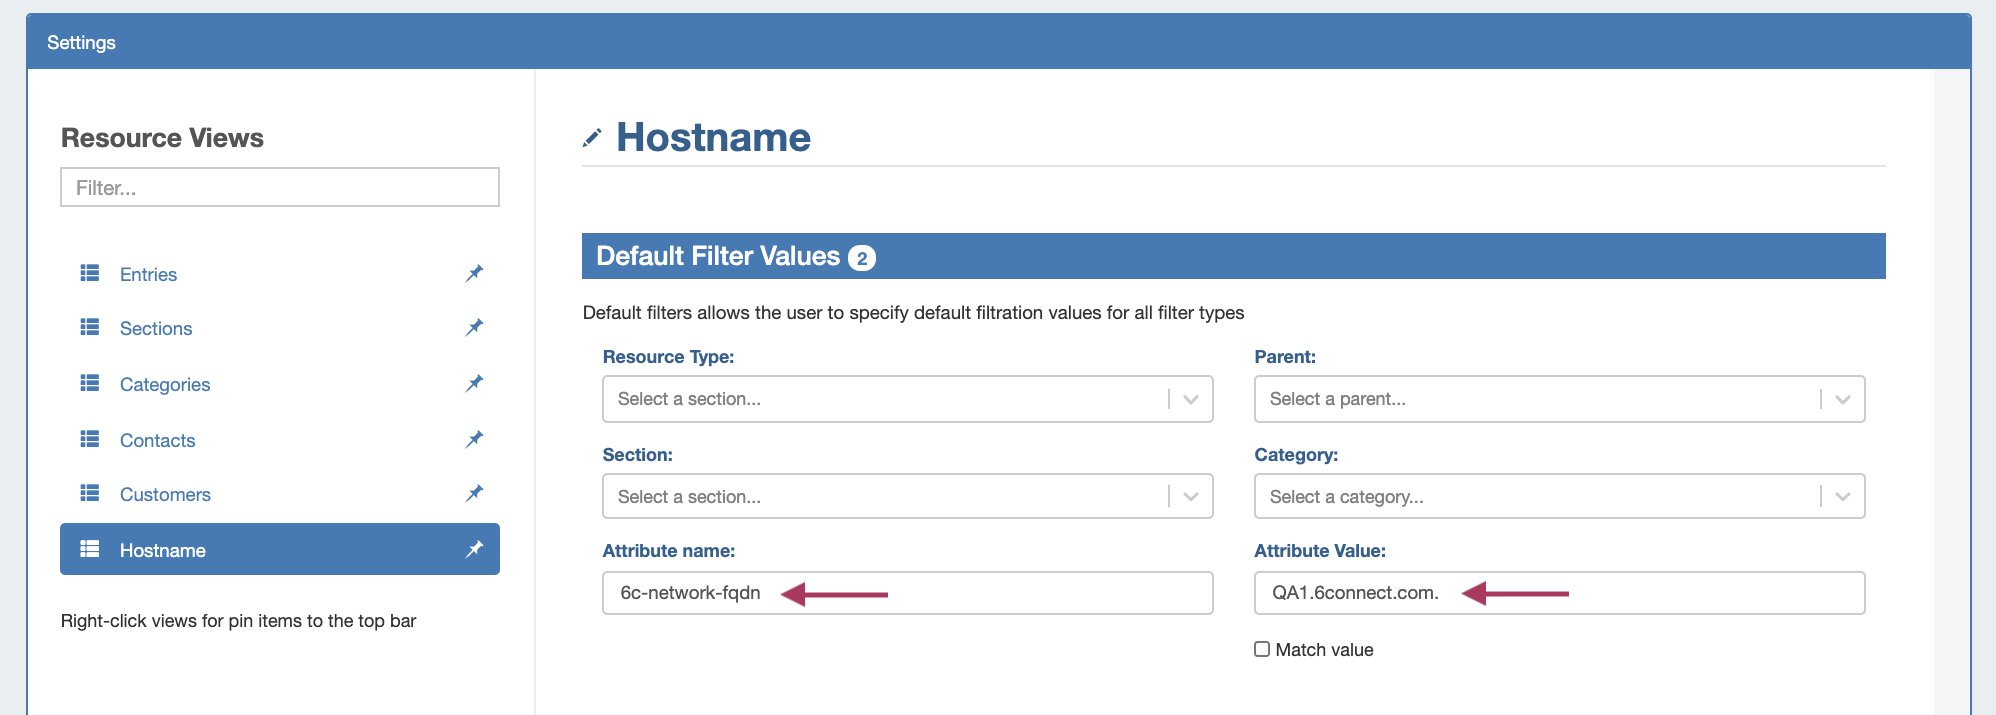
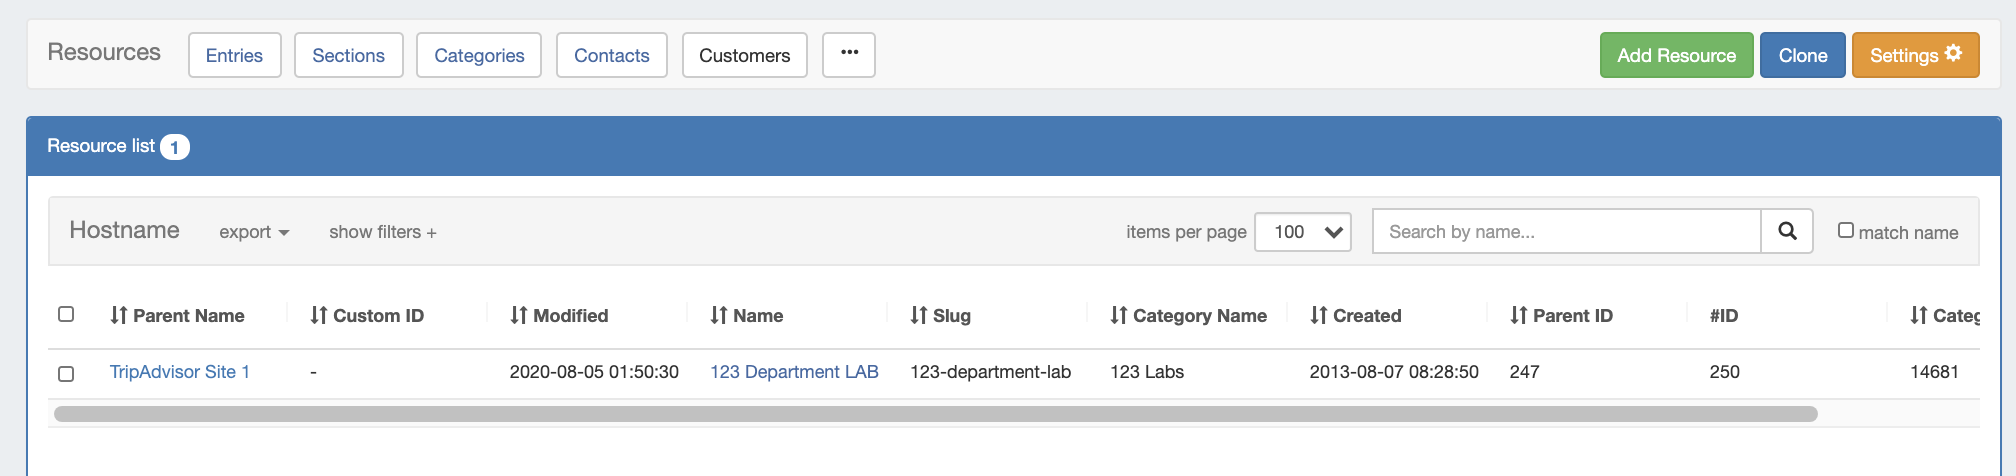
The resulting view list will then display only the resources with "QA1.6connect.com." entered for the Hostname (6c-network-fqdn) field:
Set Default Columns
Default Column settings allow you to choose which resource fields are displayed as columns, as well as the column order, name, and visibility settings.
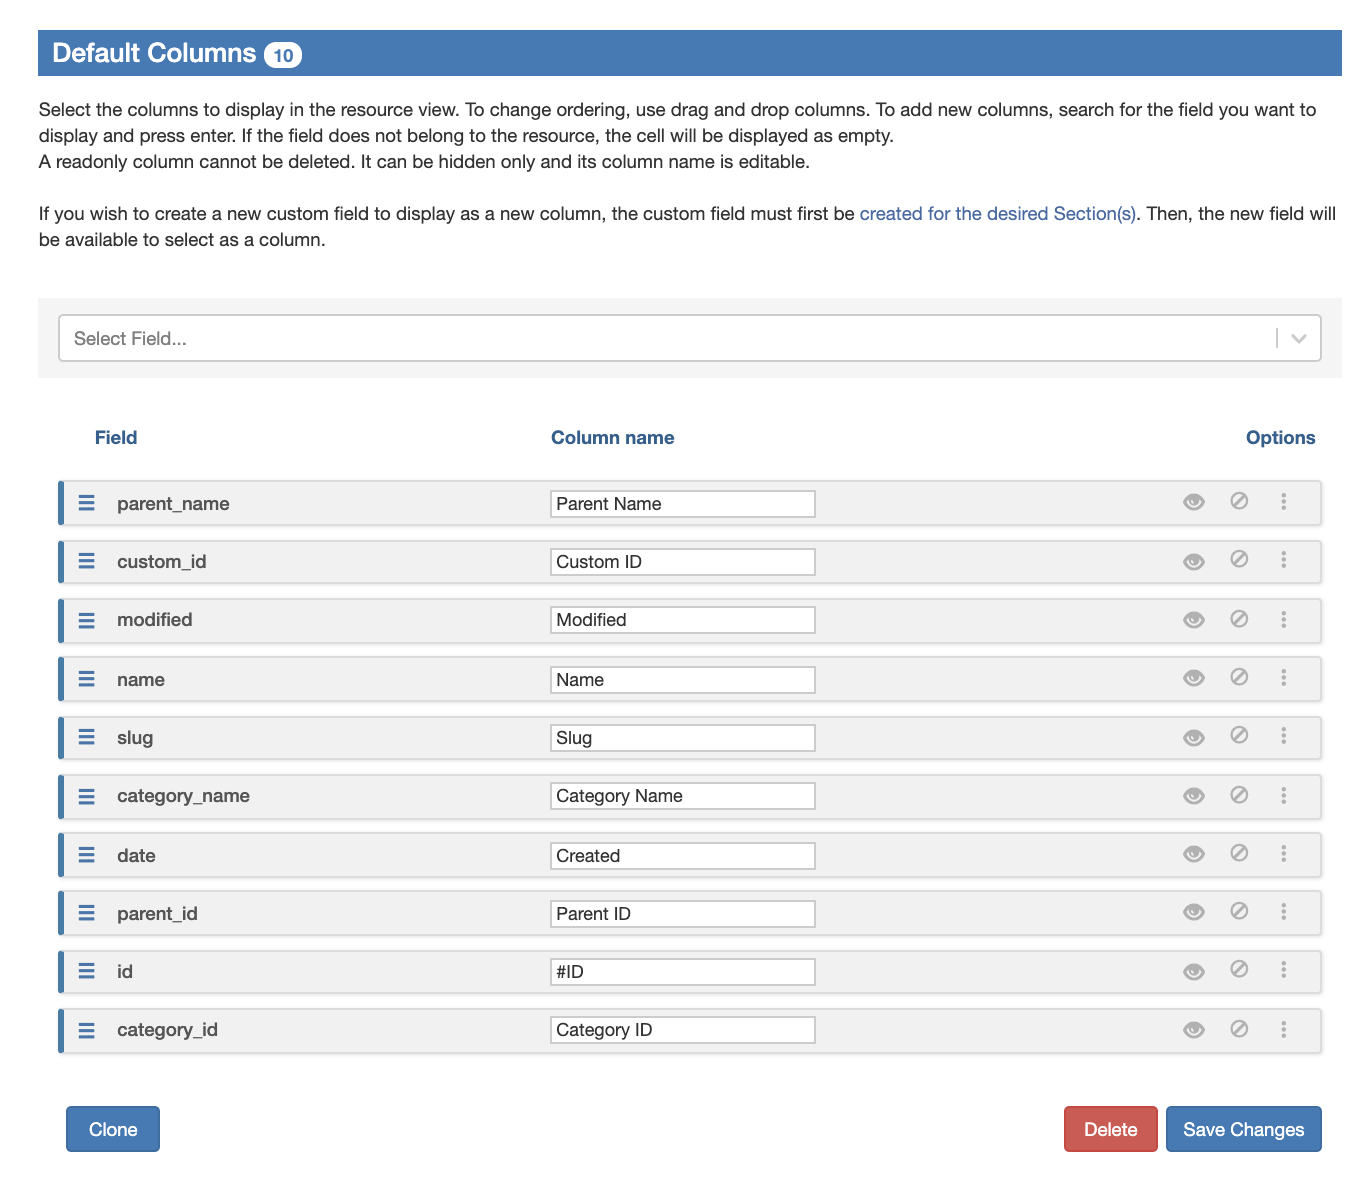
For all of the default views, the default column fields include:
- Id (id)
- Slug (slug)
- Name (name)
- Parent Id (parent_id)
- Parent Name (parent_name)
- Category Id (category_id)
- Category Name (category_name)
- Created (date)
- Modified (modified)
These default columns may be reordered, renamed, or be hidden, but they may not be deleted. You may, however, hide any unwanted columns and add custom fields to display only the specific information you wish to see in your view.
Select Field(s) to Add
You may add any existing resource field as a column for a view. In the "Select Field" input box, click and search for the field name you wish to add:
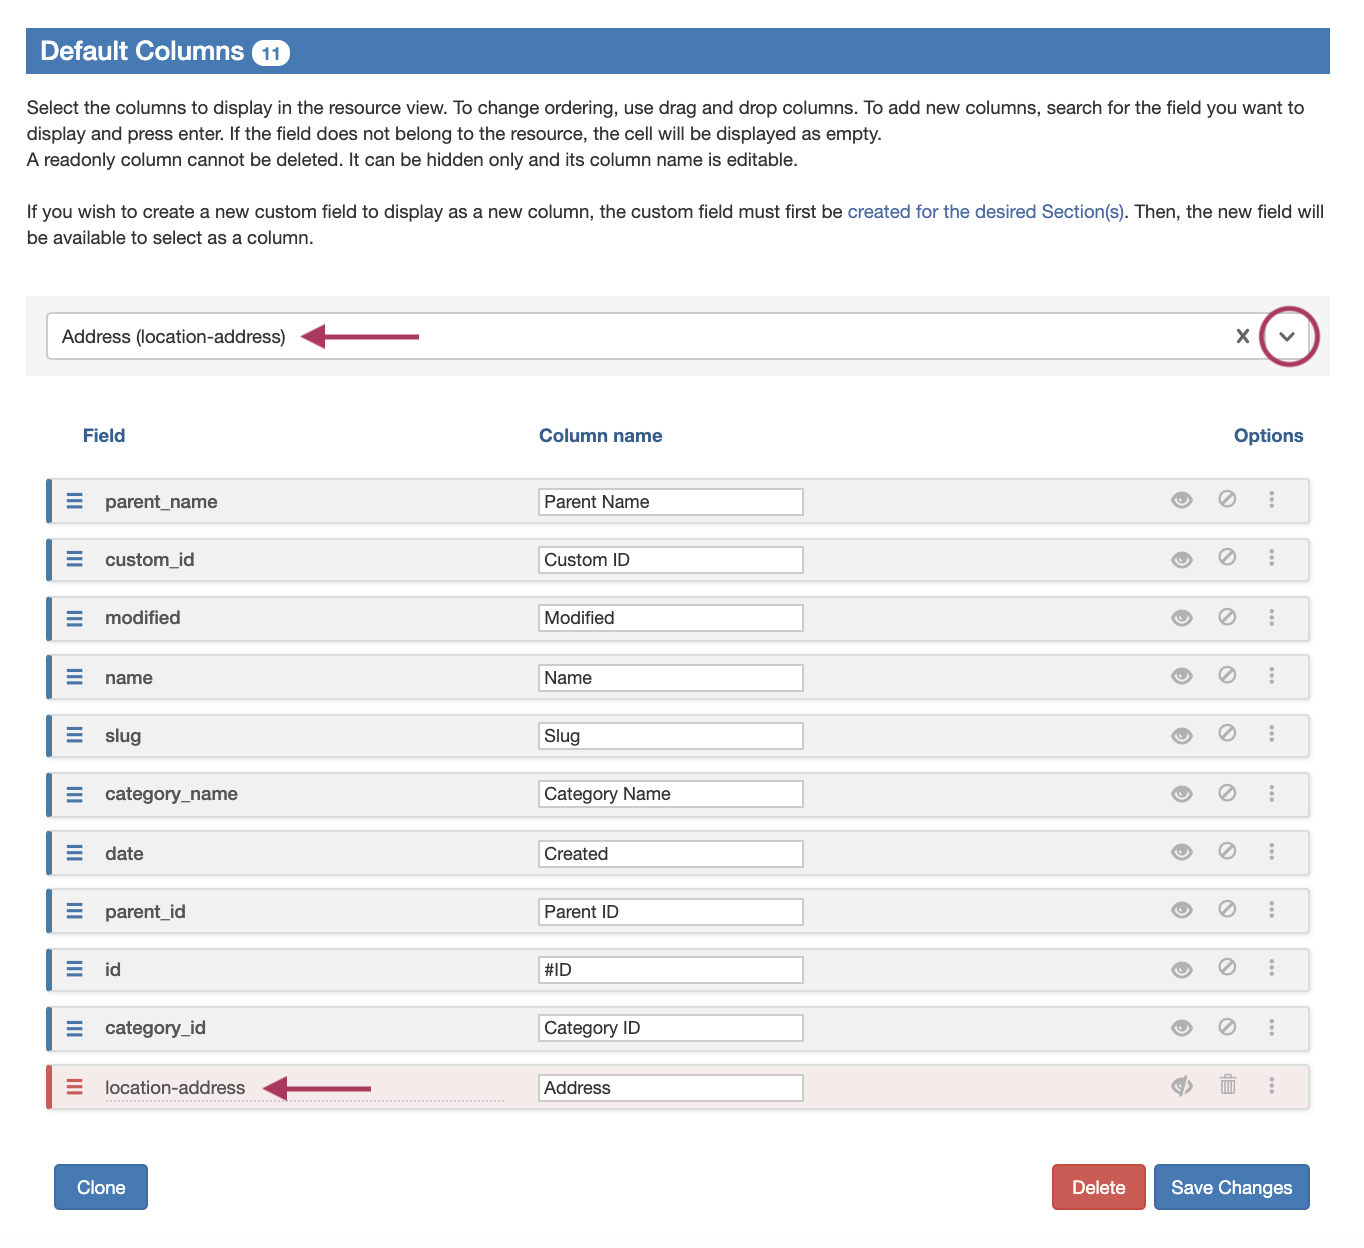
Once selected, the field will automatically be added to the bottom of the column field list, and automatically set with visibility to "off".
Create New Fields
Note: If you would like to create a new custom field to display as a column, you must first create the field for the desired section. Then, the new field will be available to select as a column.
For additional information on creating fields, see Customizing Sections and Customizing Fields.
From here, you may add or edit additional fields, or click "Save Changes" to save your changes.
Toggle Column Visibility
To toggle column visibility on or off, click the "eye" icon on right side of the field row.
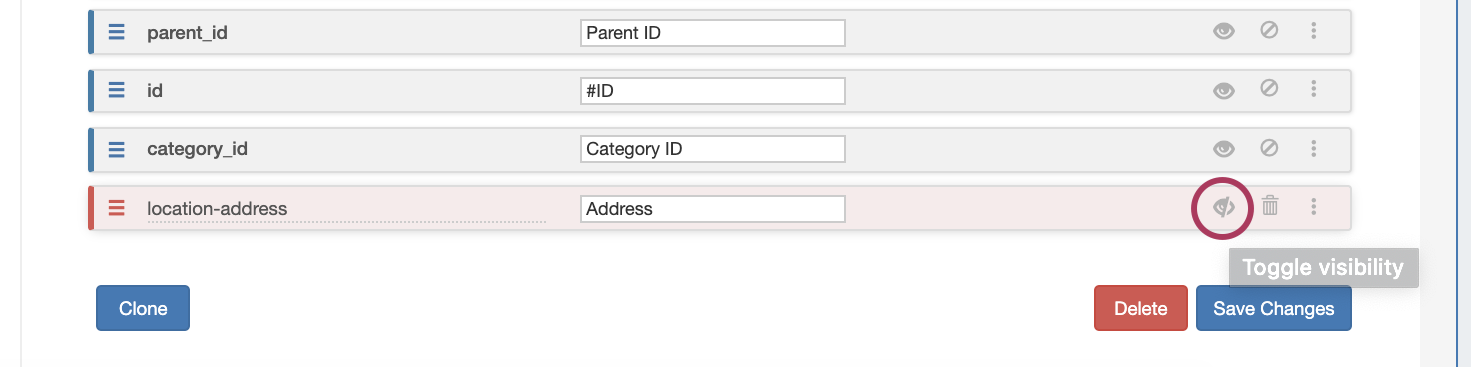
Fields that have visibility turned off will display as a red bar, whereas visible fields will be grey bars.
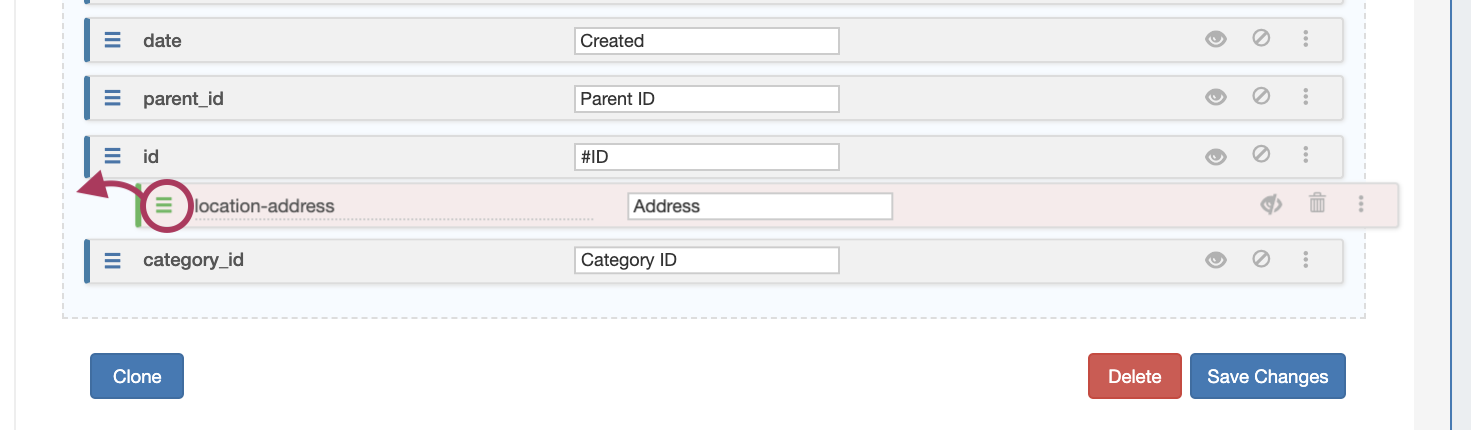
Reorder Columns
To reorder columns, click on the "list" icon (three horizontal lines) on the far left of the field bar, then drag the bar to the desired location in the list.
Release the mouse button when it is placed in the new location.
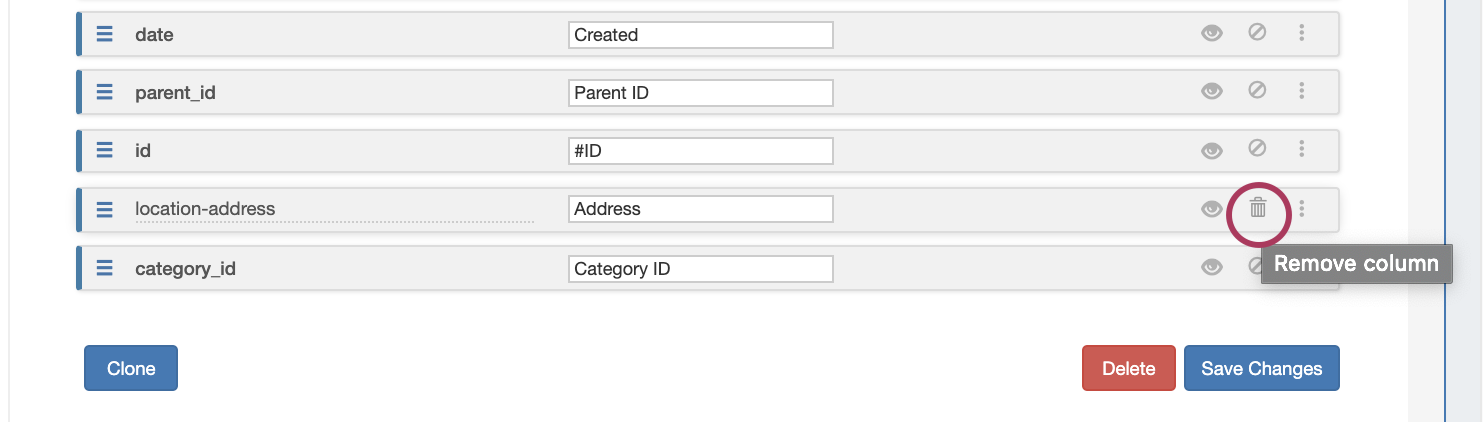
Remove Columns
Default columns are not able to be removed (you may hide visibility, instead), but user-added columns may be removed by clicking on the "delete" icon (trash can) for the desired field.
Resize Columns / Additional Options
Additional options exist to manage column sizing and behavior. Click the menu icon (three dots) on the right side of the field bar.
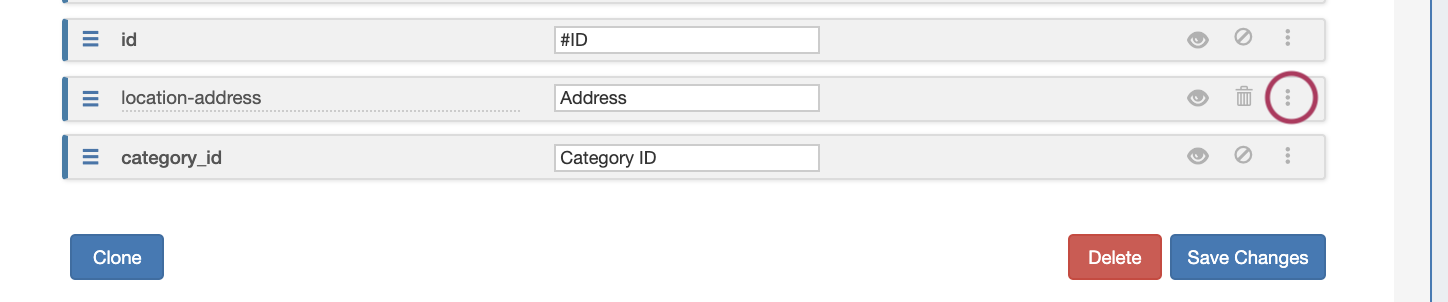
This opens the "More Options" box. From here, you can set a specific minimum pixel width for the column, or enable/disable drag resizing in the field view.
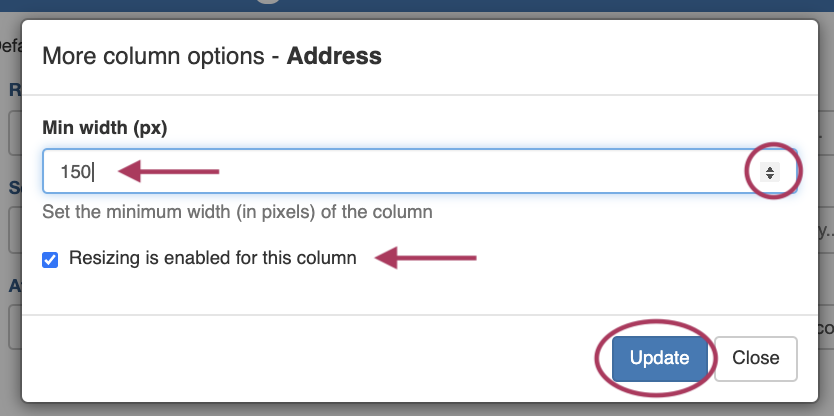
When done, click "Update", or click "Close" to exit without saving your changes.
Rename Columns
The display name for any column may be renamed by simply clicking inside the name box, and typing your changes.
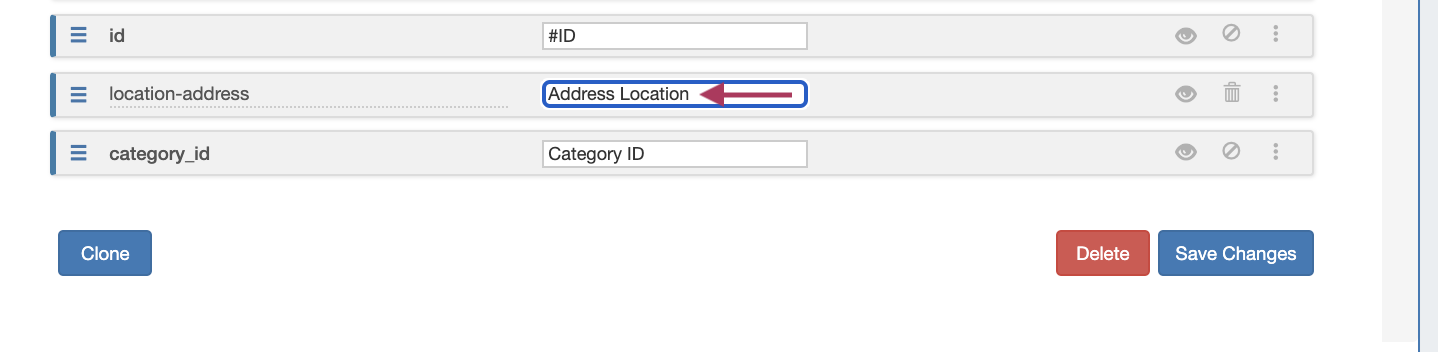
When done, click "Save Changes".
Additional Information
See the following pages for additional information on working with Resources in Provision:
- Working with Entries
- Customizing Sections
- Customizing Fields
- Customizing Resource Views
- Gadgets
- Contact Manager