...
The ACP Workflow Form is a Gadget connecting 6connect's ACP (API Composer Platform) with the ProVision interface to run Workflows.
It allows users to specify and execute Workflows created in the ACP product on a ProVision Resource Entry page.
See below for additional details on setting up and working with the ACP Workflow Form: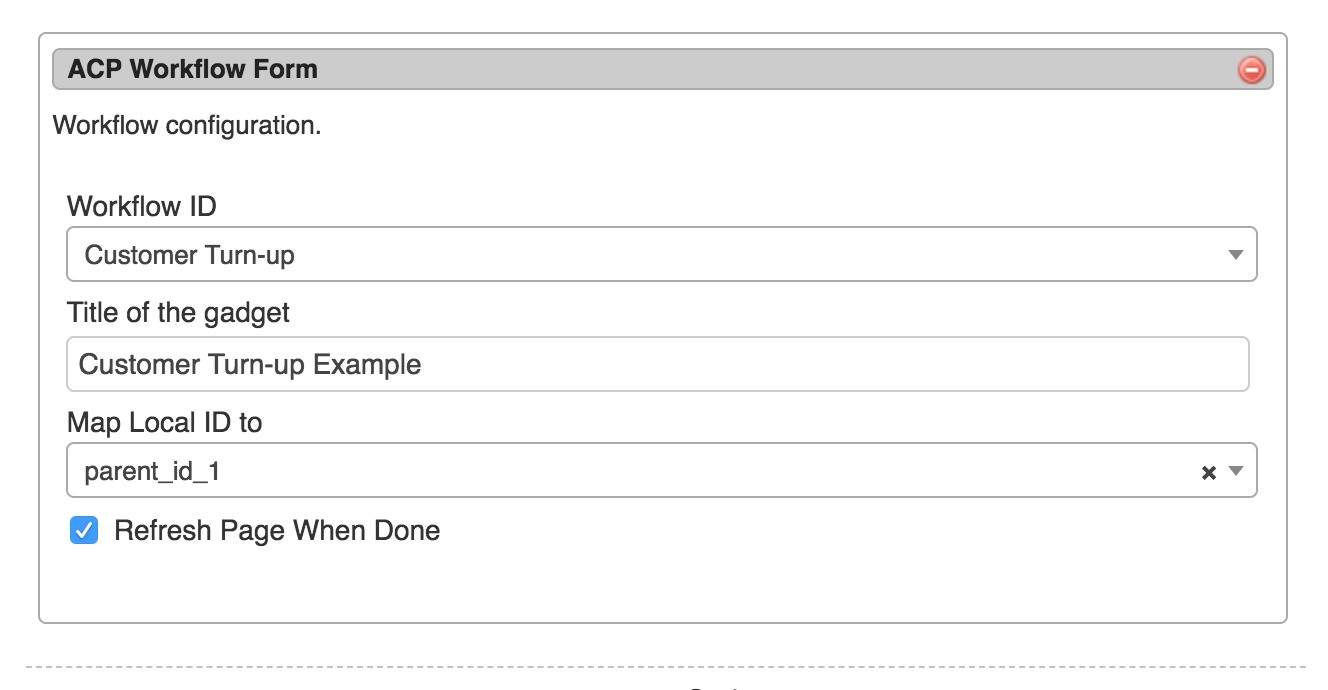
| Expand | ||
|---|---|---|
| Working with the ACP Workflow Form
Contact Info
This Gadget is used on the Resource Holder Section type. In the Contact Info Gadget, you can track information such as mailing / billing addresses, phone number, and fax number for that Resource.

Contacts
The Contacts Gadget may be used on any Section type to assign a contact (from the Contact Manager) to a Resource.
To assign a contact, search for and select the desired contact in the search box, then click "Assign". The Contact will show in the list below.
...
| title | Working with the Contacts Gadget.... |
|---|
Contacts Action Menu:
The Action Menu (wrench icon) in the contacts gadget has three options:
Set Role: Opens a dialog box to select a role to assign to the contact, add a new role, or delete an existing role.

Unassign: Unassigns the contact from the resource
View: Redirects to the contact's detail page in the Contact Manager
Refer to the Contact Manager page in the documentation for more detail on working with the Contacts gadget and the Contact Manager.
| Info | ||
|---|---|---|
| ||
The ability to view and assign a contact to a resource is restricted by the Parent assigned to the contact upon creation. If a user does not have permissions for a contact's Parent Resource, that contact will not be able to be viewed / assigned via the gadget. |
DHCP Server Management (Legacy)
| Info |
|---|
The DHCP Server Management Gadget has functionally been replaced by the DHCP Tab updates in version 7.0.0. Although the DHCP Management Gadget may still be used, we recommended checking out the DHCP Groups, DHCP Servers, and DHCP Pools pages instead for an improved user experience. |
...
When initally added to the section, it will show in the "Off" configuration:

| Expand | ||
|---|---|---|
| ||
To enable the DHCP Management Gadget, select the "On" radio button next to "DHCP Services", and click the "Update" Button. The DHCP Management Gadget in the "On" configuration:
Each of the sections in the DHCP Management Gadget - Group Management, Connection Configuration, Server Details, Scan Server, DHCP Pools, and Create a New DHCP Pool - may be expanded to change settings in each area. Additional sections may appear in the Gadget once unpushed or pushed configurations are saved:
For detailed information on working with the DHCP Management Gadget, see DHCP Tab - Managing DHCP Server Configurations. |
DHCP Customer Configuration
The DHCP Customer Configuration Gadget allows users to assign IP aggregates to the DHCP server pools and generates DHCP Server Configuration changes depending on the tag(s) and DHCP options selected.
These configurations are then sent to the associated DHCP server Management Gadget as "Unpushed Configurations", where they may be held until a manual or schedule push occurs.
| Expand | ||
|---|---|---|
| ||
Before You Begin Before using the DHCP Customer Configuration Gadget, the following should be set up in ProVision:
Associate with DHCP Server Once the Gadget is enabled, the first step is to associate it with an already-created DHCP server in ProVision. Select the DHCP Server to link to, and click "Continue".
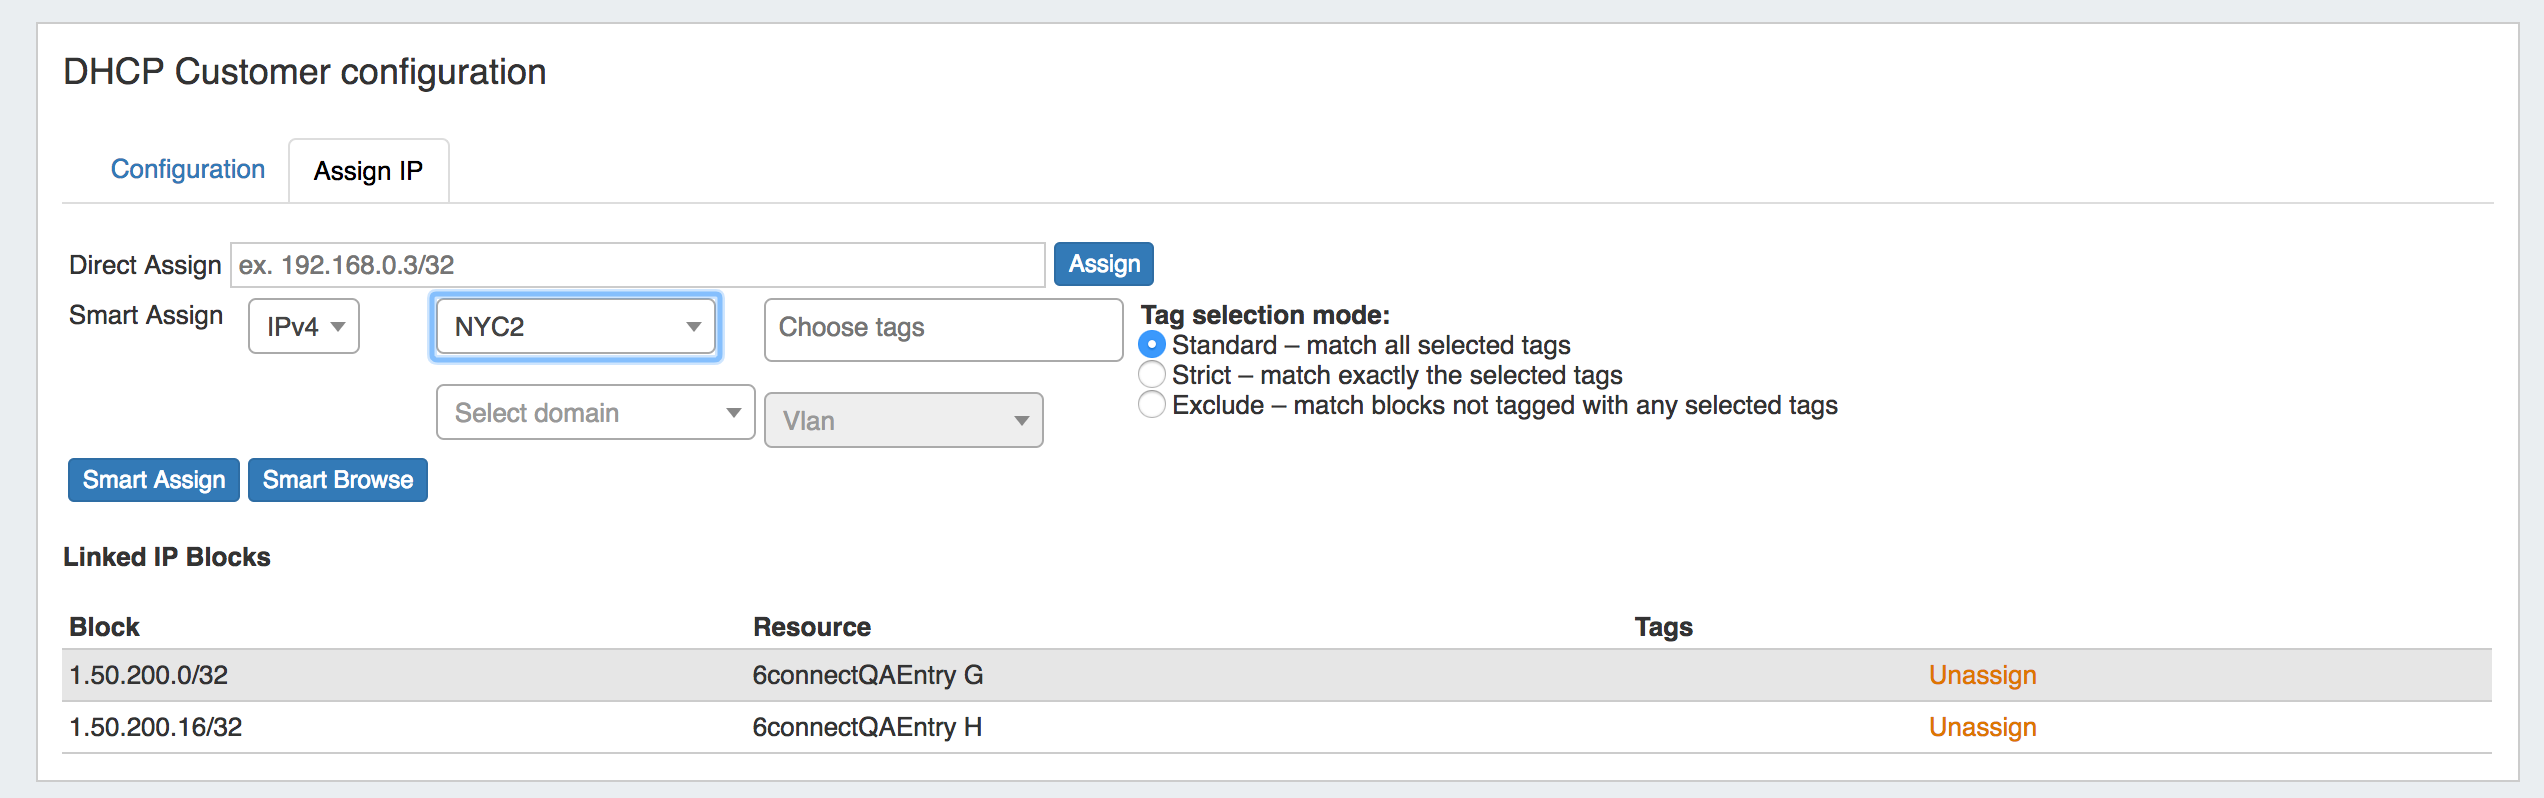
Assign IP's Next, Assign IP's for Pools from DHCP Aggregates. You may Direct Assign, Smart Assign, or assign from Smart Browse based on the selected criteria. Once assigned, a Pool Name will be automatically generated under "Resource". Pools may be unassigned by clicking the "Unassign" button.
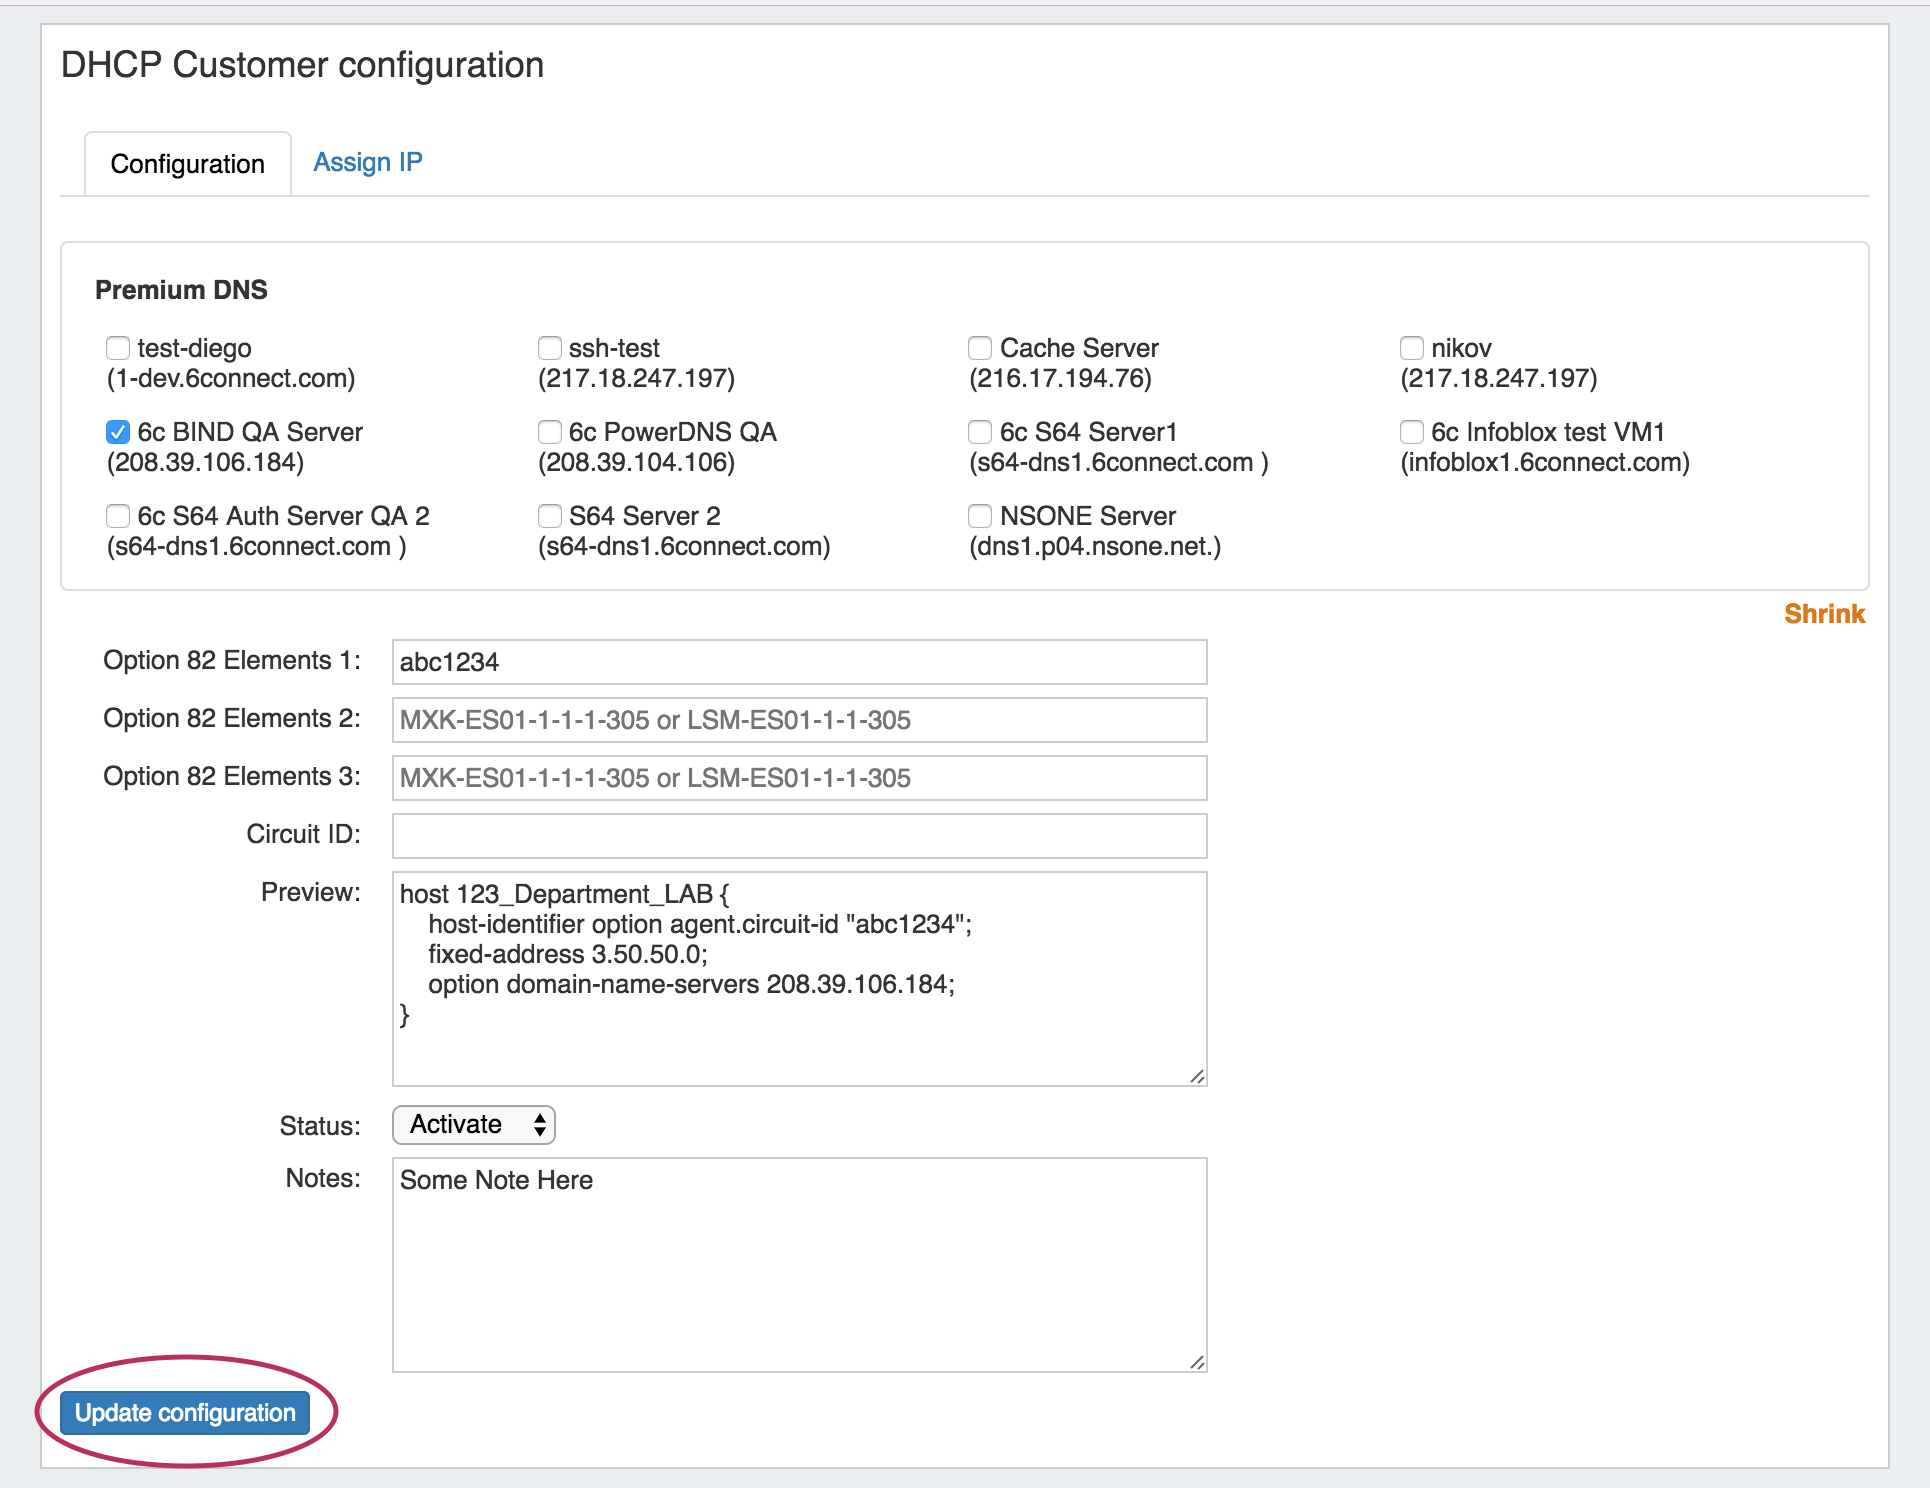
Set up Configuration Once IP's have been assigned, the "Configuration" tab will appear. Click on the tab, and then select or deselect the DNS Server associated with the Customer, add Option 82 Elements, Add Circuit ID text, and add notes if desired. Use the "Preview" field to confirm the accuracy of the data, and select the status as "Activate" or "Terminate". When done, click "Update Configuration". The configuration will be sent to the associated DHCP server's DHCP Management Gadget.
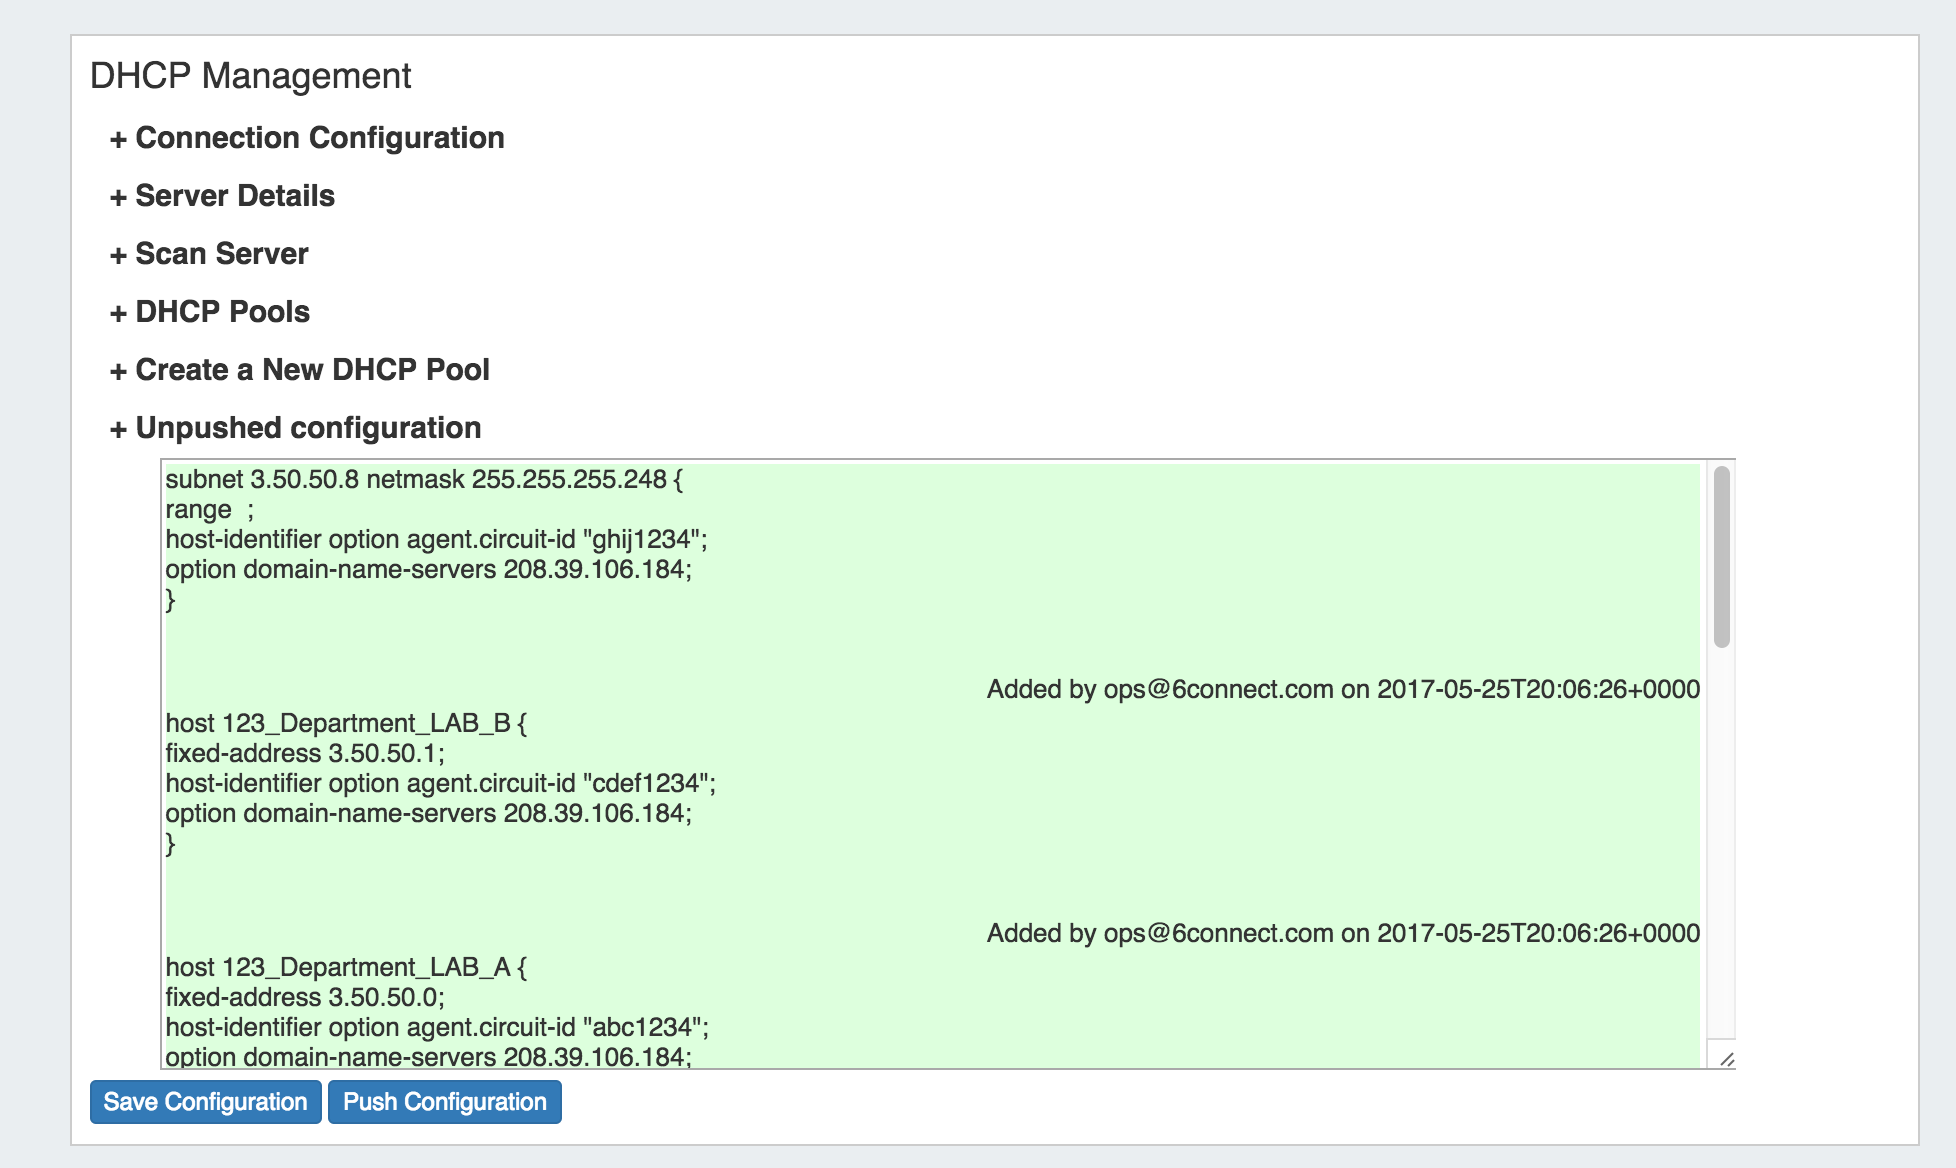
Reviewing and Pushing Configuration Updates When a configuration has been saved from the DHCP Customer Configuration Gadget, it will appear as an "Unpushed Configuration" in the DHCP Management Gadget for the DHCP Server. If you expand that option, you will see the config elements highlighted – red are config elements that will be deleted, green are config elements that will be added.
At this point, an Admin user may manually push the updated configuration, or use a scheduled DHCP push task to automate the pushes. |

DNS
This gadget is used on the Resource Holder Section type. The DNS Gadget shows zones that have the current Resource Holder set as their parent, and provides links to the zone's View Zone page.
...
To go to the View Zone page, you may either click on the zone name, or click on the Action Menu (wrench icon) and select "View Zone".
For more information on DNS functions and managing zones, refer to the documentation for the DNS Tab.
DNS Autogenerator
The DNS Autogenerator Gadget uses the Hostname field (6c-hostname-fqdn) of the Resource to generate a list of DNS forward and reverse zone entries based on the blocks assigned to the Resource in the IPAM Gadget It will generate a list of potential zone records - just select the ones you want to create, save the changes and you are ready to push the zones.
| Expand | ||
|---|---|---|
| ||
Enabling the DNS Autogenerator To set up this Gadget, ensure that the Section of the Resource (typically, "Resource Holder" ), has the "Hostname" field (6c-hostname-fqdn) and the DNS Autogenerator Gadget added to the Section. (See: Customizing Sections and Customizing Fields). Then, check that the Resource itself has information entered into the "Hostname" field. If the field is already filled out, it will show in the "Fields" information area at the bottom of the Resource Entry page. To add or edit the hostname, click "Edit" at the bottom of the resource entry page, add the information to the Hostname field, and click "Save".
Once a hostname has been associated with a Resource, and the page refreshed, the DNS Autogenerator Gadget will be visible. |

...
| title | Working with the DNS Autogenerator Gadget ... |
|---|
Before you Begin
Before starting, check that the blocks assigned to the Resource in the IPAM Gadget are correct and up-to-date - the Autogenerator uses these blocks to create the records. If using a DNS Group other than "Default" to hold zones, ensure that the desired DNS Group to hold the generated records has been set up. (See: Working with DNS Groups).
Working with the DNS Autogenerator
One enabled and visible, the DNS Autogenerator Gadget will initially show a short description, the hostname, and a button to "Autogenerate Records".

When ready, click the "Autogenerate Records" button. The Gadget will search through the blocks in the IPAM gadget and provide a list of found blocks.
Add Subdomain / DNS Group
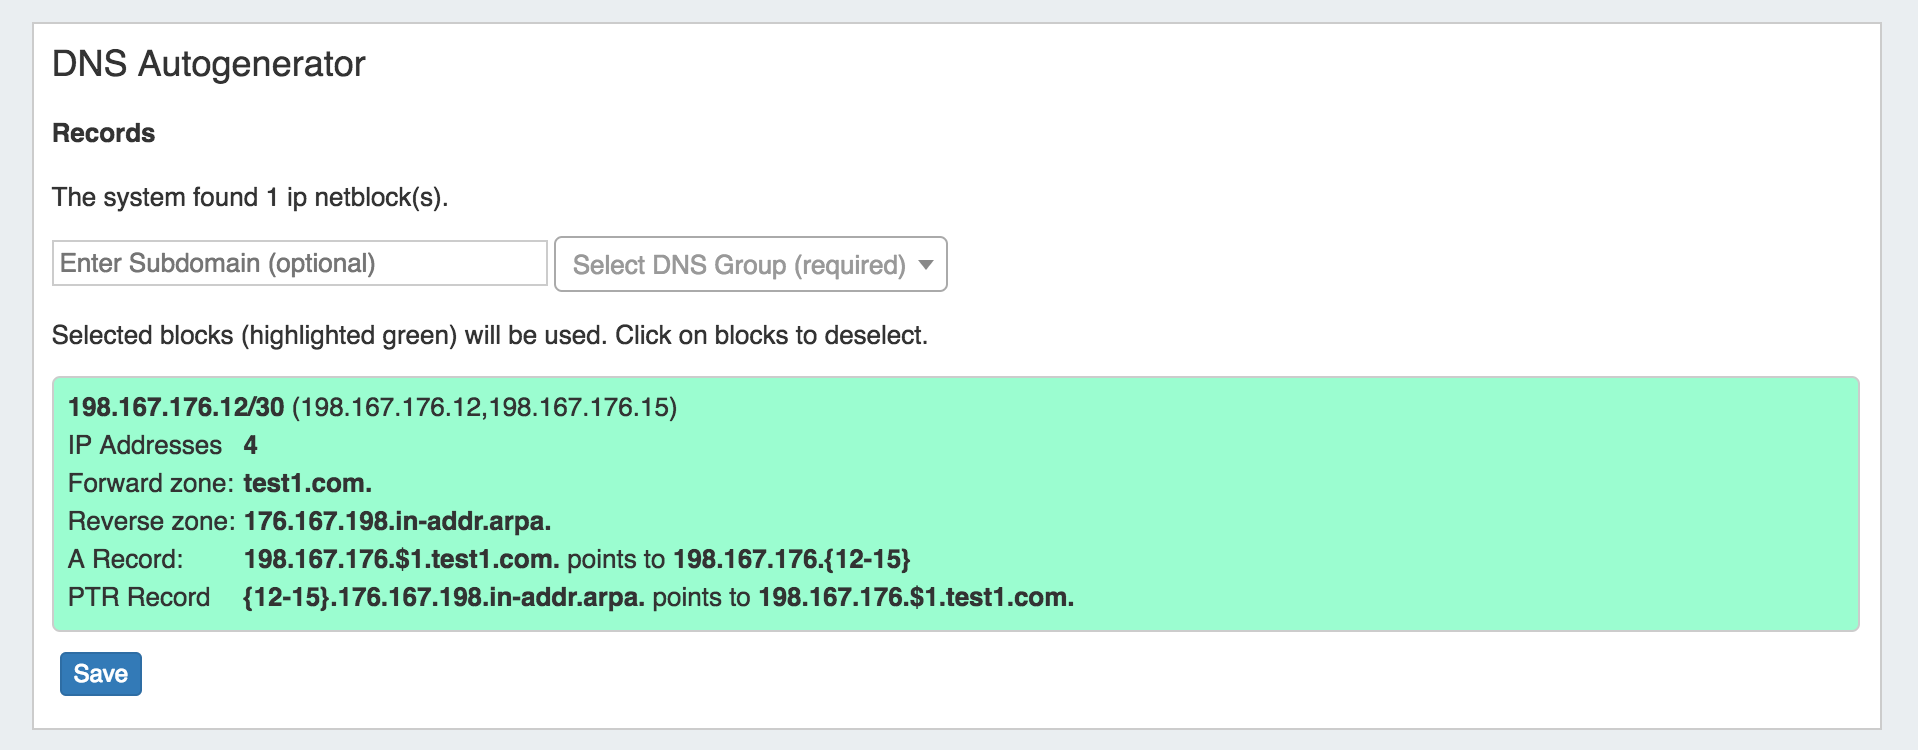
Next, add in a subdomain if desired (optional), and select the DNS Group to hold the records (required). Click on the listed blocks to select (highlighted green) or deselect (grey) for DNS zone / record creation.
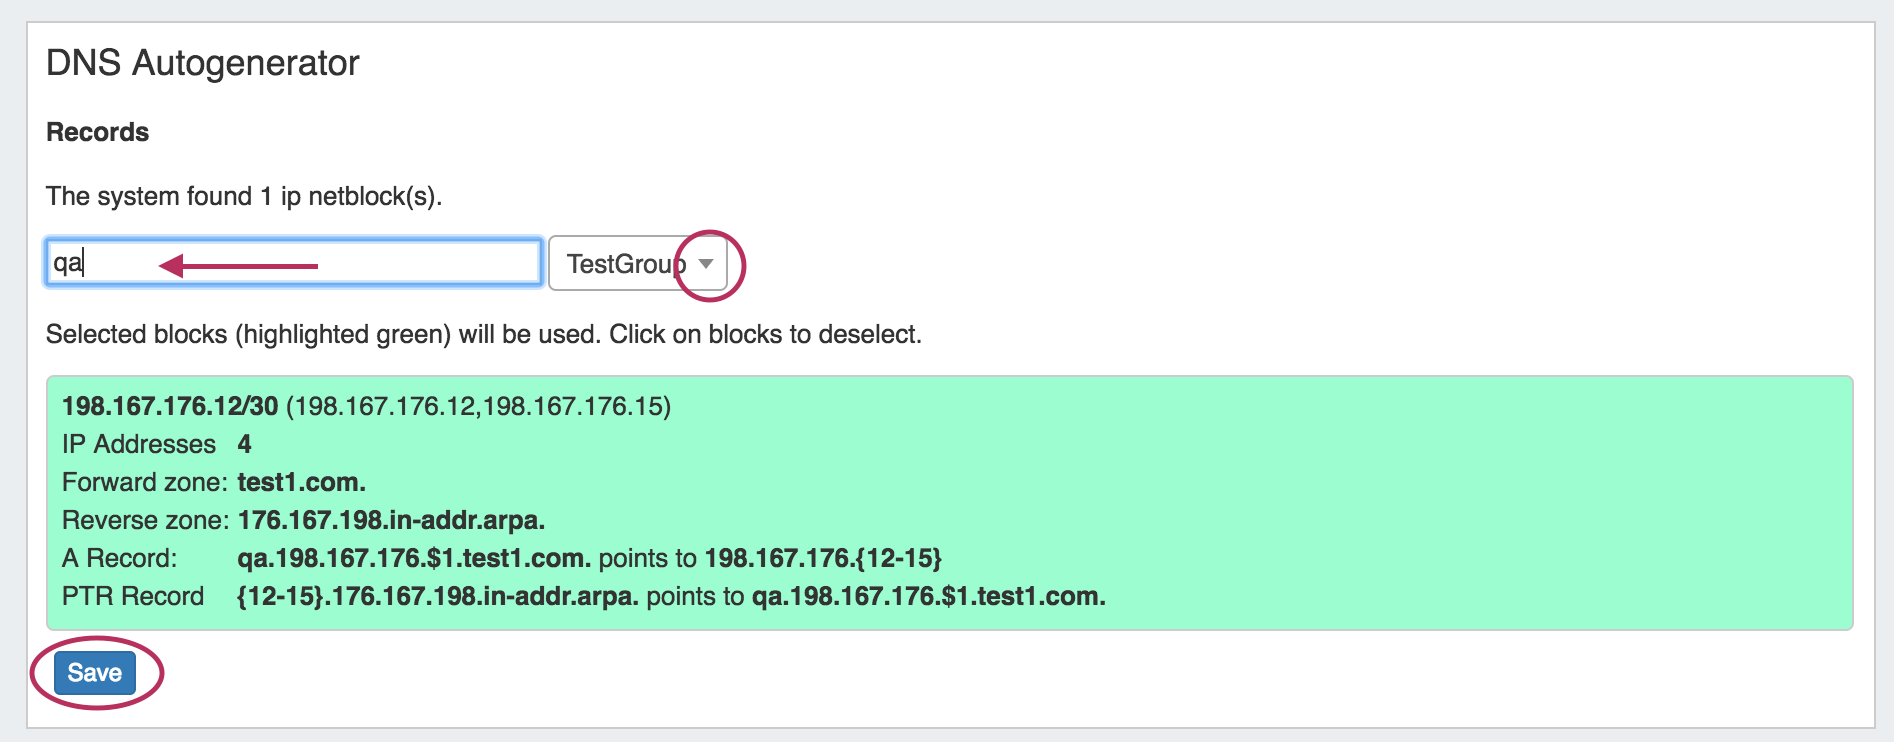
Save and Push
Finally, hit the "Save" button at the bottom of the gadget - the selected forward and reverse DNS records will be created and added into the DNS Group, viewable in the DNS Tab.
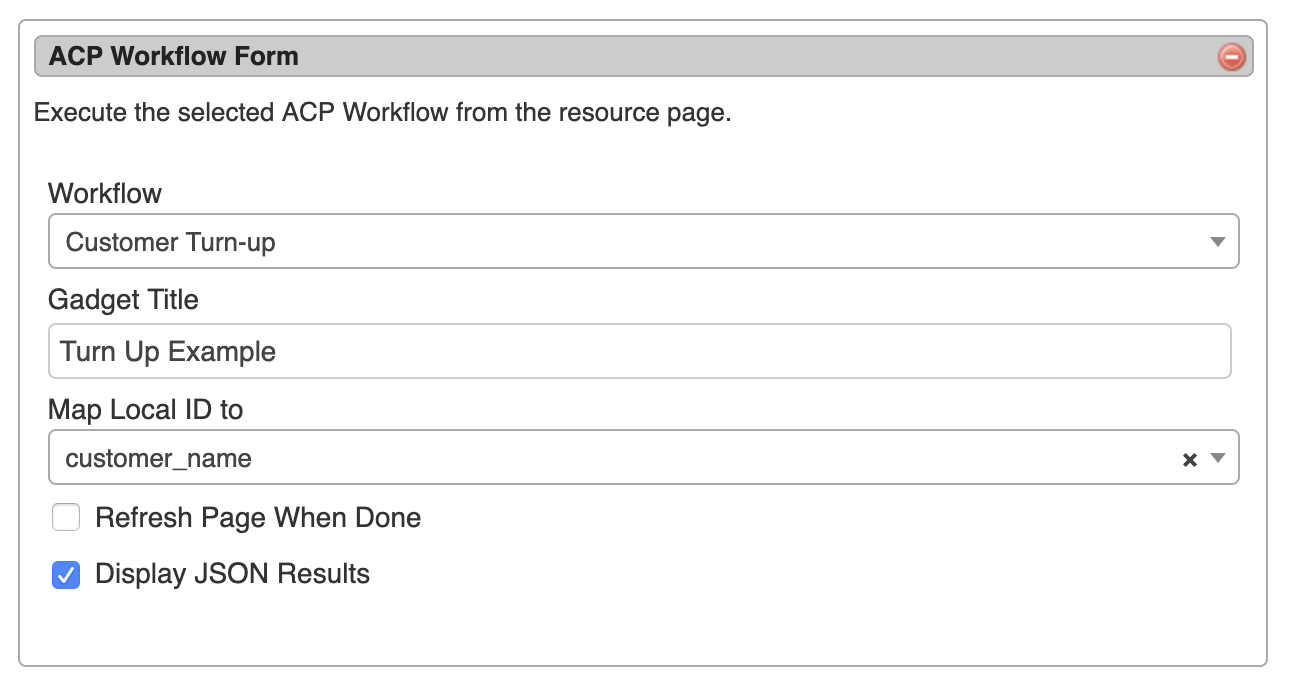
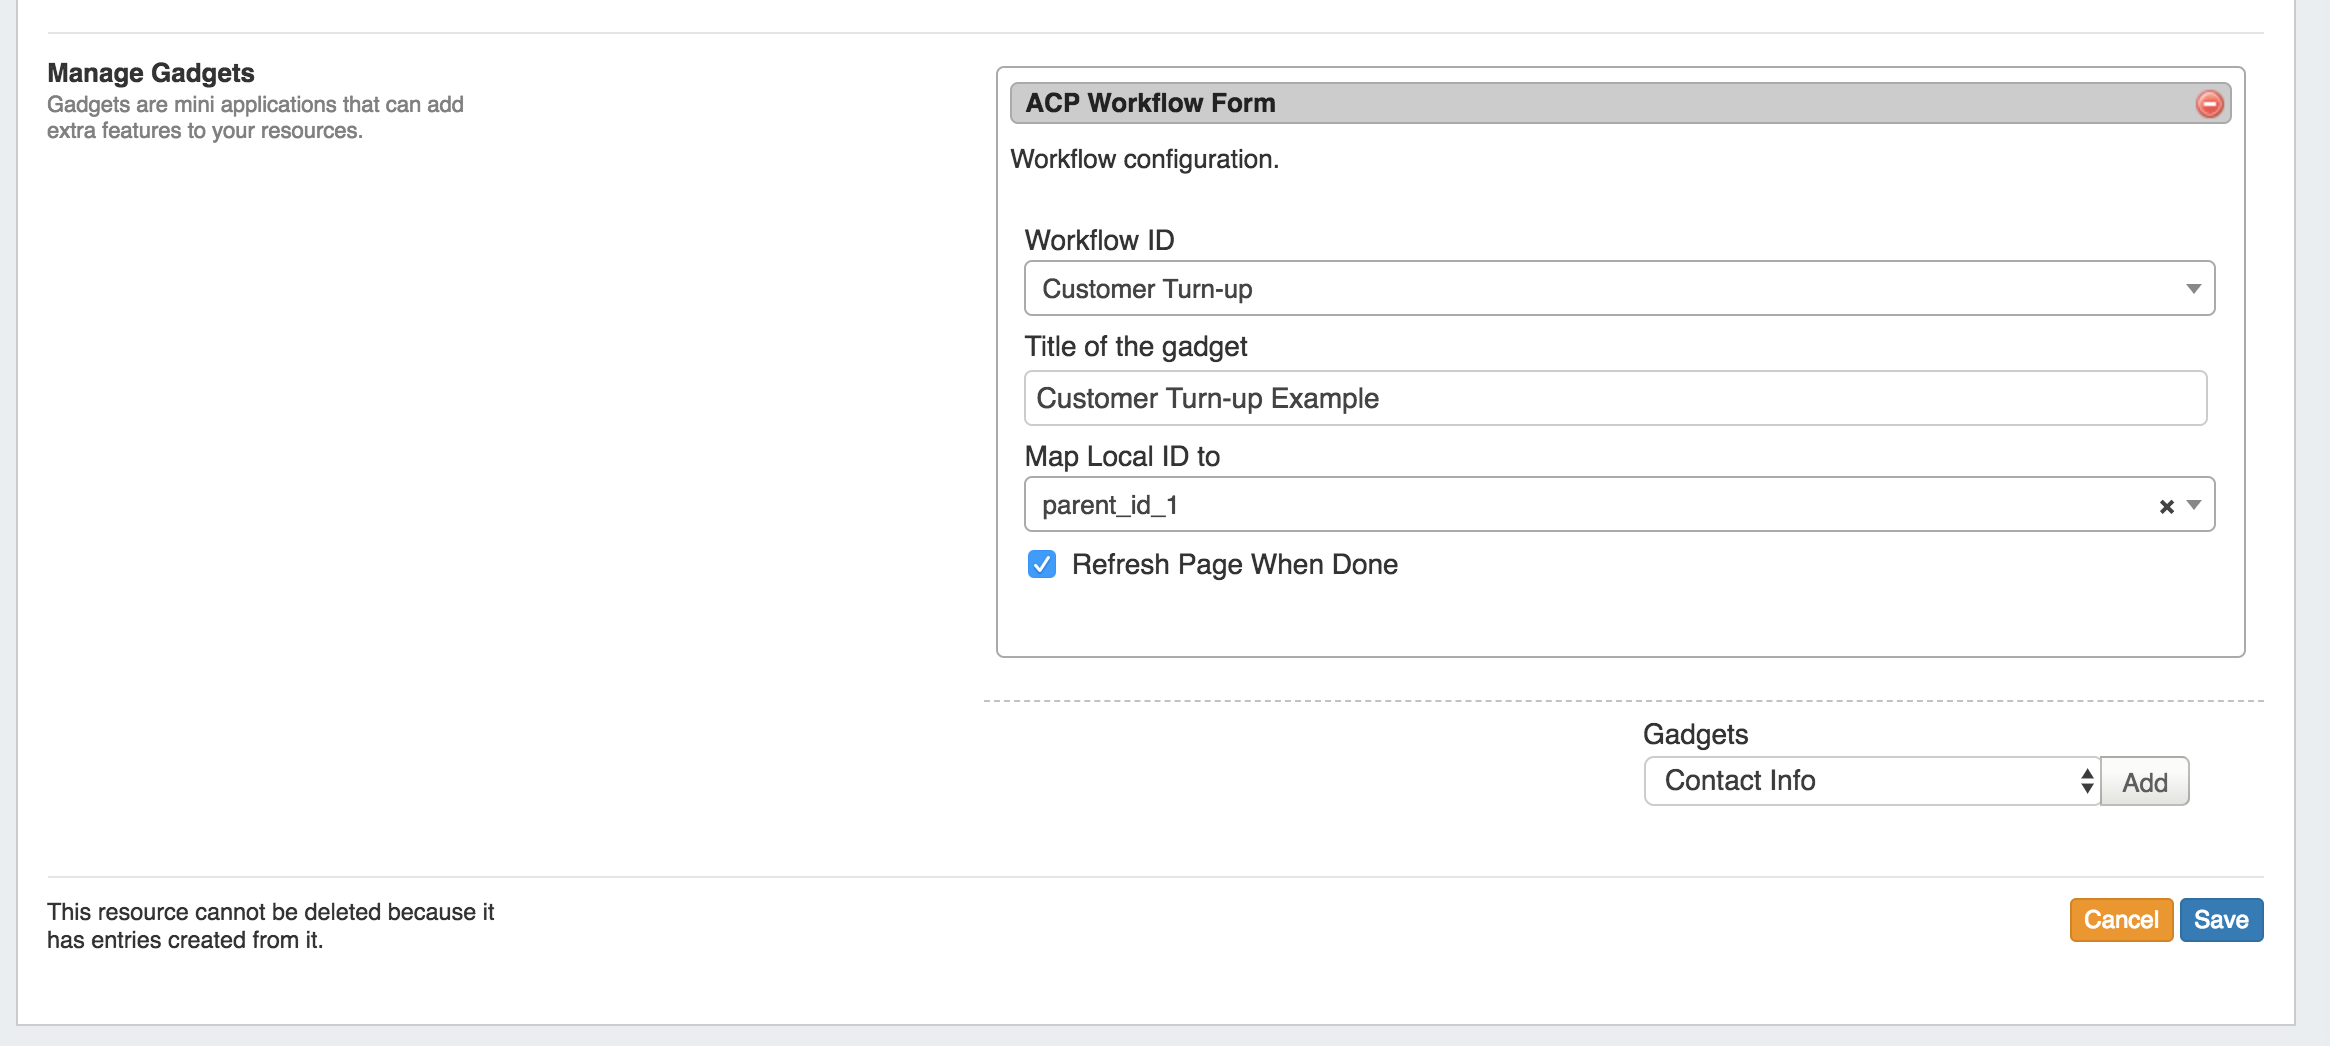
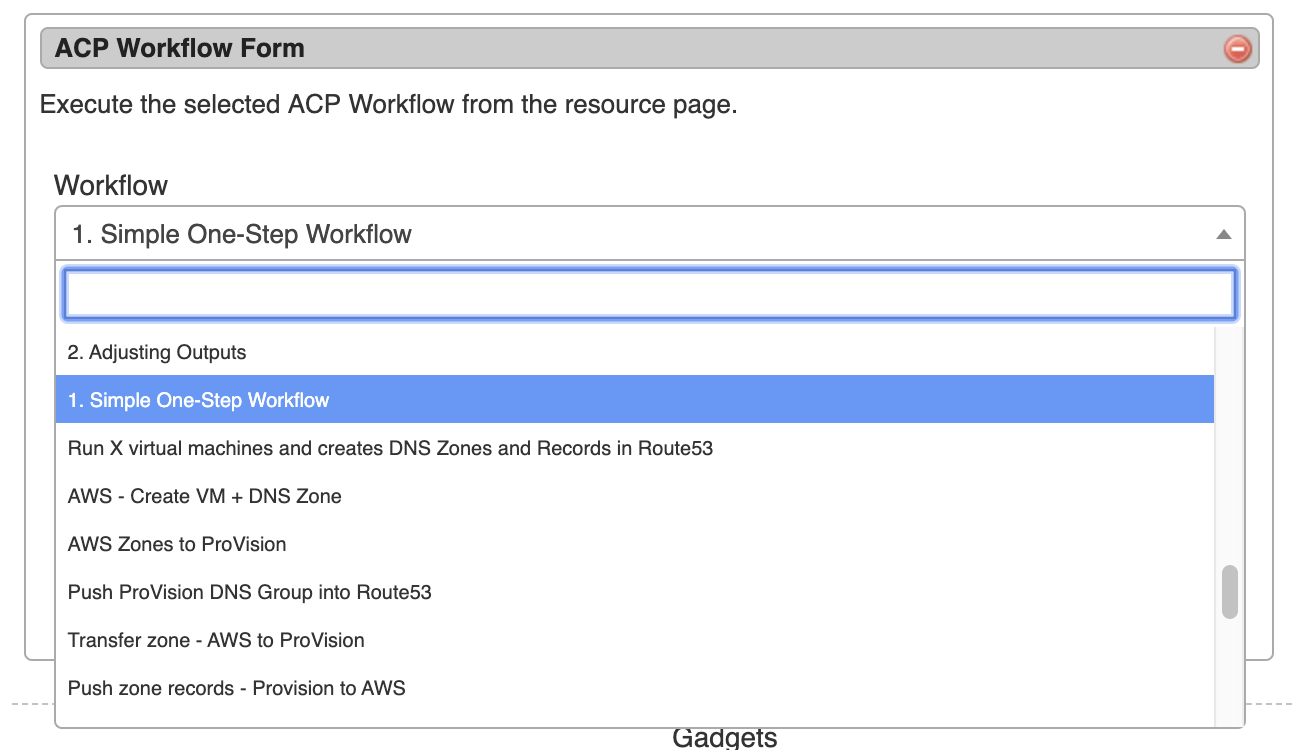
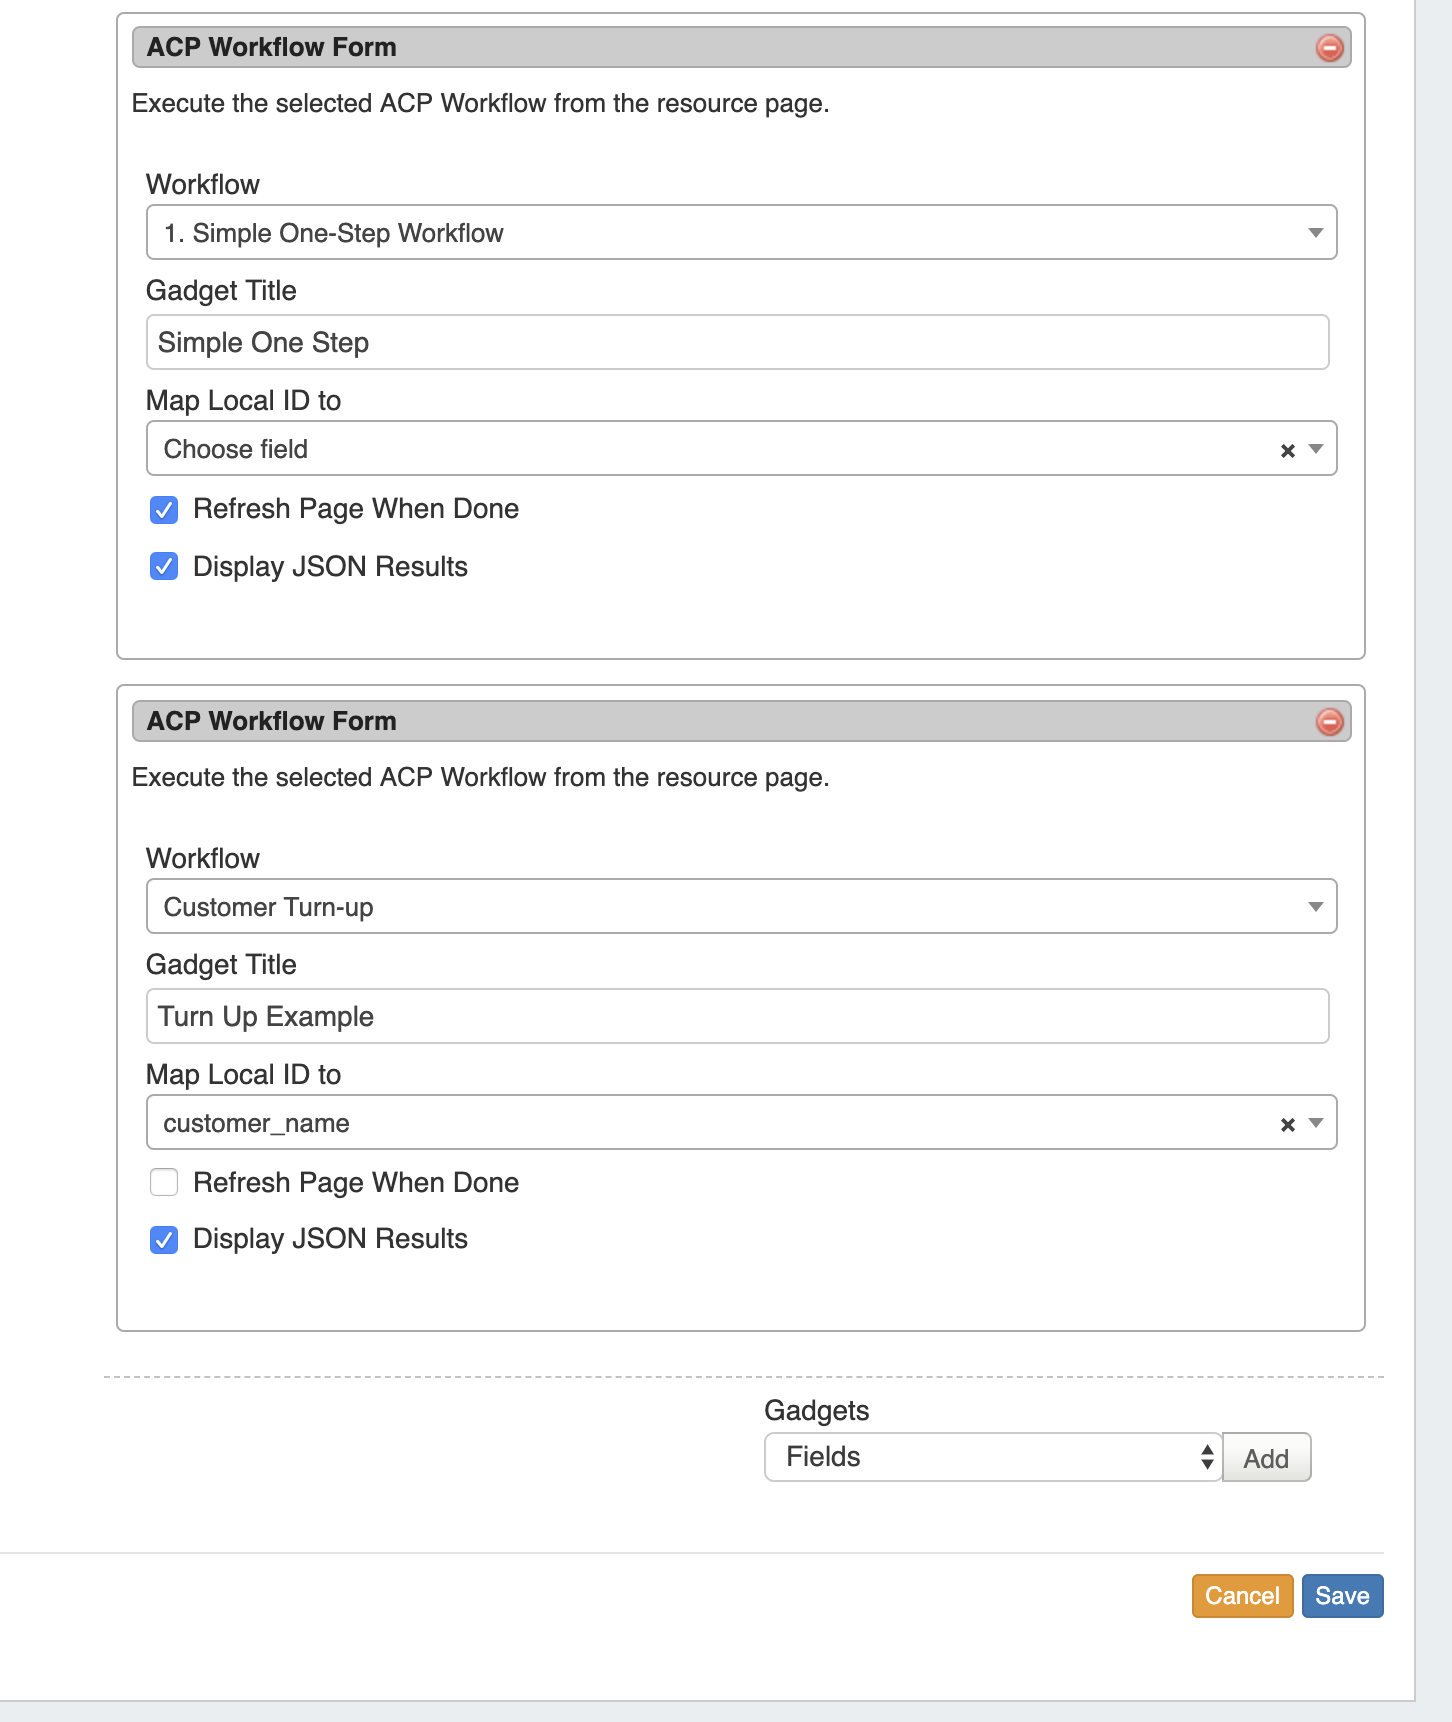
Setting up ACP Access in ProVision Before using the ACP Workflow Gadget, you must set the ACP URL and user credentials in Admin → Admin Preferences. 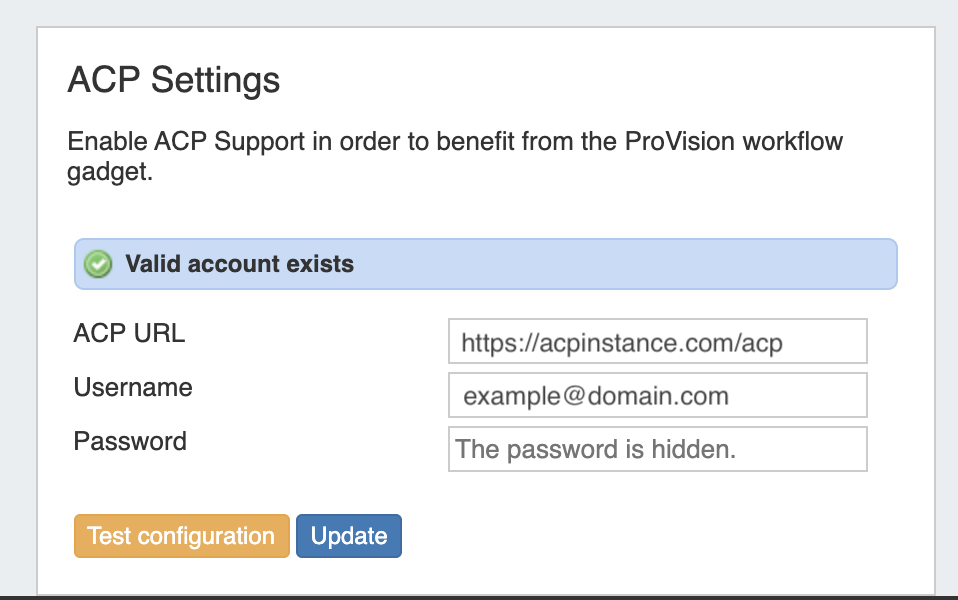 Enter the ACP URL for a licensed ACP instance, then provide the ACP Username and Password for the user that should be used to execute Workflows. To verify the account, click "Test Configuration" - you will be notified whether the account is valid. When done, click "Update". After setup, the ACP Workflows Gadget will load with the available Workflows from your ACP instance, and can be configured to select which Workflow and inputs you wish to use. Configuring the ACP Workflow Form The ACP Workflow form is access from the Edit Section page, under "Manage Gadgets". Once ACP settings have been added to Admin Preferences, the "ACP Workflow Form" Gadget can be added to a Section, and Workflows from the associated ACP instance will be available to select. containing fields to select the desired Workflow to Run, Title, and map input options.
Select a Workflow, then edit the title to display on the gadget and map input options. Input options will vary according to the selected Workflow. You may also choose to refresh the page once the workflow execution is complete, and/or show JSON results.
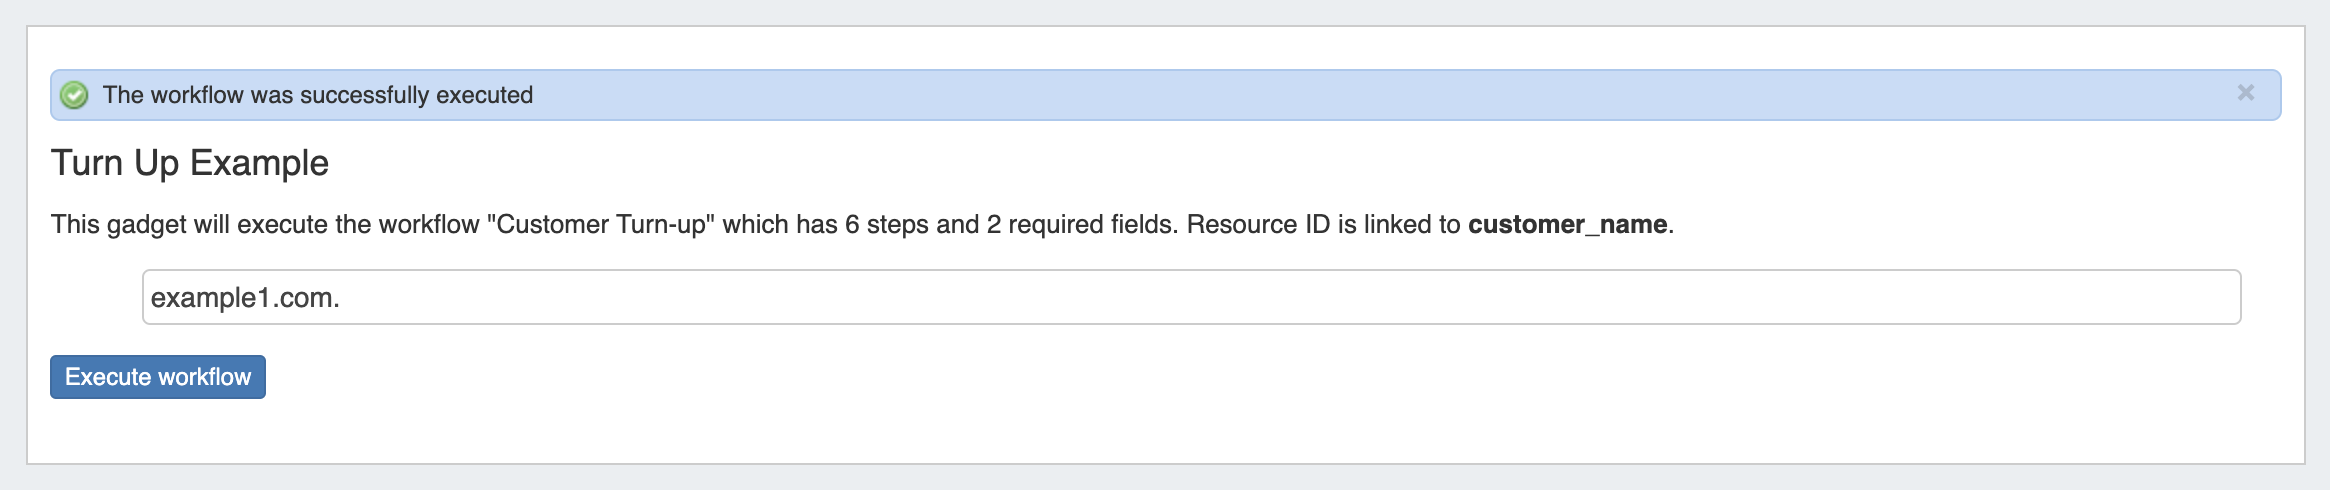
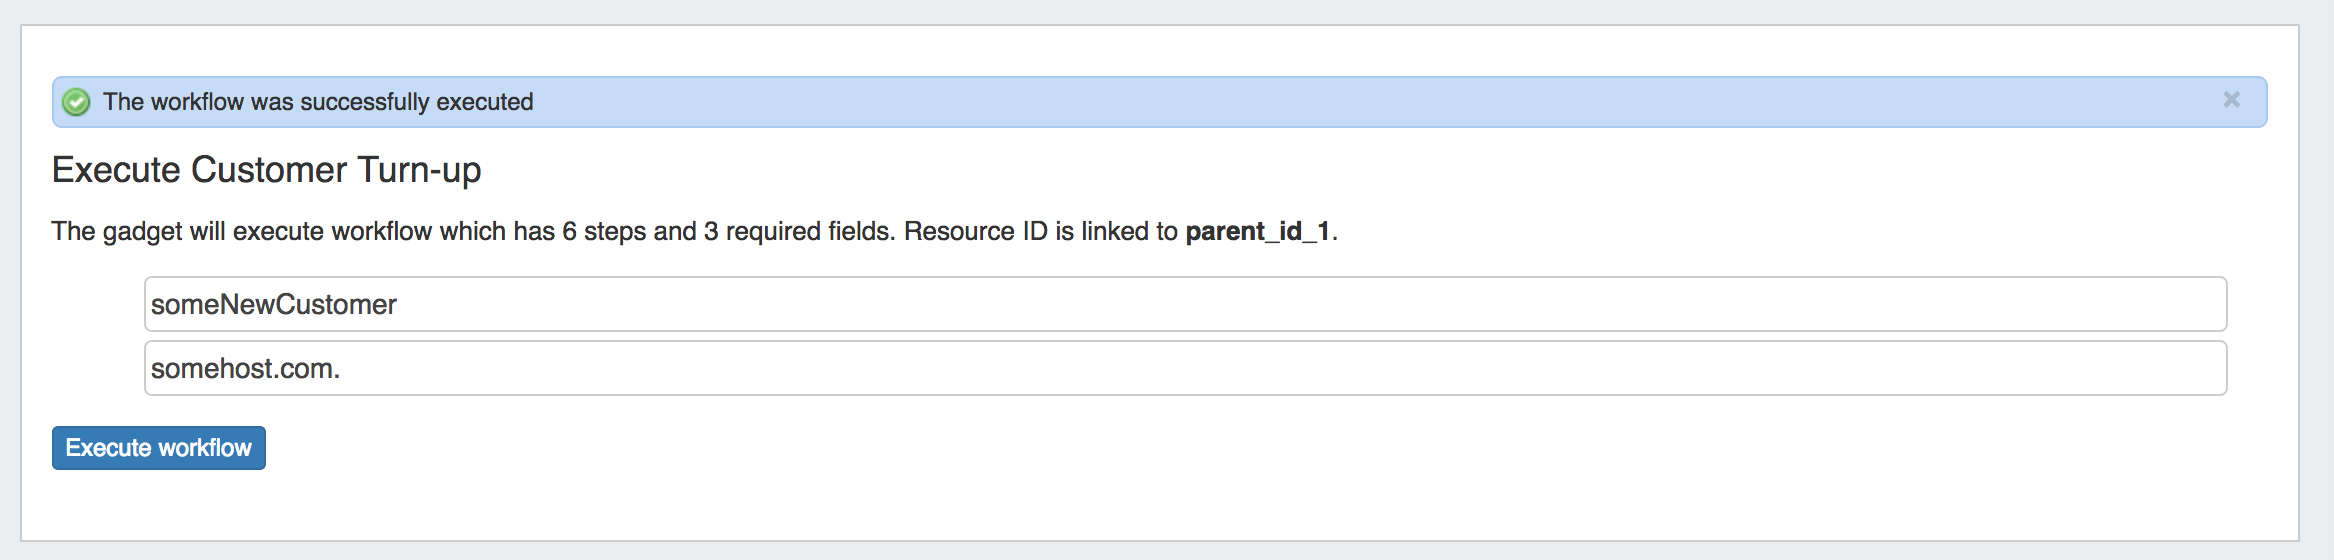
Multiple Forms may be added to a Section, in order to run additional Workflows or option settings. When complete, click "Save". Working with the ACP Workflow Form Once enabled, the Gadget will show on the resource page for any resource of the section type. Input the field data necessary for the Workflow - here, it's adding a hostname - then click "Execute Workflow" to process the chain of workflow calls.
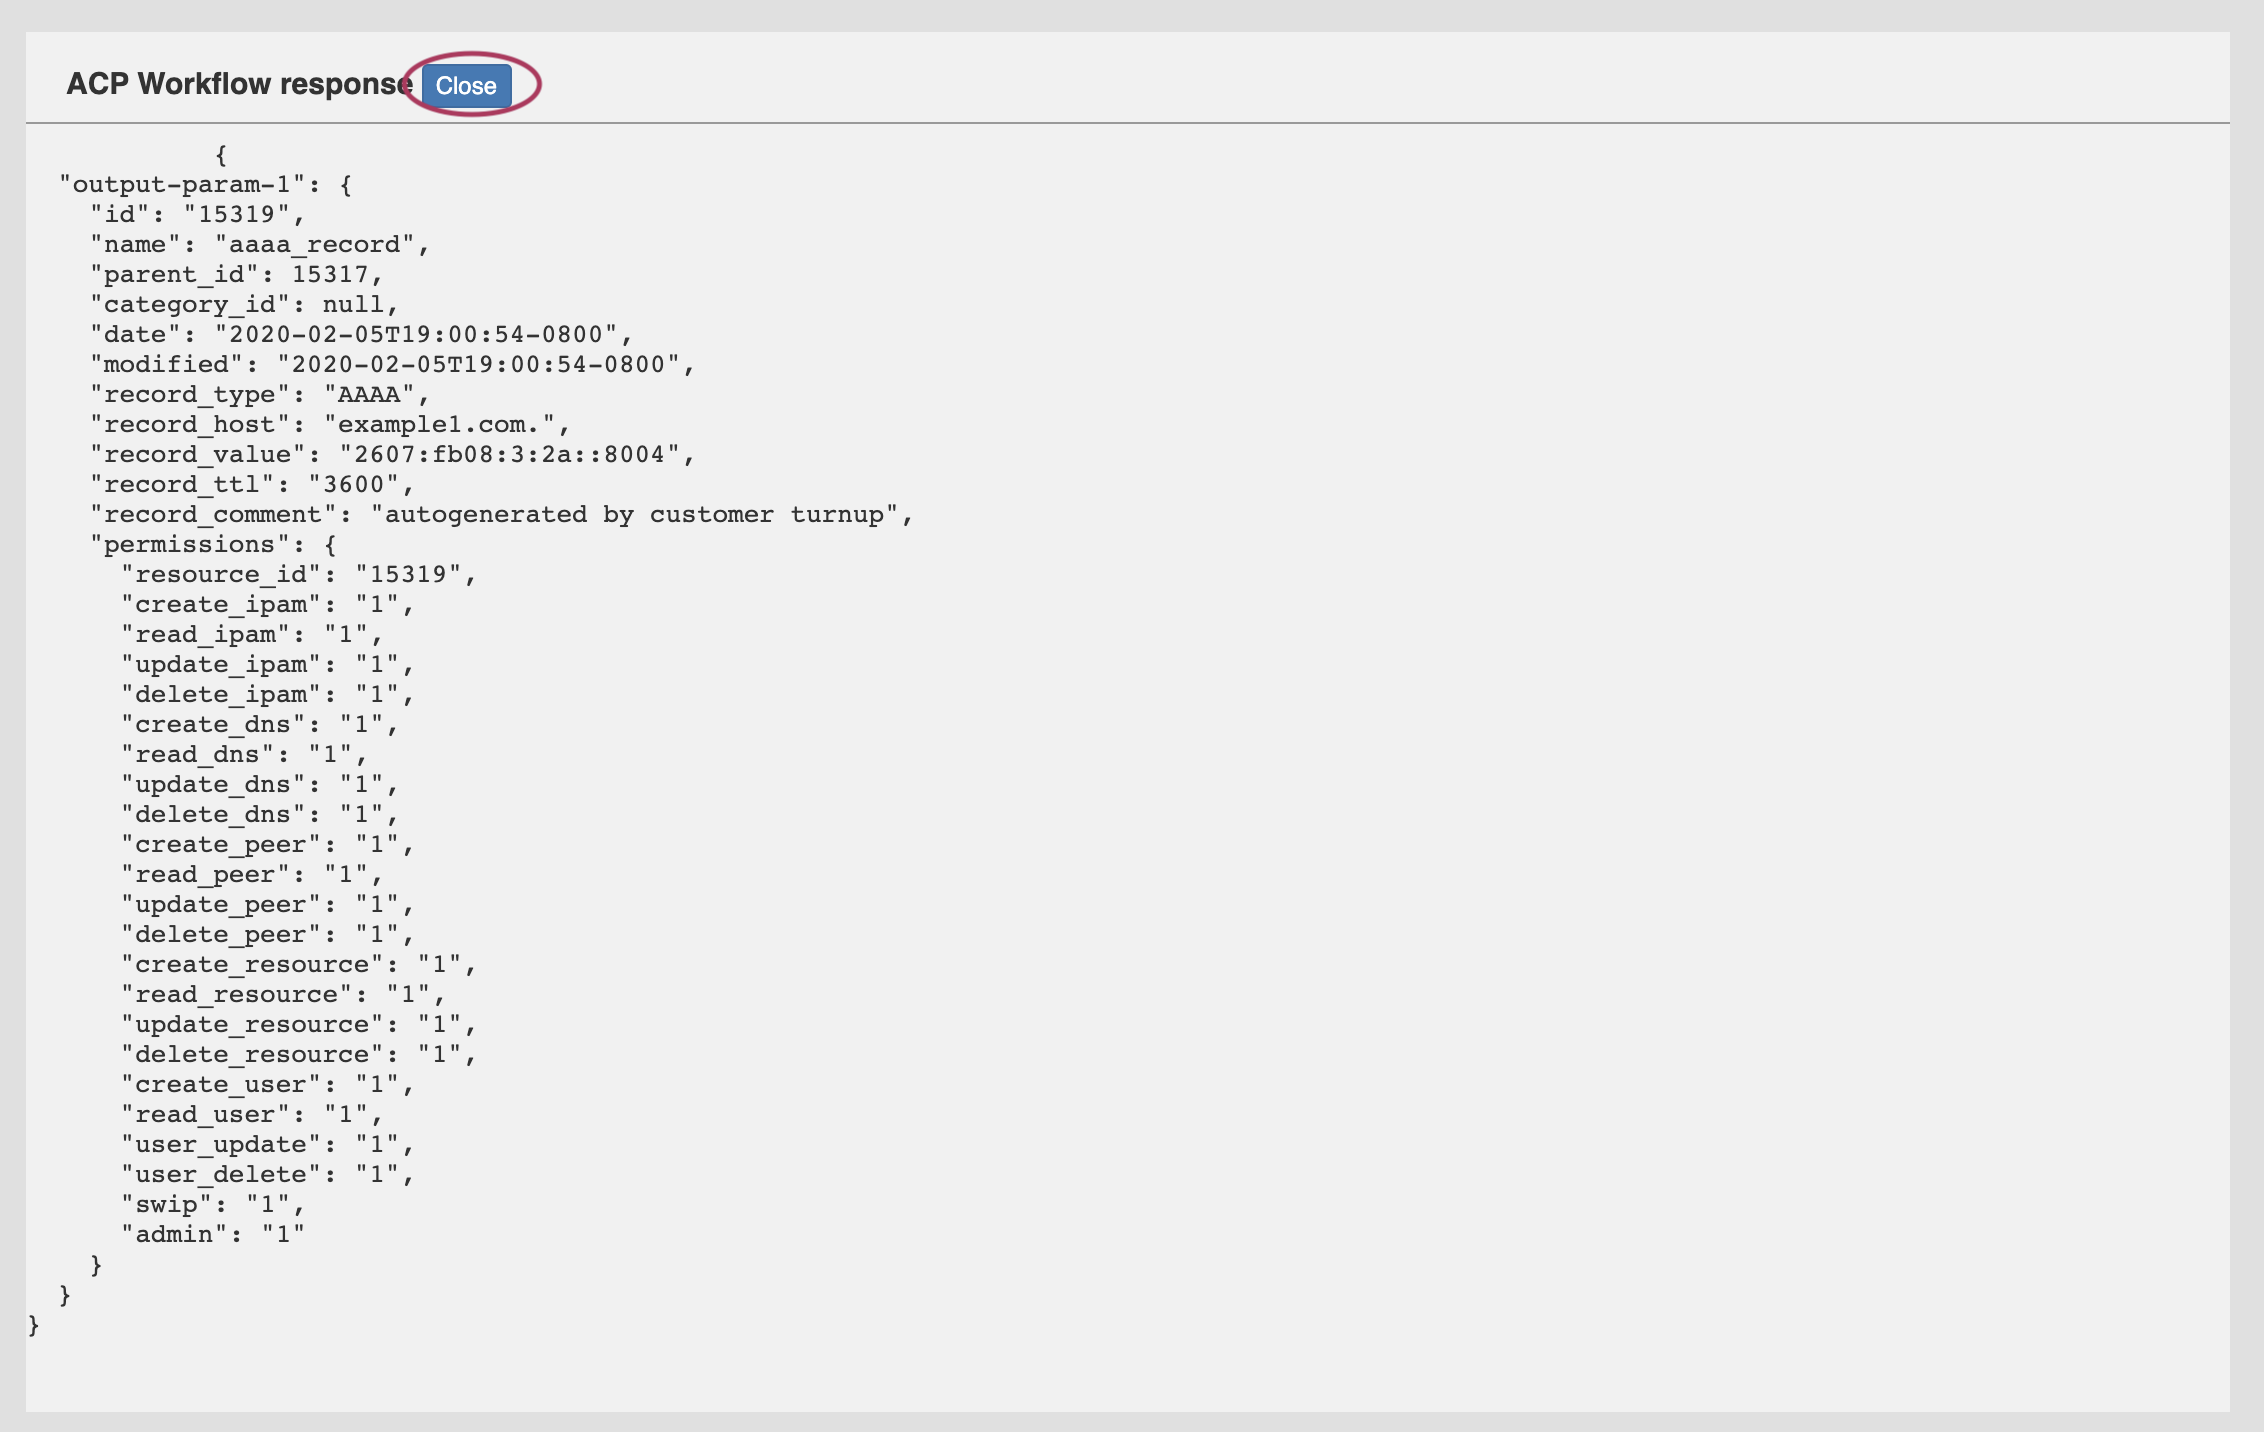
If "Display JSON Results" has been enabled, a display modal will appear showing the JSON response of the executed workflow.
When done reviewing the response, click "Close". If the page has not refreshed, you will see a message informing you whether the Workflow has successfully executed.
In this example, a "Customer Turn-Up" Workflow was selected (created in ProVision's ACP product) that performed six functions with one button click. The successful "Execute" for "Customer Turn-Up" created a new customer resource entry, assigned IPv4 and IPv6 blocks to them, created a DNS zone for the hostname, and lastly created 'A' and 'AAAA' records for the zone. |

Contact Info
This Gadget is used on the Resource Holder Section type. In the Contact Info Gadget, you can track information such as mailing / billing addresses, phone number, and fax number for that Resource.
Contacts
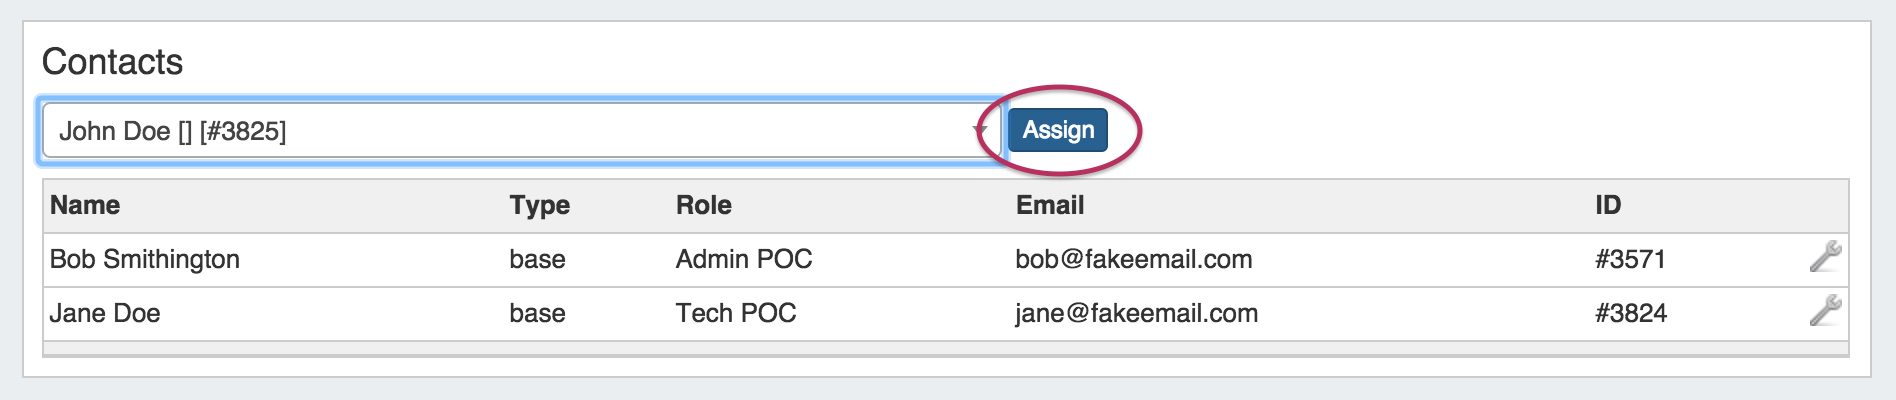
The Contacts Gadget may be used on any Section type to assign a contact (from the Contact Manager) to a Resource.
To assign a contact, search for and select the desired contact in the search box, then click "Assign". The Contact will show in the list below.
| Expand | |||||
|---|---|---|---|---|---|
| |||||
Contacts Action Menu: The Action Menu (wrench icon) in the contacts gadget has three options: Set Role: Opens a dialog box to select a role to assign to the contact, add a new role, or delete an existing role.
Unassign: Unassigns the contact from the resource View: Redirects to the contact's detail page in the Contact Manager Refer to the Contact Manager page in the documentation for more detail on working with the Contacts gadget and the Contact Manager.
|
DHCP Server Management (Legacy)
| Info |
|---|
The DHCP Server Management Gadget has functionally been replaced by the DHCP Tab updates in version 7.0.0. Although the DHCP Management Gadget may still be used, we recommended checking out the DHCP Groups, DHCP Servers, and DHCP Pools pages instead for an improved user experience. |
The DHCP Server Management Gadget should be used with the "Server" Section.
When initally added to the section, it will show in the "Off" configuration:
| Expand | ||
|---|---|---|
| ||
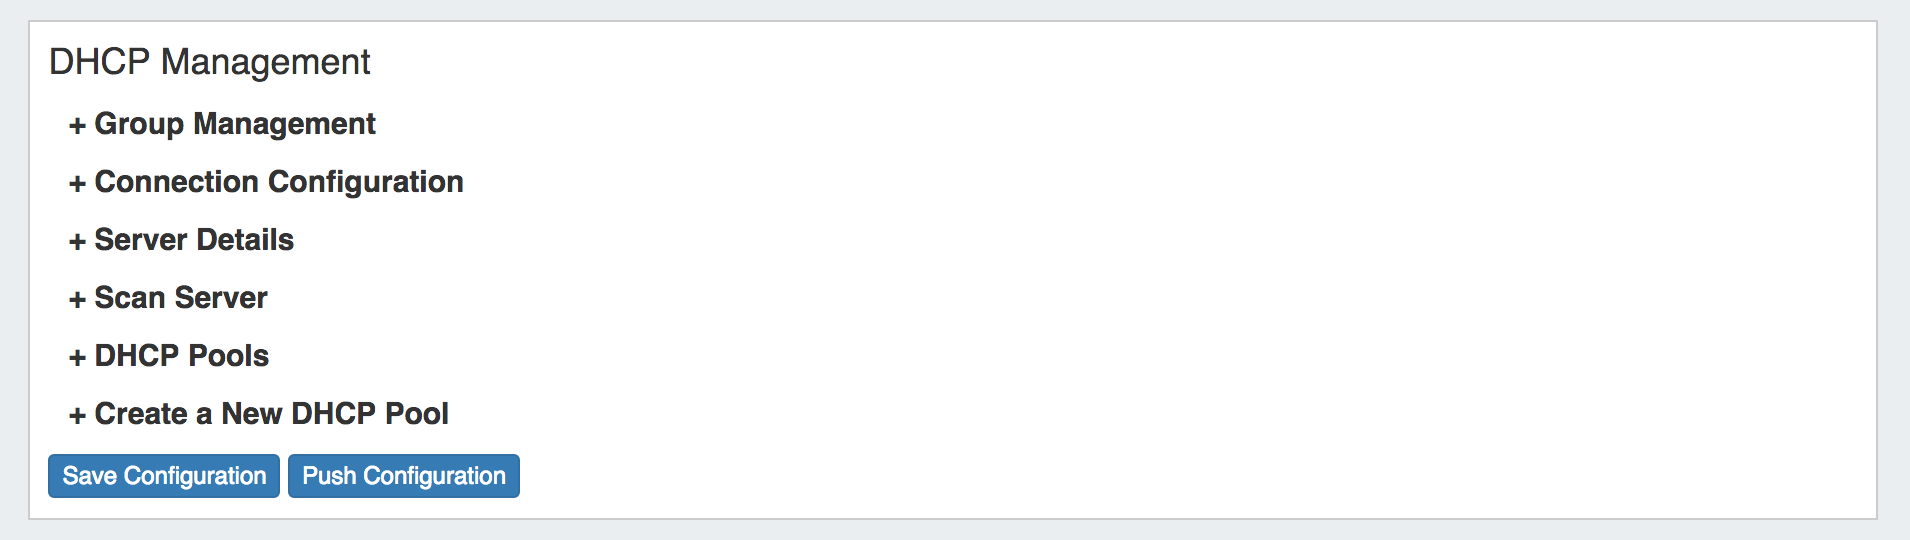
To enable the DHCP Management Gadget, select the "On" radio button next to "DHCP Services", and click the "Update" Button. The DHCP Management Gadget in the "On" configuration:
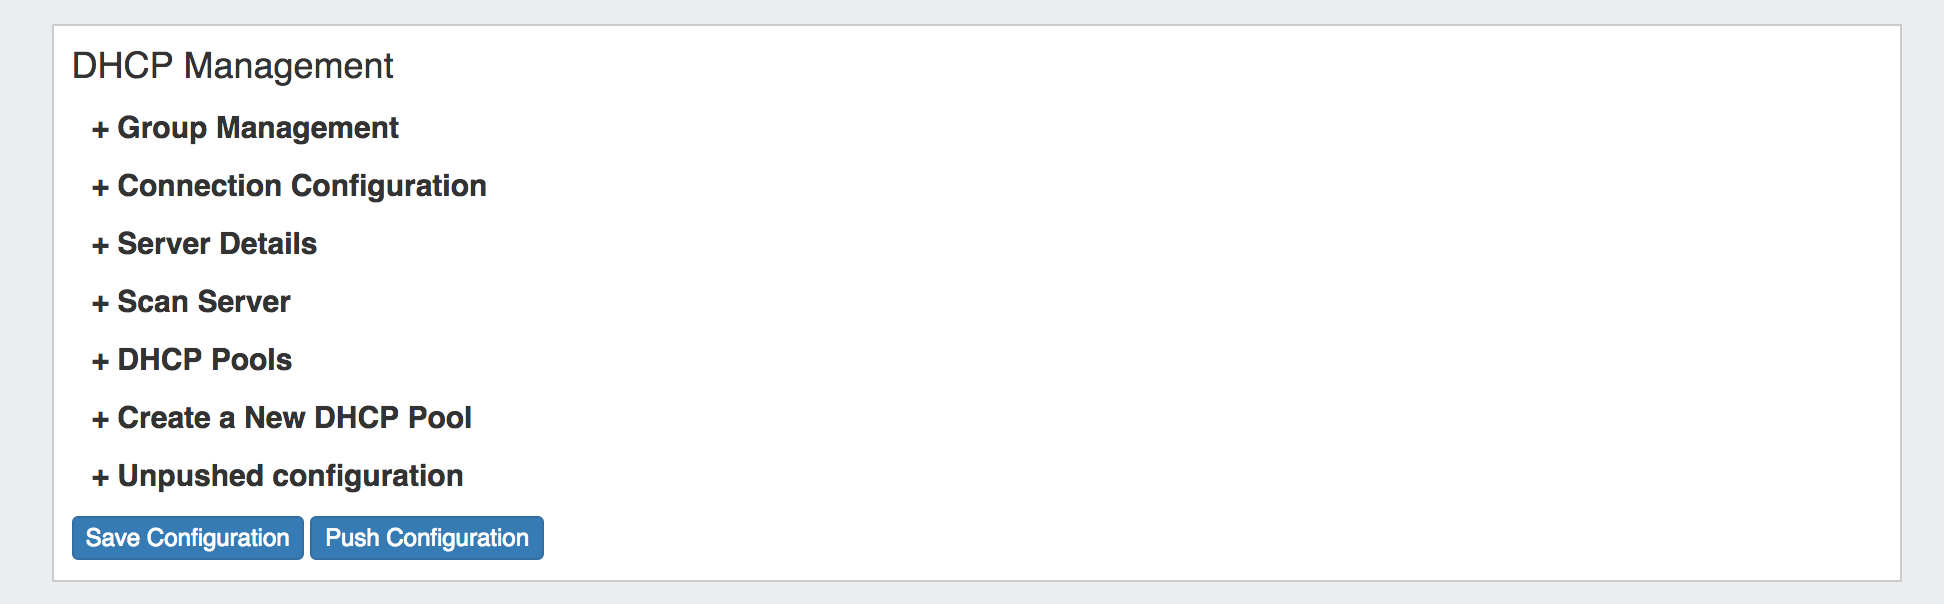
Each of the sections in the DHCP Management Gadget - Group Management, Connection Configuration, Server Details, Scan Server, DHCP Pools, and Create a New DHCP Pool - may be expanded to change settings in each area. Additional sections may appear in the Gadget once unpushed or pushed configurations are saved:
For detailed information on working with the DHCP Management Gadget, see DHCP Tab - Managing DHCP Server Configurations. |
DHCP Customer Configuration
The DHCP Customer Configuration Gadget allows users to assign IP aggregates to the DHCP server pools and generates DHCP Server Configuration changes depending on the tag(s) and DHCP options selected.
These configurations are then sent to the associated DHCP server Management Gadget as "Unpushed Configurations", where they may be held until a manual or schedule push occurs.
| Expand | ||
|---|---|---|
| ||
Before You Begin Before using the DHCP Customer Configuration Gadget, the following should be set up in ProVision:
Associate with DHCP Server Once the Gadget is enabled, the first step is to associate it with an already-created DHCP server in ProVision. Select the DHCP Server to link to, and click "Continue".
Assign IP's Next, Assign IP's for Pools from DHCP Aggregates. You may Direct Assign, Smart Assign, or assign from Smart Browse based on the selected criteria. Once assigned, a Pool Name will be automatically generated under "Resource". Pools may be unassigned by clicking the "Unassign" button.
Set up Configuration Once IP's have been assigned, the "Configuration" tab will appear. Click on the tab, and then select or deselect the DNS Server associated with the Customer, add Option 82 Elements, Add Circuit ID text, and add notes if desired. Use the "Preview" field to confirm the accuracy of the data, and select the status as "Activate" or "Terminate". When done, click "Update Configuration". The configuration will be sent to the associated DHCP server's DHCP Management Gadget.
Reviewing and Pushing Configuration Updates When a configuration has been saved from the DHCP Customer Configuration Gadget, it will appear as an "Unpushed Configuration" in the DHCP Management Gadget for the DHCP Server. If you expand that option, you will see the config elements highlighted – red are config elements that will be deleted, green are config elements that will be added.
At this point, an Admin user may manually push the updated configuration, or use a scheduled DHCP push task to automate the pushes. |
DNS
This gadget is used on the Resource Holder Section type. The DNS Gadget shows zones that have the current Resource Holder set as their parent, and provides links to the zone's View Zone page.

To go to the View Zone page, you may either click on the zone name, or click on the Action Menu (wrench icon) and select "View Zone".
For more information on DNS functions and managing zones, refer to the documentation for the DNS Tab.
DNS Autogenerator
The DNS Autogenerator Gadget uses the Hostname field (6c-hostname-fqdn) of the Resource to generate a list of DNS forward and reverse zone entries based on the blocks assigned to the Resource in the IPAM Gadget It will generate a list of potential zone records - just select the ones you want to create, save the changes and you are ready to push the zones.
| Expand | ||
|---|---|---|
| ||
Enabling the DNS Autogenerator To set up this Gadget, ensure that the Section of the Resource (typically, "Resource Holder" ), has the "Hostname" field (6c-hostname-fqdn) and the DNS Autogenerator Gadget added to the Section. (See: Customizing Sections and Customizing Fields). Then, check that the Resource itself has information entered into the "Hostname" field. If the field is already filled out, it will show in the "Fields" information area at the bottom of the Resource Entry page. To add or edit the hostname, click "Edit" at the bottom of the resource entry page, add the information to the Hostname field, and click "Save".
Once a hostname has been associated with a Resource, and the page refreshed, the DNS Autogenerator Gadget will be visible. |
| Expand | ||
|---|---|---|
| ||
Before you Begin Before starting, check that the blocks assigned to the Resource in the IPAM Gadget are correct and up-to-date - the Autogenerator uses these blocks to create the records. If using a DNS Group other than "Default" to hold zones, ensure that the desired DNS Group to hold the generated records has been set up. (See: Working with DNS Groups). Working with the DNS Autogenerator One enabled and visible, the DNS Autogenerator Gadget will initially show a short description, the hostname, and a button to "Autogenerate Records".
When ready, click the "Autogenerate Records" button. The Gadget will search through the blocks in the IPAM gadget and provide a list of found blocks.
Add Subdomain / DNS Group Next, add in a subdomain if desired (optional), and select the DNS Group to hold the records (required). Click on the listed blocks to select (highlighted green) or deselect (grey) for DNS zone / record creation.
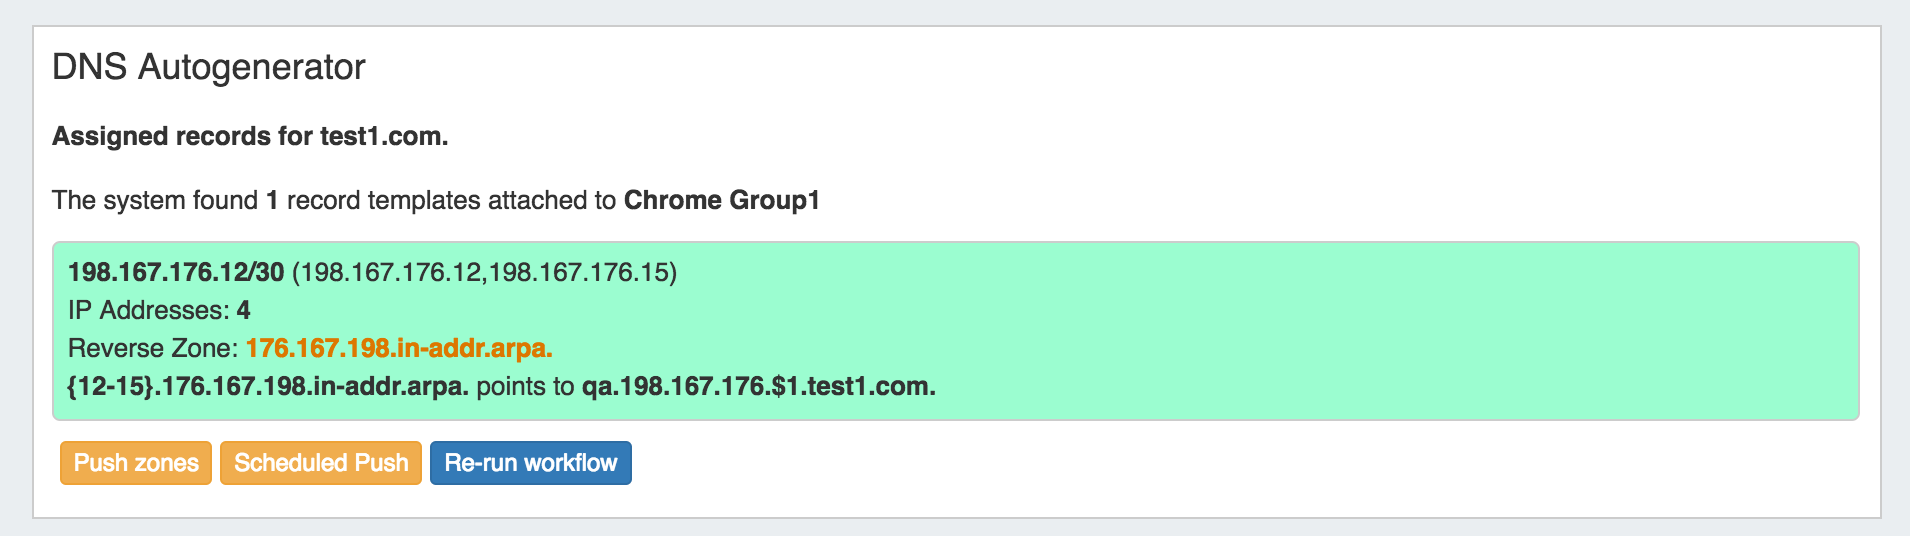
Save and Push Finally, hit the "Save" button at the bottom of the gadget - the selected forward and reverse DNS records will be created and added into the DNS Group, viewable in the DNS Tab.
At this point, you may choose to immediately push the autogenerated zone(s), schedule a push, or re-run the workflow to edit the subdomain or group.
|
Document Storage
The Document Storage gadget allows you to upload documents to a resource, and have those documents accessible to download from the 6connect cloud to your local machine. It may be enabled on any Section type.
| Expand | ||
|---|---|---|
| ||
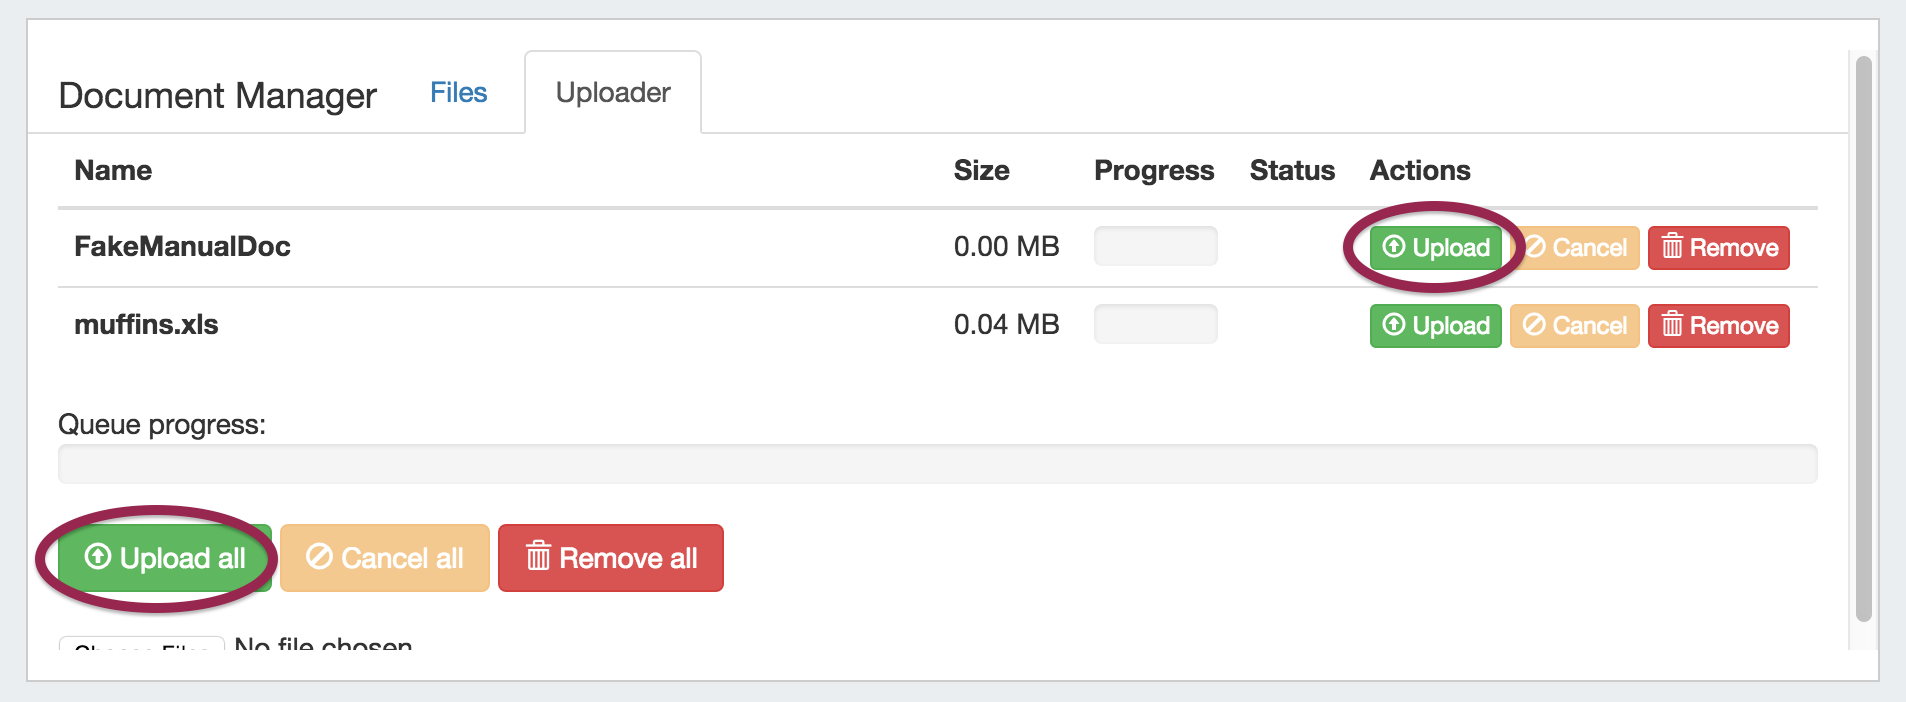
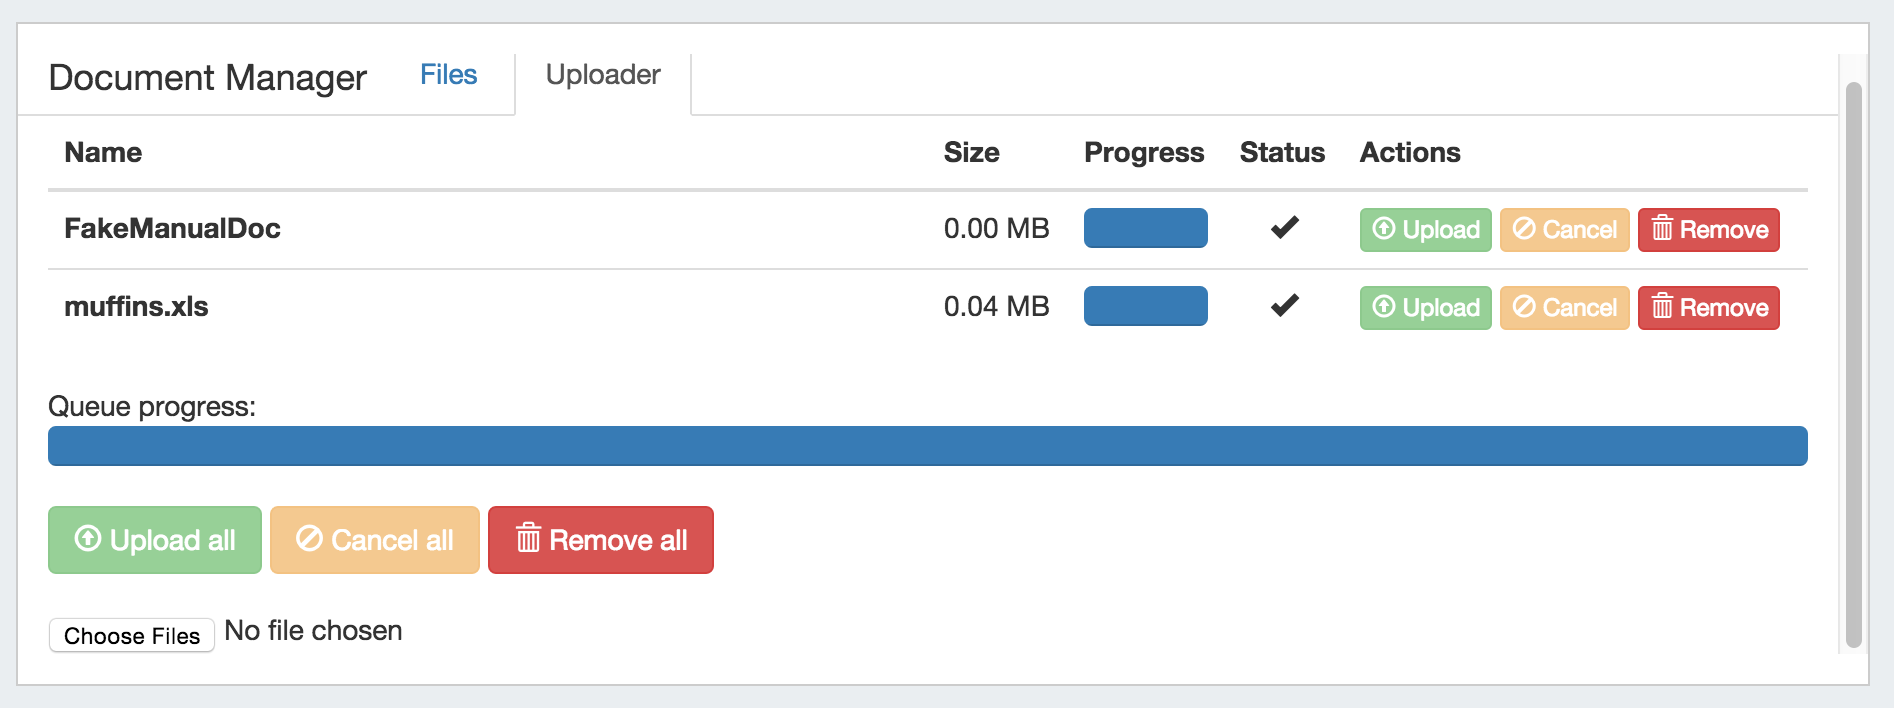
Upload Files First, ensure the Document Storage gadget is enable for the Section type. Then, select the "Uploader" tab under the Document Manager gadget. Click on the "Choose Files" button, and select the file(s) you would like to upload.
The selected files will show in a list under the Uploader tab. To upload the file(s), click on either the "Upload" button adjacent to the file to upload the individual file, or the "Upload All" button to upload all files listed. You may also choose to remove files from the upload list, or cancel.
Once the progress bar is filled in, your upload is complete! Your files will show under the "Files" tab.
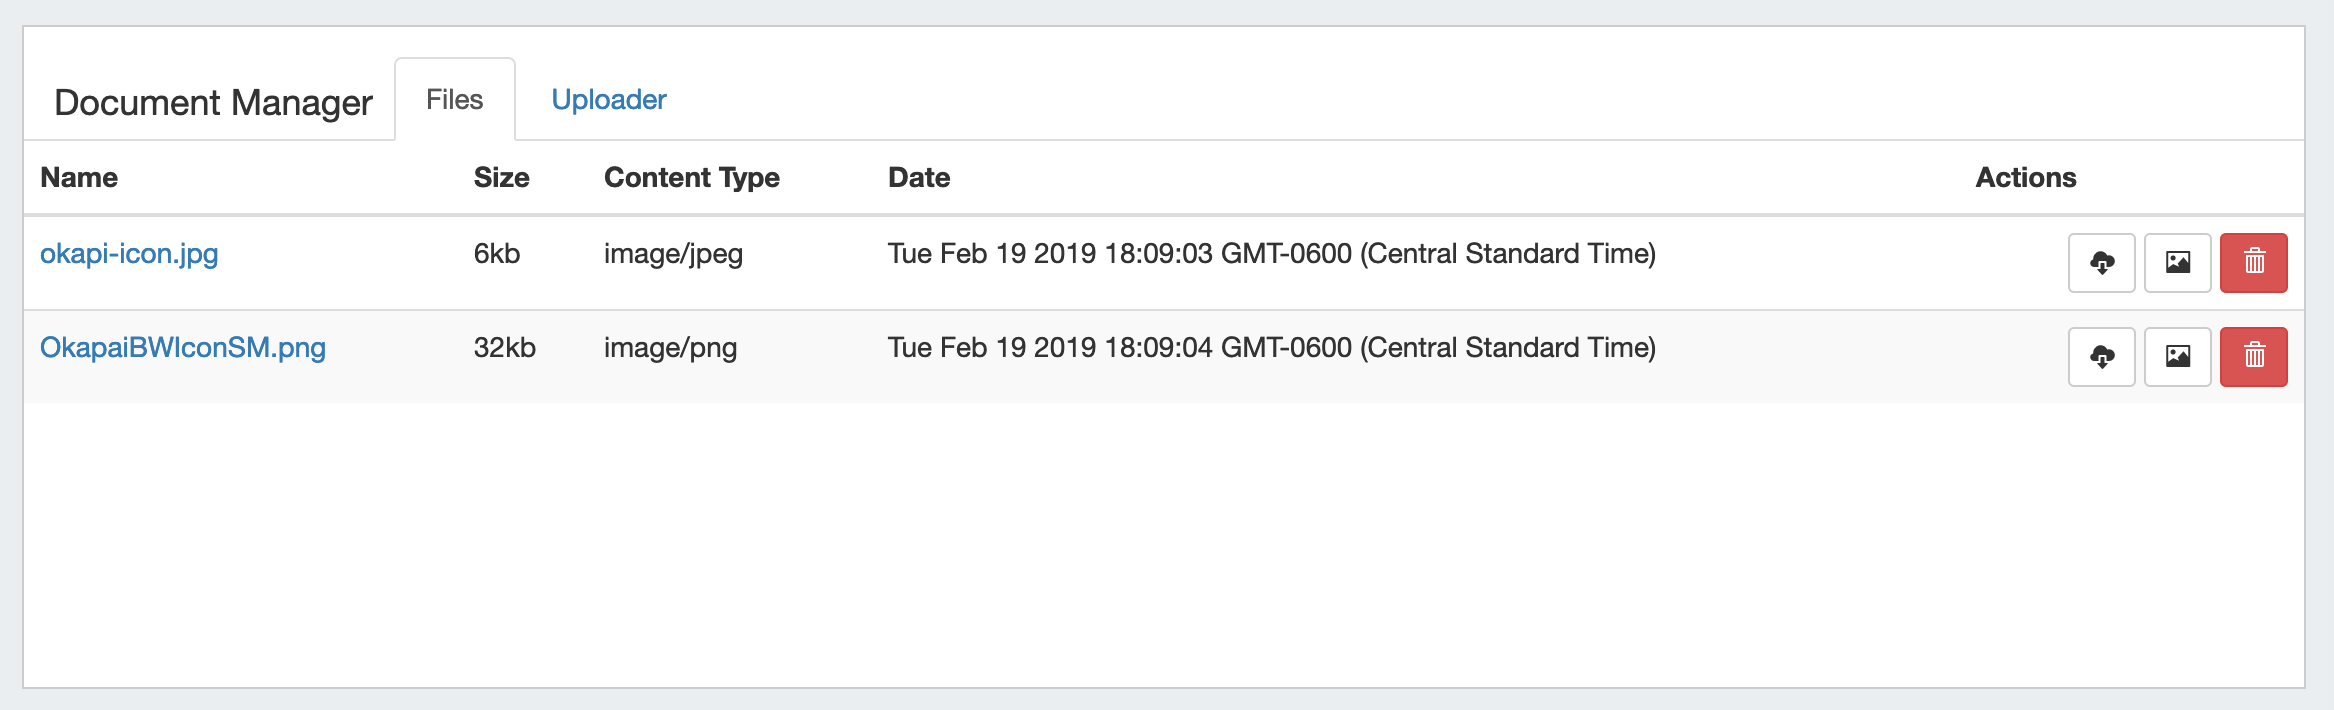
Download Available Files Successfully uploaded files are listed under the "Files" tab of the Document Manager gadget. From here, you can see the file Name, Size, Type, Date, and available Actions. To download a file to your local machine, ensure you are on the "Files" tab, then click on the "Download from Cloud" icon.
If a file is no longer needed, you may delete the file from the Document Manager by clicking on the Delete (trash can) icon. |

| Info |
|---|
| Note: The uploader has a file size limit of 14mb, files above this size will not successfully upload. |
Field Gadget
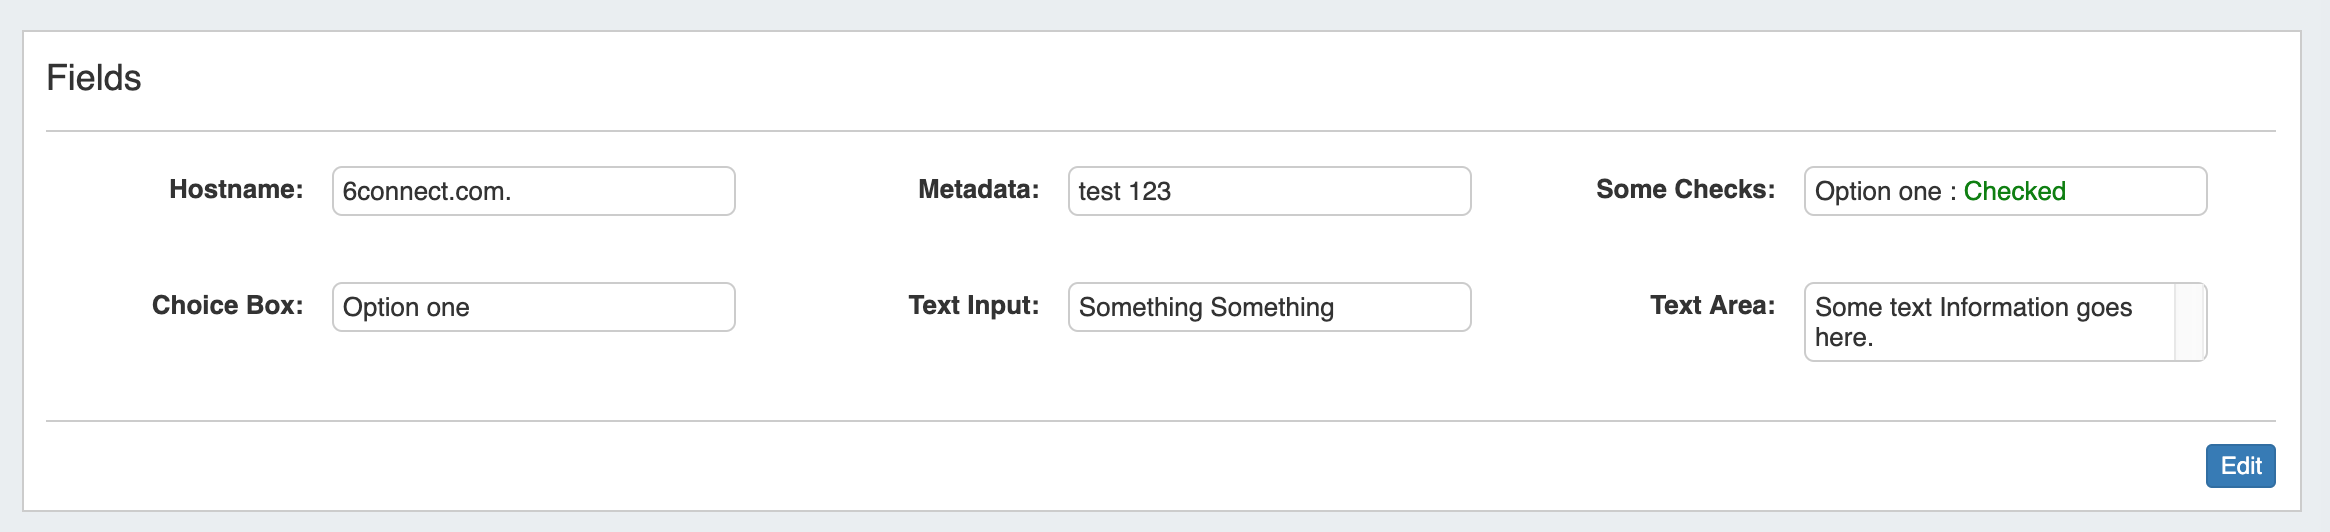
The Field Gadget displays the information fields available for the Section and specific Resource that is being viewed.
Users may add enabled fields to the resource, edit field values, and remove fields from the Resource through this Gadget. Field values in this Gadget (such as Hostname, Username, and Password, among others) may also be used by other Resource Gadgets and Provision modules.
Before You Begin
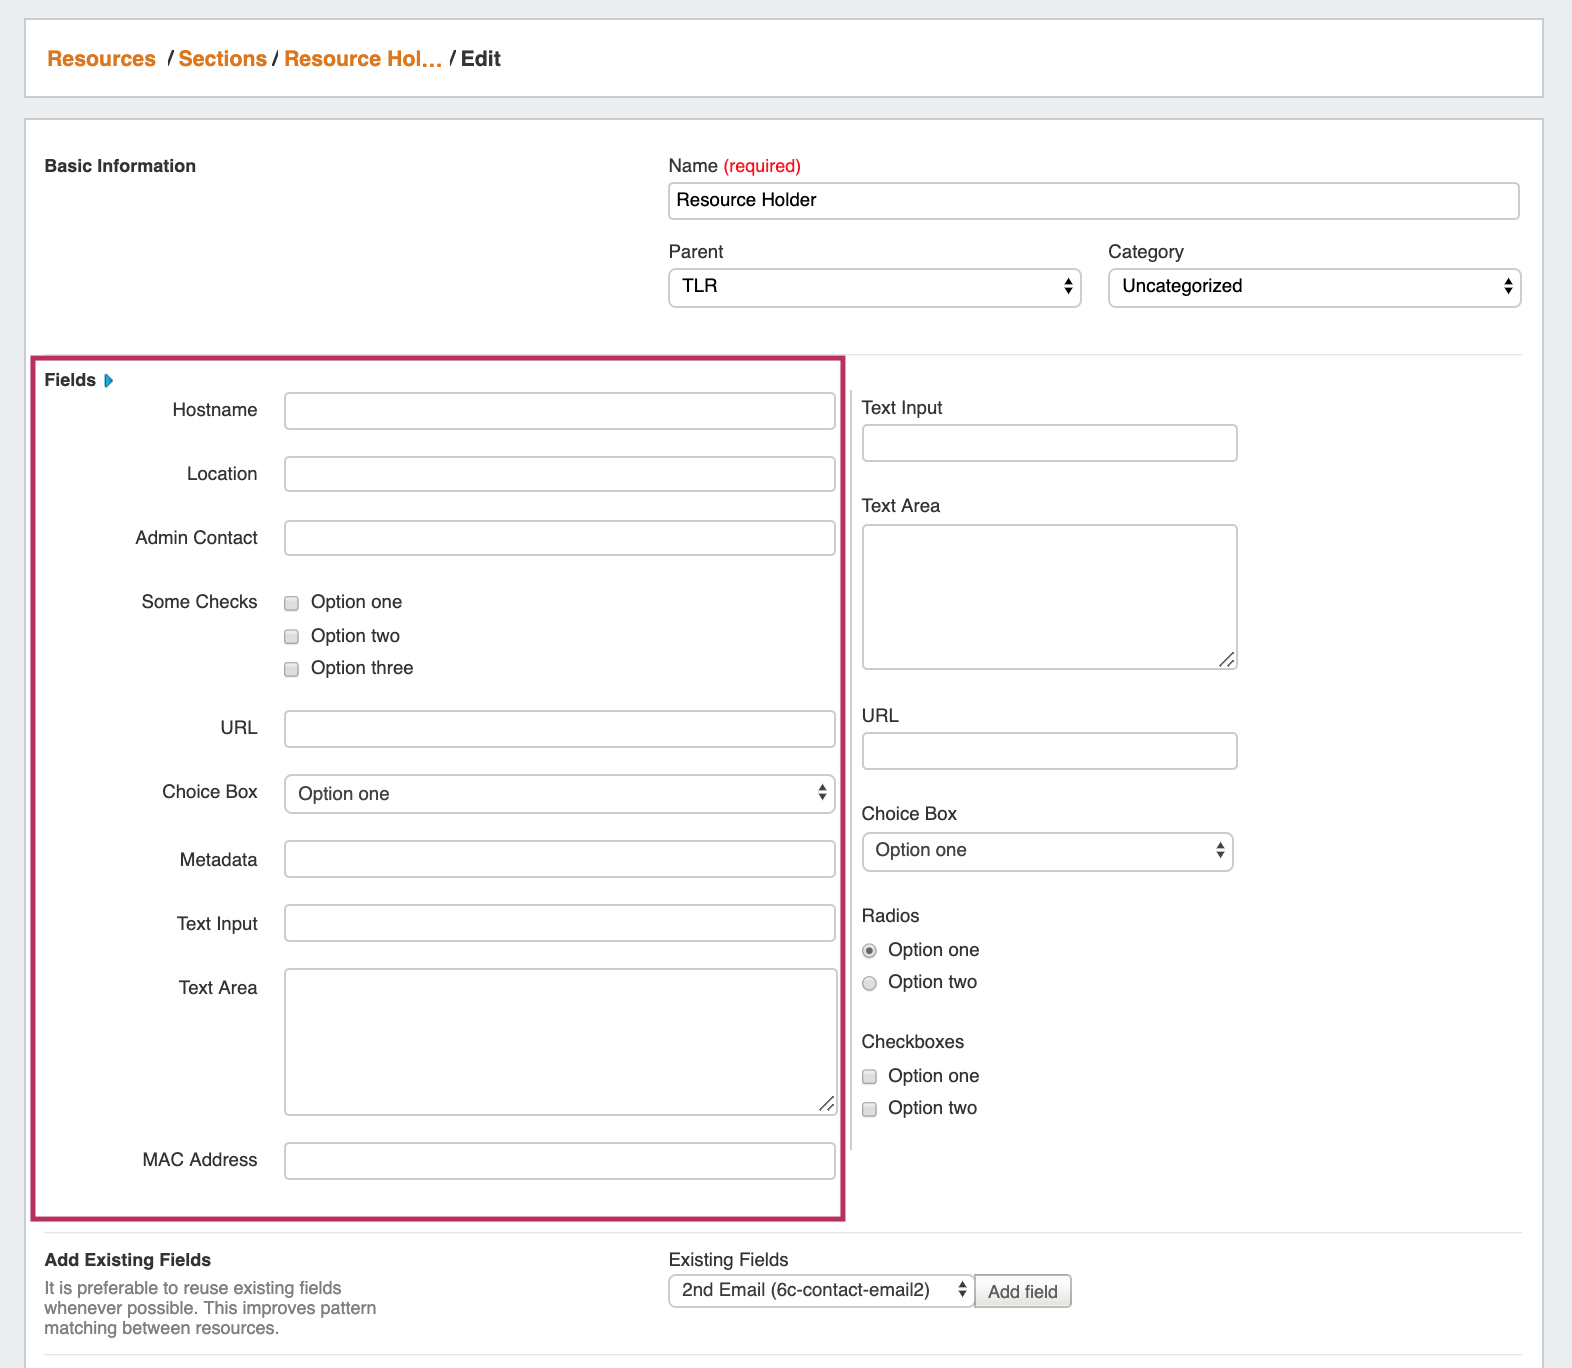
Fields must be enabled and added to the Resource's Section before they can be used in the Field Gadget.
Fields enabled in a Section (pictured below) will be available to add to the Field Gadget for any Resource of that Section.
| Expand | ||
|---|---|---|
| ||
 |
Working with the Field Gadget
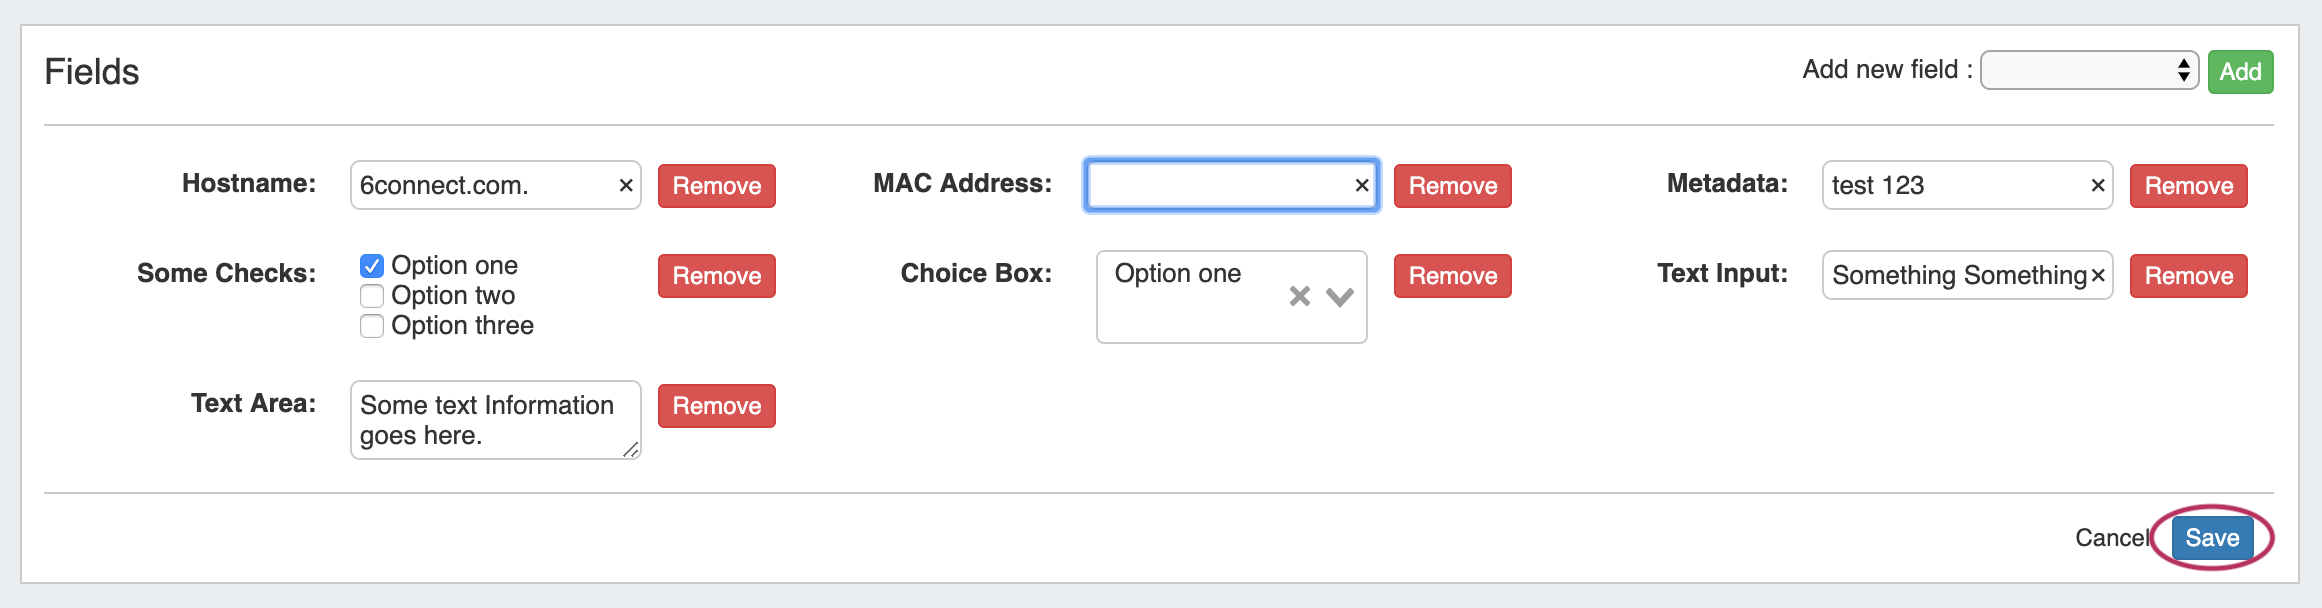
Once fields have been enabled for a Section, they will be available to select in the "Add New Field" dropdown.
To Add fields, click the "Edit" Button at the bottom right corner of the Field Gadget.
Then, next to "Add New Field:", select one of the available fields from the dropdown, and click "Add".

Once added, the field will be available to edit or remove. Edit field value(s) as desired, then click "Save".
IPAM (Legacy)
| Info |
|---|
The IPAM Gadget has functionally been replaced by the IPAMv2 Gadget in version 7.0.0. Although the original IPAM Gadget is still able to be used by existing customers, we recommend switching to the IPAMv2 Gadget for improved speed, filters, and UI customization options. |
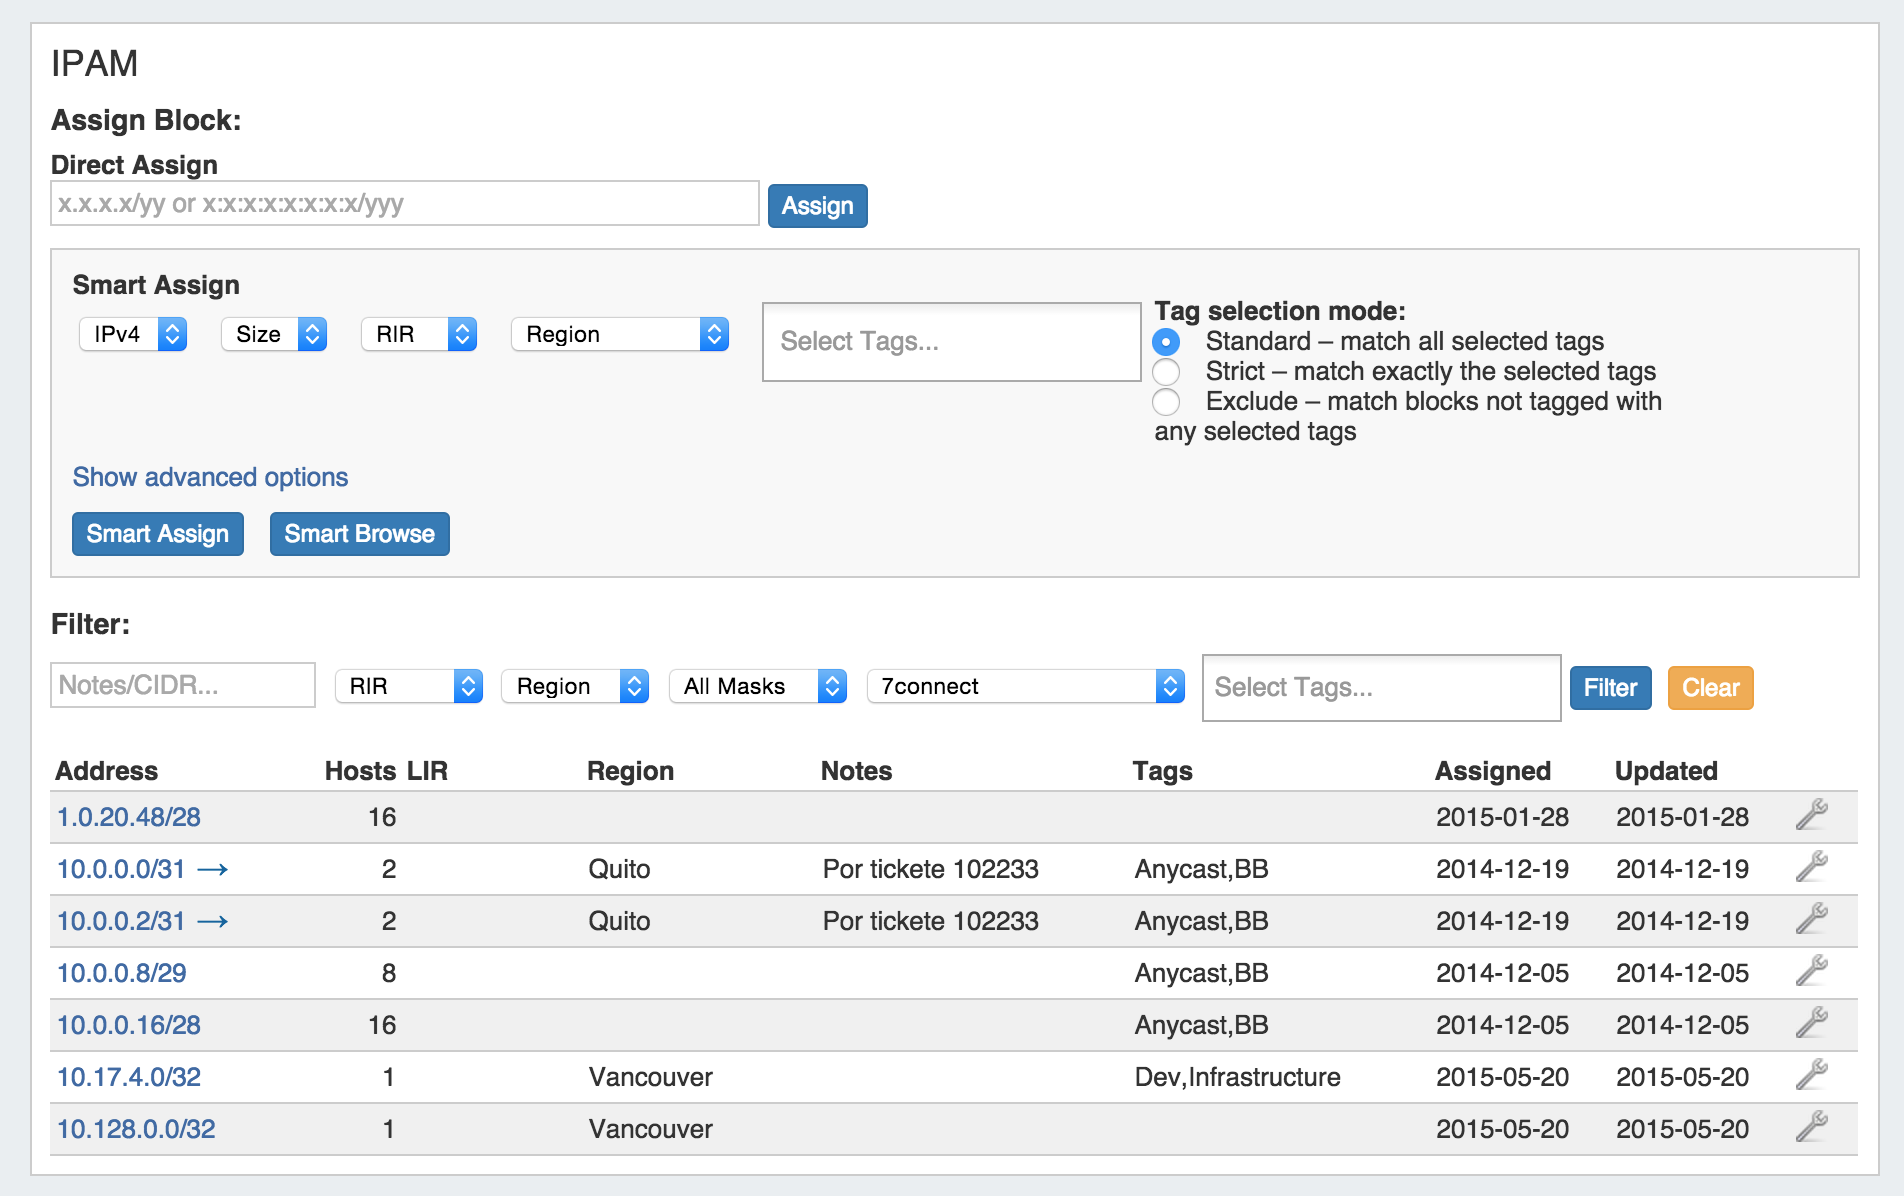
This gadget is used on the Resource Holder Section type. IPAM Gadget allows you to view, assign, and manage blocks for that resource.
For more information on assigning and managing blocks, see Working with IP Blocks - Assigning IP Space.
IPAMv2
The IPAMv2 Gadget is used on the Resource Holder Section type, and allows you to view, assign, and manage blocks for that resource. As of ProVision 7.0.0, it replaces the previous IPAM Gadget.
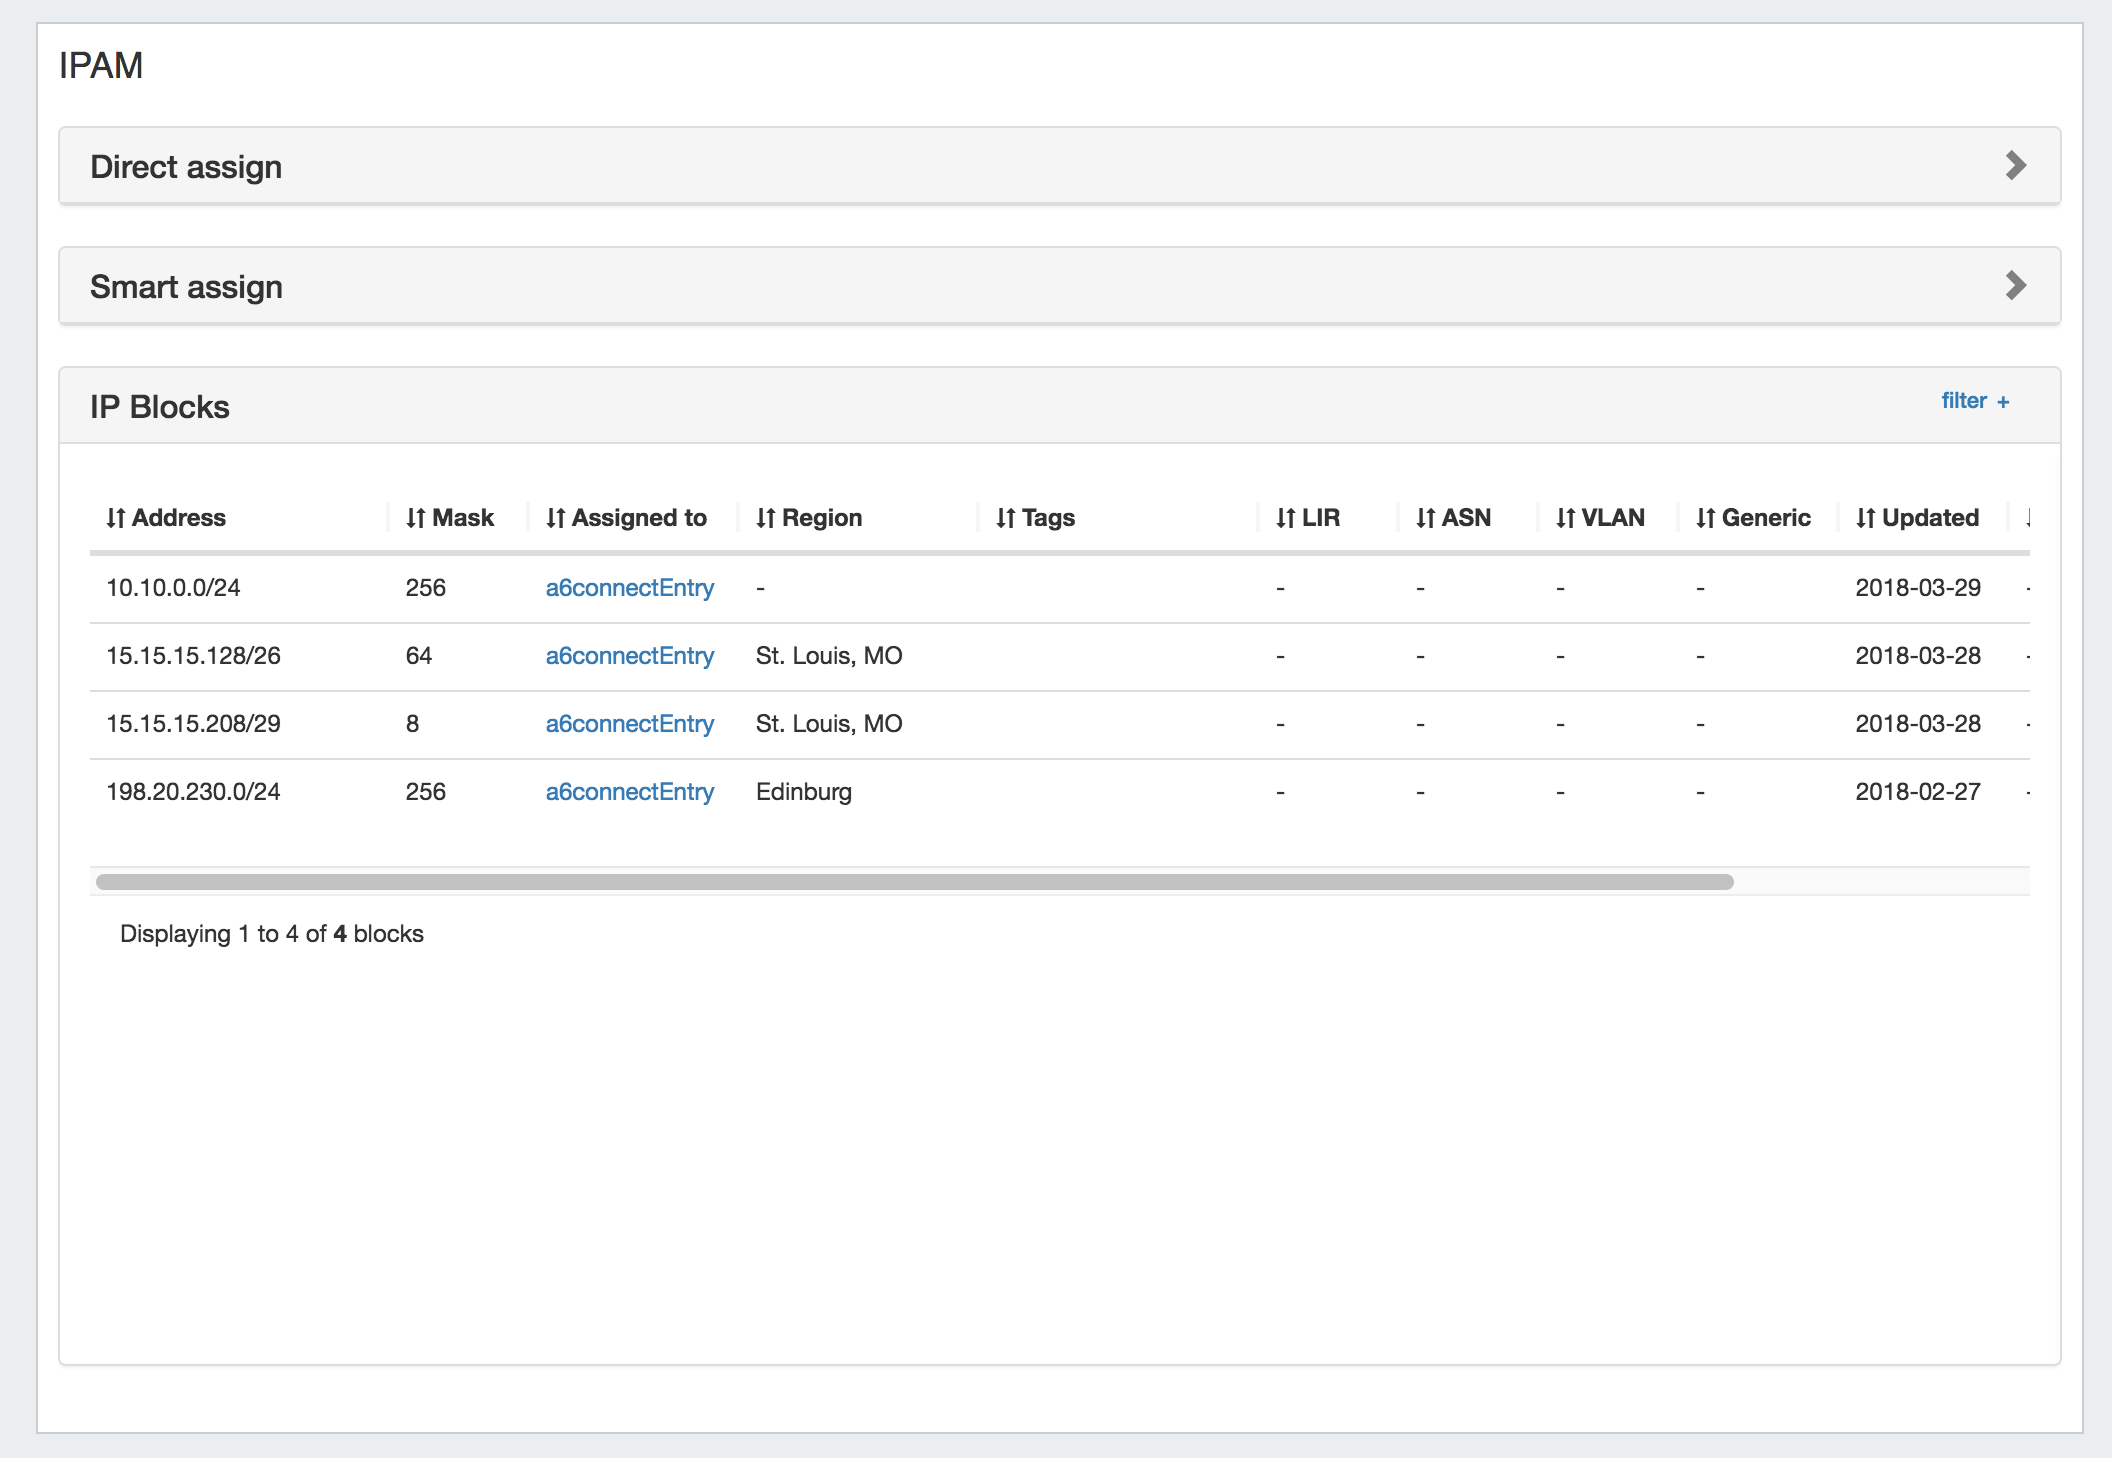
It contains improvements over the original IPAM gadget, such as improved speed, pagination, advanced filters, sortable columns, reverse zone generation, customized column order/names, and custom data fields.
| Expand | ||
|---|---|---|
| ||
Using this gadget, you can:
For more information on assigning and managing blocks, see Working with IP Blocks - Assigning IP Space. |
Notes
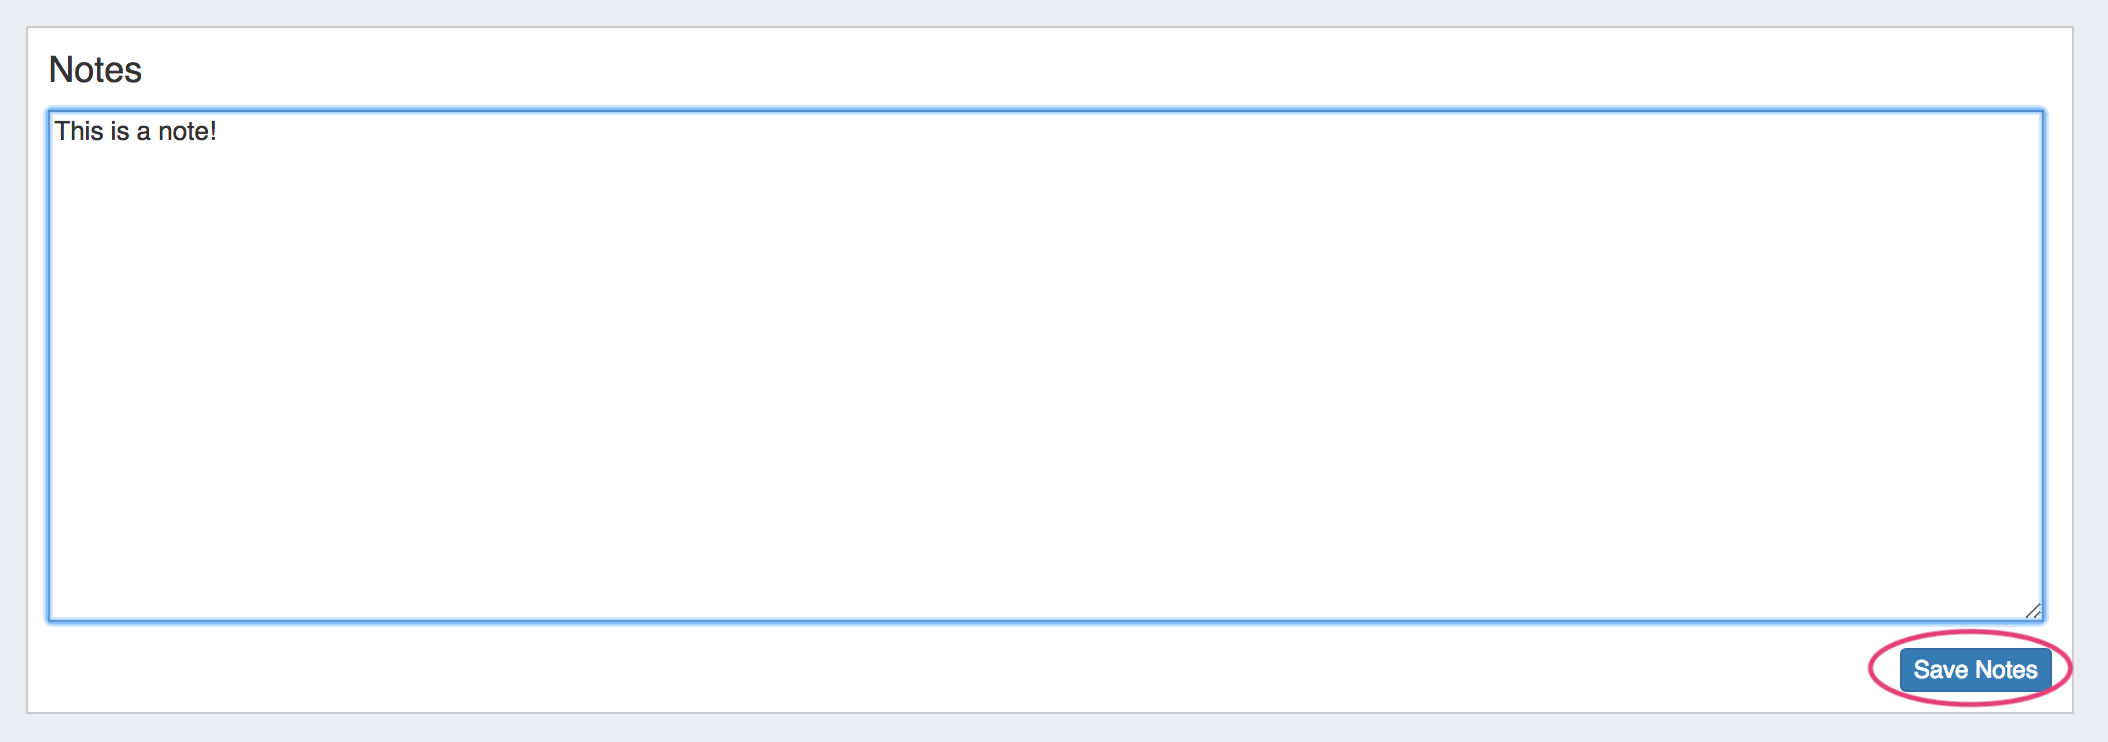
The Notes Gadget is a simple text area box, where you can save text notes relevant to the Resource.
To save a note, just click inside the note box, type the desired notes, and click the "Save Notes" button.
Peer Groups
The Peer Group Gadget allows you to add peer groups for IPv4 and IPv6 for a selected exchange from a router's Resource Entry page.

To do this, simply select the exchange, type in a Peer Group name in the text box, select IPv4 or IPv6, the click "Add Group".
Peer Groups added from this gadget will be then be available to select in the "Add Session" dialog box in the Peering tab.

| Note | ||
|---|---|---|
| ||
Peer groups listed in the Gadget are for ProVision only and should reflect groups that exist on the router. Adding or deleting peer groups from the Gadget will not add or delete them on the router. |
For additional information on Peering, see Peering v2.
Peering Sessions
This Gadget is used on the Router Section type. From here, new sessions may be added by clicking on the "Add Session" button, then entering session information into the "Create New Session" page.
![]()
Existing sessions may be managed by clicking on the "View" link for the session, bringing up the Peering v2 session details page.

For additional information on Peering, see Peering v2.
Peering VRFs
The Peering VRF Gadget allows you to add VRFs from a router's Resource Entry page.
![]()
| Expand | ||
|---|---|---|
| ||
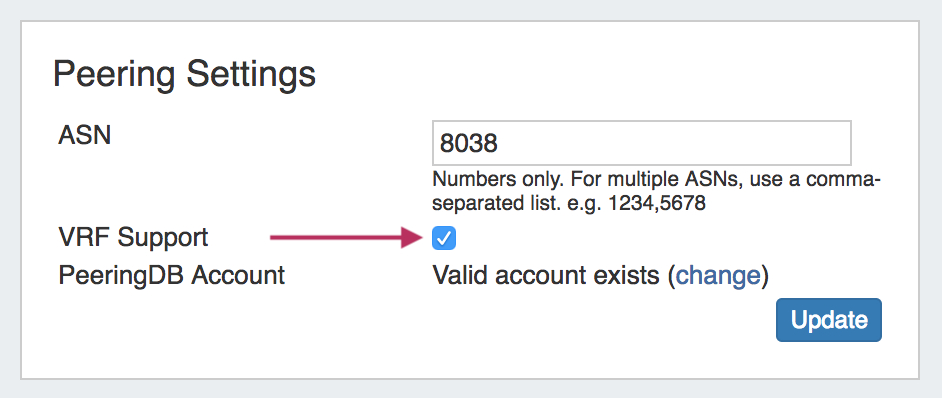
Enabling "VRF Support" in the Admin home page under "Peering Settings" will automatically add the VRF gadget to the router Section.
The VRF gadget will then be accessible in a router's Resource Entry page. To add a VRF, type the VRF name and ASN, then hit "Add VRF". 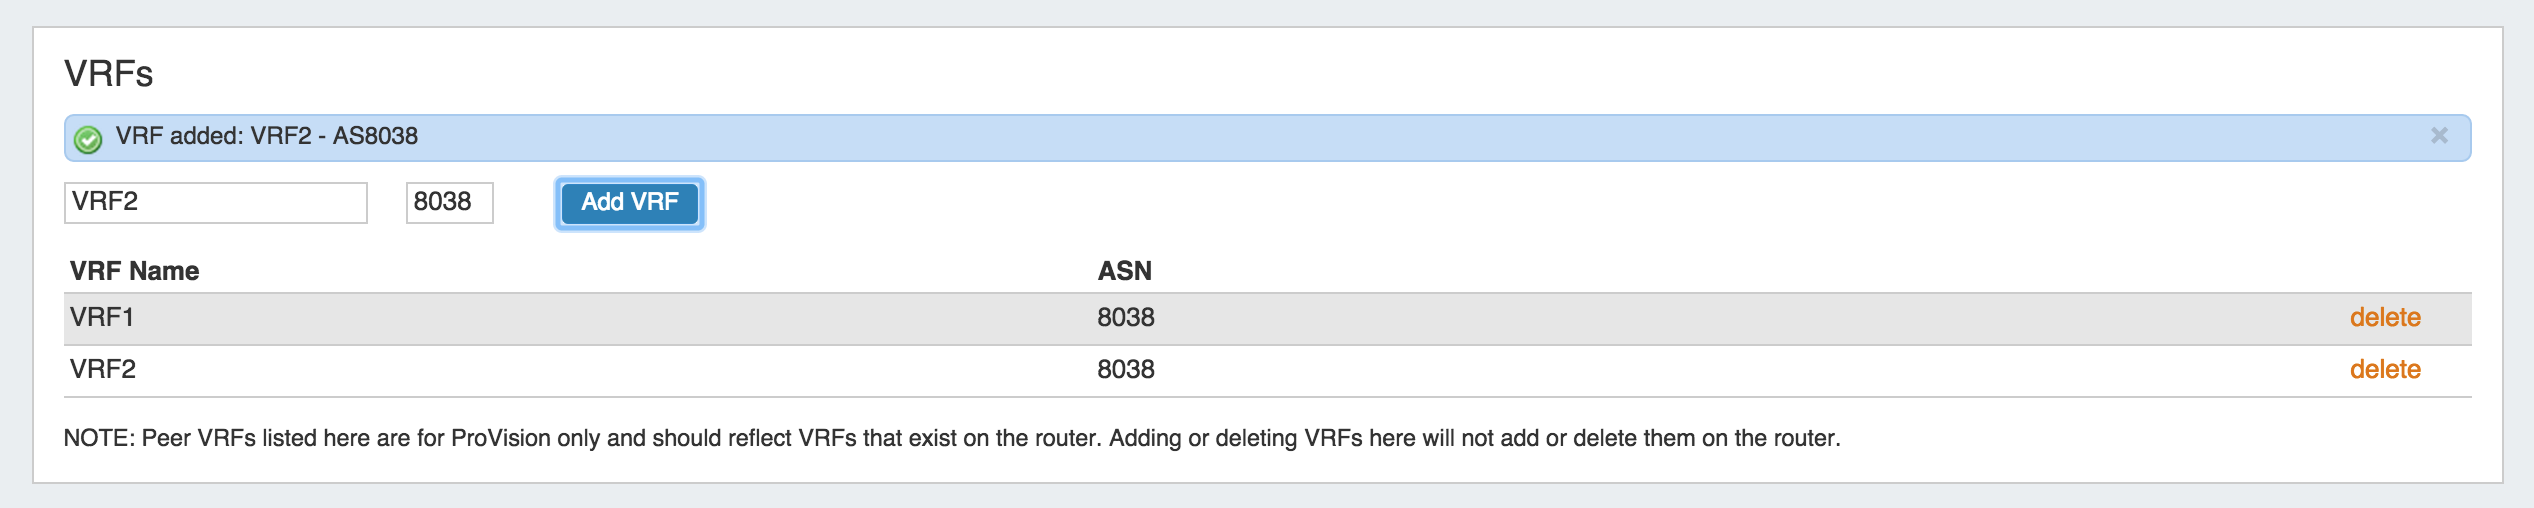 To delete a VRF, click on "delete" next to the VRF entry in the gadget. Once VRFs are set up for a router, the source ASNs for the associated VRFs will appear in the Source ASN dropdown when adding or editing a session for that router from the Peering tab.
|
Resource Linkage Gadget
The Resource Linkage Gadget allows you link a Resource to other Resources, and display the links in one place, without needing a hierarchy relationship.This gives you more flexibility to centralize data without requiring direct relationships. By default, all links created in the Resource Linkage Gadget are reciprocal.
The Resource Linkage Gadget also provides information to the Linked IPs Gadget - Resources linked here will have their IP Block information displayed in the Linked IPs Gadget.

| Expand | ||
|---|---|---|
| ||
Working with the Resource Linkage Gadget To use the Resource Linkage Gadget, first, ensure that "Resource Linkage" is enabled under "Manage Gadgets" for the Section type of the Resource being used. At this step, an empty Resource Linkage Gadget is displayed on the Resource's Entry page. Add a new link by clicking the "Add New" button.  Search for the desired Resource to add, select, type in a note, and click "Add new linkage". A reciprocal link will be created, and the linked Resource will show in the Resource list for the gadget. To follow the link, simply click on the resource name for the linked Resource.
Once a resource link has been created, you may also edit the comment or delete the link. Edit a Resource LinkEditing a link allows for changes to be made to the associated comment - just click on the action menu (gear icon) for the link, then select "Edit".
Type in the desired comment change, and click "Save" when complete. Or, you may exit out by clicking "Cancel".
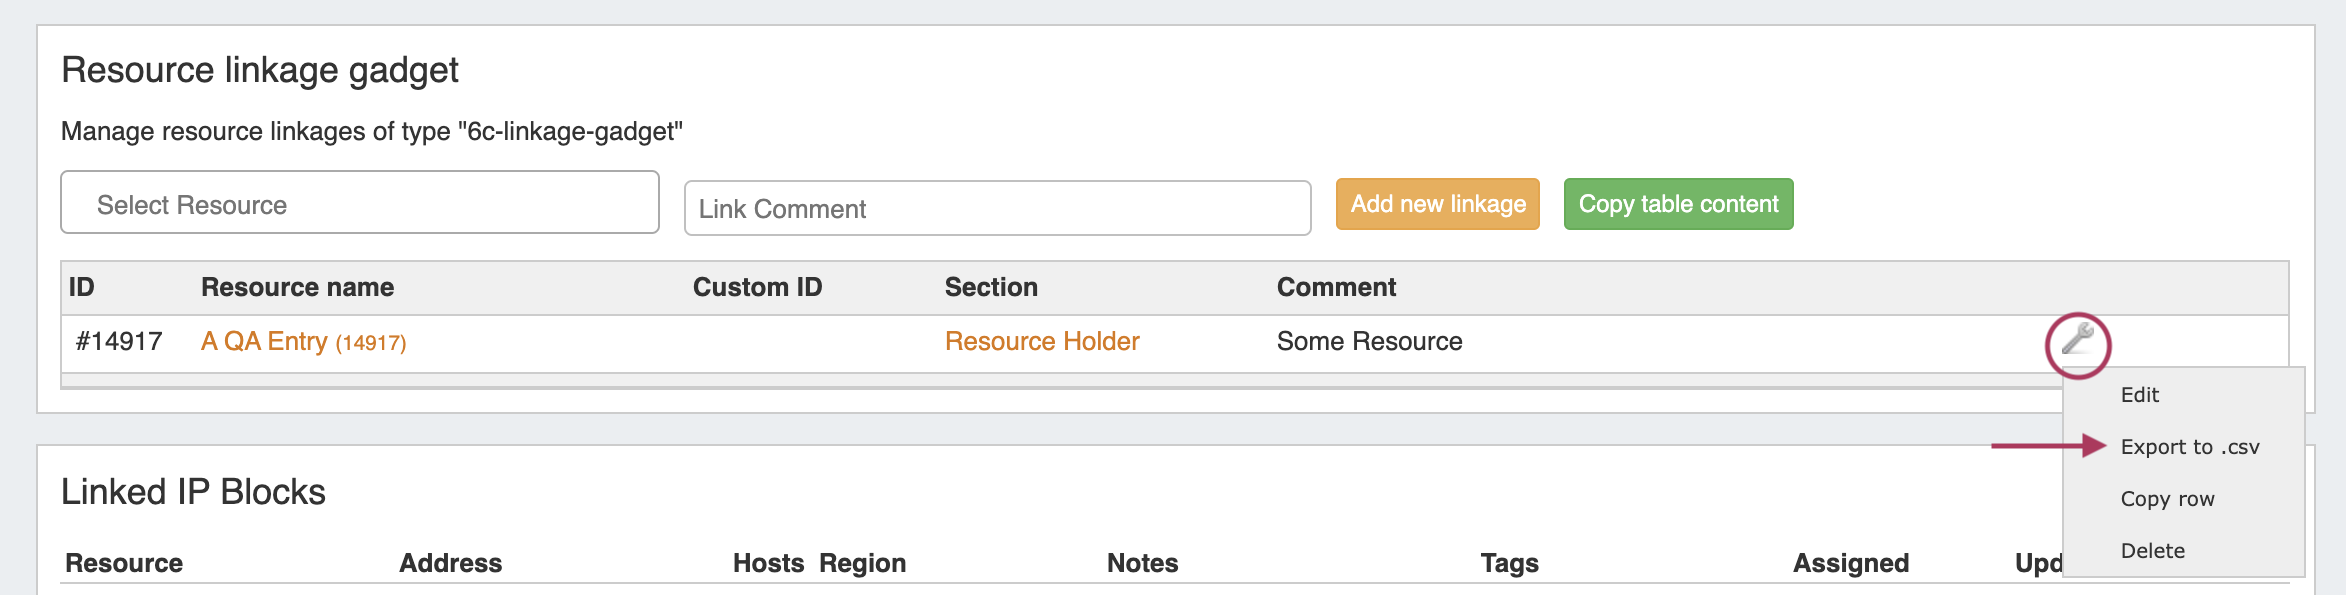
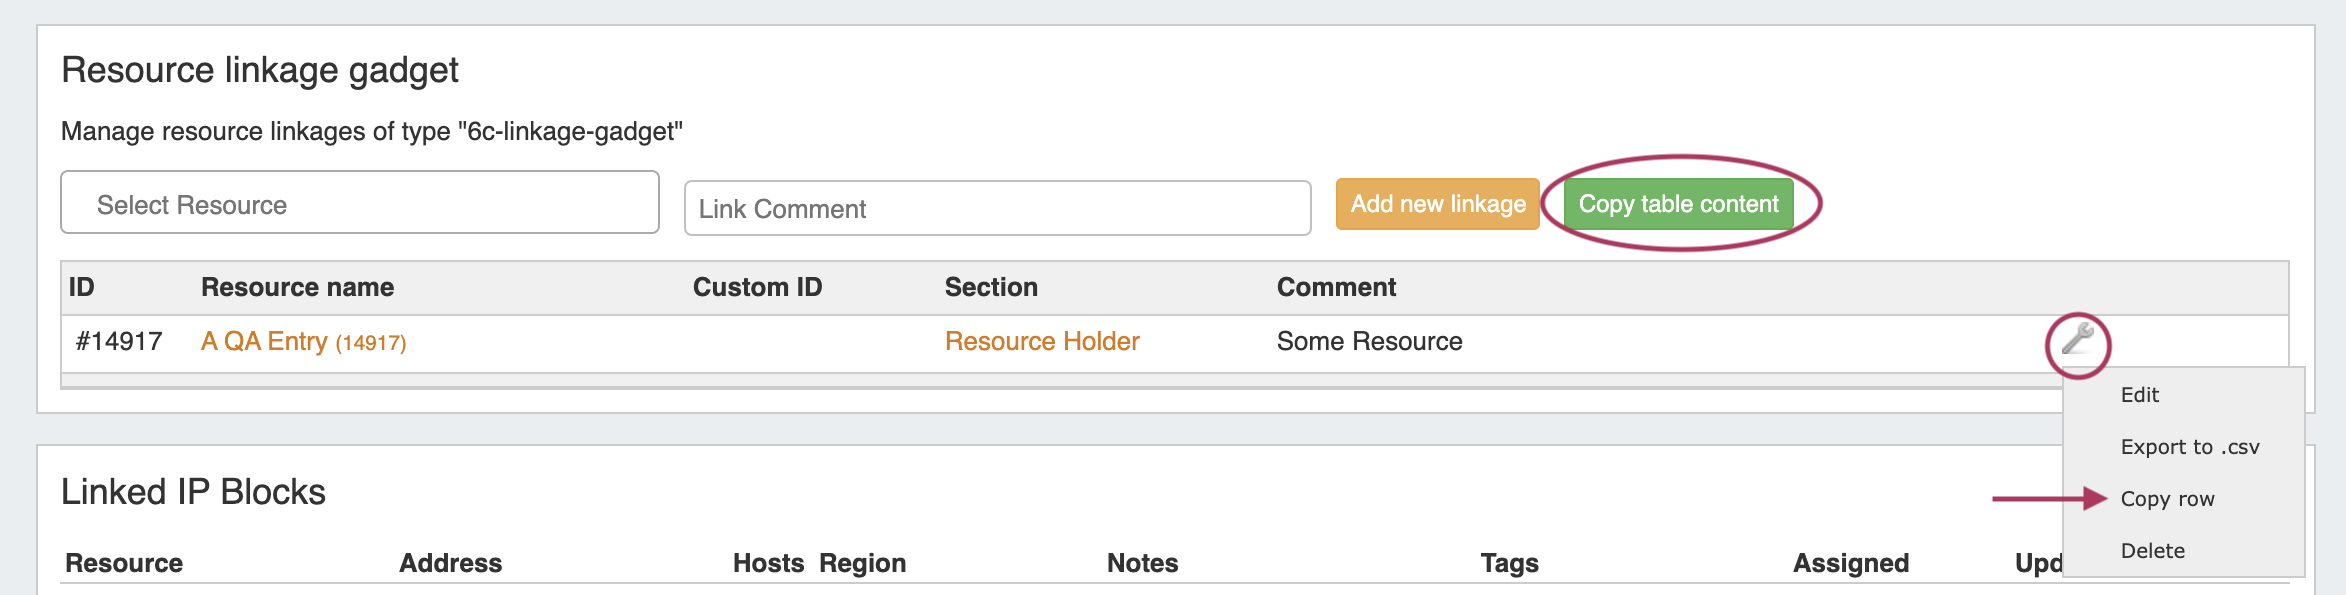
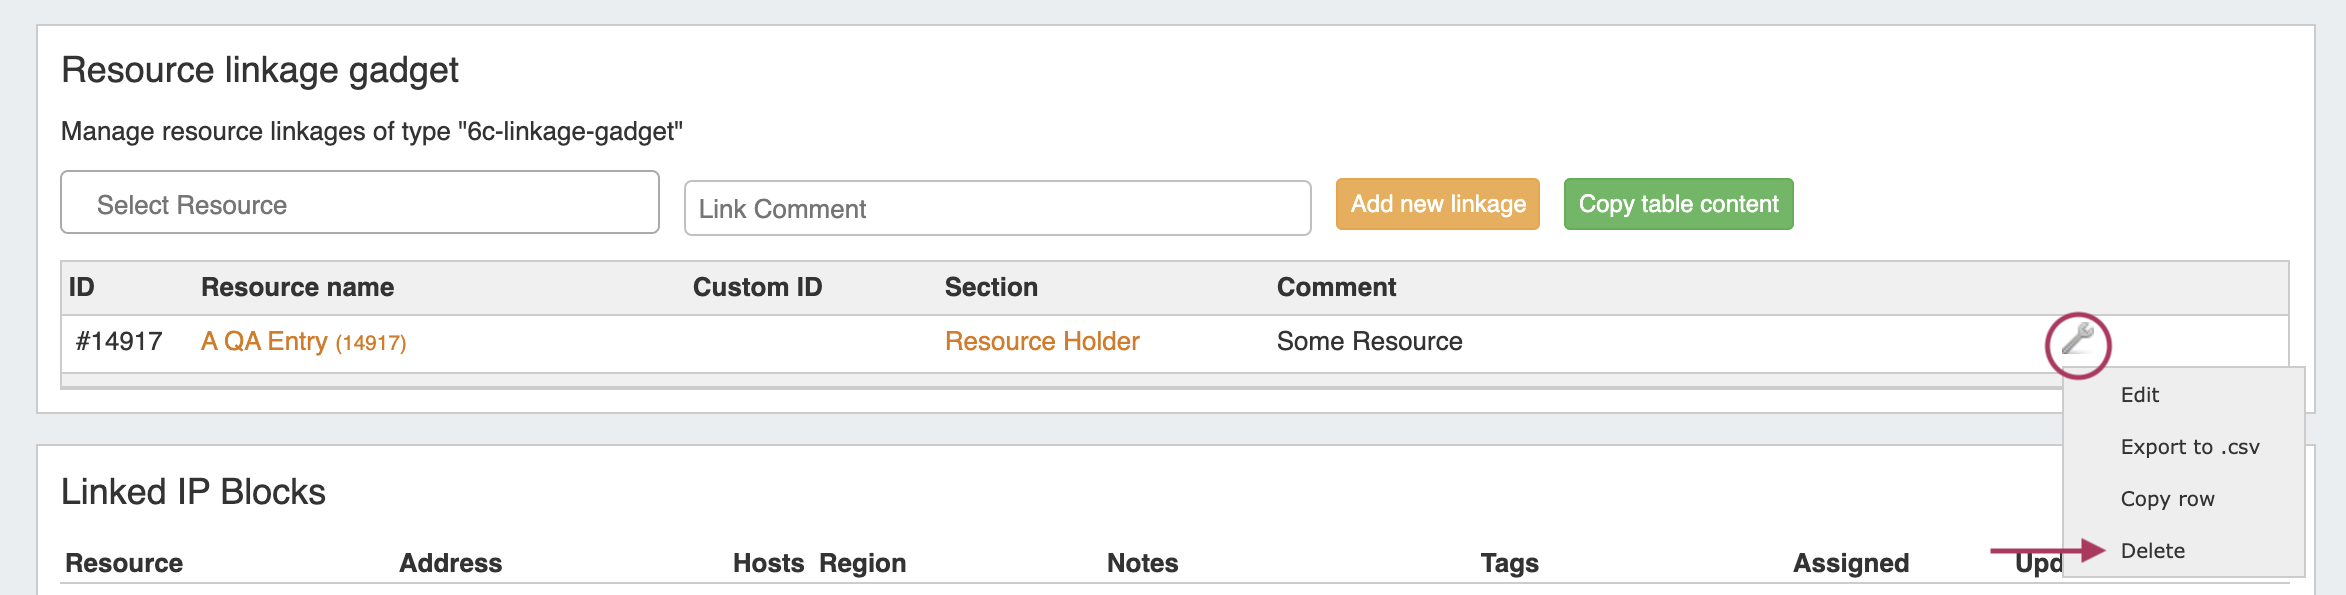
Export Linked Resource Fields to .csvResource field data for a linked Resource may be exported to a .csv file. This includes basic resource metadata, such as the resource's Name, Section, Category, Created Date, and Modified Date. If the resource also contains data in custom resource fields (fields that have been added to the Resource Field Gadget, and filled in), those fields will also be contained in the export. To export, click on the action menu and select "Export to .csv" - the file will download via your browser.
|


At this point, you may choose to immediately push the autogenerated zone(s), schedule a push, or re-run the workflow to edit the subdomain or group.
Document Storage
The Document Storage gadget allows you to upload documents to a resource, and have those documents accessible to download from the 6connect cloud to your local machine. It may be enabled on any Section type.
| Expand | ||
|---|---|---|
| ||
Upload Files First, ensure the Document Storage gadget is enable for the Section type. Then, select the "Uploader" tab under the Document Manager gadget. Click on the "Choose Files" button, and select the file(s) you would like to upload.
The selected files will show in a list under the Uploader tab. To upload the file(s), click on either the "Upload" button adjacent to the file to upload the individual file, or the "Upload All" button to upload all files listed. You may also choose to remove files from the upload list, or cancel.
Once the progress bar is filled in, your upload is complete! Your files will show under the "Files" tab.
Download Available Files Successfully uploaded files are listed under the "Files" tab of the Document Manager gadget. From here, you can see the file Name, Size, Type, Date, and available Actions. To download a file to your local machine, ensure you are on the "Files" tab, then click on the "Download from Cloud" icon.
If a file is no longer needed, you may delete the file from the Document Manager by clicking on the Delete (trash can) icon. |
| Info |
|---|
| Note: The uploader has a file size limit of 14mb, files above this size will not successfully upload. |
Field Gadget
The Field Gadget displays the information fields available for the Section and specific Resource that is being viewed.
Users may add enabled fields to the resource, edit field values, and remove fields from the Resource through this Gadget. Field values in this Gadget (such as Hostname, Username, and Password, among others) may also be used by other Resource Gadgets and Provision modules.
Before You Begin
Fields must be enabled and added to the Resource's Section before they can be used in the Field Gadget.
Fields enabled in a Section (pictured below) will be available to add to the Field Gadget for any Resource of that Section.
| Expand | ||
|---|---|---|
| ||
|
Working with the Field Gadget
Once fields have been enabled for a Section, they will be available to select in the "Add New Field" dropdown.
To Add fields, click the "Edit" Button at the bottom right corner of the Field Gadget.
Then, next to "Add New Field:", select one of the available fields from the dropdown, and click "Add".
Once added, the field will be available to edit or remove. Edit field value(s) as desired, then click "Save".
IPAM (Legacy)
| Info |
|---|
The IPAM Gadget has functionally been replaced by the IPAMv2 Gadget in version 7.0.0. Although the original IPAM Gadget is still able to be used by existing customers, we recommend switching to the IPAMv2 Gadget for improved speed, filters, and UI customization options. |
This gadget is used on the Resource Holder Section type. IPAM Gadget allows you to view, assign, and manage blocks for that resource.
For more information on assigning and managing blocks, see Working with IP Blocks - Assigning IP Space.
IPAMv2
The IPAMv2 Gadget is used on the Resource Holder Section type, and allows you to view, assign, and manage blocks for that resource. As of ProVision 7.0.0, it replaces the previous IPAM Gadget.
It contains improvements over the original IPAM gadget, such as improved speed, pagination, advanced filters, sortable columns, reverse zone generation, customized column order/names, and custom data fields.
...
| title | Working with the IPAMv2 Gadget... |
|---|
Using this gadget, you can:
- Direct Assign with or without additional filtering options. In cases where duplicate blocks exist, using the filter options with Direct Assign allows you to specifically control which of the dupilicate blocks is assigned.
- To open the Direct Assign section of the Gadget and the advanced options, click the expansion caret in the upper right section, and then click "Advanced Options".
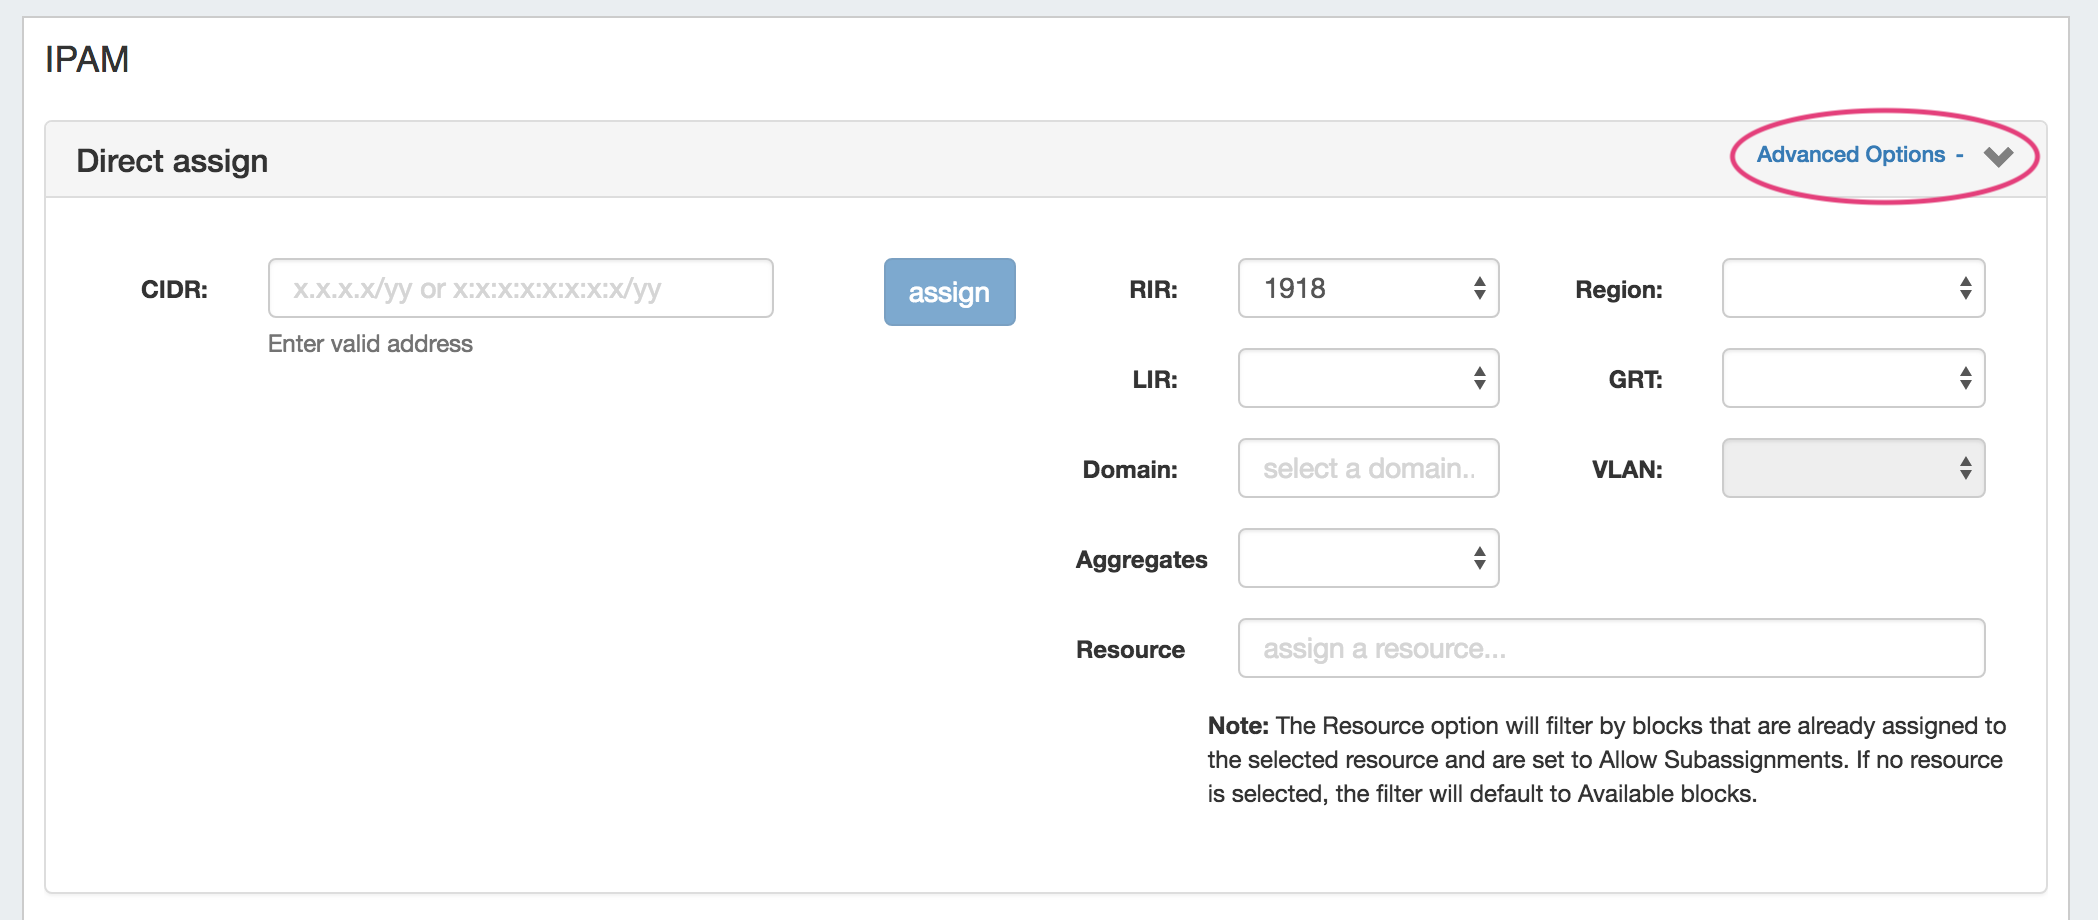
- To open the Direct Assign section of the Gadget and the advanced options, click the expansion caret in the upper right section, and then click "Advanced Options".
- Smart Assign with or without additional filtering options. Required fields for Smart assign are: "Type", "RIR", and "Size", but additional fields such as "Region", "VLAN", "LIR", "Resource" (for blocks that allow subassignments), and various "Tag" mode options.
- Smart Browse using smart assign filter options to bring up a browsable list of blocks meeting that critera, from which you may assign or assign out of.
- To open the Smart Assign / Smart Browse section of the Gadget and the advanced options, click the expansion caret in the upper right Smart Assign section, and then click "Advanced Options".

- To open the Smart Assign / Smart Browse section of the Gadget and the advanced options, click the expansion caret in the upper right Smart Assign section, and then click "Advanced Options".
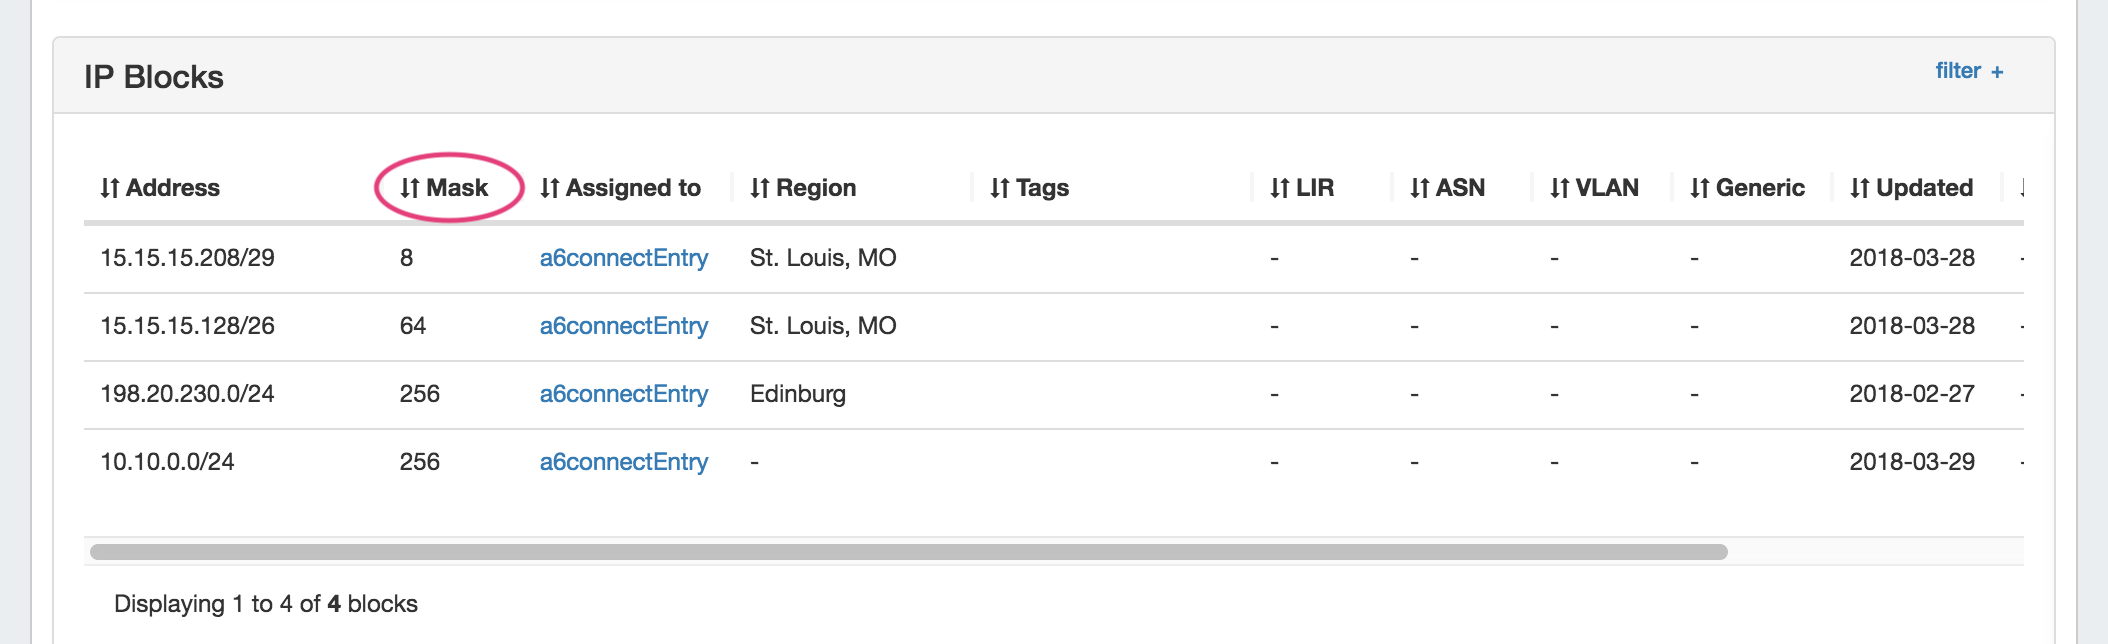
- View, Filter, and Sort Assigned Blocks for the resource via the "IP Blocks" list.
- To Filter: click the "filter" link in the top right area of the header to open filter options. Enter your desired criteria and hit "Apply".
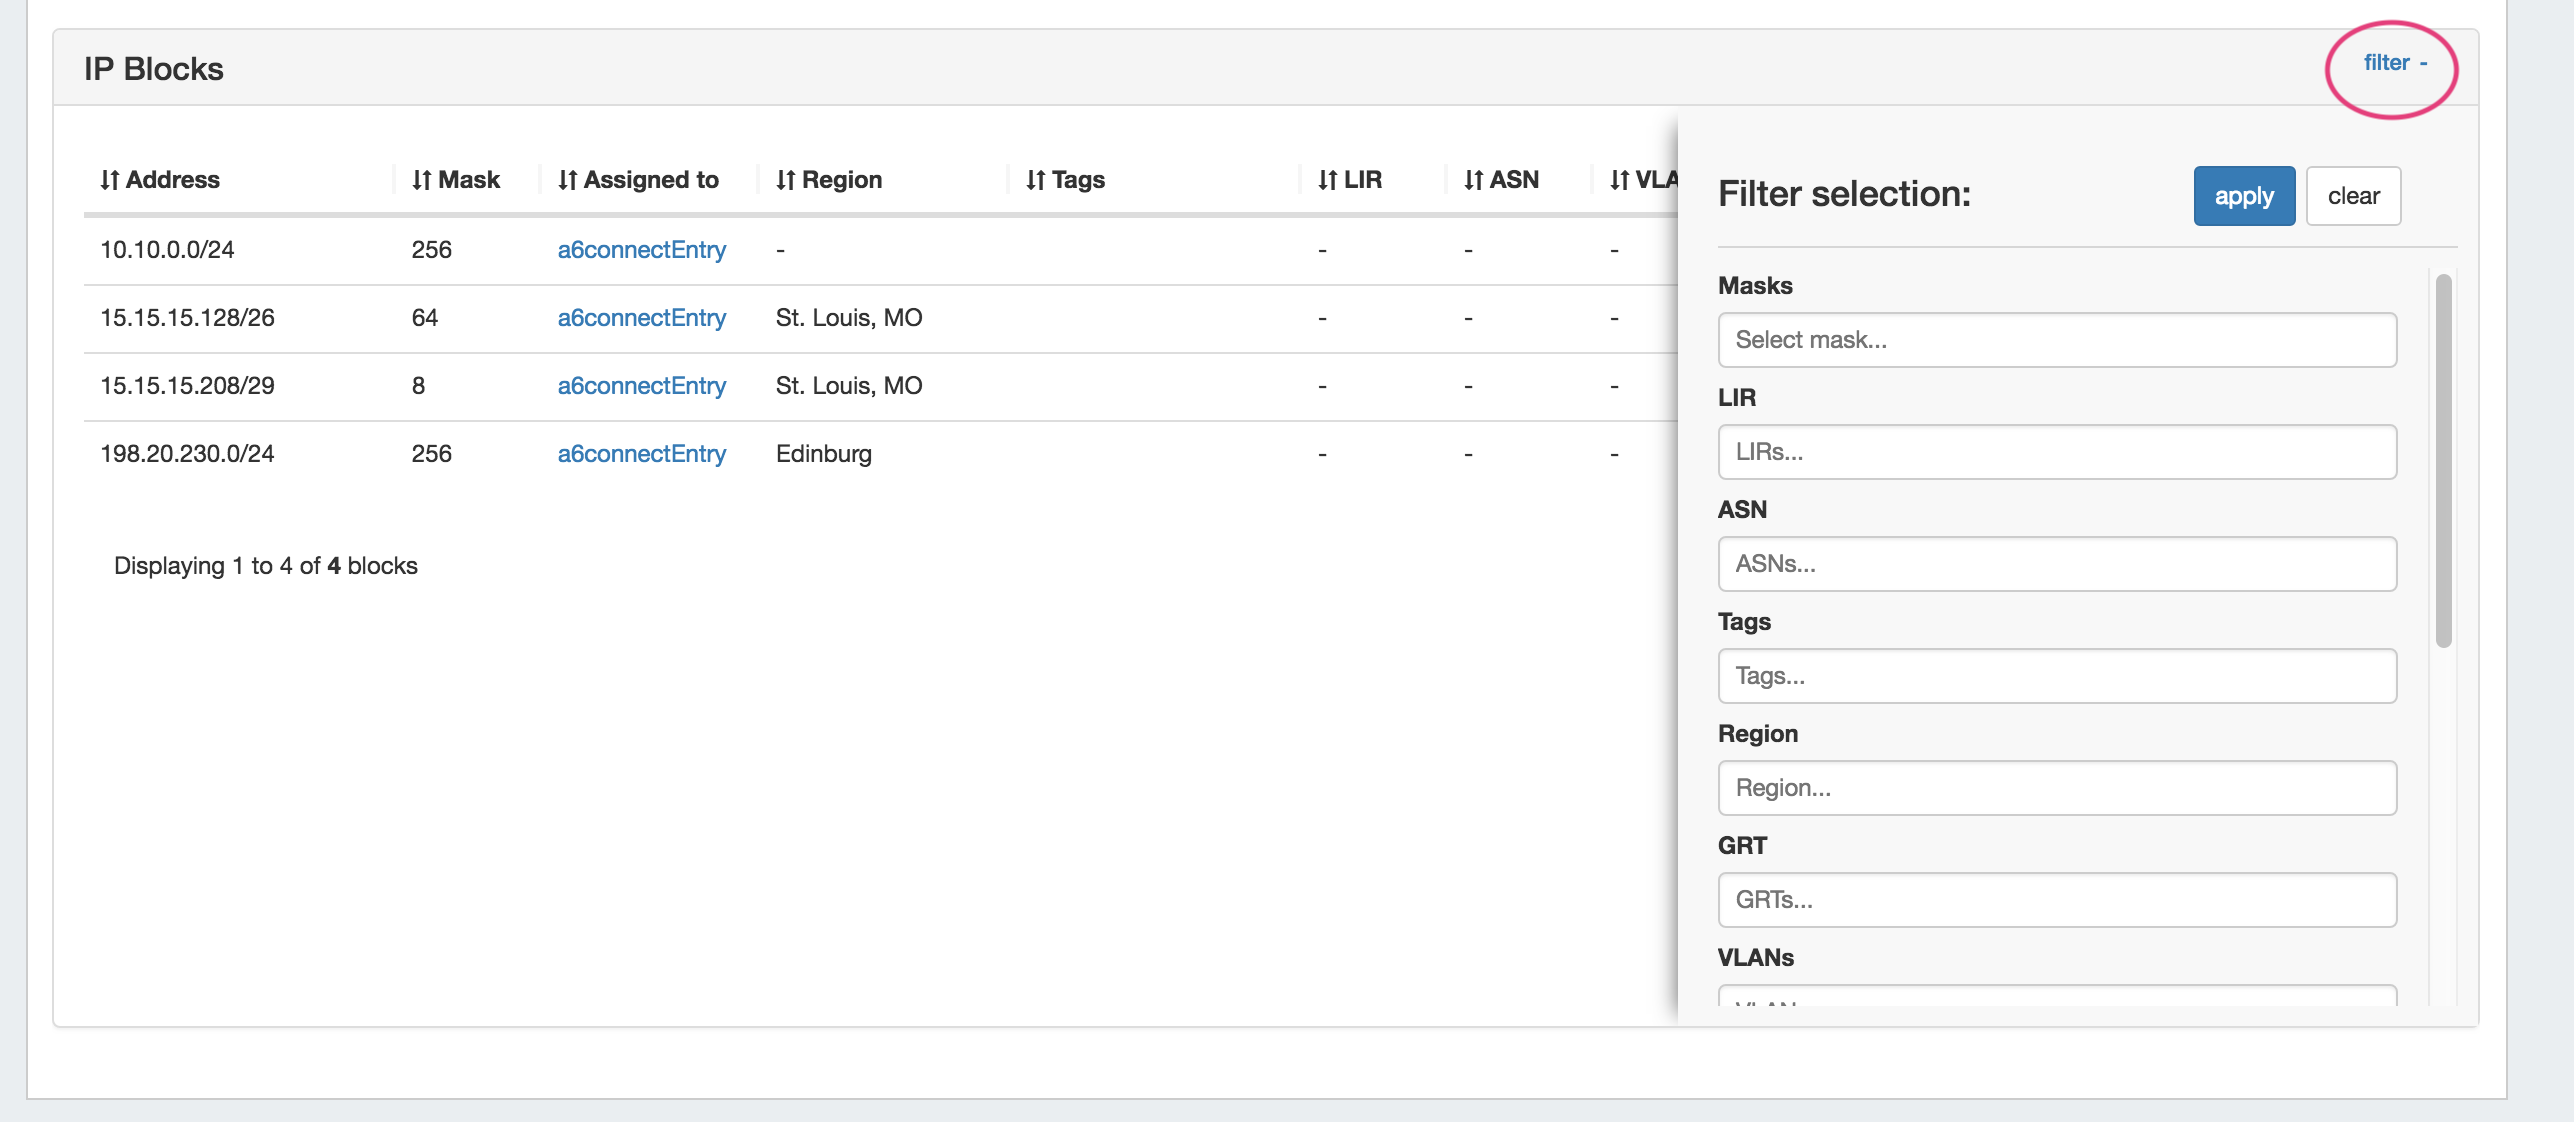
- To Sort: Click on the header name you wish to sort by, and the field will toggle between ascending and descending order.
- To Filter: click the "filter" link in the top right area of the header to open filter options. Enter your desired criteria and hit "Apply".
- Manage Assigned Blocks for the resource by going into the "IP Blocks" list, and using the Action Menu (Gear Icon) to perform actions for the selected block.
All options available in IPAM Manage for a block are also available in the IPAM Gadget Action menu, although the "Templates" option will be applicable in the IPAM Gadget.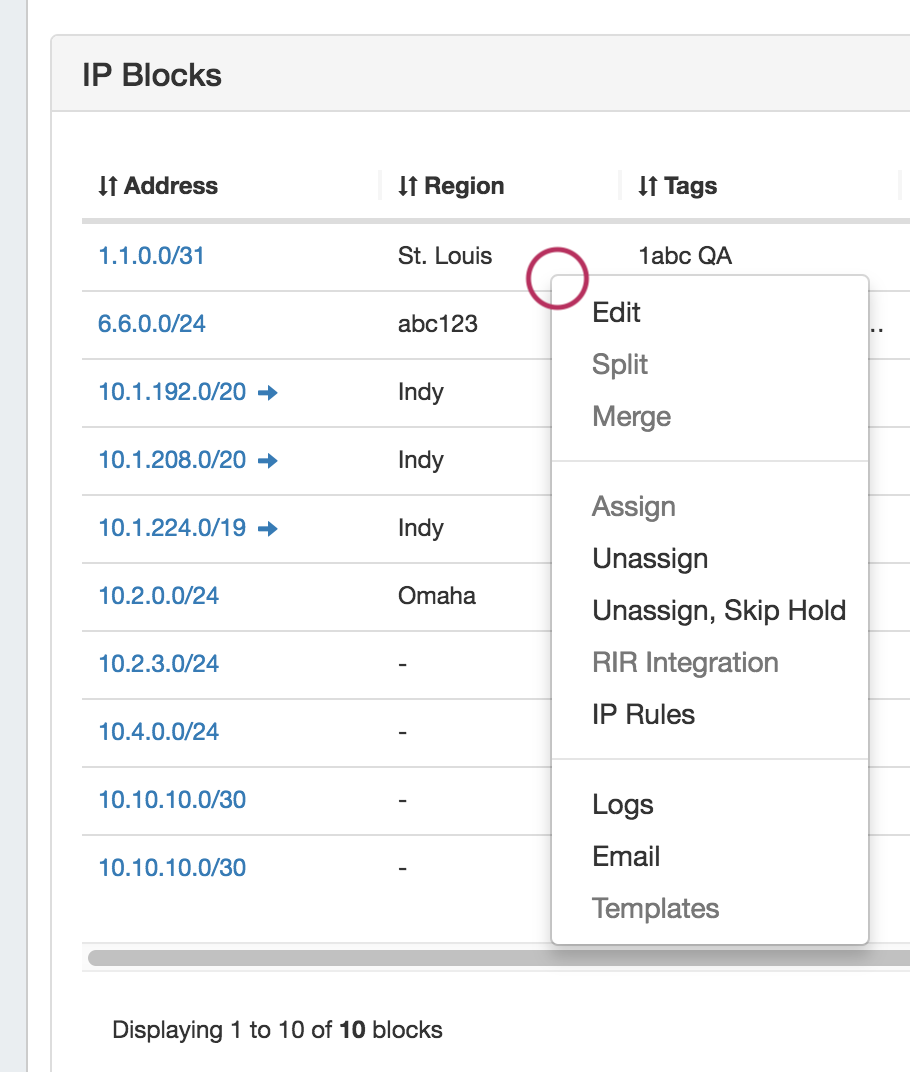
- Edit Multiple Blocks: by shift-clicking or cmd-clicking to select multiple blocks, and then right click to show the multi-block Action options, then select "Edit". The Edit Block Attributes screen will display.
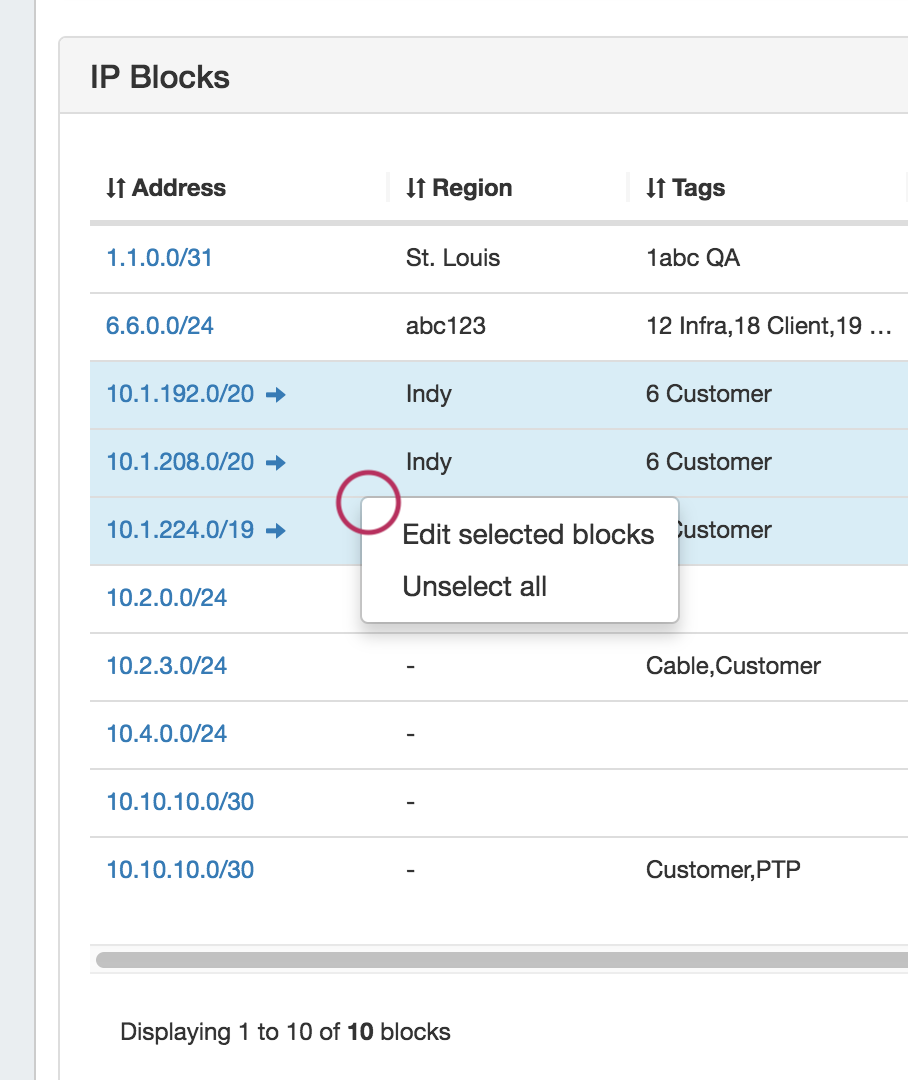
For more information on assigning and managing blocks, see Working with IP Blocks - Assigning IP Space.
Notes
The Notes Gadget is a simple text area box, where you can save text notes relevant to the Resource.
To save a note, just click inside the note box, type the desired notes, and click the "Save Notes" button.
Peer Groups
The Peer Group Gadget allows you to add peer groups for IPv4 and IPv6 for a selected exchange from a router's Resource Entry page.
To do this, simply select the exchange, type in a Peer Group name in the text box, select IPv4 or IPv6, the click "Add Group".
Peer Groups added from this gadget will be then be available to select in the "Add Session" dialog box in the Peering tab.
| Note | ||
|---|---|---|
| ||
Peer groups listed in the Gadget are for ProVision only and should reflect groups that exist on the router. Adding or deleting peer groups from the Gadget will not add or delete them on the router. |
...
Peering Sessions
This Gadget is used on the Router Section type. From here, new sessions may be added by clicking on the "Add Session" button, then entering session information into the "Create New Session" page.
![]()
Existing sessions may be managed by clicking on the "View" link for the session, bringing up the Peering v2 session details page.
For additional information on Peering, see Peering v2.
Peering VRFs
The Peering VRF Gadget allows you to add VRFs from a router's Resource Entry page.
![]()
...
| title | Working with the Peering VRF Gadget... |
|---|
Enabling "VRF Support" in the Admin home page under "Peering Settings" will automatically add the VRF gadget to the router Section.
...
| Note |
|---|
| Peering VRF currently only supports Cisco routers. |
Resource Linkage Gadget
The Resource Linkage Gadget allows you link a Resource to other Resources, and display the links in one place, without needing a hierarchy relationship.This gives you more flexibility to centralize data without requiring direct relationships. By default, all links created in the Resource Linkage Gadget are reciprocal.
The Resource Linkage Gadget also provides information to the Linked IPs Gadget - Resources linked here will have their IP Block information displayed in the Linked IPs Gadget.
| Expand | ||
|---|---|---|
| ||
Working with the Resource Linkage Gadget To use the Resource Linkage Gadget, first, ensure that "Resource Linkage" is enabled under "Manage Gadgets" for the Section type of the Resource being used. At this step, an empty Resource Linkage Gadget is displayed on the Resource's Entry page. Add a new link by clicking the "Add New" button. Search for the desired Resource to add, select, type in a note, and click "Add new linkage". A reciprocal link will be created, and the linked Resource will show in the Resource list for the gadget. To follow the link, simply click on the resource name for the linked Resource.
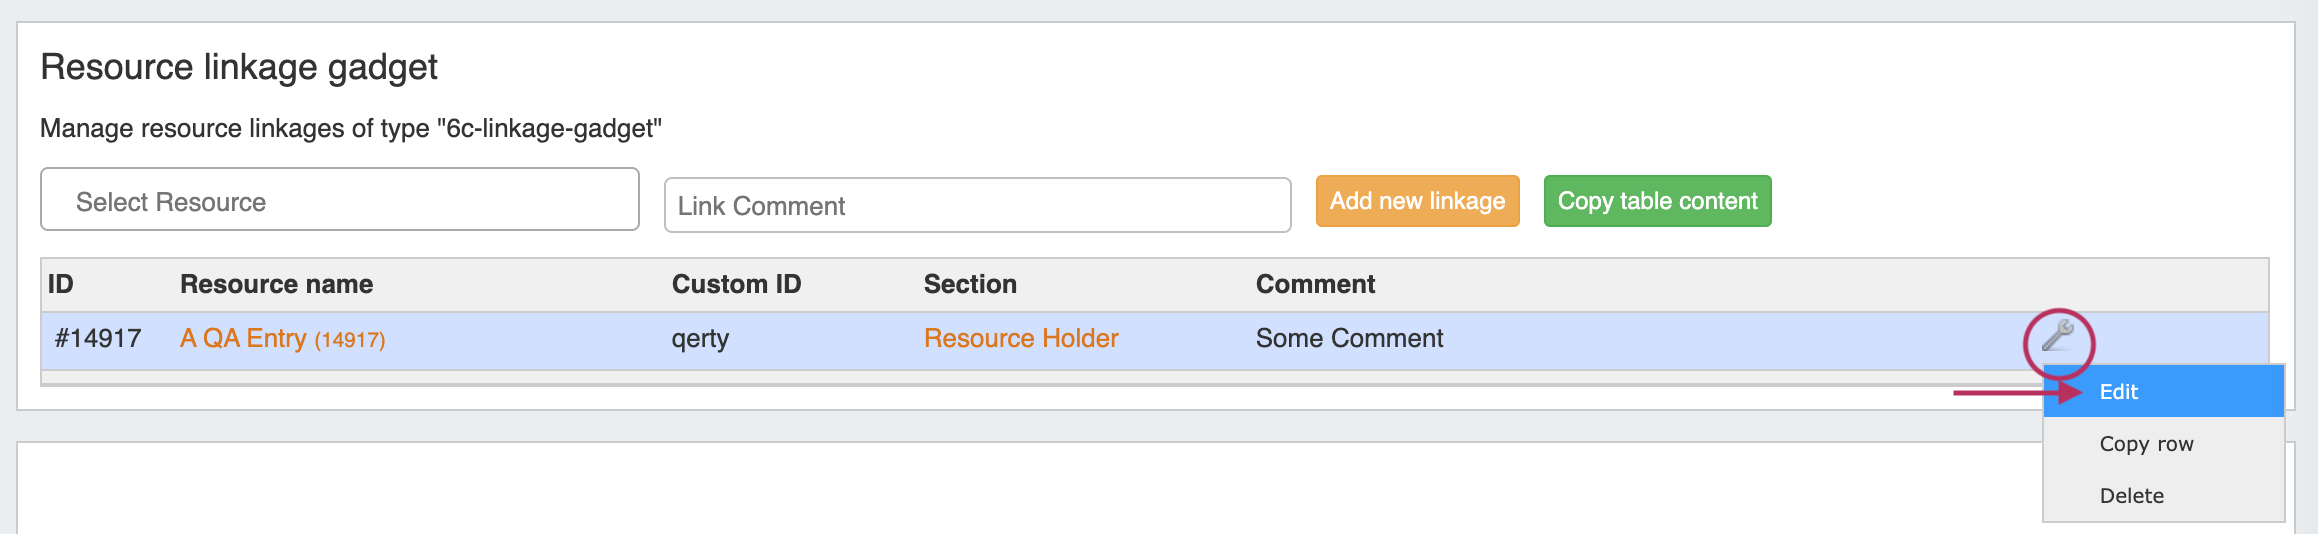
Once a resource link has been created, you may also edit the comment or delete the link. Edit a Resource LinkEditing a link allows for changes to be made to the associated comment - just click on the action menu (gear icon) for the link, then select "Edit".
Type in the desired comment change, and click "Save" when complete. Or, you may exit out by clicking "Cancel".
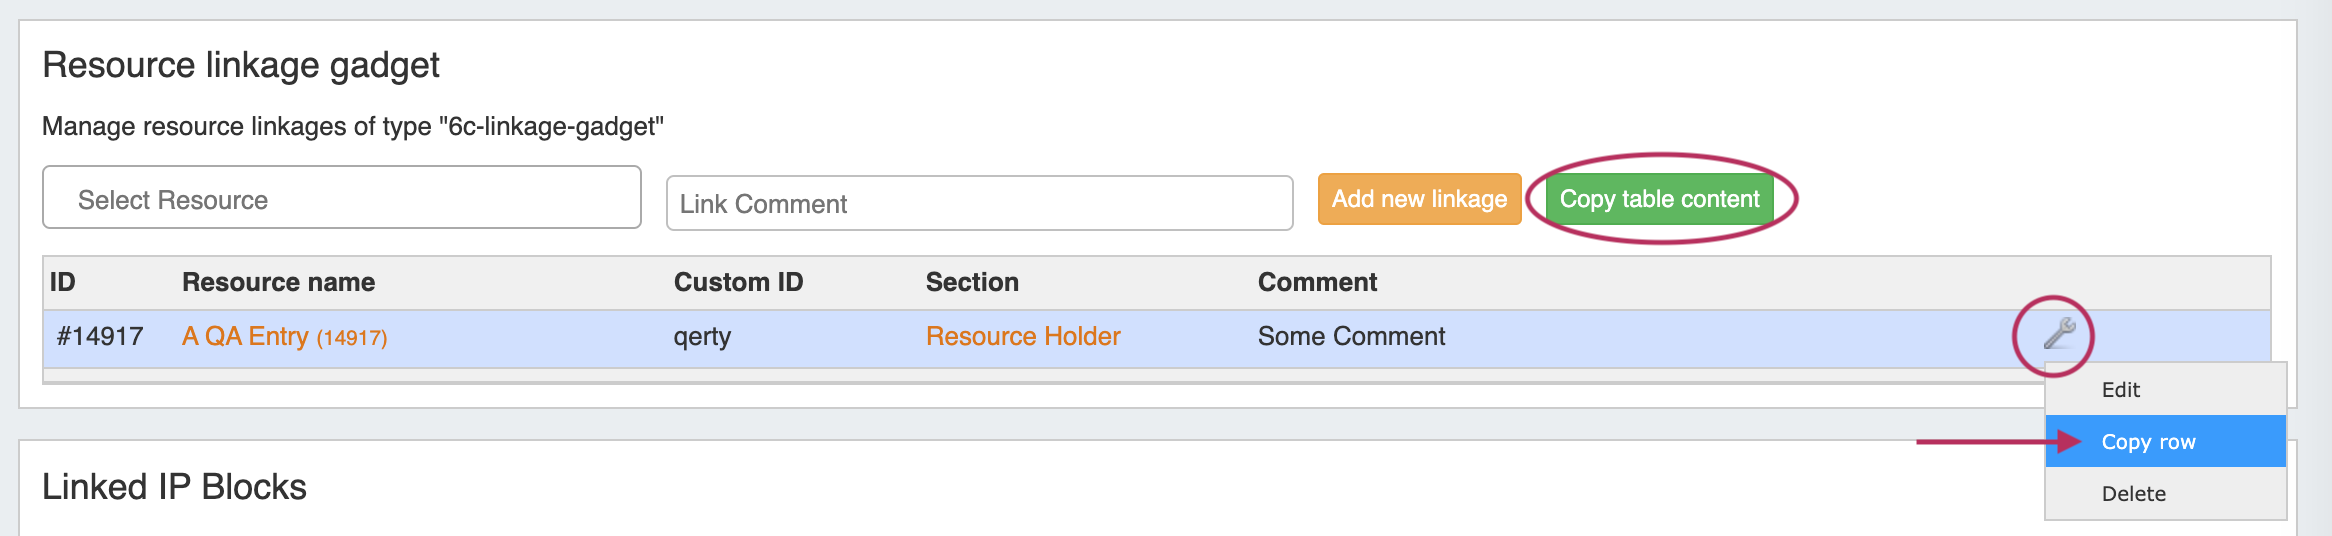
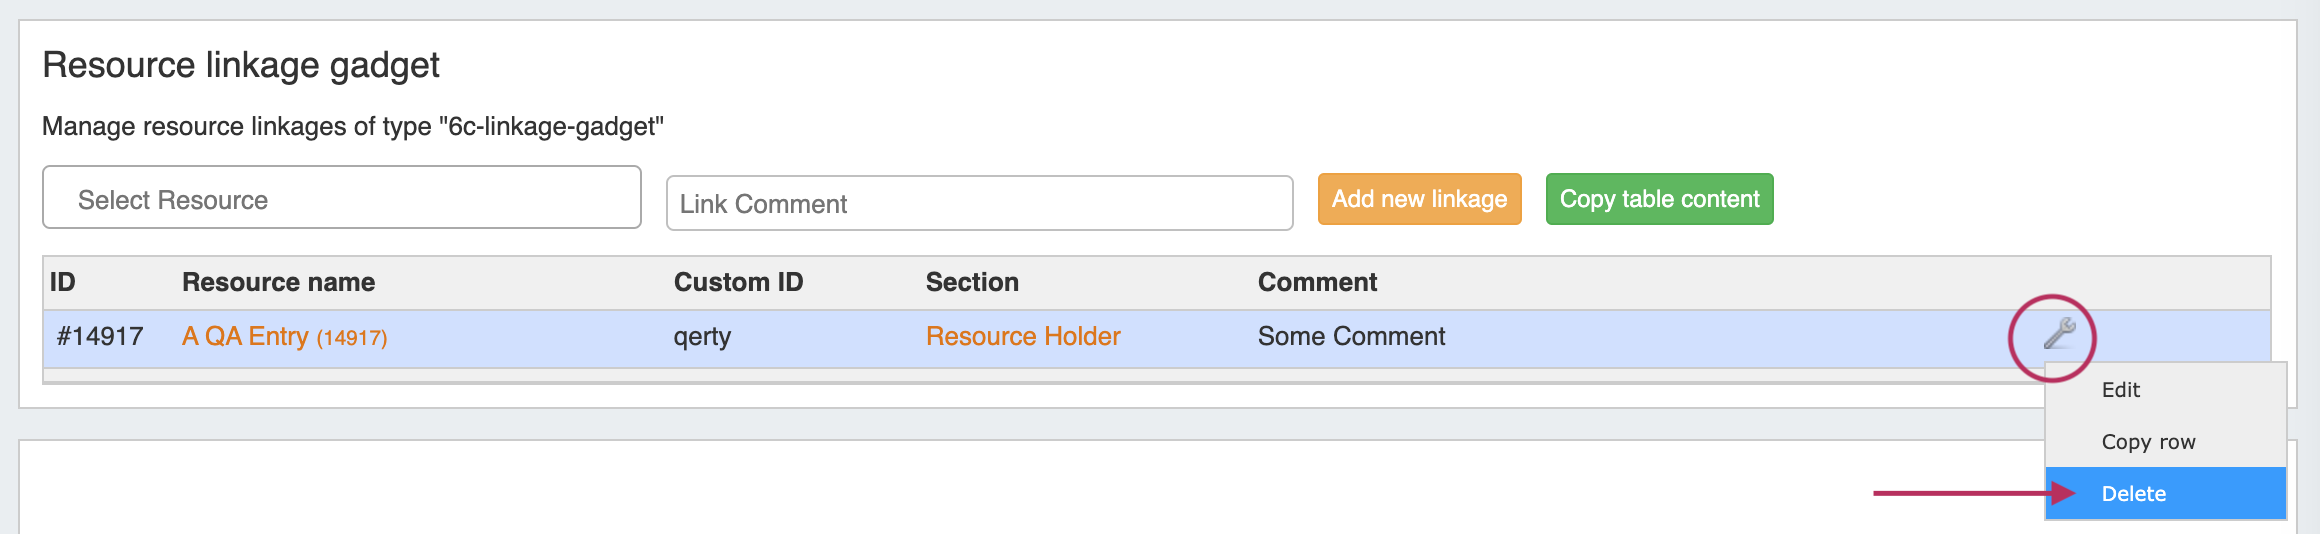
Copy Link DataYou may copy either a single row of data, or the entire table, to the clipboard to paste into another application. To copy the entire table, click "Copy table content" at the top of the gadget. To copy only a single row, open the action menu (wrench icon) for the row, and select "Copy row".
Then paste the data into the desired application. Delete a Resource LinkTo delete a Resource Link, click the "Delete" button for the desired link in the list, and confirm the delete in the message that appears. Deleting a resource link also deletes the reciprocal link from the other resource's page.
For additional information on working with Sections and Fields, see Customizing Sections and Customizing Fields. For adding field data to the Resource Field Gadget, see the "Resource Field Gadget" section on this page. |
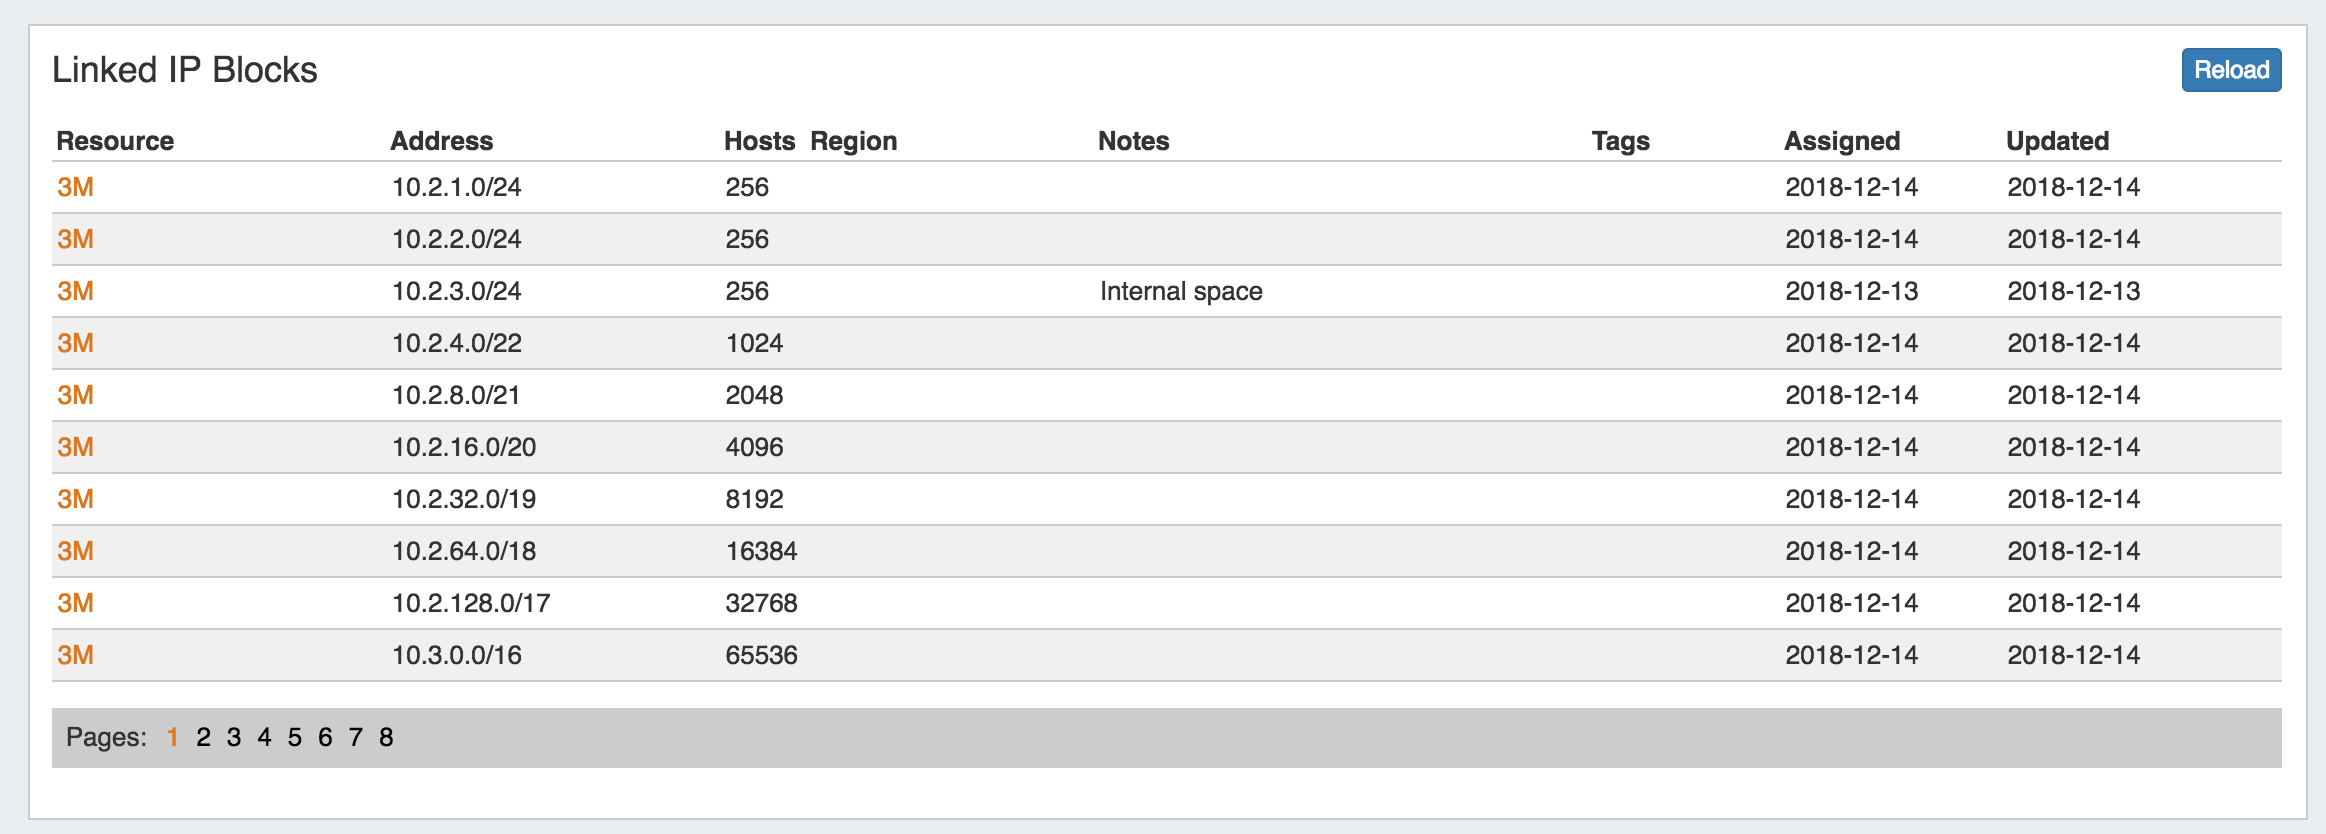
Resource Linkage - Linked IPs Gadget
The Linked IPs Gadget lists IP blocks assigned to Resources linked under the Resource Linkage Gadget, with a link to the resource holder.
Block information may be refreshed by clicking the "Reload" button to check for changes.
Resource View
This Gadget is used on the Resource Holder Section type. The Resource view displays and provides links for the Section and Category for the Resource.

Reverse API Console
The Reverse API Console Gadget allows you to add endpoints from a Resource Entry page, and view customizable javascript displays set for the selected endpoint. The Reverse API Console may be added to any type of Section / Resource, and must be enabled for a Resource for certain rAPI processes to successfully complete.
After adding the gadget to a section, the Reverse API console will appear as whitespace with the option to add an endpoint display. Endpoints must already be created via rAPI or through the Admin Reverse API interface in ProVision to be selectable via the gadget.

Selecting an Endpoint and clicking "Add" will allow the javascript display code (added via rAPI or the Admin Reverse API interface) associated with that endpoint to display on the Resource Entry page.
An example display might be integrating Observium to display server status modules and alerts for Resources with the "Server" Section:
![]()
As a completely customizable area, displays can be designed to meet individual Resource needs - create charts, alerts, command buttons, or any other type of data that you wish to view.
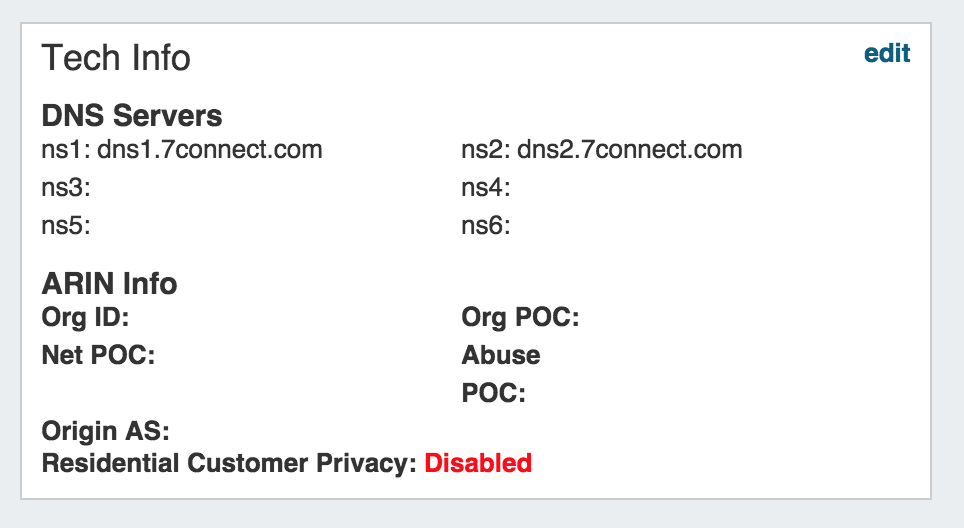
Tech Info
This visual element is used on the Resource Holder Section type. This Gadget allows you to list DNS servers, ARIN information, and enable/disable customer privacy.
...