...
See below for additional information on enabling and using the ACP Workflow Form.
6connect ACP (API Composer Platform)
6connect ACP (API Composer Platform) is a separate plugin product that enables you to create and share API workflows via a graphical editor.
ACP & Workflows
With ACP, you can pull in data from multiple APIs and easily combine it into a new API endpoint – on the fly – with no code necessary, and share your setup using JSON for convenience or adding to a version control system.
...
| Expand |
|---|
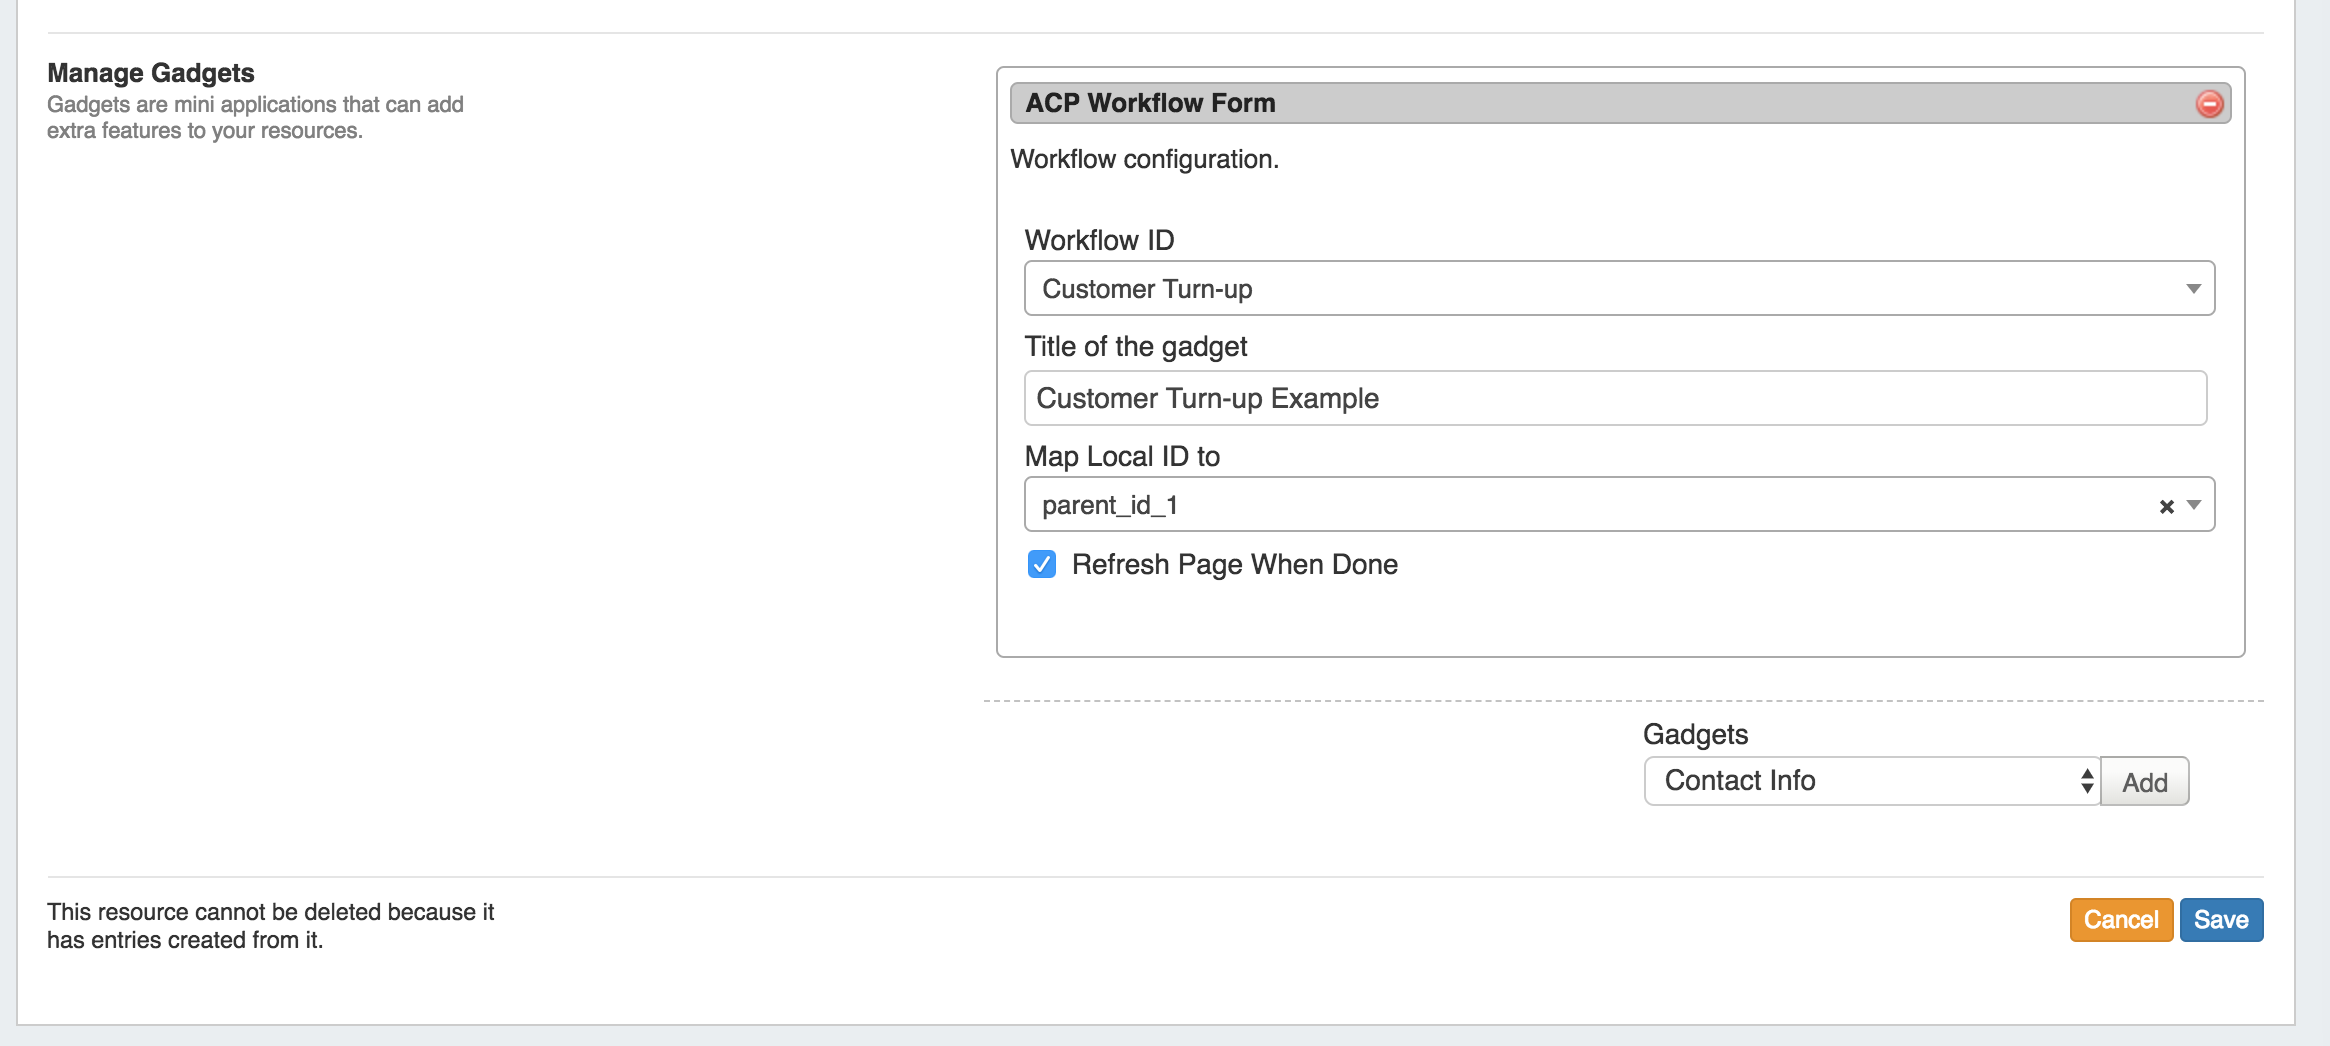
Customers with an ACP license can select and add the "ACP Workflow Form" Gadget to a Section, containing fields to select the desired Workflow to Run, Title, and map input options. Multiple Forms may be added to a Section, in order to run additional Workflows or option settings. When complete, click "Save".
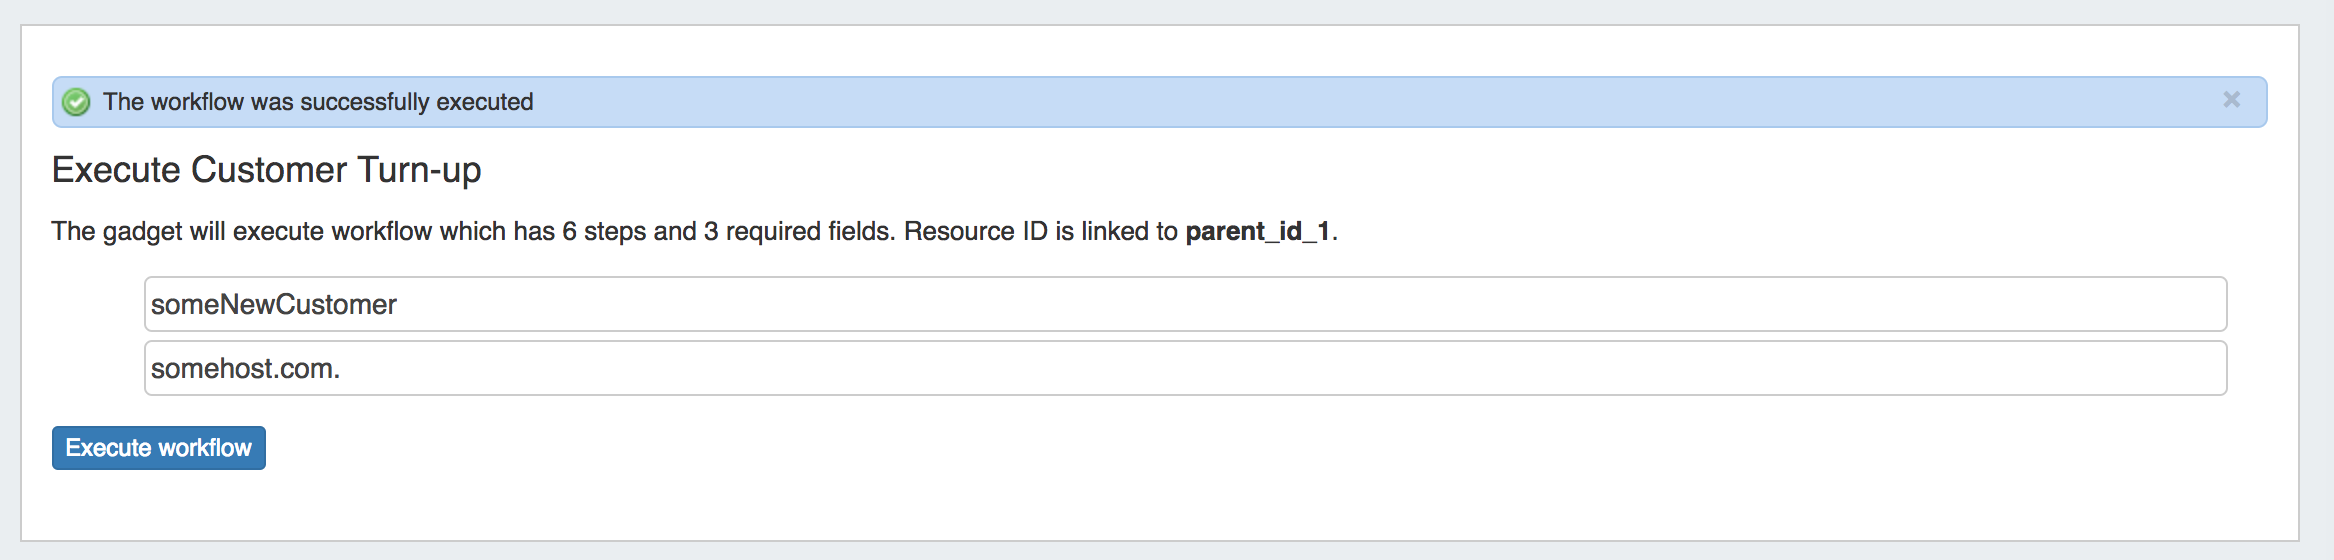
Once enabled, the Gadget will show on the resource page of the section type. Input the field data necessary for the Workflow, and click "Execute Workflow" to process the chain of workflow calls.
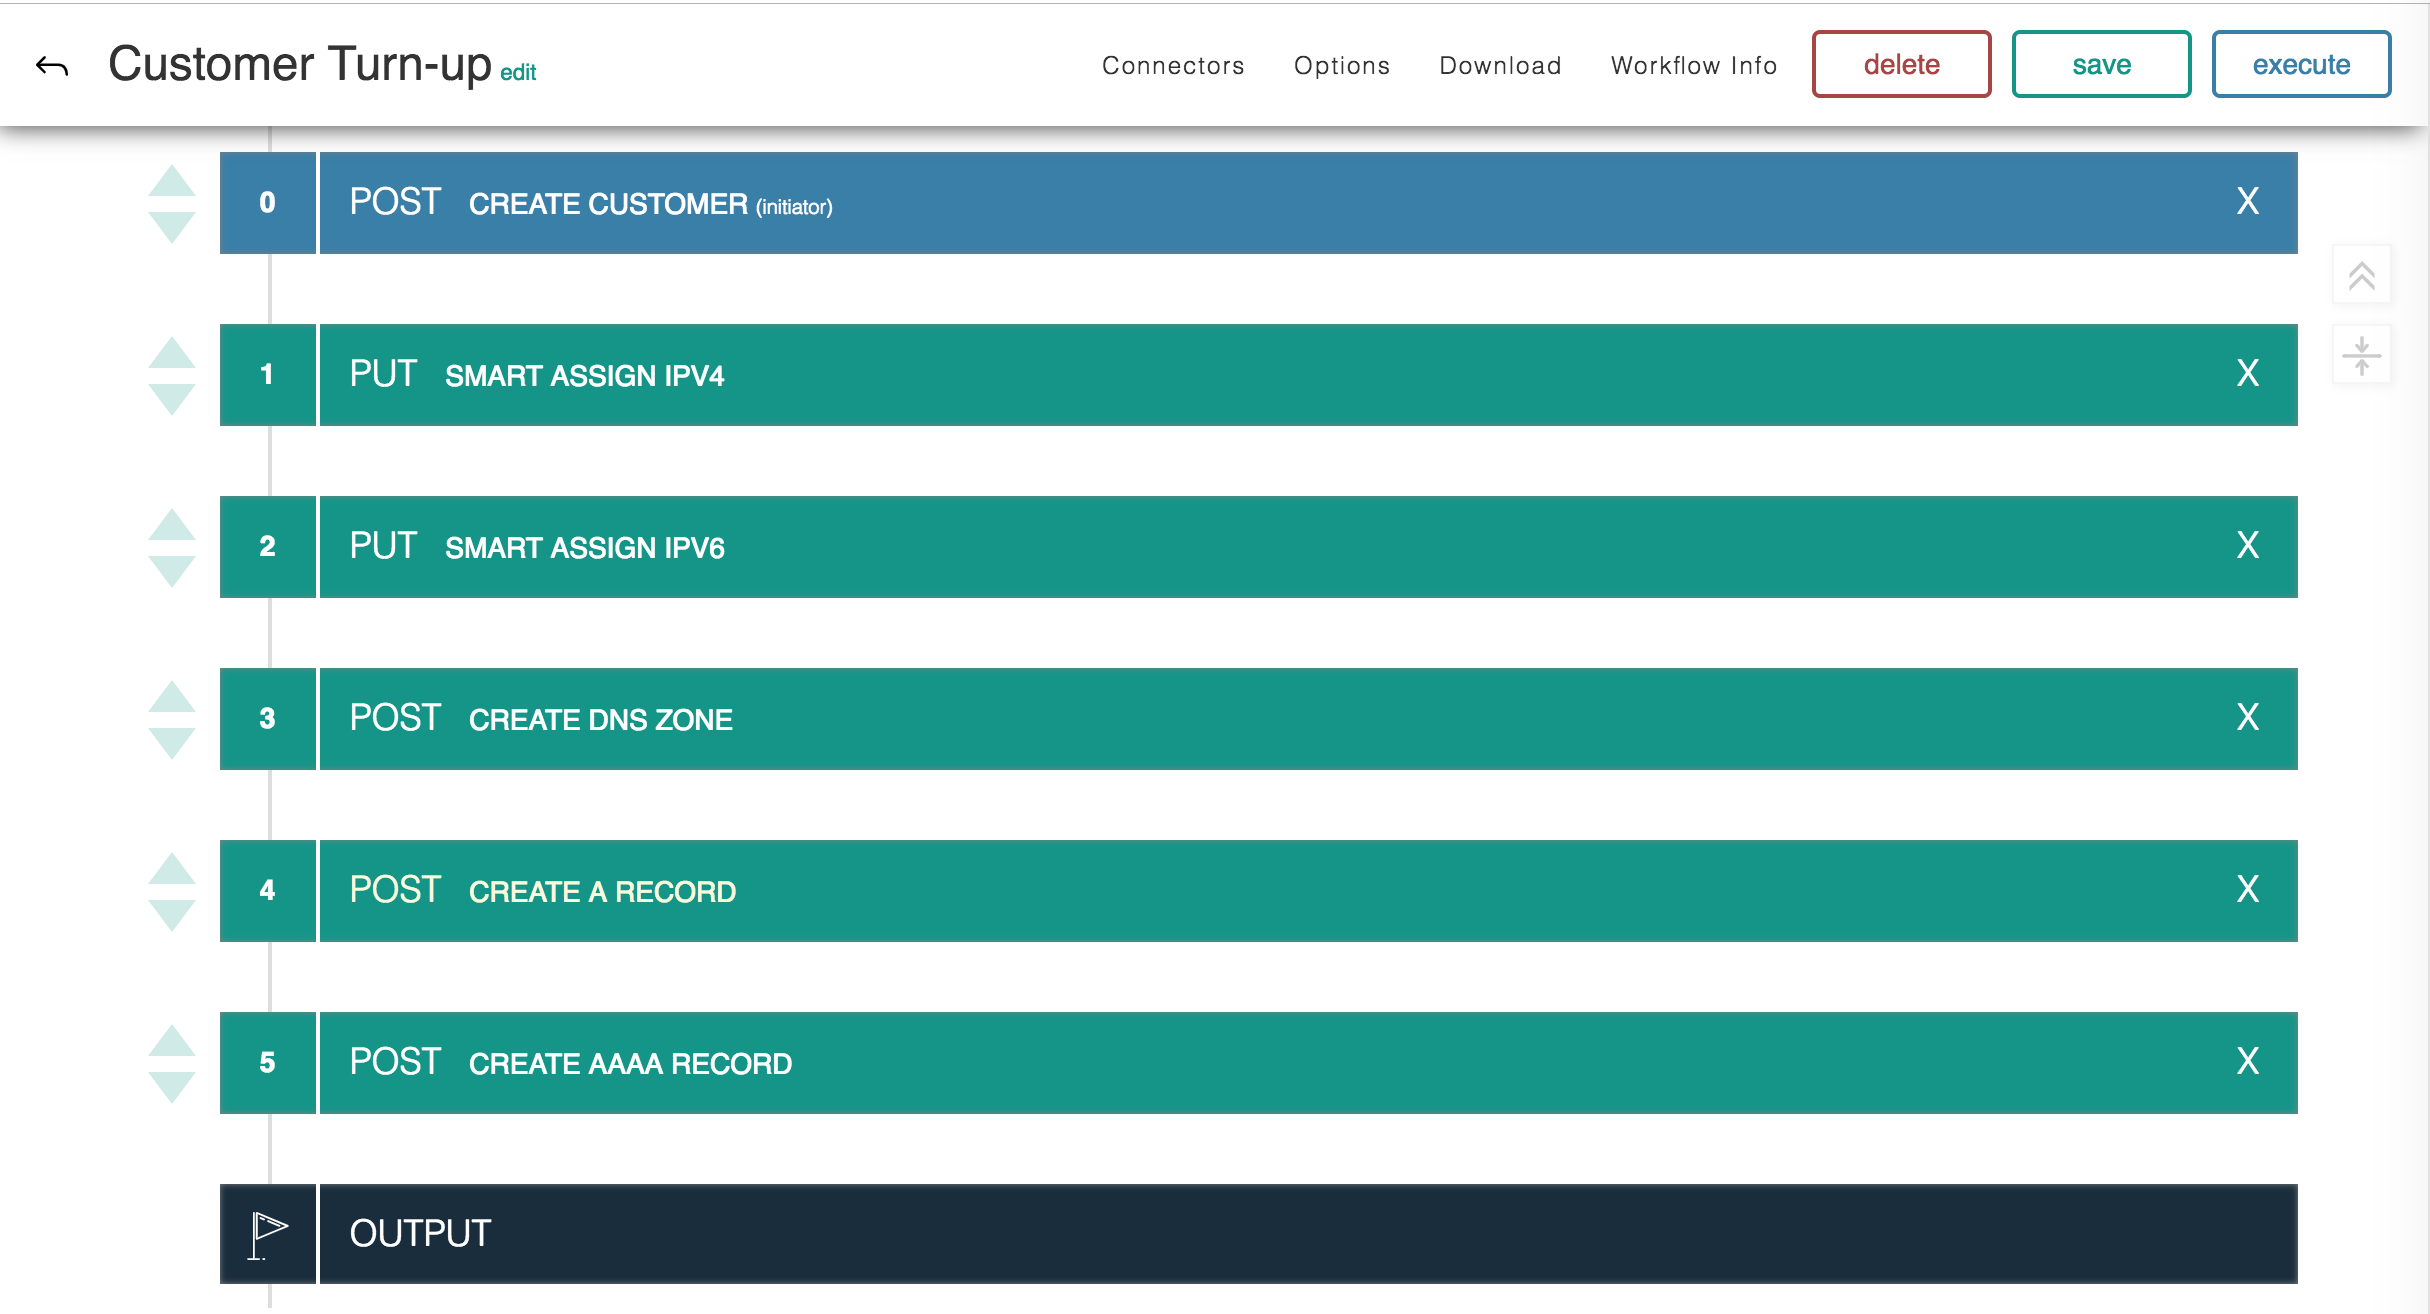
In this example, a "Customer Turn-Up" Workflow was selected (created in ProVision's ACP product) that |
...
When clicking "execute", a prompt displays requesting values for required inputs - such as the customer name for the newly created resource - before continuing.
...
performed six functions with one button click. The successful "Execute" for "Customer Turn-Up" created a new customer resource entry, assigned IPv4 and IPv6 blocks to them, created a DNS zone for the hostname, and lastly |
...
created 'A' and 'AAAA' records for the zone. |
For more information, see https://www.6connect.com/acp/. To schedule a demo, visit https://www.6connect.com/demo/ or send an email to info@6connect.com.
Linked IPs Gadget
CFR / IM - 3066: Added a "Linked IPs Gadget" to the available Gadgets list for Resource Entry pages. See Gadgets.
The Linked IPs Gadget lists IP blocks assigned to Linked Resources (via the Resource Linkage Gadget).
SAML Authentication Support
CFR / IM - 3137: Added support for SAML login, and authentication settings to Admin→Admin Settings→ Authentication Options. See the Authentication section under Admin Preferences.
SAML is a Single Sign On (SSO) authentication method that uses an external identity provider to authenticate a user at their first login, saving a token to the user's browser that is then used for subsequent logins, so that the user does not need to re-submit credentials.
SAML Setup
Before configuring SAML in ProVision, you must have an account set up with an Identity Provider (IdP) and ProVision users / groups set up in the IdP.
SAML Login
Once the correct configuration has been established and users set up for SAML in the IdP, users will be able to use SAML logins.
DUO Mobile Authentication Support
SEC-14 / IM - 3200: Added support for DUO Mobile authentication options to Admin→ Authentication Options. See the Authentication section under Admin Preferences.
To use DUO Authentication, an account must first be set up with DUO. Once an account is set up, obtain the Integration Key, Security Key, and DUO API Host name.
Enter those items into Admin→ Authentication Options → DUO Mobile Configuration, and click "Update" to save your changes.
Peering Communications Page
CFR/ IM - 3261: Added Peering "Emails" Sub-tab to the Peering Tab (Accessible to Global Admins). See Peering and Peering Emails.
The Peering "Emails" page associates a single company peering email account (such as peering@company.com) with your ProVision instance, creating a 'shortcut' email system to keep on top of the most recent peering requests while in ProVision.
Load, view, and reply to the most recent 3 days of emails received at that address, view requests sent from ProVision's Exchange Communications page, and process emails associated with ProVision Peers.
Freely trim down the ProVision 'Inbox' to keep only those emails on your short term ProVision To-Do list; 'deleting' ProVision emails only affects what messages are loaded into the ProVision instance - your original messages remain intact on your original email server.
The Peering→ Emails page is only accessible to Administrative users in the primary "Global Admins" User Group. Ensure that Peering Administrators using ProVision's Peering Emails area are included as members of that group for full access.
Additional Features / Improvements
DNSv3 Improvements
Multiple improvements have been made to DNSv3 areas:
- IM - 2500: Updated the DNS "Scheduled Push" interface to be more user-friendly
- IM - 3019: Added the ability to view/download the zone file to to Zone Details page
- IM - 3046: Added ability to select "Delete all zones" when deleting a DNS Group
- CFR/ IM - 3053: Added the ability to import Zone/Record information to an existing zone via a "Import File" button in the Zone Details page
- IM - 3054: Added additional fields to / support for S64x86 KNOT connector
- IM - 3062: Added individual "Push" buttons to the "Attached Servers" section in the Zone Details page.
- CFR/ IM - 3180: Added "Public IP" field to DNS S64 server types.
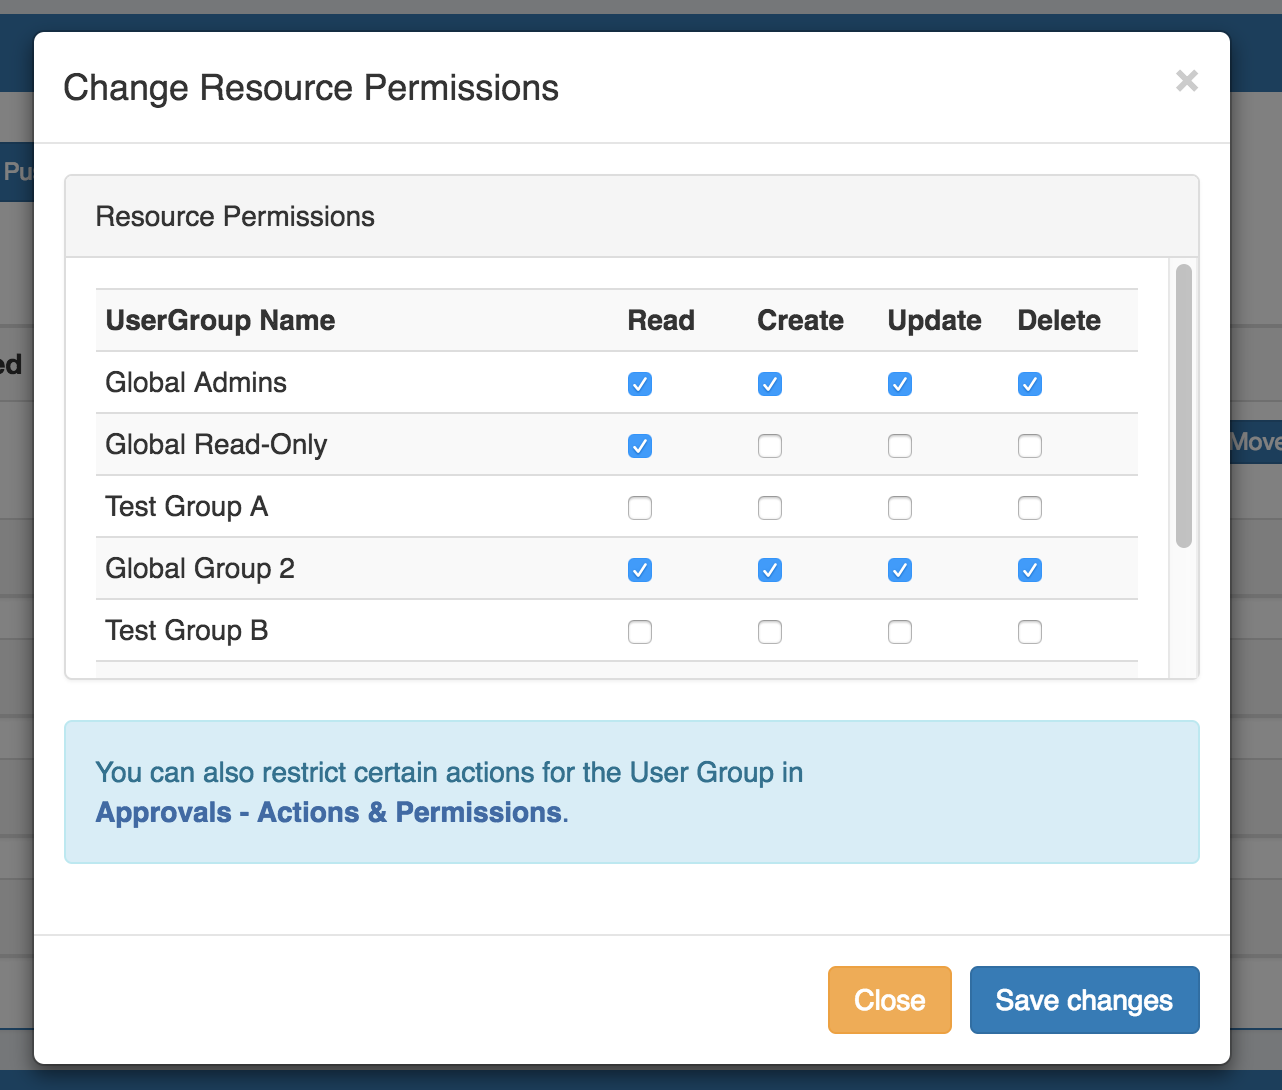
- IM - 3126: Added a permissions shortcut button ("Perms") throughout DNS, for quick CRUD permissions adjustments to specific DNS resources. Available to Admins only.
IM - 3202: Added "Advanced Settings Inherited by the Zones" to DNS Group Default Parameters. New zones created from the Group will also inherit the Advanced Settings fields as set from the group defaults.
For detailed information on DNS, see DNS Tab, Working with DNS Groups, DNS Zones Overview, Working with DNS Zones, and DNS Administration.
...
6connect ACP (API Composer Platform)
6connect ACP (API Composer Platform) is a separate plugin product that enables you to create and share API workflows via a graphical editor.
ACP & Workflows
With ACP, you can pull in data from multiple APIs and easily combine it into a new API endpoint – on the fly – with no code necessary, and share your setup using JSON for convenience or adding to a version control system.
In the example above, a "Customer Turn-Up" Workflow was created in ProVision's ACP product that chained together six ProVision API calls into one function.
When clicking "execute", a prompt displays requesting values for required inputs - such as the customer name for the newly created resource - before continuing.
Then, a successful "execute" creates a new customer resource entry, assigns both an IPv4 and IPv6 block to that resource, creates a DNS zone for the hostname, and lastly creates 'A' and 'AAAA' records for the zone.
For more information, see https://www.6connect.com/acp/. To schedule a demo, visit https://www.6connect.com/demo/ or send an email to info@6connect.com.
Linked IPs Gadget
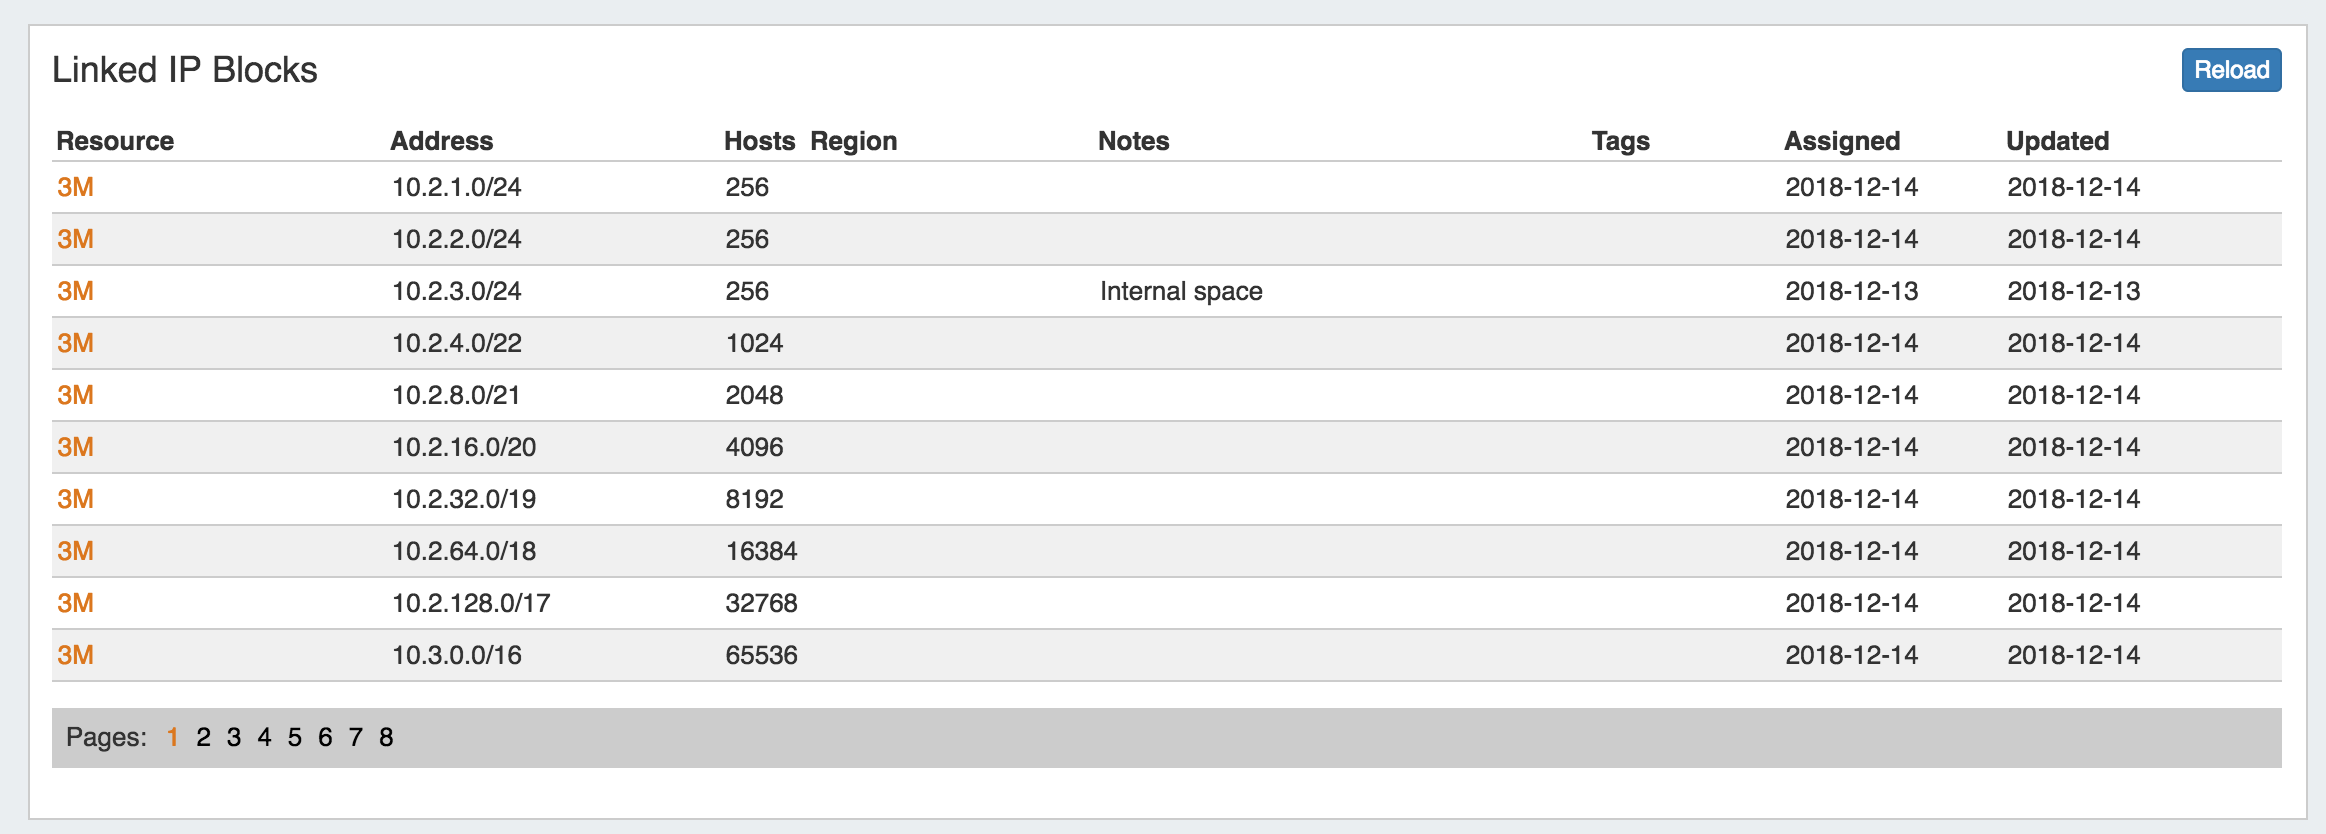
CFR / IM - 3066: Added a "Linked IPs Gadget" to the available Gadgets list for Resource Entry pages. See Gadgets.
The Linked IPs Gadget lists IP blocks assigned to Linked Resources (via the Resource Linkage Gadget).
SAML Authentication Support
CFR / IM - 3137: Added support for SAML login, and authentication settings to Admin→Admin Settings→ Authentication Options. See the Authentication section under Admin Preferences.
SAML is a Single Sign On (SSO) authentication method that uses an external identity provider to authenticate a user at their first login, saving a token to the user's browser that is then used for subsequent logins, so that the user does not need to re-submit credentials.
SAML Setup
Before configuring SAML in ProVision, you must have an account set up with an Identity Provider (IdP) and ProVision users / groups set up in the IdP.
| Expand | ||
|---|---|---|
| ||
Set up the IdP To use SAML authentication, you will need SAML set up for your instance with an Identity Provider (IdP), such as Microsoft ADFS, OneLogin, Elastic SSO, or others. You can view a list of available SAML IdPs at Wikipedia's SAML based products page. Users and Permissions: User credentials will need to be created and associated with ProVision permission group names via the IdP. All user creation, management and permissions handling occurs via the IdP, externally from ProVision. Configure SAML in ProVision ProVision setup for SAML is located in Admin →Admin Settings → Authentication Options.
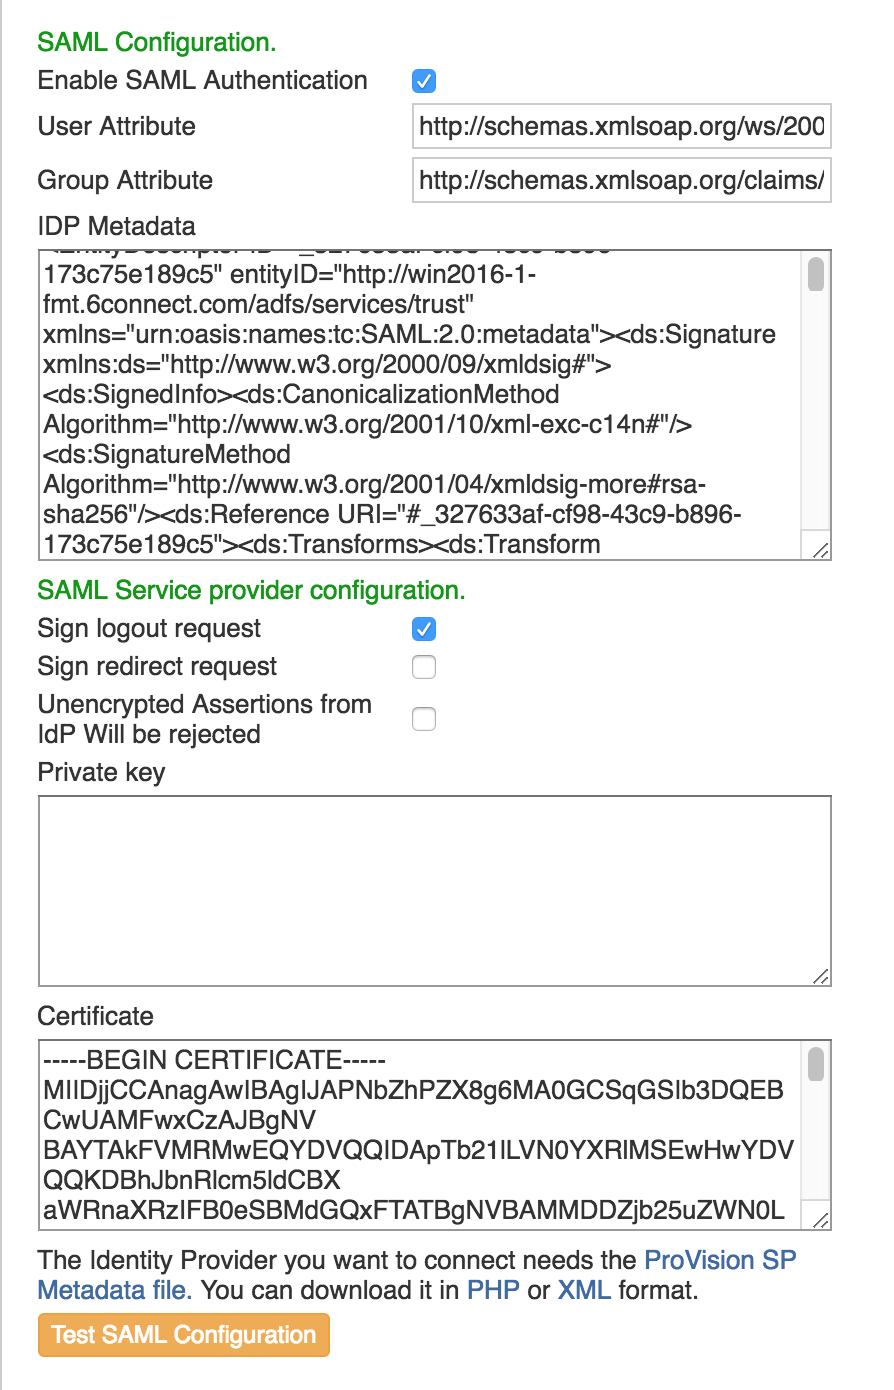
Under SAML Configuration: Enable SAML authentication by clicking the checkbox next to "Enable". The following fields are required and will need to be obtained from the IdP:
Under SAML Service Provider Configuration:
Links are provided below the configuration settings for the ProVision SP Metadata file in php and xml format, which will be needed to provide to the IdP. You can test the configuration by clicking the "Test SAML Configuration" button, a new page will open giving health check information for your provided attributes. |
SAML Login
Once the correct configuration has been established and users set up for SAML in the IdP, users will be able to use SAML logins.
| Expand | |||||
|---|---|---|---|---|---|
| |||||
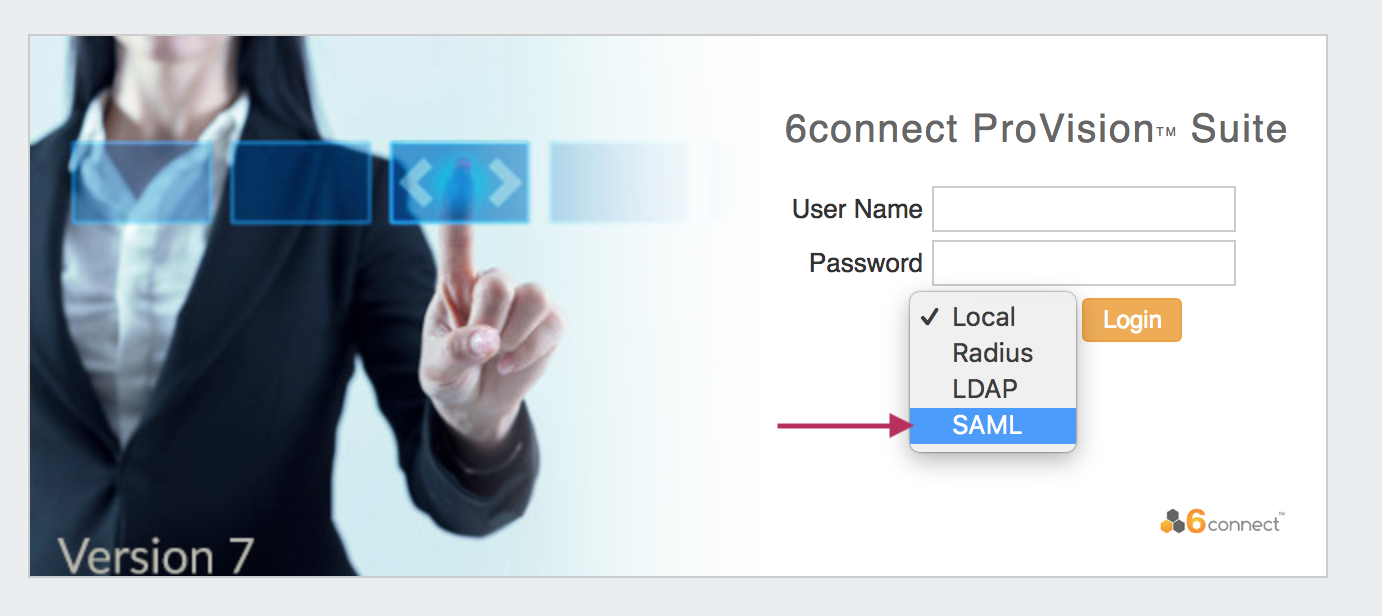
Initial Login: The initial login process occurs for the first time a user logs in, and anytime afterwards if the browser token is not present (e.g., cookies are cleared from the browser, the browser closed, or a new browser is used). From the ProVision login page, select SAML from the authentication options dropdown - you do not need to enter Username or Password.
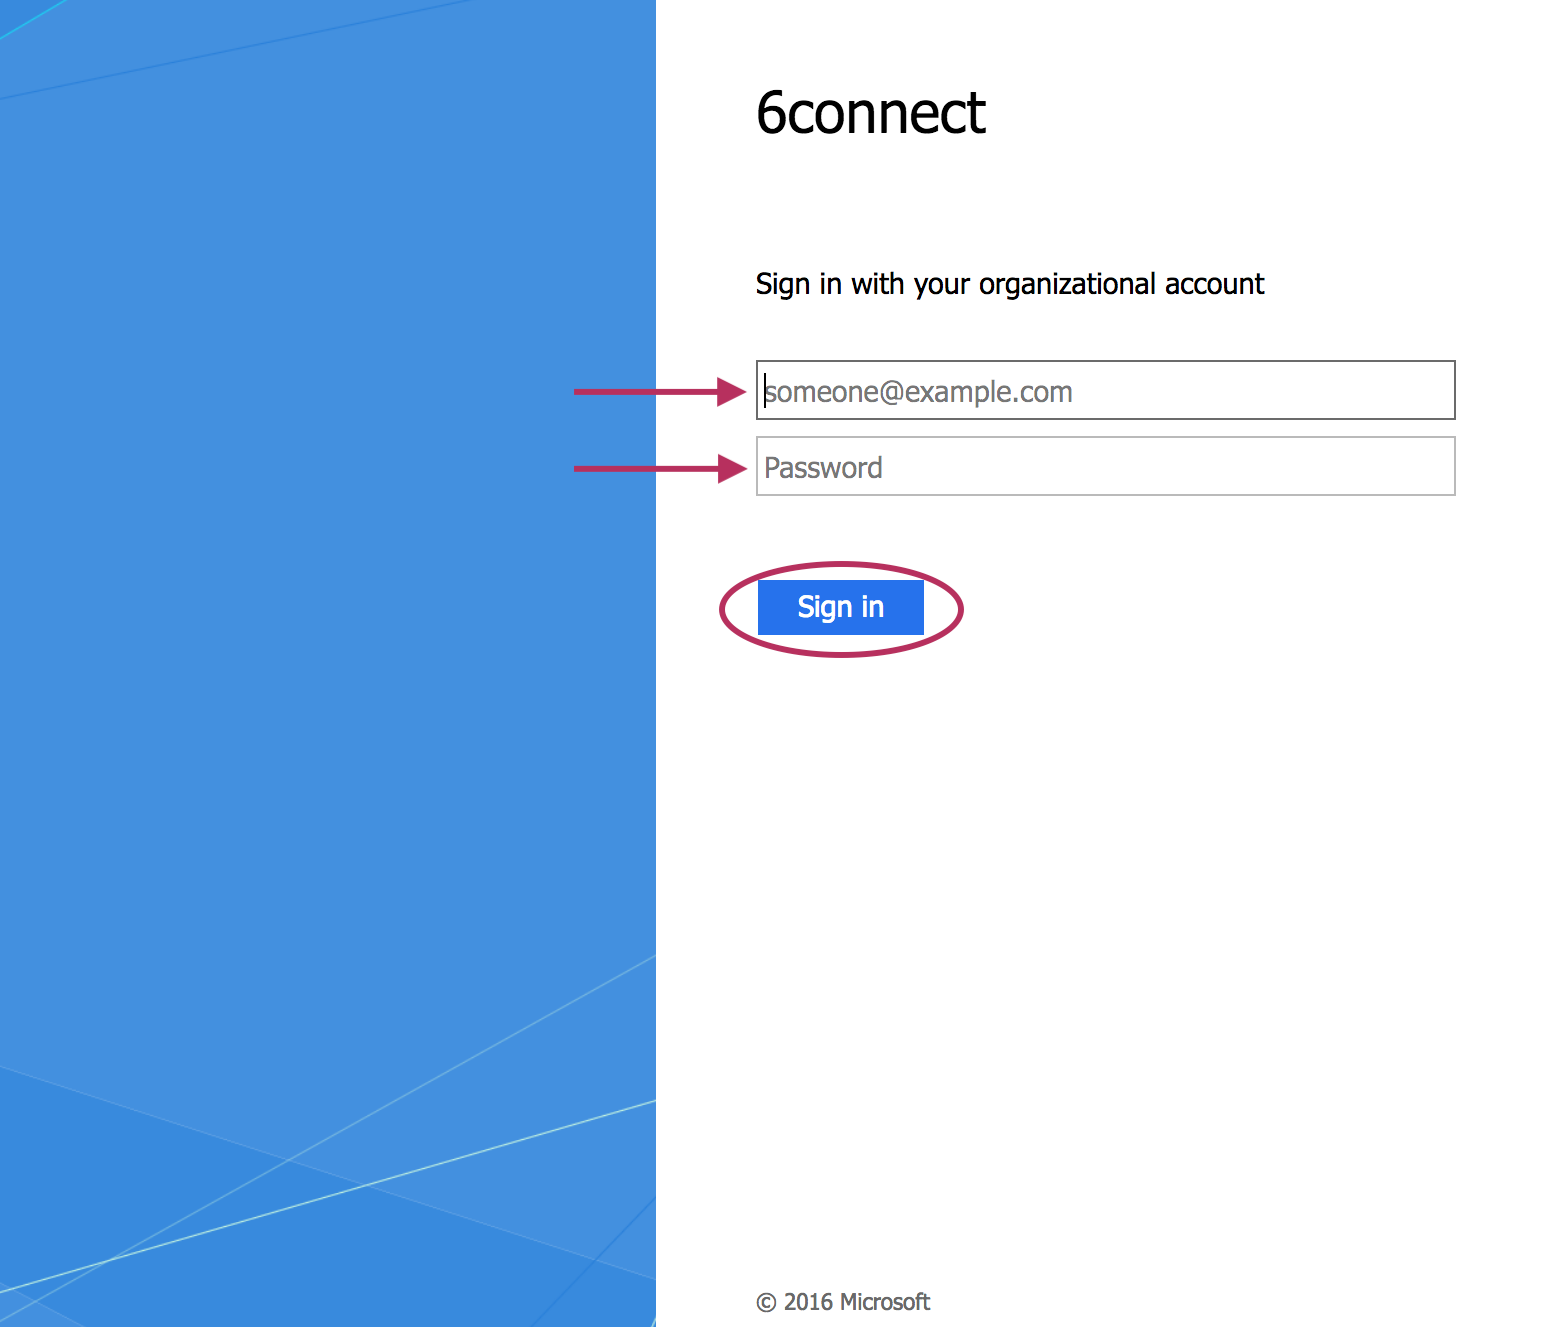
You will be redirected to the IdP site as set up in the Admin Configuration - here, we are using Microsoft ADFS (Active Directory Federation Services). Log into the IdP site using your SAML credentials, and click "Sign In".
If the sign in is successful, you will be logged into the ProVision home page. Subsequent Logins: After the initial login via the IdP (as long as the auth token is present) users will be able to login to ProVision simply by selecting the "SAML" options from the ProVision login page without entering credentials.
The auth token may be destroyed or not available if browser cookies have been cleared, a different browser used, or the browser fully closed, depending on security settings. In these cases, the user will need to sign in again via the IdP. |
DUO Mobile Authentication Support
SEC-14 / IM - 3200: Added support for DUO Mobile authentication options to Admin→ Authentication Options. See the Authentication section under Admin Preferences.
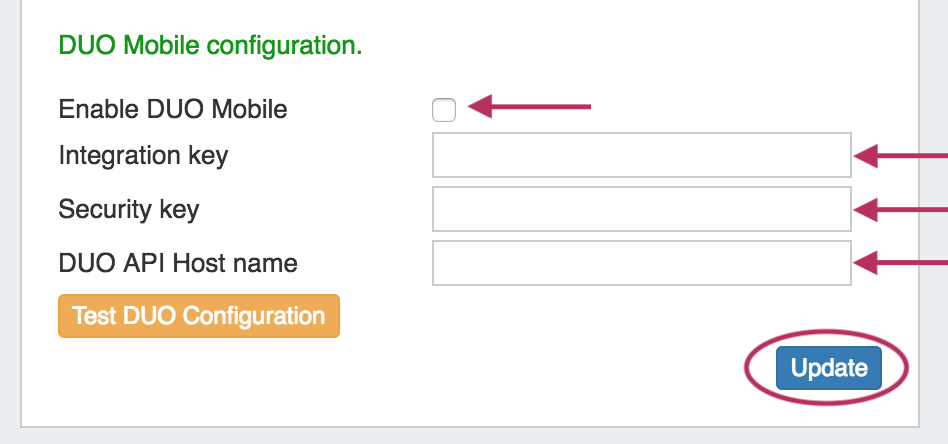
To use DUO Authentication, an account must first be set up with DUO. Once an account is set up, obtain the Integration Key, Security Key, and DUO API Host name.
Enter those items into Admin→ Authentication Options → DUO Mobile Configuration, and click "Update" to save your changes.
Peering Communications Page
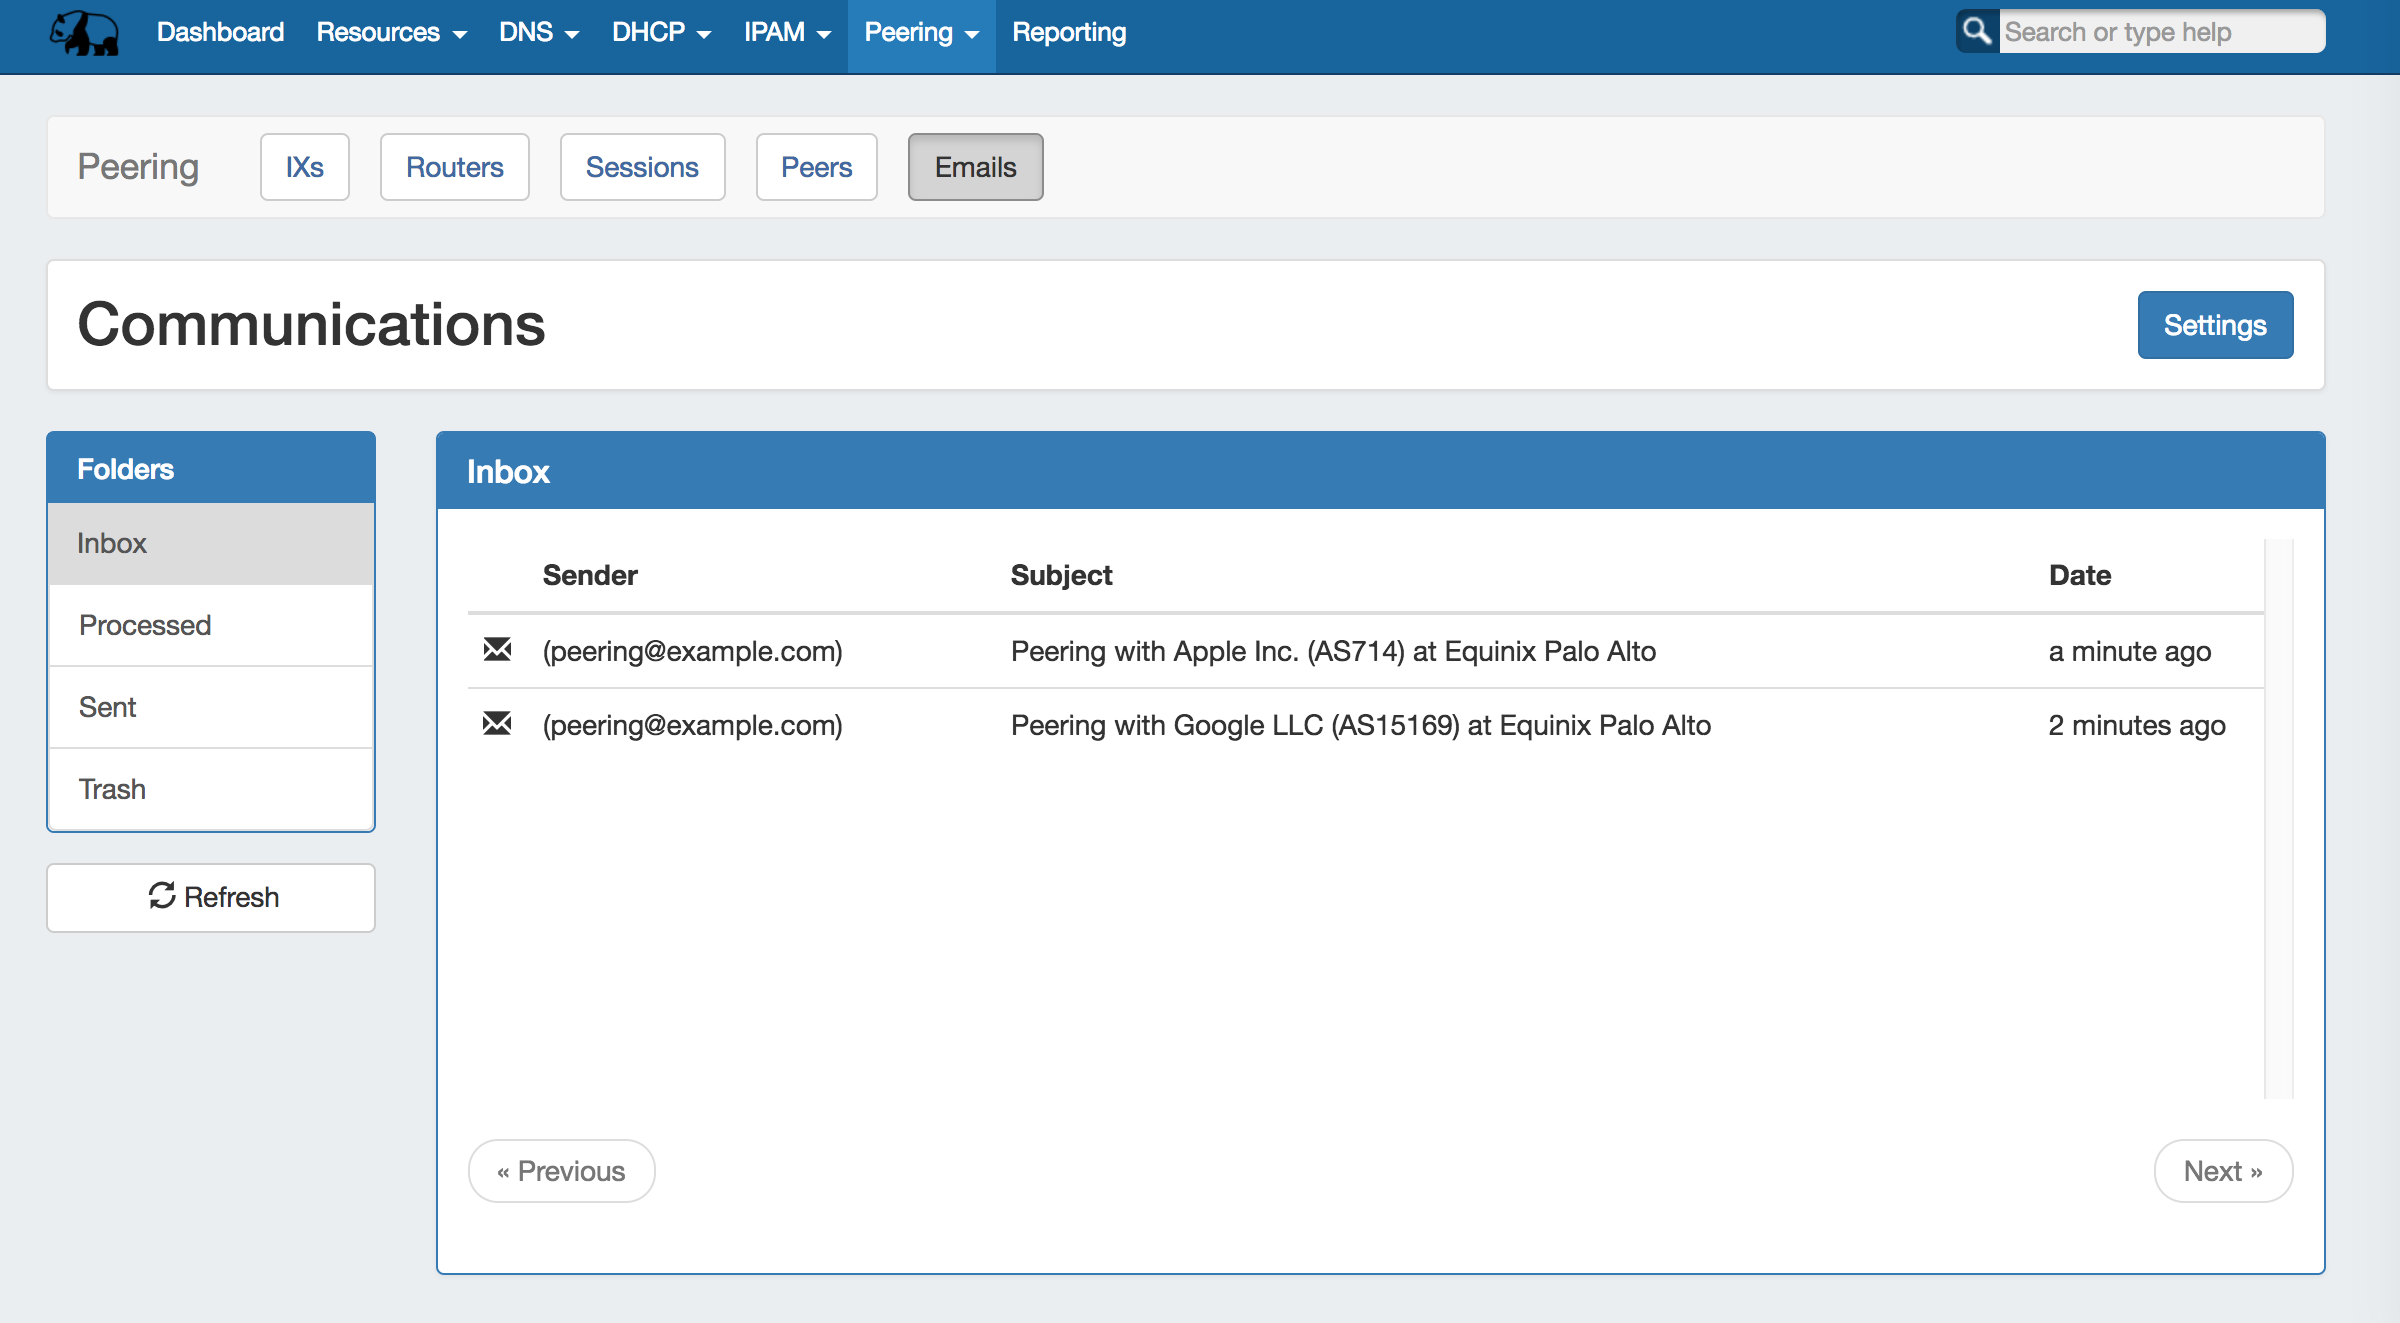
CFR/ IM - 3261: Added Peering "Emails" Sub-tab to the Peering Tab (Accessible to Global Admins). See Peering and Peering Emails.
The Peering "Emails" page associates a single company peering email account (such as peering@company.com) with your ProVision instance, creating a 'shortcut' email system to keep on top of the most recent peering requests while in ProVision.
Load, view, and reply to the most recent 3 days of emails received at that address, view requests sent from ProVision's Exchange Communications page, and process emails associated with ProVision Peers.
Freely trim down the ProVision 'Inbox' to keep only those emails on your short term ProVision To-Do list; 'deleting' ProVision emails only affects what messages are loaded into the ProVision instance - your original messages remain intact on your original email server.
| Info |
|---|
The Peering→ Emails page is only accessible to Administrative users in the primary "Global Admins" User Group. Ensure that Peering Administrators using ProVision's Peering Emails area are included as members of that group for full access. |
Additional Features / Improvements
DNSv3 Improvements
Multiple improvements have been made to DNSv3 areas:
- IM - 2500: Updated the DNS "Scheduled Push" interface to be more user-friendly
- IM - 3019: Added the ability to view/download the zone file to to Zone Details page
- IM - 3046: Added ability to select "Delete all zones" when deleting a DNS Group
- CFR/ IM - 3053: Added the ability to import Zone/Record information to an existing zone via a "Import File" button in the Zone Details page
- IM - 3054: Added additional fields to / support for S64x86 KNOT connector
- IM - 3062: Added individual "Push" buttons to the "Attached Servers" section in the Zone Details page.
- CFR/ IM - 3180: Added "Public IP" field to DNS S64 server types.
- IM - 3126: Added a permissions shortcut button ("Perms") throughout DNS, for quick CRUD permissions adjustments to specific DNS resources. Available to Admins only.
IM - 3202: Added "Advanced Settings Inherited by the Zones" to DNS Group Default Parameters. New zones created from the Group will also inherit the Advanced Settings fields as set from the group defaults.
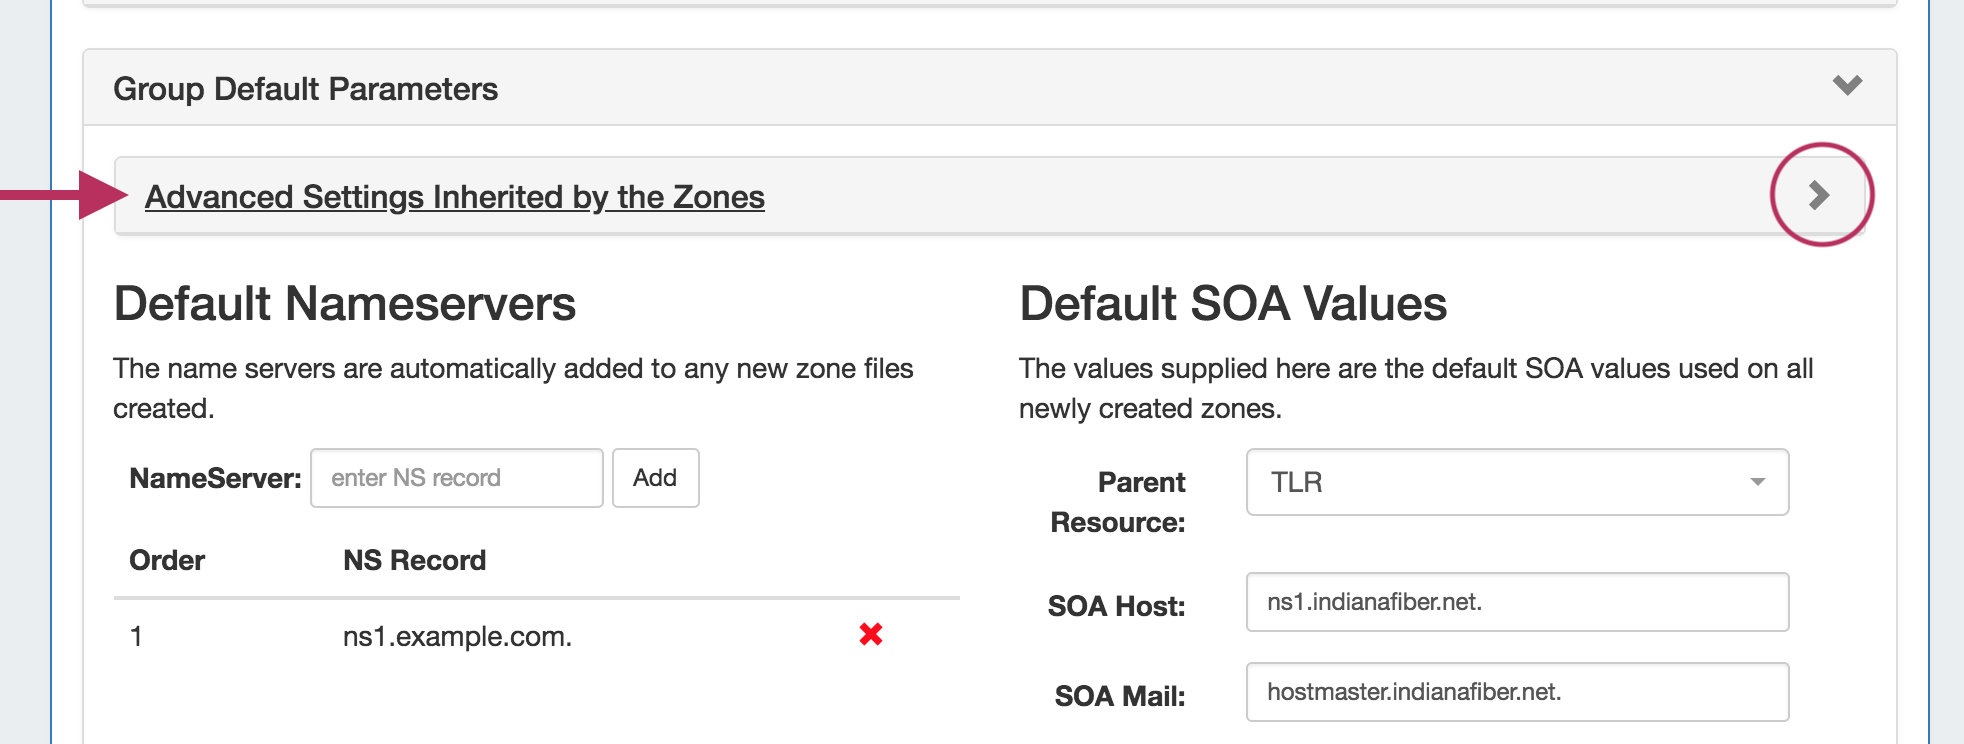
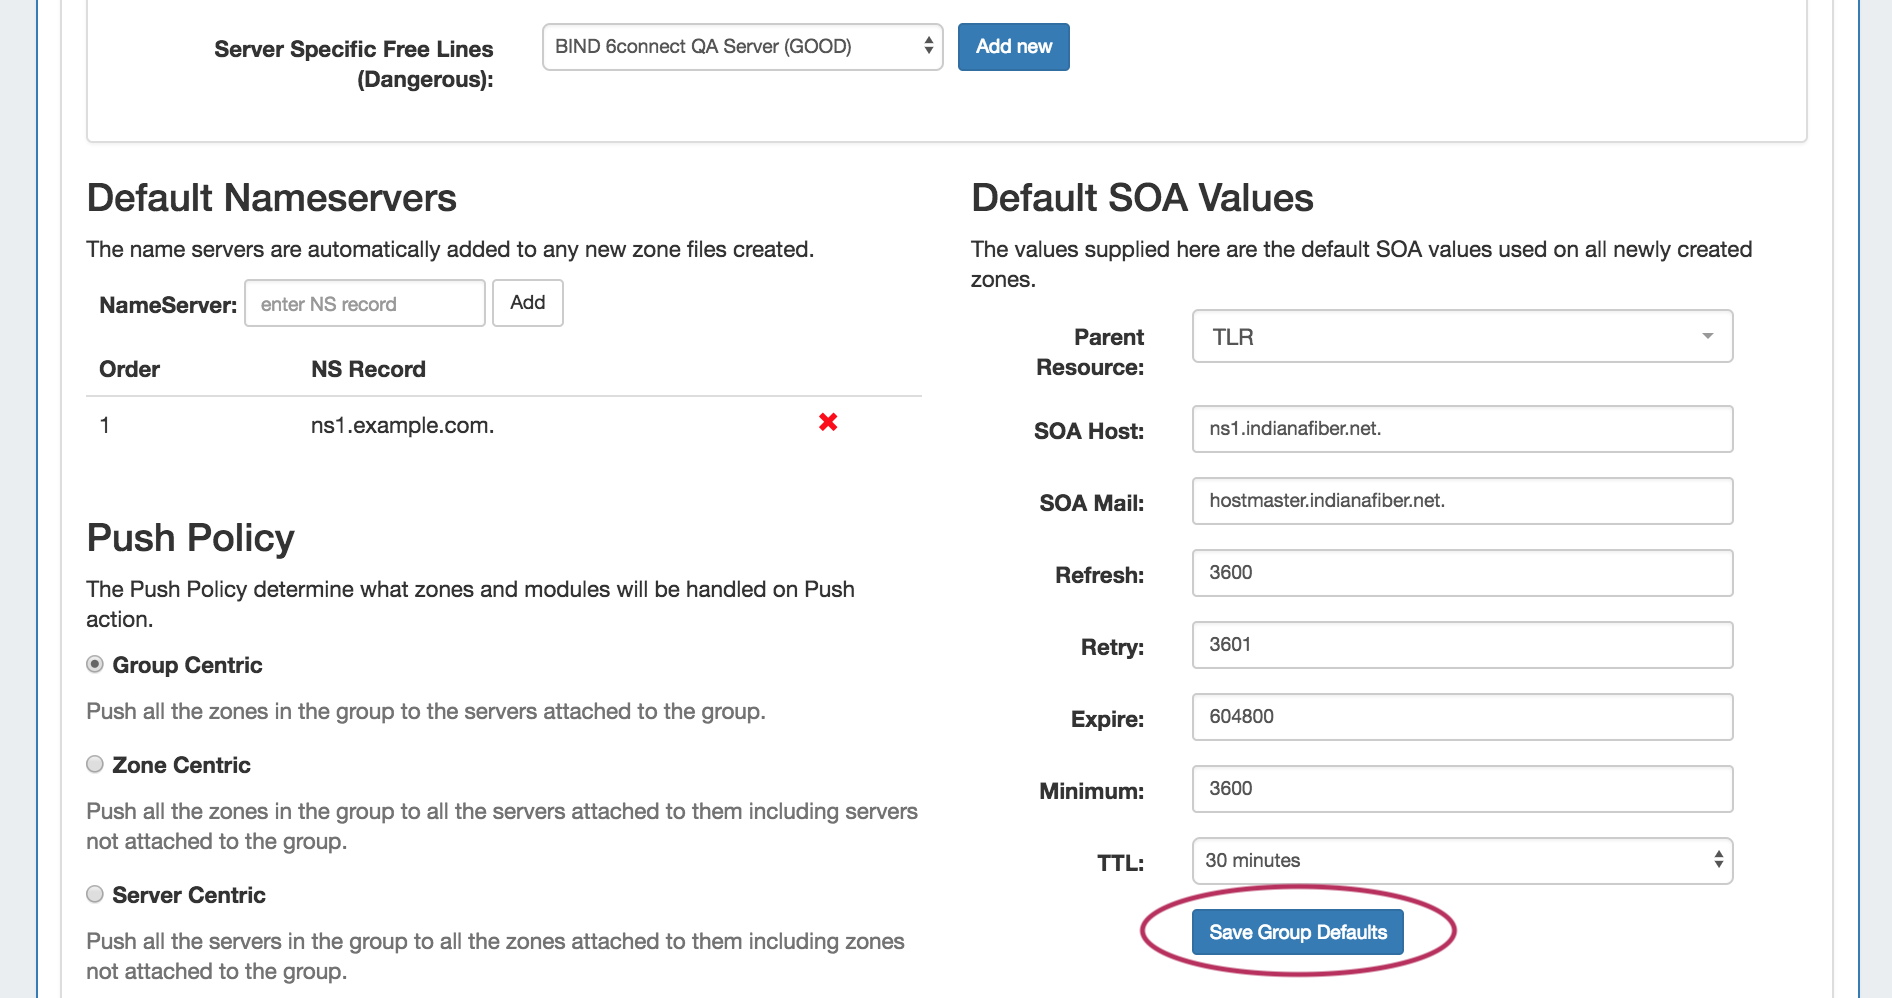
Expand title Using the "Advanced Settings" module... Open the "Advanced Settings Inherited by the Zones" module by going to any DNS Group and opening the "Group Default Parameters".
The Advanced Settings module will be at the top of Default Parameters area. To expand it, click on the expansion arrow on the right side of the header bar.
Once expanded, settings may be entered for DNSSEC, Dynamic Updates, Master-Slave Handling, Lists, and free lines.
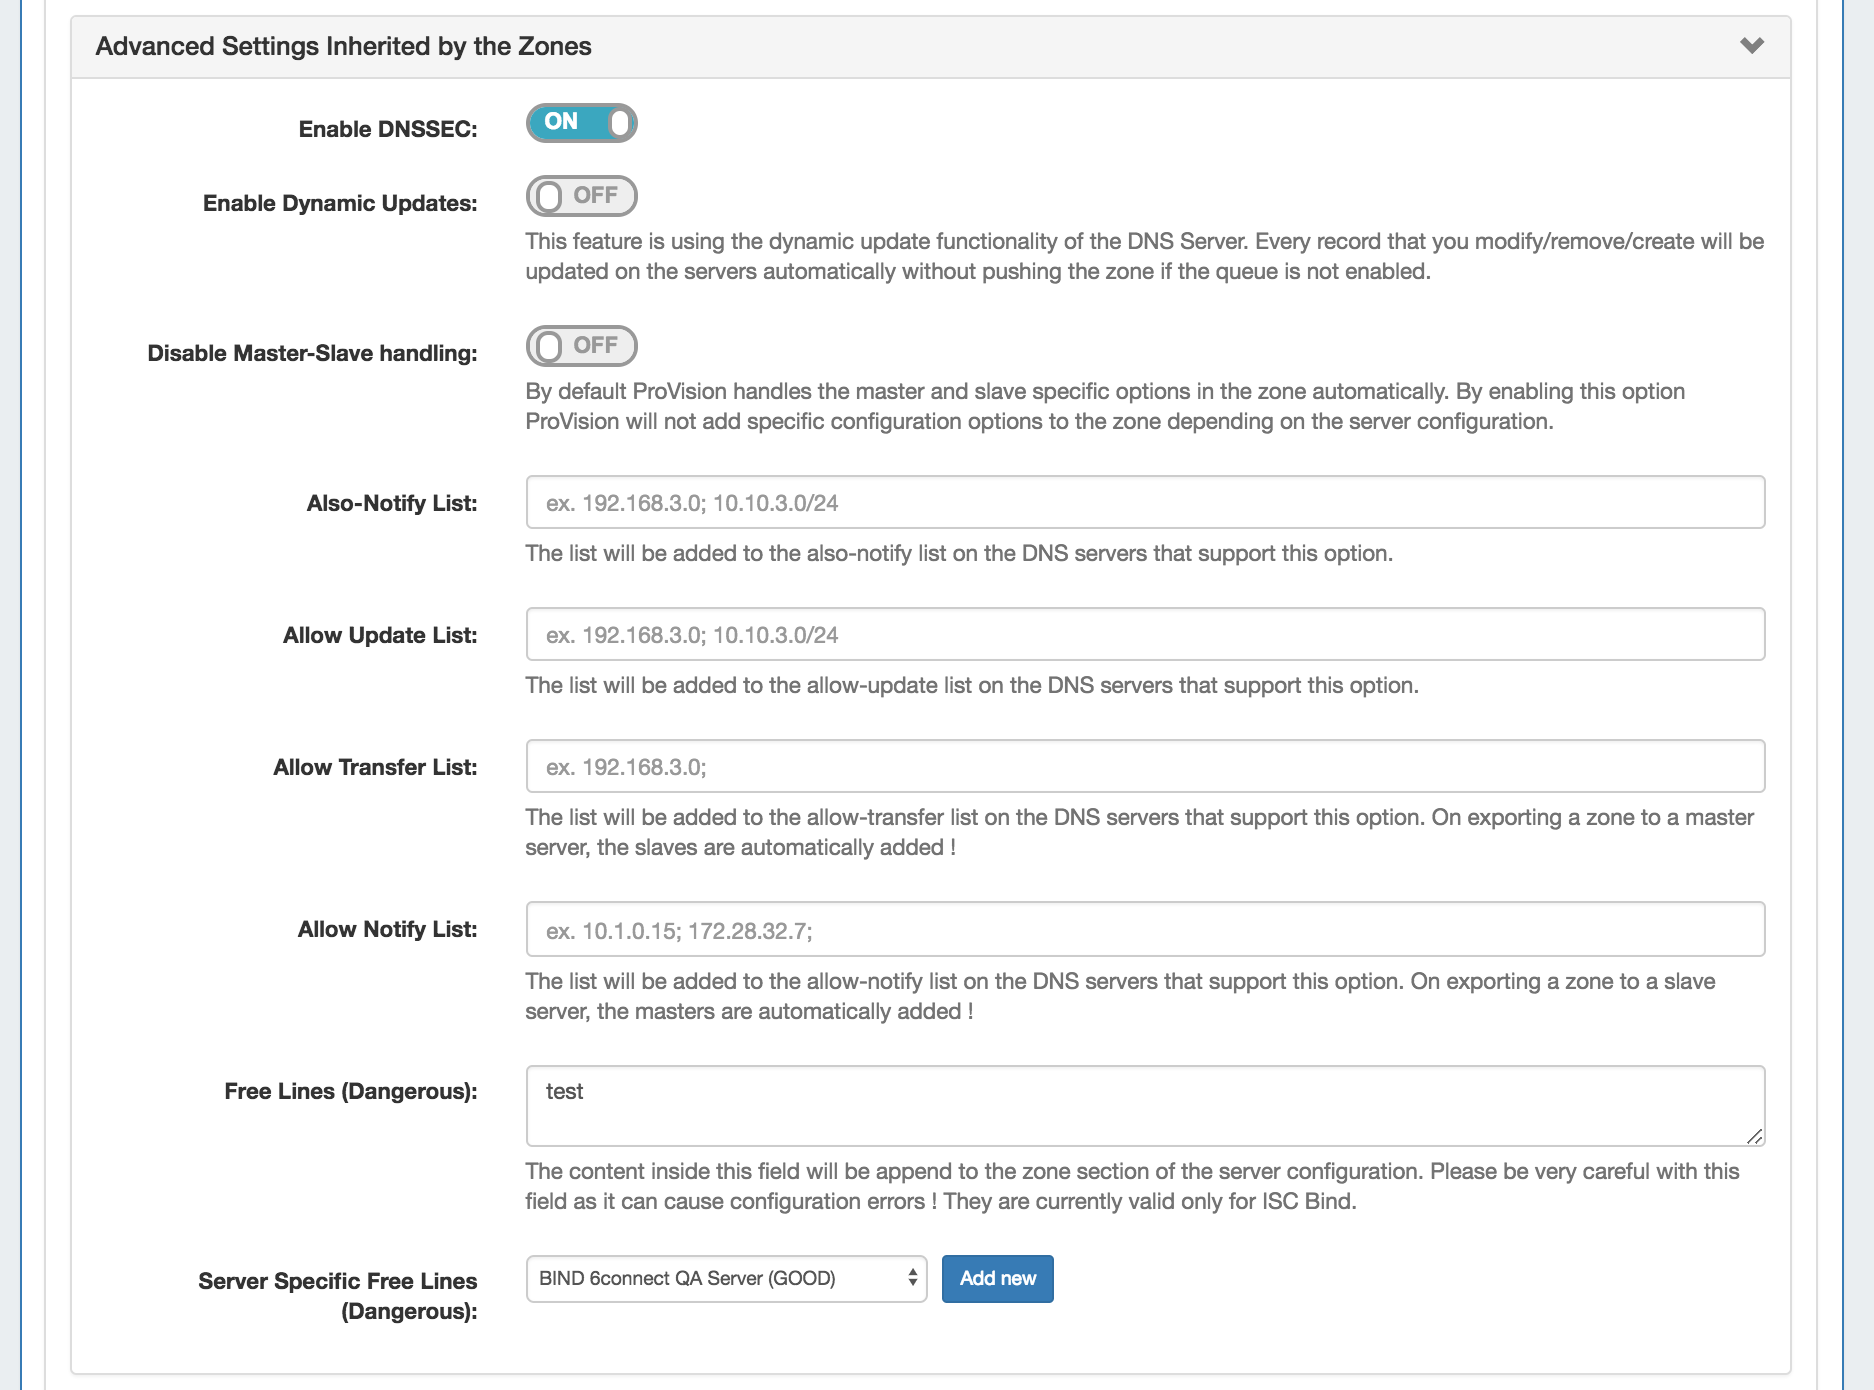
Note title Save your changes! Important - to ensure that your changes are saved, click the "Save Group Defaults" button under the Default SOA Values section - this save button will save any changes made to Advanced Settings, Default Nameservers, or Default SOA Settings.
For detailed information on DNS, see DNS Tab, Working with DNS Groups, DNS Zones Overview, Working with DNS Zones, and DNS Administration.
Scheduler Updates
New Scheduler
...
New Scheduler Tasks
IM - 3104: Three new scheduler tasks have been added: Delete Archived Data, Approvals - Process Subscriptions, and Approvals - Delete events older than 1 month. See Scheduler Tab and Approvals.
...
Action Menu (right click) updates include the additions of Split, Merge, Assign, Unassign - Skip Holding, IP Rules, Templates, and Multi-block Edit.
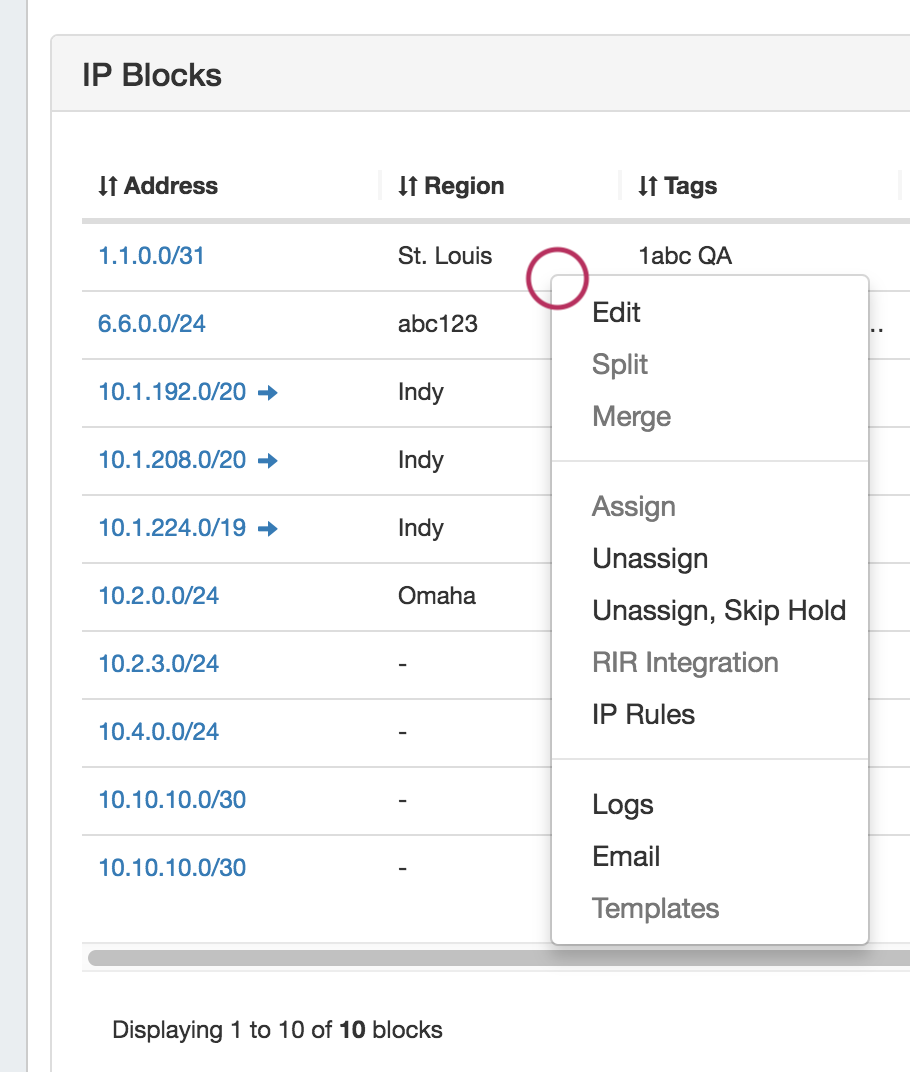
To select multiple blocks in the IPAMv2 Gadget, left click on a single block, and the shift-click or cmd-click to select additional blocks. Once all desired blocks have been selected, right click to show the multi-block Action Menu.
Log Updates
IM - 3107: Added a color-coded "Chart View" to Admin Logs. See: Log.
To view the graphical chart version of Logs, click the "chart" toggle on the bottom right of the search fields. Each log event will be displayed as a color-coded box.
View log details by hovering the mouse arrow over an event box.

IPAM Regions Updates
IM - 3156: Updated IPAM Regions to support a Google Geocode API key setting (required for proper geolocation function of IPAM Maps). See: IPAM Tab and IPAM Parameters.
![]()
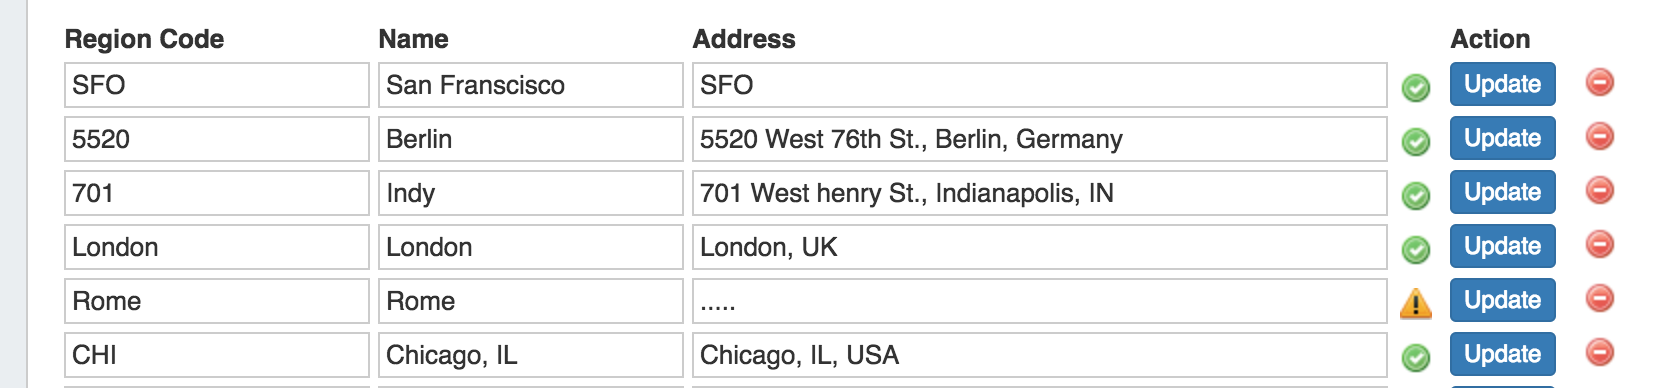
IM - 3214: Added Address validation if IPAM Maps is enabled, and a Google Geocode API key field setting has been provided.
Valid addresses (according to Google's API) will show a green check mark next to the address field, invalid addresses (unable to be mapped) will show a yellow exclamation mark.
Google Geocode API Key Requirement
Due to changes in Google's licensing and Geocoding API, the previous geolocation method used in ProVision is no longer supported. IPAM Regions now requires a Google Geocode API Key in order for IPAM Maps to properly determine a Region's location.
6connect is exploring adding additional map integration options for ProVision.
Any customers who require an alternative geocode option supported apart from Google Geocode API key, please contact us at feedback@6connect.com.
...
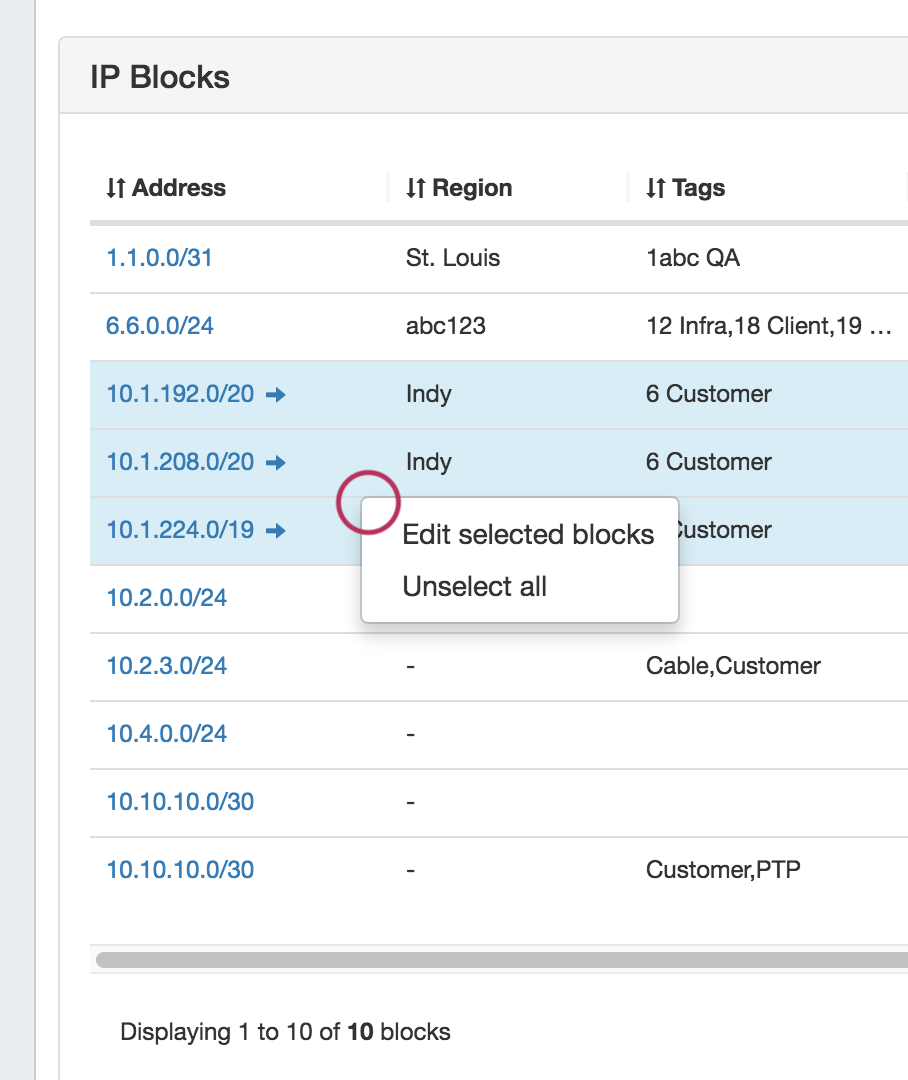
Multi-block Edit.
To select multiple blocks in the IPAMv2 Gadget, left click on a single block, and the shift-click or cmd-click to select additional blocks. Once all desired blocks have been selected, right click to show the multi-block Action Menu.
Log Updates
IM - 3107: Added a color-coded "Chart View" to Admin Logs. See: Log.
To view the graphical chart version of Logs, click the "chart" toggle on the bottom right of the search fields. Each log event will be displayed as a color-coded box.
View log details by hovering the mouse arrow over an event box.
IPAM Regions Updates
IM - 3156: Updated IPAM Regions to support a Google Geocode API key setting (required for proper geolocation function of IPAM Maps). See: IPAM Tab and IPAM Parameters.
![]()
IM - 3214: Added Address validation if IPAM Maps is enabled, and a Google Geocode API key field setting has been provided.
Valid addresses (according to Google's API) will show a green check mark next to the address field, invalid addresses (unable to be mapped) will show a yellow exclamation mark.
| Note | ||
|---|---|---|
| ||
Due to changes in Google's licensing and Geocoding API, the previous geolocation method used in ProVision is no longer supported. IPAM Regions now requires a Google Geocode API Key in order for IPAM Maps to properly determine a Region's location. 6connect is exploring adding additional map integration options for ProVision. Any customers who require an alternative geocode option supported apart from Google Geocode API key, please contact us at feedback@6connect.com. |
Applying a Google Geocoding API Key:
| Expand | ||
|---|---|---|
| ||
Step 1: Obtain a Google Geocoding API Key To get a Google Geocoding API Key, follow the instructions listed here: How to get a Google Geocoding API Key Note: In order to obtain a Google Geocoding API Key, a company must have a subscription enabled to Google Cloud Platform Console. Step 2: Assign the API Key to IPAM Regions Once assigned a Google Geocoding API Key, paste the API key into the IPAM regions page under "Apply google geocode api key" and click the "Assign" button.
|

IPAM 'Advanced' Button
CFR - 143: The IPAM "Advanced" button has been brought back, by popular demand. See:IPAM Tab
...