...
There are two DHCP Gadgets available to integrate onto a Resource Entry Page resource entry page - the DHCP Management Gadget, and the DHCP Customer Configuration Gadget.
For an overview of Gadgets gadgets and how to attach them to Resource resource pages, see see Gadgets and Adding a Gadget to a Section .
| Table of Contents |
|---|
DHCP Management Gadget (Legacy)
...
Attach / Enable the DHCP Gadget
Verify that the DHCP Gadget is attached to to the Resource Sectionresource section. Then, you can enable the gadget by selecting the radio button next to "On", and click "Update".
...
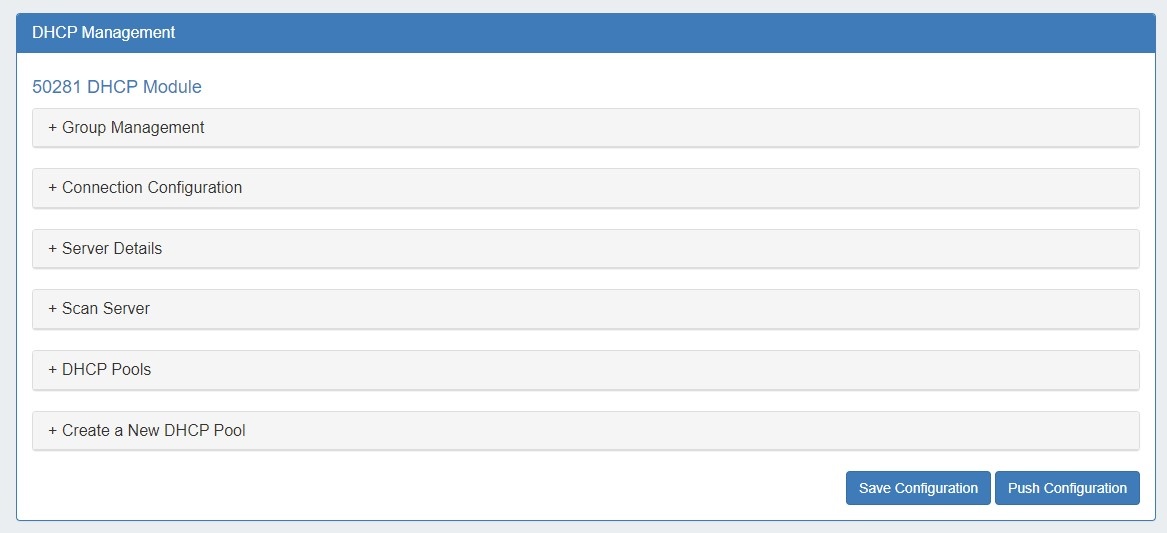
Once DHCP functions are enabled for a Resource Sectionresource section, you will be able to manage configurations per Resource resource by expanding the relevant areas on the Resourceresource's Entry entry page.
Group Management
This section of the DHCP Management Gadget allows you to create and manage DHCP Groupsgroups.
DHCP groups help you to organize all of your Pools and Servers together into a single place, and push pools linked to a DHCP Group to all of the servers attached to that Groupgroup. It also allows for the designation of a DHCP Failover Peer for ISC BIND servers.
...
| Expand |
|---|
Ensure that all necessary DHCP servers are created via the DHCP Tab DHCP Servers page. See Working with DHCP Servers for additional information. All DHCP servers listed under the DHCP tab will be available to select to attach to DHCP Groupsgroups. |
Step 2: Create DHCP Groups
| Expand |
|---|
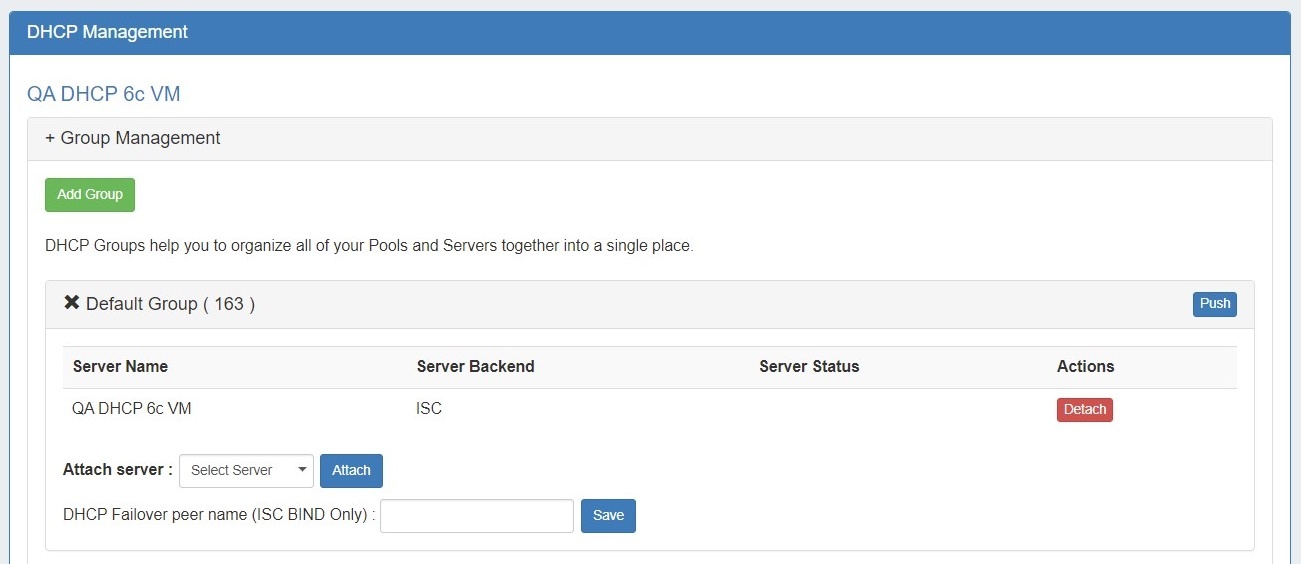
Select a DHCP server page with the DHCP Management Gadget from, and expand the Group Management section. Note: Any DHCP server page with the Management Gadget is fine to use, as the Group Management section will globally update to be the same in any DHCP Management Gadget. As of ProVision 7.0.0, DHCP Groups groups may also be created and managed from the DHCP Groups page under the DHCP TabDHCP Tab.
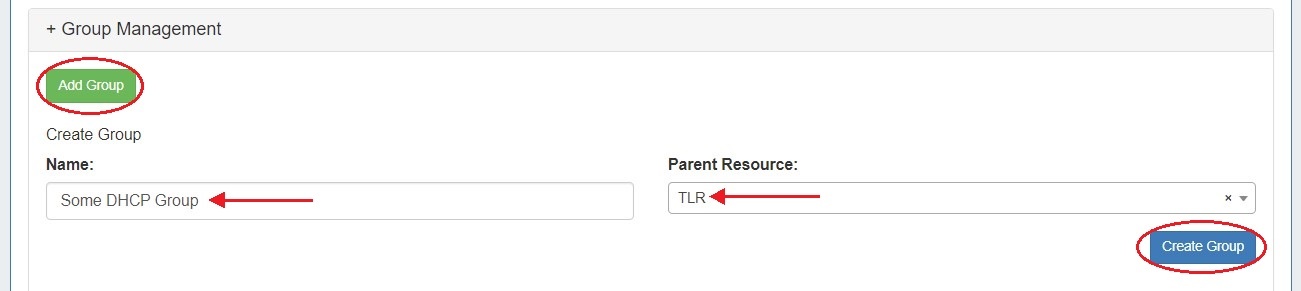
A "Default Group" should be available immediately, or you can click the "Add Group" button to create a new DHCP Groupgroup. Type in the desired Group Name group name and select a Parent Resource parent resource for the Groupgroup, then click "Create Group".
Your new Group group will be available in the DHCP Management Gadget. To delete the DHCP Groupgroup, click the "X" next to the Group group name. |
Step 3: Attach DHCP Servers to Groups
| Expand |
|---|
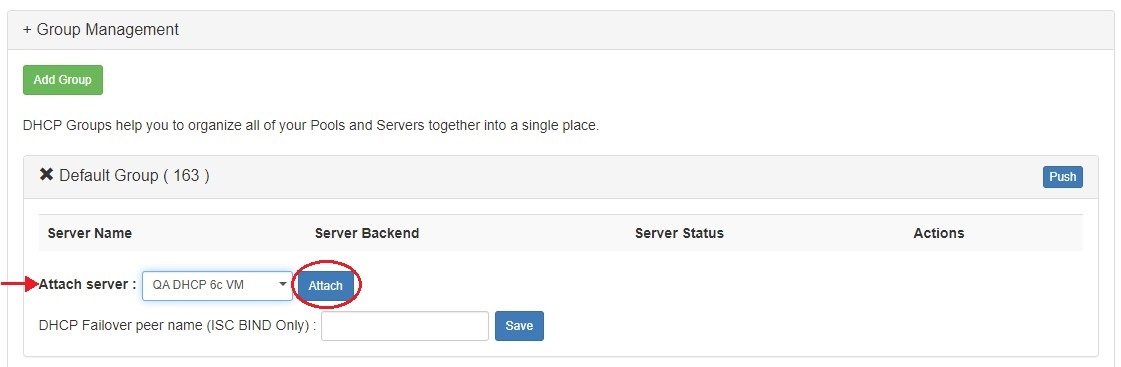
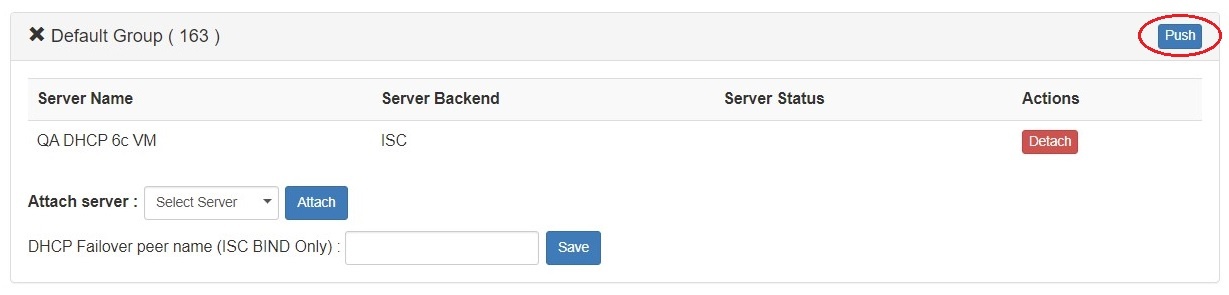
All DHCP servers listed under the ProVision DHCP Tab will be available to select and attach to the Groupgroup. Select the desired server from the "Attach Server" selector, then click "Attach". The server is now attached to the group and available for pushes.
If needed, a server may be removed from a DHCP Group group by clicking the "Detach" button. |
...
| Expand |
|---|
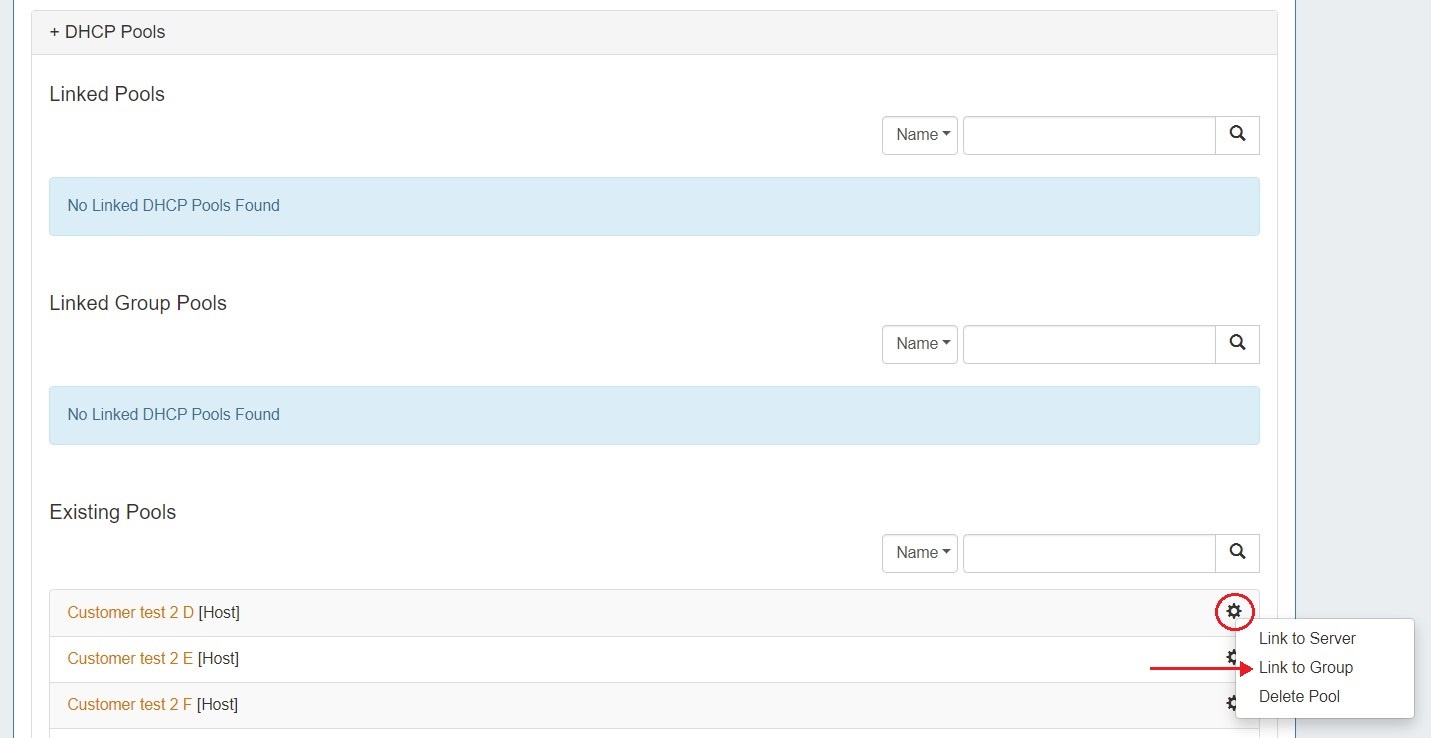
From the Existing Pools list under the DHCP Pools section, click the Action Menu (gear icon) for the pool you wish to link to a DHCP Groupgroup. From there, click "Link to Group".
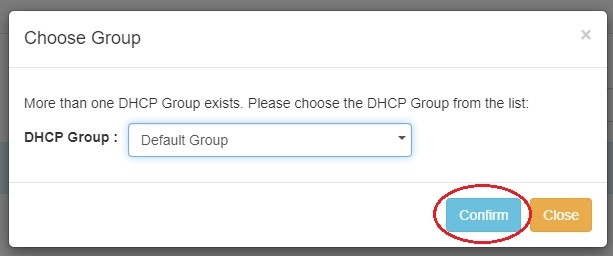
If multiple DHCP Groups groups exist, a dialog box will pop up for you to select the desired Group group to link the pool to. Select the DHCP Groupgroup, then click "Confirm" to add the pool to the Groupgroup.
Once linked, the DHCP Pool pool will show under the "Linked Group Pools" area of the DHCP Pool section. From here, if desired, you may remove the pool from the group by clicking the Action Menu and "Remove Link".
|

...
| Expand |
|---|
Lastly, click the "Push" button for the DHCP Group group to push the linked pool(s) for the Group group to the linked DHCP Modulemodule, and then push all DHCP servers linked to the Groupgroup.
While pushing, a status box will appear to show status and any errors, if applicable. |
...
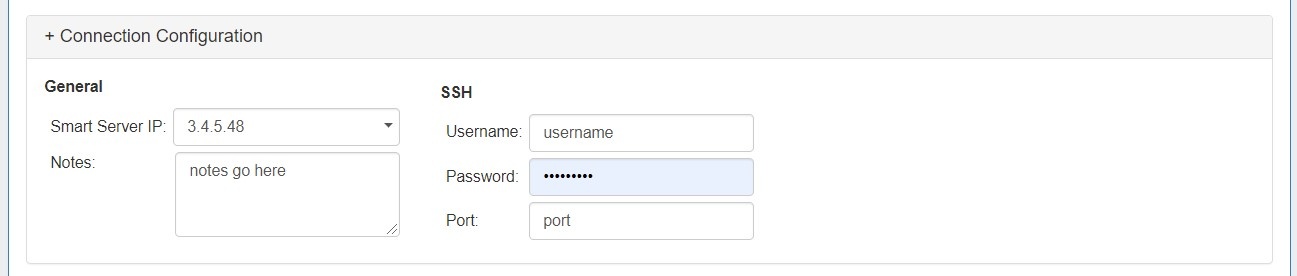
In this gadget area, you may enter in the information that will be used for ProVision to communicate to the DHCP Serverserver.
Server Details
Server details and advanced options may be entered under this portion of the gadget.
...
Scan Server provides a "Scan Now" button, which scans the DHCP server and returns found IPs under DHCP Poolspools.

The returned IPs are divided by Pools pools and IPv4/IPv6. Returned fields include MAC address, IP address, and name. The percentage utilization of IP space out of the available DHCP Pool pool space is also included at the top of the list.
...
In this area, the admin can specify what DHCP Pools pools are linked to the DHCP server or DHCP Groupsgroups.This includes any host reservations, as well as DHCP Pools pools as defined in the next section.
Use the Action menu on Existing Pools Menu on an existing pool to Link to Server, Link to Group, or Delete Pool. The Action menu Menu for Linked Pools will show the option to Remove Link from Pools.
...
Additional edits may be made to pools by clicking on the Pool pool name. This allows the Pool pool name, assignment, and lines to be changed. Be sure to hit "Save" after making changes.
...
Create a New DHCP Pool - Subnets
When Assigning assigning a Subnet subnet (via dropdown) the IP Assignment assignment selection will pull the data from any IPAM block meeting your defined criteria. You can use either a Smart or Direct assignment depending on your preference. For Smart Assign pool creation, existing IP Rules may be applied to reserve additional addresses out of the pool range. To create an IP Rule, see IPAM Rules.
| Info | ||
|---|---|---|
| ||
For DHCP Poolspools, ProVision automatically reserves the first and last address of the pool for Gateway and Broadcast addresses, respectively. If an additional IP Rule is applied, the rule will begin with the second address in the block. For example: if a DHCP Pool pool is created using 10.0.0.64/29 with an IP Rule of "Reserve First Three", the resulting pool range would be 10.0.0.68 through 10.0.0.70, as the first four as well as the final address would be reserved. |
Enter the name of the Pool pool / Subnetsubnet, and select the assignment criteria:
...
When reserving Hostname/MAC data, change the Dropdown dropdown to "Host". This will also give you an option to assign from an existing DHCP block (smart assignSmart Assign) or a specific IP address (direct assignDirect Assign).
Enter the name of the Hostname hostname and MAC address, then select the assignment criteria:
...
It is recommended that you save your configuration after changes. Save your changes by clicking the "Save Configuration" button at the bottom of the DHCP Management Gadget.
When you Push push a Configuration configuration (by clicking "Push Configuration") the configuration is automatically saved.
...
The DHCP Customer Configuration Gadget allows users to assign APNIC IP aggregates to the DHCP server pools and generate DHCP Server Configuration changes.
These configurations are then sent to the associated DHCP server Management Gadget as "Unpushed Configurations", where they may be held until a manual or schedule push occurs.
Setting up the DHCP Customer Configuration Gadget
Before using the DHCP Customer Configuration Gadget, the following should be set up in ProVision:
- The associated DHCP server should be created in ProVision and set up in the DHCP Management Gadget or DHCP Tab or DHCP Tab - DHCP Servers DHCP Servers list (See: DHCP TabDHCP Tab).
- Add the DHCP Customer Configuration Gadget to the desired Sectionsection. You may want to create a specific "DHCP Customer" Section section for DHCP customer entries (See: Customizing Sections).
- Have, or set up APNIC Aggregates for DHCP use from the IPAM Tab the IPAM Tab with the desired IP space type, Region(s), Tags, and any desired VLAN criteria. Regions are a required field when assigning IPs from the DHCP Customer Configuration Gadget. Any APNIC aggregate may be used for DHCP, so you may want to create a "DHCP" IPAM Tag to help denote the desired aggregate(s).
- If you are planning on Direct Assigning the DHCP blocks in the Customer Configuration Gadget, ensure that the desired blocks in the DHCP are split to individual /32 or /128 size. Smart Assign and Smart Browse will automatically split the block to assign the correct size.
Using the DHCP Customer Configuration Gadget
Step 1) Link the Gadget with the desired DHCP Serverserver

Step 2) Assign IP's for Pools pools from DHCP Aggregatesaggregates

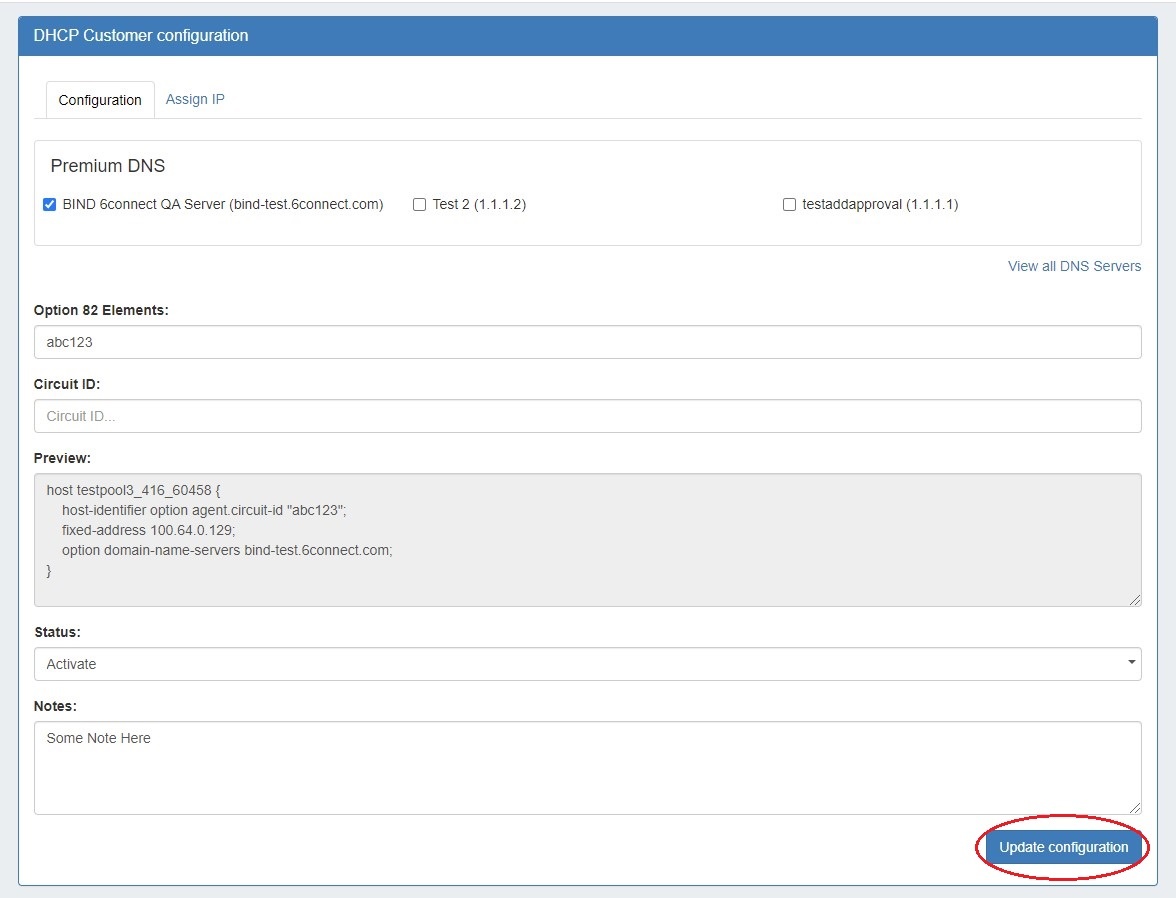
Step 3) Set up configuration information - add Option 82 Elements, Circuit ID, and notes. Use the "Preview" field to confirm the accuracy of the data, and select the status as "Activate" or "Terminate".
Once saved, the updated configuration will be sent to the DHCP Management Gadget.
Step 4) An admin user may manually push the updated configuration from the DHCP Management Gadget, or use a scheduled DHCP push task to automate the pushes.
See Gadgets - DHCP Customer Configuration for more details.
...