Configuring Secure64 Support
| Table of Contents |
|---|
| Note | ||
|---|---|---|
| ||
ProVision uses port 22 to communicate with and configure Secure64 infrastructure - please ensure that this is addressed in any ACLs/firewalls ProVision also uses port 53 to do zone checks if the DNS Module is enabled and in use. Please ensure that your Secure64 infrastructure is configured to accept DNS lookups from the ProVision server |
The initial setup of the Secure64 Authoritive Authoritative server is as follows:
Step 1: Create an nsd.conf file under the root directory / of your S64 Auth server
...
| Note | ||
|---|---|---|
| ||
Make sure to add the line include: 6connect_nsd.conf to the nsd.conf file |
...
| Code Block | ||
|---|---|---|
| ||
[authdnsadmin@Secure64DNS]# cat nsd.conf server: ip-address: 50.198.192.138141 axfr-logfile: /axfr_log/axfr.log axfr-logfile-flush-count: 1 axfr-logfile-max-size: 100000 axfr-logfile-max-size: 10 request-logfile: /request_log/request.log request-logfile-flush-count: 10 request-logfile-max-size: 1000000 request-logfile-max-files: 10 include: 6connect_nsd.conf |
Step 2: Make a directory for
...
ProVision to push zone files to on the Secure64 DNS Server
| Code Block |
|---|
[authdnsadmin@Secure64DNS]# mkdir test12 [authdnsadmin@Secure64DNS]# ls /: 322 2013-08-19 06:07:42 nsd.conf <DIR> 1024 2013-08-16 17:30:12 test12 |
Step 3: Setup and Configure
...
ProVision for your Secure64 DNS Server
Go to the 6connect Admin area and click on the DNS Admin Tab. Click on the New Server button.
Then fill in the information as follows (including any relevant SOA information):
Step 4: Test the Secure64 DNS Server configuration
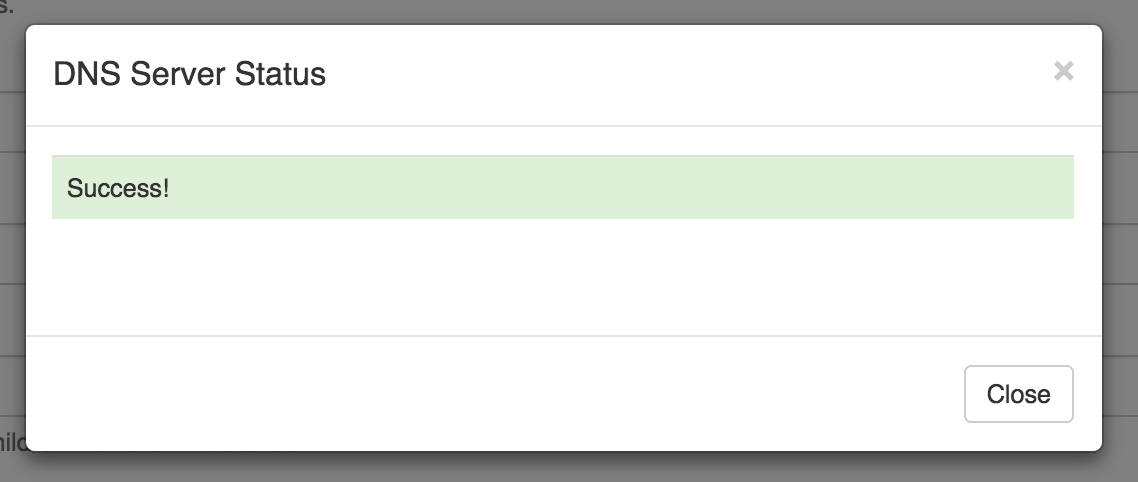
Press the Test Config button for the DNS Server you setup.
Success! Will show as depicted above.
Click Add Server to add this server as a permanent entry in the dropdown menu. This server will now be available for assigning DNS zones to.
...
To create a new server, start from the DNS Tab, select the DNS Servers sub menu. Then, click the "Add Server" button next to "DNS Server List".
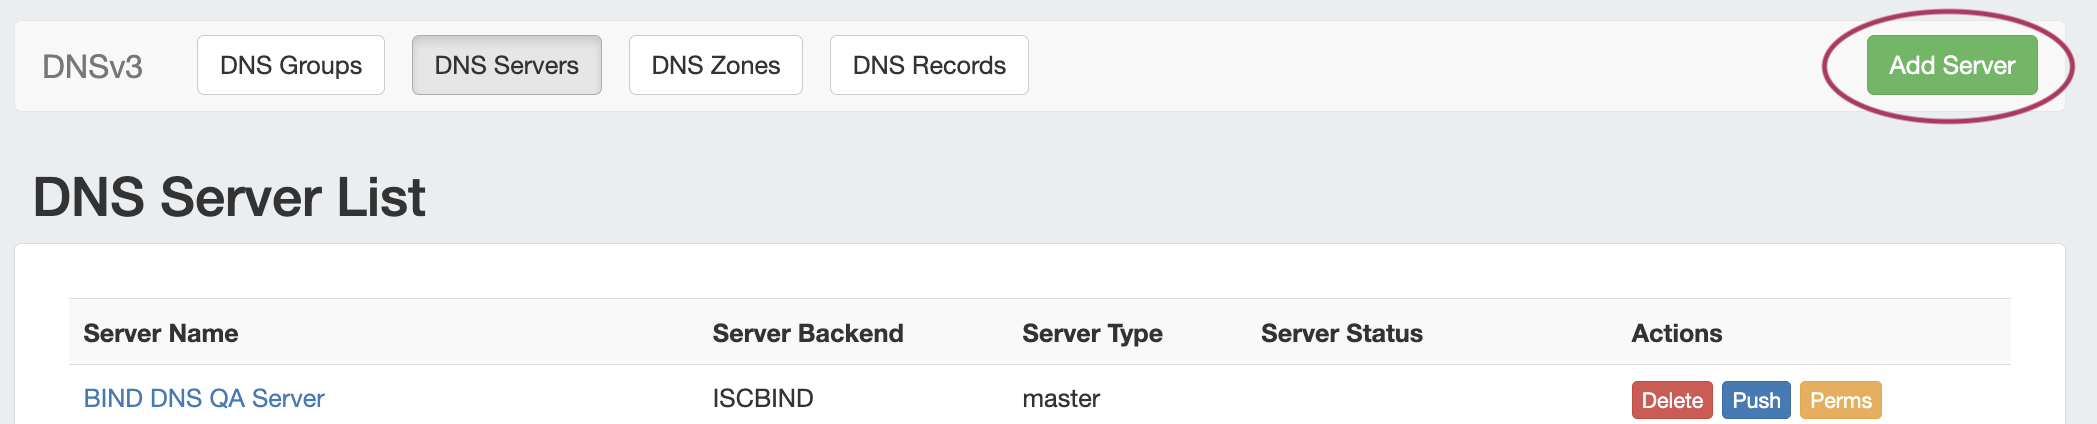
This will open the "Server Settings" page.
Server Settings
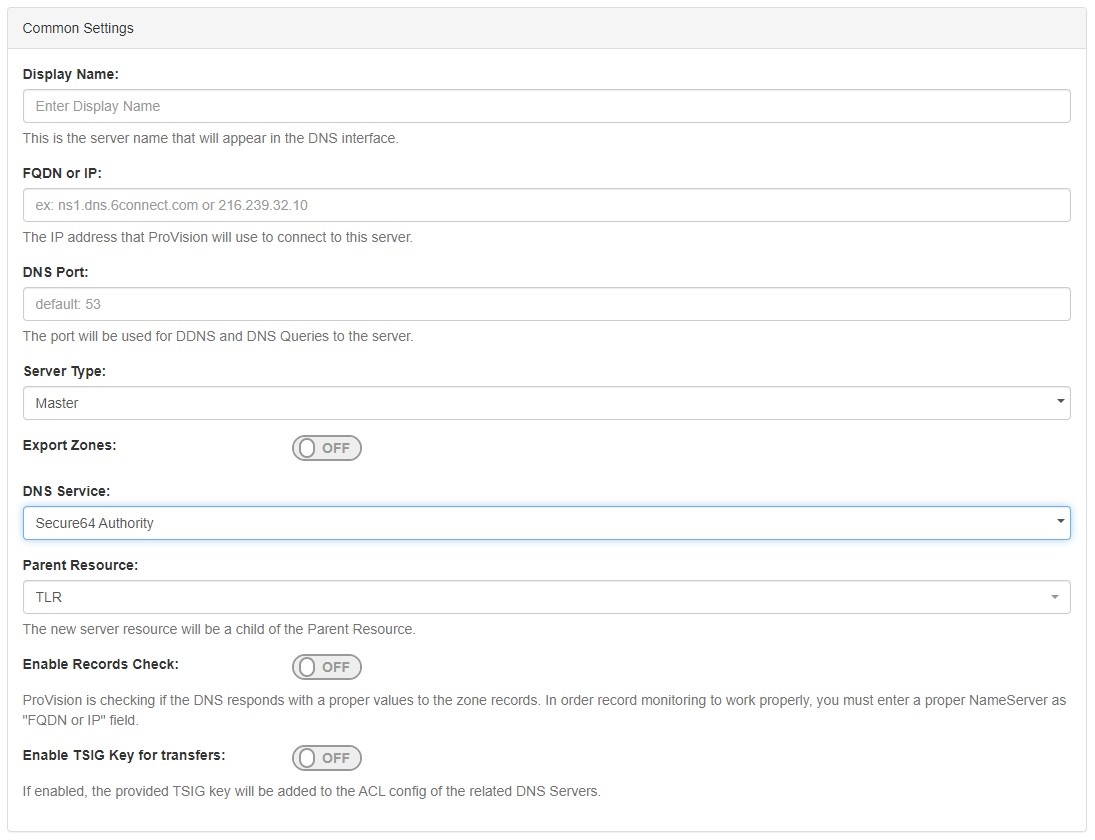
1) Set Server Common Settings
In the "Common Settings" section of Server Settings, enter the new server's Display Name (the name that will appear on the ProVision interface), the FQDN / IP, server type, DNS service type, and desired parent Resource (may be left at the default Top Level Resource). For Secure64 servers, ensure that DNS Service is set to "Secure64 Authority", "Secure64 x86 Authority", "Secure64 KNOT Authority", or "Secure64 Cache".
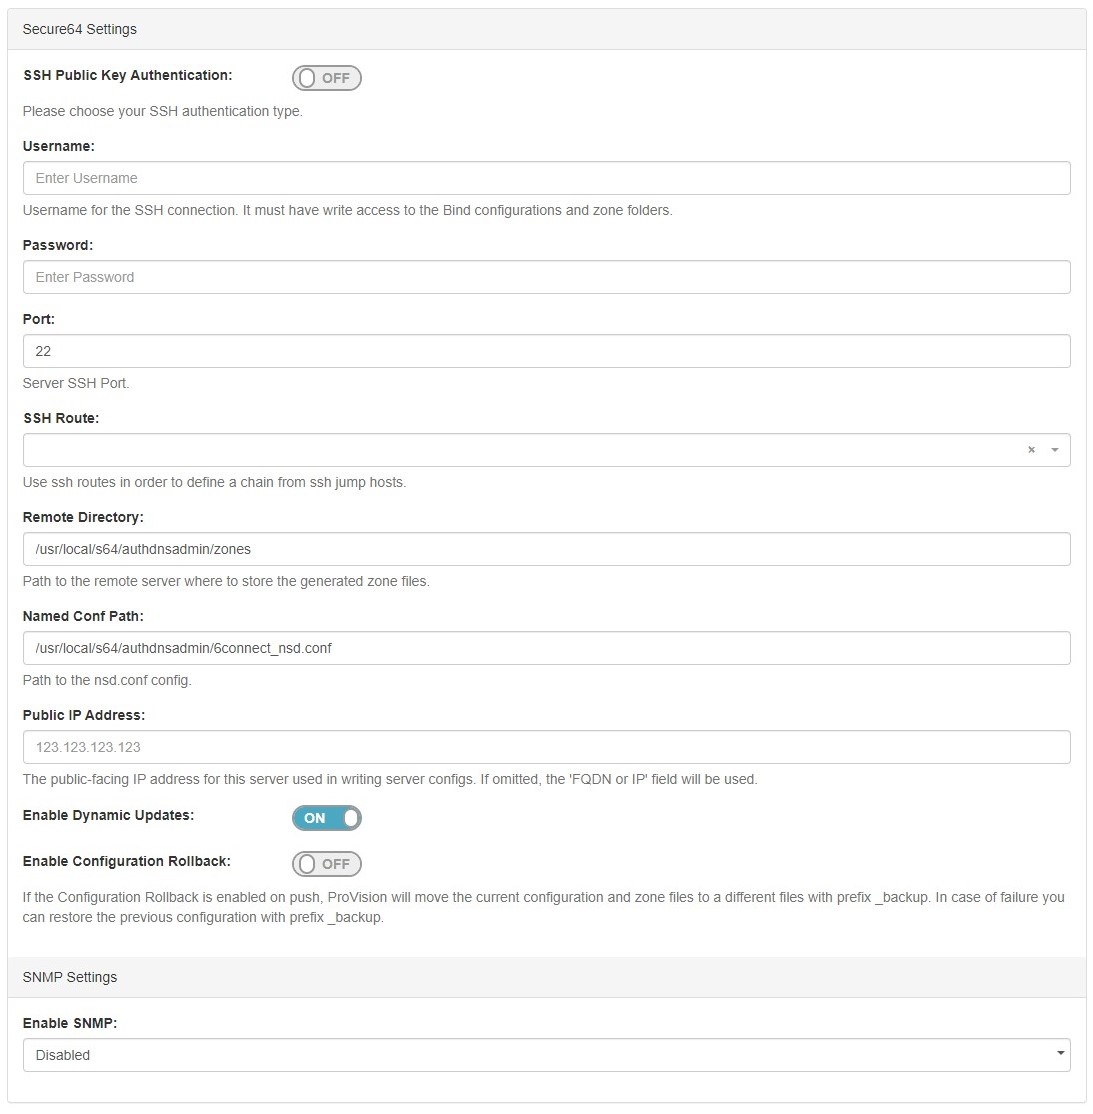
2) Set Server Specific Settings
The next section is entering server service-type specific settings. The options visible in this section will depend on the "DNS Service" type chosen under "Common Settings".
Here, we see the fields for Secure64 server settings.
Enter the server Username, Password, Port, Remote Directory, Named Conf. Path, and whether to enabled SNMP.
For SSH Public Key Authentication and Dynamic Option updates, click on the ON / OFF toggle to select "ON" or "OFF" for each as needed.
After entering the server-specific settings in this section, you can click the "Test Connection" button at the bottom right of the page to test the server connection and authentication.

A window will pop up showing a success or failure response.
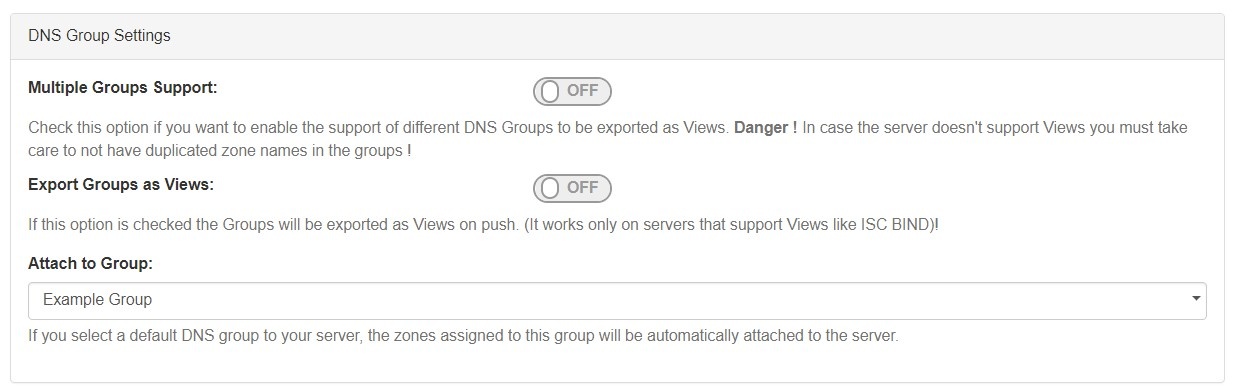
3) Set DNS Group Settings for Server
In the last section, select whether to enable support for exporting DNS Groups as Views (click to toggle ON / OFF), and select a default Group, if desired, to be associated with the server. Zones assigned to the selected Group will automatically be attached to the server.
4) Save Changes
Save your changes when done! Just click the "Save Changes" button at the bottom right of the page.

Step 4: Associate zones to your Secure64 DNS Server(s)
...
If a default Group was selected while setting up the S64 server, then any zones in that Group will automatically be associated with the server.
Zones may be manually added, moved, or imported into the Group - see Working with DNS Zones - Common Tasks and Working with DNS Groups for details on associating zones with Groups.
If zones are to be imported, a DNS Group may be selected during the import process to associate with the zones.
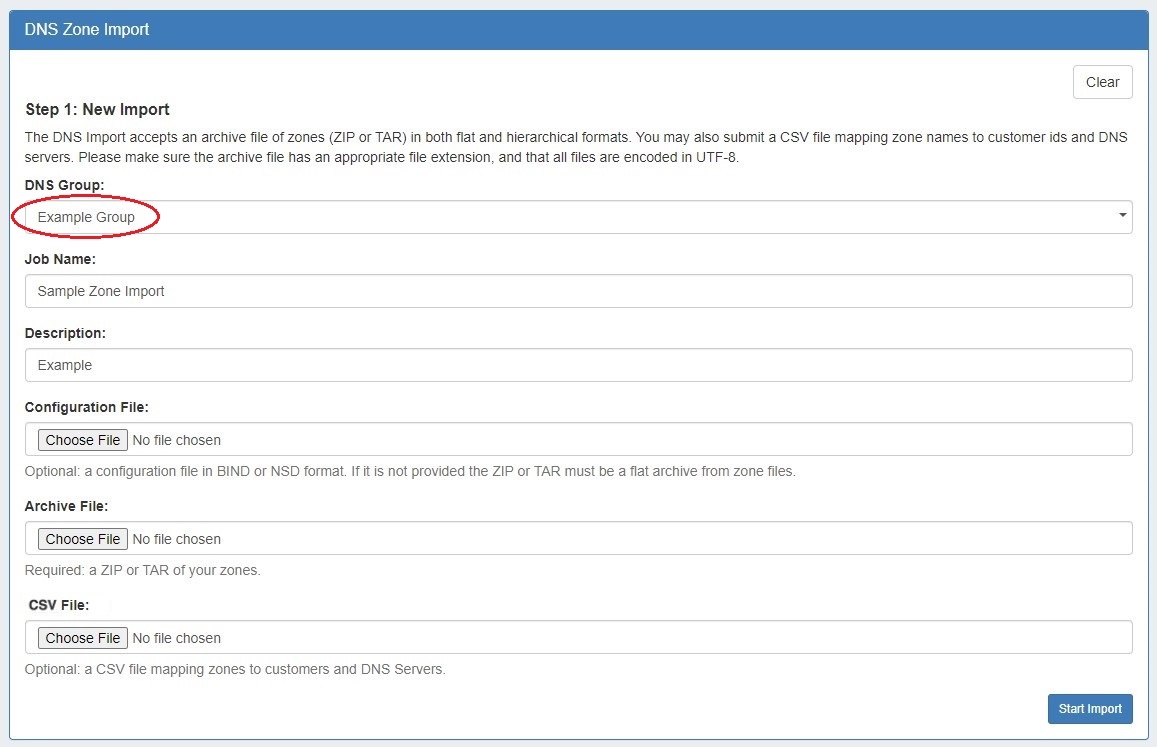
Select the group specified as the default S64 server Group, then import the zones as described in the Import DNS Zones documentation.
| Info | ||
|---|---|---|
| ||
When working with DNS Zones and Records, additional record types may be manually added by selecting "Other" when adding a new record. S64 DNS users can use record type "Other" to add "SYNTH" or "TYPE65464" type records similar to the format below: $ORIGIN 30 IN TYPE65464 ${p4} PTR ${a4}.pool.example.com.
$ORIGIN 600 IN TYPE65464 ${a4} A ${a4}
$ORIGIN TYPE65464 ${p6} PTR user${a6}.my.example.com.
$ORIGIN 5 IN SYNTH user${a6} AAAA ${a6}
$ORIGIN IN SYNTH nptr-${u} NAPTR 10 20 "A" "" "" srv-${u}
$ORIGIN IN SYNTH srv-${u} SRV 10 20 1234 srv-addr-${u}However, arbitrary / other record types are unable to be validated, so use with care! |
Step 5
| Info | ||
|---|---|---|
| ||
No character in the search area indicates a search for all zones as shown below |

Select the Select Server and as Master dropdowns and Assign the above zones to this server.
Verify the DNS Zones Tranfers area indicates your server and the # of zones to transfer.
...
: Push Zones to Secure64 Server(s)
...
Navigate back to the DNS tab, and select the "DNS Servers" tab.
Locate the Secure64 server in the DNS Servers list, and then click the "Push" button under "Actions" at the end of the row.

Step 6
...
: Verify DNS Zone push on Secure64 Server(s)
The result of the Push can be checked/verified by checking the Secure64 server as follows:
| Note | ||
|---|---|---|
| ||
| ssh to 50.198.192.138141 Login using the designated login account and password Enable cachednsadmin ls |
...
| Note |
|---|
[authdnsadmin@Secure64DNS]# cat 6connect_nsd.conf AutoGenerated by 6connect ProVision. Do not manually edit. zone: name: mnc016.mcc502.gprs.APNatestzone.com zonefile: /test12/6connectGeneric/m/mnc016.mcc502.gprs.APNatestzone.com.zone zone: name: mnc0016.mcc502.gprs.name4Testzone2.com zonefile: /test12/6connectGeneric/m/mnc0016.mcc502.gprs.name4.zone zone: zonefile: /test12/6connectGeneric/e/epc.mnc016.mcc502.3gppnetwork.orgTestzone2.com.zone |
In the example above, three two Zones have transferedtransferred.
To look at the contents of each zone you can cd to the proper directory /test12/6connectGeneric and find the zone files in an alphabetical directory structure as follows: [authdnsadmin@Secure64DNS]# cd 6connectGeneric
...
| Info |
|---|
[authdnsadmin@Secure64DNS]# cd |
...
6connectGeneric |
Could not find directory: /6connectGeneric
[authdnsadmin@Secure64DNS]# cd test12 changed to test12 |
...
atestzone.com.zone |
...
Testzone2.com.zone |
Step
...
7: Validate Zone data
...
in Your Infrastructure
Do Finally, do a dig of the zones to verify the DNS configuration has been successfully deployed.
| Info | ||
|---|---|---|
| ||
| [authdnsadmin@eval138.secure64.com]# dig @50.198.192. |
...
| 141 atestzone.com ; ﹤﹤﹥﹥ DiG SourceT 3.x ﹤﹤﹥﹥ @50.198.192. |
...
| 141 atestzone.com ;; Got answer: ;; ﹥﹥HEADER﹤﹤ opcode: QUERY, status: NOERROR, id: 59591 ;; flags: qr aa rd; QUERY: 1, ANSWER: 0, AUTHORITY: 1, ADDITIONAL: 0 ;; QUESTION SECTION: ; |
...
| atestzone.com. IN A ;; AUTHORITY SECTION: |
...
| atestzone. |
...
| com. |
...
| 3600 IN SOA ns1.dns.6connect.net. hostmaster.6connect.net. (2013082102 10800 3600 604800 38400 ) [authdnsadmin@eval138.secure64.com]# |
For any questions regarding the integration of Secure64 products into ProVision, please email 6connect at support@6connect.com, or Secure64 at support@secure64.com
| Info | ||
|---|---|---|
| ||
When you setup ProVision to communicate via SSH to a Secure64 server, a ley/fingerprint is saved to the local hosts file. If you modify the IP address, but do not clear out the hosts file, then ProVision will think this is an attack and prevent communication with the Secure64 server. To rectify this issue, you may need to reset the host file so that a new SSH host key can be added for the IP address. To do this manually, please follow the following steps: 1) The admin needs to login to the ProVision server via SSH/CLI If you have any issues, please contact 6connect support per your Support Agreement/Plan. |
Additional Information
For additional information on working in DNS, see the following sections: