Importing DNS Zones
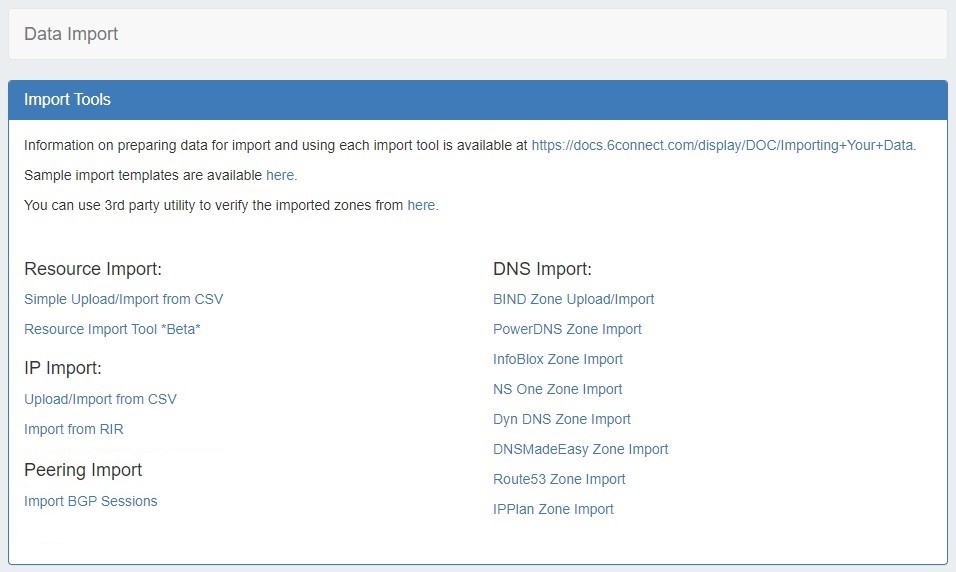
ProVision offers three multiple DNS zone import options, available under the Data Import tab in the the Admin section. Additional Import options may be available on zone or server pages.
DNS Global Import Options
ProVision offers various DNS zone import options available under the Data Import tab in the the Admin section:
BIND Zone Import
- Imports using the named.conf configuration file tied to the zones you are uploading, a .zip or .tar file of the zones themselves, and an optional .csv file mapping zones to customers and DNS Servers.
DynECT Zone Import
- Imports and syncs ALL zones on the system with those in your DnyECT instance. This means any zones in ProVision not present in your DynECT instance will be removed and any changes lost.
PowerDNS Zone Import
- Option is available after configuring a PowerDNS server with a MySQL backend. Connects to the selected server and imports all zones.
InfoBlox Zone Import When it comes to importing your
- Imports DNS zones using a provided Host, Username,
...
- and Password. The InfoBlox import pulls all zones on the InfoBlox LOCAL grid and adds them to a designated Group. It is advised to create a DNS Group prior to the import with default parameters and NS records to be inherited by the imported records.
NS One Zone Import
- Imports DNS zones using a NS One API Key. It is advised to create a DNS Group prior to the import with default parameters and NS records to be inherited by the imported records.
Dyn DNS Zone Import
- Imports DNS zones using a Dyn DNS Customer Name, Username, and Password. It is advised to create a DNS Group prior to the import with default parameters and NS records to be inherited by the imported records.
DNSMadeEasy Zone Import
- Imports DNS zones using a DNSMadeEasy API Key and API Secret. It is advised to create a DNS Group prior to the import with default parameters and NS records to be inherited by the imported records.
IPPlan Zone Import
- Imports DNS zones using IPPlan MySQL database options. It is advised to create a DNS Group prior to the import with default parameters and NS records to be inherited by the imported records.
3rd Party Zone Check
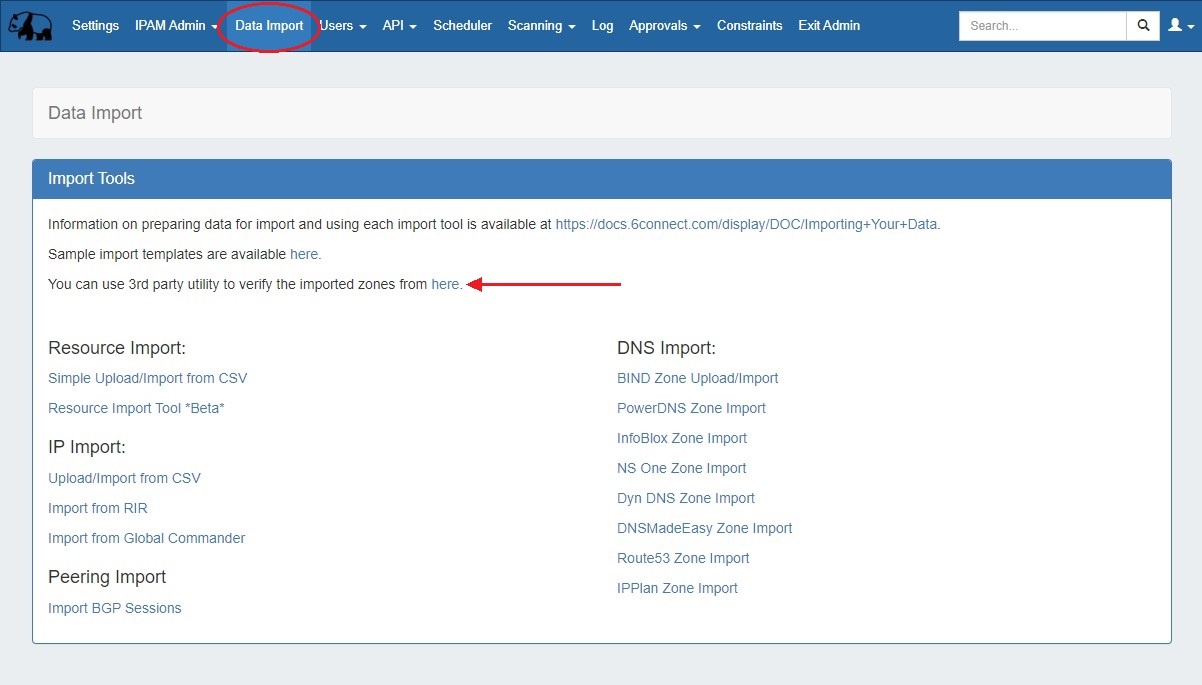
The DNS Import Check is accessible from the Admin Section --> Data Import Tab.
| Expand |
|---|
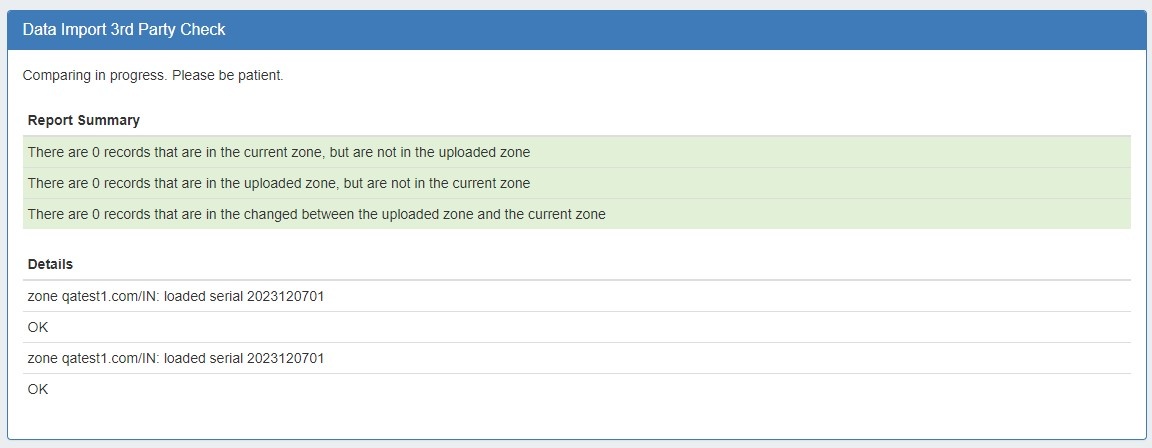
Select an existing zone from the dropdown and upload a .zone file. Click the "Compare" button to start the process. The resulting comparison will verify the zone matches the uploaded file or highlight differences found between the two. |
Additional DNS import options may be available on a per-zone or per-server level, accessed from the DNS Tab:
DNS Zone Import Options (Individual)
DNS Zone / Record Import:
- This tool is available on a zone's "View Zone" page, and allows the user to import additional zone/record information into an existing ProVision zone by uploading a zone file (.zone).
Expand Import Zone / Import Records
A zone file (.zone) may be imported into a ProVision zone to populate record data. Note: To import the record data, the zone must already exist in ProVision - although it may be an empty placeholder zone if necessary.
Enable Saving Import Files (Admin Setting - Optional)
Before you import a zone file, you may (optionally) select to save the import file to the zone. Saving the file allows you to later re-download it directly from ProVision.
To enable saving import files, go to Admin Preferences → DNS Settings sub-tab. From there, select "Import Settings" in the DNS Global Settings module.
Toggle "Keep Import File" into the ON position, then select "Save Changes".
Import Zone File
To import a zone file to populate record data in ProVision, go to the View Zone page for the zone. The zone must already exist in ProVision, although it may be empty
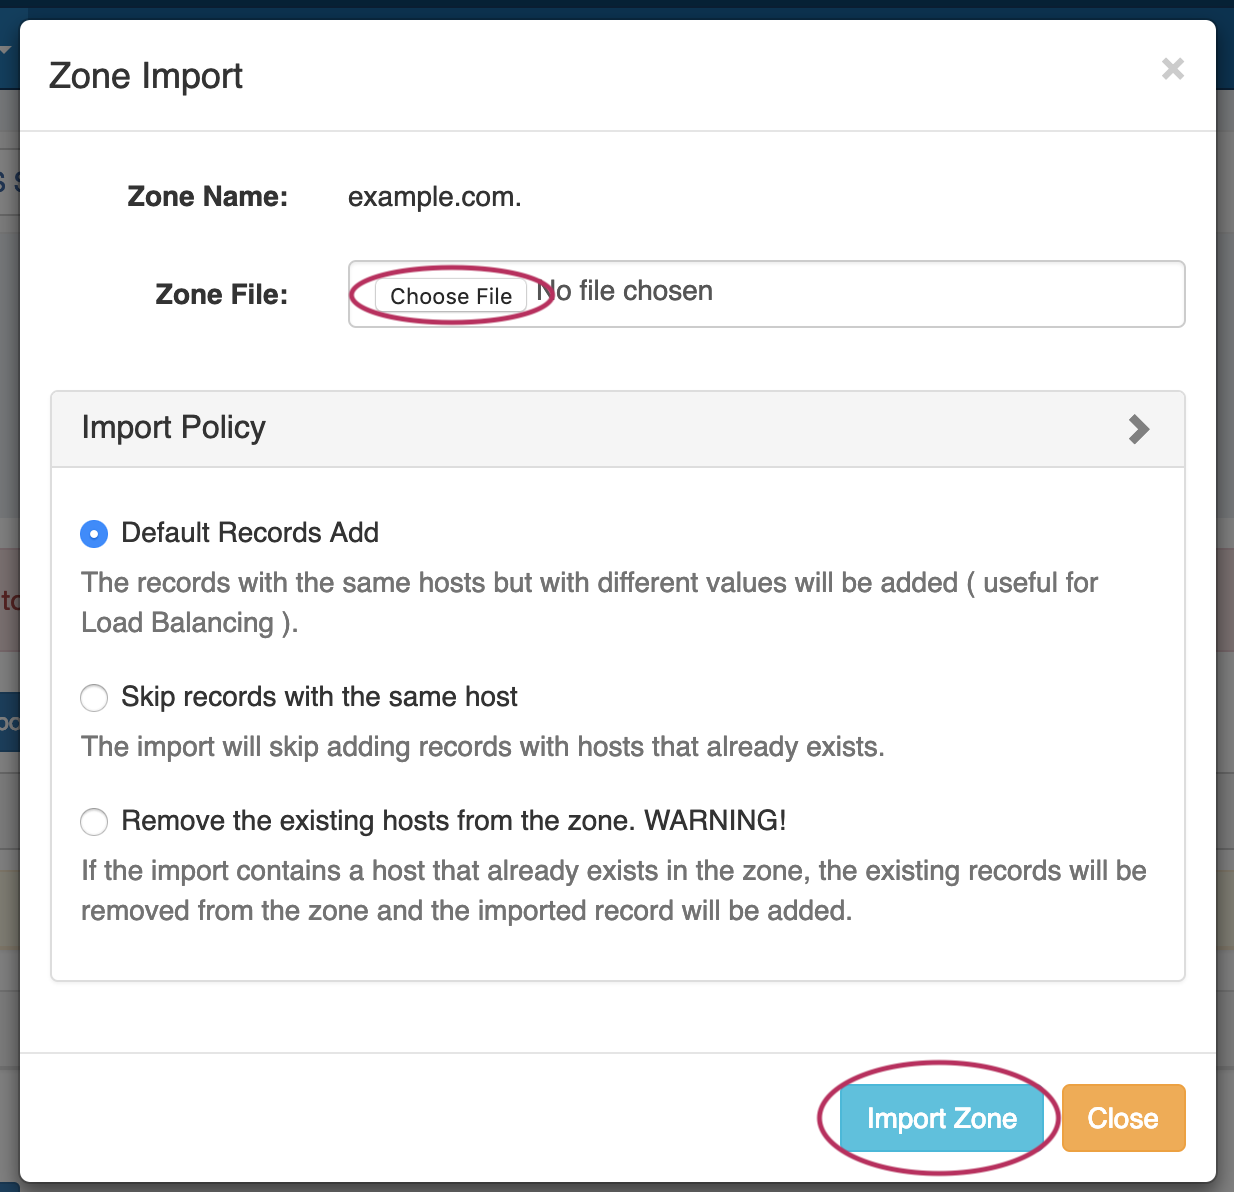
Click "Import Zone" on the View Zone page.
A Zone Import dialog box will open. Next to Zone File:, click "Choose File" and select your .zone file to import. Then, select an import policy to follow.
When done, Click "Import Zone".
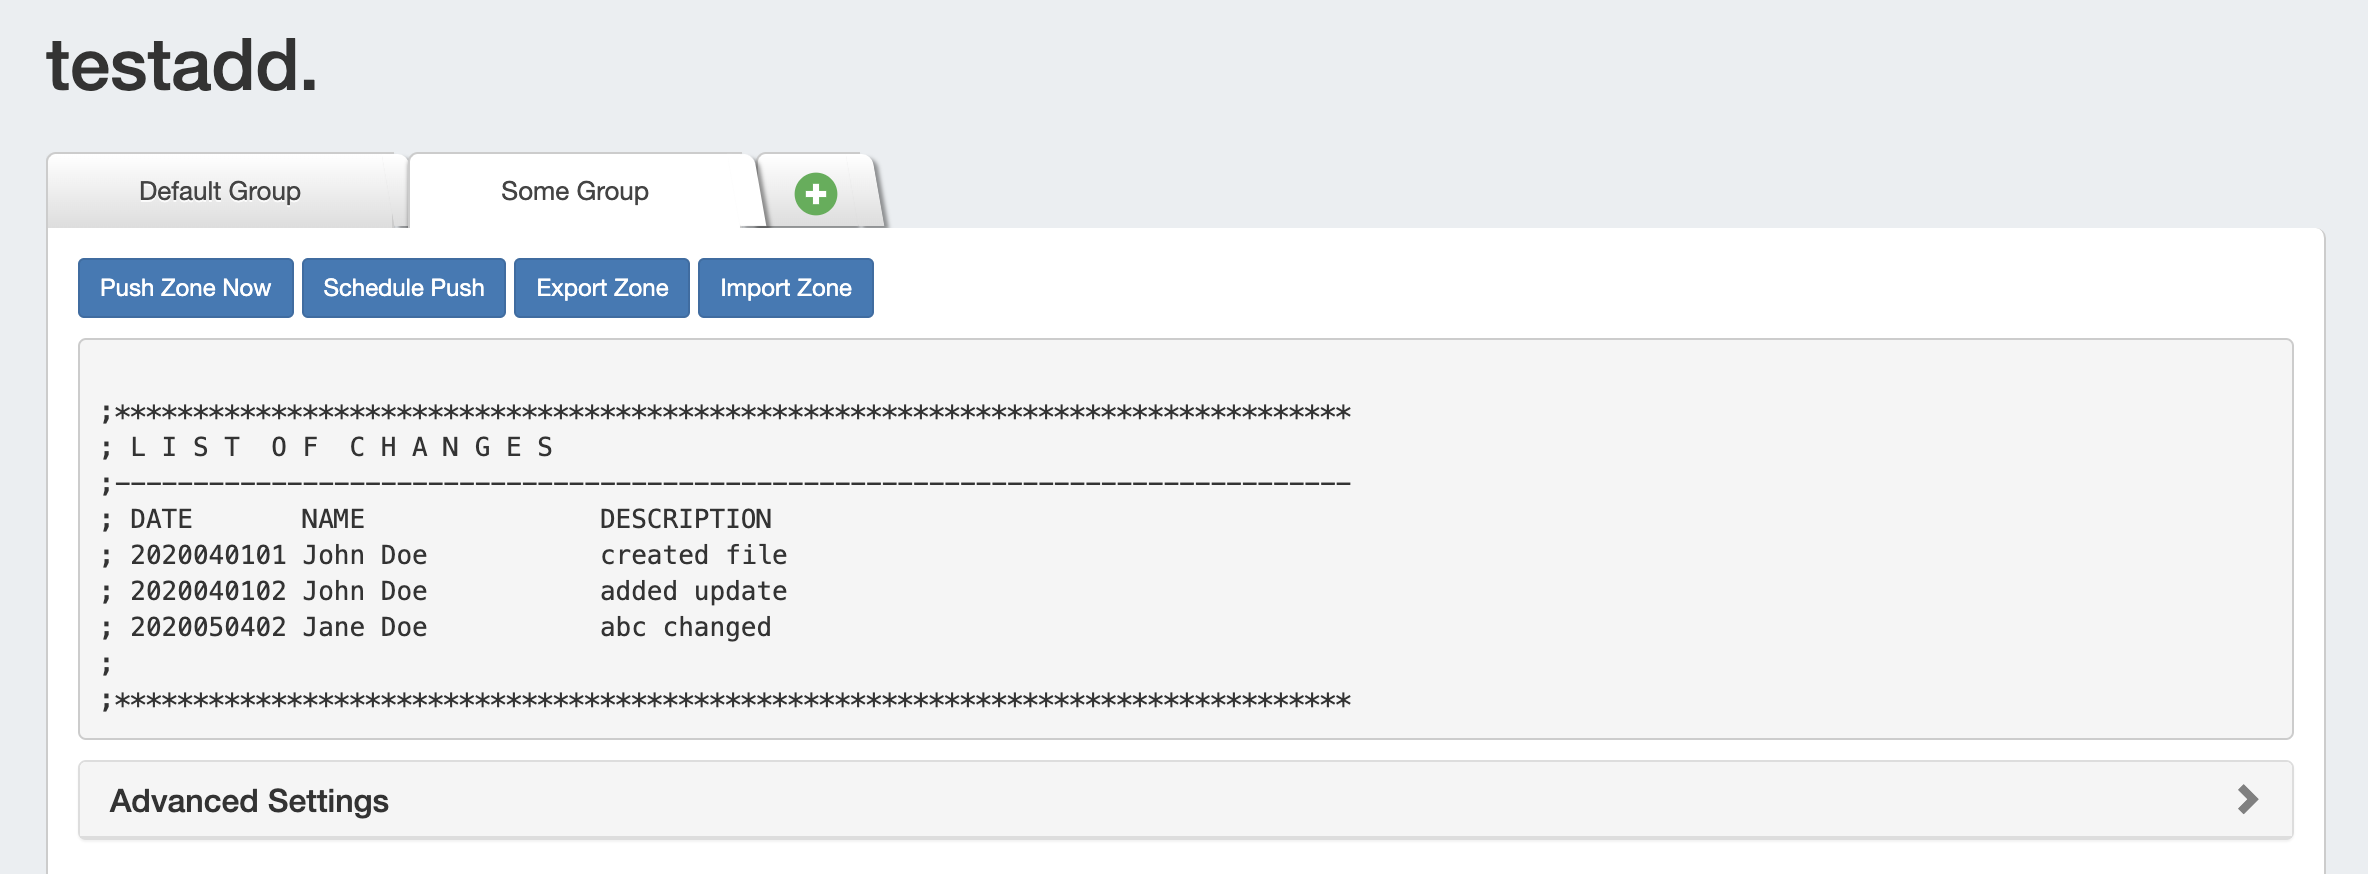
Importing Zone file with Comments
DNS Zone Import will also import comments contained in the .zone file, such as an internal change log (as seen in the image below).
During import, these comments are added to ProVision's zone comments field:
Additional Information
Continue to the following sections for details on performing each import method:
| Children Display | ||
|---|---|---|
|
Preparing your DNS Zones for Import
If your zone data is currently in BIND format - this is very straightforward.
There are three components to the upload process:
1) The named.conf configuration file tied to the zones you are uploading (required)
This tells the importer the Zone Name and where the zone file is written. It could be as simple as a multi-line file:
| Code Block | ||
|---|---|---|
| ||
zone "my-zone.com" { type master; file "my-zone.com.zone"; };
zone "my-other-zone.com" { type master; file "my-other-zone.com.zone"; };
zone "my-third-zone.com" { type master; file "my-third-zone.com.zone"; }; |
or could be more complex like this file structure directory:
| Code Block | ||
|---|---|---|
| ||
zone "my-zone.com" { type master; file "/usr/local/zones/my-zone.com.zone"; };
zone "my-other-zone.com" { type master; file "/usr/local/zones/more/my-other-zone.com.zone"; };
zone "my-third-zone.com" { type master; file "/usr/local/zones/more/even more/my-third-zone.com.zone"; }; |
This configuration file can be taken directly from the DNS server, and can be in either ISC BIND or NSD format. The system auto-detects which one is being supplied.
For a sample Simple Config conf.conf
2) A ZIP or TAR file of the DNS zones themselves (required)
This is as it sounds - a file archive where we can find the zones and it should match the configuration file uploaded in Step 1.
| Note | ||
|---|---|---|
| ||
These zone files can be in any order, or in sub-directories, so long as the configuration file (Step 1) correctly points to them |
For a sample Simple ZIP zones.zip
3) Match CSV for assigning DNS Zones to Resources (optional)
This file allows the administrator to "assign" zone files to a given Resource. If you have Imported a group of Resources, they have Resource IDs associated with them. You can then import DNS zones and assign them to those Resource IDs. When complete, you will be able to pull up the Resource Record and see the DNS Zones associated to that Resource ID.
| Code Block | ||
|---|---|---|
| ||
my-zone.com,test-01,fun stuff, 174.23.14.4, 174.23.14.9
my-otherzone.com,test-02,great stuff, dns1.dns.net, dns2.dns.net
even-reverse-zones.arpa,test-03,amazing stuff |
Note the columns are the "Zone Name", the "Resource ID", "Notes", "Master Server", "Slave Server"
| Info | ||
|---|---|---|
| ||
When importing zones, you can use the "Master Server" and "Slave Server" columns to assign zones to specified DNS Servers. Please note that the IP address or FQDN of the DNS Server is supported in this field. |
| Note |
|---|
To successfully map to a DNS server, that server must already exist within Provision. |
For a sample CSV config.csv
Importing your DNS Zones
Step 1: Create a new DNS Import Job
Navigate to the Data Import Tab from the Admin button to import your data. Select "BIND Zone Upload/Import" under "DNS Import".
Create a Job Name and Description for the import. This is especially useful to keep track of progress in cases the data arrives from multiple sources, or will require multiple stages of manual review. Select the appropriate Configuration File (required), Archive File (required), and CSV File (optional) that you prepared above by selecting the "Choose File" button(s) under each section, and browsing to the correct file location. Then hit "Start Import".
| Note | ||
|---|---|---|
| ||
Although you cannot add new files to an existing job, for jobs with multiple sources for data (which may have different formatting), you can simply create separate jobs and descriptions for each source - no need to manually combine the data into one file before importing. The Import tool's mapping and editing functions will allow for the data to be reconciled in ProVision. For large data sets where multiple stages of manual review might be needed, you can create a new job using the same set of data files in order to work in parallel on a different portion of the data. |
After importing, the new job will appear under the "Existing Jobs" section. To continue working with this job, select it from the list and the next step will appear on the page.
Step 2: Map Data Columns (Optional)
If you chose to load an optional match CSV file to assign DNS Zones to Resource, a mapping step will be available. Otherwise, proceed to Step 3: Reviewing Data.
For DNS imports, four column definitions are available: Zone, Resource ID, Server Master IP, and Server Slave IP. Using the dropdown menu, select the appropriate definition for each of the imported columns. Zone and Resource Holder ID should each only have a single column selected, however, any number of columns may be defined as Server Master IP or Server Slave IP. Other columns which do not apply under the available definitions should be left as blank, and will be skipped during the upload process.
When completed, hit "Next".
Step 3: Reviewing Data
After supplying the file set and defining columns (if applicable), a review step is provided. The configuration file is broken into individual jobs, scanned for errors, and shown by row (in batches of 100) to be reviewed. Zones with errors will show as color coded. and can be filtered to be viewed by All, Valid, Warnings, Invalid, or Ignored. From here, the zone can be edited or ignored.
Editing the zone provides options to alter the Resource Holder, enable DNS servers, and redefine Master and Slaves.
After editing, hit "Save", and continue reviewing / editing data as desired.
When the review step is completed, hit the "Execute Import" button. A progress bar will appear to show progress and note errors if they occur.
When the bar reaches 100%, the import is complete.
