...
Peering
ProVision versions 7.0.0 and later:
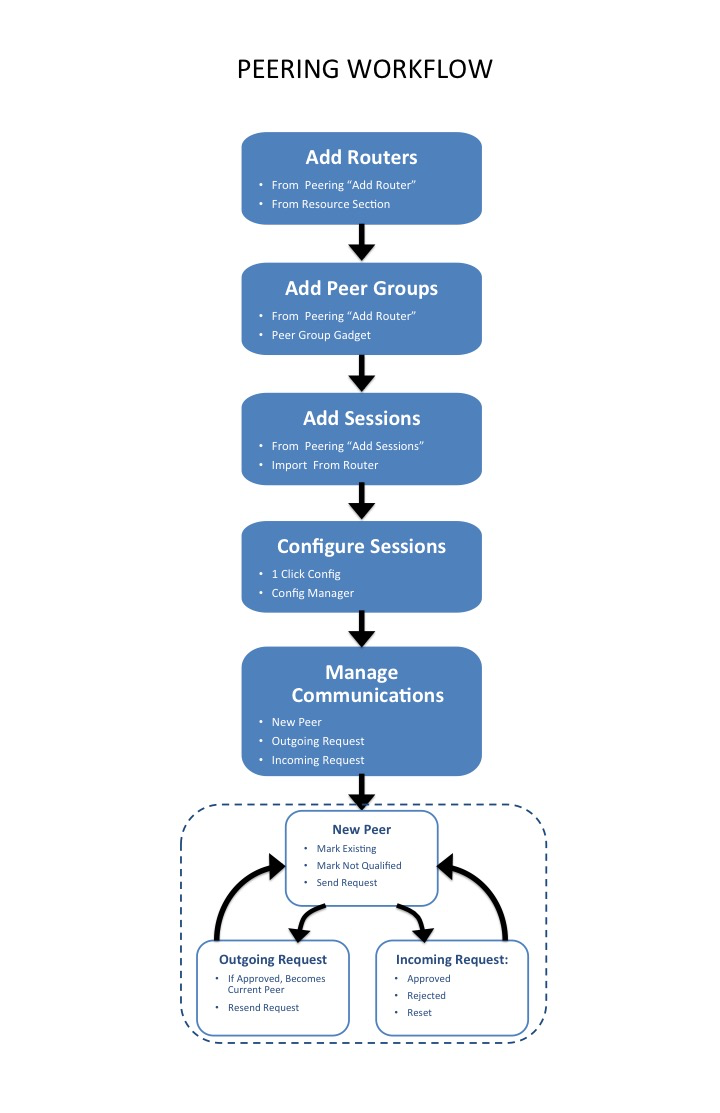
Initially, ASNs and Peering DB information will need to be entered into ProVision to enable Peering functionality. After that, Peering starts with designating Routers. Routers may be added from the "Add Router" button under the Peering Tab Routers sub-tab. Once a router has been created, Peer Groups may be added from the Router Details page or the Peer Group Gadget.
After the router(s) and Peer Groups have been created in ProVision, Sessions need to be added. Sessions may be added manually through the "Add Session" dialog in the Peering v2 tab, or Imported from a router (requires ProVision Admin requires Admin permissions).
Once a session has been created, it can be configured and managed through the Sessions list and Session details page (using 1-click Config or Config Management), or multiple sessions may be configured for a specific Peer via the "Configure Multiple Sessions" option, which will provide options to either "Config Now" or "Schedule Config" for a later time.
Managing Peer Communications is done primarily from the Exchange → Communications menu, sending requests and marking peers as existing / not qualified / approved, etc. If desired, a corporate Peering email account may be associated with ProVision under the Peering → Emails subtab, allowing for peering requests to be viewed from ProVision and associated with Peers.

ProVision versions 6.2.1 and earlier:
| Expand |
|---|
 |
For more information on performing tasks under Peering, see the following documentation sections:
...
VLAN Manager
ProVision versions 7.3.0 and later:
The VLAN Manager allows users to add domains and VLANs to their ProVision instance, and associate them with IP blocks. Customizable VLAN columns - including up to ten user-defined metadata columns - allow you to rename column headers, set the display order, select which columns are visible, and display your own information fields.
...
Once a VLAN has been added to a domain in ProVision, the VLAN may be edited to add a VLAN name or metadata information, and have IP blocks associated with it.
...
Once a VLAN has been added to a domain in ProVision, IP blocks may be associated with ('assigned to') that VLAN. There are multiple methods to set the VLAN for a block:
...
Editing Domains - including renaming, adding metadata, and deleting - may be performed from VLAN Advanced.
DHCP
VLAN Workflow (Legacy):
ProVision versions 7.3.0 and earlier:
| Expand | ||
|---|---|---|
| ||
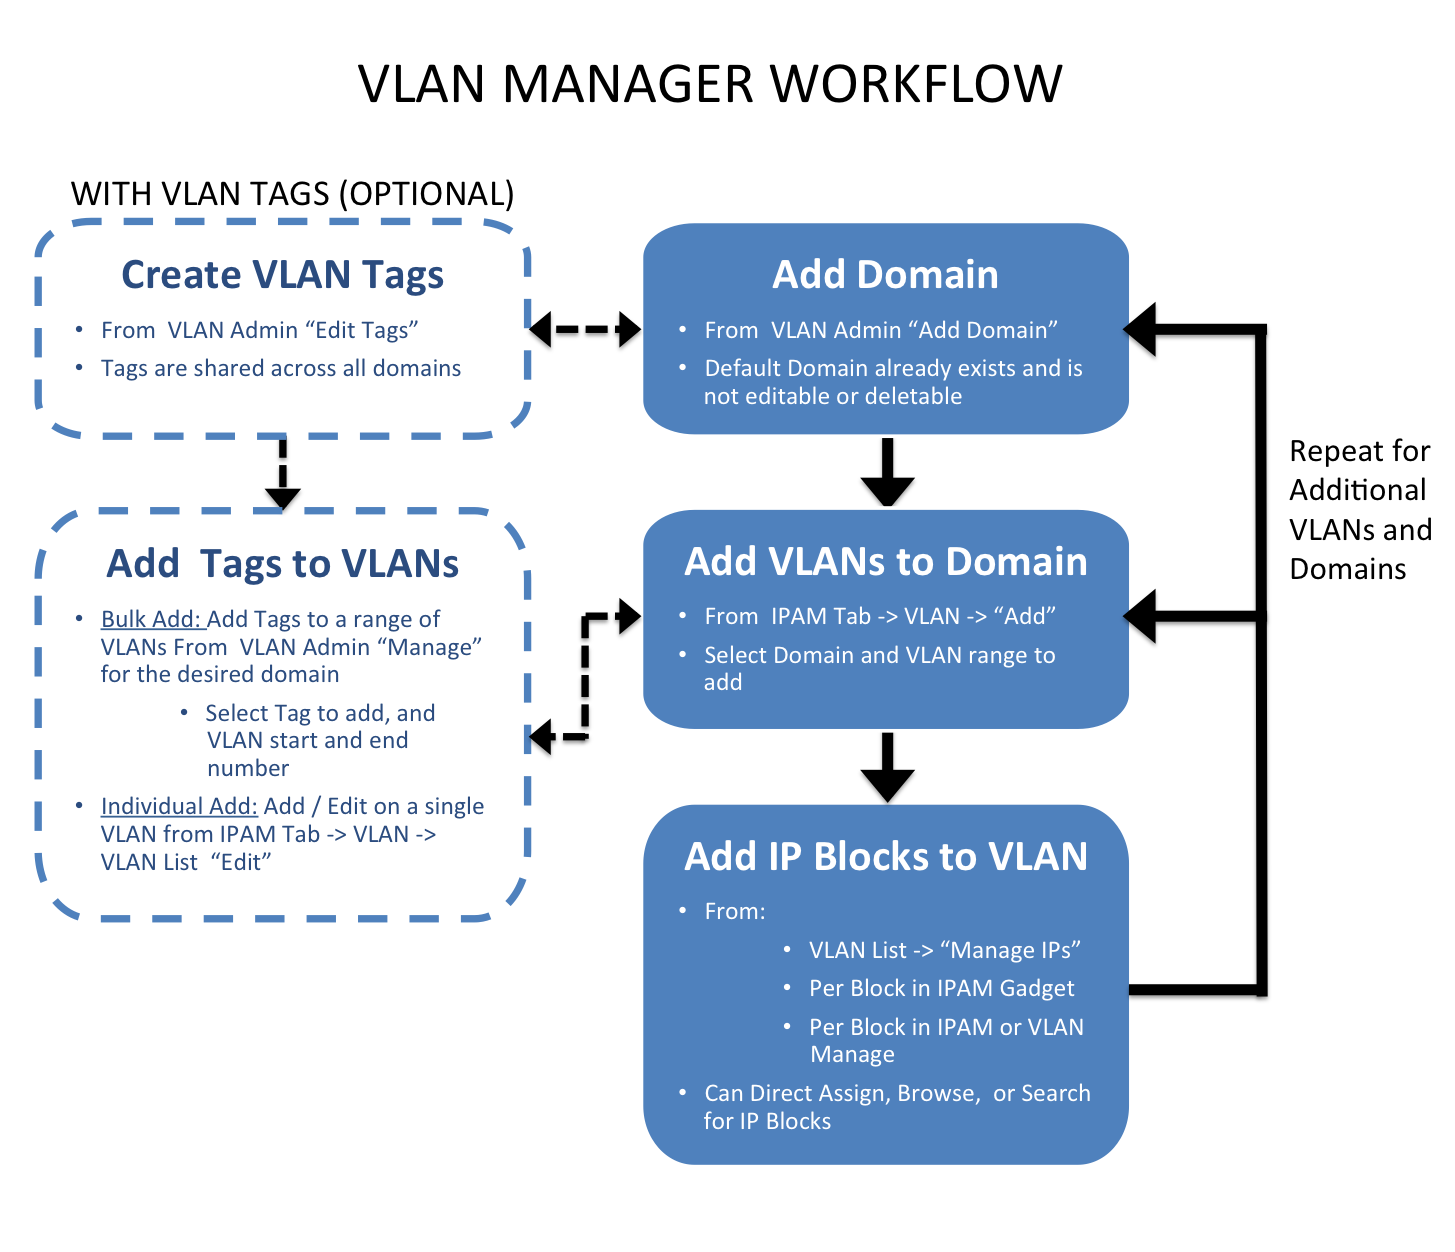
The VLAN Manager allows Admin users to add domains and VLANs to their ProVision instance, and associate them with IP Blocks. Optionally, VLAN tags may be associate with ranges or individual VLANs under a domain, to help limit VLAN search results when enabling VLANs. Standard flow (without VLAN tags):The workflow starts with creating a domain in the VLAN Admin section of ProVision. During creation, domains may be selected as "standard" or "extended" domains, declaring the size of the VLAN pool from which VLANs are available to be enabled. Next, VLANs must be enabled and added to the domain. This is done under the IPAM Tab -> VLAN section of ProVision. Add VLANs to the domains by clicking "Add", searching for the desired range of VLANs to enable from the standard / extended pool, and selecting the desired VLANs to enable. Once enabled, VLANs may be edited or have IP blocks associated with that VLAN. Editing VLANs and Direct / Smart Browse / Search IPs functions for adding blocks to VLANs are available from the Domain/ VLAN list under under the IPAM Tab -> VLAN section of ProVision by expanding the desired domain and clicking on the VLAN link. IP blocks may also be edited individually through the IPAM gadget, IPAM Manage, and VLAN Manage areas to add domain and VLAN information to the block. Optional flow (with VLAN tags):The workflow starts with creating a domain in the VLAN Admin section of ProVision. During creation, domains may be selected as "standard" or "extended" domains, declaring the size of the VLAN pool from which VLANs are available to be enabled. VLAN tags may be added (from the VLAN Admin Tab -> Edit Tags submenu) before or after domain creation. Tags created in this area are available to all domains and VLANs. If the tags created need to be added to a large range of VLANs, the next step would be to add tags to the desired range(s) of VLANs from the VLAN Admin -> Domain "Manage" button. Domain Manage allows you to select an existing tag, type in the numeric VLAN start and end point, and assign that tag to that entire range of VLANs under the current domain. Once a bulk range of tags is associated with VLANs, you can use the tag as a search criteria when adding VLANs to a domain. This is done under the IPAM Tab -> VLAN section of ProVision. Add VLANs to the domains by clicking "Add", using the tag name as a search field for the desired range of VLANs, and then selecting the desired VLANs to enable. If tags are only desired for individual VLANs, they may be added when editing a VLAN after the VLAN has already been added/enabled for the domain. Editing VLANs may be accessed from the IPAM Tab -> VLAN section, then expanding the desired domain and clicking on the VLAN link, selecting "Edit". Next, VLANs must be enabled and added to the domain. This is done under the IPAM Tab -> VLAN section of ProVision. Add VLANs to the domains by clicking "Add", searching for the desired range of VLANs to enable from the standard / extended pool, and selecting the desired VLANs to enable. Once enabled, VLANs may be edited or have IP blocks associated with that VLAN. Editing VLANs and Direct / Smart Browse / Search IPs functions for adding blocks to VLANs are available from the Domain/ VLAN list under under the IPAM Tab -> VLAN section of ProVision. IP blocks may also be edited individually through the IPAM gadget, IPAM Manage, and VLAN Manage areas to add domain and VLAN information to the block.
|
DHCP
ProVision versions 7.0.0 and later:
| Info |
|---|
ProVision 7.0.0+ includes many updates to the DHCP module, including the introduction of DHCP Groups, updated interface, improved permissions control, and simplified pool management. The DHCP Tab contains areas for managing both admin and non-admin tasks together for DHCP Groups, DHCP Servers, and DHCP Pools. DHCP Groups allow you to create, view, and manage groups of DHCP Servers and Pools. Using groups, you can configure and push selected combinations of zones at one time. DHCP pools may be gathered under DHCP Groups, and servers attached to those Groups. Pools, attached servers, and failovers are managed at a per-Group level. Users can then view and manage Groups, individual pools, failover values, attach servers, and perform pushes all on the same page. Additionally, starting in ProVision 7.0.0, any IPAM aggregate or block may be used for DHCP pools - provided it meets the specified criteria when creating a DHCP Pool. If assigning a pool out from a specific resource, ensure ahead of time that the resource contains suitable blocks with subassignments enabled. |
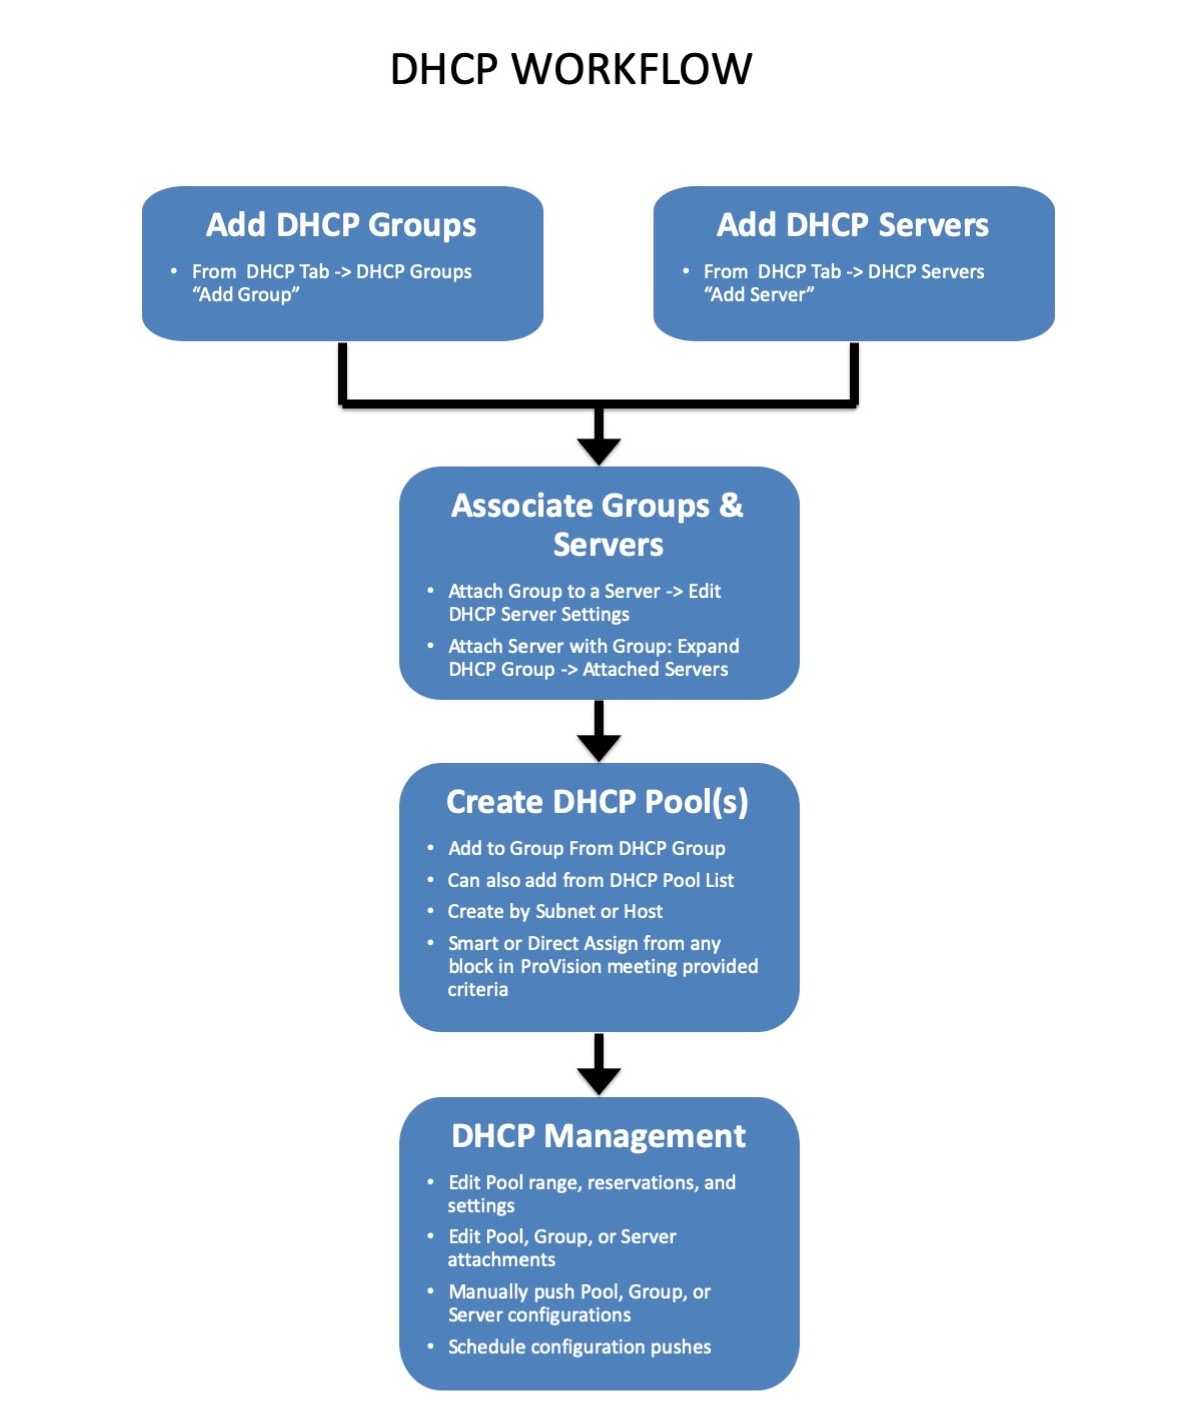
The DHCP Workflow begins with adding DHCP Servers into ProVision and creating an additional DHCP Groups as needed.
New DHCP servers may be added from the DHCP Tab - DHCP Servers subtab by clicking "Add Server". Type in the server information, select the service, and choose the resource to which the DHCP server belongs if applicable. This creates a hierarchical relationship, with the server as a child resource under the selected parent, and affects how permissions are handled for the server and pools. Then, enter any service-specific or advanced settings for the server. You may also choose which DHCP group to associate with the server if the group already exists, but you may also add that setting later.
If desired, you may create additional DHCP Groups to organize certain pools and associated DHCP servers together to push concurrently, with the option of a common failover value. A common scenario is using separate DHCP Groups per server, or separate Groups for IPv4 vs. IPv6 pools. A new DHCP Group may be created from the DHCP Groups subtab "Add Group" button. Enter the Group Name and parent resource. Once created, you may attach a DHCP server to the Group, associate a failover, and add pools to it.
Next, you may add/assign DHCP pools. Before assigning pools, ensure that you have suitable IP aggregates created in ProVision meeting your desired parameters to assign to the pool (such as desired RIR, region, VLAN, or allocated to a specific Resource). If assigning a pool out from a specific resource, ensure ahead of time that the resource contains suitable blocks that have subassignments enabled.
To add a pool to a DHCP Group, click the "Add Pool" button for that group. You may also add a pool from the DHCP Pools subtab without associating the pool with a DHCP Group. From the "Create New Pool" dialog, select the pool type ("Subnet" or "Host), enter in the relevant information, and select to either Direct Assign a specific block, or have ProVision Smart Assign a block based on provided filter criteria - such as assigned resource, region, rule, or VLAN. Click "Save" to complete the Pool assignment.
Once servers, groups, and pools have been created, you may complete management tasks such as pushing configs on either a server, group, or individual pool level, schedule pushes, update reservations or assignment ranges, and change group/server associations as needed.
For ProVision versions 6.2.1 and earlier:
...
The DHCP Workflow begins with adding DHCP Servers into ProVision and creating an additional DHCP Groups as needed.
New DHCP servers may be added from the DHCP Tab - DHCP Servers subtab by clicking "Add Server". Type in the server information, select the service, and choose the resource to which the DHCP server belongs if applicable. This creates a hierarchical relationship, with the server as a child resource under the selected parent, and affects how permissions are handled for the server and pools. Then, enter any service-specific or advanced settings for the server. You may also choose which DHCP group to associate with the server if the group already exists, but you may also add that setting later.
If desired, you may create additional DHCP Groups to organize certain pools and associated DHCP servers together to push concurrently, with the option of a common failover value. A common scenario is using separate DHCP Groups per server, or separate Groups for IPv4 vs. IPv6 pools. A new DHCP Group may be created from the DHCP Groups subtab "Add Group" button. Enter the Group Name and parent resource. Once created, you may attach a DHCP server to the Group, associate a failover, and add pools to it.
Next, you may add/assign DHCP pools. Before assigning pools, ensure that you have suitable IP aggregates created in ProVision meeting your desired parameters to assign to the pool (such as desired RIR, region, VLAN, or allocated to a specific Resource). If assigning a pool out from a specific resource, ensure ahead of time that the resource contains suitable blocks that have subassignments enabled.
To add a pool to a DHCP Group, click the "Add Pool" button for that group. You may also add a pool from the DHCP Pools subtab without associating the pool with a DHCP Group. From the "Create New Pool" dialog, select the pool type ("Subnet" or "Host), enter in the relevant information, and select to either Direct Assign a specific block, or have ProVision Smart Assign a block based on provided filter criteria - such as assigned resource, region, rule, or VLAN. Click "Save" to complete the Pool assignment.
Once servers, groups, and pools have been created, you may complete management tasks such as pushing configs on either a server, group, or individual pool level, schedule pushes, update reservations or assignment ranges, and change group/server associations as needed.
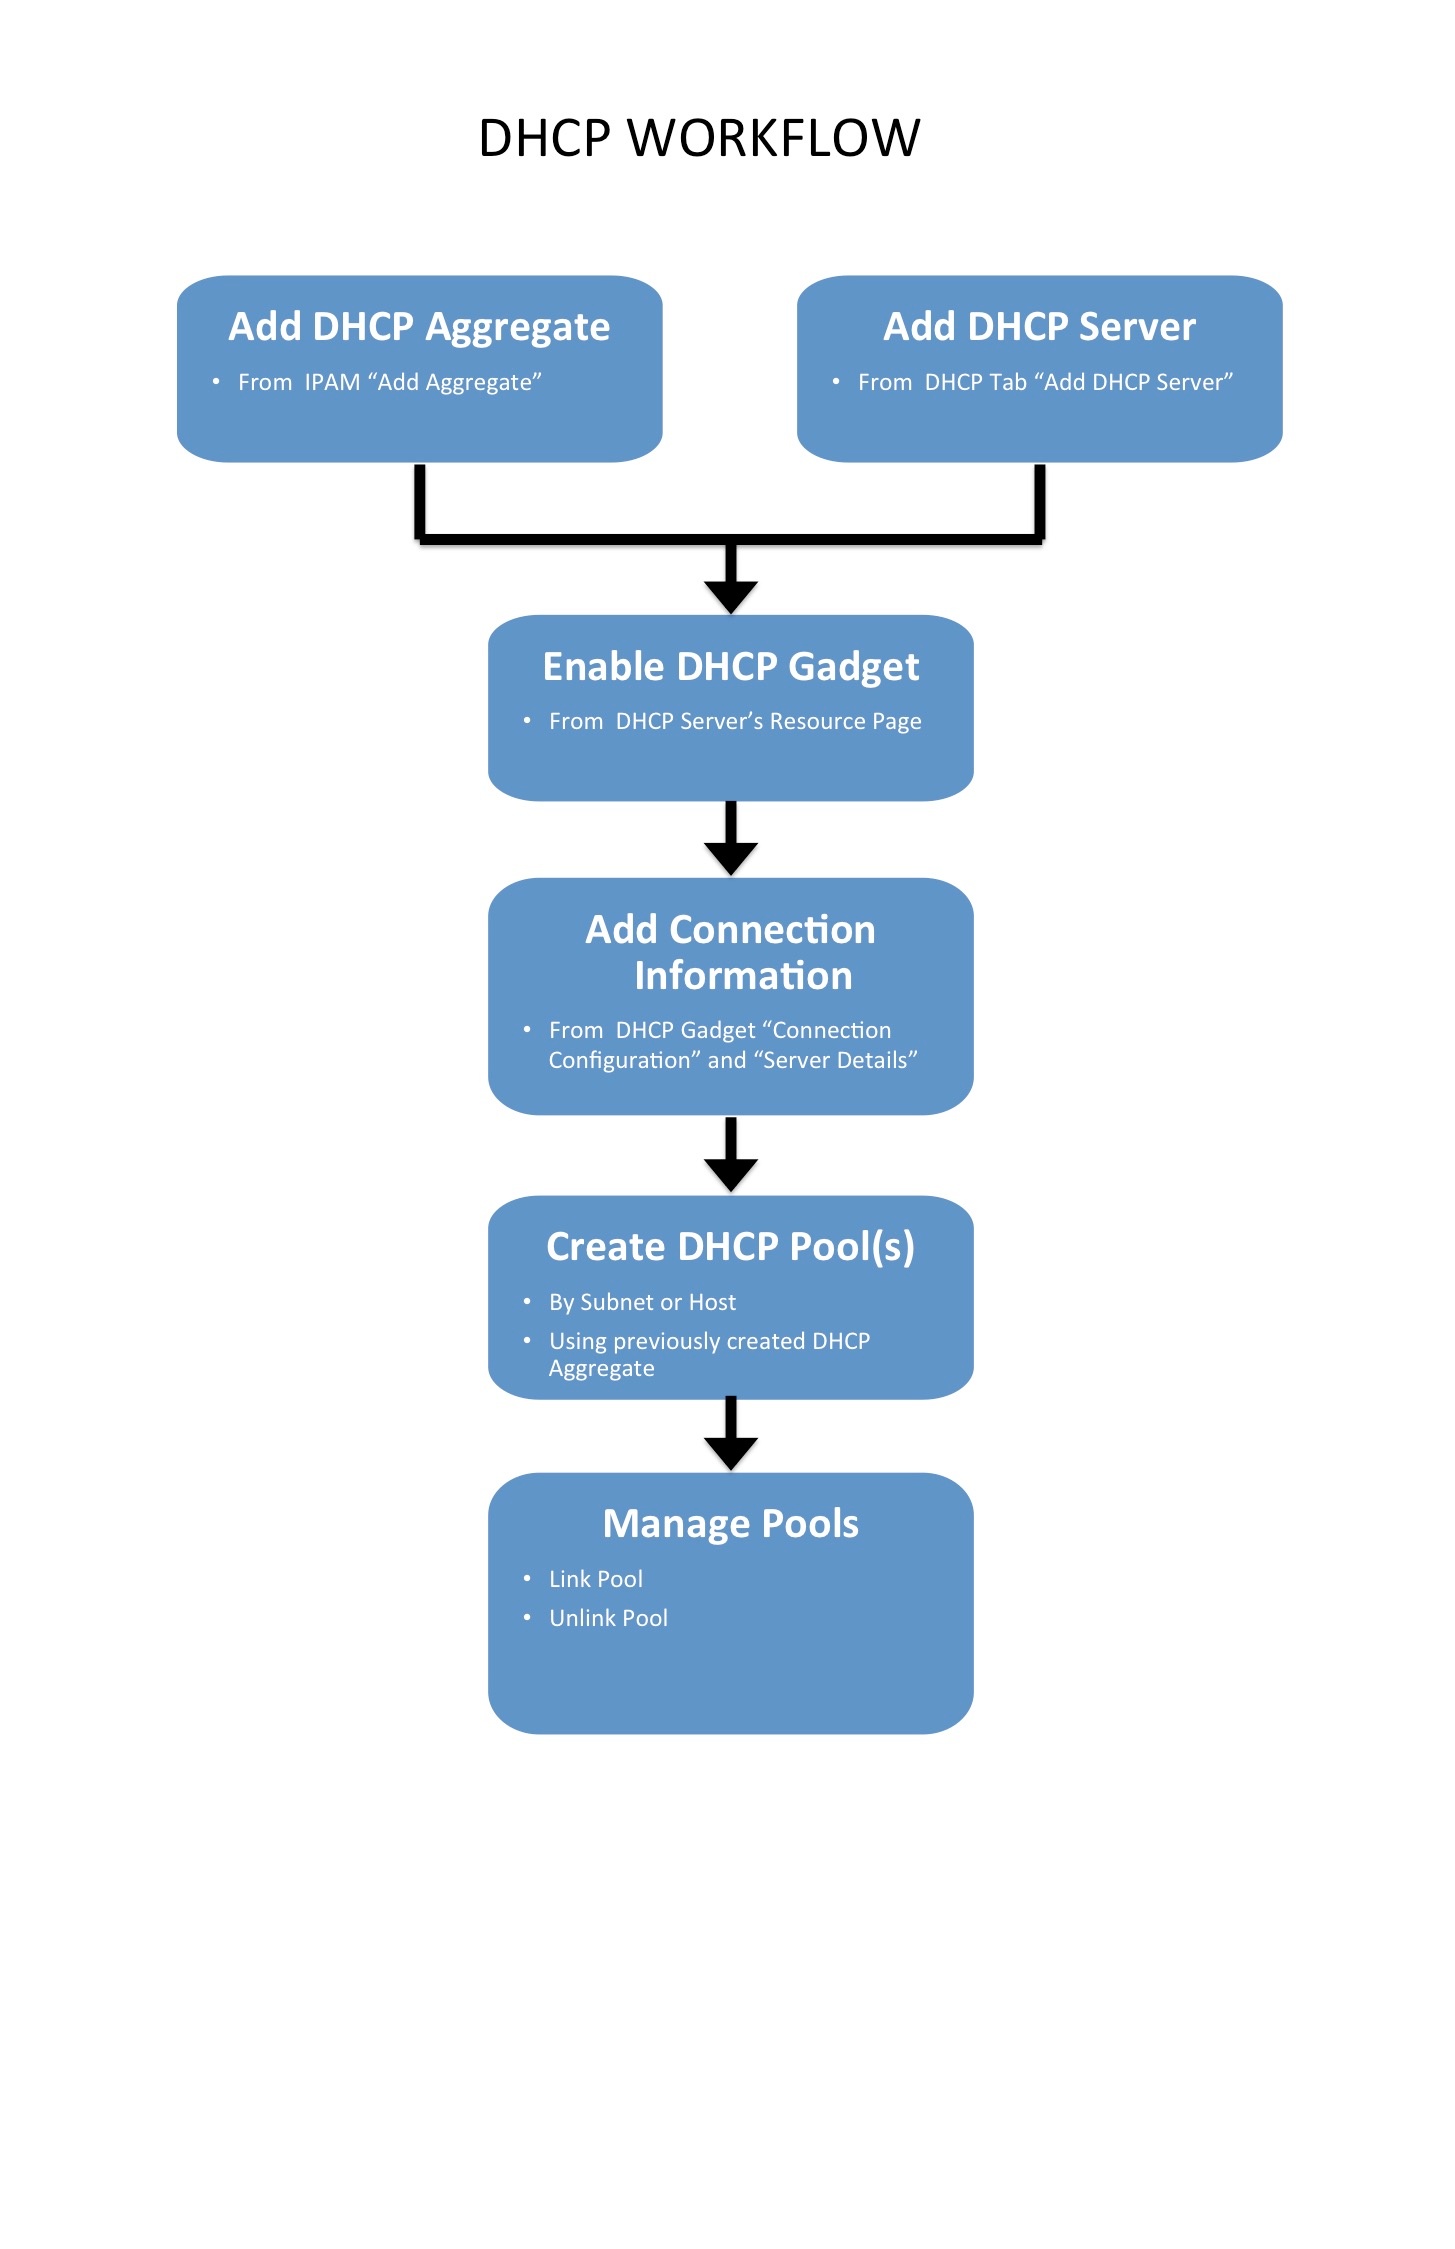
The DHCP Workflow in ProVision begins with denoting the DHCP IP Aggregate(s) from the IPAM Tab -> "Add Aggregate". When creating DHCP aggregates, ensure that the block is designated as 1918 space, and has the check boxes next to "DHCP Aggregate" and "Allow Sub-assignment" selected. This will ensure the block is automatically added to the DHCP Available Resource, and is usable when defining DHCP Pools.
Separately, ensure that the DHCP server is added into ProVision. New DHCP servers may be added from the DHCP Tab "Add DHCP Server" button. Type the server name, then choose the resource to which the DHCP server belongs. This creates a hierarchical relationship, with the server as a child resource under the selected parent.
Once the server has been created in ProVision, click on the server name in the DHCP server list to go to the server's Entry Page. If the server was created through the DHCP Tab, the DHCP Management Gadget will already be enabled for the DHCP server. If created elsewhere, the DHCP Gadget may need to be enabled by simply selecting the "On" radio toggle next to "DHCP Services", and clicking the "Update" button. Next, add in the connection configuration and server details for the DHCP server in the DHCP Gadget.
Now that the DHCP server is set up and DHCP aggregates created, DHCP Pools may be created and managed. Pools may be created by subnet or host. Creating by subnet allows for a block to either be directly assigned manually, or for ProVision to SmartAssign a block based on the provided criteria. Creating by host requires providing a host and MAC address, and then likewise may have an IP directly assigned or Smart Assigned. DHCP Pools, once created, are managed by linking or unlinking to the DHCP server. IP assignments and pool details may be changed at any time by clicking on the pool name, editing the details as desired, then clicking "Save".
...
For more information on DHCP tasks, see the following sections:
- DHCP Tab
- Working with DHCP Groups
- Working with DHCP Pools
- Working with DHCP Gadgets
- DHCP Administration
- Working with DHCP Servers
...
DNS Workflow
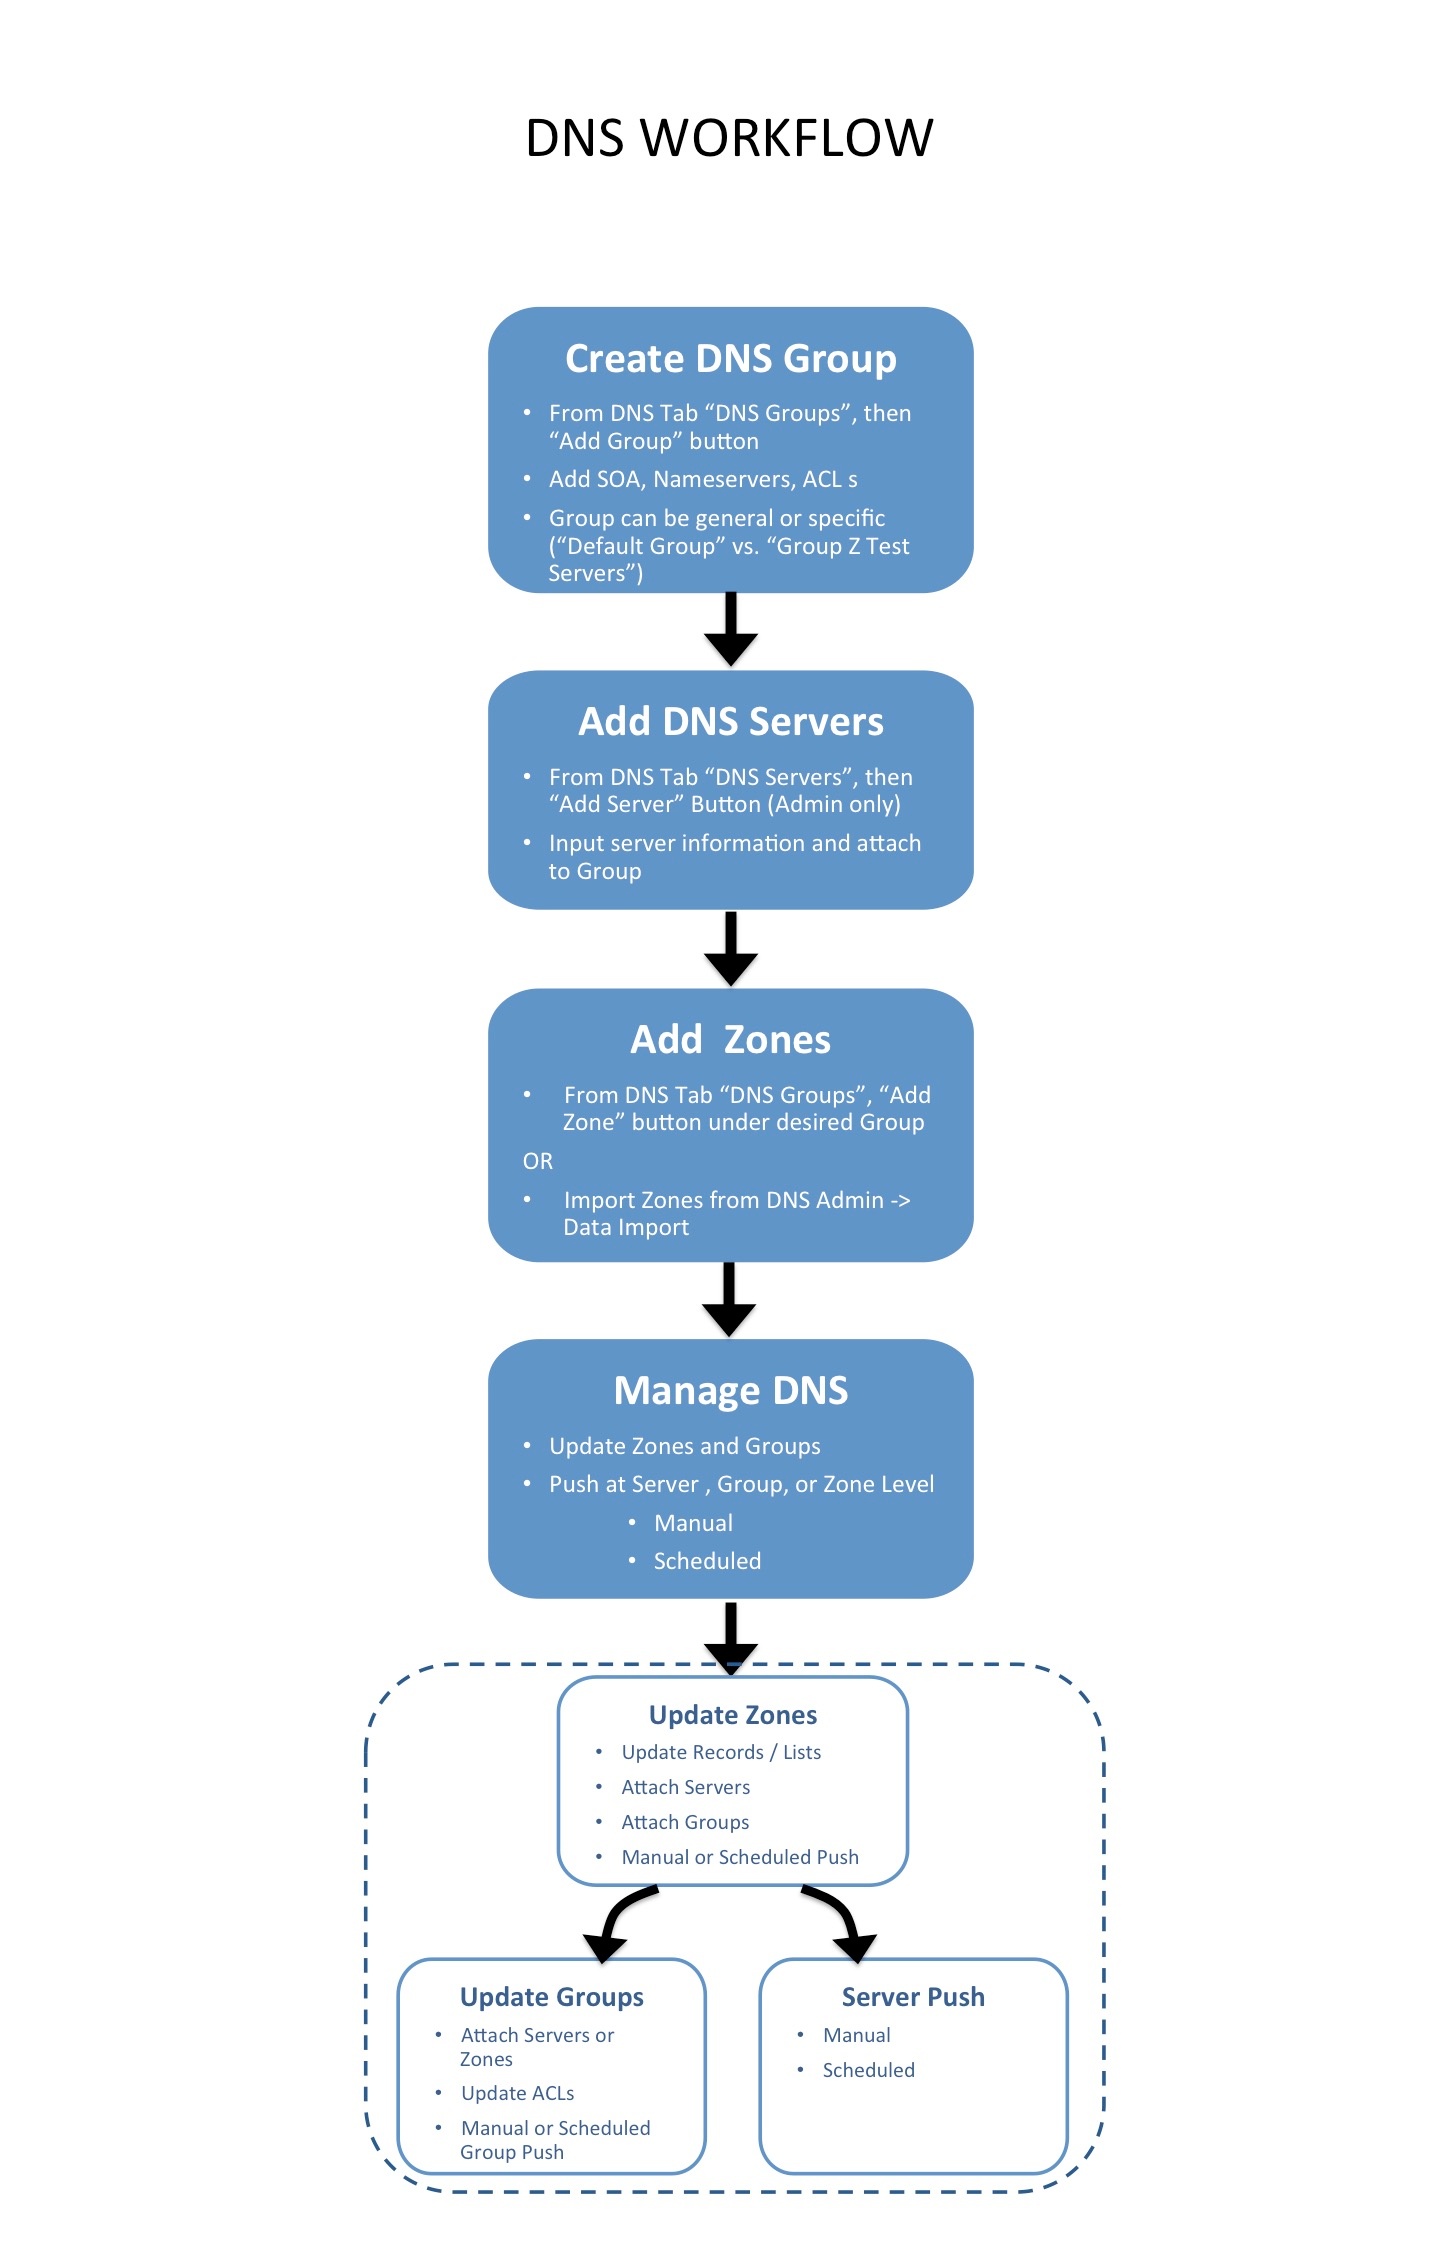
DNSv3 DNS in ProVision revolves around Groups. Zones are gathered under Groups, servers attached to Groups, and pushes may be done on a per Group level. Thus, the first workflow step in DNSv3 DNS is to set up one or more DNS Groups. A "Default Group" is automatically provided in ProVision, but other Groups may be desired to organize zones and default values.
...
After Groups have been set up, DNS servers should be added or settings verified. Admin users may add DNS servers from the DNS Servers tab tab "Add Server" button. Input the server information and save. Existing servers may be reviewed and edited by clicking on the server name in the DNS Server List. Once a server is created in ProVision, it may be attached to any DNS Group under the Group's "Attached Servers" module. Attaching a server to a Group will allow for zones in that group to be pushed to the attached server(s). See Working with DNS Servers.
...
At this point, all major components of the ProVision DNS the DNS system have been added - from here management tasks take over. Zones may be updated and moved to or from Groups; Groups may be edited with different default values or servers, and pushes maybe be performed for an individual zone, a full Group, or for an entire server. Pushes may be manual or scheduled for a future time through the Scheduler.
For more information on DNSv3 DNS tasks, see the following sections:
...
Review User Groups and Approval Process Needs
Expand Step 1 - Review Existing User Groups and Process Needs
When setting up Approvals for the first time, review the information in the previous section under "Approvals Fundamentals" to ensure a basic understanding of how Policies, Actions, and User Groups relate together in Approvals.
Then, take a few minutes to think about the following questions to get a better sense of how to use Approvals with your specific organization:
Expand Who are the users that perform DNS / DHCP tasks, and at what level?
Affects which users should be included in what User Groups
What ProVision User Group(s) are they in?
Approvals settings are applied to the User Group, not individuals - ensure users with similar oversight needs are grouped together
What actions made by a certain user group should be automatically denied, if any?
Assign the "Deny Action" policy to that Action/User Group combination
What actions made by a certain user group should require oversight (admin approval / rejection)?
Assign "Approve Action to be approved" to that Actionthat Action/User Group combination
Who is the admin / User Group that will make the final approval on a change?
Ensure the approver(s) is in a User Group with the "Must Approve Action" policy assigned for the actions requiring approval
Should any changes require multiple admins / User Groups to approve it in order to execute?
A single user from every group assigned with "Must Approve Action" for the action must approve the action for it to succeed
If two admins are required to both separately agree on a change, they should be under two separate User Groups assigned "Must Approve Action"
What User Groups would need to receive email Approval Status notifications, and on what type of actions?
Affects whether to enable notifications and set up the scheduler task to send the notifications, and to what User Groups. When enabled, all users of the relevant group(s) will receive the email(s)
Once your User Groups are optimized for use with Approvals, you may want to write down a quick note on which Action Types and policies are planned for each group.
Edit User Groups / Create Approvals-Specific User Groups, if needed
Expand Step 2 - Add or Edit
ProVisionUser Groups
From here, depending on the answers to the questions in step 1, you may need to do one or more of the following from the Users tab:
- Edit existing User Groups to add or remove users, in order to combine users who will need similar action types approved.
- Verify the User Groups have appropriate CRUD permissions set to perform the action(s) to be approved (e.g, you may have previously removed "Create" permissions for a group, but if the intent is now for those users to have "Add" actions approved by an Admin, the submitter will need User Group resource "Create" permissions back!)
- Create new User Groups specifically for use with Approvals (recommended)
- Associate users with different, or additional User Groups (remember - users can be associated with multiple groups!)
For more information on adding and editing ProVision User Groups, see see Users & Permissions, Global Permissions, and Working with Users.
Assign Action and Policy Settings to User Groups
Expand Step 3 - Assign Approval Action Settings to Groups
From the Approvals Tab, navigate to the Permission Groups sub-tab.
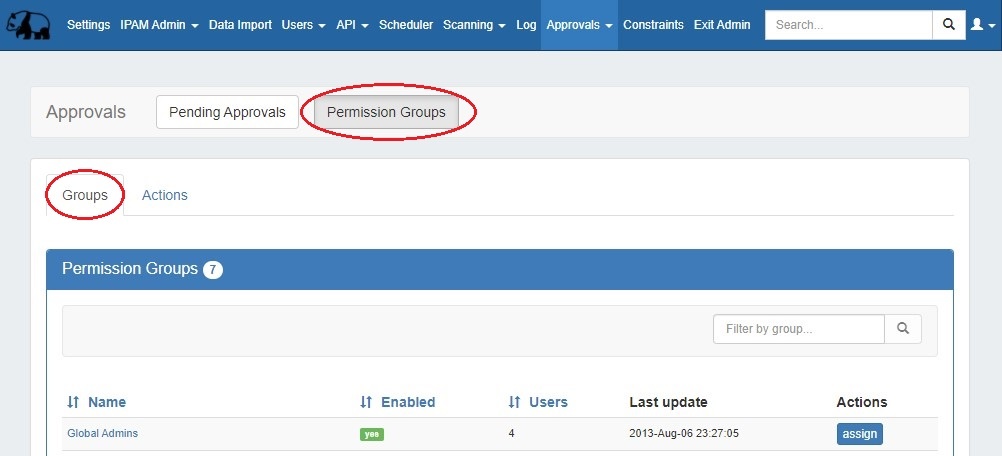
Then, under the Groups page tabpage tab, find the ProVision User Group you wish to want to assign a policy to and click "Assign".
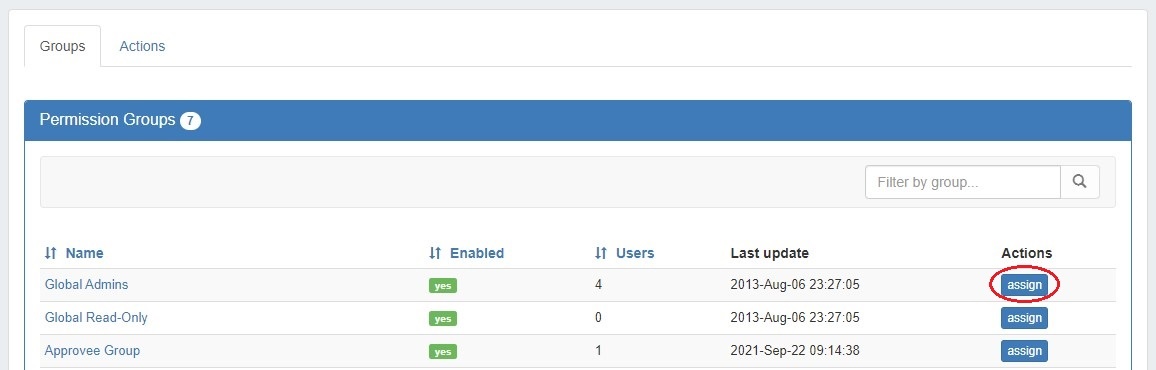
Clicking the "Assign" button for a group brings up a checklist to select what policy to apply to the group for what Family and Actions (i.e. DNS Zone 'Add' or DNS Group 'Update'). You Group 'Update'). Select either "Deny Action", "Submit Action", or "Approve Action" under Policy. Once a policy is selected, you can "quick-select" all actions for a DNS Family (Severs, Groups, Zones, Records) or DHCP Family (Servers, Groups, Pools, Reservations) by clicking the checkbox next to the family name, or only select individual action types for each Family.
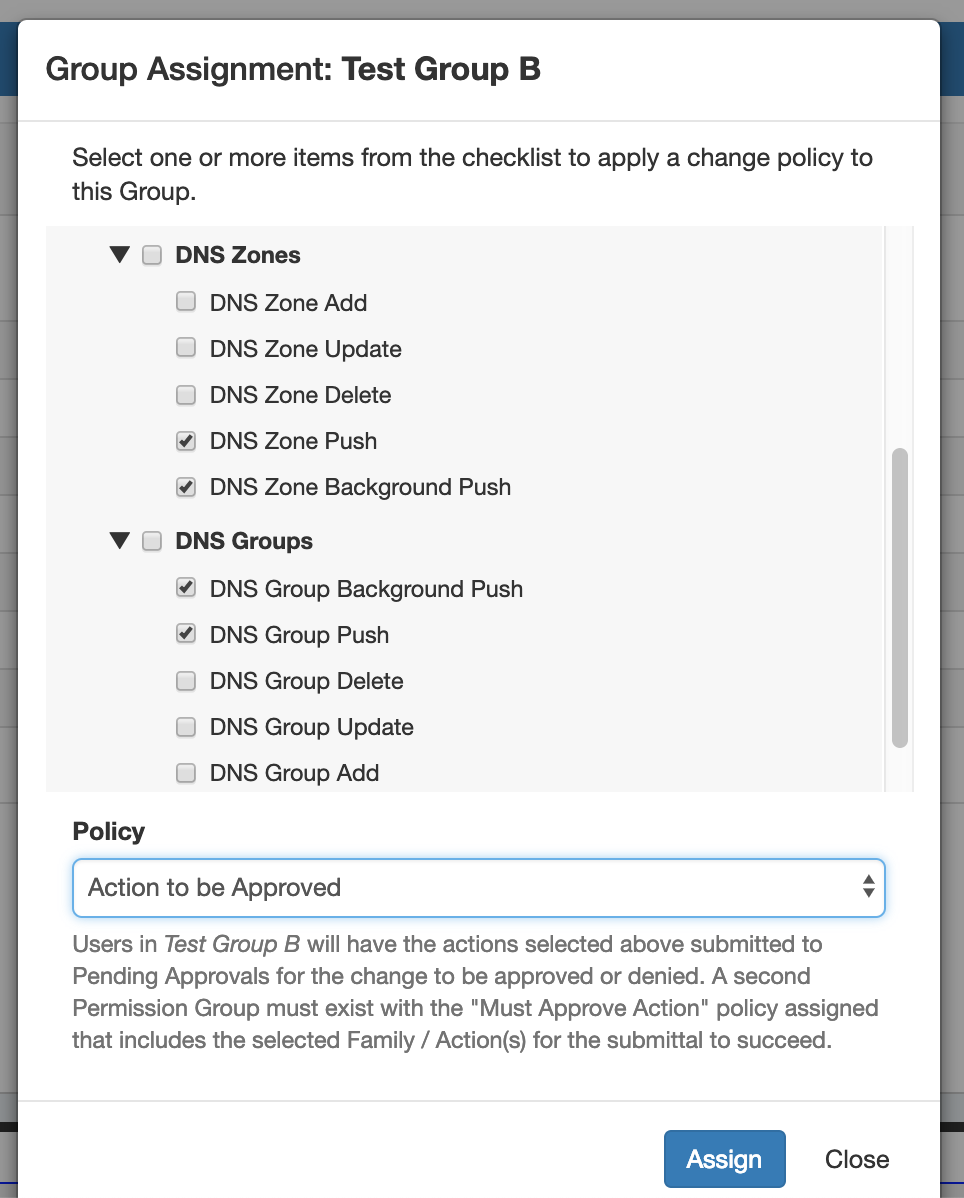
Once you've selected the applicable Family/Action combinations to apply a policy for, select either "Deny", "Action to be Approved", or "Must Approve Action" under Policy.
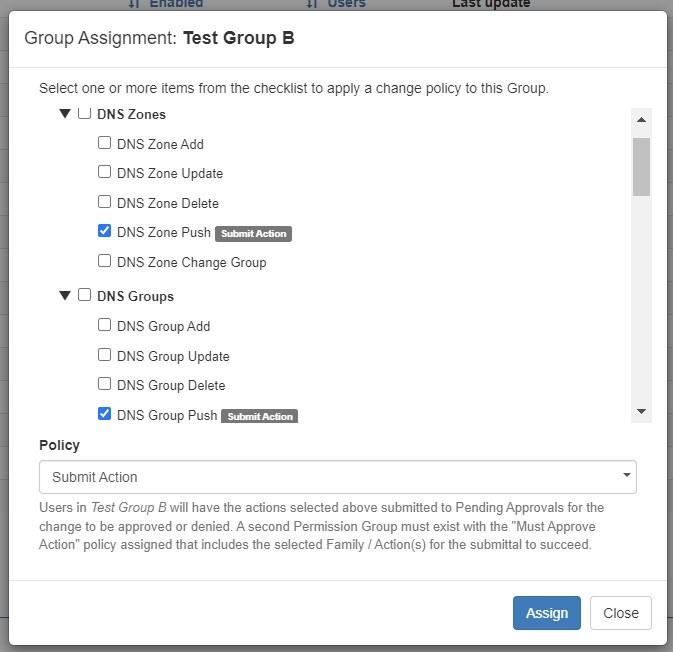
When done, Click "Assign", and repeat as needed for other Policy types or User Groups.
If using Approvals notifications, enable notifications for the appropriate Permissions Group(s)
Expand Step 4 - Enable Notifications (Optional)
From the Approvals Tab, navigate to the Permission Groups sub-tab Groups page tab.
Click on the group name for which you want to set notifications - the Group Permissions Detail page will provide additional information on the group's settings.
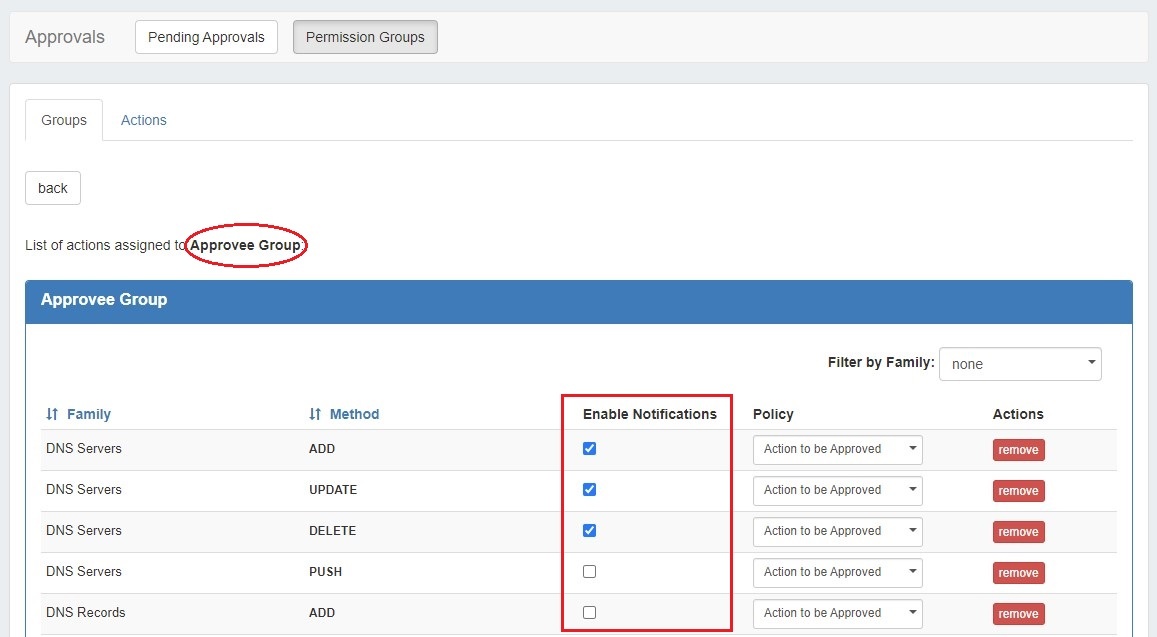
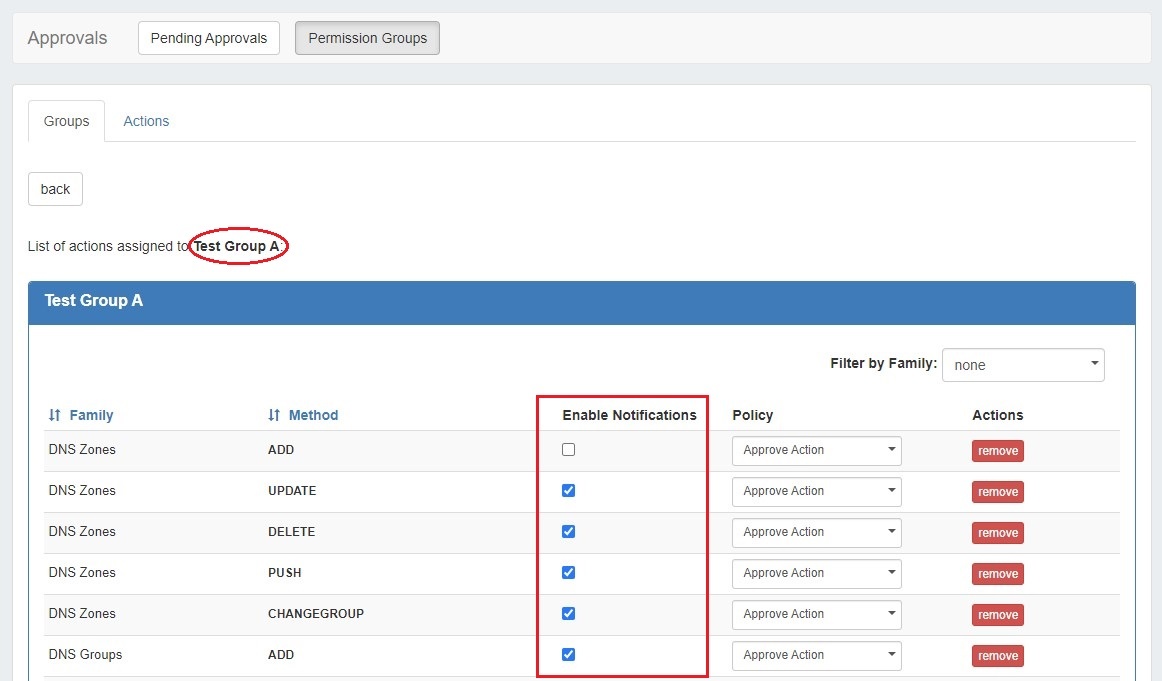
For any Family/Action that you want to enable notifications, click the checkbox under "Enable Notifications". All users of that group will get email notifications when a change of the selected type(s) are made.
If using Approvals notifications, set up a Scheduler task for "Approvals - Process Subscription"
Expand Step 5 - Add Scheduler Task: "Approvals - Process Subscription"
The "Approvals - Process Subscription" task processes approval request events and handles the sending of notification emails to subscribed Approvals Groups - this task must be created and running on a regular interval in order for Approval Notification emails to be sent.
In order to receive the most up to date information in the Approval Notifications, is recommended to create this task with a run time of "every 5 minutes" and no end date.
For information on setting up Scheduler Tasks, see Scheduler.
Set up a Scheduler Task for "Approvals - Delete events older than 1 month", to occasionally clear out old and obsolete Approval request events
Expand Step 6 - Add Scheduler Task: "Approvals - Delete events older than 1 month"
The "Approvals - Delete events older than 1 month" task deletes any Approvals history events older than 30 days.
It is recommended to set this task to run monthly with no end date, to clear out obsolete approvals items, reduce data storage space needs, and reduce approvals page load time.
For information on setting up Scheduler Tasks, see Scheduler.
...
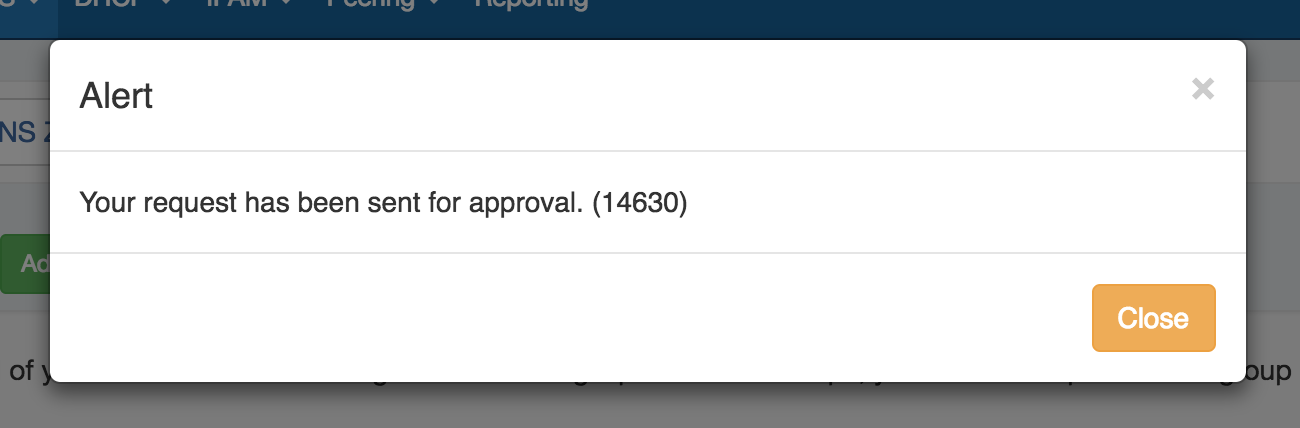
- Submitter makes an action (either by action type or DNS Family) that requires approval
- Submitter is notified that their action is pending approval
The requested change is sent to the Approvals Tab Pending Approvals list, and also to the DNS Resources Awaiting Approval module (the submitter may see their own submitted action under "Resources awaiting approval", but only Approvers can take approve/reject actions)
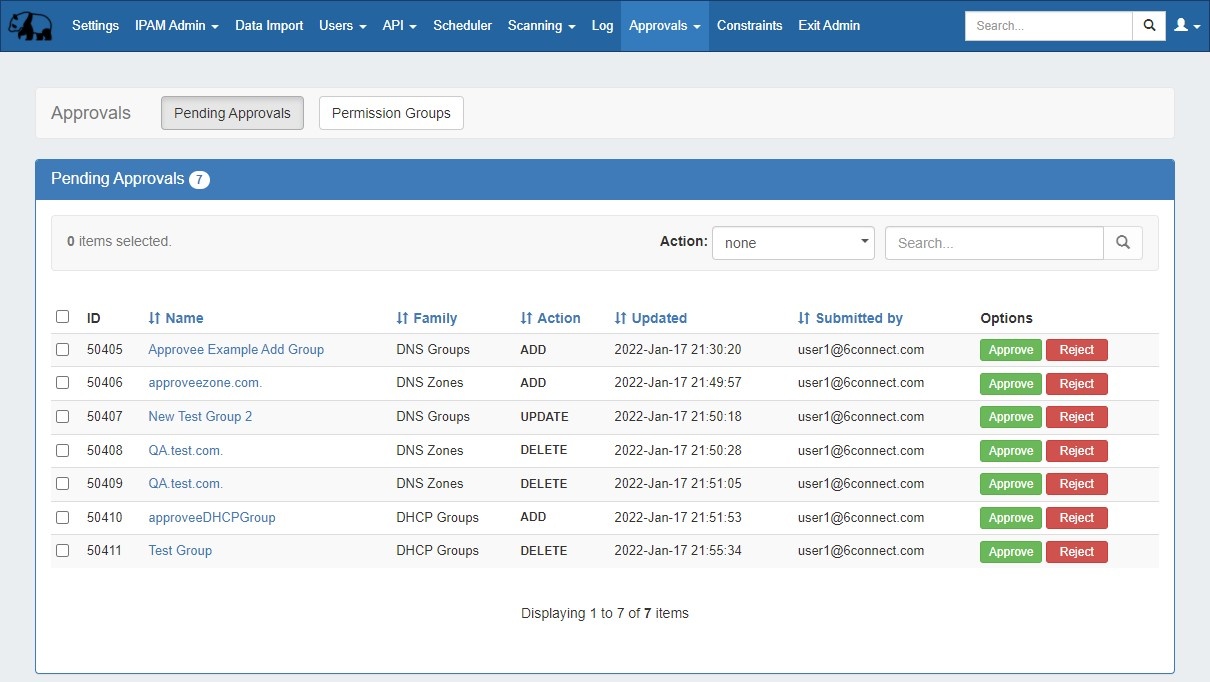
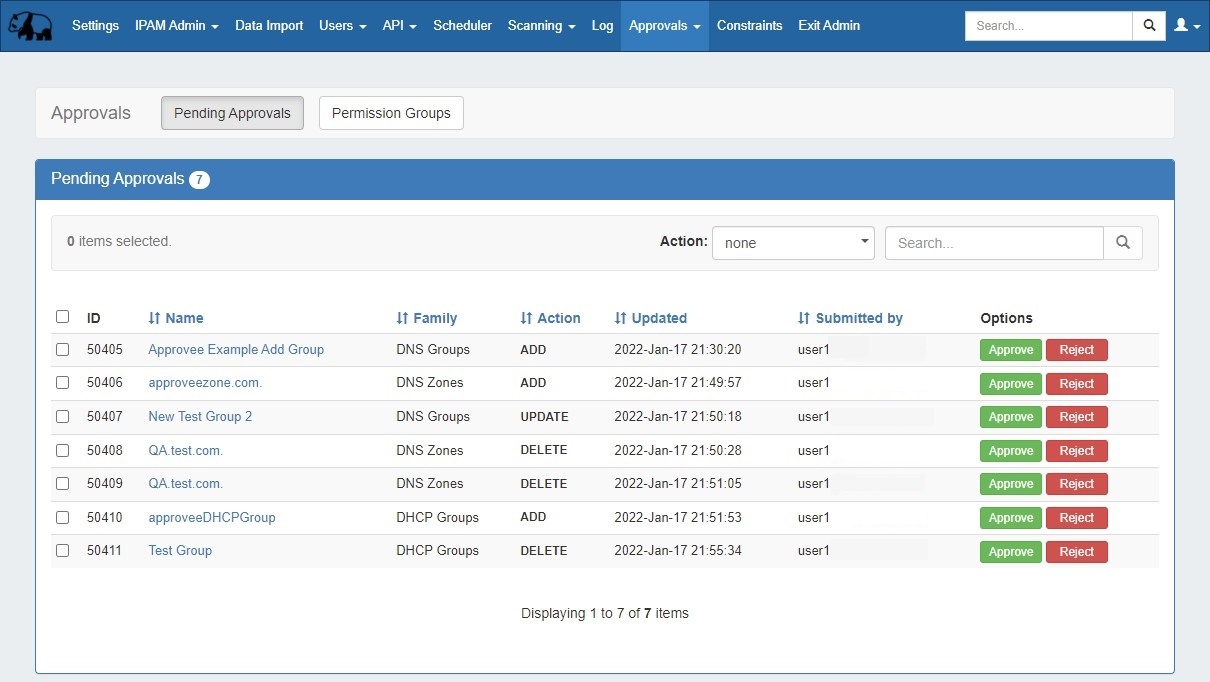
Expand title Pending Approvals List... The Pending Approvals list is under the Approvals Tab. It shows Approvals events (change requests) for which the user has the ability to Approve or Deny - it does not show approval requests for all of ProVision or those for other users.
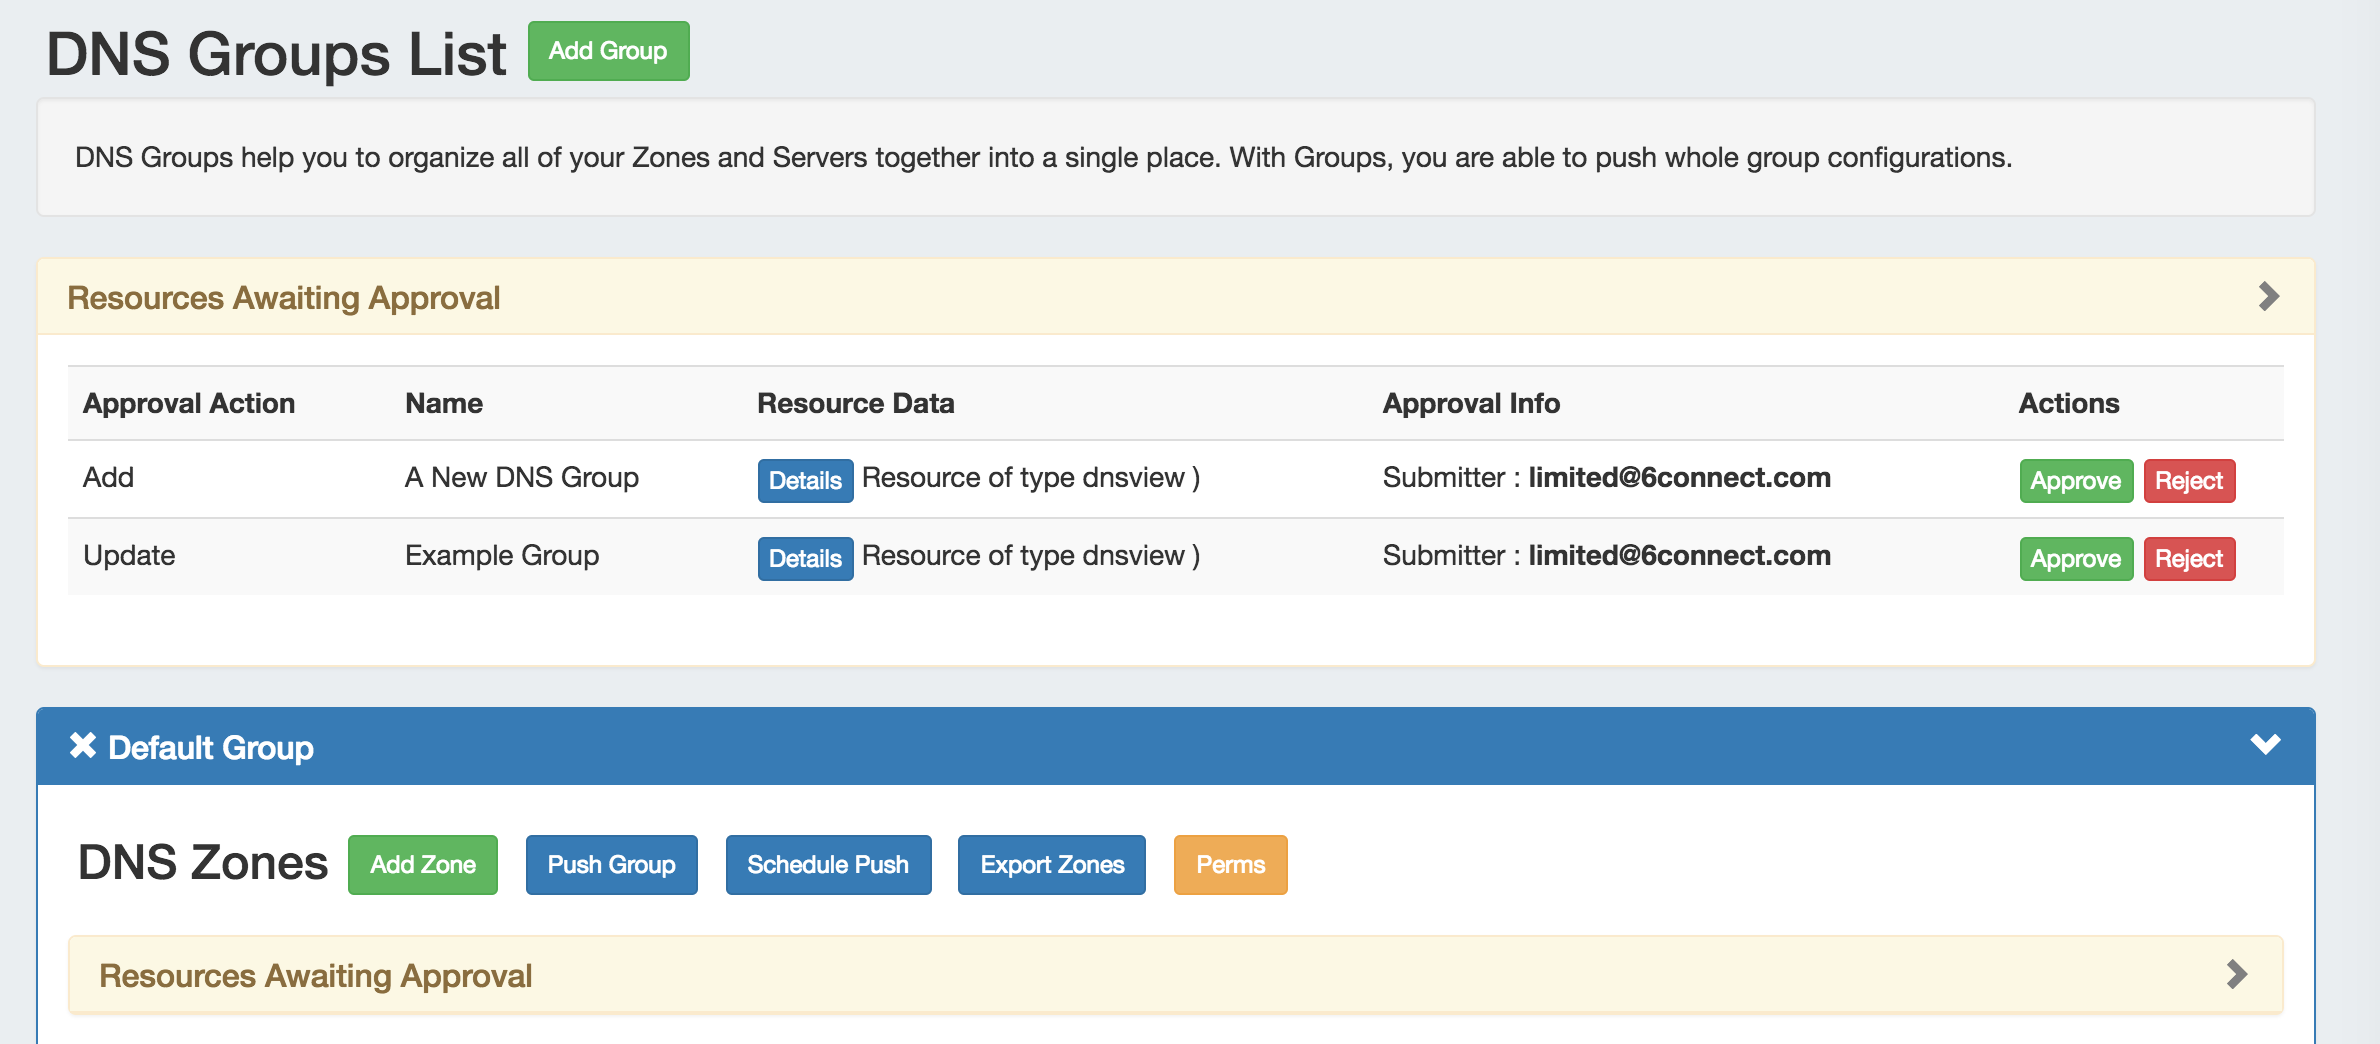
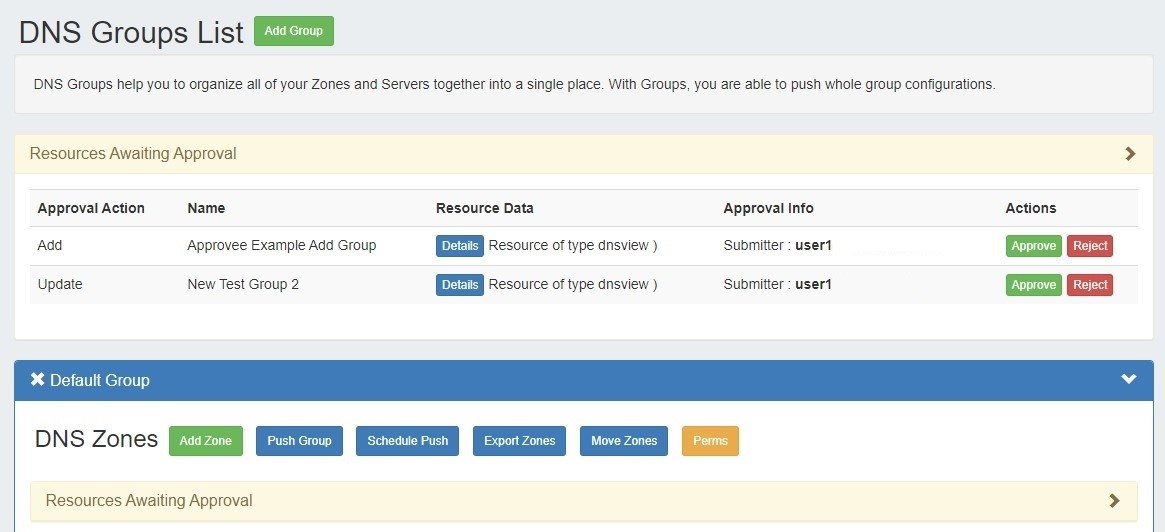
Expand title Resource Awaiting Approval Module... A "Resources Awaiting Approval" module will display in selected DNS / DHCP pages to Users with Admin / Approval permissions, if a change has been submitted on that page that is pending approval by the User's Approval Group.
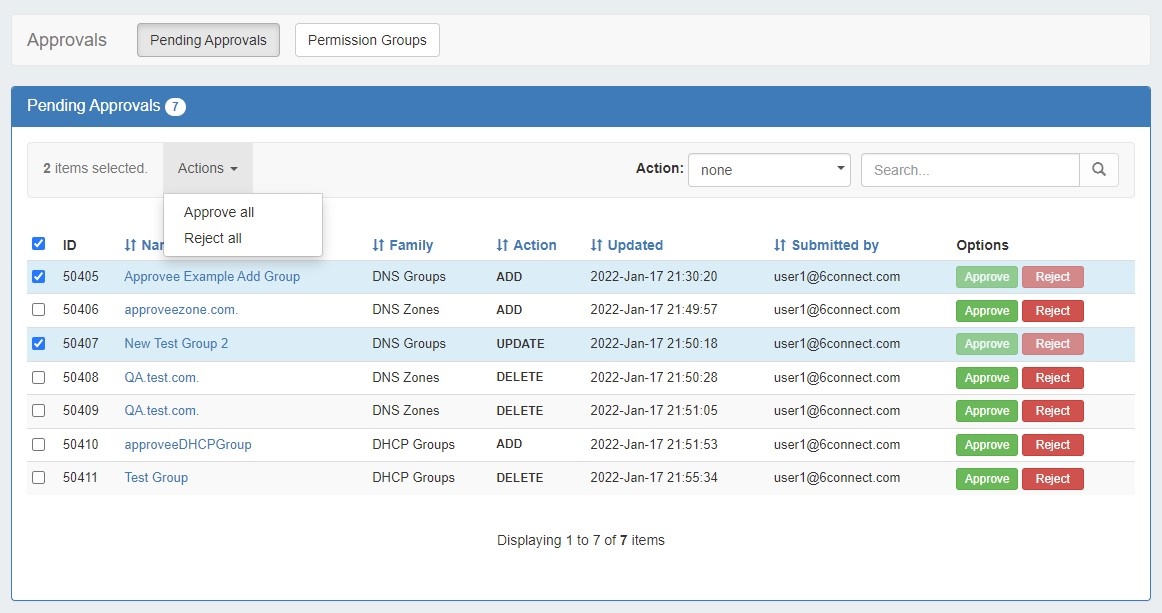
The Approver reviews the change in either their Approvals Tab Pending Approvals list, or the Resources Awaiting Approval module, and chooses to Approve or Reject the change:
Expand 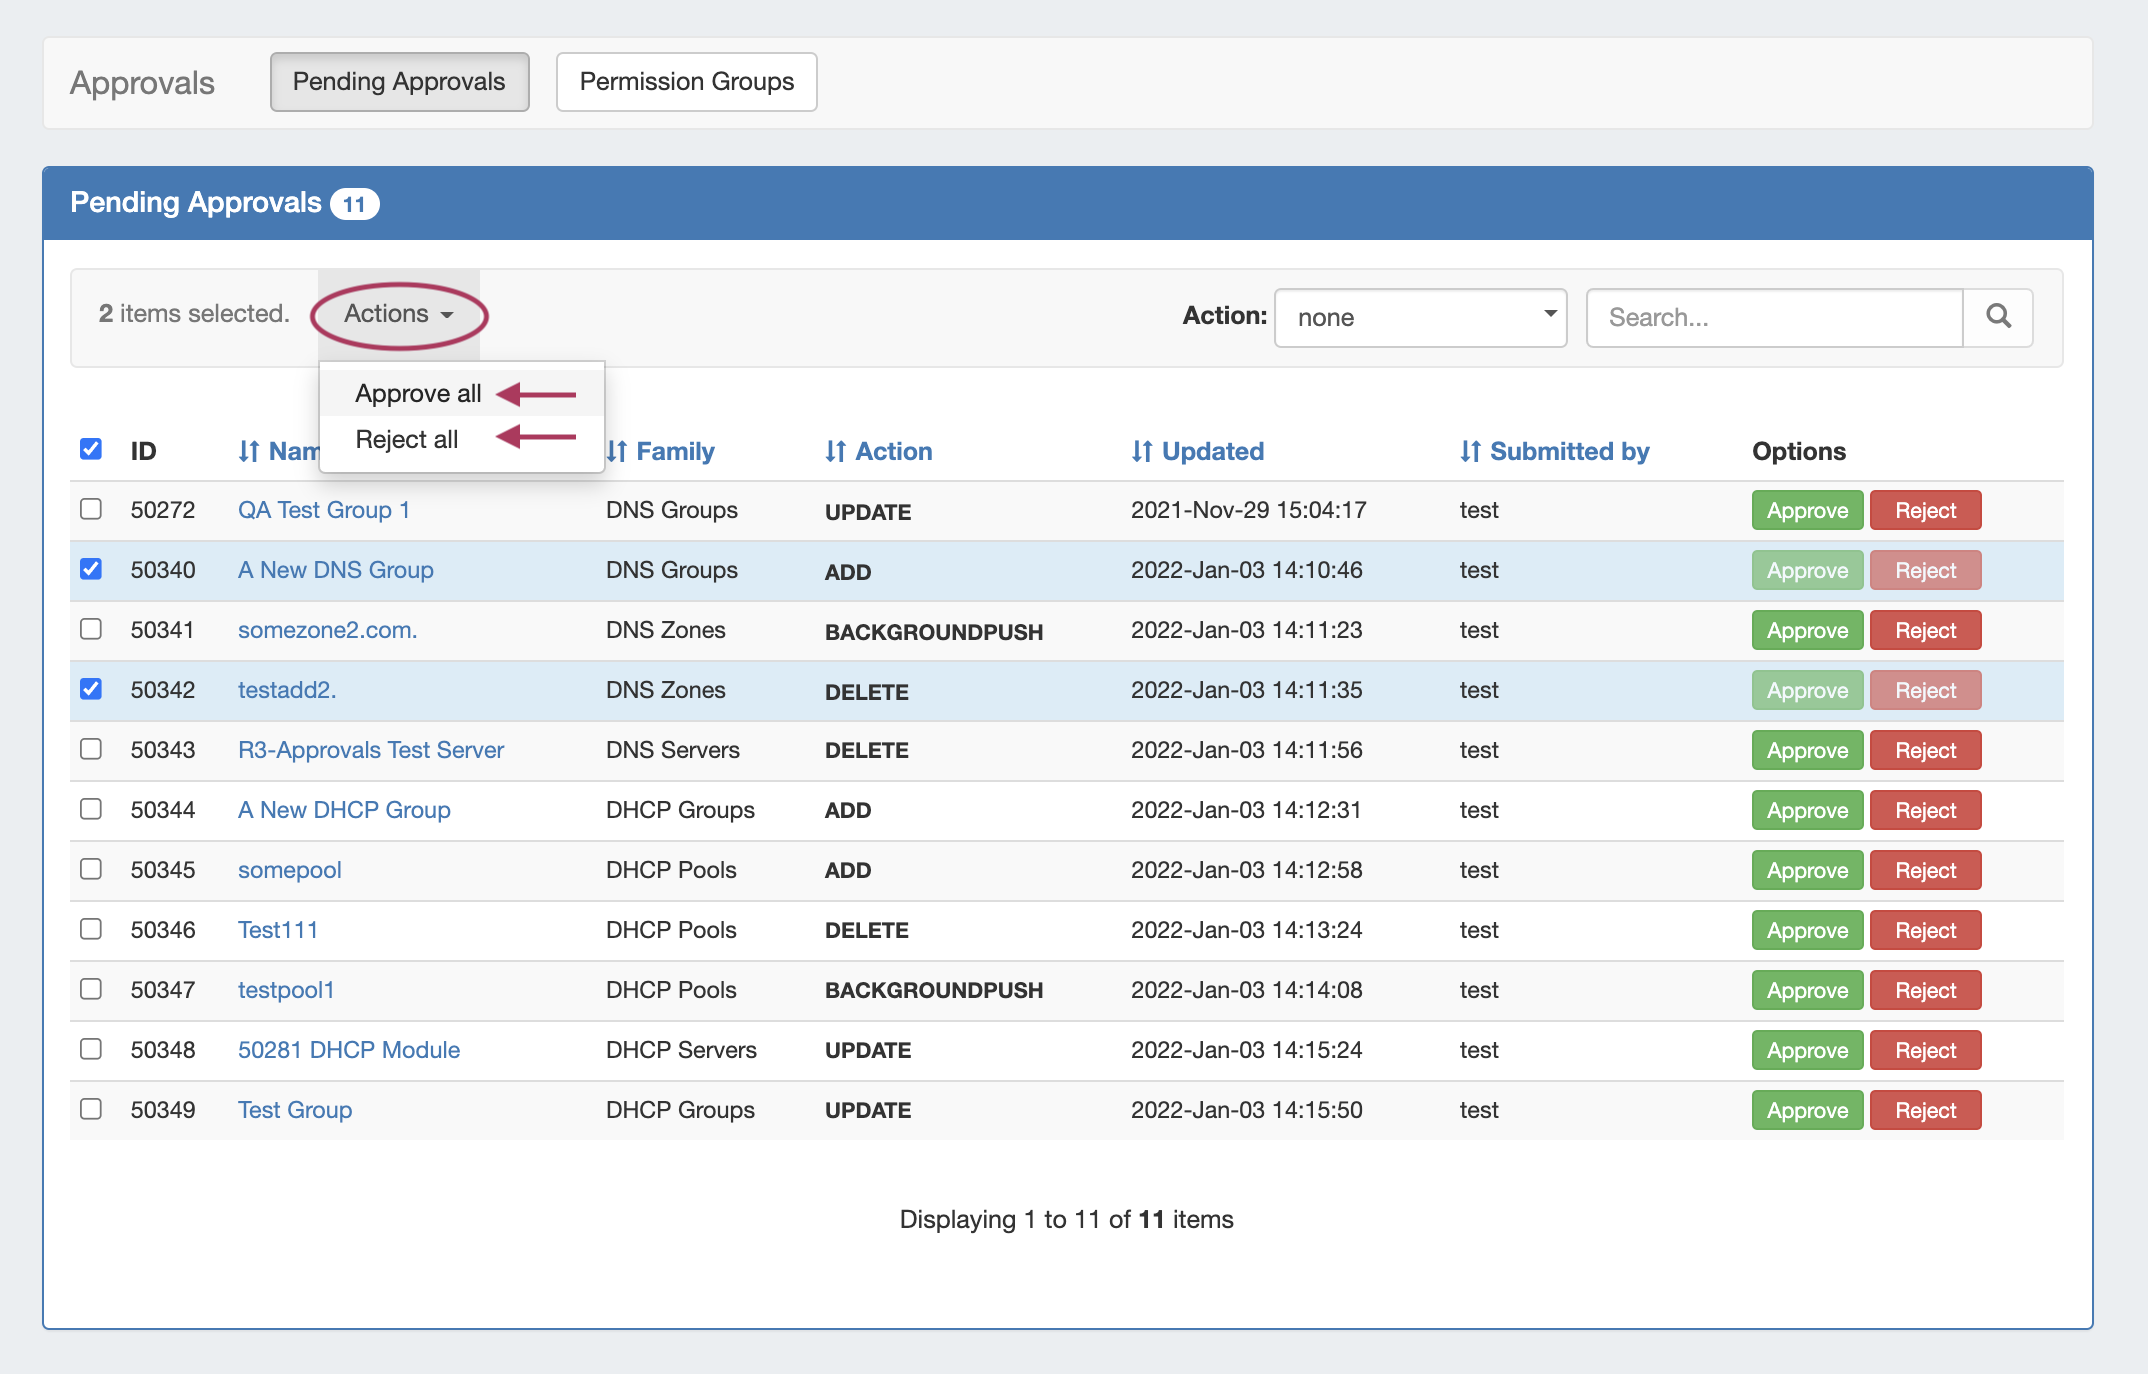
- If Approved, and no other groups need to approve it, then the change executes and is saved. A status change notification email is sent, if enabled.
- If Approved, and is waiting approval from an additional User Group, the change continues to be held as Pending, until the other group responds (Both groups must "Approve" for the change to execute). A status change notification email is sent, if enabled, stating that the change is awaiting another Group.
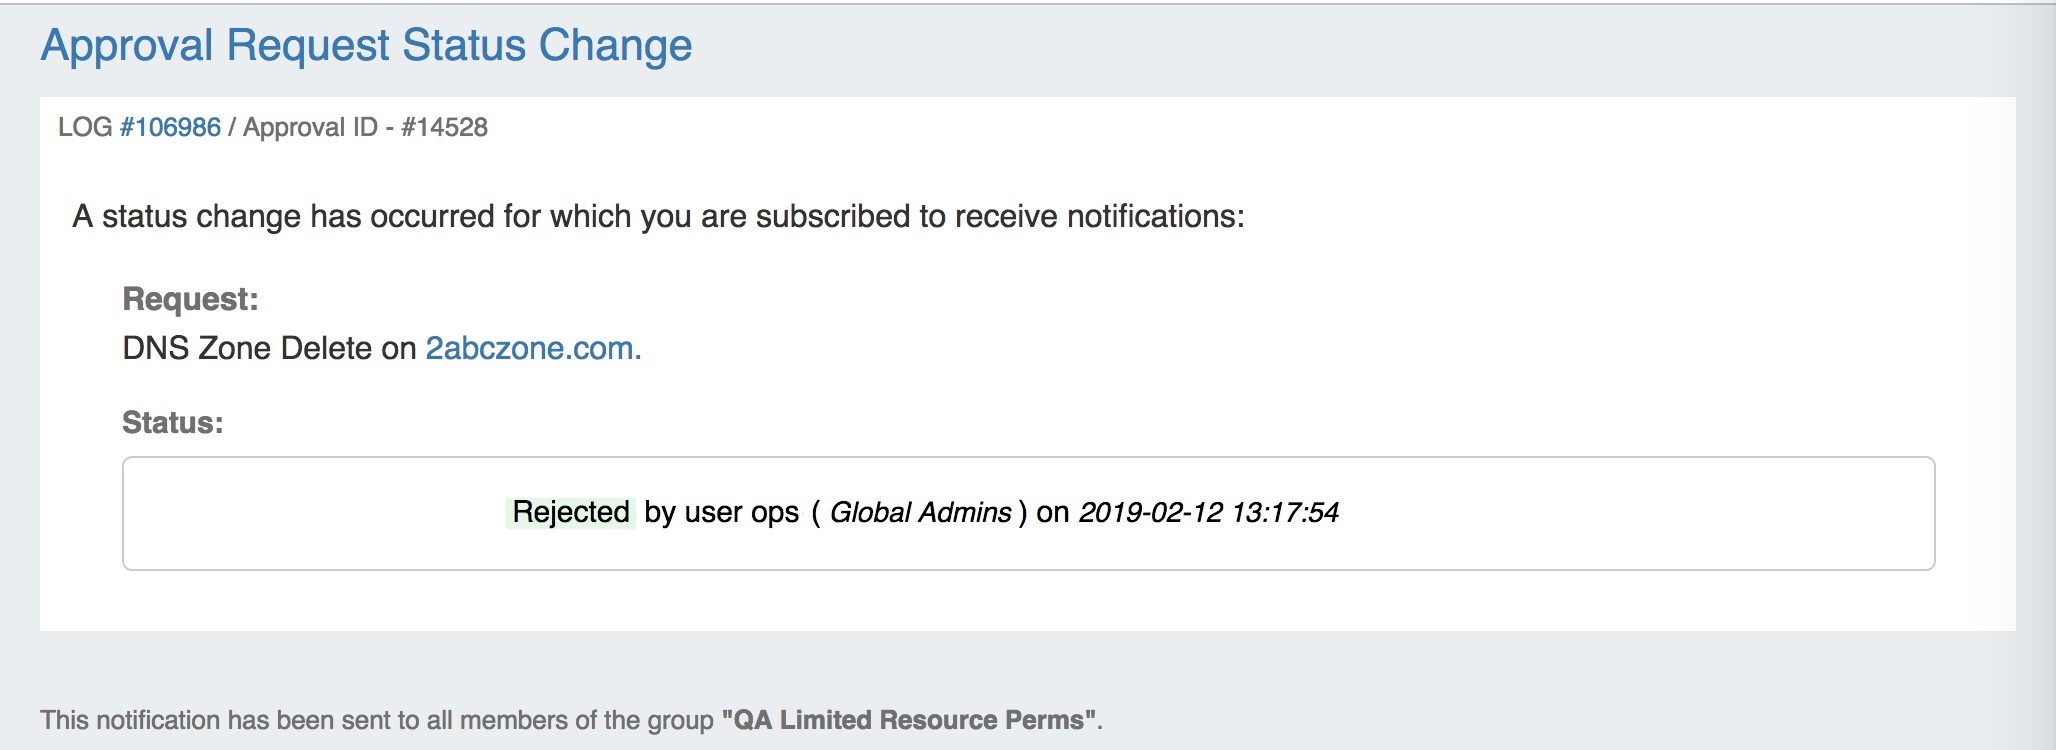
- If Rejected, the change is not executed. A status change notification email is sent, if enabled.
Example Notification Email:
See the following areas for more information on Approvals:
...