Working with VLANs
Step 1) Add Domain
Add a new domain by clicking the "Add Domain" button at the top right of the VLAN Home page. Optionally, you may add VLANs to the domain at the same time.
Viewing the Domain List
Edit a Domain
Remove a Domain
Step 2) Add VLANs to a Domain
After creating domains, VLANs need to be added for that domain out of the pool of available VLANs.
The IPAM VLAN Page
Go to the IPAM Tab, and then either select VLAN from the IPAM dropdown menu, or click "VLAN" from the subtab buttons that appear on the IPAM page.

This takes you to the IPAM - VLAN page, which shows an overview of Domains and VLANs on the left sidebar (click the + next to the domain names to see the enabled VLANs under each domain), and similar to the IPAM page, shows IPAM Utilization data for each Domain / VLAN pair. Clicking on the VLAN Name will open "VLAN Manage", which has the same type of functionality for IP blocks as IPAM Manage, but organized under the scope of that VLAN.
Add VLANs to a Domain (Enable)
In the IPAM - VLAN page, click the "Add VLAN" button. Select the Domain, and enter the individual or range of VLANs to add. When done, click "Save".
Remove VLANs from a Domain
Removing VLANs may be performed from multiple areas:
- On the VLAN Home page sidebar, by right clicking on the VLAN and selecting "Remove VLAN" from the menu
- From the VLAN Utilization Box for the VLAN, by clicking the gear icon and selecting "Remove VLAN"
- From VLAN Advanced, by right clicking on the desired VLAN in the list, and selecting "Remove VLAN"
For details on the VLAN update endpoint, see API Module - VLAN - (update).
Edit a VLAN
You can edit a VLAN by clicking on the VLAN in the VLAN List sidebar, then selecting "Edit VLAN".
You cannot change the Domain of the VLAN, but you can add a descriptive text name or edit VLAN Metadata (if enabled).
After making your changes, click the "Save" button. The named VLAN will now show both VLAN number and name when viewing Domain / VLAN lists or when working with blocks.
Step 3) Add Blocks to VLANs
After VLANs have been enabled for domains, you can associate those VLANs with IP blocks.
Add / Update Blocks to VLAN from VLAN - Manage IPs:
While on the VLAN Home Page, expand the desired domain in the sidebar and right click on a VLAN. Then select "Assign Blocks". You should automatically be taken to that VLAN's Utilization Box, with the "Assign Blocks" panel open. You may also access the panel directly from the Utilization Box or VLAN Manage by clicking on the plus-sign icon.
This opens up a panel where IP Blocks may be associated to the VLAN. From here, you can "Direct Assign" a block to the VLAN, or use filter criteria to " Smart Browse Assign" blocks.
Direct Add Block to VLAN:
Directly add a known, available IP Block by typing in the CIDR, then hitting "Add IP Block".
Browse IP Blocks to add to VLAN:
This opens a window similar to the "Smart Browse" used in assigning IPs to a resource - just select IPv4, IPv6 blocks, or Resources to browse from the radio buttons at the top of the list.
When you have selected the block to add, click "add to VLAN".
Add / Update VLAN to Blocks from IPAM Manage or VLAN Manage:
When editing a block in either IP Manage (IPAM Tab -> Action Menu (wrench) -> Manage), or VLAN Manage (IPAM Tab - VLAN -> Action Menu (wrench)) , you can select an existing domain and VLAN to associate to the block.
VLAN Manage:
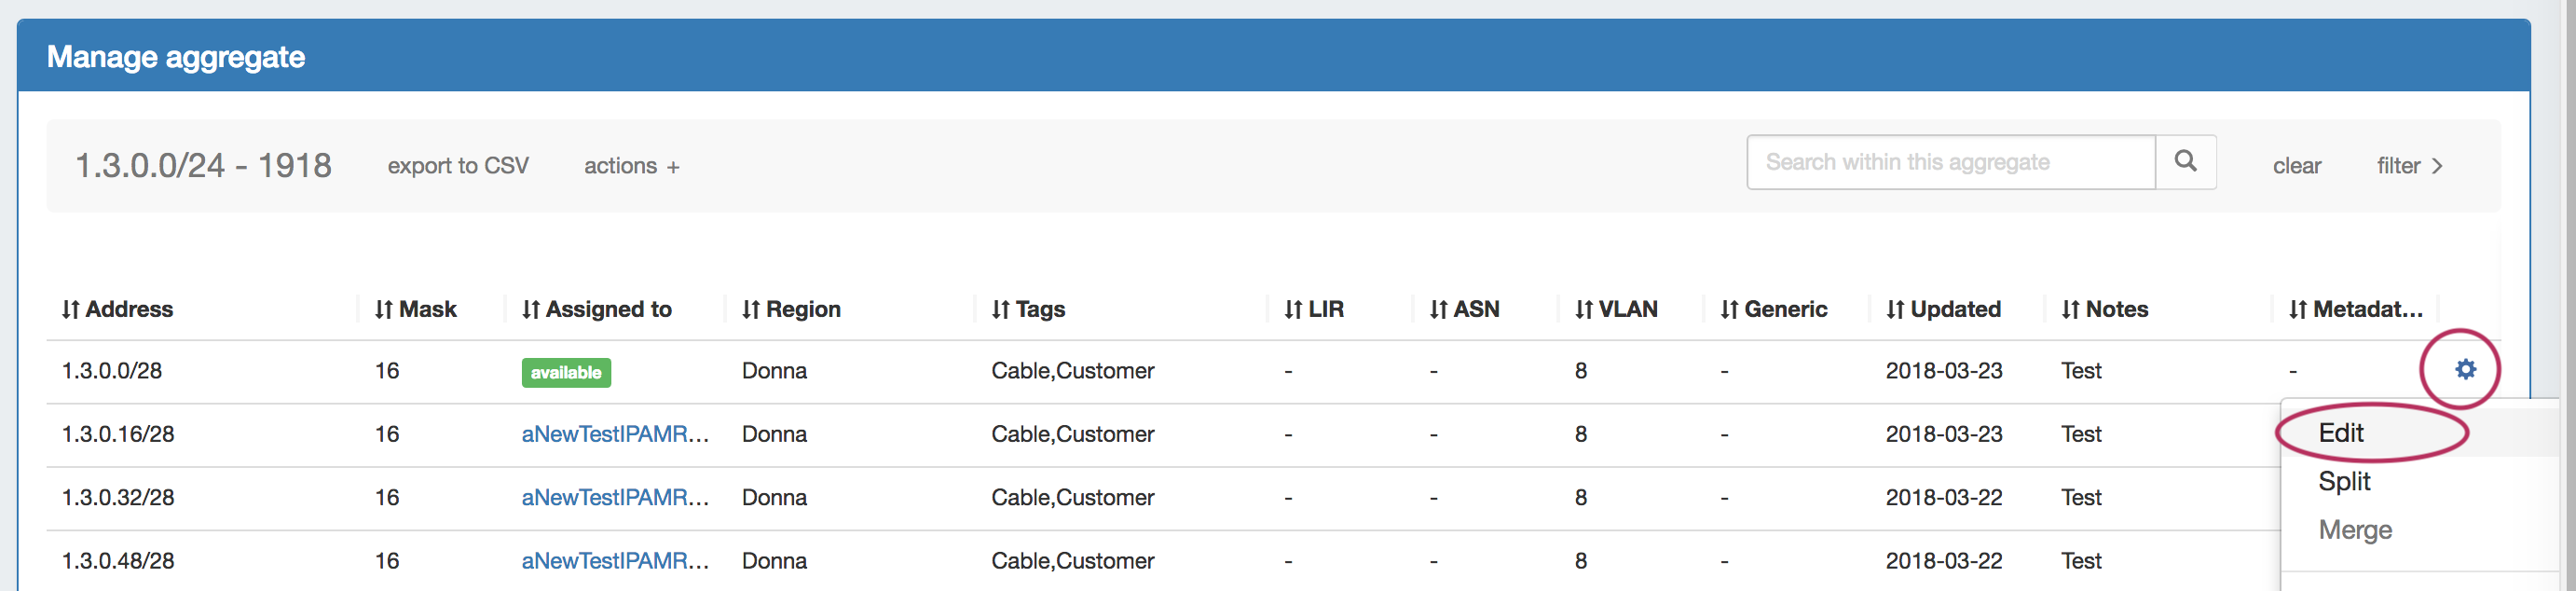
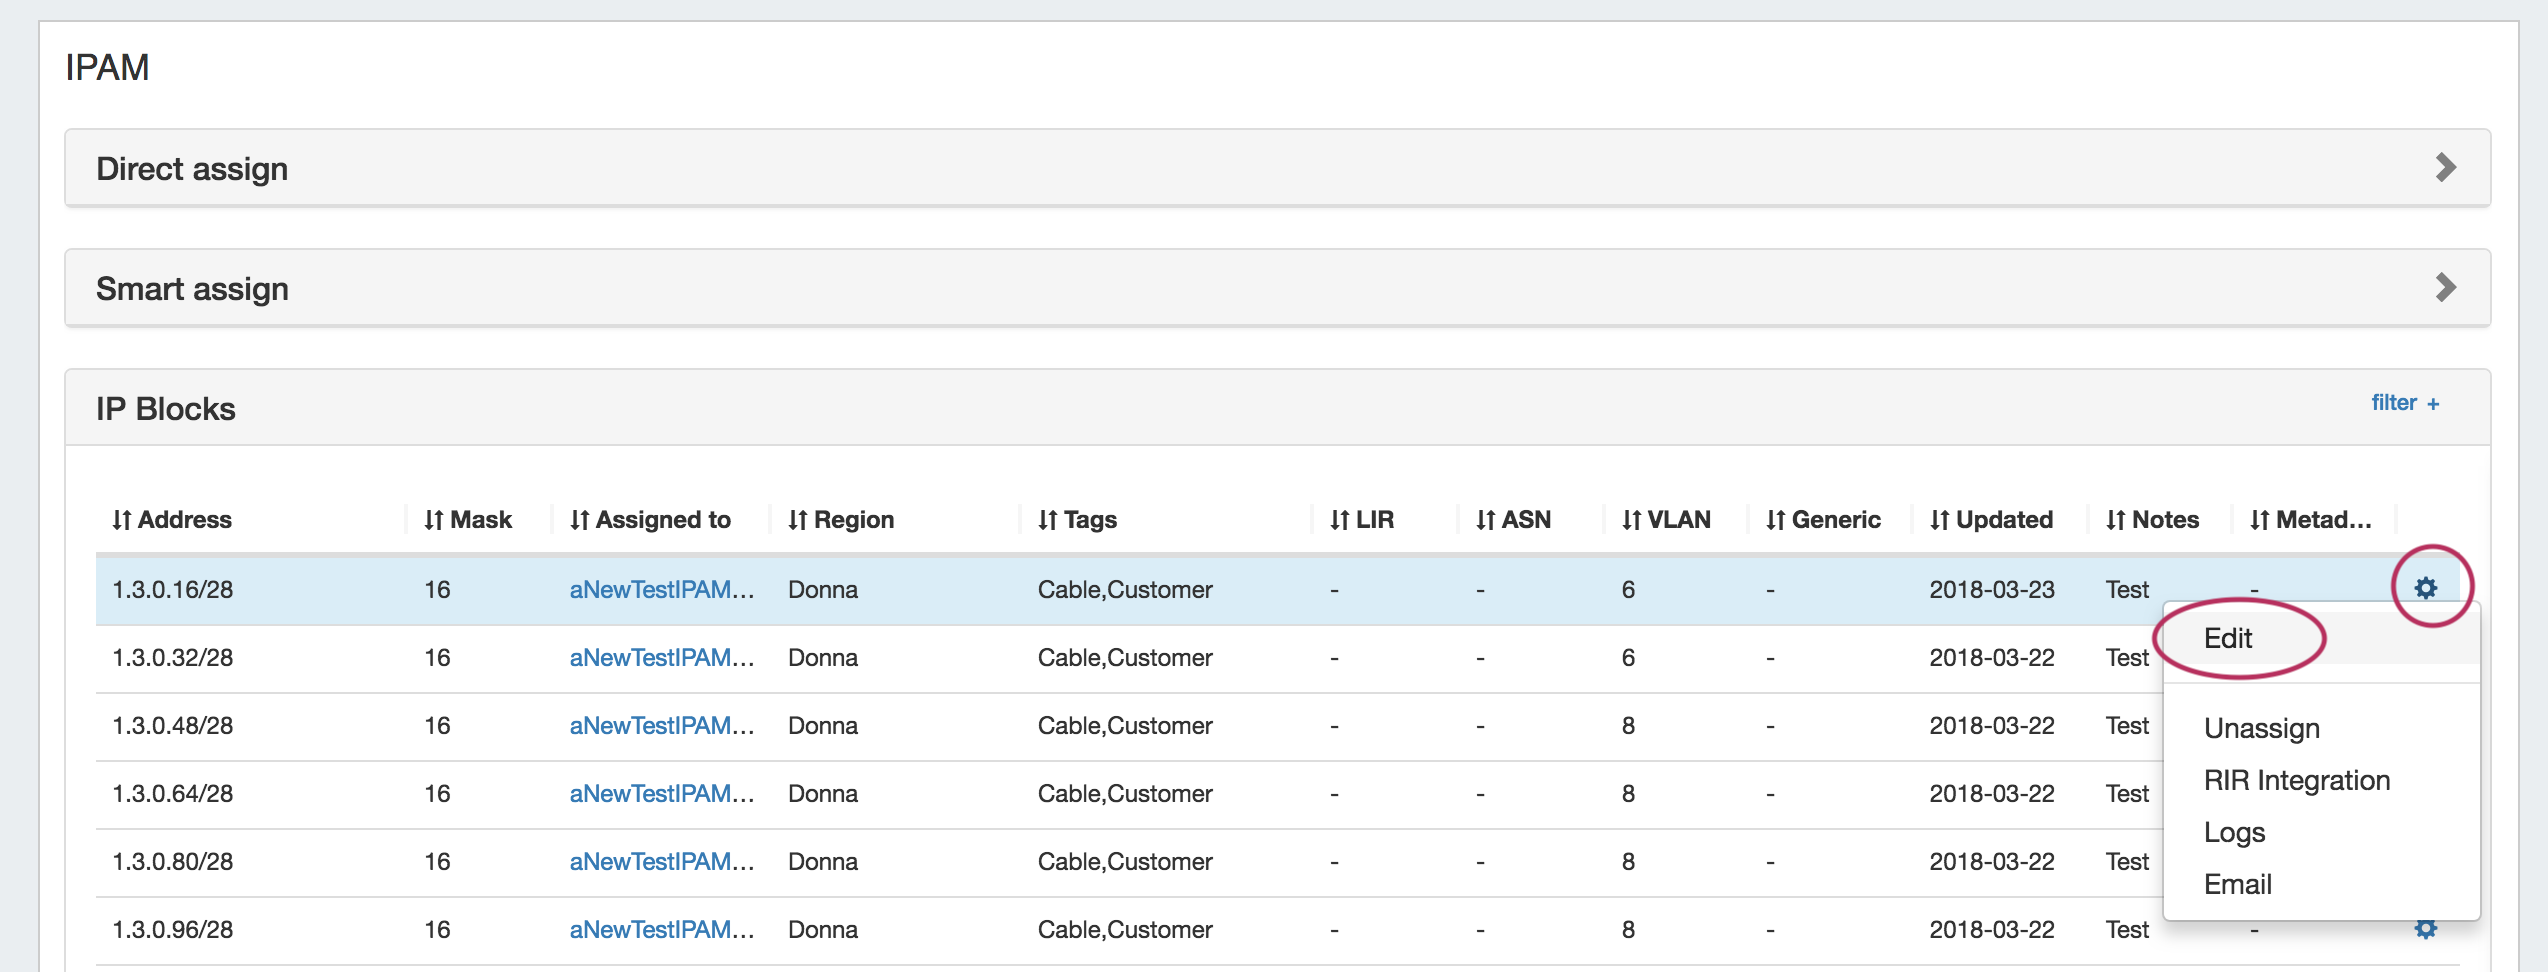
From the VLAN Manage screen, click on the Action Menu (gear icon) for the desired block, the select "Edit". You may also double-click on the block to open the same screen.
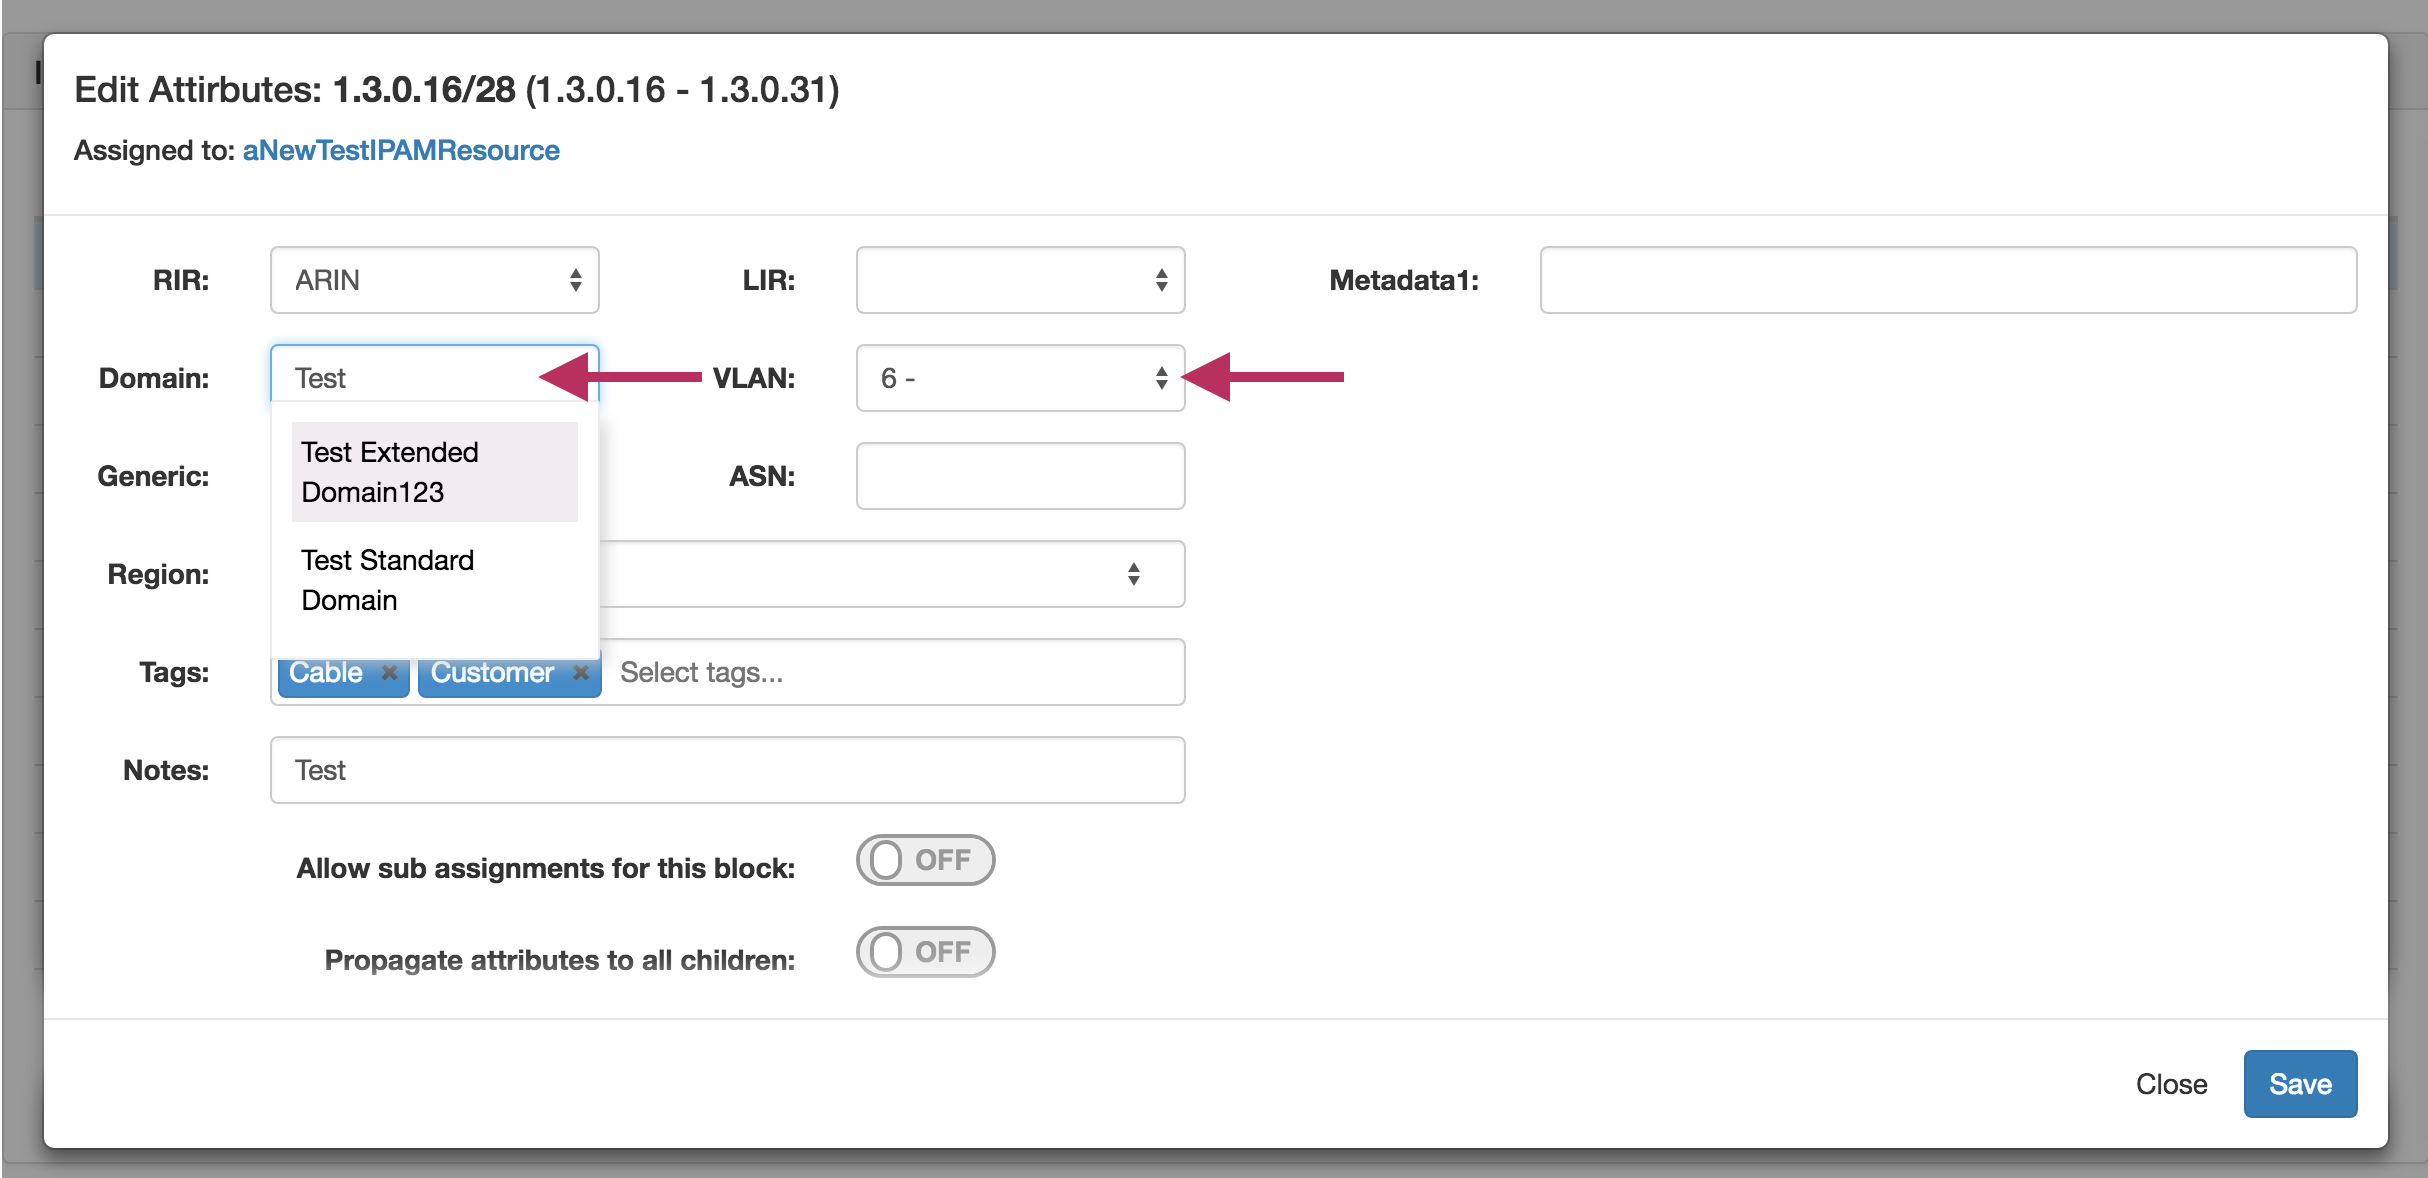
In the Edit Attributes page for the block, change the Domain to the desired item, then select the VLAN. Hit save when done.
IPAM Manage:
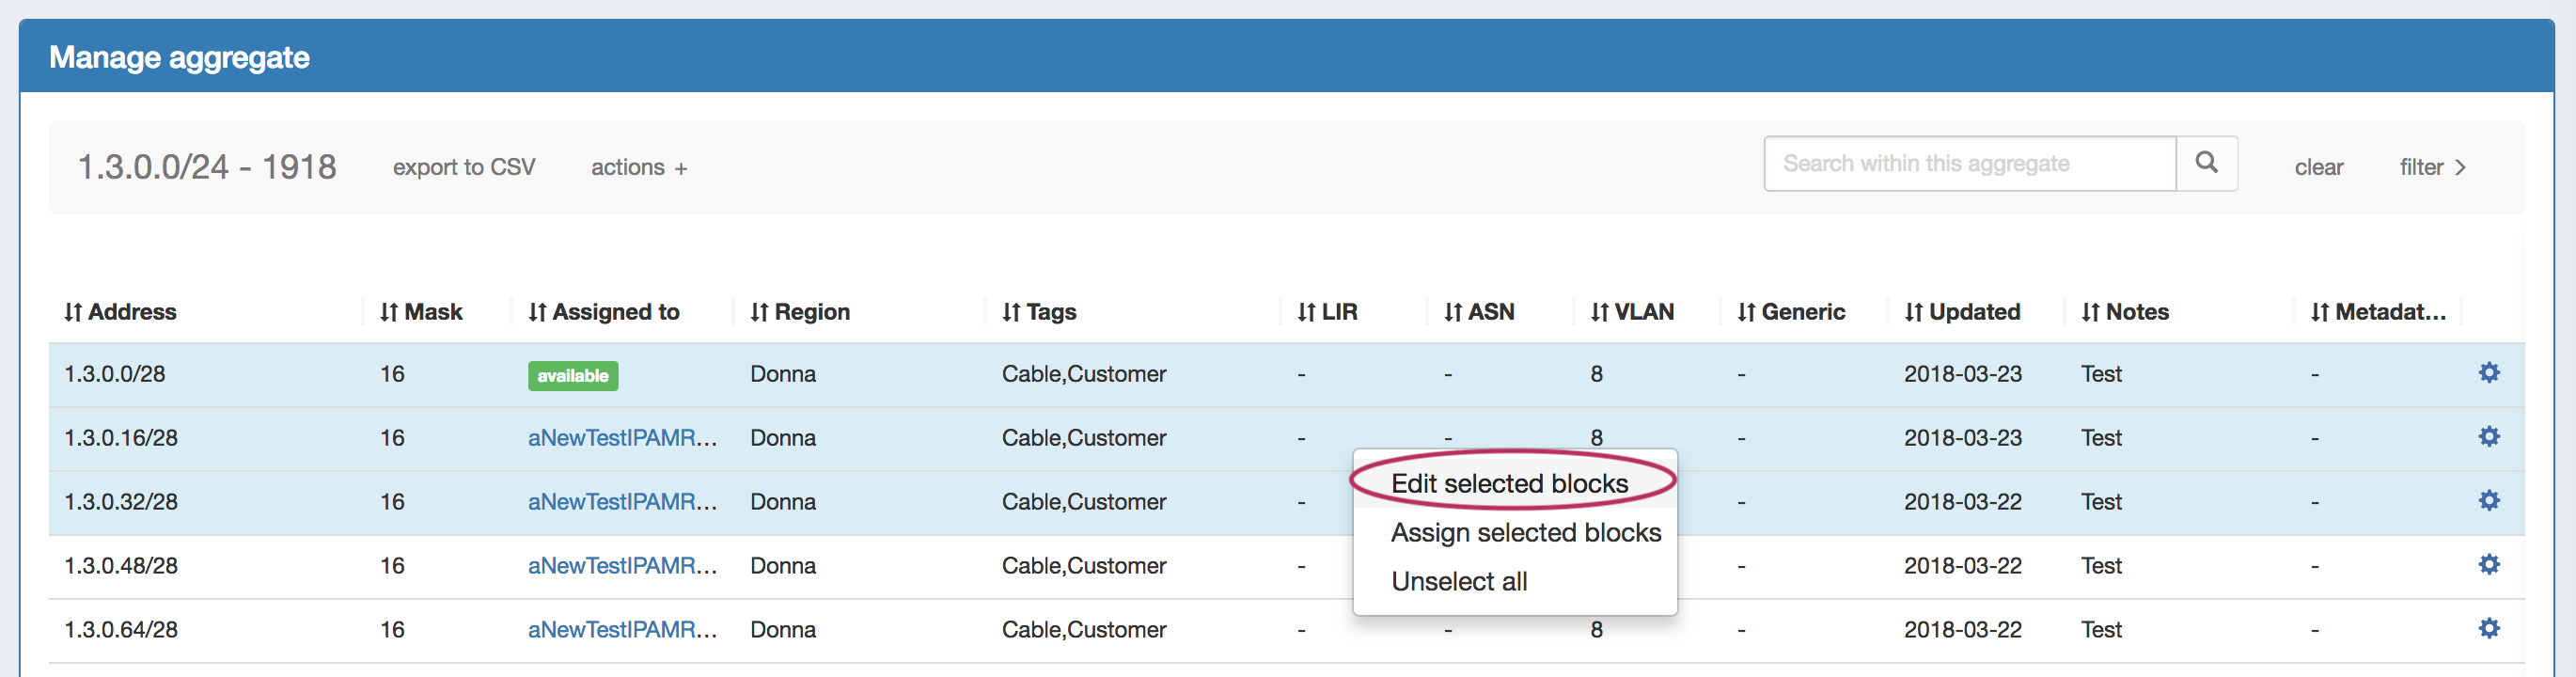
From the IPAM Manage screen, right click on the Action Menu (gear icon) for the desired block, the select "Edit".
To select multple blocks to edit, hold down the shift key and click on the blocks you wish to edit - the selected blocks will be highlighted. Right click anywhere in the blue highlighted area, and select "Edit selected blocks".
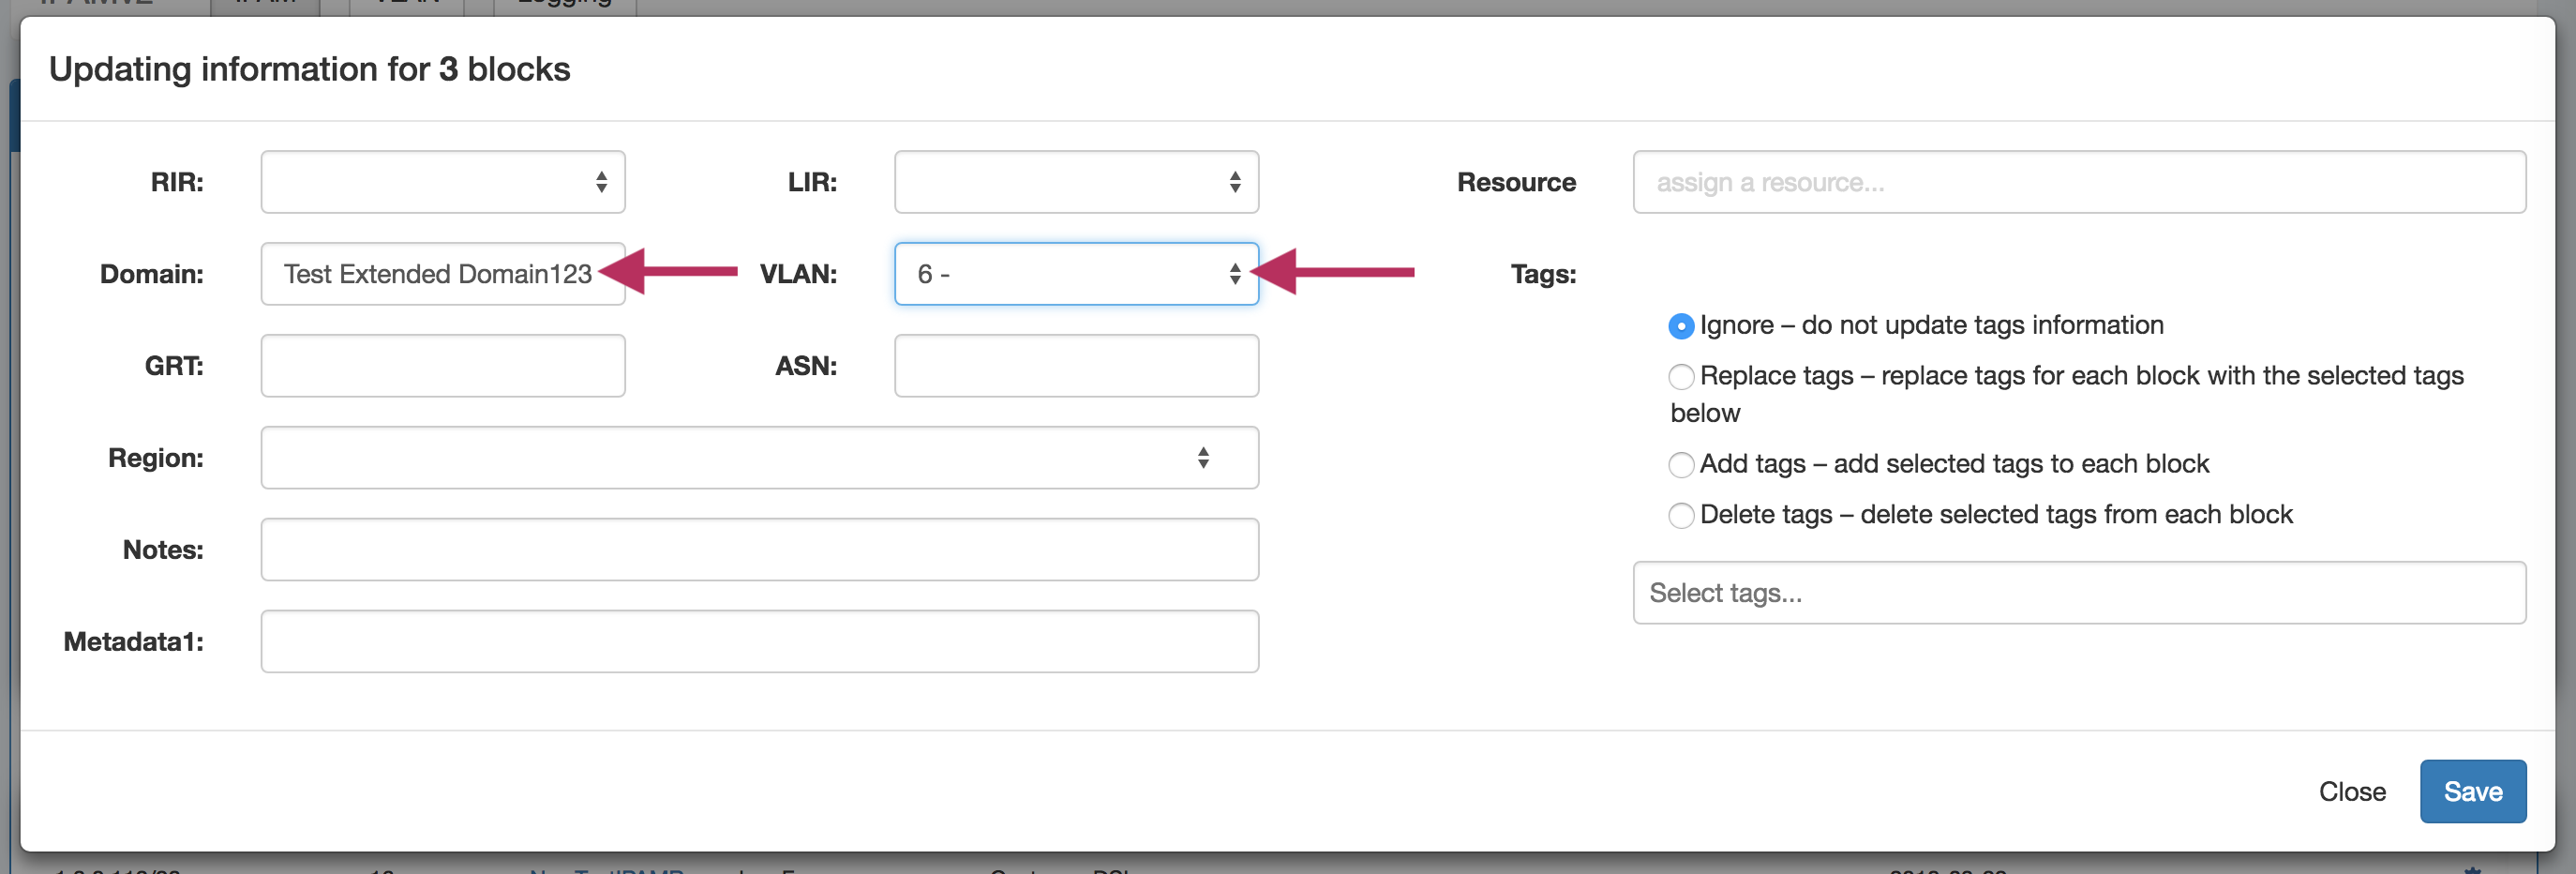
The "Edit Block" modal window will pop up for the selected block(s). Edit the domain by clicking in or typing in the domain search box, and select the desired Domain.
Then, select the VLAN for the blocks from the enabled VLAN list. When done, click "Save".
VLANs and Child Blocks
NOTE: Child blocks whose Parent blocks already have an assigned Domain / VLAN, may not have domains and VLANs changed to be different than the Parent Block's values. If you attempt to save domain / VLAN changes to a child block under this situation, an error will occur.
i.e., Parent and Child IP Blocks must have matching Domain / VLAN values.
Add / Update VLAN to Blocks from IPAM Gadget:
You may also add / edit Domain /VLAN information when editing a block in the IPAM Gadget. From the IP block's Action Menu (gear icon), select "Edit".
Then, in the Edit Attributes box that pops up, search for or type the desired Domain, select VLAN information, and click "save".
Working with VLAN Metadata
Customizable metadata fields are available to hold VLAN-specific information such as Location, Client, Firewall, Gateway, and more.
These fields can be enabled and disabled in the VLAN Admin section of ProVision, and viewed / edited under "Edit VLAN" in the VLAN Tab.
Enable / Disable VLAN Metadata Fields
VLAN Metadata fields can be enabled and disabled under the IPAM Admin → VLAN Columns area of ProVision.
Here, you may edit the order of columns, rename columns, and enable/disable column visibility. Any columns that are disabled will hide the column from VLAN Manage, as well as hide the applicable field from any VLAN filters or Edit VLAN actions.
View / Edit Metadata Field Information
VLAN Metadata may be viewed and edited in from the IPAM - VLAN Tab.
While in the IPAM Tab -> VLAN Page, expand the desired domain from the left sidebar and right click on a VLAN. Then select "Edit VLAN".
VLAN Metadata may also be viewed from VLAN Advanced - Global View, if enabled.