ProVision 7.3.0
ProVision 7.3.0 is a major release with new features, improvements and bug fixes.
Local Software Requirements Update
For local installation customers, ProVision versions 7.0.0 and newer have upgraded software requirements (in red, below):
Required | Link | |
Operating System | Linux/BSD/OSX | |
Apache | Apache 2.4 | |
PHP | PHP 7.1 | |
MySQL | MySQL 5.7 |
Note on MySQL: We recommend setting the max_allowed_packet setting in the MySQL configuration file to 128MB (or similar) to account for the typical dataset size handled in ProVision.
Major Features and Improvements in this release:
- New Features
- Additional Features / Improvements
- API Updates
- Bug Fixes/Minor Improvements
Contact 6connect at info@6connect.com to schedule a demo or get more information.
New Features
VLAN v2
IM / CFR - 3471: Fully updated the ProVision VLAN user interface and added new features, pages, and ease of use improvements.
ProVision's VLAN system has been given a shiny new UI to match IPAM and updated with new features, views, and improved access to common tasks.
Included Updates and Features
- Updated UI for all VLAN pages - featuring a cleaner look, collapsible sections, and easy access to management actions
- Supports custom domain ranges and exclusions, using ProVision's Numbering Authority
- Create Domains and add VLANs directly from the VLAN Home page
- Associate Domains with Routers
- VLAN Manage updated to reflect IPAM's interface
- Customizable VLAN Metadata Columns (IPAM Admin → VLAN Columns) in lieu of VLAN tags
- Action shortcut panels in VLAN Utilization - Quickview, Assign IP, and Edit VLAN
- New "VLAN Advanced" page provides a global list view of all Domains, VLANs, and their associated metadata
- Improved VLAN workflow by removing the VLAN Admin page, and integrating functions directly into the VLAN Tab.
For more information, see detailed breakdowns of the features, below, or see documentation at IPAM Tab -> VLAN.
VLAN Updates by Page / Feature:
VLAN Home Updates
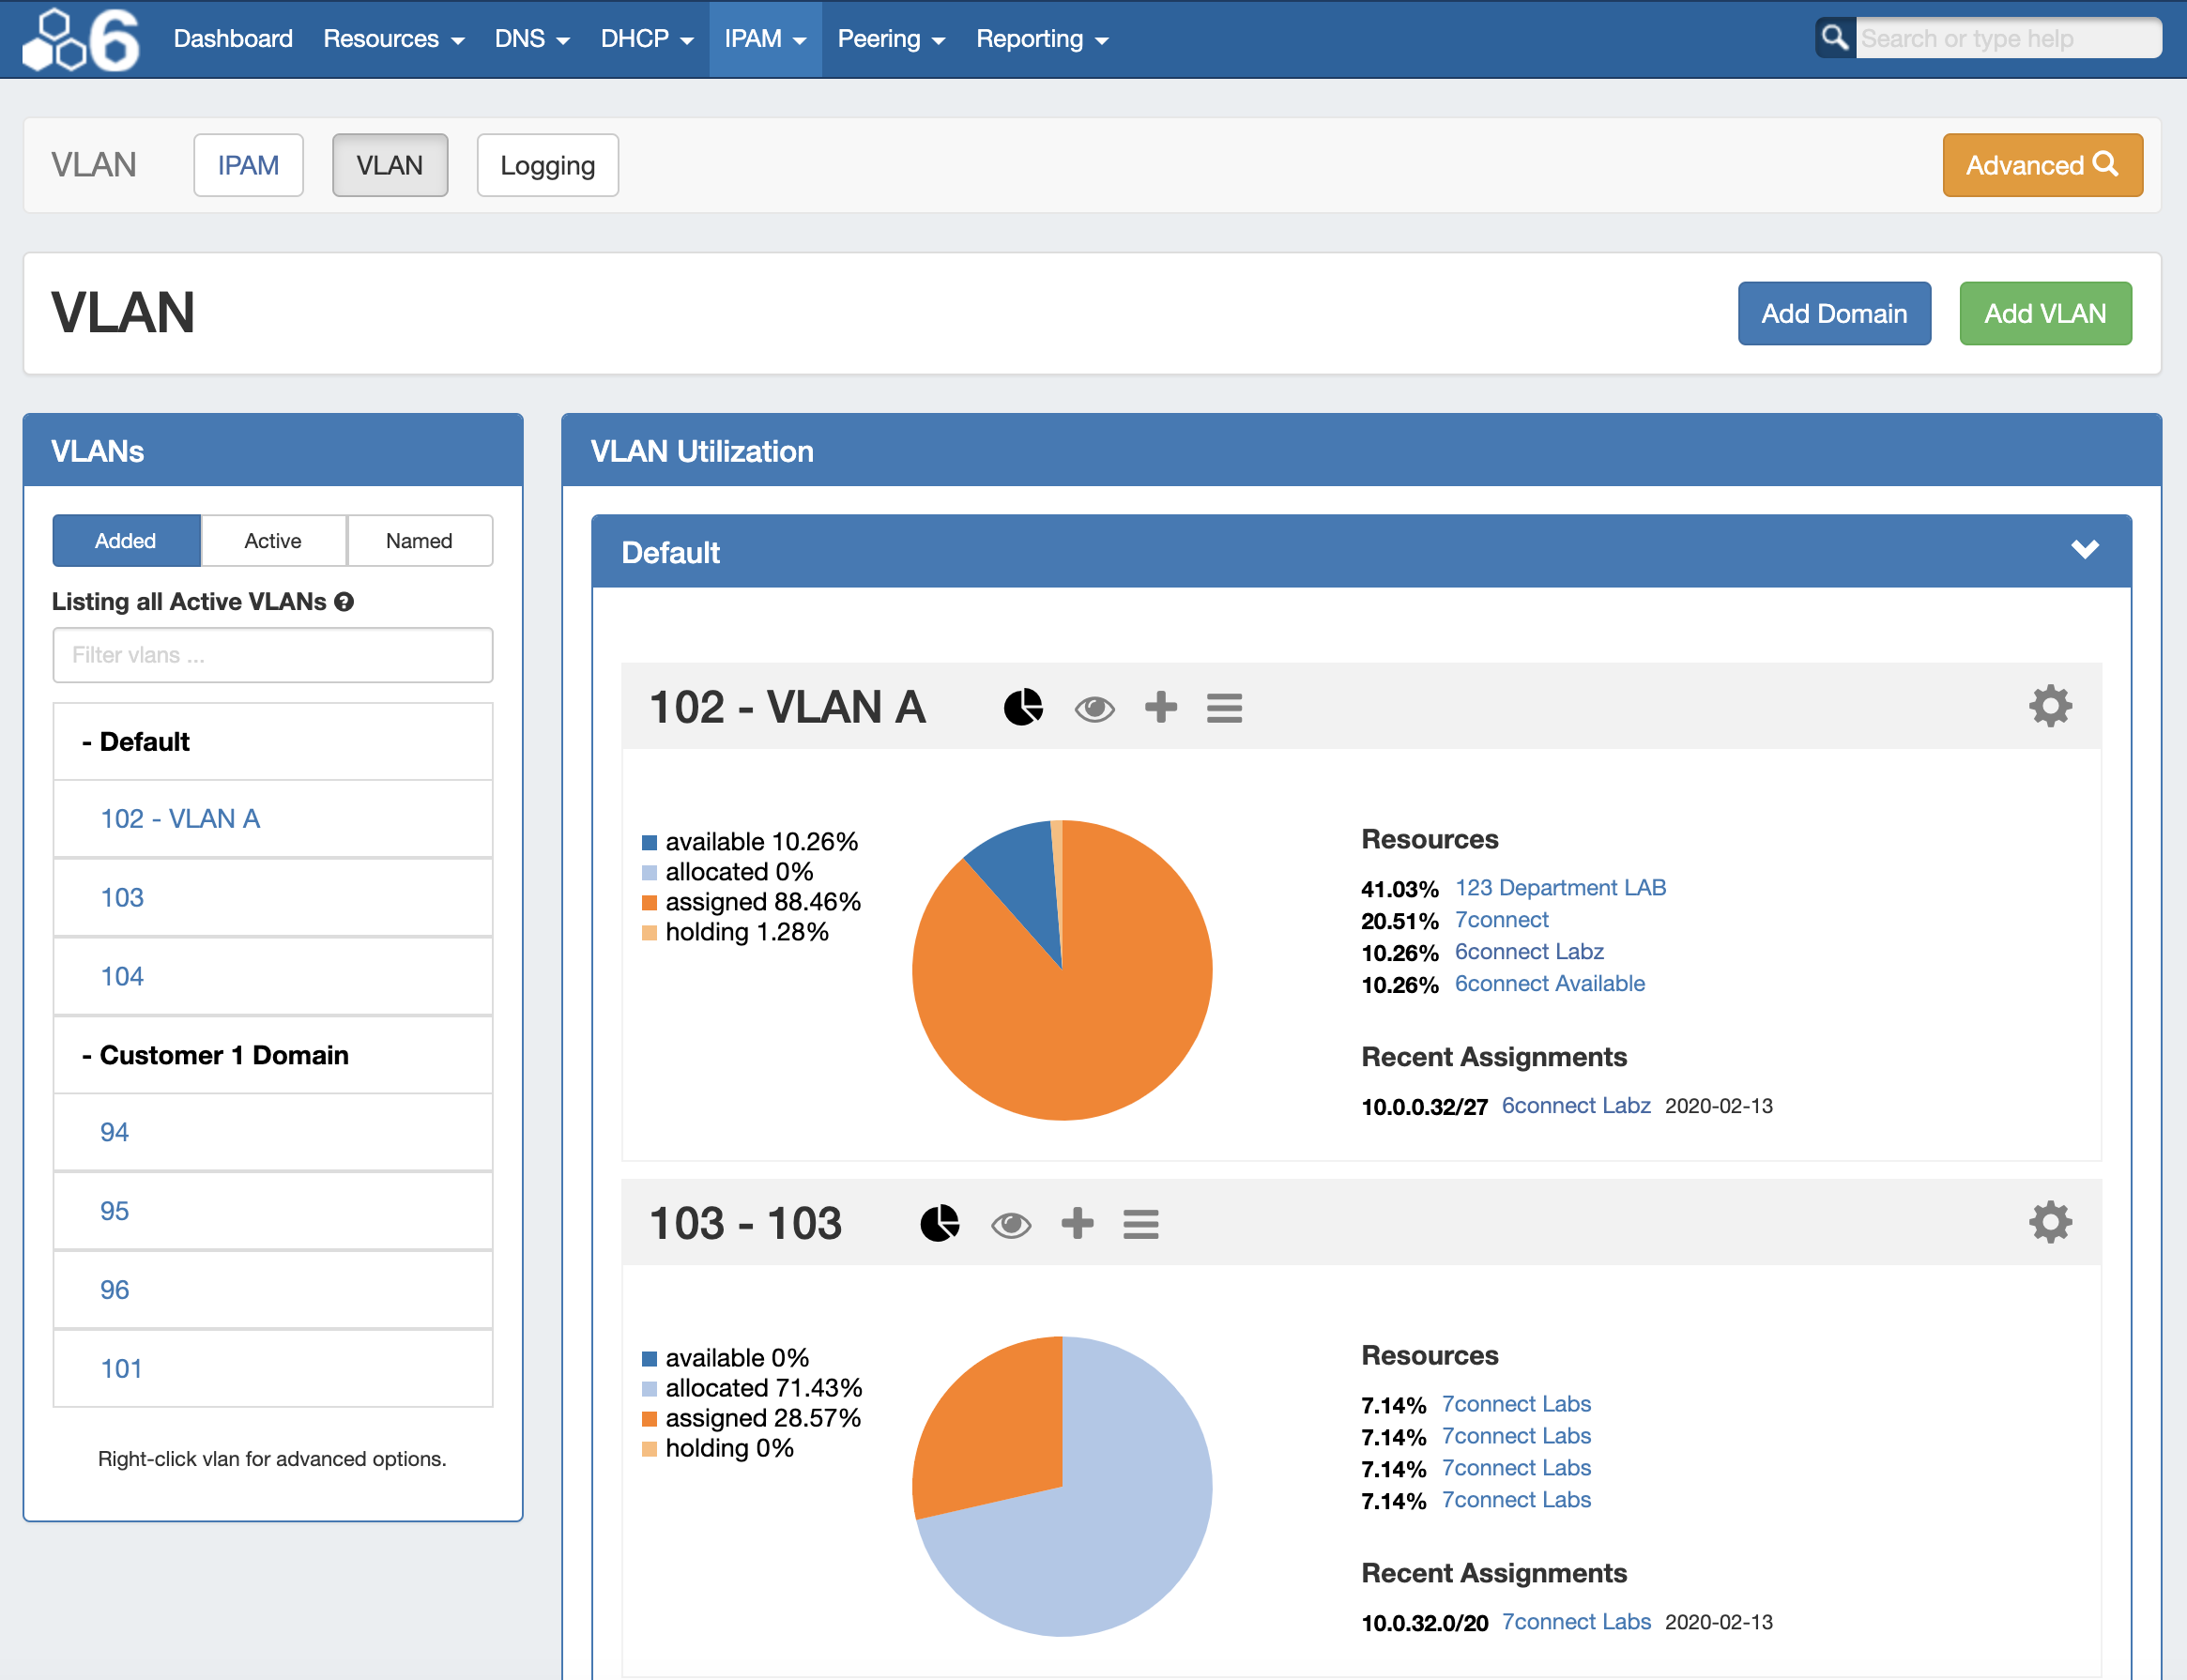
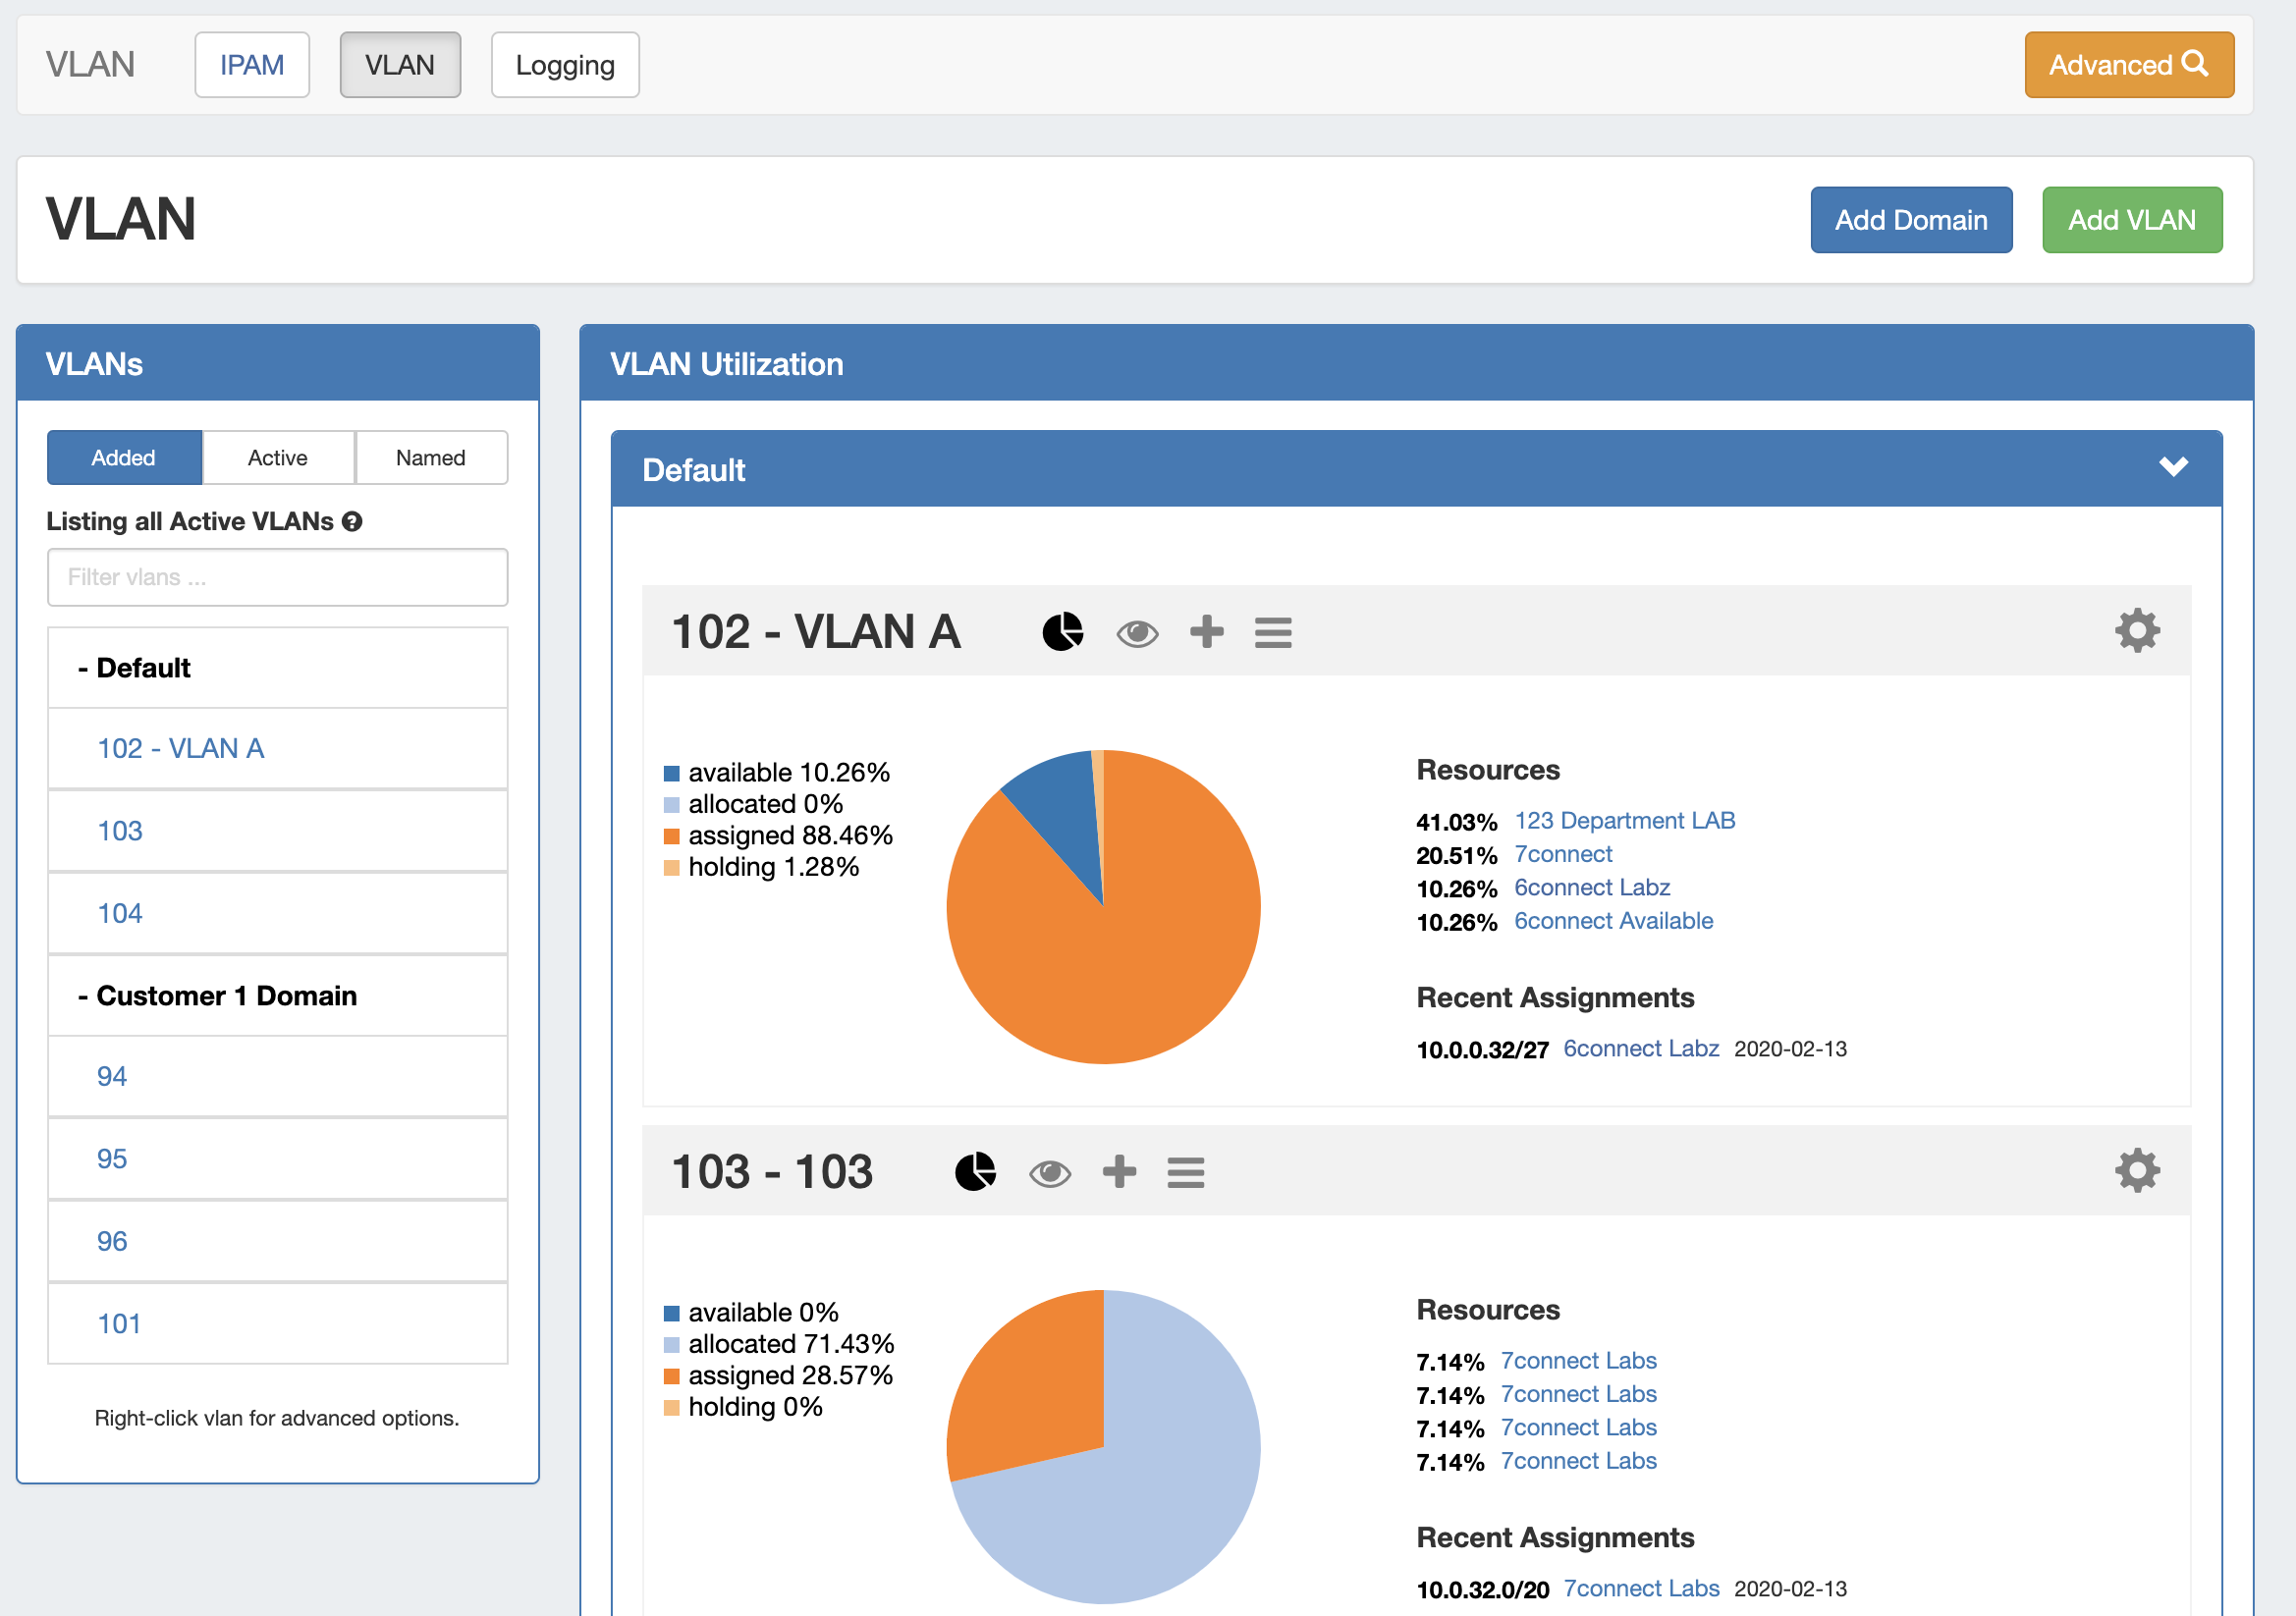
The VLAN Home page features an updated UI, to better match the style and layout of the IPAM Tab. Navigate between IPAM, VLAN, and Logging by clicking on the sub-tab buttons at the top of the page.
- Navigate between IPAM, VLAN, and Logging by clicking on the sub-tab buttons at the top left of the page
- Open VLAN Advanced (Global View), by clicking the "Advanced" button at the top right of the page
- The VLAN Page Header now contains direct links to add a new domain ("Add Domain") or VLAN ("Add VLAN"), that were previously only accessible from the ProVision Admin area
- The VLAN sidebar list has been updated with new features and options (detailed later)
- The VLAN Utilization area now has domains that are able to be expanded/collapsed and paginated VLAN entries
- The Utilization entry for each VLAN contains an updated UI, gear menu, and new panel options (detailed later)
VLAN Sidebar Updates
The VLAN Sidebar has been updated with a new interface (similar to IPAM's), improved filtering, and new menu options.
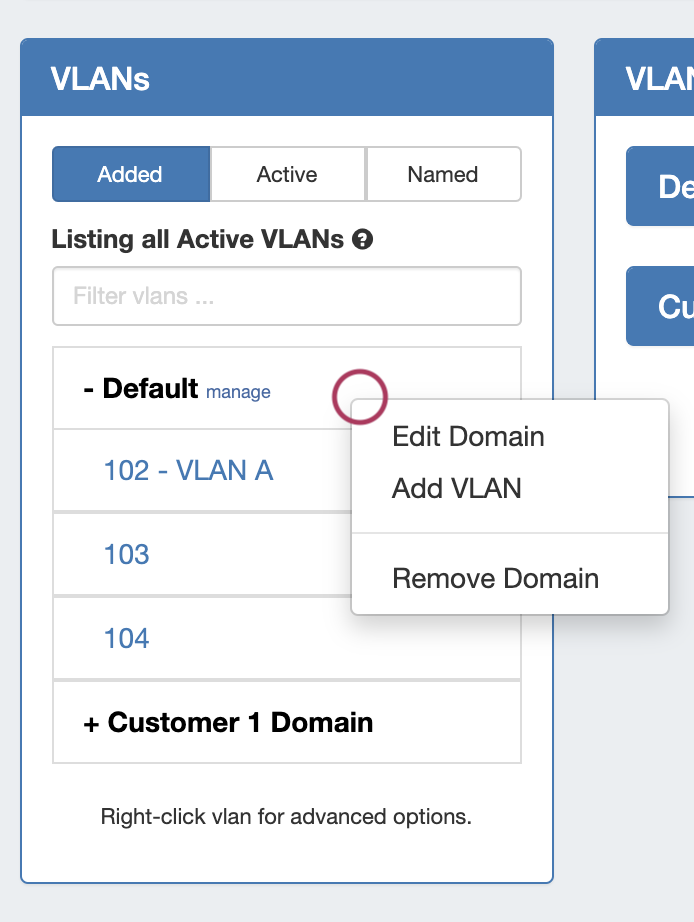
Above: VLAN Sidebar - Domain Menu

Above: VLAN Sidebar - VLAN Menu
- The VLAN sidebar has been updated with search, filters, and new right-click menu options
- Filter the VLAN sidebar to display either "Added" VLANs, "Active" VLANs that have blocks assigned, or "Named" VLANs with user-provided names
- Search the VLAN sidebar for a particular Domain, VLAN Number, or VLAN name by typing into the search/filter field "Filter VLANs..."
- Right click to open context menus for both Domains and VLANs
- The VLAN list under a Domain is now paginated
- Domain Sidebar Actions
- Click on a Domain name to show/hide the VLANs contained under that Domain
- Click "manage" next to the Domain name to open VLAN Global for that domain
- Right click on a domain to open options to:
- "Edit Domain"- Opens VLAN Advanced → Edit Domain Panel for that Domain
- "Add VLAN" - Opens the Add VLAN page for that Domain
- "Remove Domain" - Deletes the domain and all VLAN data under it
- VLAN Sidebar Actions
- Click on a VLAN number/name to QuickNav to its location in the VLAN Utilization area of the page
- Click on "open" next to a VLAN to open VLAN Manage for that VLAN
- Right click on a VLAN to open options to:
- "QuickView" - QuickNavs to the VLAN's Utilization area listing, and opens the VLAN's Quickview Panel
- "Assign Blocks to VLAN" - QuickNavs to the VLAN's Utilization area listing, and opens the VLAN's "Assign Blocks" Panel
- "Edit VLAN" - QuickNavs to the VLAN's Utilization area listing, and opens the VLAN's "Edit VLAN" Panel
- "Remove VLAN" - Deletes the VLAN, removing the VLAN assignment from any blocks assigned to it
VLAN Manage Updates
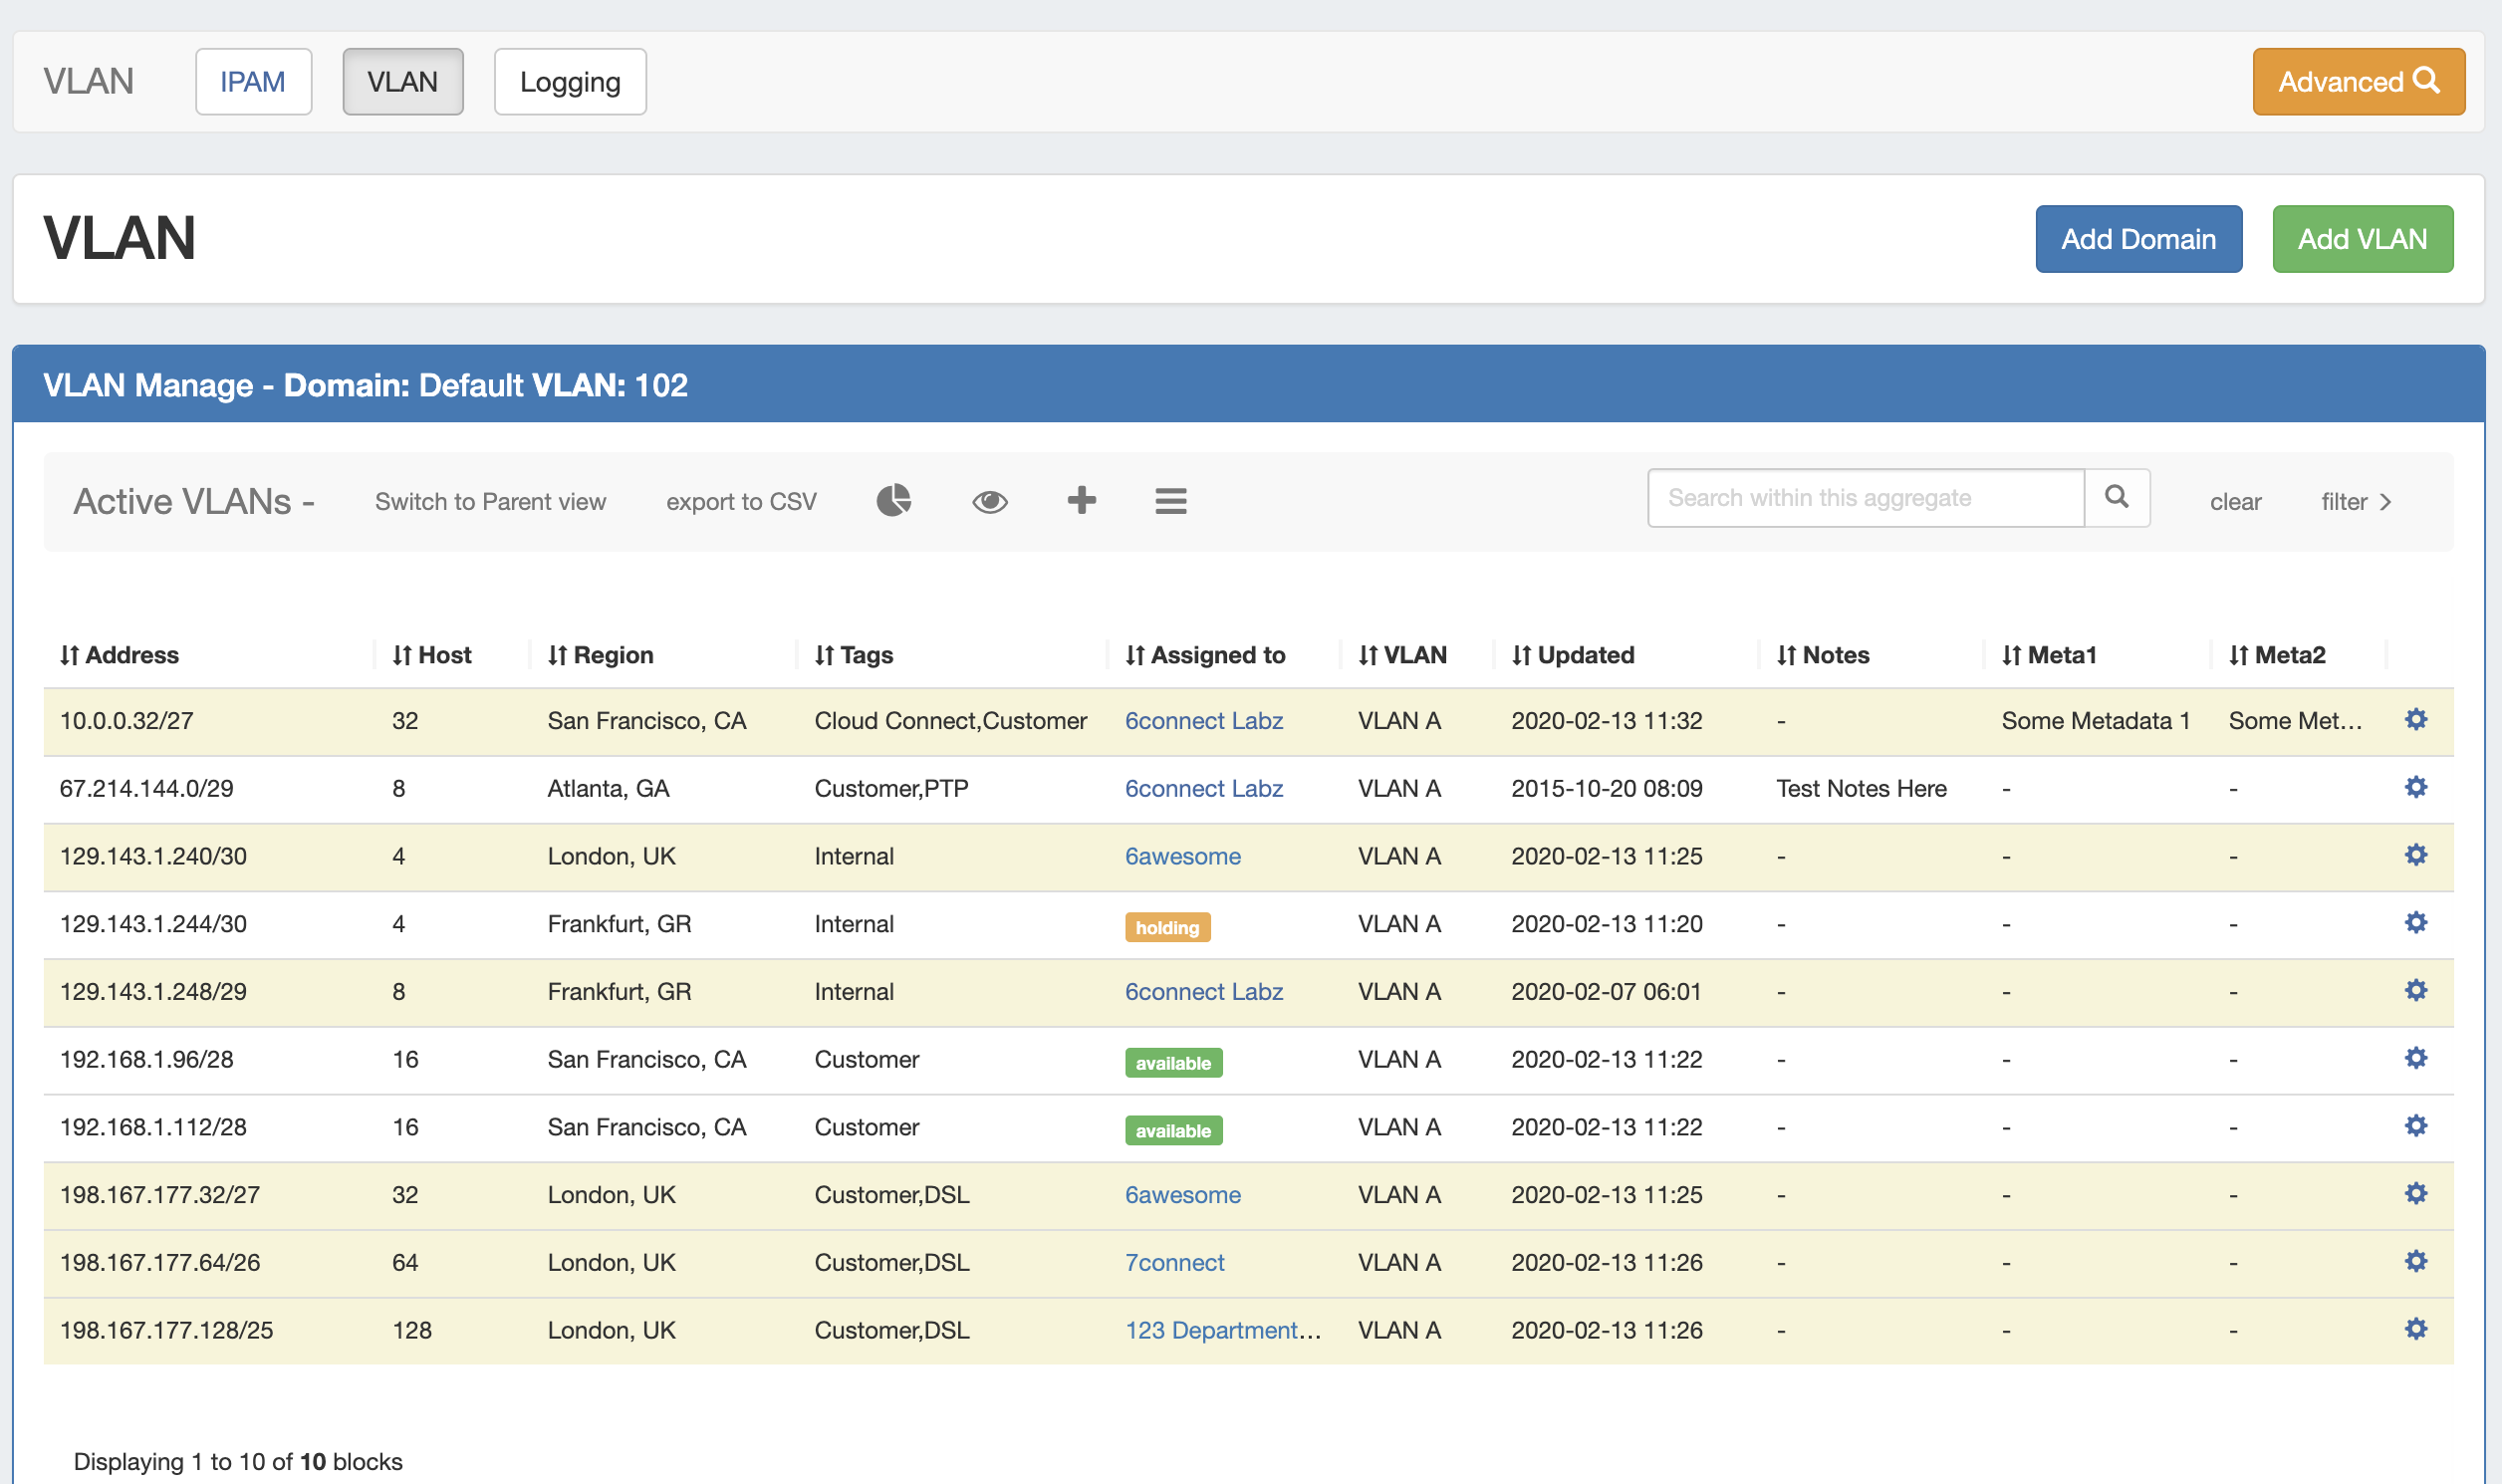
VLAN Manage has been updated to match the IPAM Manage interface and filtering options, now supports customizable columns / metadata columns, and adds access to common VLAN management areas, and includes four VLAN Panels - Utilization, Quickview, Assign Block, and Edit VLAN.
From any VLAN manage page, you may navigate to VLAN Advanced ("Advanced"), add a new Domain ("Add Domain"), or add a new VLAN ("Add VLAN").
In addition, VLAN Manage has been updated to use the same interface options as IPAM Manage:
- Sort the block list by clicking on column names
- Resize columns by dragging the vertical divider between column names to the left or right
- Edit column order, visibility, names, or add custom metadata columns from IPAM Admin → VLAN Columns
- Double-click to open "Edit Block" for any block in the list
- Right-click on a block (or click on the gear icon) to open the IPAM Action Menu
- Shift-click to select multiple blocks, and then right-click for multi-block menu options
- Filter the block view by clicking on "filter >", then selecting filter criteria. When done, click "Apply".
- Open VLAN Action panels from inside VLAN manage to review data or perform standard tasks, including:
- VLAN Utilization Charts (Pie Icon)
- Quickview (Eye Icon)
- Assign Blocks to VLAN (Plus Sign)
- Edit VLAN (List icon)
VLAN Manage / VLAN Utilization Action Panels
These action panels are available from both the VLAN Home page and VLAN Manage, and may be opened or closed by clicking on the associated header bar icons. Each panel allows you to view data specific to that VLAN, or perform common management actions.
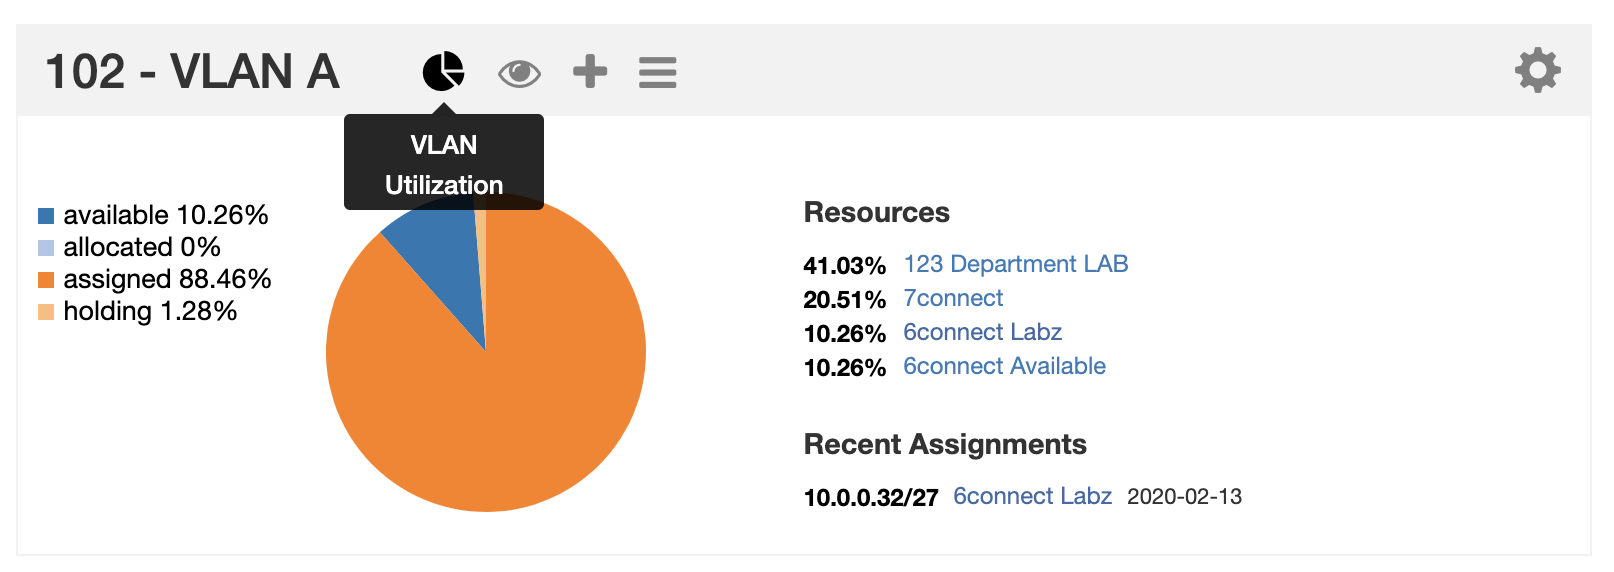
Utilization
The Utilization panel displays breakdowns for all blocks assigned to the VLAN by both status (available, allocated, assigned, holding) and by resource. Recently assigned blocks are noted under the "Recent Assignments" section, and links are provided to the Resource Entry page for each resource listed. To open or close the Utilization panel, click on the "Pie" icon in the grey header bar.
Quickview
The Quickview panel provides a condensed, filterable list of all blocks assigned to that VLAN, separated into three columns - IPv4 blocks, IPv6 blocks, and grouped by resource.
To open or close the Utilization panel, click on the "Eye" icon in the grey header bar.
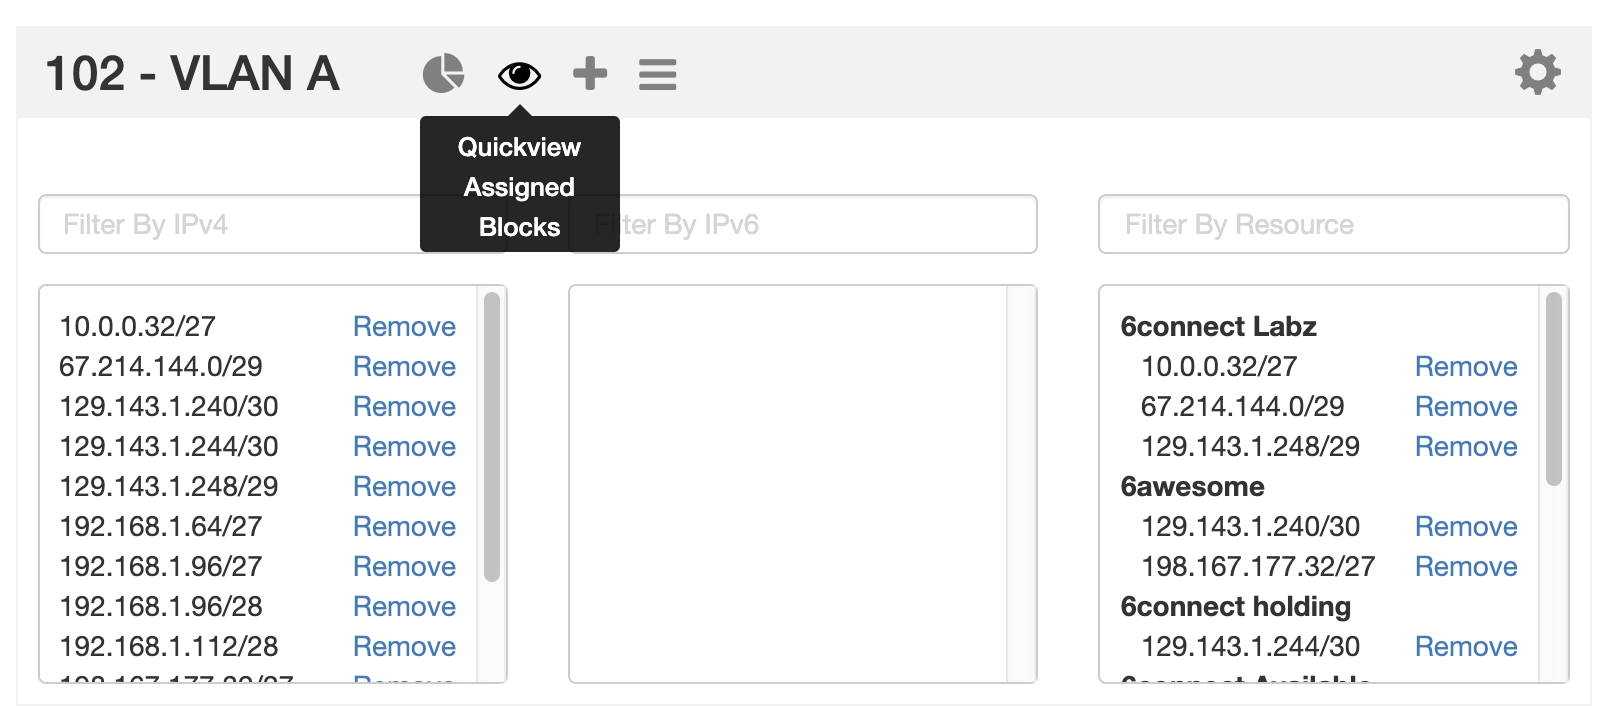
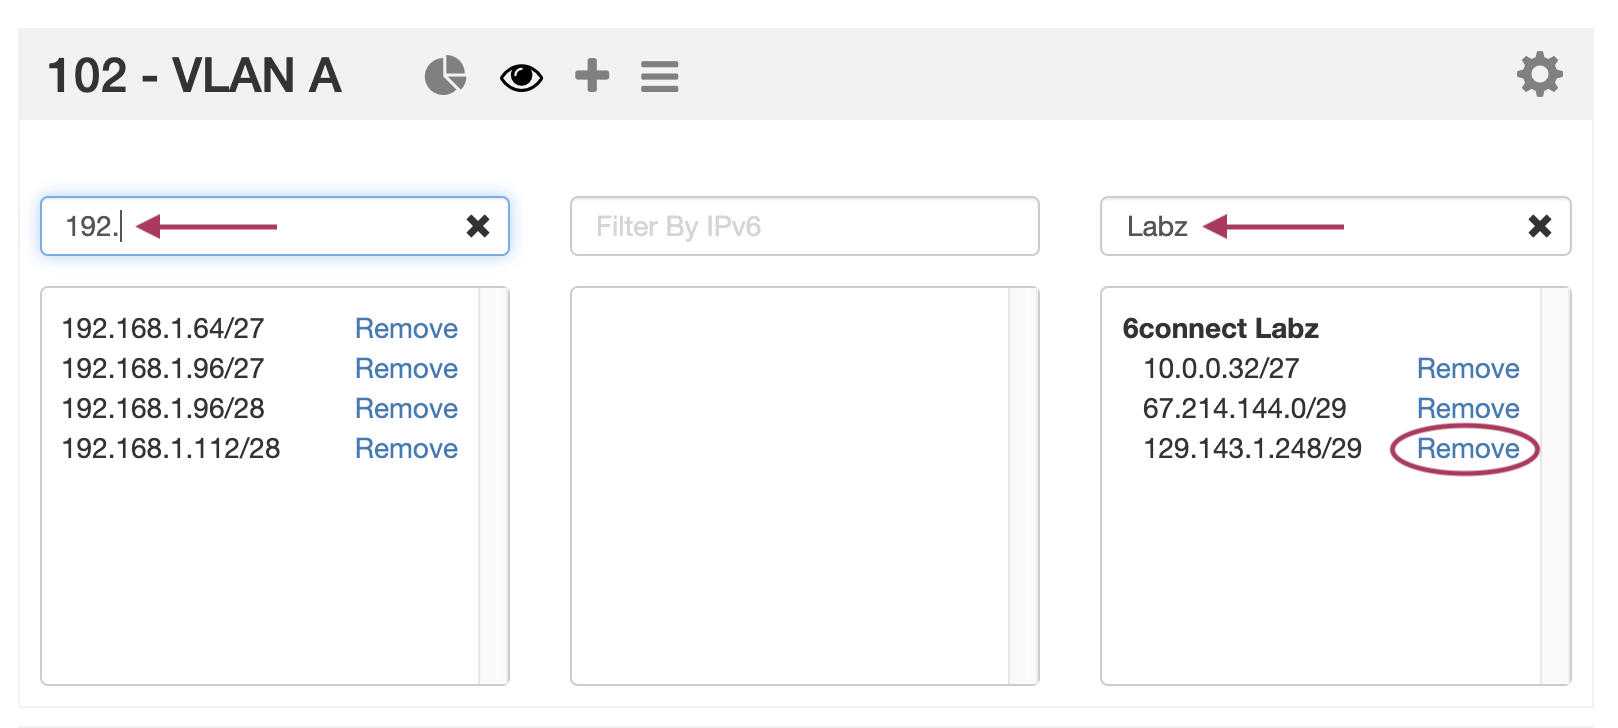
While in the Quickview panel, you may easily search for a block by typing the all or part of the CIDR into the IPv4 or IPv6 Filter boxes - useful for verifying an assignment or quickly scanning ranges.
You may also remove a block from the VLAN with a single click of the "Remove" button.
Assign Blocks to VLAN
Blocks may be assigned to the VLAN from the Assign Blocks Panel, opened or closed by clicking on the plus-sign icon. Two assignment options are available - Direct Assign to VLAN, if you know the specific block to assign, and Smart Browse to VLAN, where you can specify filter conditions and select one of more blocks meeting those conditions.

To open either option, click on the appropriate header bar to expand the module.
Direct Assign to VLAN
To Direct Assign a specific block to the VLAN, expand the "Direct Assign to VLAN" module, then enter the CIDR to assign into the "CIDR" box, and click "Add IP Block" .
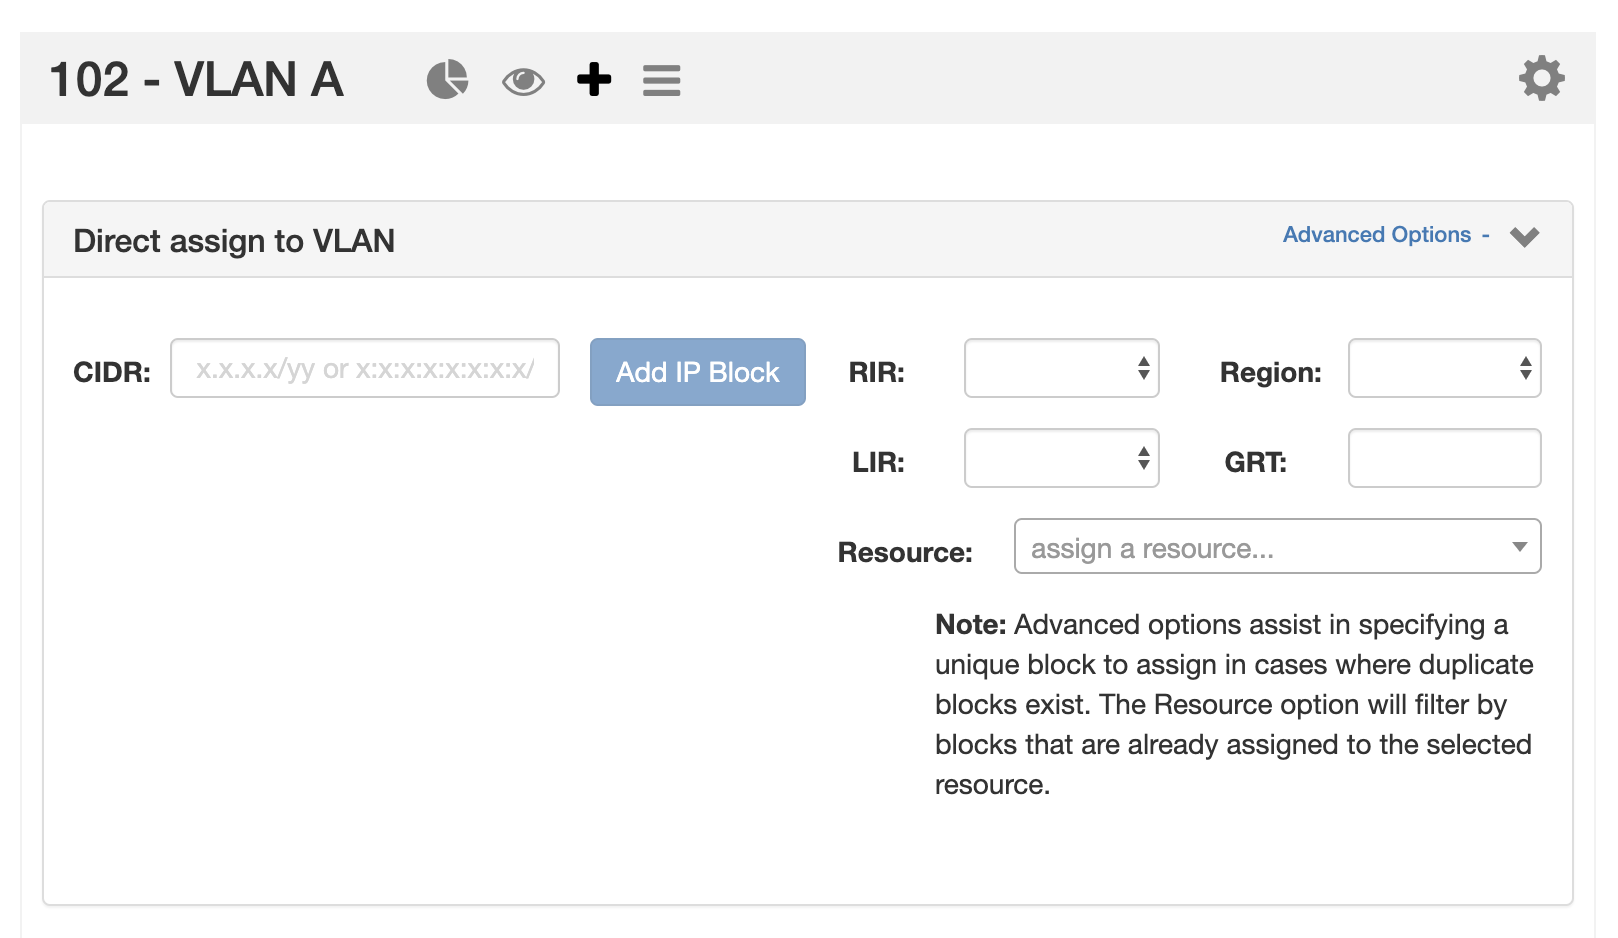
If blocks exist with the same CIDR (such as in duplicate 1918 space), you may differentiate between the two by clicking on the "Advanced Options" link and providing additional filter criteria to use to assign a specific block.
Smart Browse to VLAN
Smart Browse to VLAN is used to search for a general list of blocks available to assign to the VLAN that meets certain criteria.
Expand the "Smart Browse" module by clicking on the header bar .
Then, enter your filter criteria. At minimum, block "Type", "Size", and "RIR" must be provided; "Region" and "Tags" are optional.
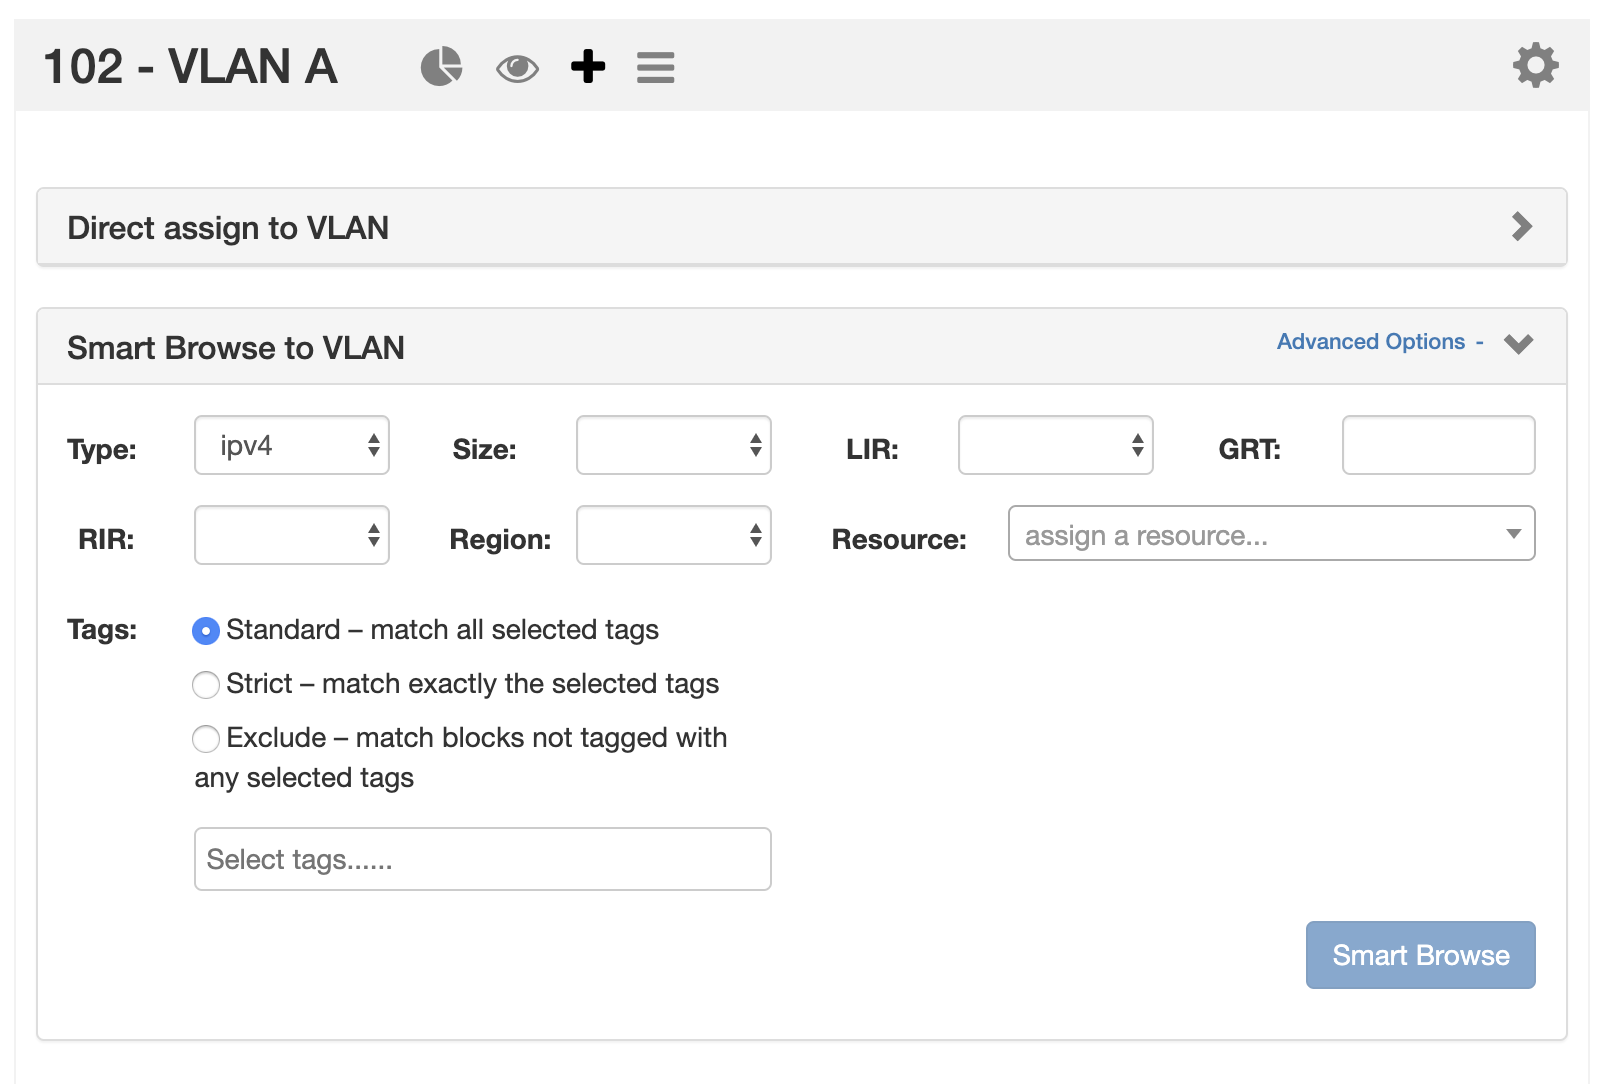
If further filtering is needed, you may click on "Advanced Options" to open the "LIR", "Custom Code" (here: as "GRT"), and assigned "Resource" fields to use.
Once you have entered your filter criteria, click on the "Smart Browse" Button to display your results.
Assigning from Smart Browse
The Smart Browse results list will display a list of blocks that a) meet your filter criteria, and b) do not already have a VLAN assigned.
You may assign individual blocks immediately ("Add IP Block"), or select multiple blocks and delay assignment until after your final selections are complete ("Assign Selected").
Immediate Assignment:
To assign an individual block immediately from the list to the VLAN, click "Add IP Block" for the desired block.
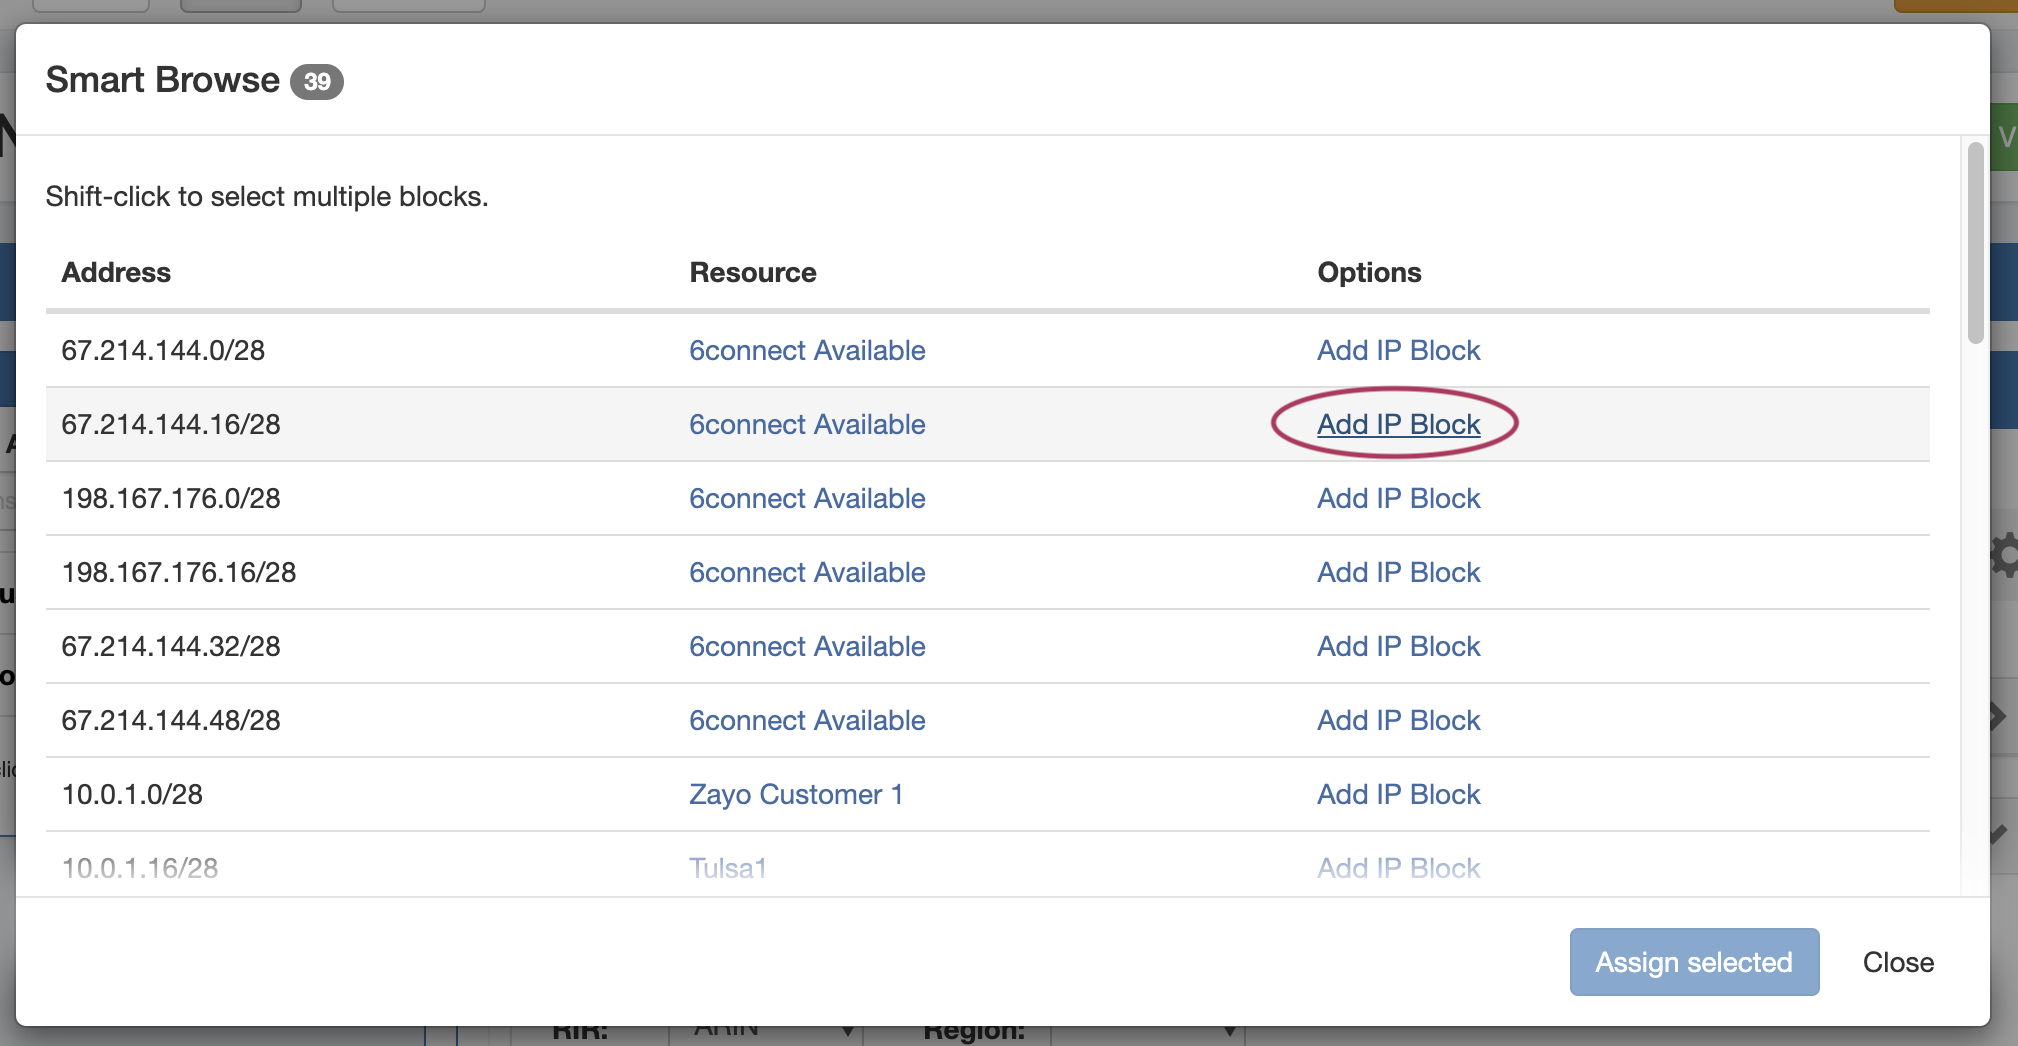
After clicking "Add IP Block", the block will immediately be assigned to the VLAN, and an "Assigned" status will display for the block in the Smart Browse list.
From here, you may assign additional blocks, clicking "Close" to exit when complete.
If the "Assigned" status displays for all blocks you intend to assign, then you may skip clicking "Assign Selected"- as nothing else remains to assign - and instead click "Close" exit.
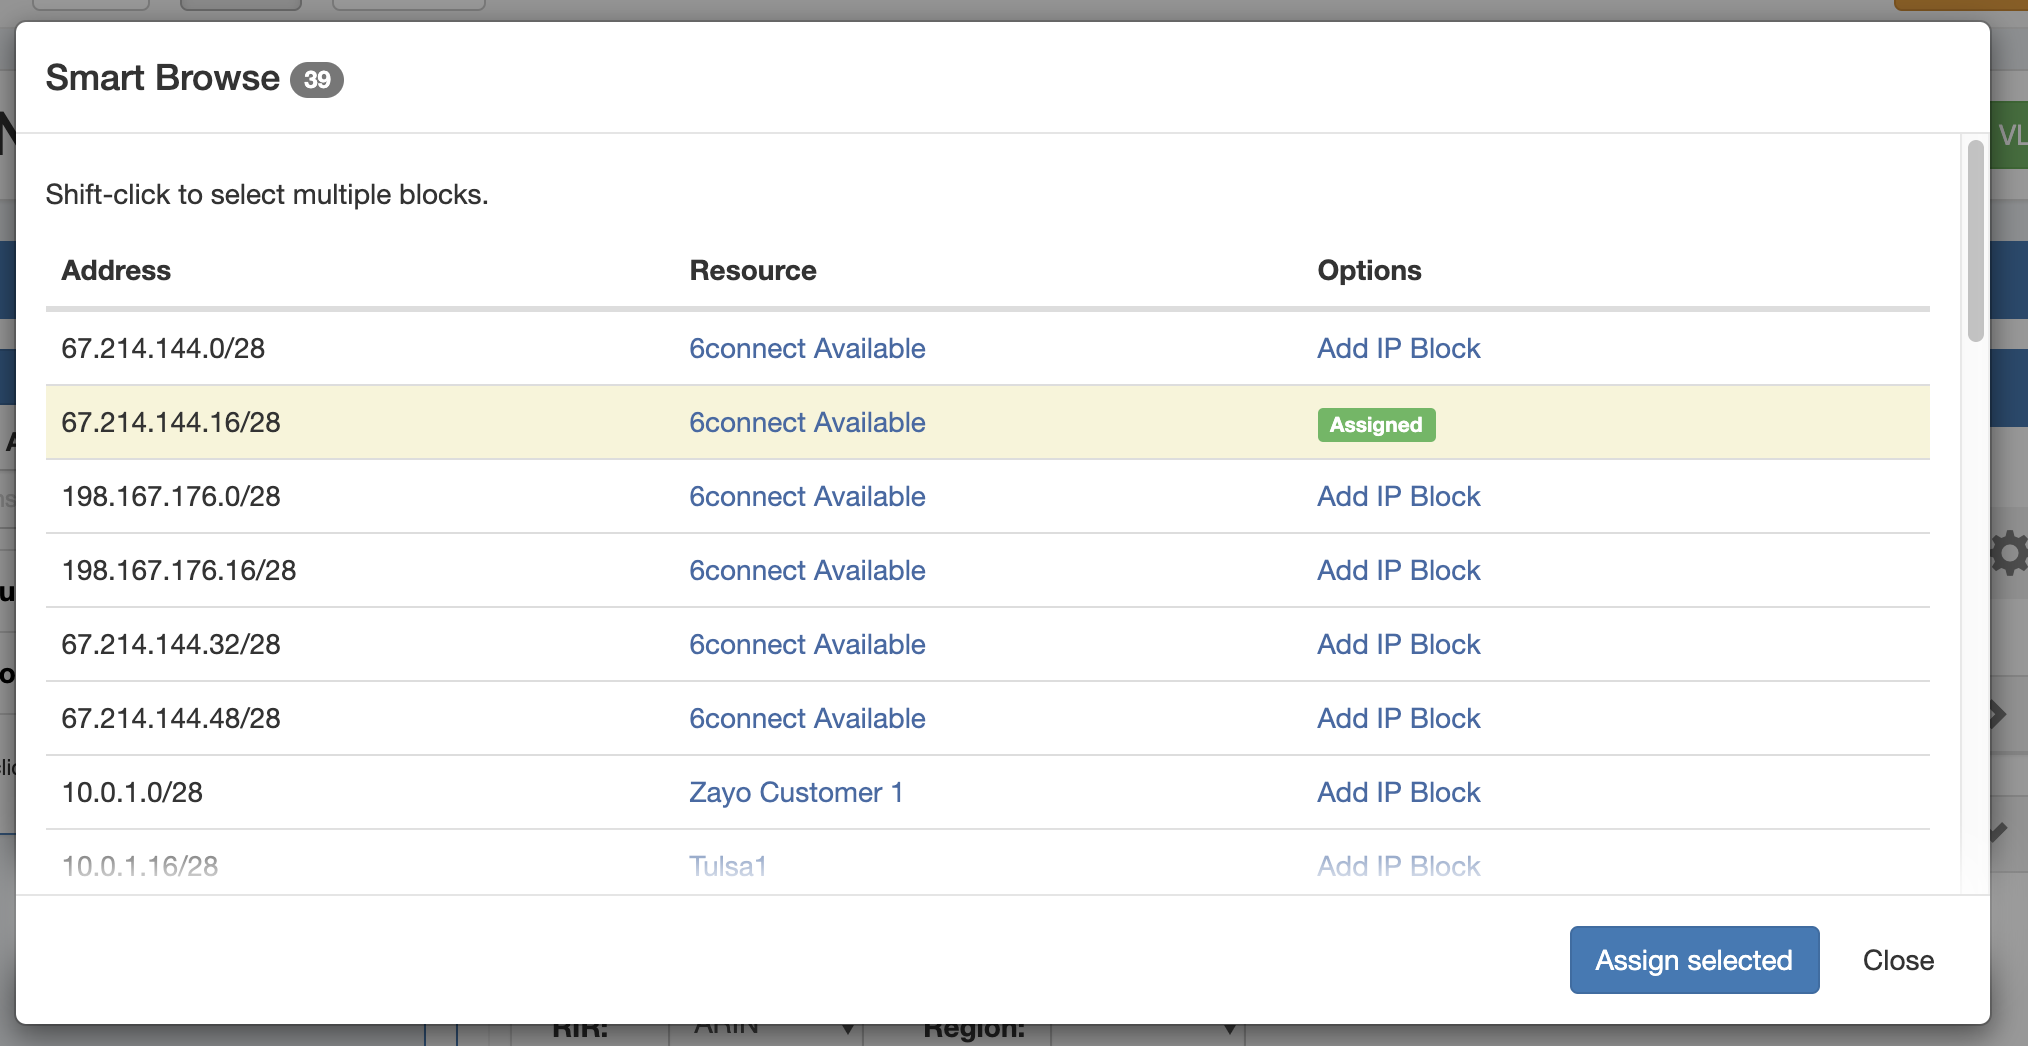
Delayed Assignment / Selecting Multiple Blocks:
If you wish to assign multiple blocks to the VLAN at the same time, or mark a single block to assign later while continuing to browse the list, you may select a block to mark for later assignment and then assign all selected blocks at once.
To select a single block, left click on row for the block, taking care not to accidentally click on a blue link. Note that the row will have a yellow highlight indicating it is selected:
To select additional blocks, shift-click on each row you wish to mark for assignment. You may freely scroll through the results to review your selection.
When done, click "Assign Selected". All highlighted blocks will be assigned to the VLAN at the same time, and the Smart Browse window will close.
Edit VLAN
The Edit VLAN panel allows you to view and edit the data associated with the VLAN (Note: not all VLAN fields may be editable).
To open or close the Edit VLAN panel, click on the "List" icon in the grey header bar.
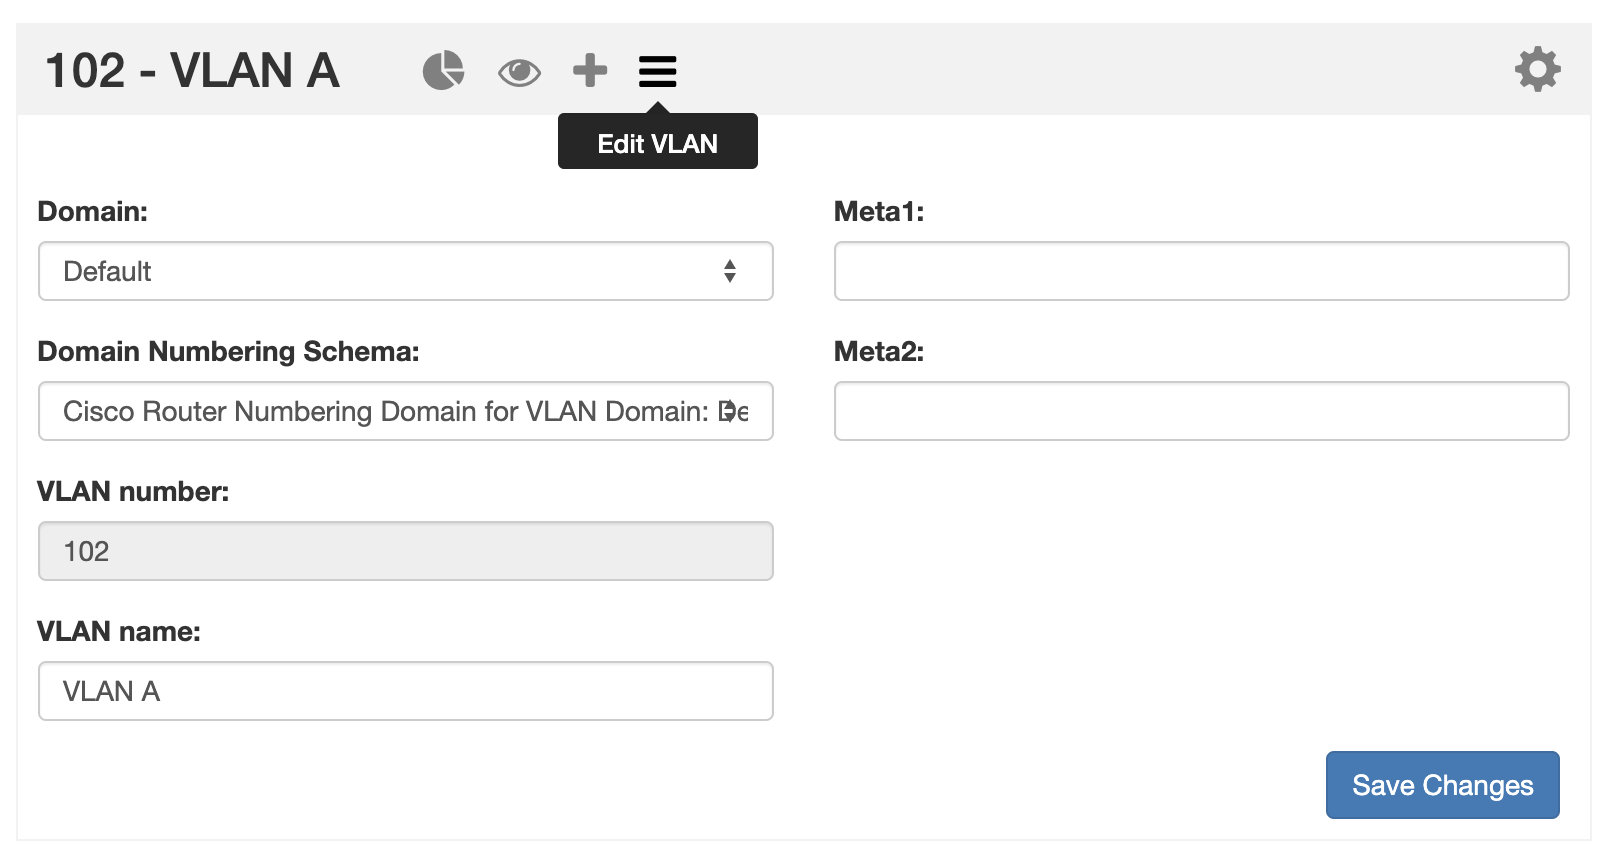
Typically, editable VLAN fields include the VLAN Name and any enabled VLAN "Metadata 1-10" fields enabled in VLAN Columns. To change the information in these fields, click inside the relevant box, type your change, and then click "Save Changes". The information provided in these fields will also display in the "VLAN Advanced" Global View.
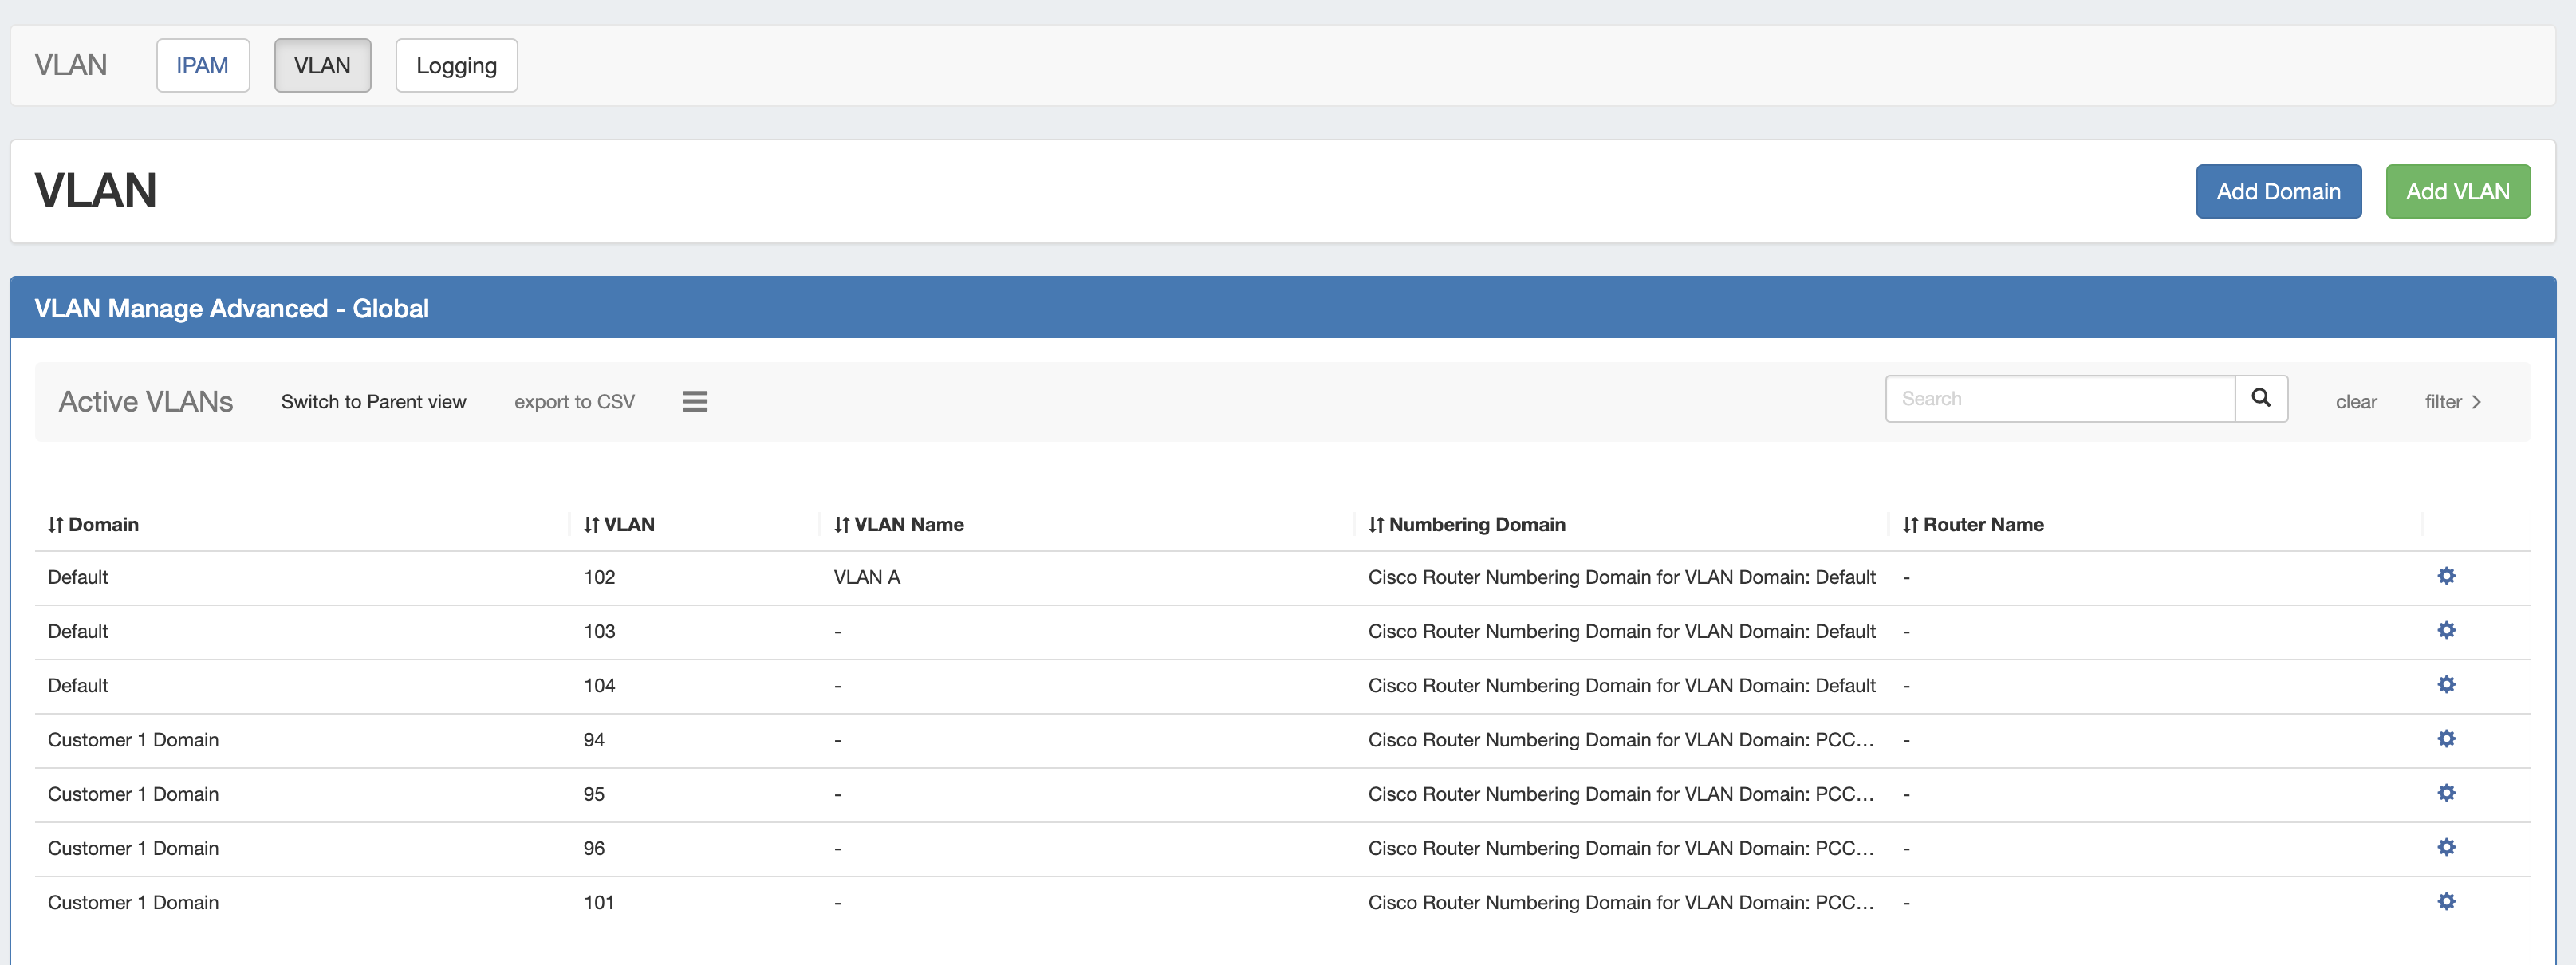
VLAN Advanced (Global View)
VLAN Advanced displays a list of all domains / vlans added to ProVision. Here, you can perform domain level management tasks, view data on added VLANs, including Domain, VLAN Name, applied Numbering Domains, associated routers, and any enabled VLAN metacolumn data.
From this page, you may add domains or vlans, edit a domain (by clicking the "List" icon), and perform various actions from the VLAN Action Menu (right click on a VLAN entry).
Reporting v2
CFR - 148: Fully updated ProVisions reporting system, including an updated user interface, new report types, user-created reports, report customization, and the ability to export/schedule reports.
Reporting v2 replaces ProVision's previous Reporting Tab with a new interface, new reports, and exciting new features. Reports existing from v1 (IPAM Utilization, Customer List, User Activity) have been updated and included as default report options. New report types and default reports have been provided under the categories of IPAM, Peering, DNS, Users and Resources. Note: Reporting v2 is only accessible to admin level users, non-admin users will instead be directed to Reporting v1.
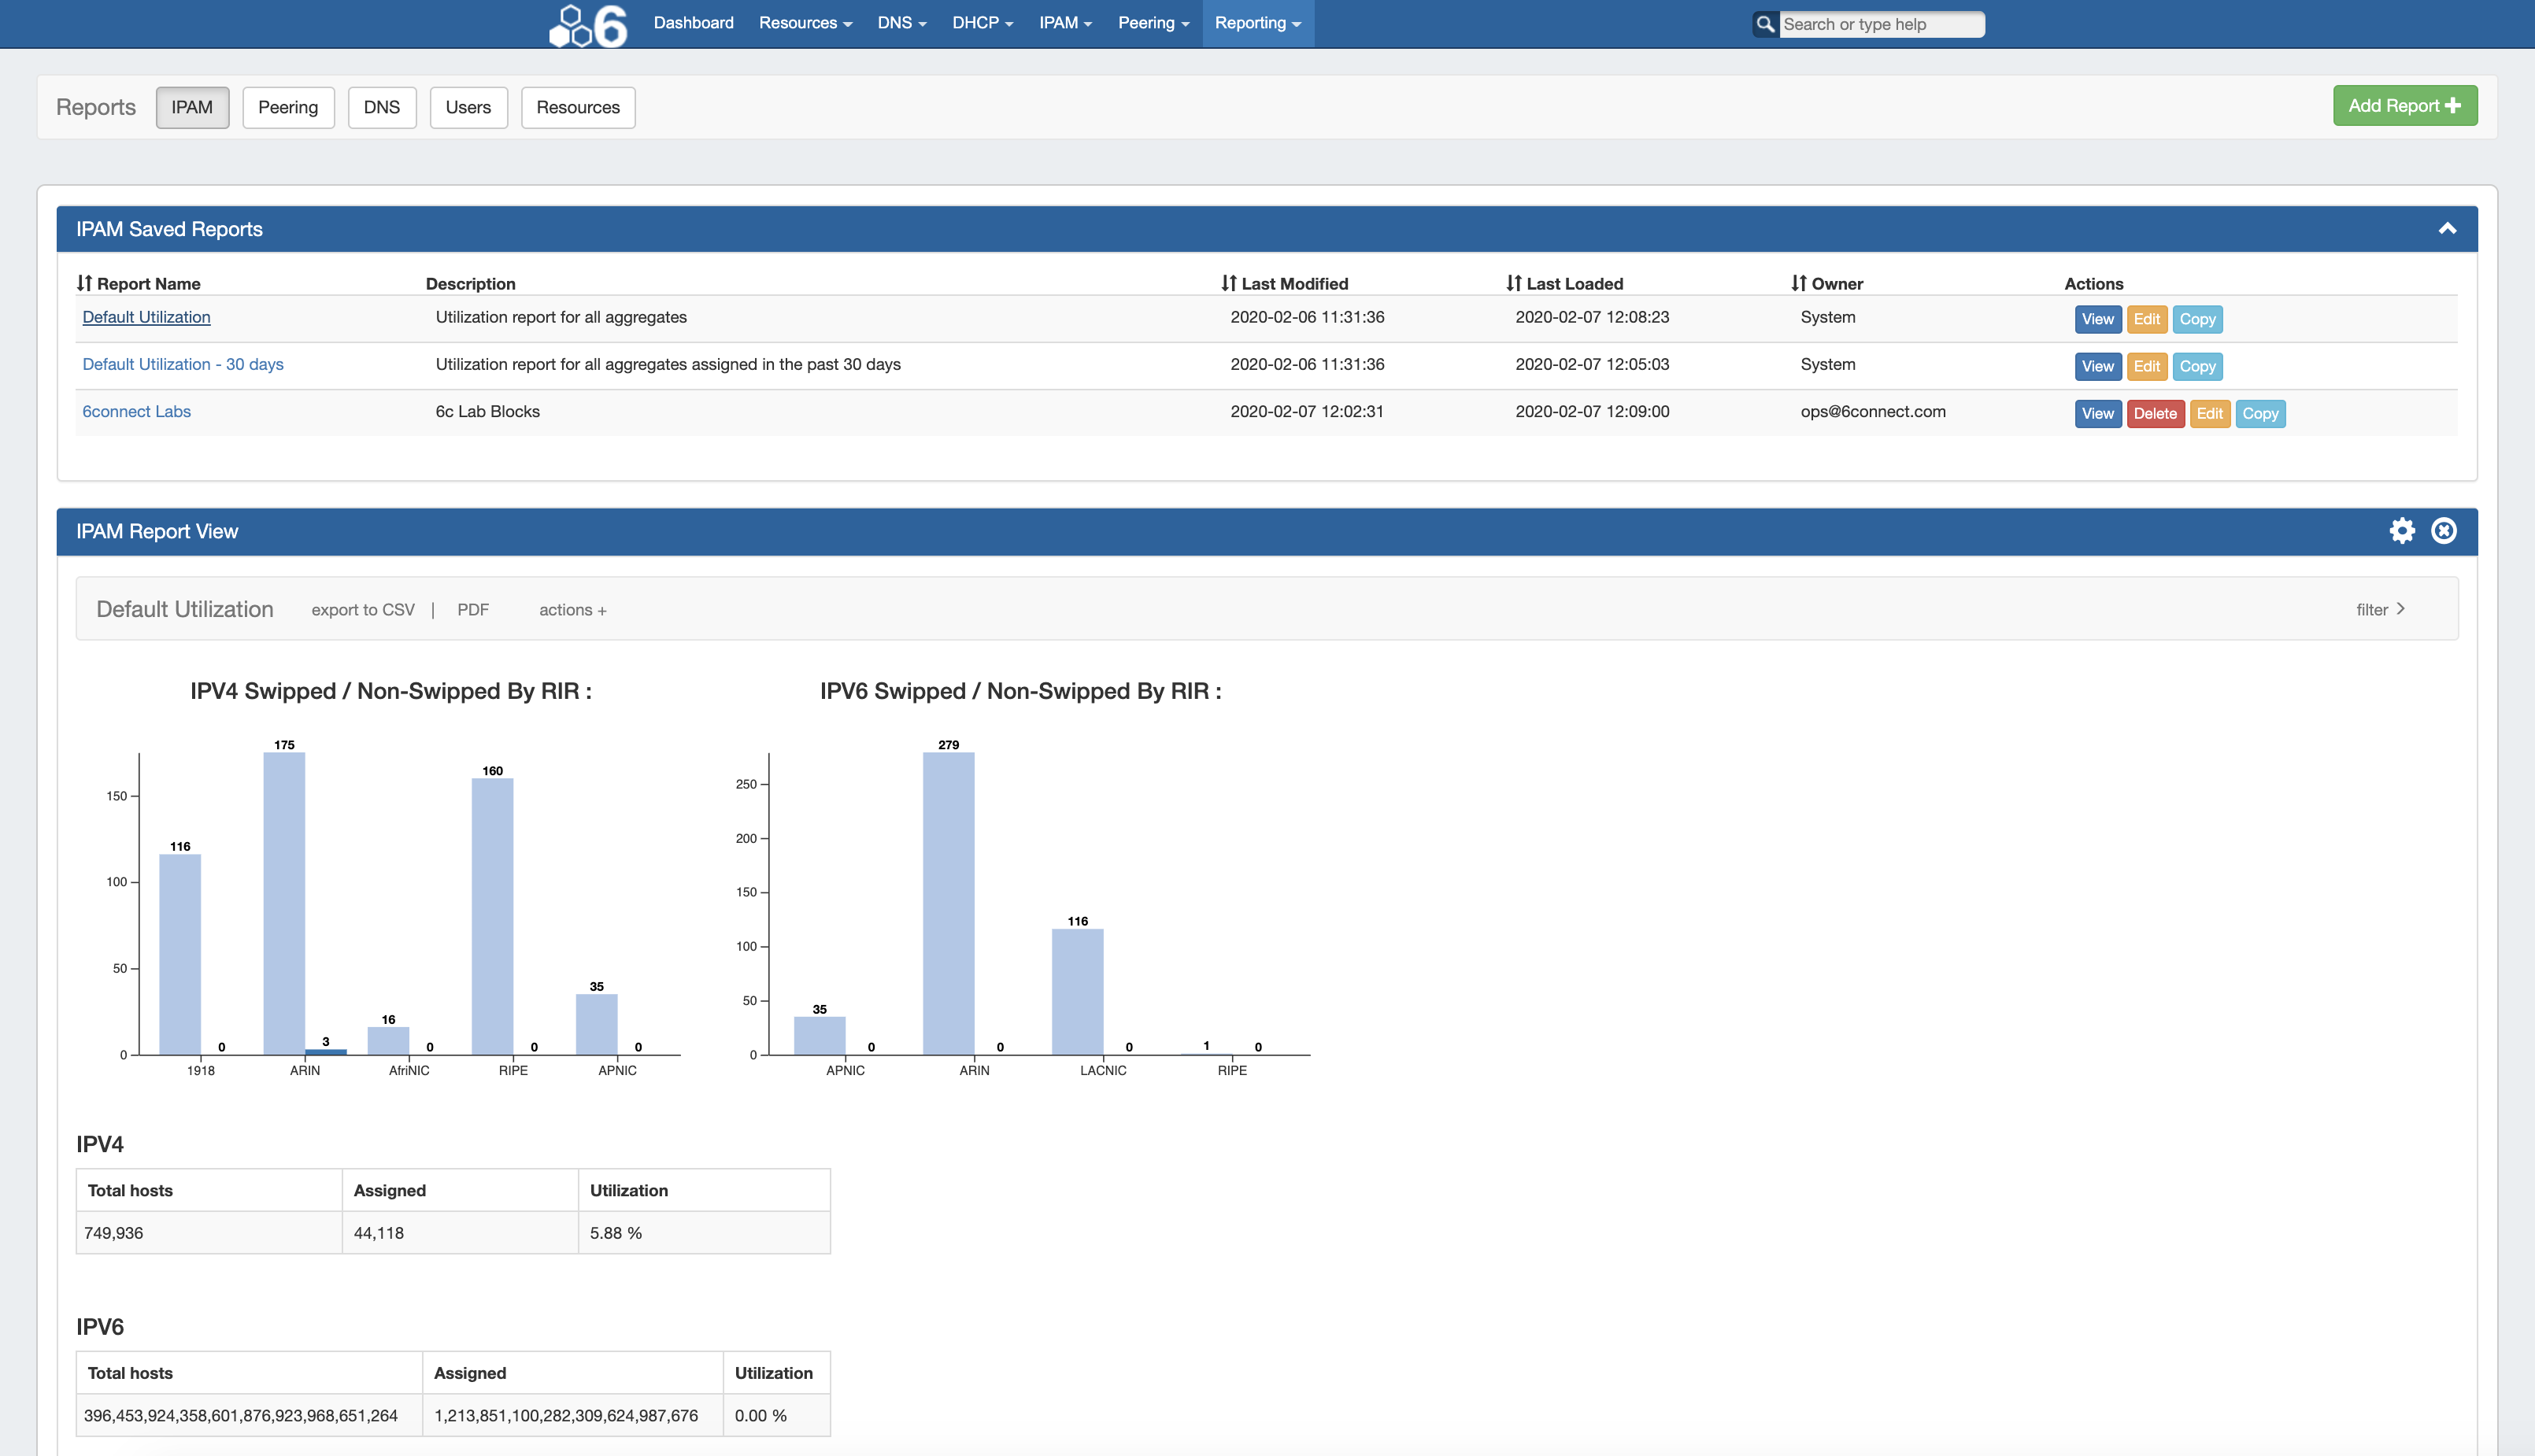
To access Reporting v2, select the Reporting Tab. To view the available report modules (IPAM, Peering, DNS, Users, and Resources), click on the applicable sub-tab button at the top of the page, or select it from the Reporting Tab dropdown menu.
Included Features
- Ten default system reports for IPAM, Peering, DNS, Users, and Resources
- Customizable user-created reports
- IPAM Utilization and Peering Status charts
- Export reports to .csv and/or pdf
- Schedule reports to be emailed at selected intervals
- Safely view existing reports and apply filters without overwriting saved report settings, or chose to permanently save changes.
- Copy existing reports to use as editable templates
- IPAM reports include integration with IPAM Metacolumn data and IPAM Column settings
Available Reports
Reporting IPAM Stats Widget
IM - 3454: Converted the Reporting IPAM Stats module to a Dashboard Widget
The "IPAM Stats" module, displayed on the Reporting page in prior versions, has been updated and converted into a Dashboard Widget.

For additional information see the walkthrough below, or Customizing the Dashboard and Working with Dashboard Widgets for details on performing basic Widget tasks.
Add the IPAM Stats Widget
To add the IPAM Stats widget to a dashboard, click "Add Widget" from that Dashboard (Note: Default Dashboards require admin permissions to edit or save changes to the Dashboard).

In the "Add new widget" list, click on "IPAM Stats". The IPAM Stats Widget will be added to the Dashboard. If using the Default Dashboard, be sure to save your changes.
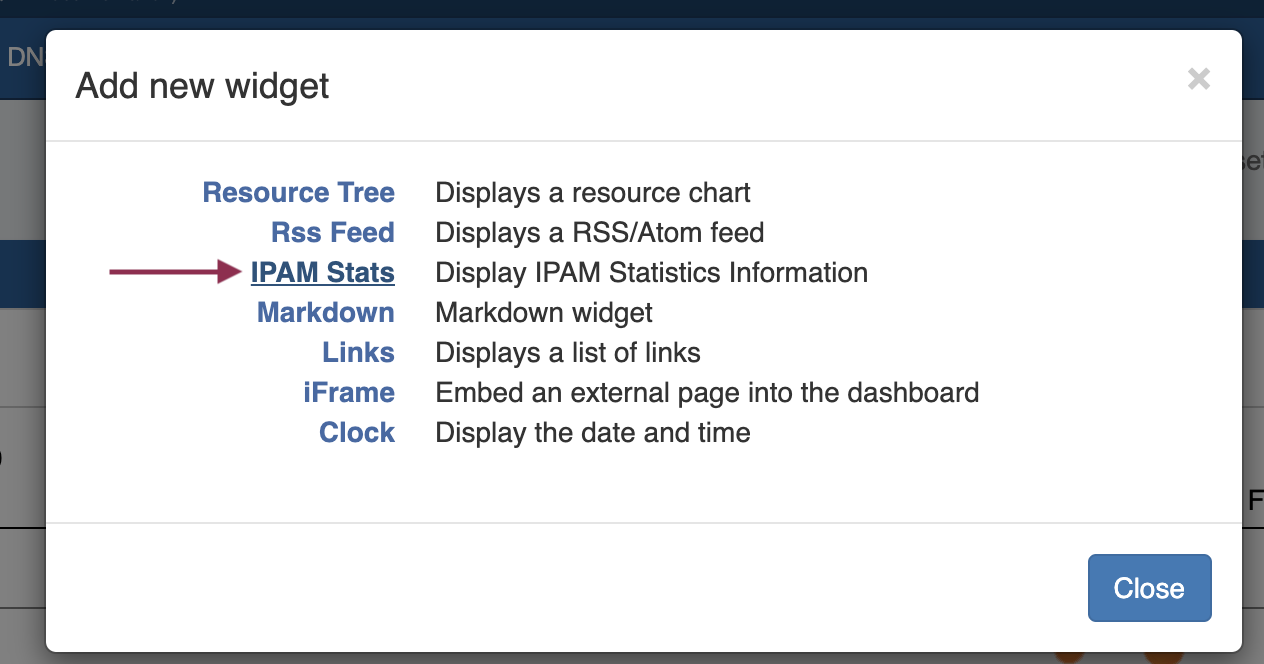
From here, you may move the widget to a new location, edit the name, or remove the Widget from the Dashboard. See Customizing the Dashboard and Working with Dashboard Widgets for details on performing basic Widget tasks.
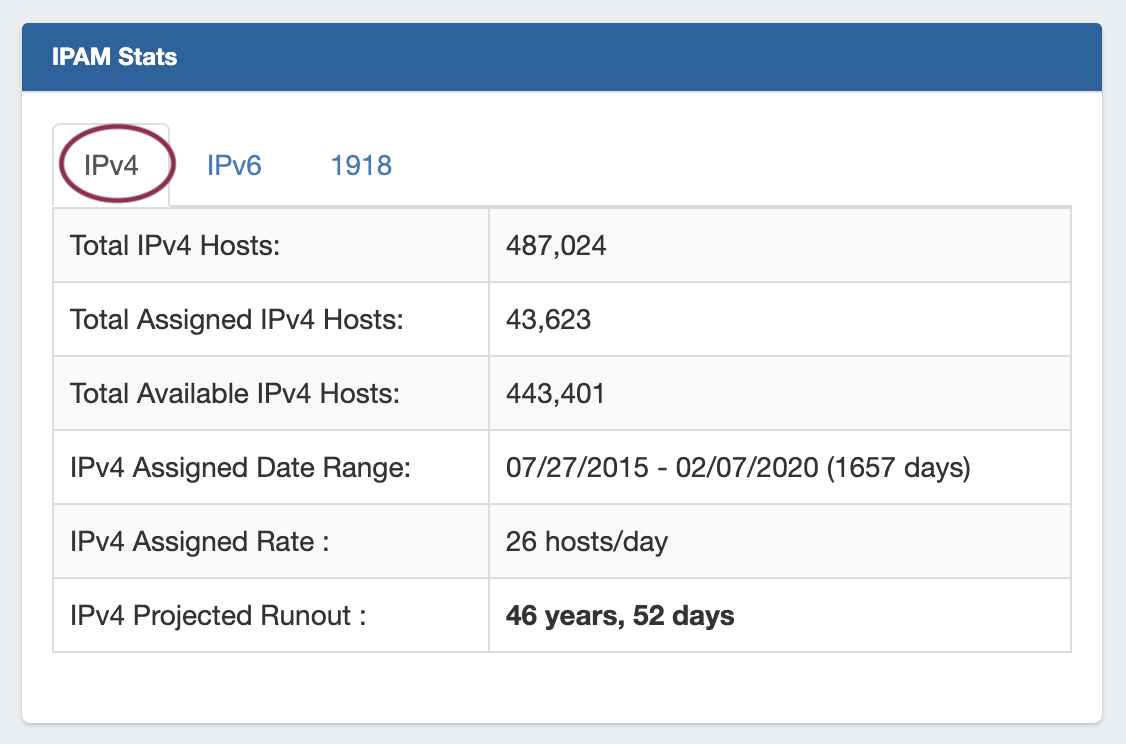
Using the IPAM Stats Widget
The IPAM Stats widget contains read-only IPAM data under three tabs - IPv4, IPv6, and 1918. Click on the desired tab for the block type you wish to view.
DNS Route 53 Connector (Beta)
IM - 2649: Added a DNS Connector for Route53/AWS
ProVision now supports Route53/AWS servers for DNS!
To use the Route53 connector, you must have Route53/AWS account set up and be able to provide the API Key, API Secret, and API Region provided to your Route53 account. For information on setting up a Route53 account, learning resources, or FAQ, see https://aws.amazon.com/route53/ .
For additional information, see Working with DNS Servers, or expand the area below:
Before you Begin
To use the Route53 connector, you must have Route53/AWS account set up and be able to provide the API Key, API Secret, and API Region provided to your Route53 account. For information on setting up a Route53 account, learning resources, or FAQ, see https://aws.amazon.com/route53/ .
To add a new DNS Server in ProVision, you must be logged in as an Admin-level user.
Add a Route53 Server to ProVision
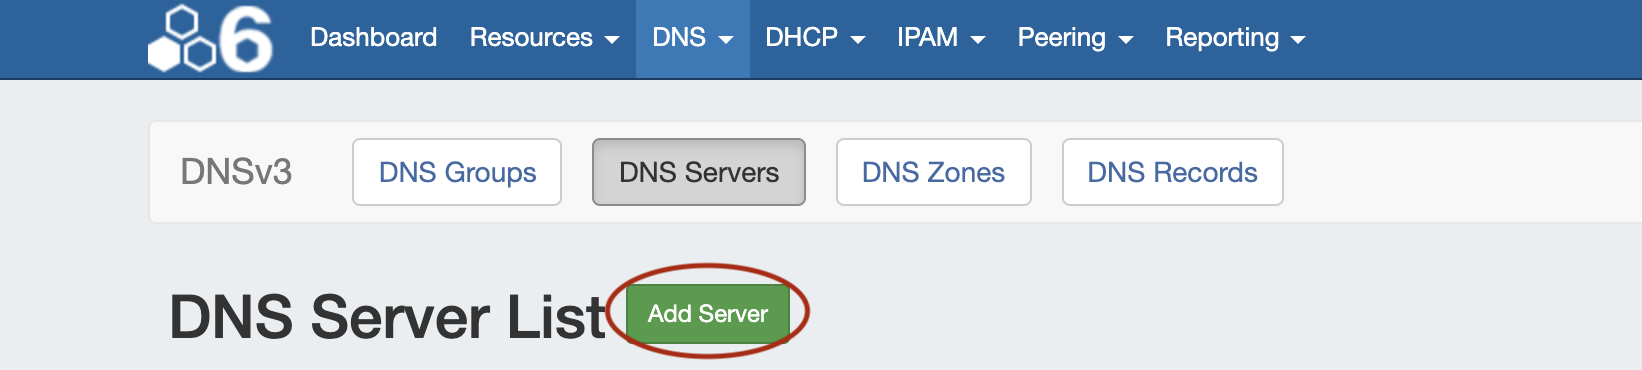
From the DNS Tab, click the DNS Servers sub-tab. From there, click "Add Server" to open the Server Settings page.
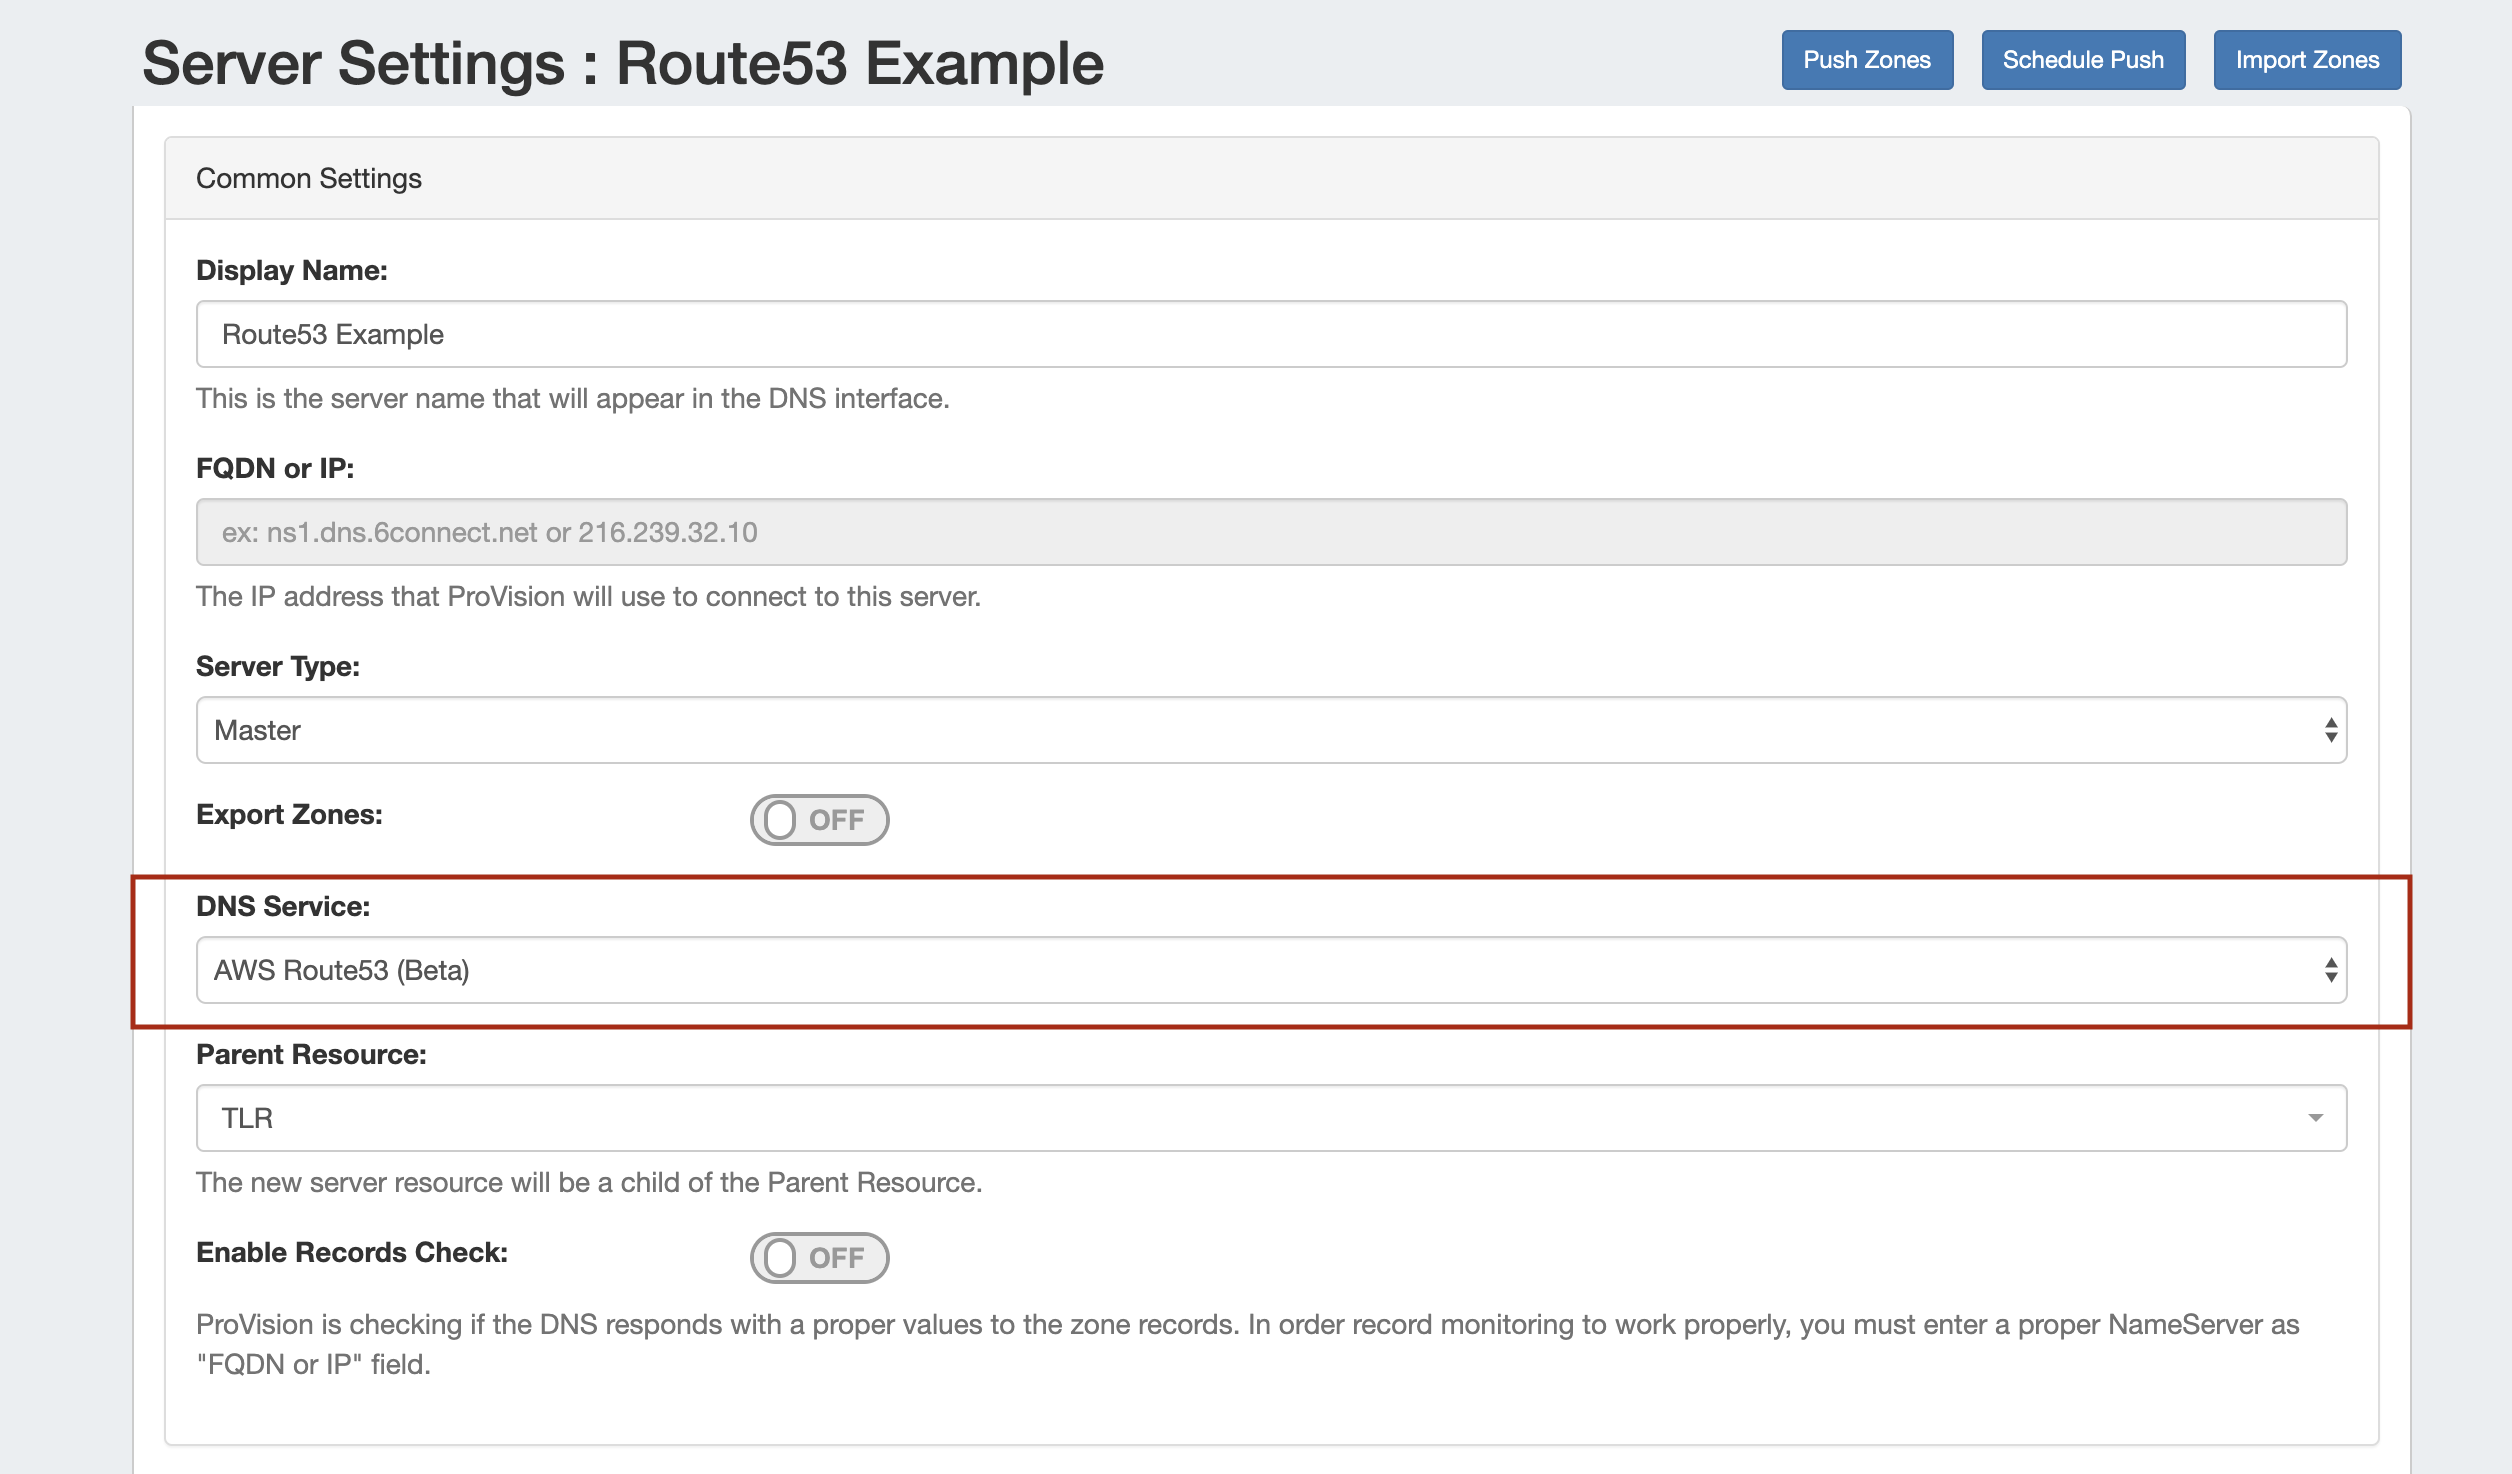
In Add Server → Server Settings, enter a Display Name for the new Route53 server, skip FQDN, and select Server Type.
Under "DNS Service", select the "AWS Route53 (Beta) connector. The FQDN field will automatically be disabled, and AWS/Route53 specific settings will be enabled in the next section.
If desired, adjust the other available settings in this section, then scroll down.
Set Route53 Specific Settings
Under the section for AWS Route53 (Beta) Settings, enter the API Key, API Secret, and API region provided to you for the AWS/Route53 account. You may choose to click "Test Server" at this time to verify the credentials and connection.

Enter additional Dynamic Updates, NS Records, and Group settings if desired, then click "Save Changes".
For information on working in the rest of ProVision's DNS system, see DNS Tab, DNS Administration, andWorking with DNS Servers.
Additional Features / Improvements
IPAM Improvements
Add Aggregate UI Update
IM - 3474: Updated IPAM Add Aggregate interface to be more consistent with other ProVision areas.
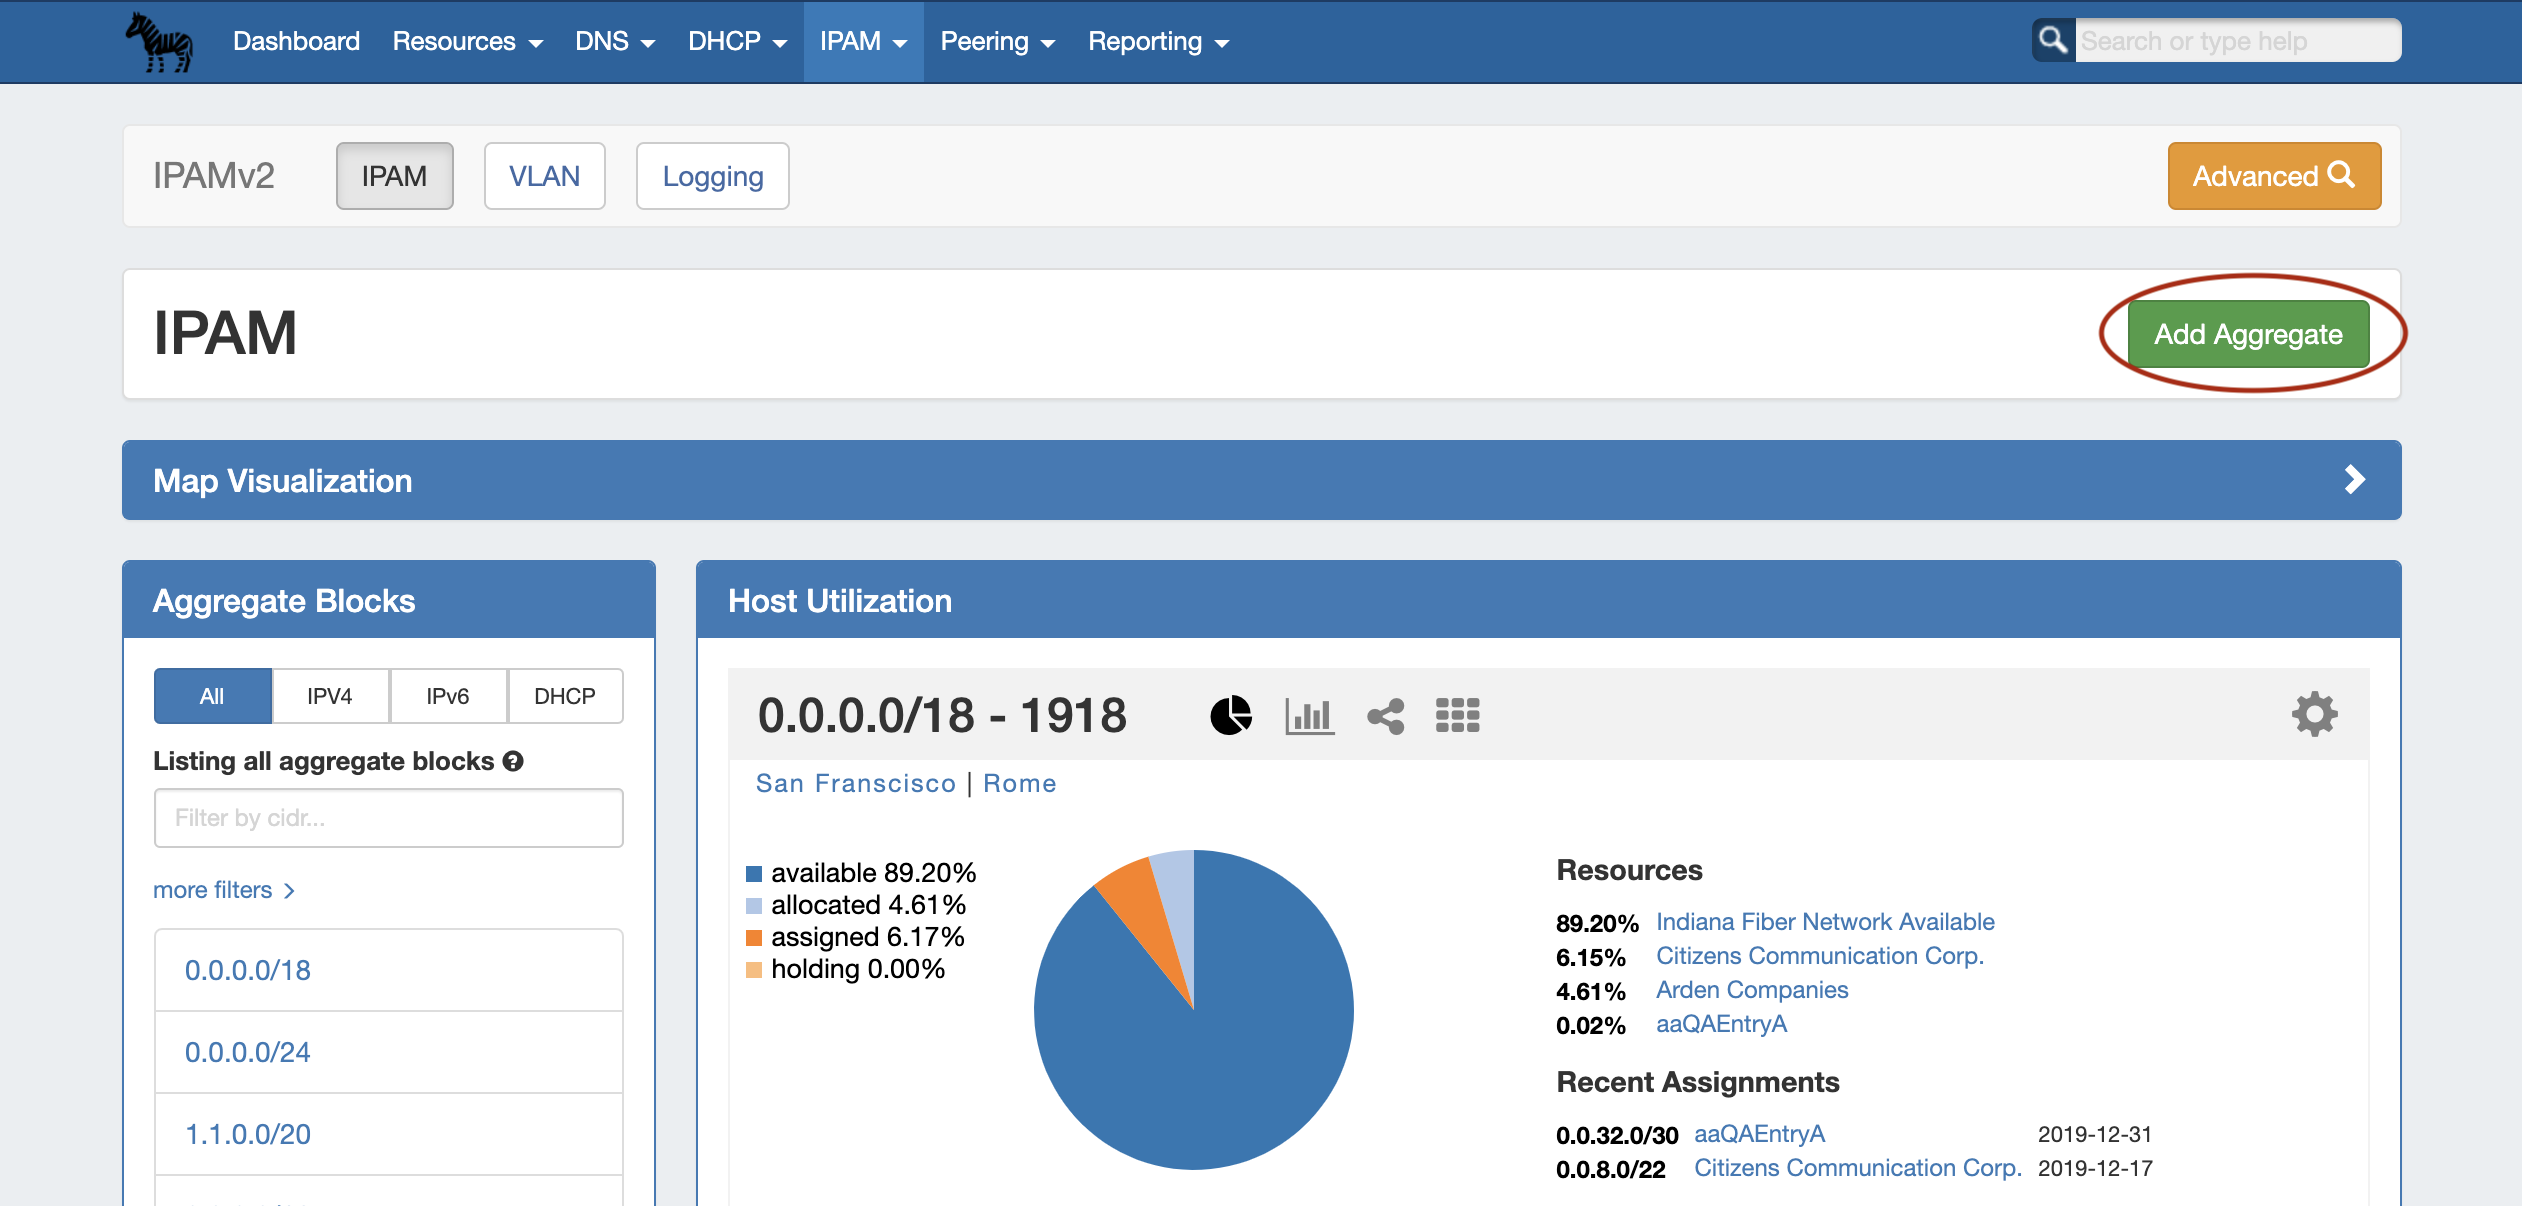
IPAM Add Aggregate is now accessed via a green button located a header bar on the IPAM Tab home page. Clicking "Add Aggregate" will open a new page to input the aggregate data.
The IPAM home page will automatically load after saving the new aggregate.
For additional information, see link here.
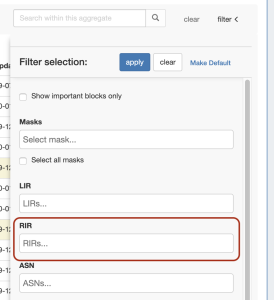
RIR Filters
IM - 3417: Added "RIR" filters to IPAM Aggregate Blocks and the IPAM Manage Filter
From the "Aggregate Blocks" list on the IPAM Tab, click "more filters" to view or change the RIR filter.
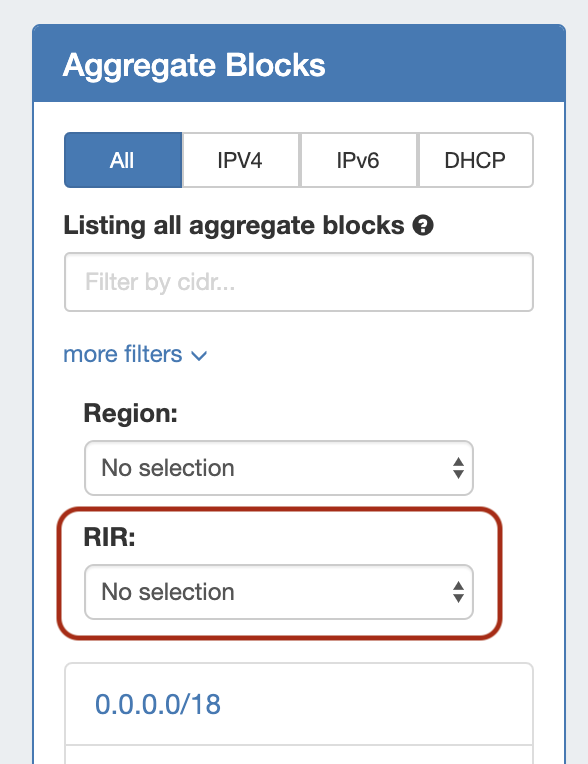
From IPAM Manage for an aggregate, click the "filter >" option to view or change the RIR filter for the current IPAM Manage view.
For additional information, see link here.
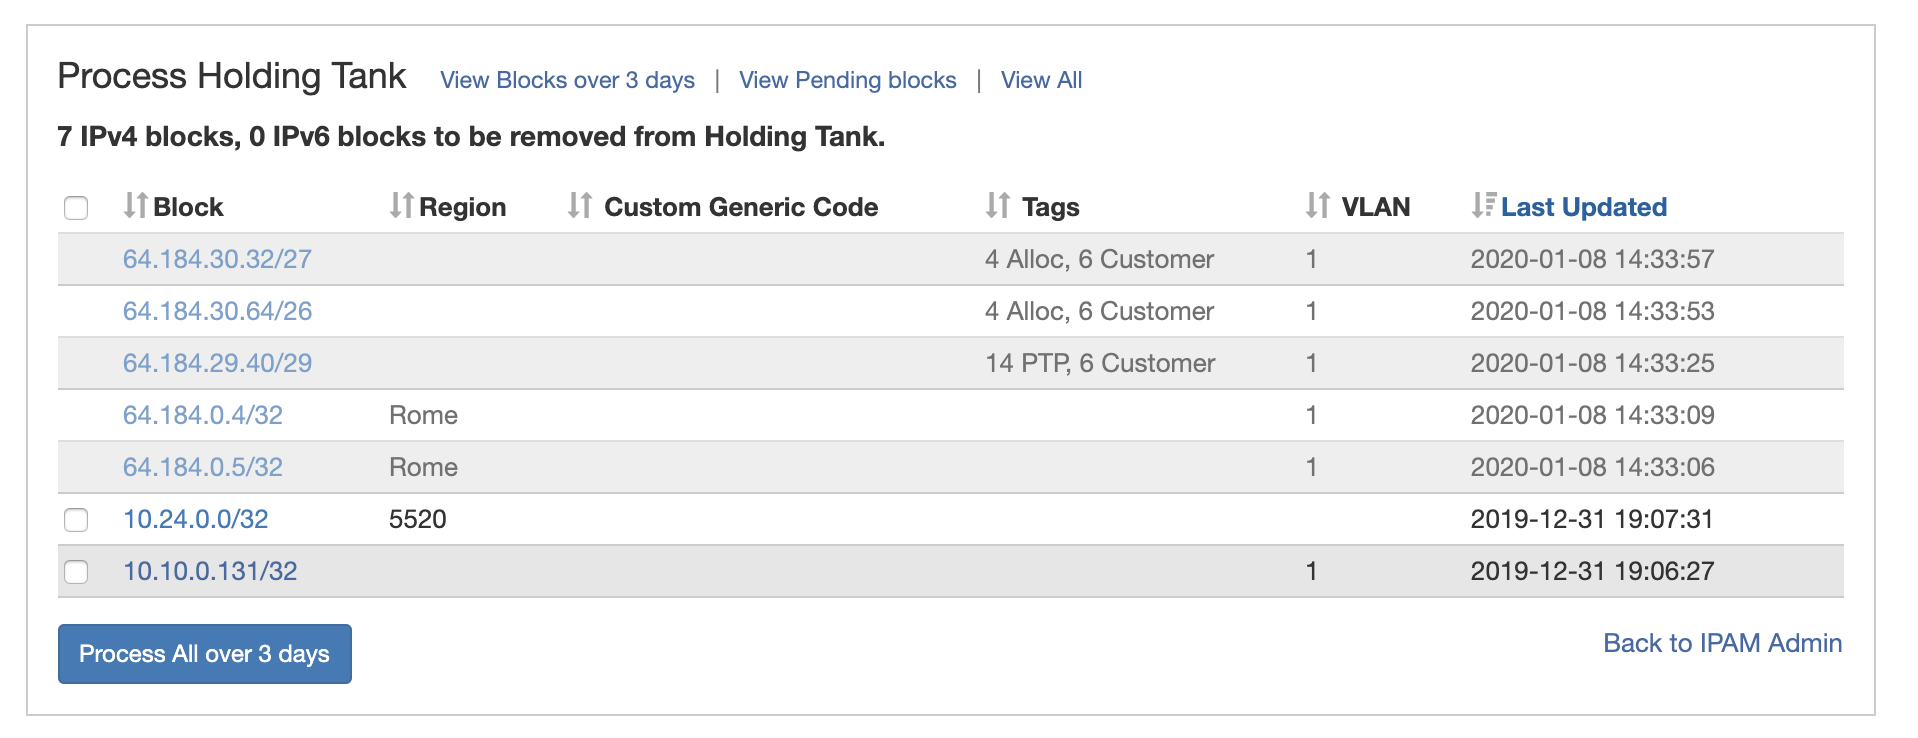
Holding Tank Improvements: "View Pending Blocks" / Column Sort
CFR - 160: Added the ability to view "Pending" items in the Holding Tank and sort by column.
IPAM Admin → Process Holding Tank now includes three view options - View Blocks over the over period, View Pending, and View All.
"Pending" blocks (displayed with light blue/grey text) may not be selected for processing until they reach the provided Holding Tank Day setting, but otherwise provide the same viewable data and IPAM Manage link as processable blocks.
In addition, the Holding Tank now provides ascending / descending column sort for all fields, by clicking on the up/down arrows next to the column name.
For additional information, view details below or see IPAM Administration - IPAM Configuration and Holding Tank Management.
Peering Improvements
Peer Templates
IM - 3291: Added Peering Templates
Peering Templates are accessible to Admin users from the Admin Preferences page, under Peering Settings.
Peering Templates allow users to create their own reusable session configuration files. When the default ProVision session configuration template doesn't do everything required for your specific use case, you can create your own template that does. Revisions to Peering Templates are tracked, and a template may be reverted to a previous version at any time.
For additional details on Peering Templates, see Peering Templates.
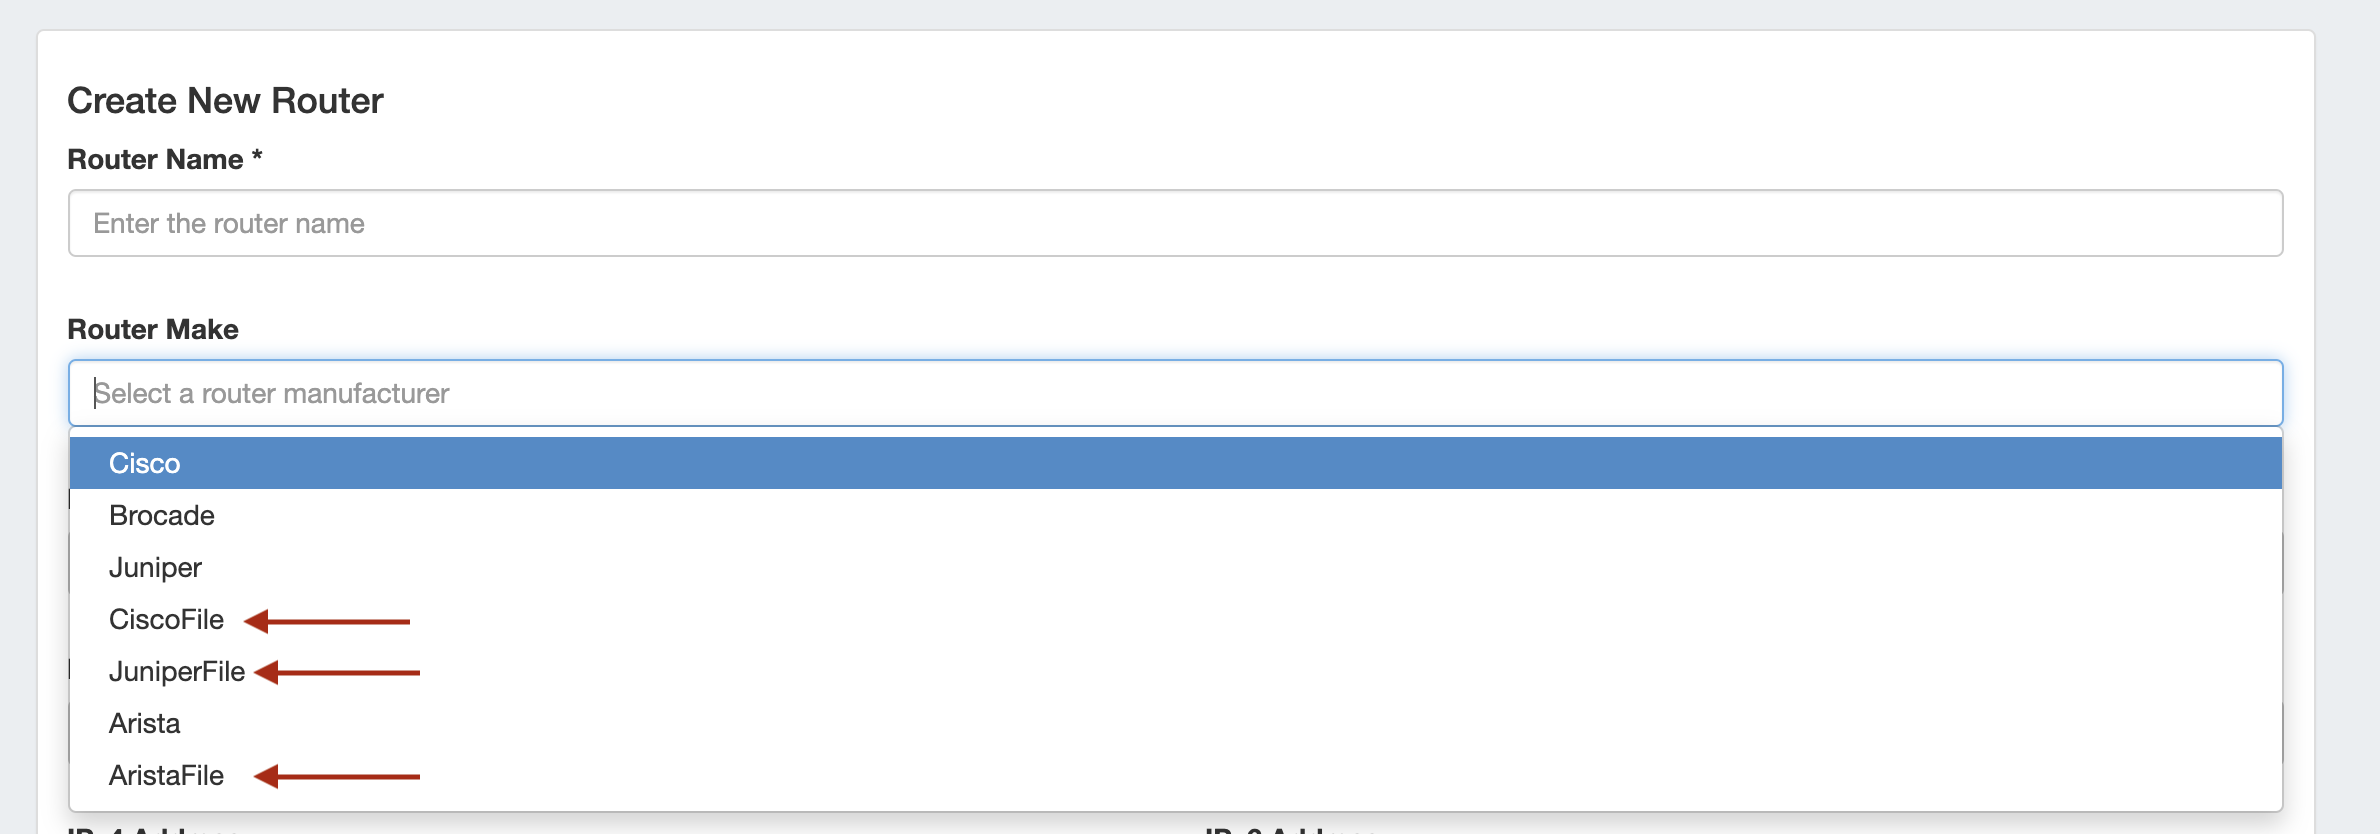
Peering File Connectors
IM- 3450: Added File Connectors for Cisco, Juniper and Arista router types for use in Peering BGP Import

Added the ability to create File Connectors to import router data files in Peering BGP Import, instead of connecting directly to the router for cases where direct router access is unavailable.
For additional information, see Import Peering Sessions, or expand the link below.
Improved Peering Import / Peering DB Coordination
IM - 3290: Improved peering import to suggest Peer Names that match PeeringDB for existing sessions.
If the ASN of a session belongs to a Peer which is in PeeringDB, that name is now suggested as the name to use when importing the session.
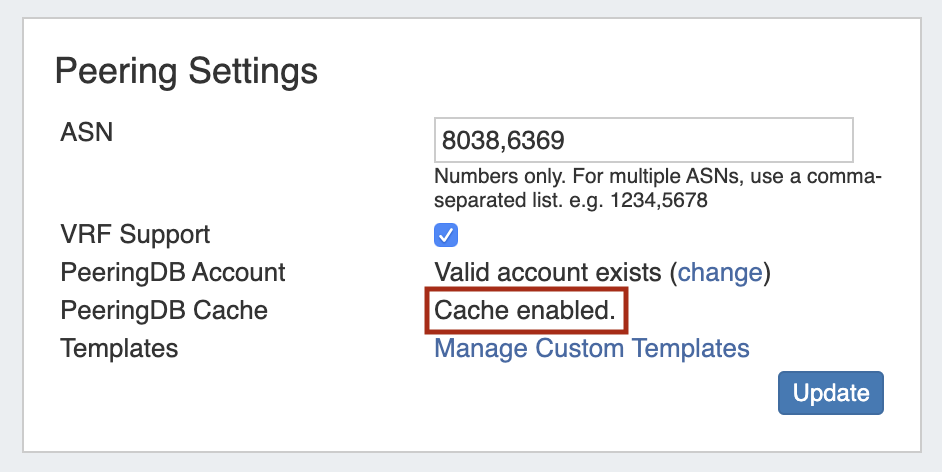
Peering Cache Check
IM - 3470: Added a PeeringDB cache status check to Admin Preferences → Peering Settings
Peering Settings now displays a status notification to show whether Peering DB cache is enabled or disabled.
For additional information, see link here.
Resource Export to .csv
IM - 3324: Added the ability to export a Resource's field information to .csv
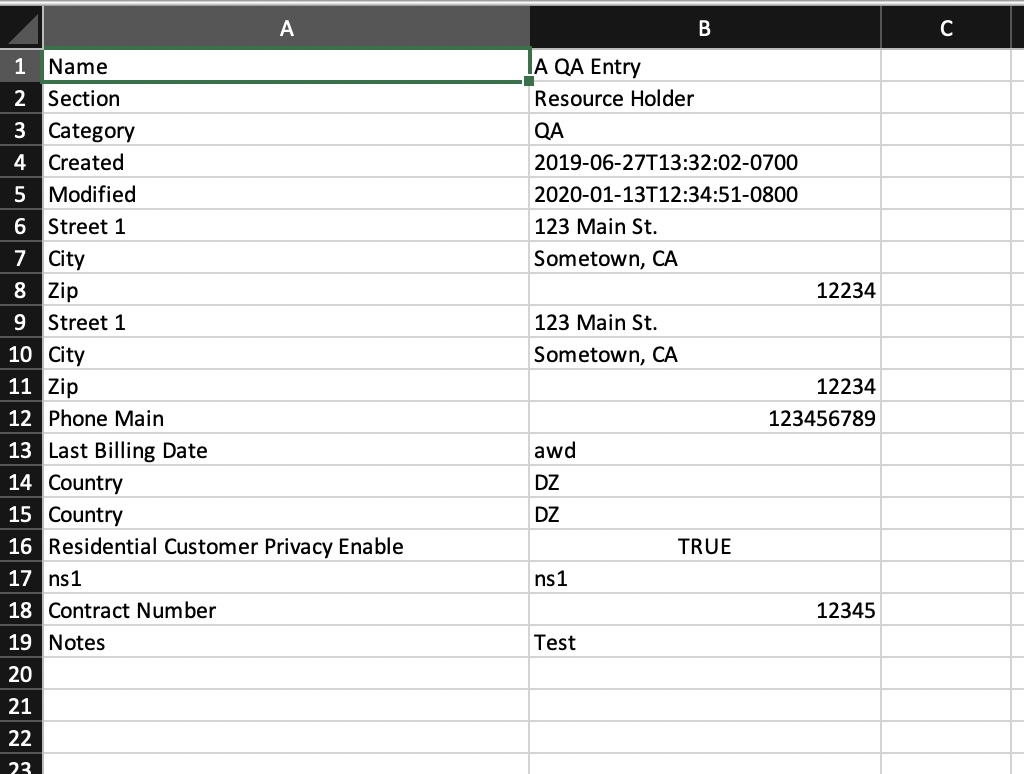
Resource Entry pages now have an "Export As CSV" button, which generates a .csv file containing the Resource's basic field information.
To export the Resource, click the "Export as CSV" button in the header on the Resource Entry Page.

The downloaded .csv file will contain the fields containing values from the Resource Info, Contact Info, Tech Info, and Resource Field Gadget(s), with the field name in the first column, and the field values in the second column.
Resource Linkage Gadget Updates
IM / CFR - 156: Added "Export to .csv" option for linked resources
The Resource Linkage Gadget → Action Menu (wrench icon) now includes an option to export resource field information for the linked resource(s).
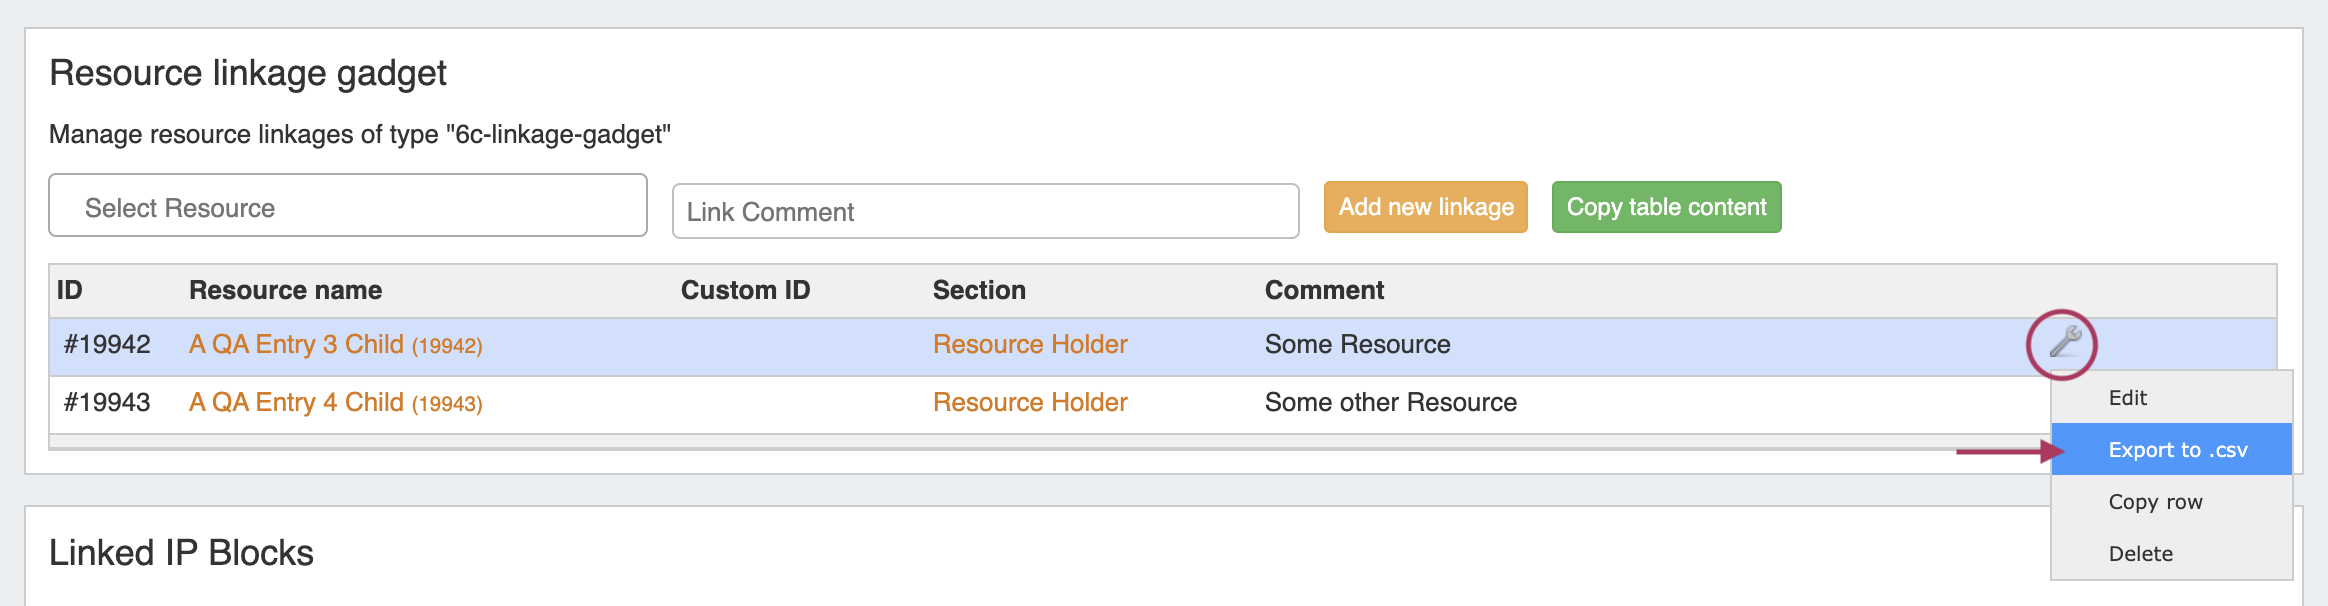
To export .csv information for the linked resource, click on the wrench icon for the desired resource, then select "Export to .csv".
A .csv file will download, containing resource metadata and available resource field data.
For additional information on adding fields to Sections, the Resource Field Gadget, and the Resource Linkage Gadget, see: Customizing Sections , Customizing Fields, and Gadgets.
Log Rotation (Admin Settings / Scheduler Task)
CFR - 127 / IM - 3469: Added automatic log rotation
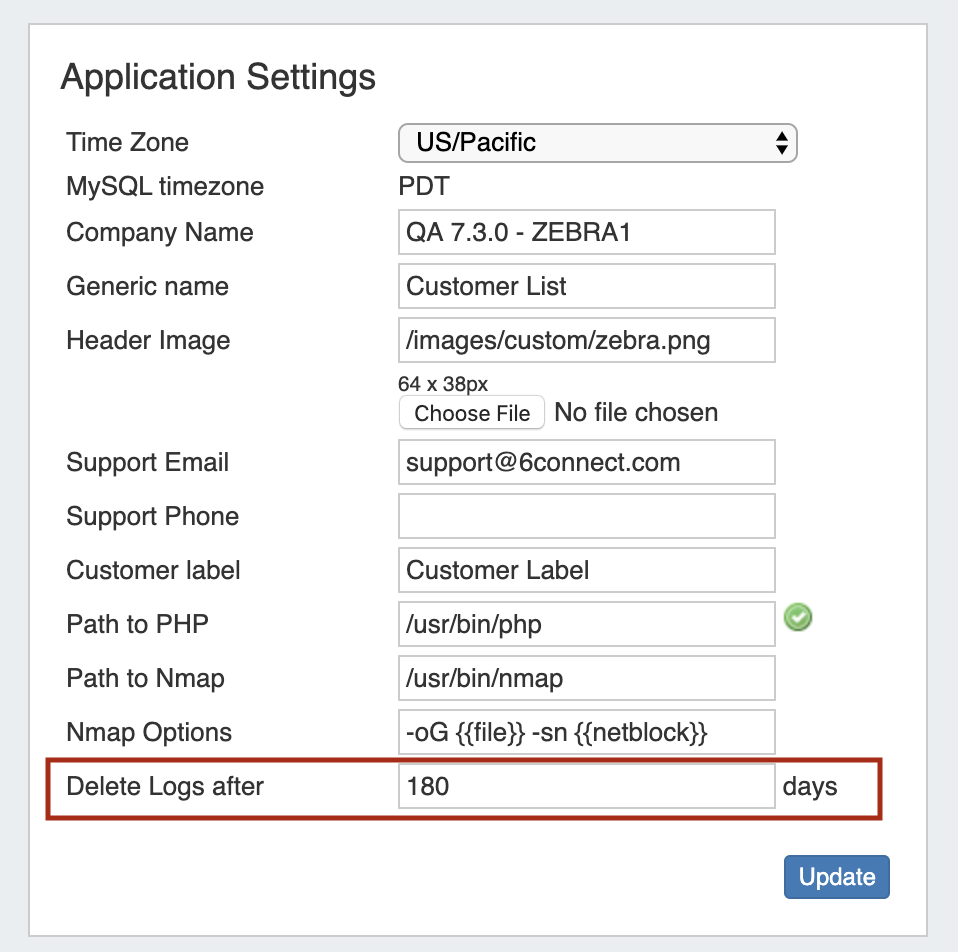
The Admin Preferences page now contains an option under Application Settings to "Delete Logs after X days". By default, this field is set to 180 days.
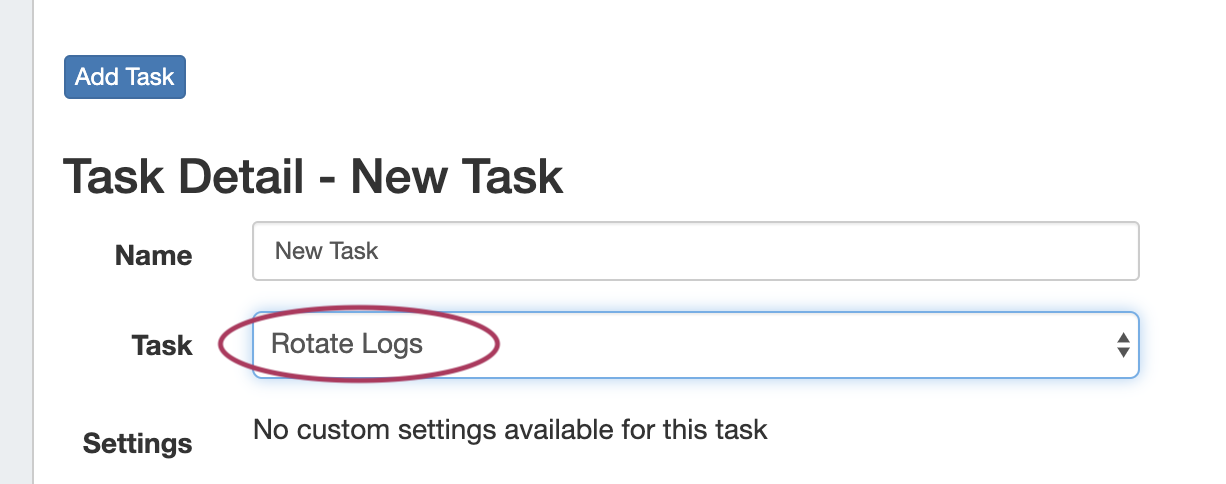
To support this, a new default Scheduled Task has been added - "Rotate Logs" - that removes all logs older than the number of days set (default is 180 days).
For additional information on how to edit Admin Preferences or Scheduler Tasks, see Admin Preferences and Scheduler Tab.
ACP Improvements
For detailed information on 6connect ACP (API Composer Platform), see ACP Overview Documentation or request a demo at info@6connect.com.
Admin ACP Settings
IM - 3472: Added ACP Instance Settings to Admin Preferences
Admin → Admin Preferences has been updated to include a section for ACP Settings. Users may enter the URL for an ACP instance and associated login credentials.
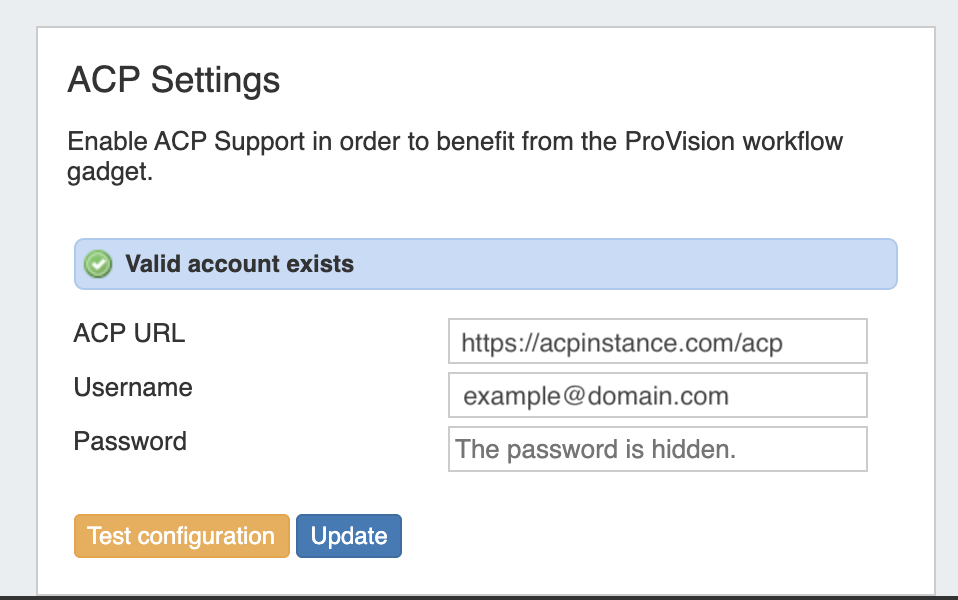
Once settings have been entered, the ACP Workflow Form Gadget will load the available Workflows from that instance/provided user.
ACP Workflow Form Gadget Updates
IM - 3473: Updated the ACP Workflow Form Gadget to integrate with Admin ACP Settings, updated ui, and added a JSON Response option
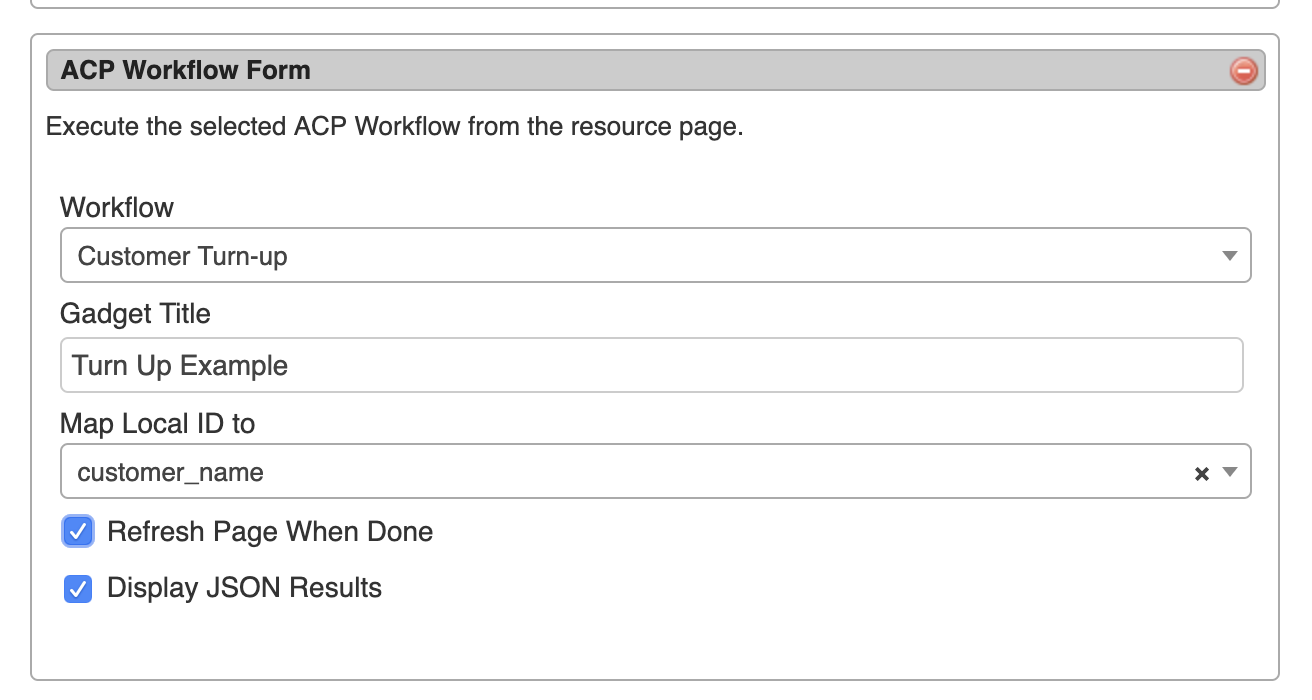
The ACP Workflow Form has been updated to automatically integrate with and load the workflows available for the instance/user specified in Admin ACP Settings. Additionally, the option "Display JSON Response" has been added to the form, along with minor ui improvements.
API Updates
APIv2 Updates
Endpoint links / references for APIv2 Swagger documentation are updated once each release is live, and may not be available prior to release.
Peering File Connectors
IM - 3450: Added an APIv2 Endpoint supporting Peering file connectors .
See APIv2 docs from your instance at: https://host.com/[your instance]/dev/swagger/spec.php?family=peering
Or, public APIv2 docs at: https://cloud.6connect.com/APIv2/spec.php?family=peering
Bug Fixes/Minor Improvements
CFR - 111: Global Search now supports search by full and partial MAC addresses for DHCP Pools and Resource MAC address fields.
CFR - 162: Added an Admin Preferences → DNS setting to omit backups for zones with over X number of records.
CFR - 163: Added a DNS Admin → Scheduler Task remove backups for zones with that are older than X number of days.
IM - 1940: Updated the "IPAM Alerts" task to be added by default to the Scheduler Task List.
IM - 3134: Removed the following obsolete DNS Global settings from Admin Preferences: Checkzone path, rndc path, and dig path.
IM - 3407: Improved error messaging for misconfigured DHCP Pool pushes.
IM - 3436: Added the "System" category dropdown option to Admin → Log Tab.
IM - 3465: Updated Peering tables to display Peer names of up to 255 characters.
IM - 3499: Resolved an issue that prevented IPAM aggregates from merging if located on separate pages of the aggregate list.
IM - 3521: Updated DHCP Host Pool → Change MAC address to better handle error cases of removed or corrupted associated IPAM netblocks.
IM - 3554: Improved search to support search by contact First Name / Last Name.
IM - 3555: Resolved an issue where deleted LIRs could still be associated with netblocks and prevent the IPAMv2 Gadget from loading.
IM - 3557: Improved DNS Autogenerator messaging and handling in cases where zones already existed or provided nameservers were not valid FQDN format.
IM - 3571: Removed the now-obsolete "Reports Importer" task from the Scheduler task list.
IM - 3606: Added new error messaging to IPAM Regions to inform users of Geocode API account errors.
IM - 3609: Updated error messages in IPAM Add Aggregate to instruct the user to select a resource if they do not have create permissions on "available".
IM - 3683: Resolved an issue where IPAM "Metadata 2" fields would not save data.