...
VLAN Manager
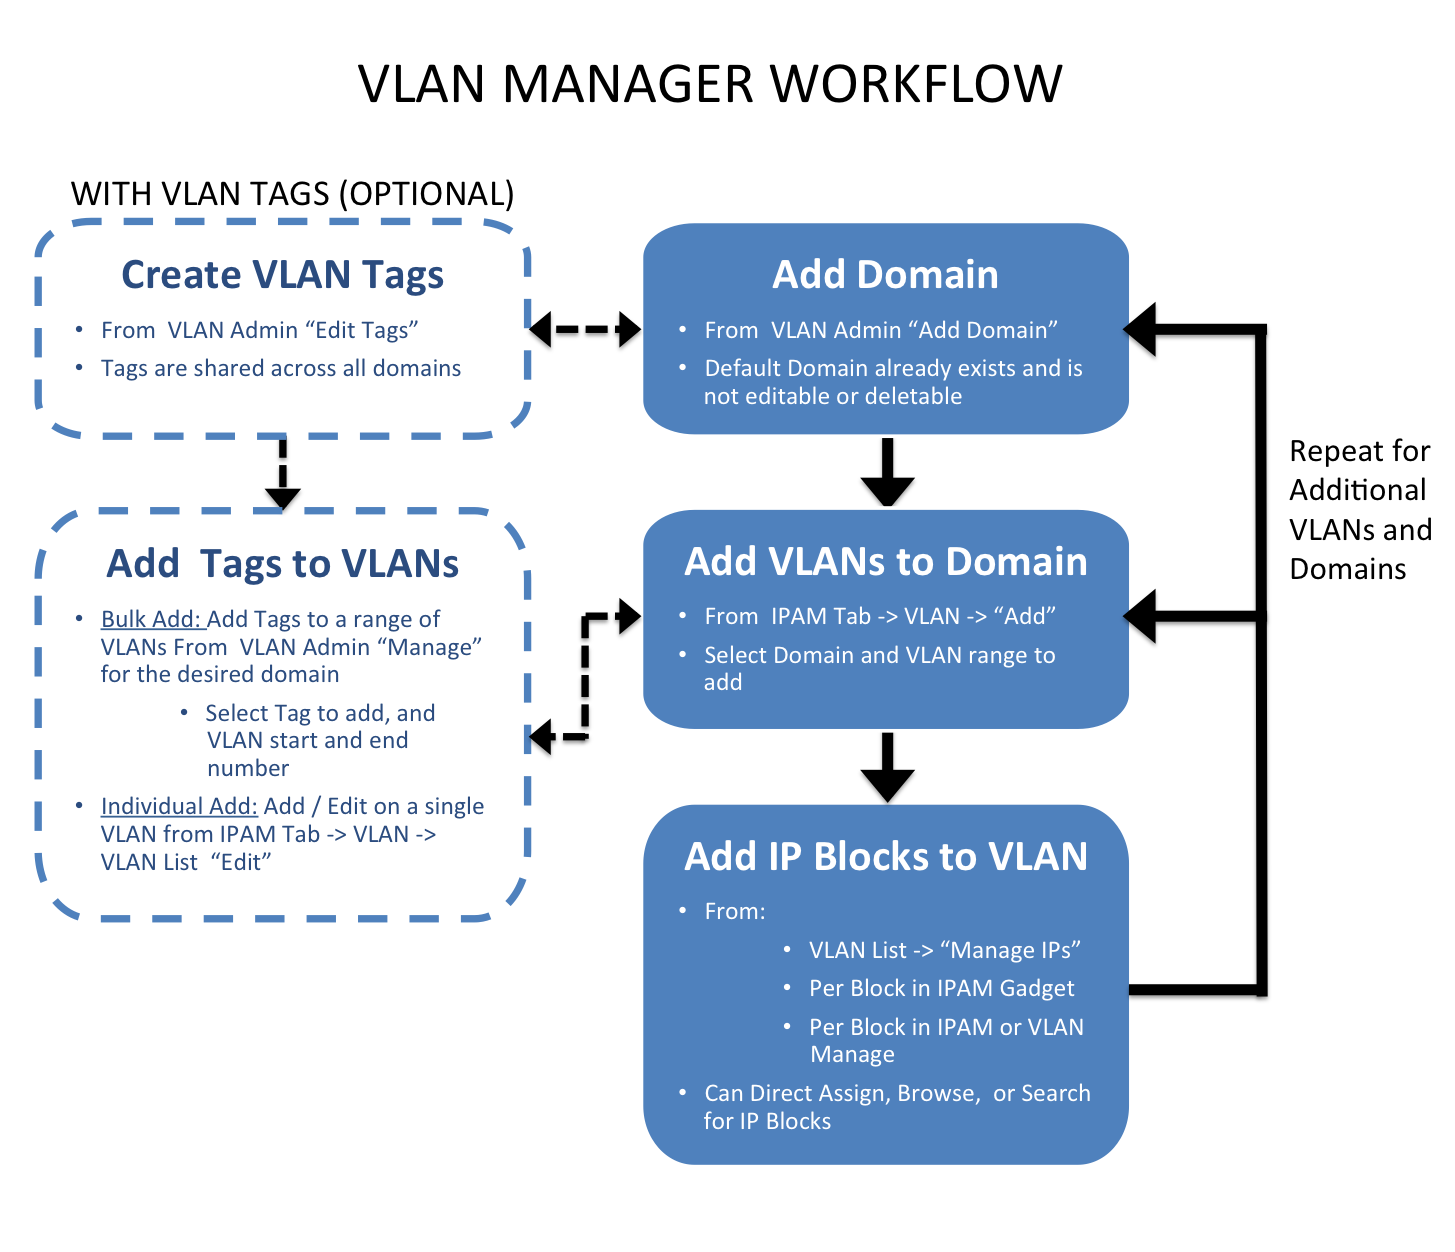
The VLAN Manager allows Admin users to add domains and VLANs to their ProVision instance, and associate them with IP Blocks. Optionally, VLAN tags may be associate with ranges or individual VLANs under a domain, to help limit VLAN search results when enabling VLANs.
Standard flow (without VLAN tags):
The workflow starts with creating a domain in the VLAN Admin section of ProVision. During creation, domains may be selected as "standard" or "extended" domains, declaring the size of the VLAN pool from which VLANs are available to be enabled. Next, VLANs must be enabled and added to the domain. This is done under the IPAM Tab -> VLAN section of ProVision. Add VLANs to the domains by clicking "Add", searching for the desired range of VLANs to enable from the standard / extended pool, and selecting the desired VLANs to enable. Once enabled, VLANs may be edited or have IP blocks associated with that VLAN. Editing VLANs and Direct / Smart Browse / Search IPs functions for adding blocks to VLANs are available from the Domain/ VLAN list under under the IPAM Tab -> VLAN section of ProVision by expanding the desired domain and clicking on the VLAN link. IP blocks may also be edited individually through the IPAM gadget, IPAM Manage, and VLAN Manage areas to add domain and VLAN information to the block.
Optional flow (with VLAN tags):
The workflow starts with creating a domain in the VLAN Admin section of ProVision. During creation, domains may be selected as "standard" or "extended" domains, declaring the size of the VLAN pool from which VLANs are available to be enabled. VLAN tags may be added (from the VLAN Admin Tab -> Edit Tags submenu) before or after domain creation. Tags created in this area are available to all domains and VLANs.
If the tags created need to be added to a large range of VLANs, the next step would be to add tags to the desired range(s) of VLANs from the VLAN Admin -> Domain "Manage" button. Domain Manage allows you to select an existing tag, type in the numeric VLAN start and end point, and assign that tag to that entire range of VLANs under the current domain.
Once a bulk range of tags is associated with VLANs, you can use the tag as a search criteria when adding VLANs to a domain. This is done under the IPAM Tab -> VLAN section of ProVision. Add VLANs to the domains by clicking "Add", using the tag name as a search field for the desired range of VLANs, and then selecting the desired VLANs to enable.
If tags are only desired for individual VLANs, they may be added when editing a VLAN after the VLAN has already been added/enabled for the domain. Editing VLANs may be accessed from the IPAM Tab -> VLAN section, then expanding the desired domain and clicking on the VLAN link, selecting "Edit".
Next, VLANs must be enabled and added to the domain. This is done under the IPAM Tab -> VLAN section of ProVision. Add VLANs to the domains by clicking "Add", searching for the desired range of VLANs to enable from the standard / extended pool, and selecting the desired VLANs to enable. Once enabled, VLANs may be edited or have IP blocks associated with that VLAN. Editing VLANs and Direct / Smart Browse / Search IPs functions for adding blocks to VLANs are available from the Domain/ VLAN list under under the IPAM Tab -> VLAN section of ProVision. IP blocks may also be edited individually through the IPAM gadget, IPAM Manage, and VLAN Manage areas to add domain and VLAN information to the block.
