Importing Resources
Before You Begin
Ensure that you are familiar with the overview and "Before you Begin" requirements listed on the Resource Import Tool page.
For this tutorial, we will be using the Contact Import Sample .csv available on the Import Templates page as an example, and associating it to an existing Section called "Contact" having the fields: First Name, Last Name, Email, 2nd Email, Phone, 2nd Phone, Mobile Phone, Role, and Time Zone. To create this Section, or edit an existing Section, refer to Working With Resources, Customizing Sections, and Customizing Fields.
In order to illustrate the abilities of the Resource Importer to edit data and adjust for formatting issues, the Contact Import Sample .csv is used intentionally leaving a few less-than-ideal conditions (much like you may encounter in real life) such as leaving typos, having an extra data column, and missing a needed column. If you follow the "Before you Begin" requirements and "Best Practice" notes, however, you may be able to skip any editing or column adjustment steps.
When you are ready to begin, open the Resource Importer and proceed to Step 1.
Step 1: Upload your .csv data file
Under the "File" Menu, select "Open .csv". Browse to and select your UTF-8 encoded data file.
After hitting "OK", your file should be visible in the workspace, as well as listed under "Open Files" like this:
Step 2: Open a Template Grid from an existing Section
Under the "Data" menu, select "Create Sheet from Section".
The Resource Browser will pop up, showing the list of Sections currently available in Provision. Clicking on the "Details" button will show the fields for that Section.
Verify that the Section and available fields match the type of data you are trying to import. In this case, the Section "Contact" has the fields that correlate to our spreadsheet data.
Select "Create Grid" to create a grid based off this Section.
When the Section Grid has been created, required fields will show in blue font with (required) after the header, in this case, "Name" is a required field. The "Custom ID" field is metadata allowing for a unique ID to be associated with each entry, but is not necessary for a successful import. The remainder of the headers directly match the Section's fields.
Step 3: Reorder .csv columns to match the Section Grid column order
One of the most important steps is to reorder the columns from the .csv data to match the order of the Section Grid headers - think of the importer as copying and pasting the csv data into the "Contact" Section grid- we want to ensure that the data is under the correct headers!
Click on the column header to Drag and Drop to the desired location:
Click back and forth between the tabs to verify the column order, click on a header and drag and drop into the desire order. This moves not only the header, but also the data below it.
What if just my column headers are in the wrong place?
What if I have too many / too few columns in my .csv to match the Section Grid?
What if I see a typo in the .csv data?
If you see any of these issues, proceed to Step 4 - Edit data as needed.
Otherwise, if your columns match up perfectly (good job!) and none of the data needs editing, skip to Step 5
Step 4: Edit data as needed
As you may have noticed in Step 3, with this example we have a couple of columns that don't quite match up to the Section Grid. The "Title" column in the .csv data is an additional column we are not tracking in our Section. Also, although we have a "First Name" and "Last Name", we are missing a data column for the top-level "Name" required in the Section Grid.
| Anchor | ||||
|---|---|---|---|---|
|
To hide extraneous column information:
Right click on a header and deselect the check box for the column you wish to hide. In this case, we want to hide "Title".

Anchor Resource Importer - Edit Data Resource Importer - Edit Data
| Resource Importer - Edit Data | |
| Resource Importer - Edit Data |
To Edit Data in the Resource Importer
Data in the grids can be edited directly by clicking on the cell(s). In our example, we can see that "Amanda Kingson" should really be "Amanda Kingston". Let's fix that! Click in the cell, type in the edit you wish to make, and then click outside of the cell to exit edit mode. To edit a full row of data, you can right click on the row, select "Edit" row, and make multiple changes in the form box.

| Anchor | ||||
|---|---|---|---|---|
|
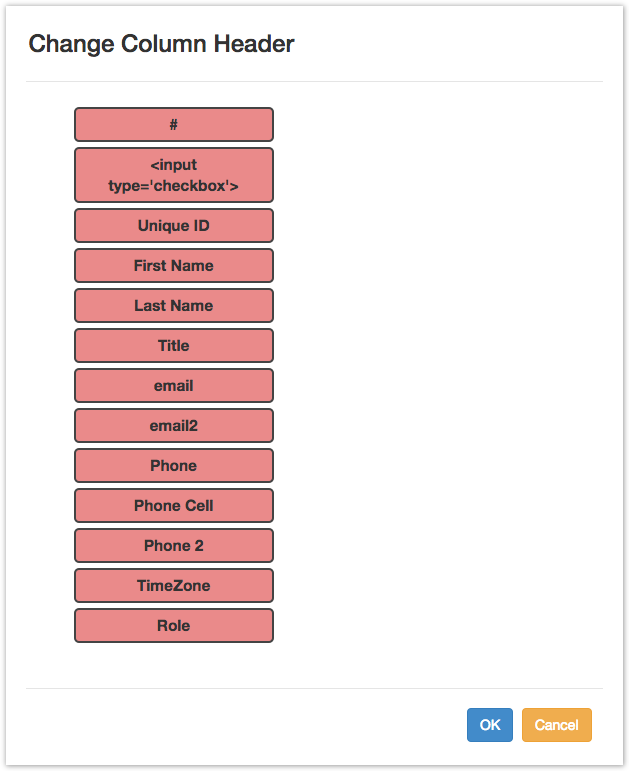
If a column header is over the wrong data:
If just the header is in the wrong spot (doesn't match the data below it), you can move just the column header in the Resource Importer, without moving the data below it.
...
2) In the "Change Column Header" dialog box, drag and drop the column header(s) into the desired order. Remember, this only moves the headers, not the data below them! Then, hit "OK".
Anchor Resource Importer - Missing Column Resource Importer - Missing Column
| Resource Importer - Missing Column | |
| Resource Importer - Missing Column |
If your .csv data is missing a data column needed for the Section grid:
In our case, the .csv data is missing the required "Name" column for the Section grid. Think of the "Name" as the information you would want to search for in Provision. We wouldn't want to search just for "Bob" or "Smith" when looking down a list of names, so under the "Name" column, we need to see the full first and last names, like "Bob Smith".
...
2) In the Resource Importer, temporarily hide the extra column in the Section Grid: Make the columns between the .csv and the Section Grid match exactly by temporarily hiding the column (in this case, "Name") in the Section Grid, proceed to move the data into the Section grid (see Step 5), then unhide the "Name" column and manually add the data as needed prior to completing the import.
...
Anchor Resource Importer - Drag Rows to Section Resource Importer - Drag Rows to Section
Step 5: Drag rows from the .csv Grid to the Section Grid
Once you have set the columns to match exactly between the .csv Grid and the Section grid, it's time to pull in the data from one to the other.
...
If you had to hide columns in the Section Grid prior to moving the .csv data, verify that all columns are visible and the required data filled in. In this case, we filled in the "Name" Column that was missing in the original .csv.
Step 5: Import into ProVision
When all of the data is under the Section Grid tab, and any required field data filled in, you can import the data into Provision! From the Data menu, select "Import active Sheet into ProVision". You will see an import progress bar. Once complete, you data will be in provision, filled into the Section fields for your chosen Resource.
...