IPAM Workflow
IP Management
IP Management is comprised of four basic functions: adding aggregates into ProVision, managing those aggregate blocks, assigning them to a resource, and deleting the aggregates.
ProVision provides multiple ways for you to achieve each step, depending on your needs. For example, if your organization currently uses spreadsheet data to track aggregates, ProVision provides tools that can import your existing spreadsheets for bulk updates, saving you time. Need to just quickly assign a single IP? Direct Assign will allow you to do so with just a few clicks.
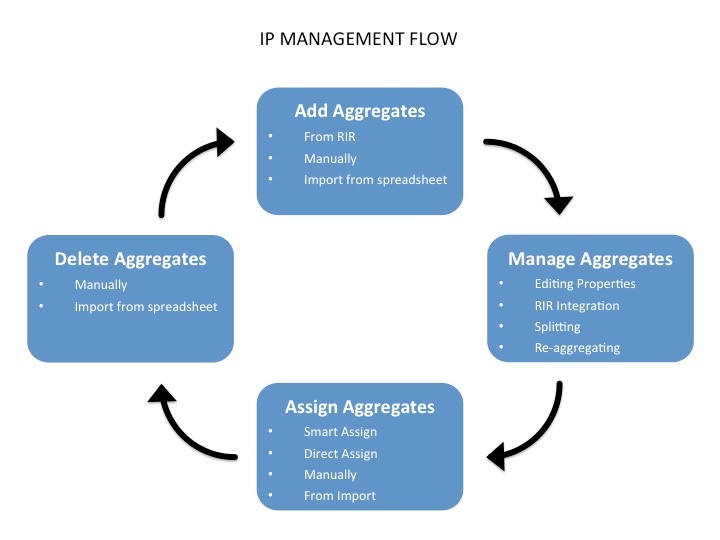
Add Aggregates
Adding new aggregate may be done manually, automatically from a RIR import, or imported from a .csv file.
- Manually: Create a new aggregate via the IPAM Tab. See: Working with IP Aggregates.
- Import from RIR: ProVision will automatically identify your RIR / organization and show available aggregates, or you can enter in an ORG ID or IP. See Import Aggregate .Blocks
- Import from .csv: Normalize your data as detailed in Importing Your Data - Normalize your Data, and then use ProVision's IP Import from .csv tool.
Manage Aggregates
Edit, Split, Merge, and connect with RIRs to architect the aggregates as needed and update WHOIS information, if applicable.
- For aggregate level actions, like splitting, merging, and editing, see Working with IP Aggregates - Common Tasks .
- RIR Integration requires LIR setup. See LIR Management and Use and RIR Integration: SWIP/RPSL .
- Editing individual blocks under an aggregate can be done from either IPAM Manage or the IPAM Gadget. See Working with IP Blocks and Working with IP Rules.
Assign Aggregates
Aggregates may be assigned to a Resource at their creation/import, or assigned later manually or via Smart / Direct Assign.
- To assign at manual aggregate creation, just select a resource from the dropdown in the IPAM Tab - Create Aggregate dropdown. See: Working with IP Aggregates.
- To assign during import, either include the resource assignment as a field in your .csv, or edit the import during the review step to assign a resource. See IP Import from .csv.
- Manual assignments may be done at any time in IPAM Manage or Smart/Direct Assign. See: Working with IP Aggregates and Working with IP Blocks.
Delete Aggregates
Delete an aggregate from the aggregate box in the IPAM Tab. See: Working with IP Aggregates.
IP Assignment Lifecycle
In ProVision, the IP assignment lifecycle starts with an available block which is free to be assigned to any IPAM-enabled resource holder. There are multiple methods that may be used to assign a block to a resource holder: Smart Assign, Direct Assign, or Manual Assign (Smart Browse). See Working with IP Blocks for details on assigning blocks.
Once an IP block is assigned, blocks can be further subassigned via the same methods, if desired, by using the "allow subassignments" toggle when editing an assigned block. If a block has subassignments enabled, but has not yet been subassigned, it is listed as "Allocated" - essentially held by the parent resource, but not fully assigned.
When an assigned block is un-assigned it proceeds into the Holding Tank: a special resource where blocks are held until either a set time has elapsed or until they are manually reclaimed to 'available' status. If a subassigned block is unassigned, it too proceeds to the Holding Tank if not overridden, and then reverts back to allocated to the original parent resource.

IP Block Status
- Available: A status of "Available" indicates the block is free and able to immediately be assigned or allocated to a resource. Available blocks may be assigned via any assignment method - manual, smart assign/browse, and direct assign.
- Assigned: A status of "Assigned" indicates that the block has been assigned to a Resource, with no subassignment capability, and is unavailable.
- Allocated: Allocated blocks have been assigned to an overarching parent resource, but have subassignments enabled and may have smaller blocks assigned out of them to other Resources, such as customers or DHCP Pools. Allocated blocks count as "Available" for reporting functionality until subassigned, but are shown as their own category on the IPAM Utilization charts. Once subassigned, the block is considered "Assigned".
- Holding: Blocks in "Holding" have recently been unassigned, and are held for a set duration in the IPAM Holding Tank, unless otherwise overridden, reassigned, or reclaimed from Holding.
Additional Information
For more information on performing tasks in this IP Assignment Lifecycle, see the following documentation sections: