ProVision 7.0.0
ProVision 7.0.0 is a major release with new features, improvements and bug fixes.
| Note | ||
|---|---|---|
| ||
For |
| HTML |
|---|
<div id="google_translate_element"></div>
<script type="text/javascript">
function googleTranslateElementInit() {
  new google.translate.TranslateElement({pageLanguage: 'en'}, 'google_translate_element');
}
</script>
<script type="text/javascript" src="//translate.google.com/translate_a/element.js?cb=googleTranslateElementInit"></script> |
ProVision 7.0.0
ProVision 7.0.0 is a major release with new features, improvements and bug fixes.
| Note | |||||||||||||||
|---|---|---|---|---|---|---|---|---|---|---|---|---|---|---|---|
| |||||||||||||||
For local installation customers, ProVision versions 7.0.0 and newer have upgraded software requirements (in red, below):
Note on MySQL: We recommend setting the max_allowed_packet setting in the MySQL configuration file to 128MB (or similar) to account for the typical dataset size handled in ProVision. |
...
Contact 6connect at info@6connect.com to schedule a demo or get more information.
New Features
IPAMv2 - New IPAM Tab Updates
IM - 2851: Updated the IPAM Tab to support IPAMv2, and added new features and improvements. See IPAM Tab for additional details.

IPAM Tab
Updates and New Features to the IPAM tab include:
| Expand |
|---|
|
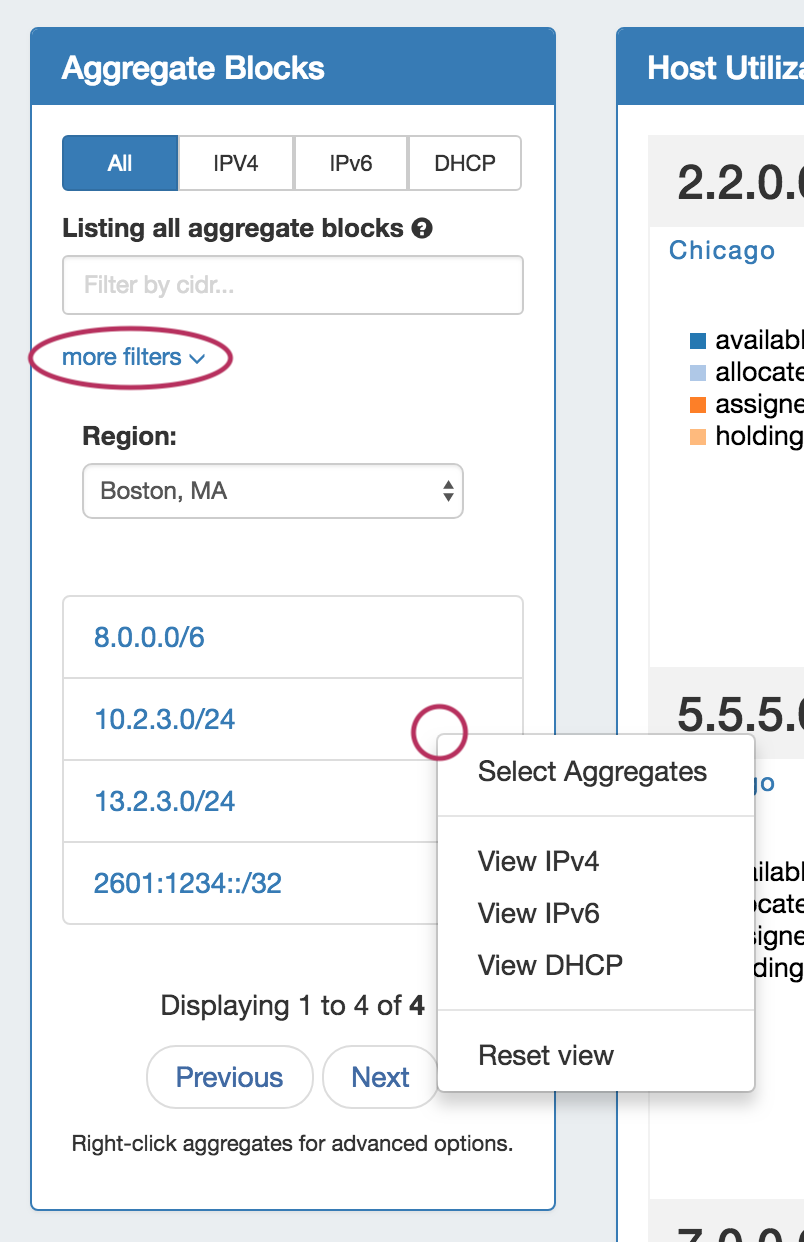
Aggregate Blocks List
Updated the IPAM Aggregates Block List to include:
| Expand |
|---|
|
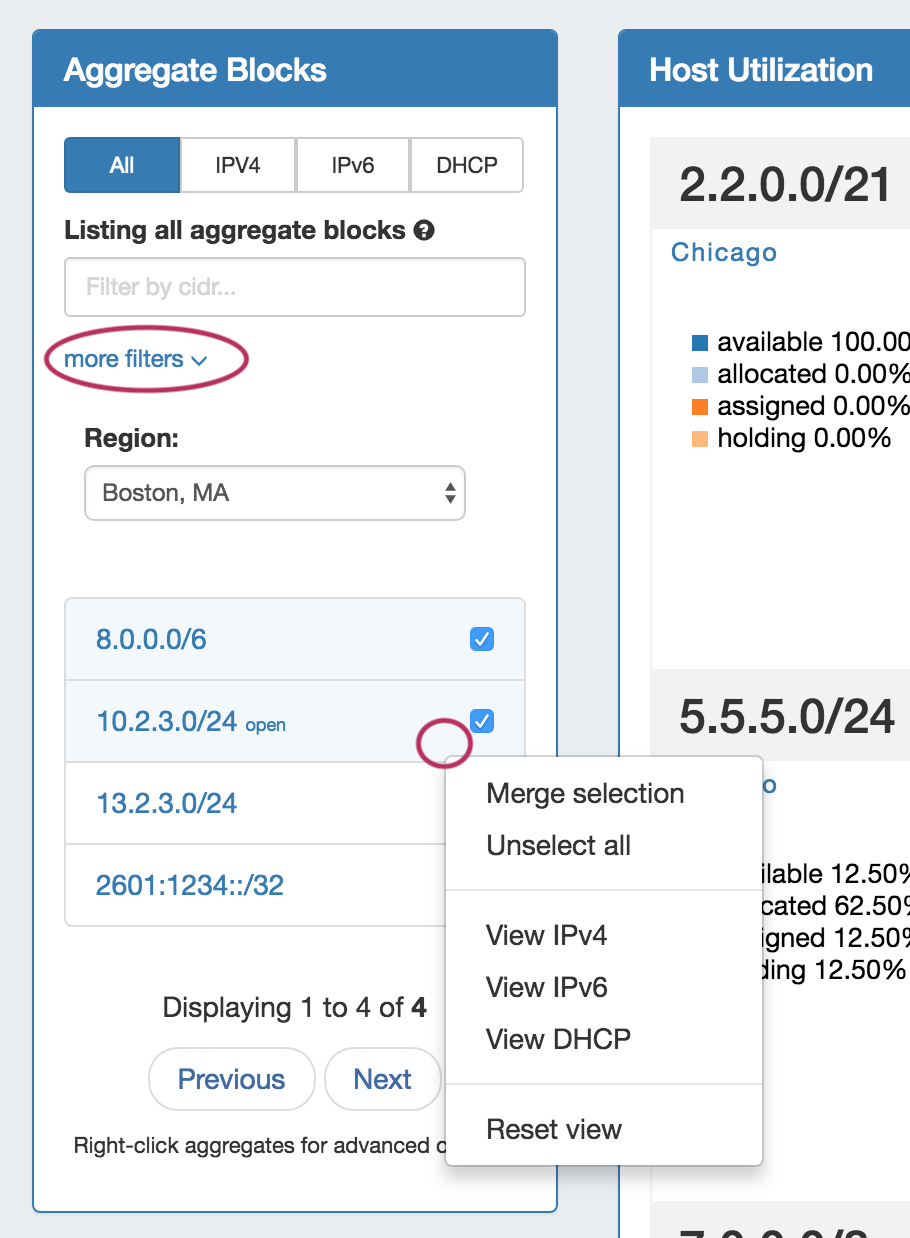
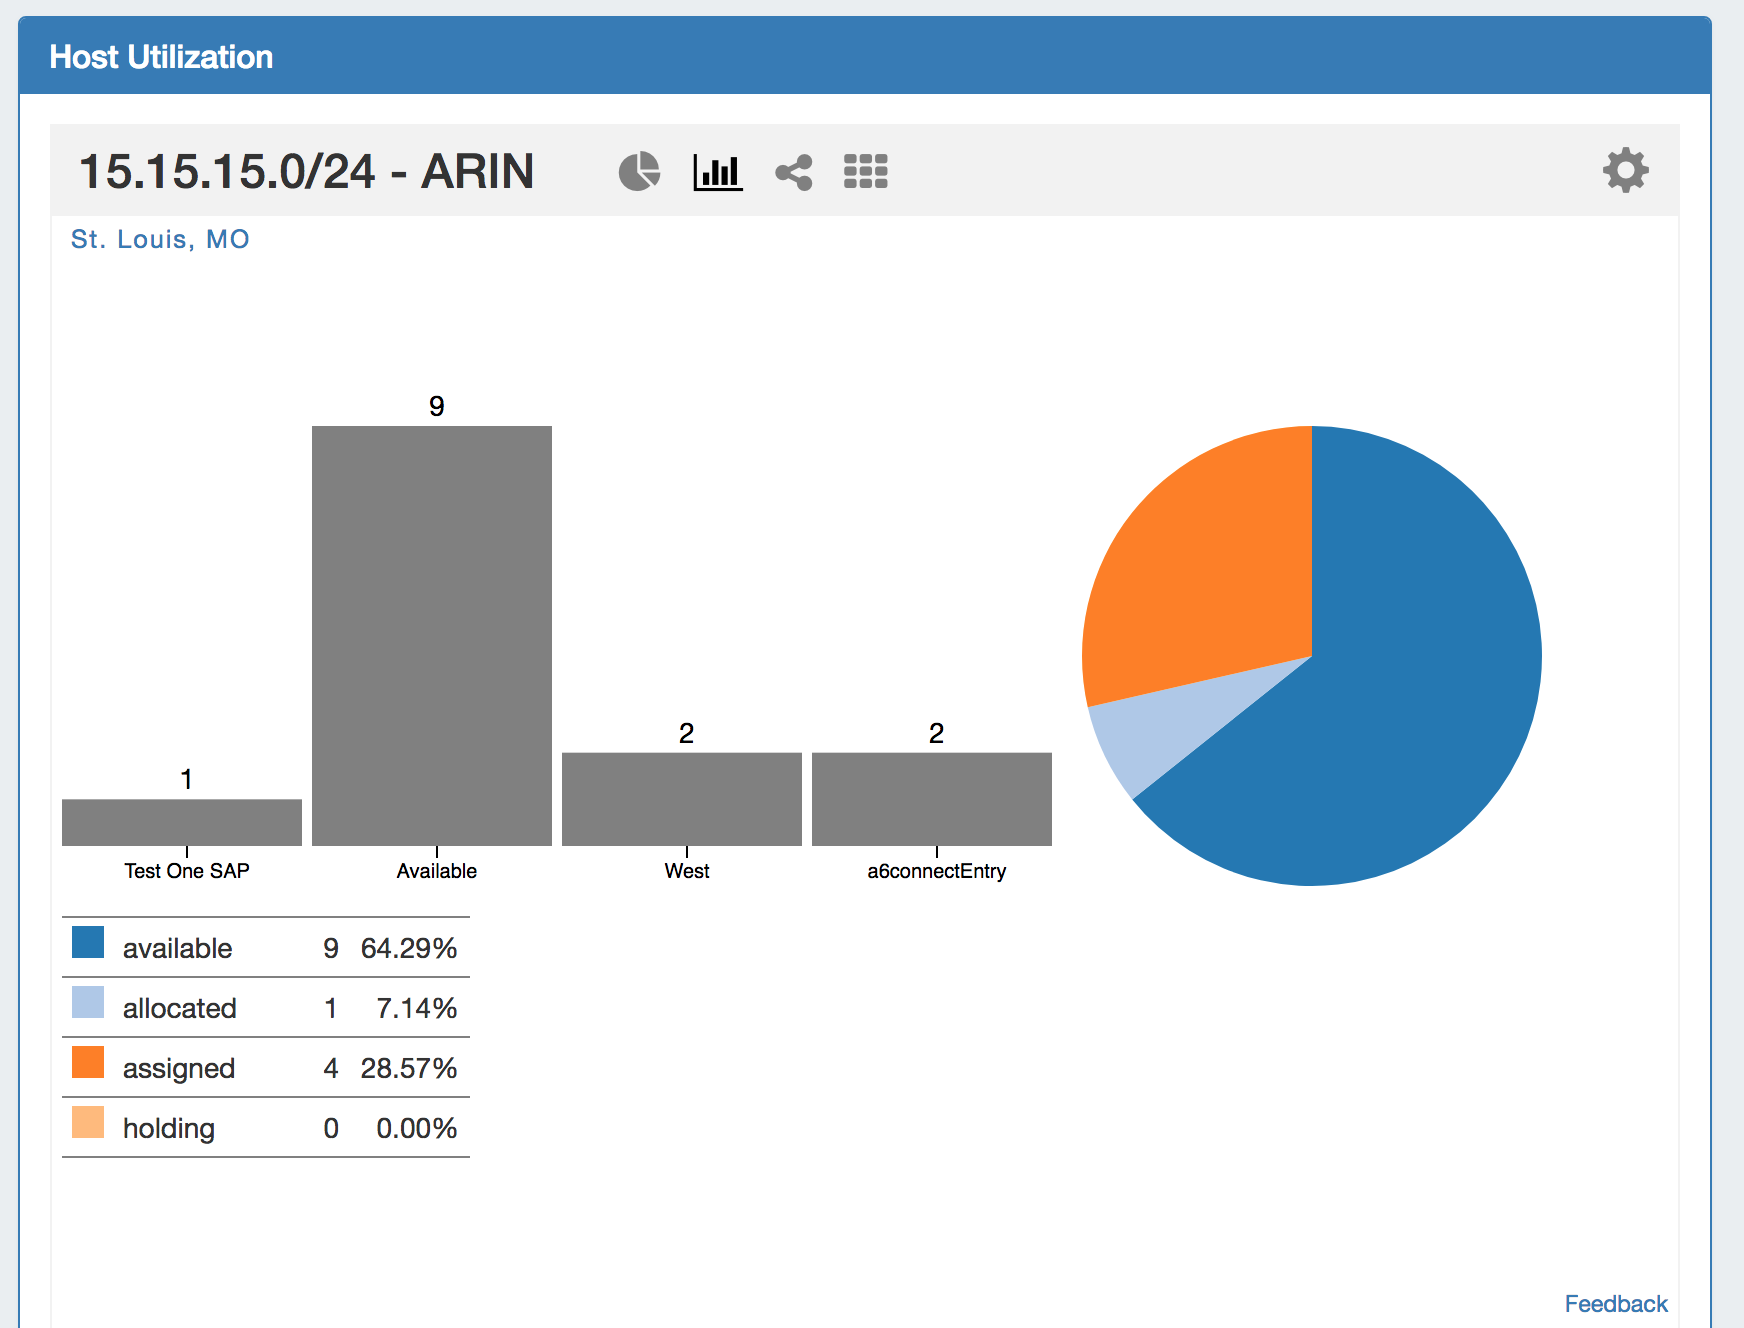
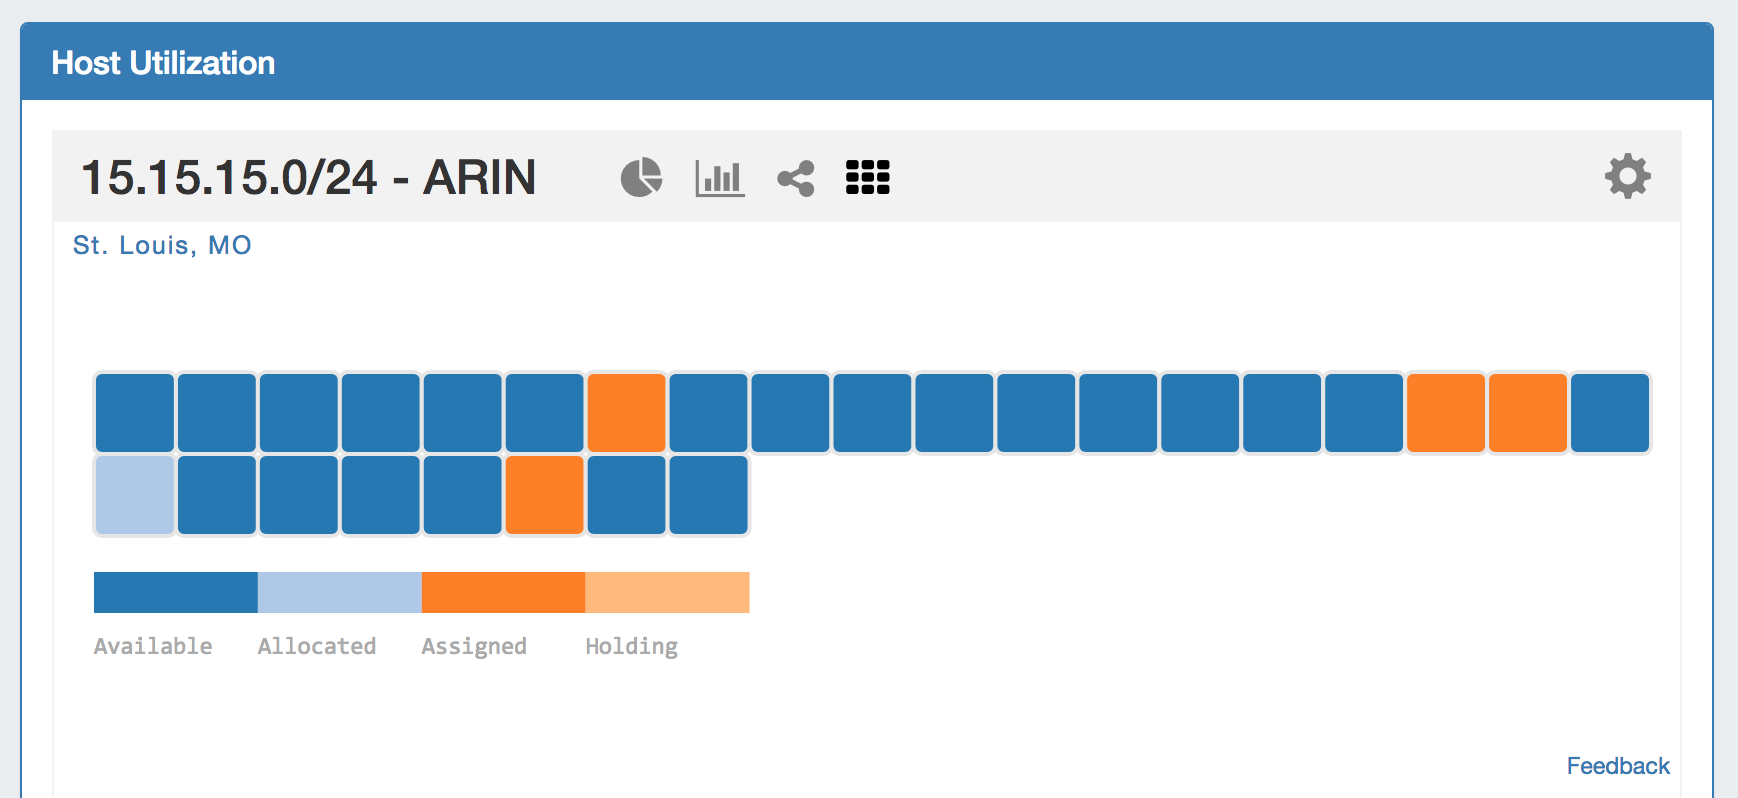
Host Utilization
Host Utilization Aggregate List updates include:
| Expand |
|---|
Simplified the Action menu (Gear Icon) to "Edit" (Open IPAM Manage for the Aggregate) and "Delete" (Delete Aggregate). Alerts, Auto-Split, and Clean up functions have been moved into the IPAM Manage page for the Aggregate. Added More Charts! Four Charts are now available: Pie (standard), Bar (by resource), Tree (hierarchy), and Grid (Block detail). To access these, click on the chart icons in the Aggregate Header.
|


IPAM Manage
IPAM Manage Updates Include:
...
See IPAM Tab for additional details on working with IPAMv2.
DHCPv3 - New DHCP Tab Updates
IM - 2648: The DHCP Tab has been updated to support DHCP Groups, an improved interface, and improved backend functionality. See DHCP Tab for details on working with the updated DHCP system.
Three new DHCP areas have been added - DHCP Groups, DHCP Servers, and DHCP Pool List. A fourth area, DHCP Logging, links directly to the Admin Logging Tab.
DHCP Groups:
The DHCP Groups page allows you to group DHCP Pools the same way ProVision allows zones under DNS Groups.
...
Refer to the Working with DHCP Groups documentation for additional information.
DHCP Servers:
The DHCP Servers page shows a list of DHCP servers, created via the "Add Server" button. Supported server types are ISC BIND or Cisco Prime Network Registrar. During server creation, you may select to attach it to a DHCP group, or leave it unattached.
...
Refer to the Working with DHCP Servers documentation for additional details.
DHCP Pools:
The DHCP Pools list provides the same pool-level functionality as the DHCP Groups pool lists, but includes all pools regardless of Group attachment. New subnet or host Pools may be added by clicking "Add Pool".
...
See Working with DHCP Pools for additional information.
Peering v2 - New Peering Tab Updates
IM - 2946 Updated the Peering tab to support Peering v2, including new peering pages, improved UI, and direct data connections to Peering DB.
General
Peering v2 has an improved backend, interfacing with Peering DB's new API. Users may chose to use PeeringDBs "main" or "beta" systems, by editing PeeringDB_URL in ProVision's global configs.
...
See Peering for additional information.
IXs Subtab
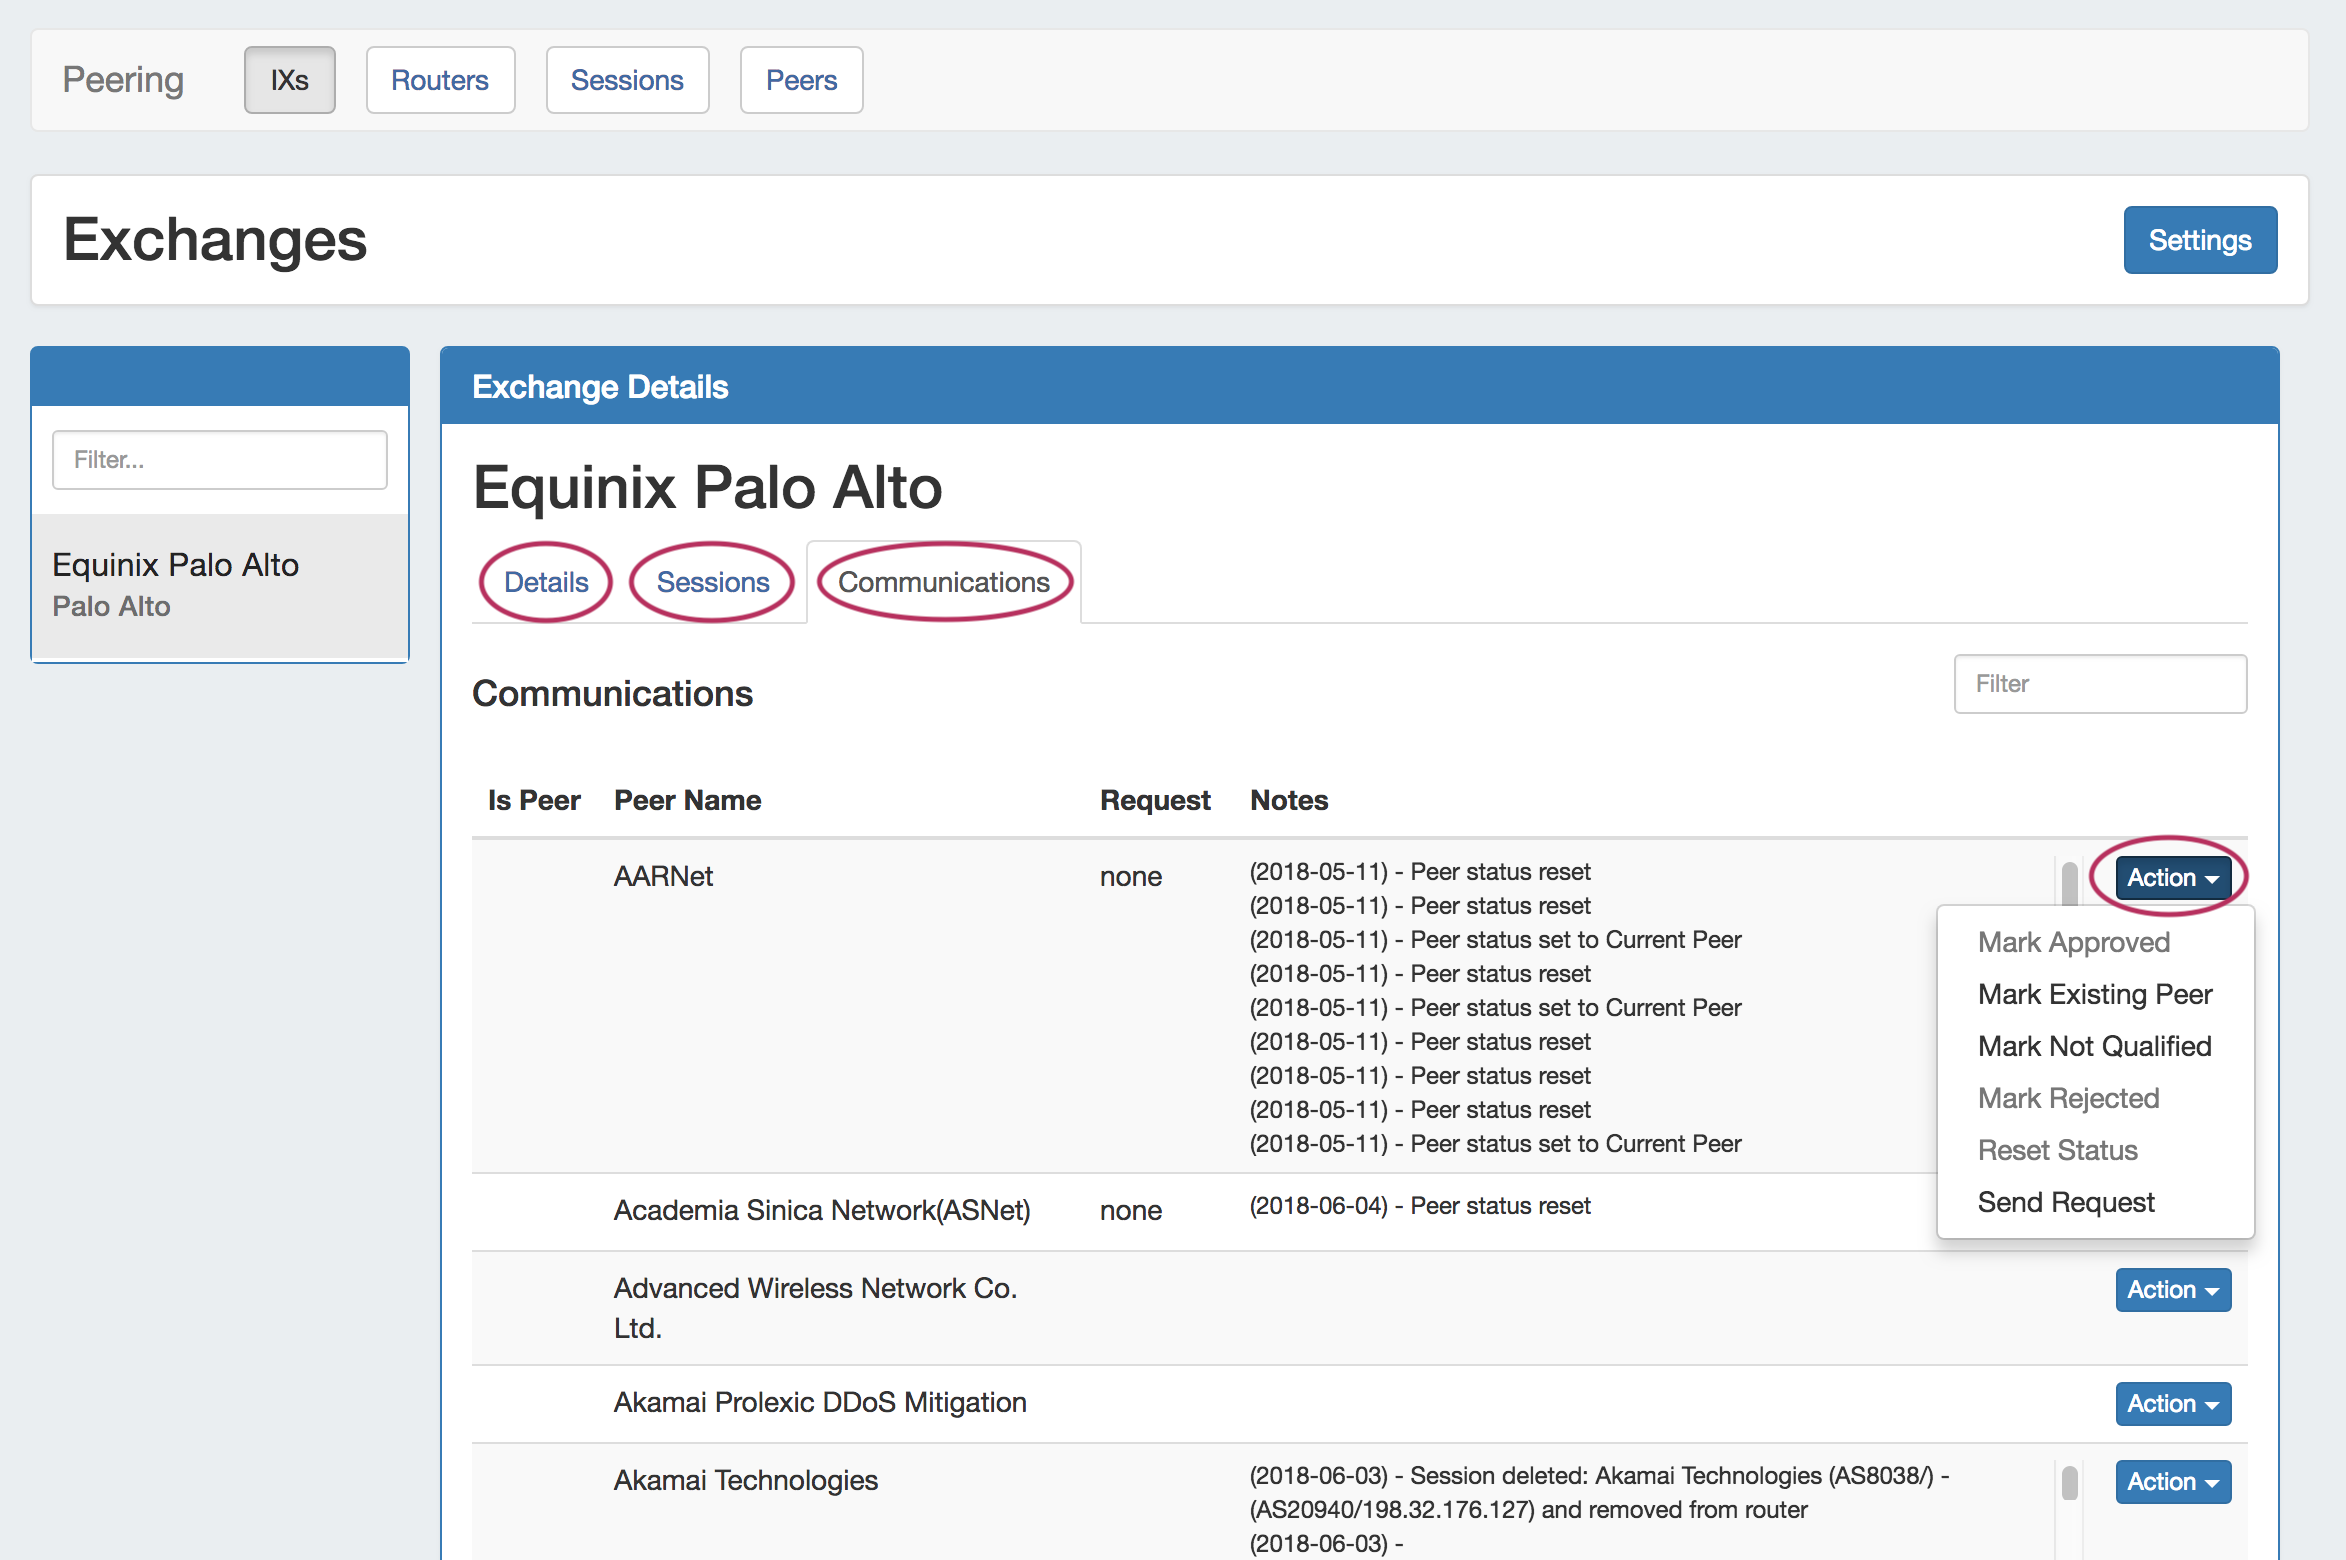
The Exchanges subtab shows the list of exchanges current set in ProVision, with IP type, city, peers, and session counts.

Routers Subtab
| Expand |
|---|
Clicking on an exchange in the exchange list will bring up an exchange details page, where Exchange Details, Session Details, and Exchange Communications may be viewed and managed.
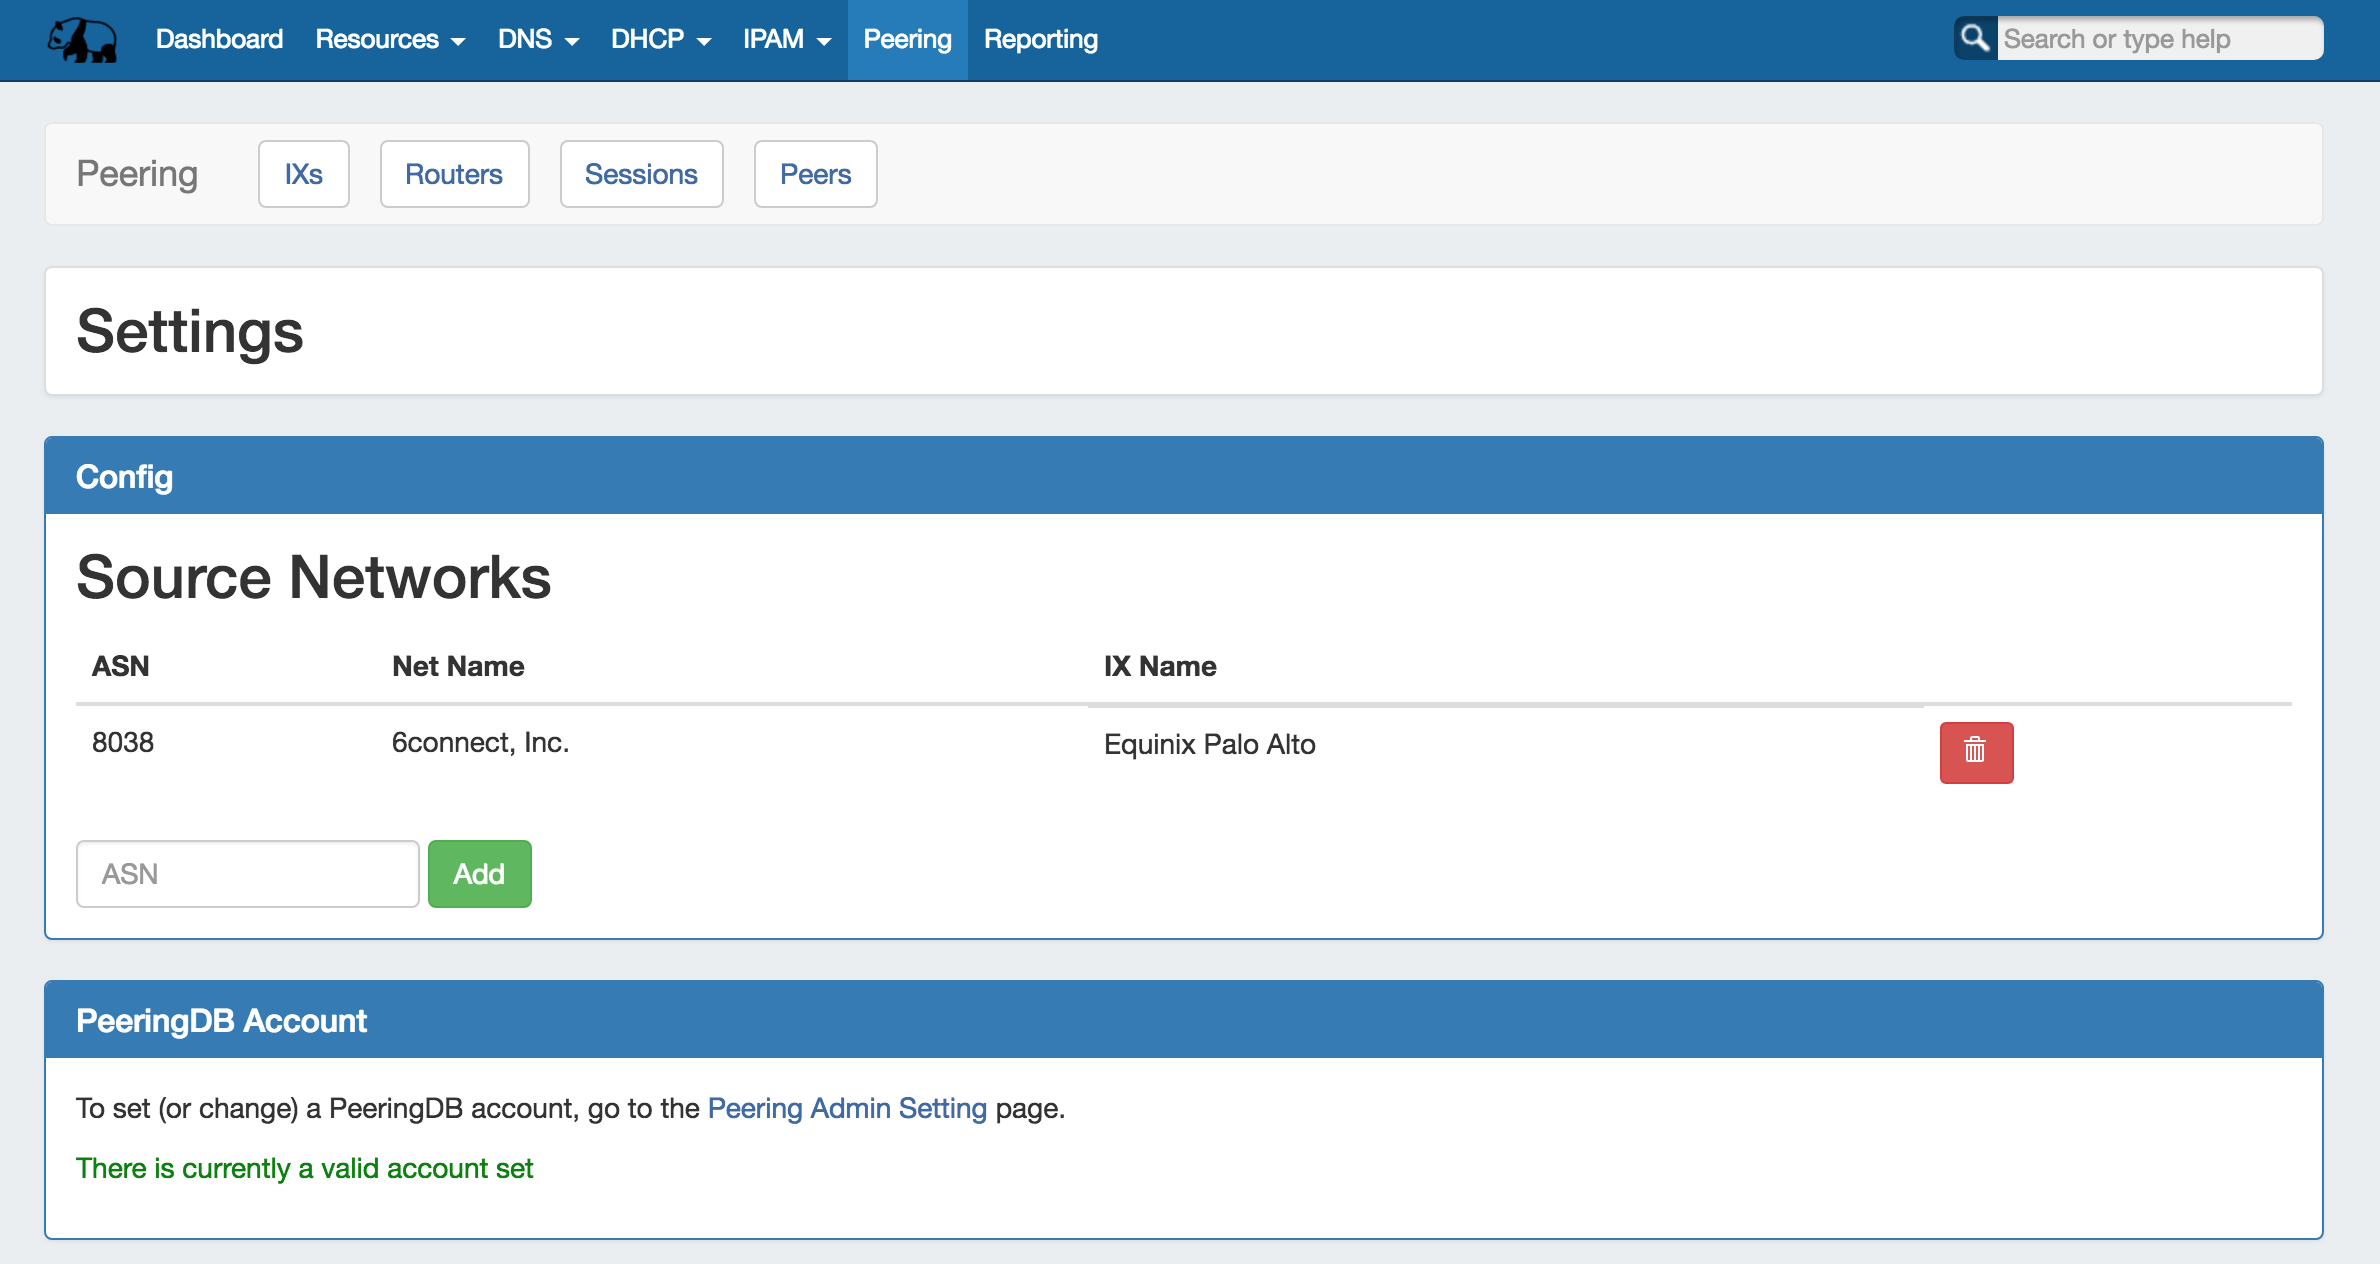
ASNs and PeeringDB account settings may be edited by clicking "Settings" in the IXs or Exchanges pages, or by going to ProVision's Admin settings page.
See Peering Exchanges for additional information. |
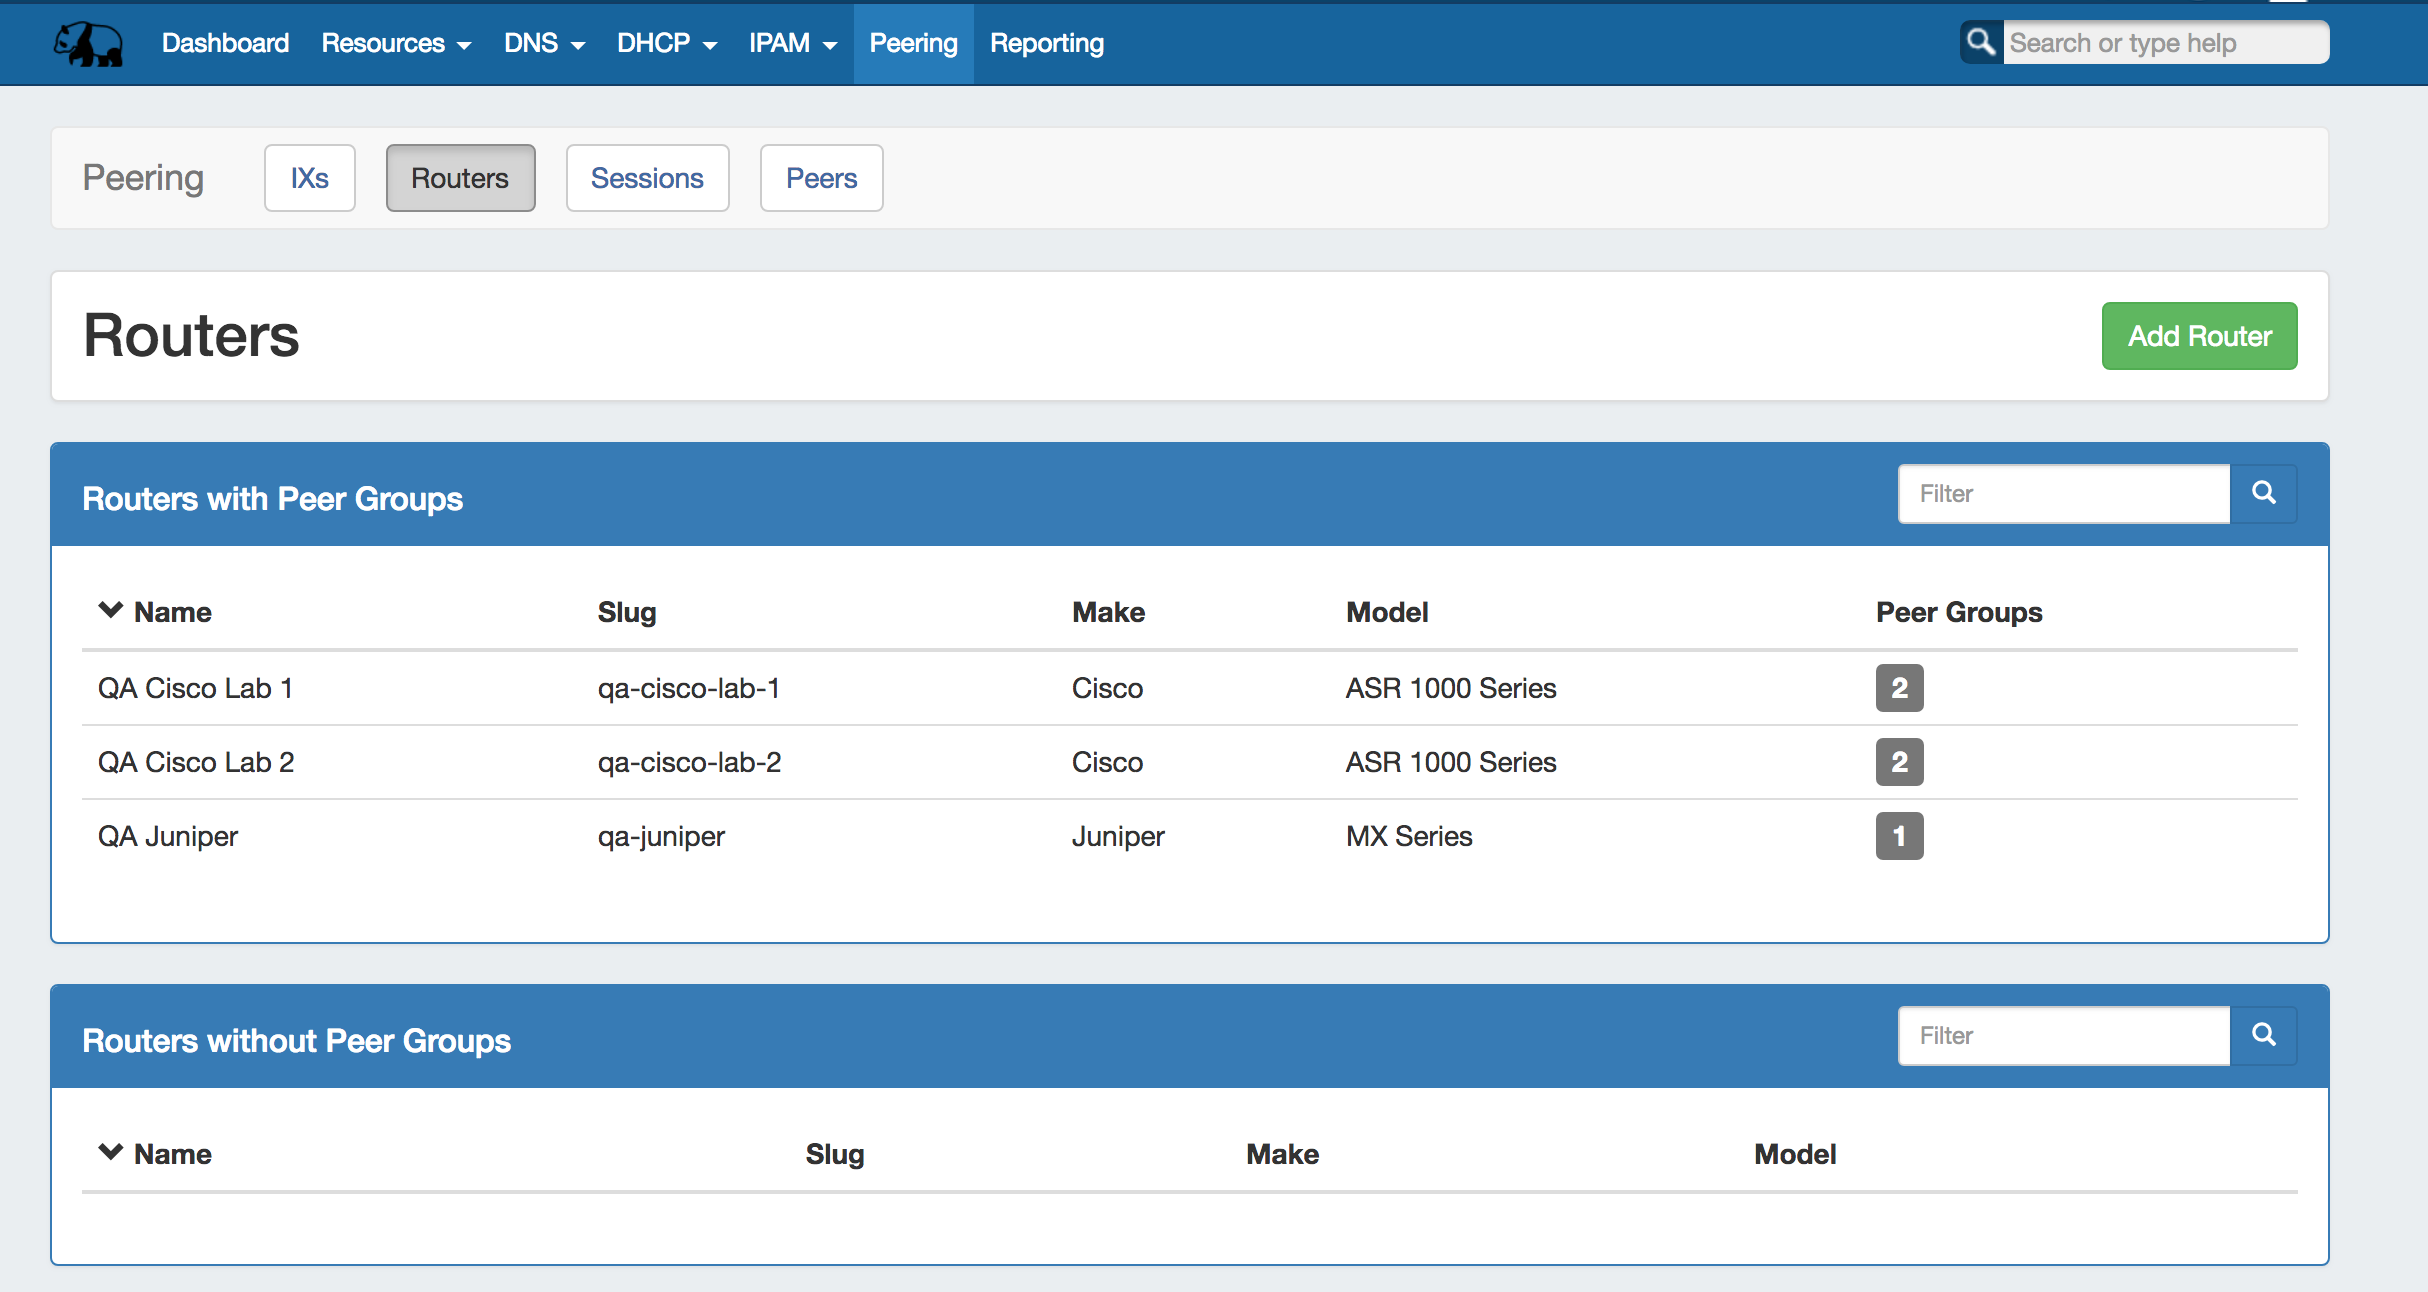
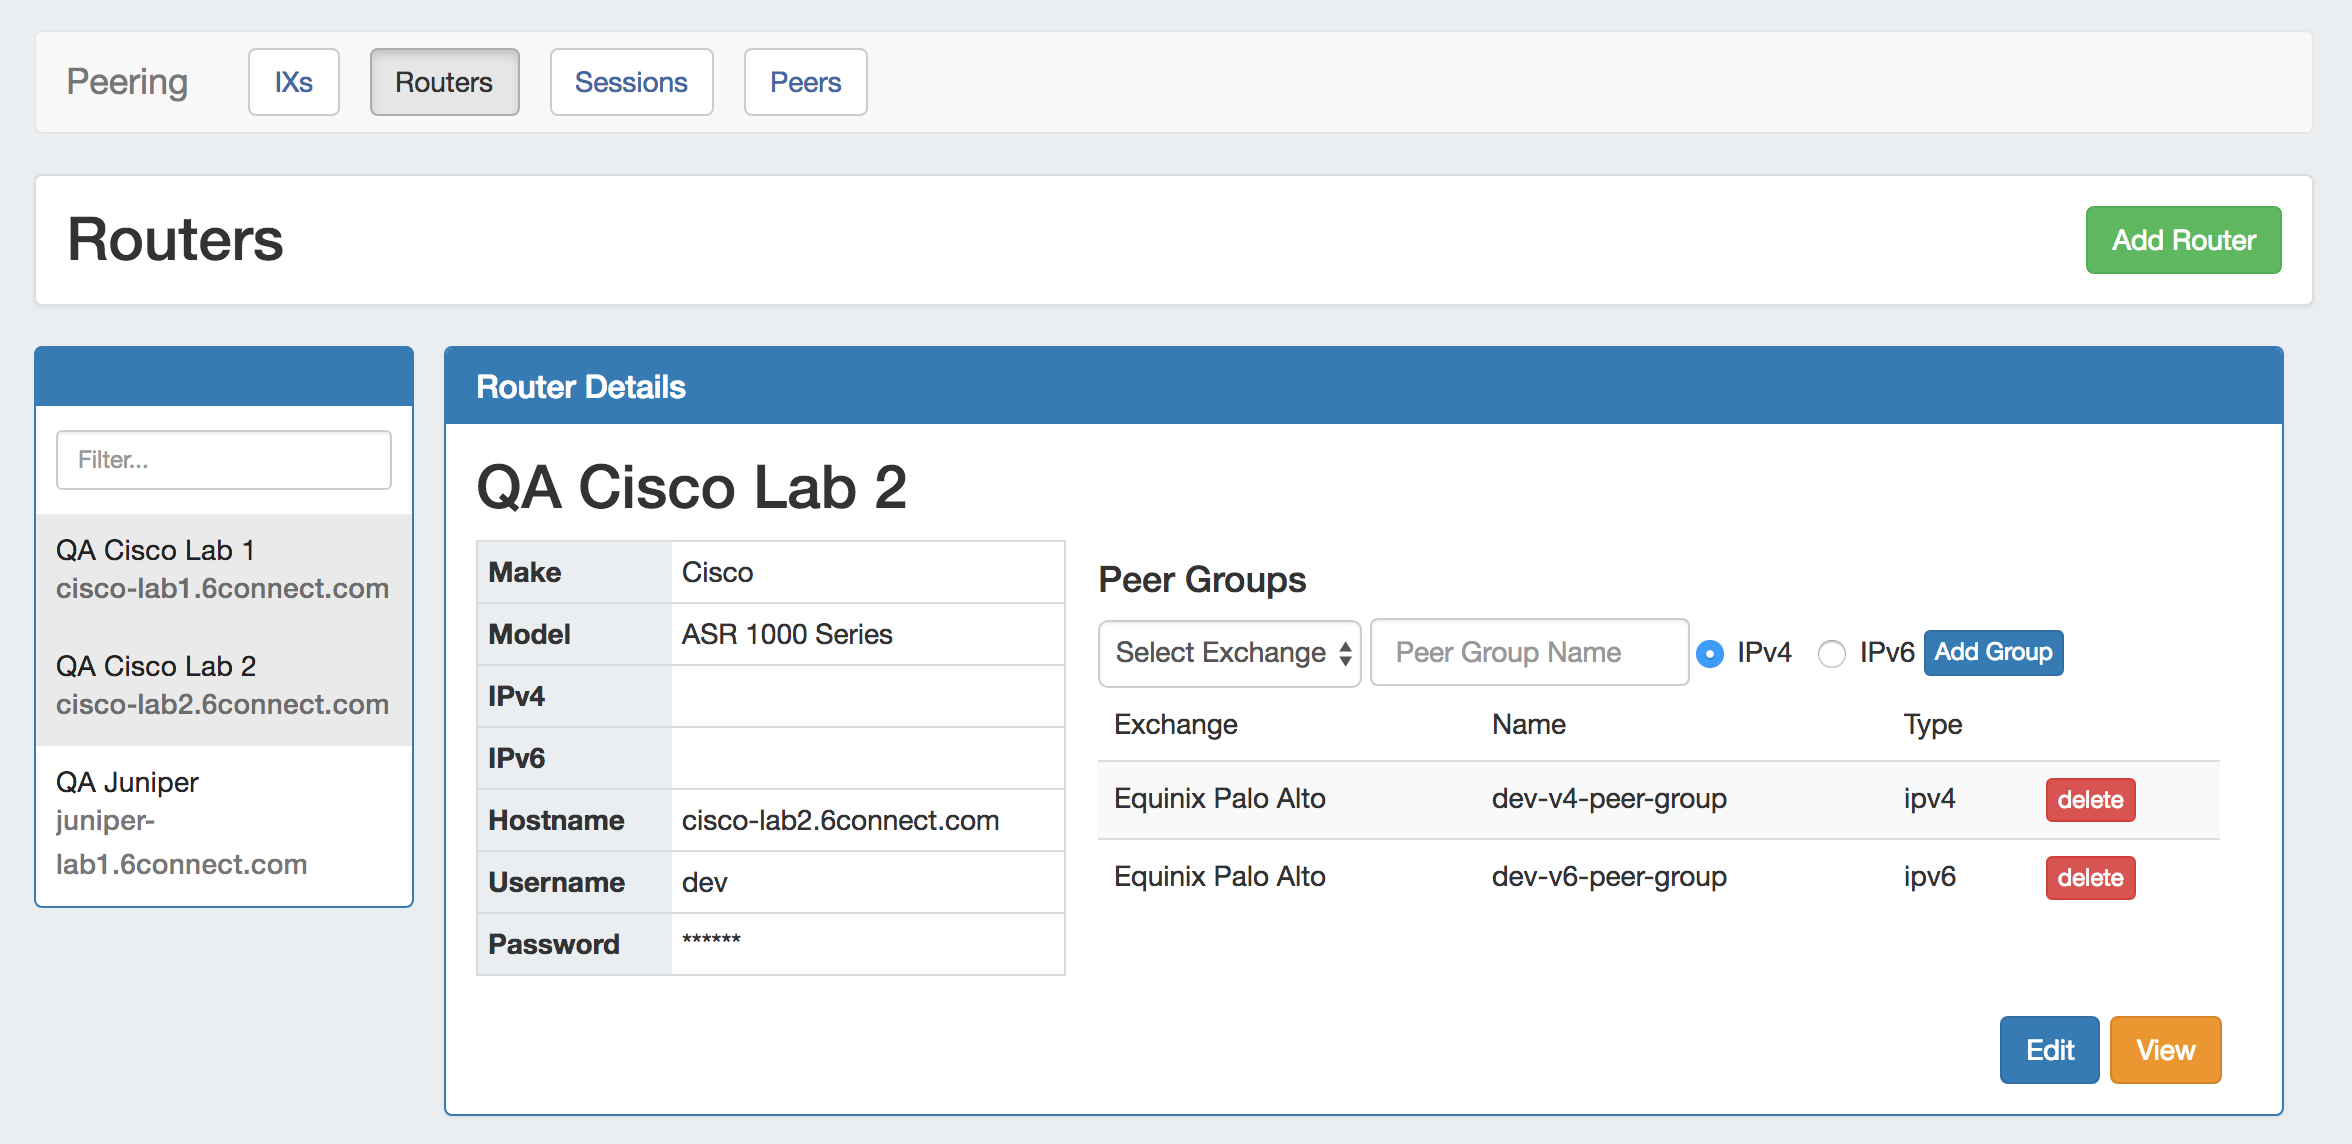
Routers Subtab
The Routers subtab is where The Routers subtab is where routers may be added and managed. Routers are divided into two lists - those with Peer Groups, and those without.
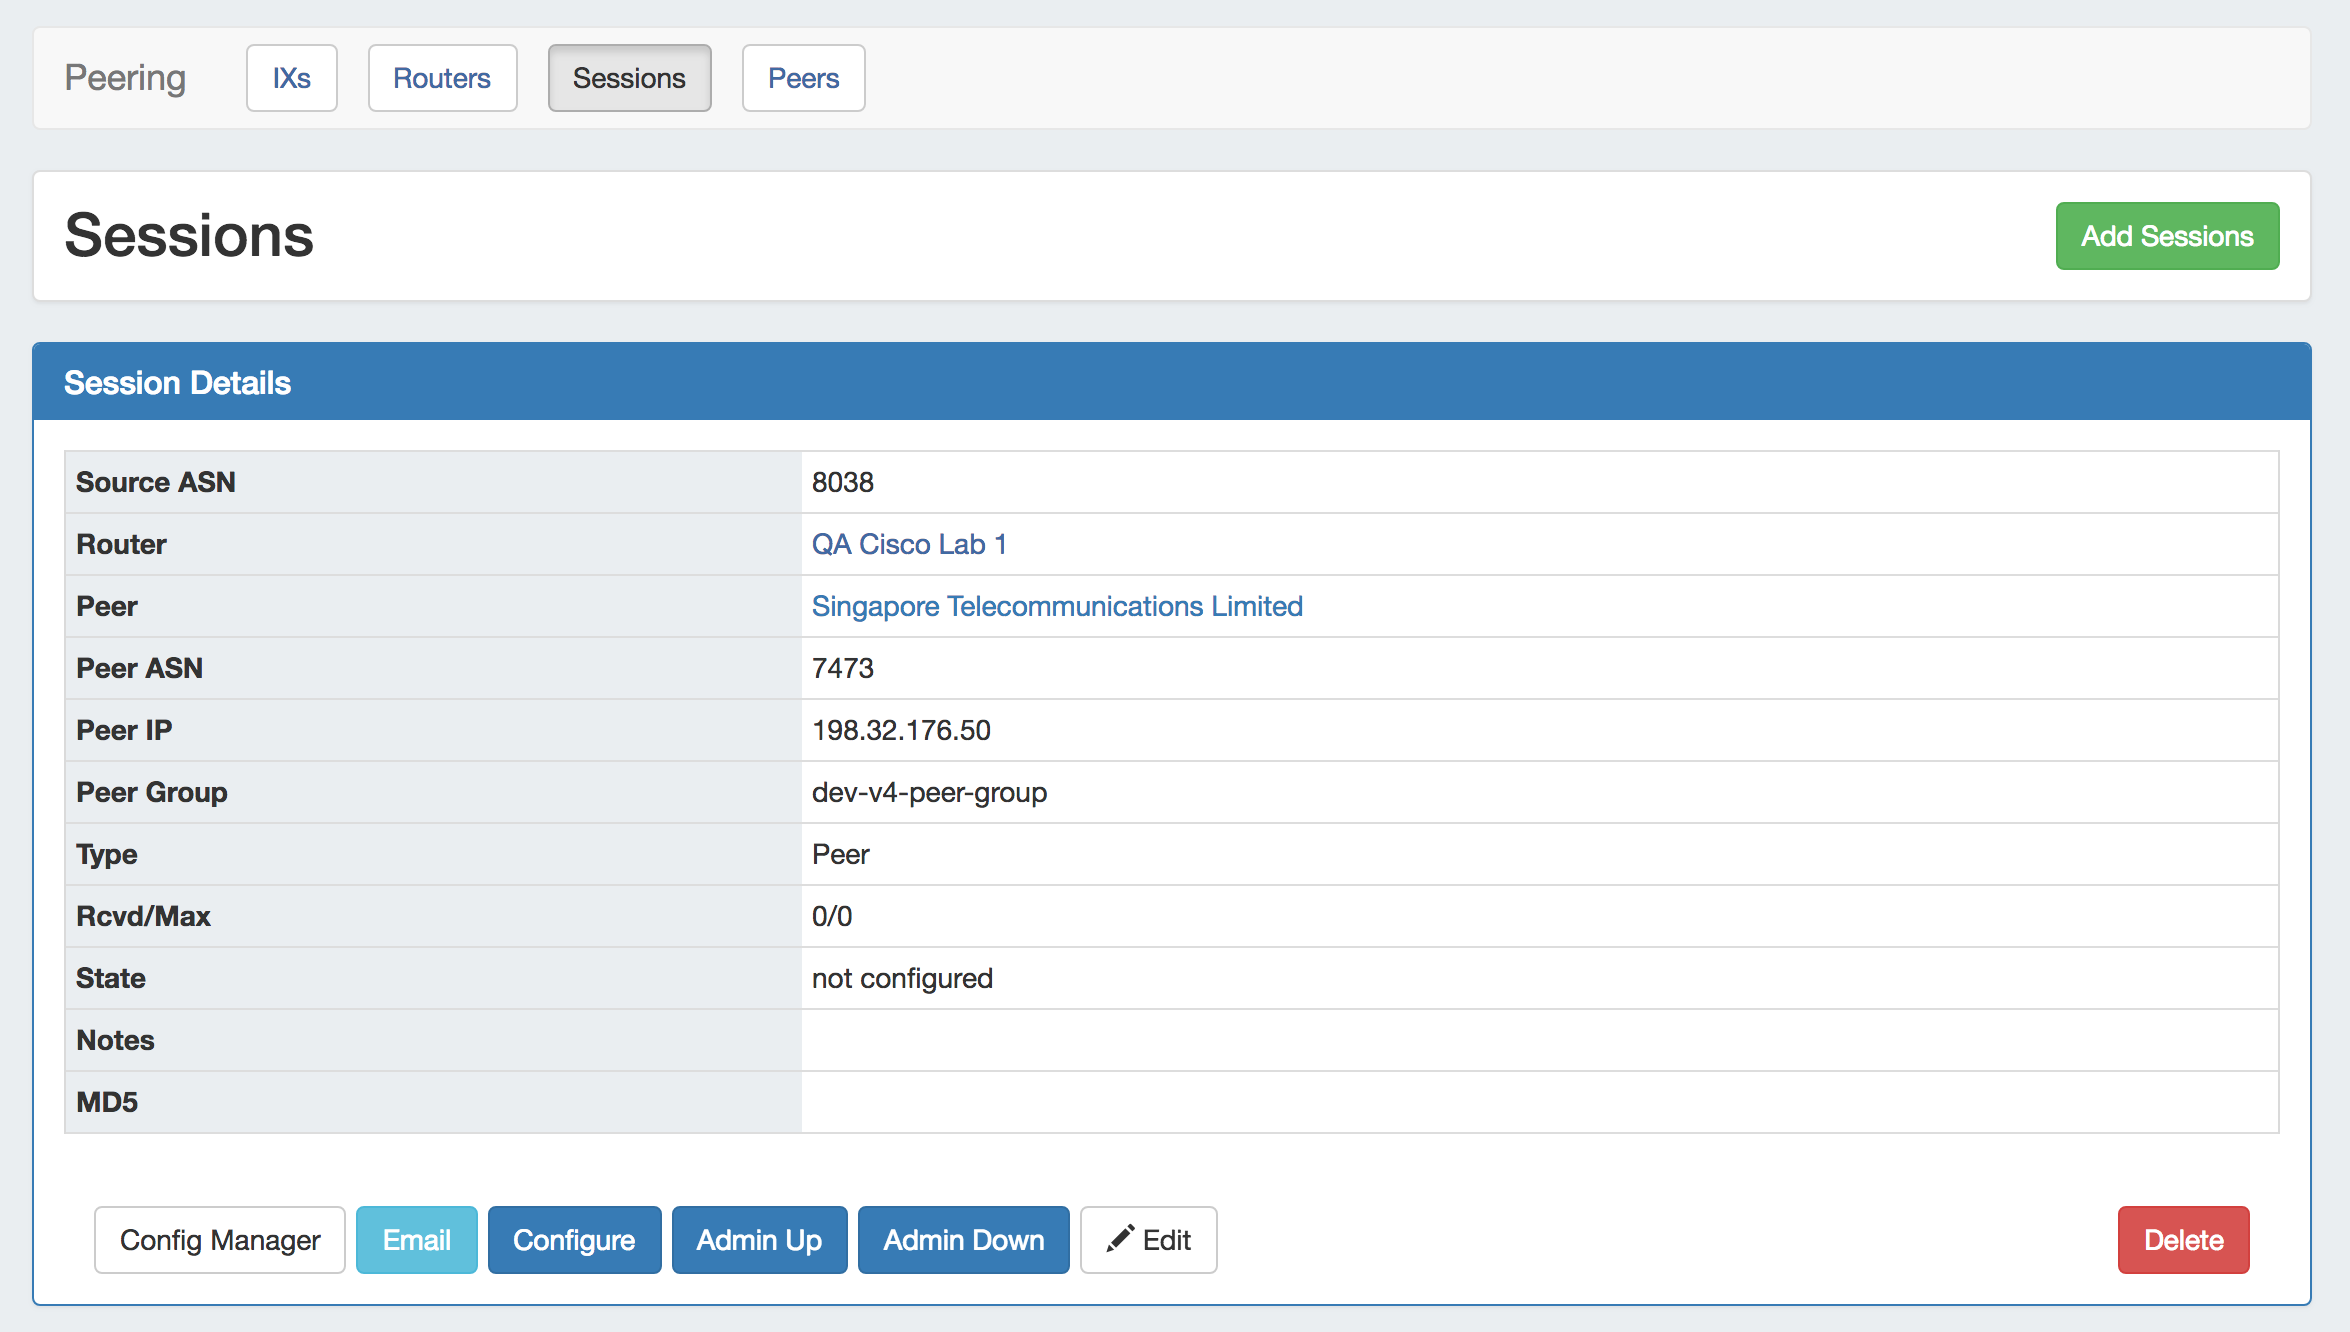
Sessions Subtab
The Sessions subtab is where current sessions may be added, managed, and updated.

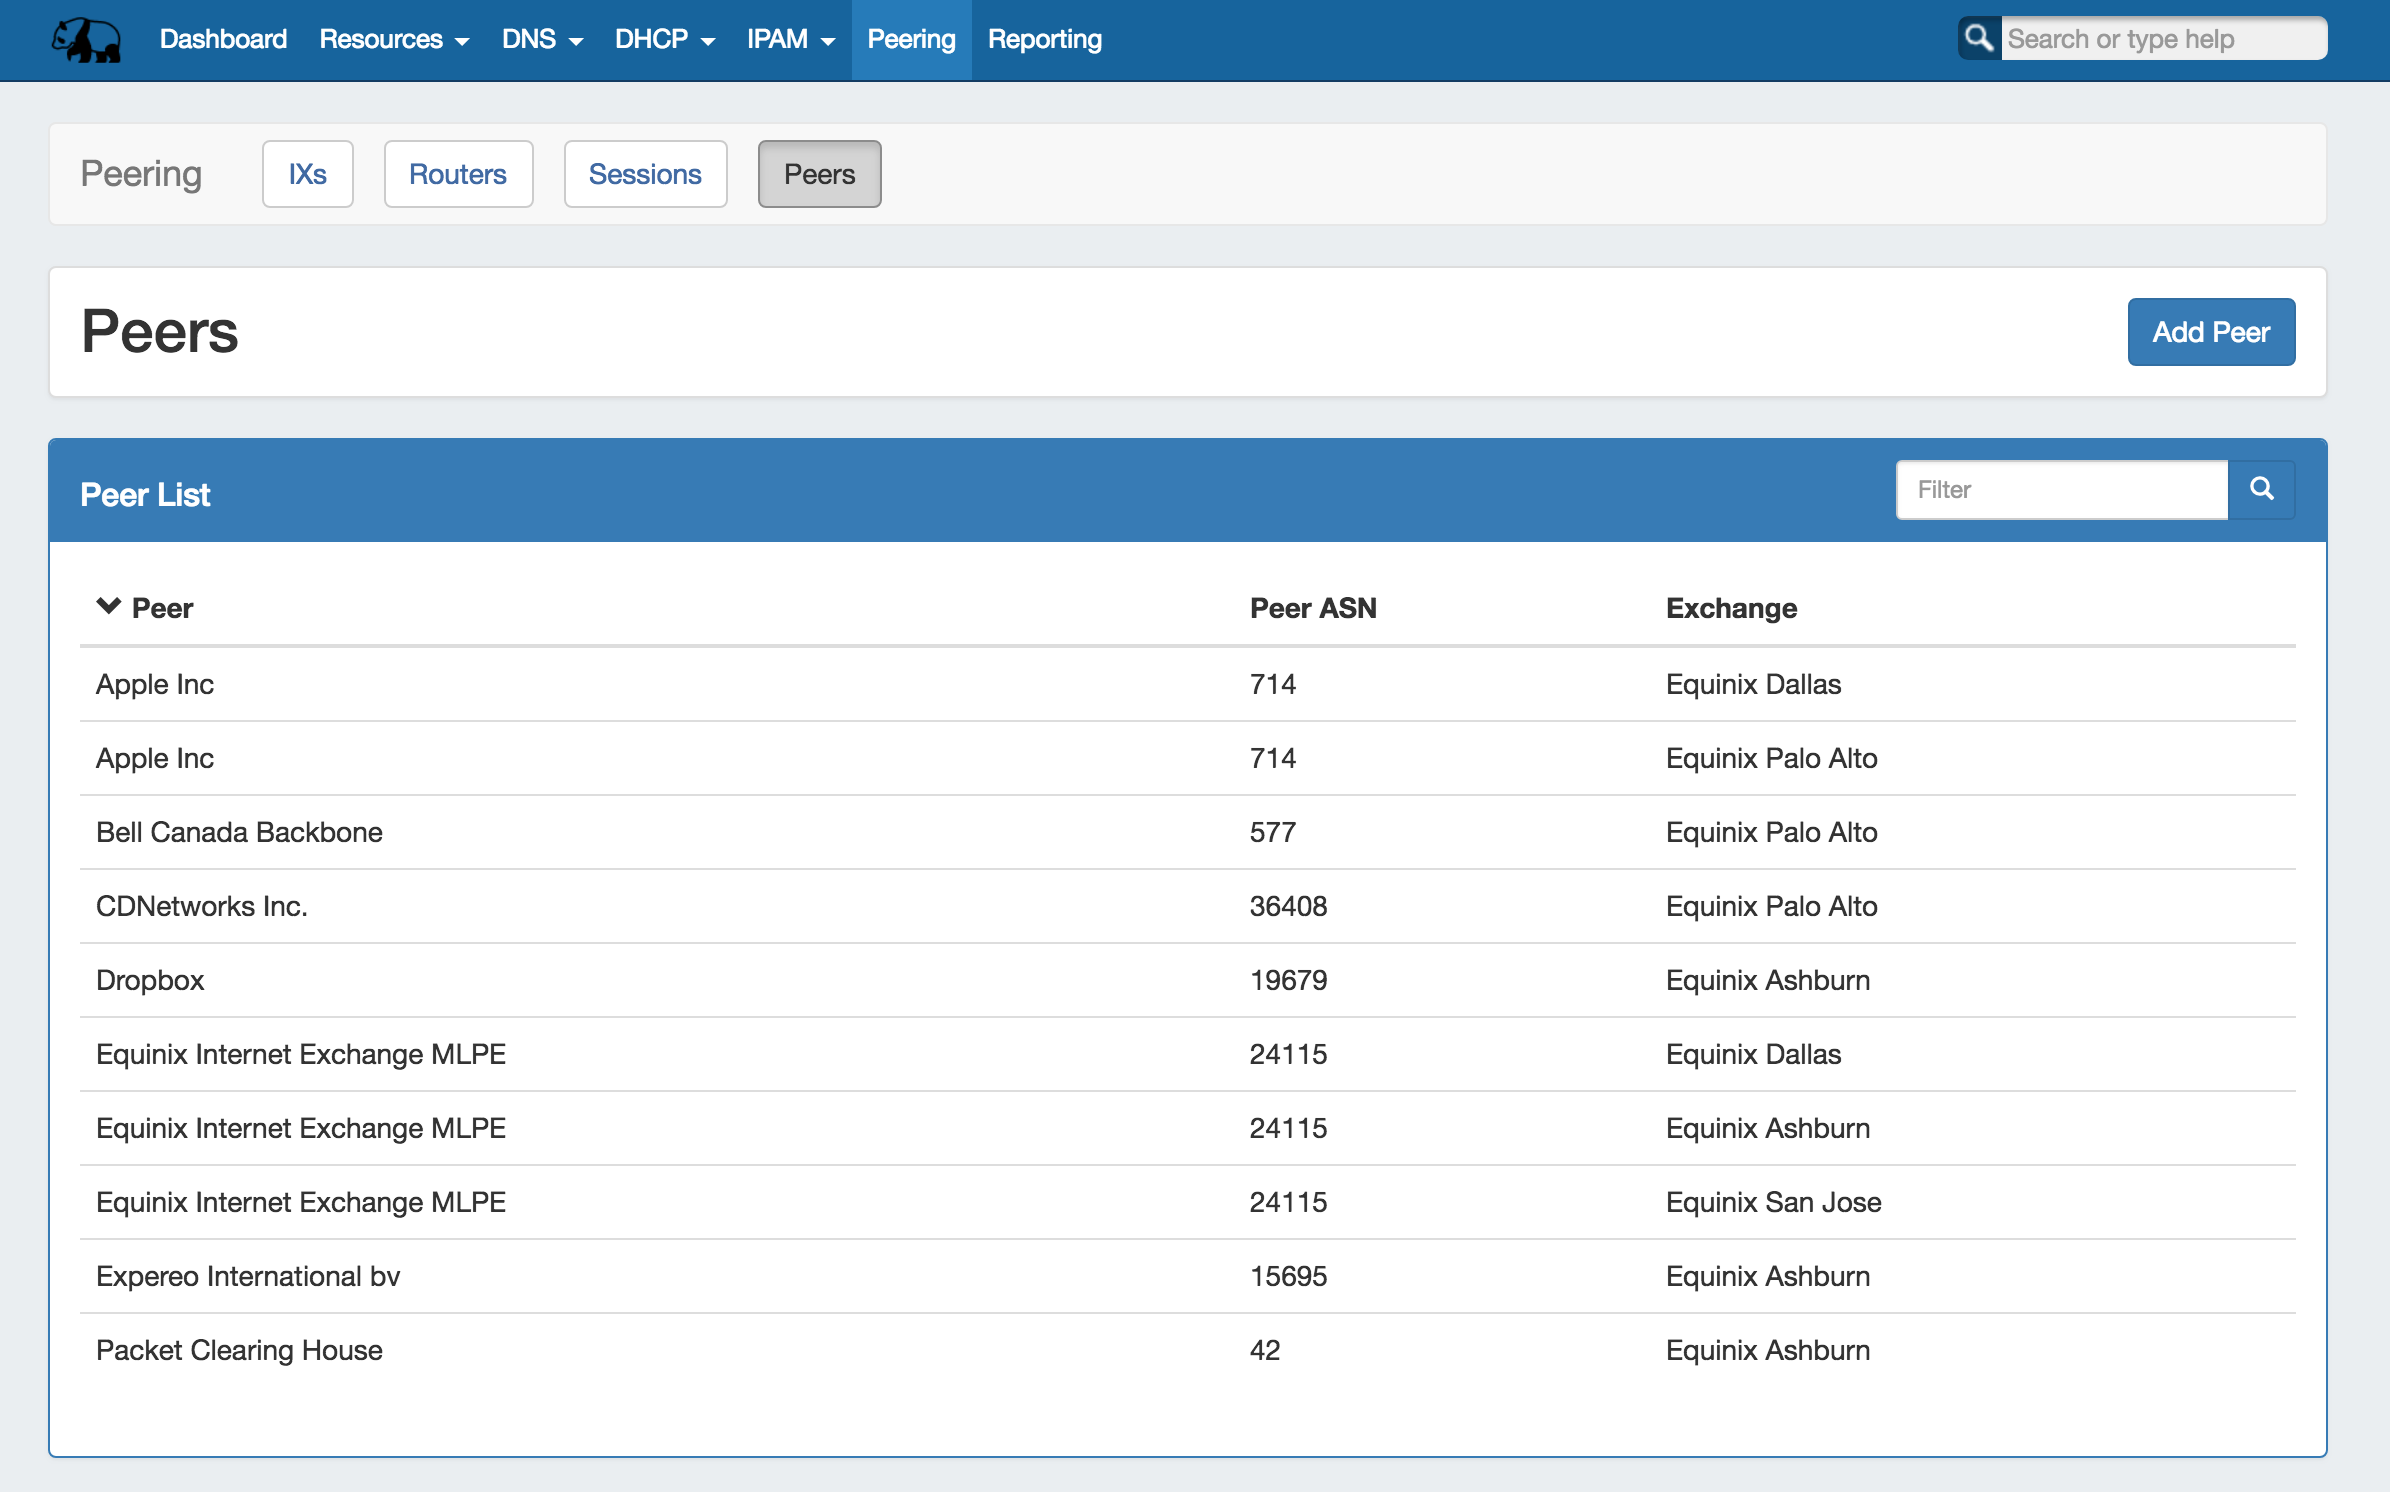
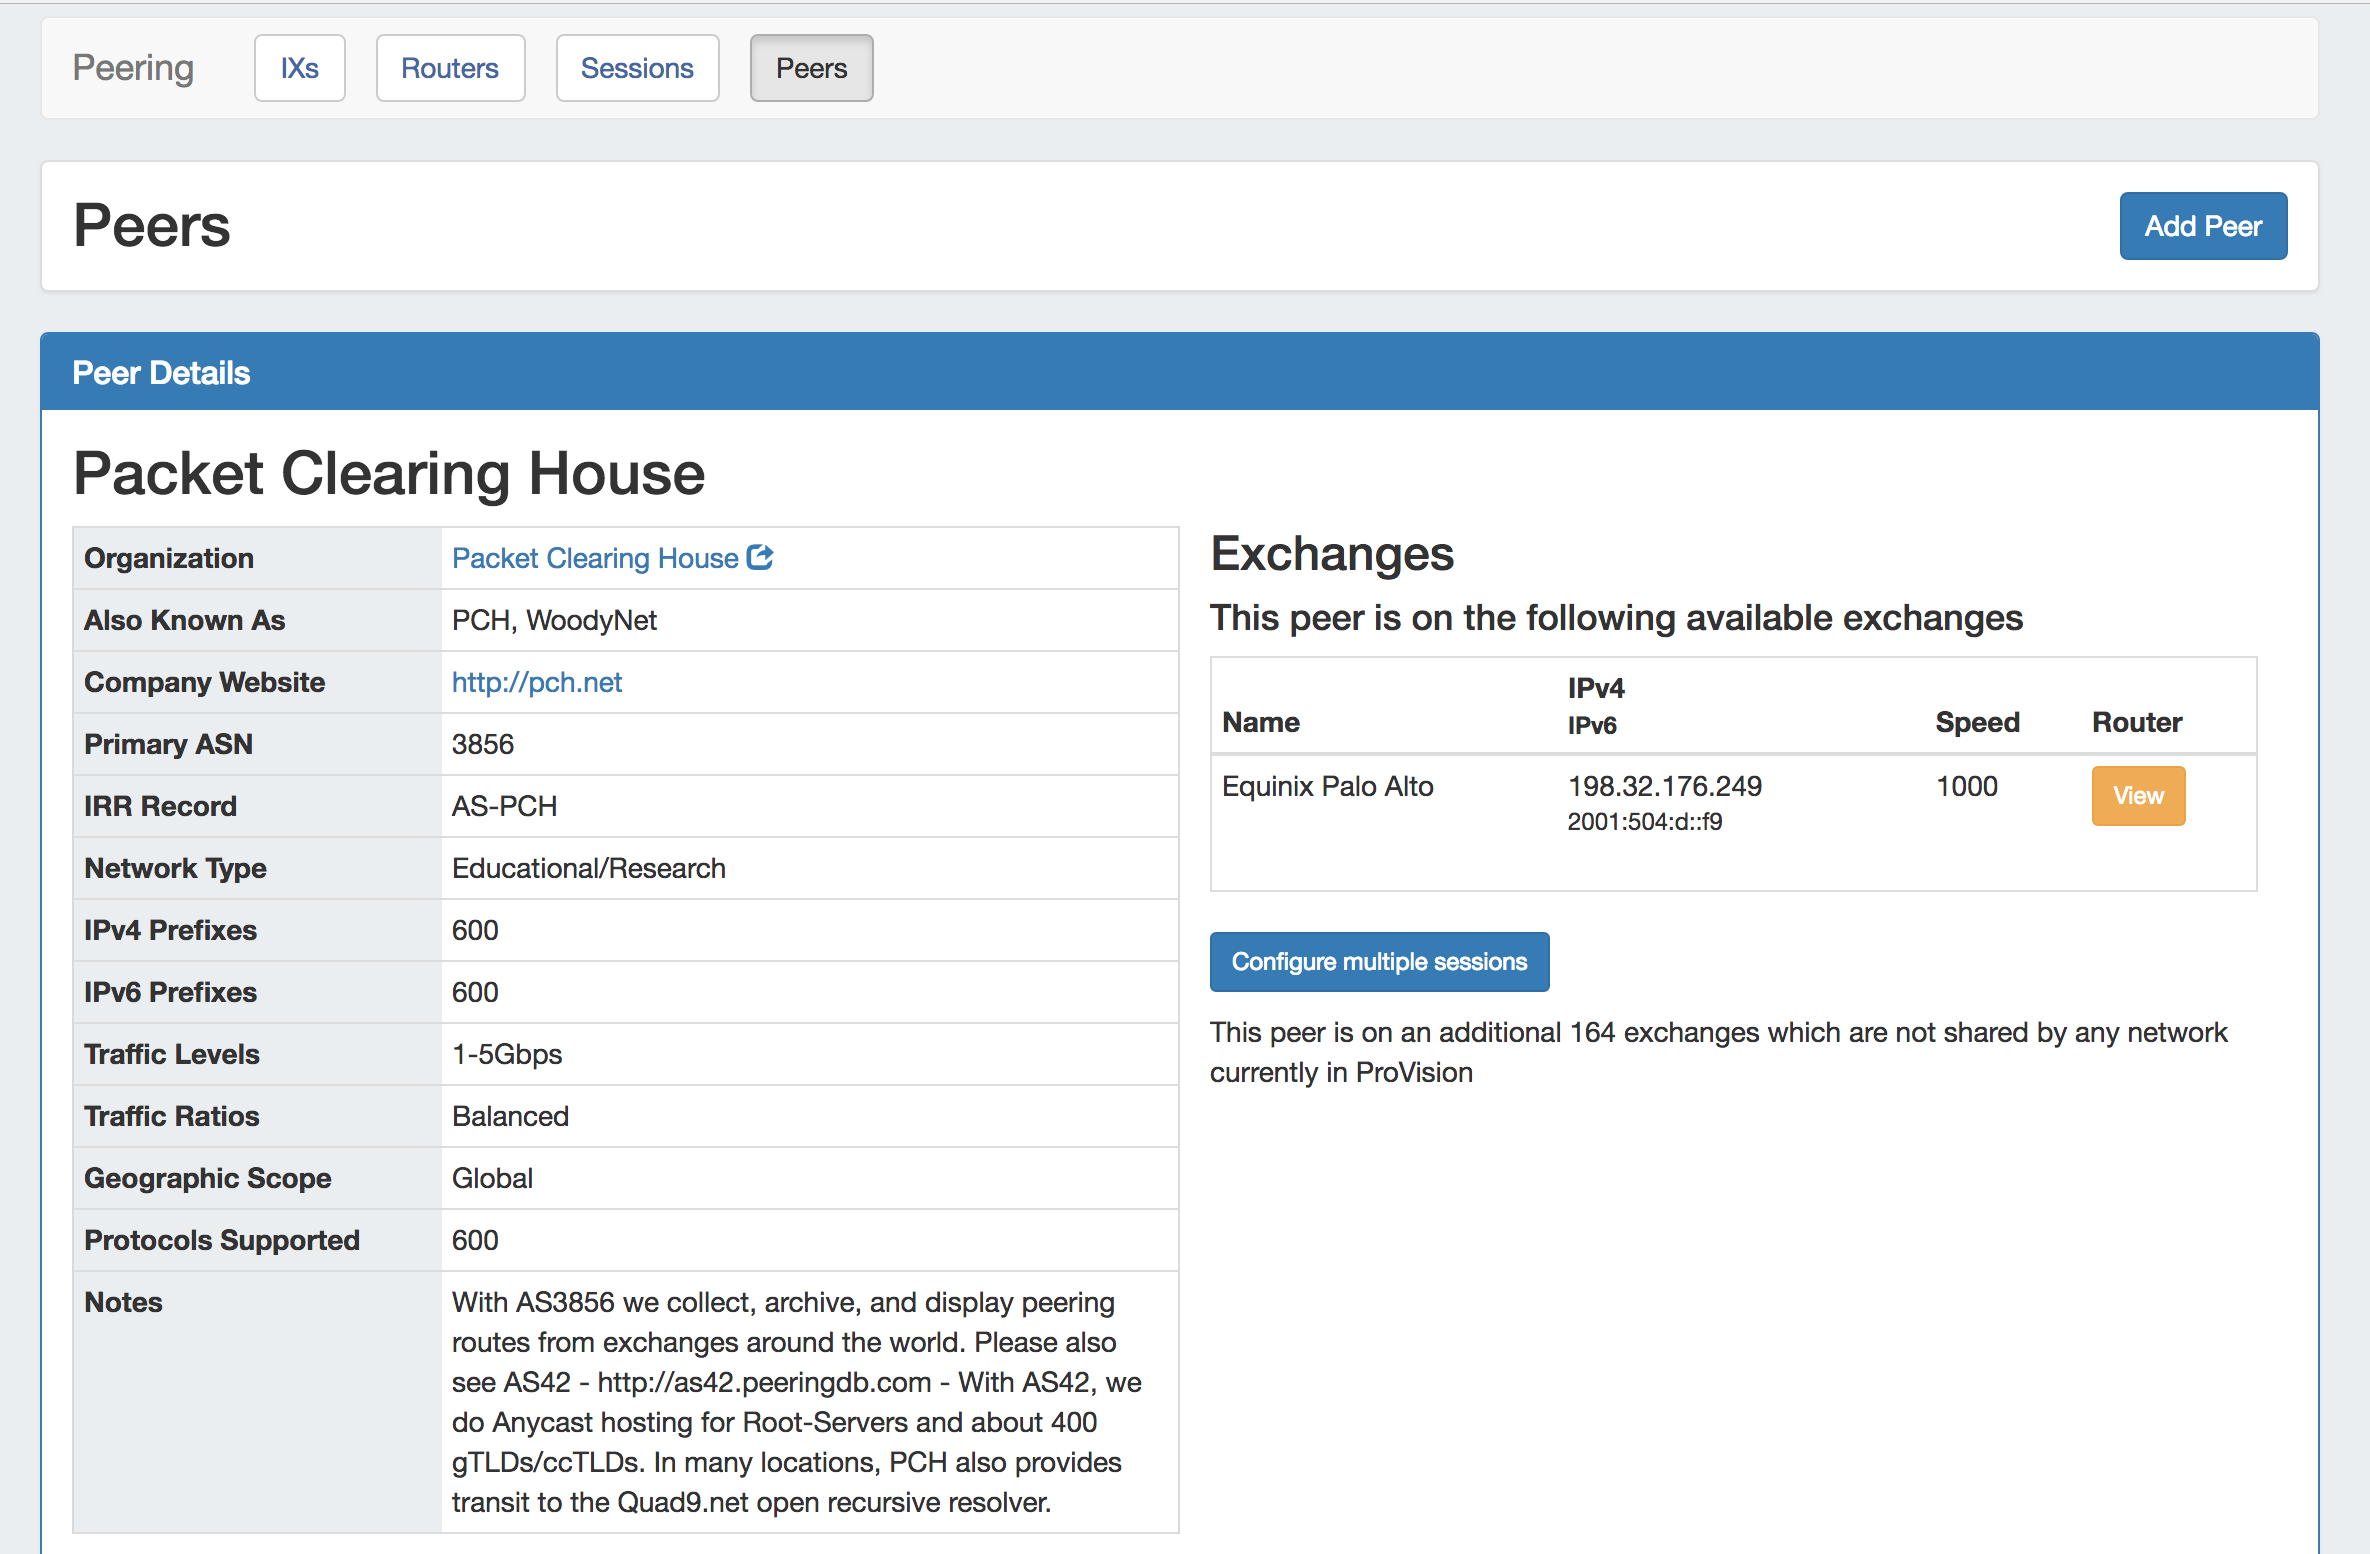
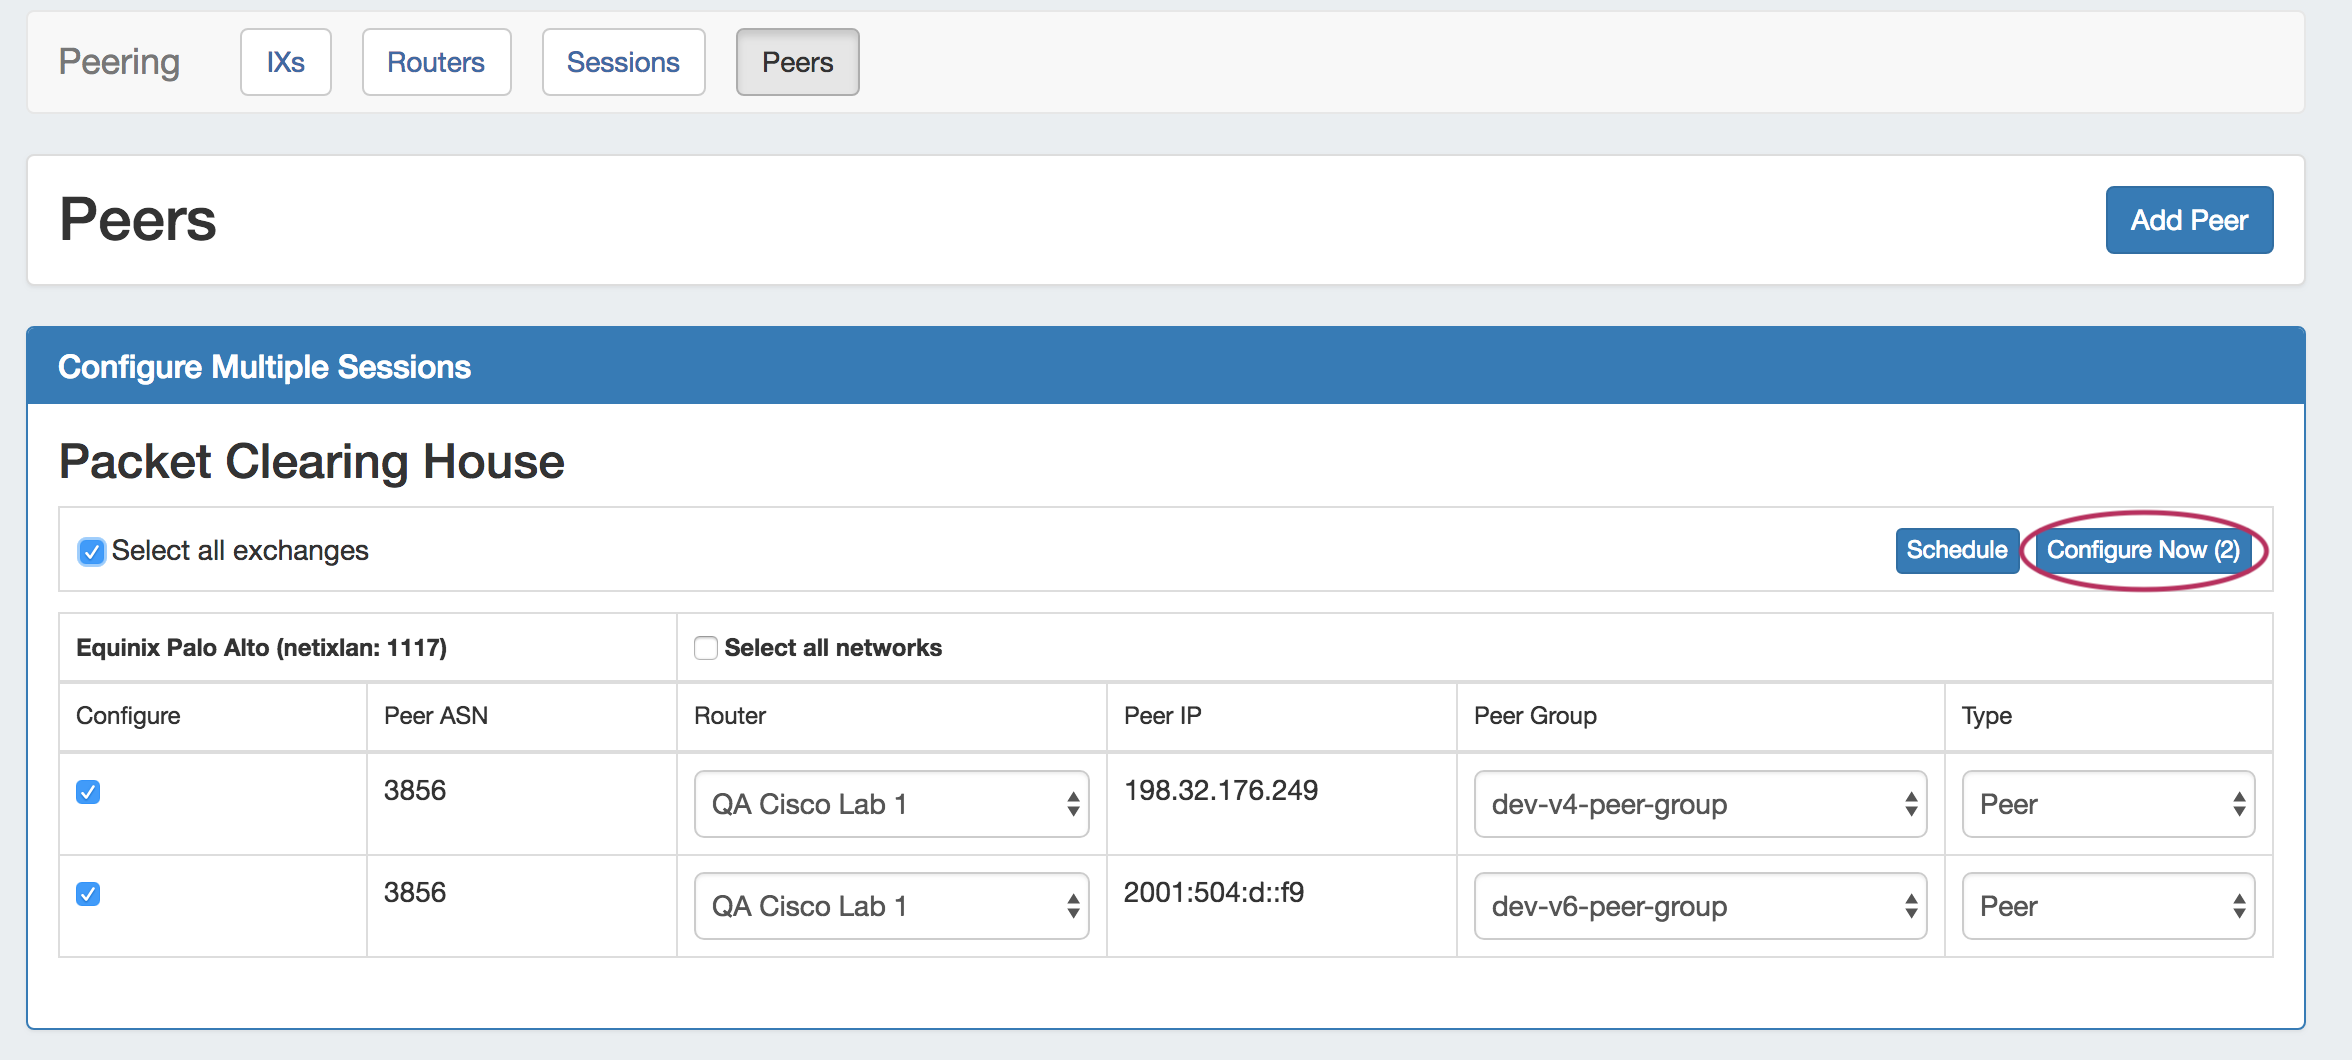
Peers Subtab
The Peers subtab lists existing peers, and allows for you to search for new peers to add via the "Add Peer" button.
Additional Features / Improvements
ProVision Backend Updates
IM - 2651, IM-2627: ProVision has been updated to support(and require) PHP 7.1 / PDO and mySQL 5.7. Local installation customers should ensure that they meet the software requirements for ProVision 7.0.0.
IPAM Manage - IPAM / VLAN Multi-Edit (IPAMv2)
IM-2077: IPAM Manage - Multi-edit now supports Domain and VLAN fields.
Customizable IPAM Columns (IPAMv2):
CFR - 109: The IPAM Admin "Lists Management" area has been updated with an "Edit Columns" page to support IPAMv2 column customization.
In "Edit Columns", you can change the column order, column name, and visibility of IPAM columns globally for IPAM areas in ProVision. See IPAM Parameters for additional details.
Updated IPAM Gadget (IPAMv2):
IM-2850, CFR-109, CFR-119, CFR-120, CFR-122: Created a new IPAM Gadget that supports IPAMv2, additional columns, user defined column order and visibility, and other improvements.
A new IPAMv2 Gadget is provided with the IPAMv2 7.0.0 updates!
The IPAMv2 Gadget will automatically replace currently enabled IPAMv1 Gadgets during the 7.0.0 upgrade. However, the IPAMv1 Gadget will remain available to manually add to a Section until a future 7.1.0 release.
The new IPAMv2 Gadget features:
- Improved layout
- Improved backend handling with faster loading, updates, and assignments.
- Pagination! (CFR-119)
- Advanced Filter options for Direct assign and Smart Assign
- Columns able to be sorted into Ascending / Descending order
- Support for customized column order, name, visibility, and up to ten custom columns (CFR-109. See: Admin - Edit Columns)
- Improved IP Block filter options (CFR-120, CFR-122)
- Single-click reverse zone generation (left mouse click on the block CIDR link).
Working with the IPAMv2 Gadget:
Additional details provided below on specific tasks involving the IPAMv2 Gadget:
Updated Dashboard IP Charts:
The Dashboard "IP Charts" Widget has been updated to show block percentages that are assigned, unassigned, allocated, or in the holding tank. Hovering over a status will show additional details.
Updated DNSSEC Toolstack:
IM - 2629: ProVision now supports new DNSSEC toolstack bind-utils (dnssec-genkey and dnssec-signzone), set in the Admin Preferences page "DNSSEC Tools" settings. See Admin Preferences for additional details
| Expand |
|---|
Add a new router by clicking the "Add Router" button, which will direct to a page to input the router details. Clicking on a router entry in the router list will open the router details page.
From here, routers may be added as well, or you can use the filterable list in the left sidebar to select a router to view. The router details area gives basic router information, which you may edit via the "Edit" button, and Peer Group management options. See Peering Routers for additional information. |
Sessions Subtab
The Sessions subtab is where current sessions may be added, managed, and updated.
| Expand |
|---|
Add a new session by clicking the "Add Session" button, which will direct to a page to input the session details. Clicking on a Session entry in the list will open the Session details page.
From here, new session may be created, but it is primarily for session management. The Session may be manually configured via "Config Manager", or automatically via "Configure". "Email" opens an Email communications form, with data automatically generated from PeeringDB. Other available tasks include Admin Up/Down, Edit, and Delete session. See Peering Sessions for additional information. |
Peers Subtab
The Peers subtab lists existing peers, and allows for you to search for new peers to add via the "Add Peer" button.
| Expand |
|---|
Clicking on a peer in the list will open the Peer Details page. From here, additional Peers may be added, or you can view details for the existing peer, including available exchanges and what routers you have available on that exchange. You may also choose to "Configure Multiple Sessions" - clicking the configure multiple buttons opens a page where you may select and set up multiple sessions for that peer, and then choose to either "Configure Now" or Schedule the config to run later via the Scheduler Tab.
See Managing Peers for additional information. |
Additional Features / Improvements
ProVision Backend Updates
IM - 2651, IM-2627: ProVision has been updated to support(and require) PHP 7.1 / PDO and mySQL 5.7. Local installation customers should ensure that they meet the software requirements for ProVision 7.0.0.
IPAM Manage - IPAM / VLAN Multi-Edit (IPAMv2)
IM-2077: IPAM Manage - Multi-edit now supports Domain and VLAN fields.
| Expand | ||
|---|---|---|
| ||
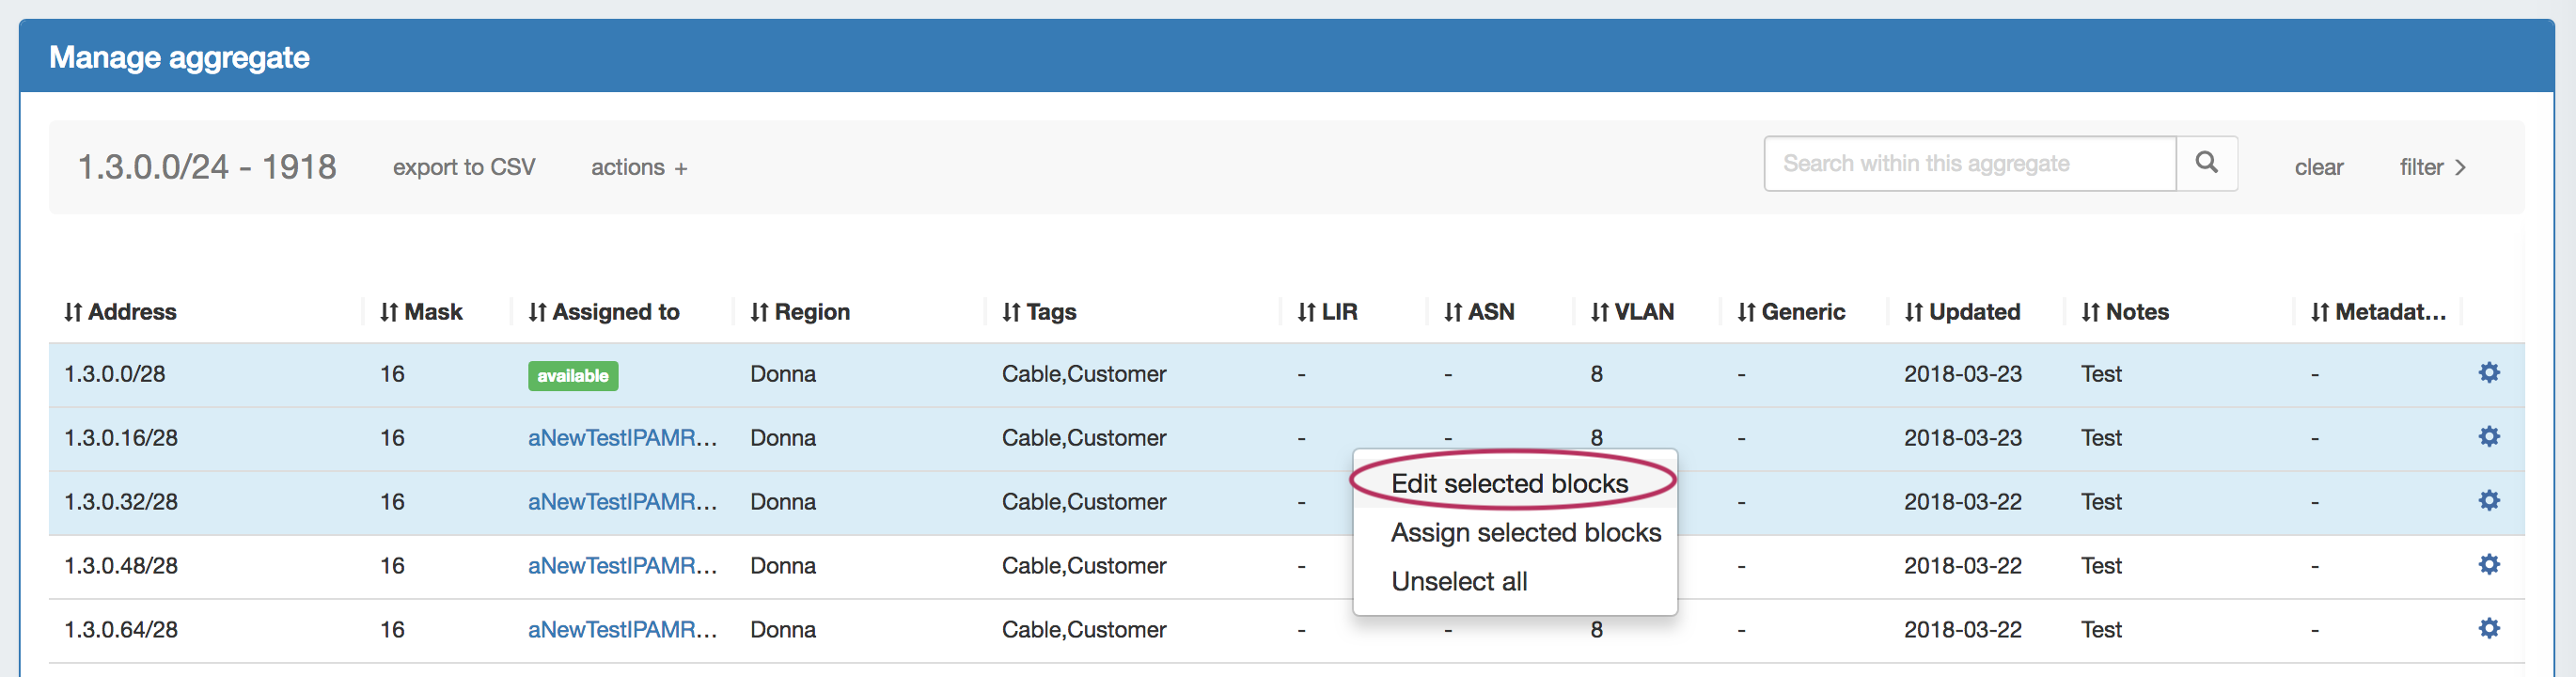
To select multple blocks to edit, hold down the shift key and click on the blocks you wish to edit - the selected blocks will be highlighted. Right click anywhere in the blue highlighted area, and select "Edit selected blocks".
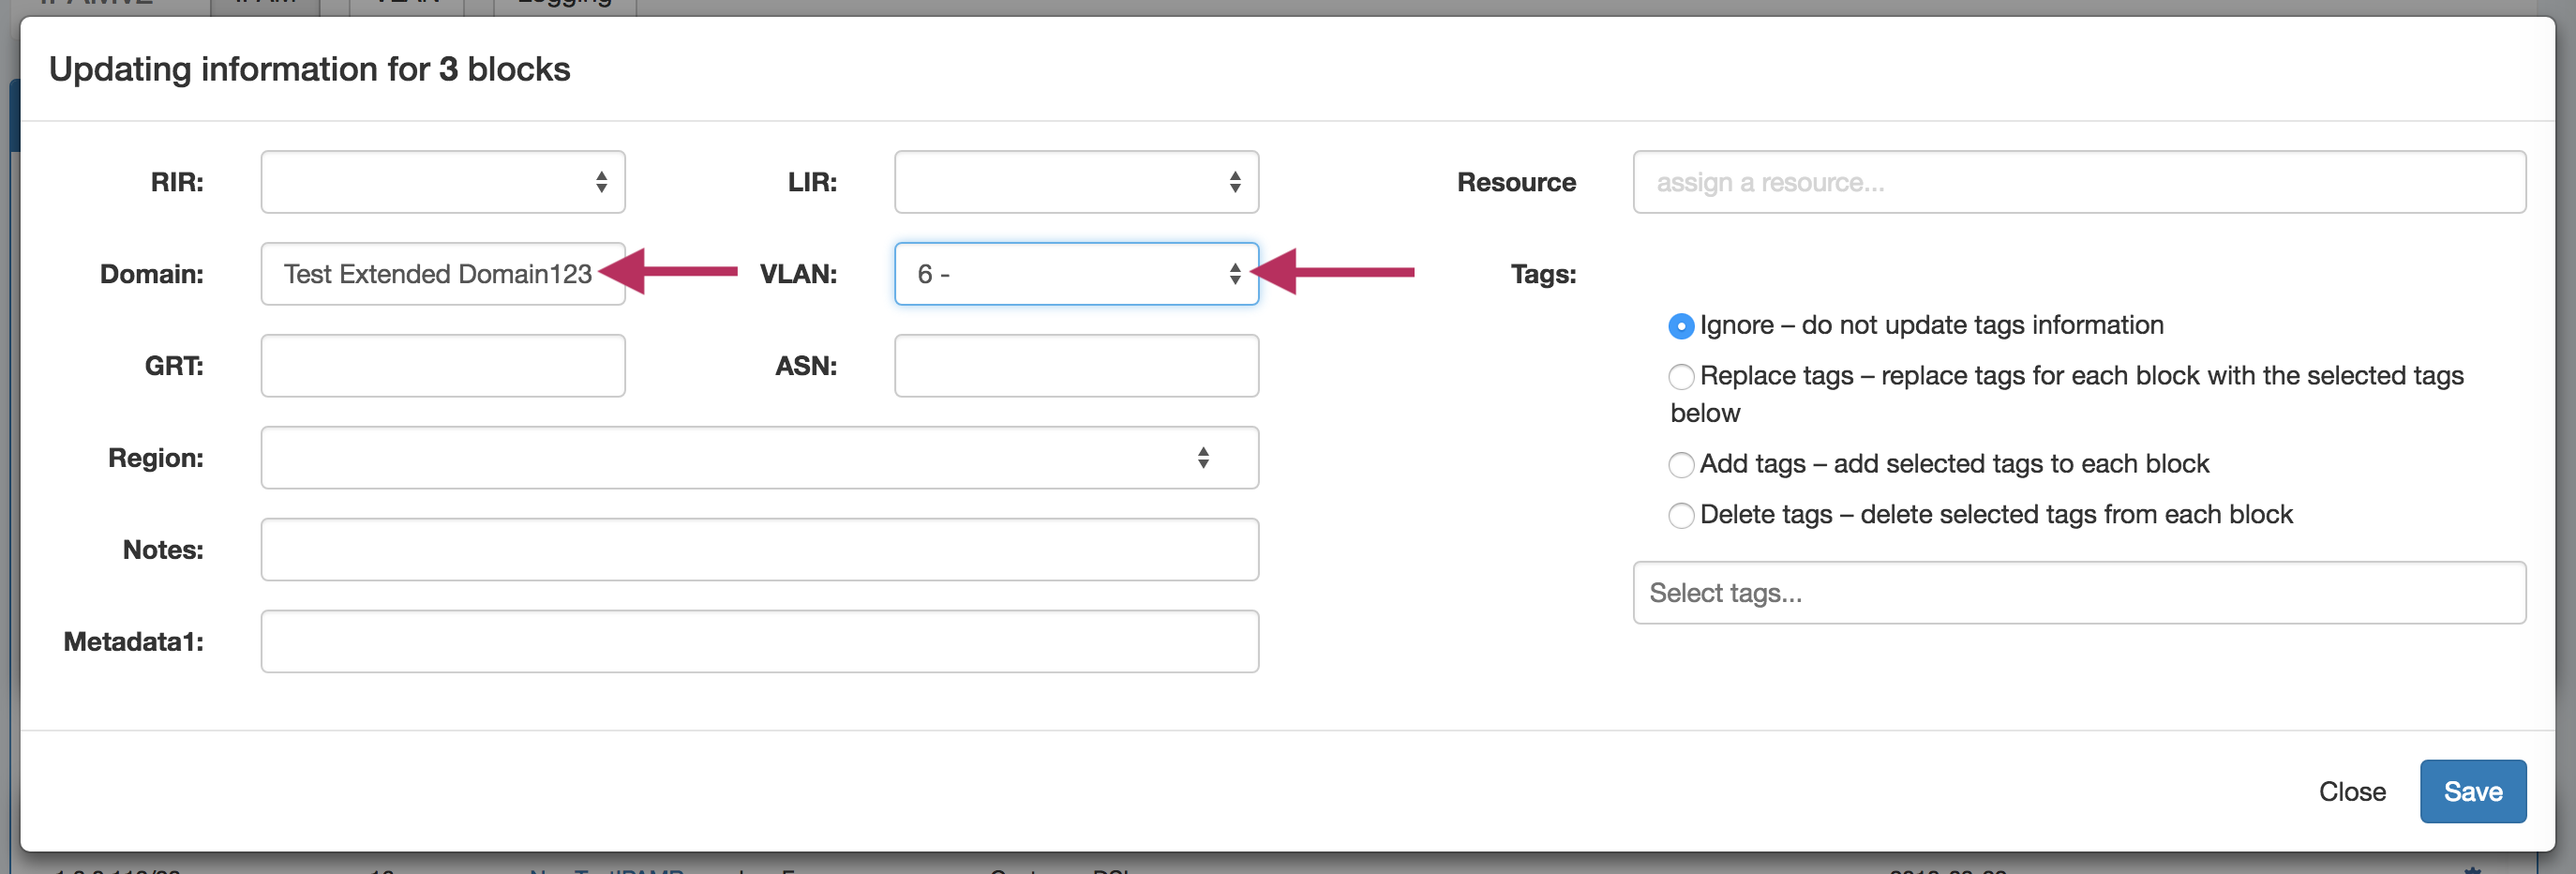
The "Edit Block" modal window will pop up for the selected block(s). Edit the domain by clicking in or typing in the domain search box, and select the desired Domain. Then, select the VLAN for the blocks from the enabled VLAN list. When done, click "Save".
|
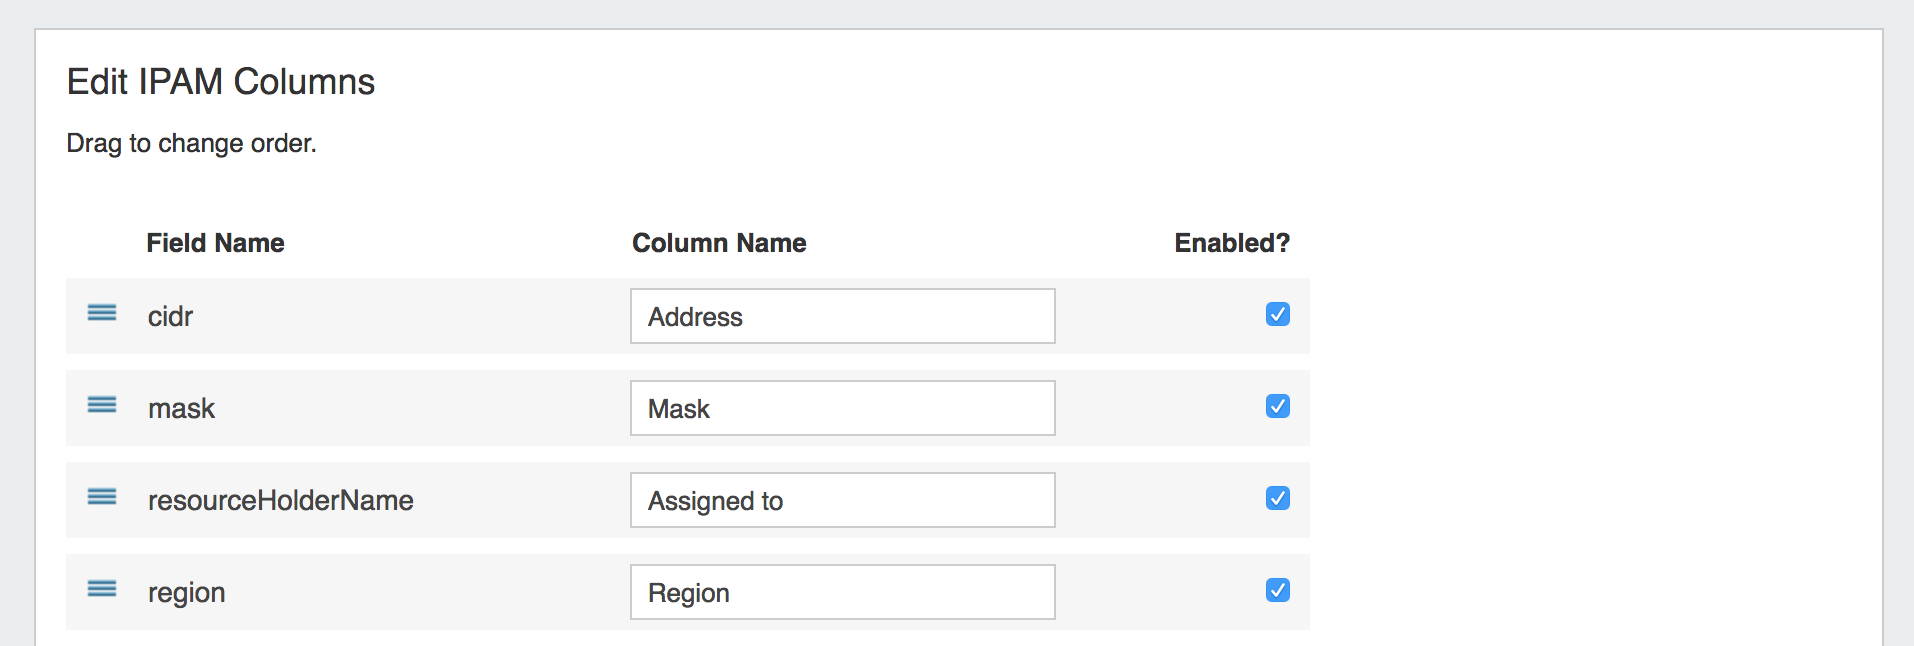
Customizable IPAM Columns (IPAMv2):
CFR - 109: The IPAM Admin "Lists Management" area has been updated with an "Edit Columns" page to support IPAMv2 column customization.
In "Edit Columns", you can change the column order, column name, and visibility of IPAM columns globally for IPAM areas in ProVision. See IPAM Parameters for additional details.
| Expand | ||
|---|---|---|
| ||
To access "Edit Columns", you must be logged in as a user with Admin access. From the Admin area of ProVision, go to the IPAM Admin tab, then click "Edit Columns" under IPAM Lists Management.
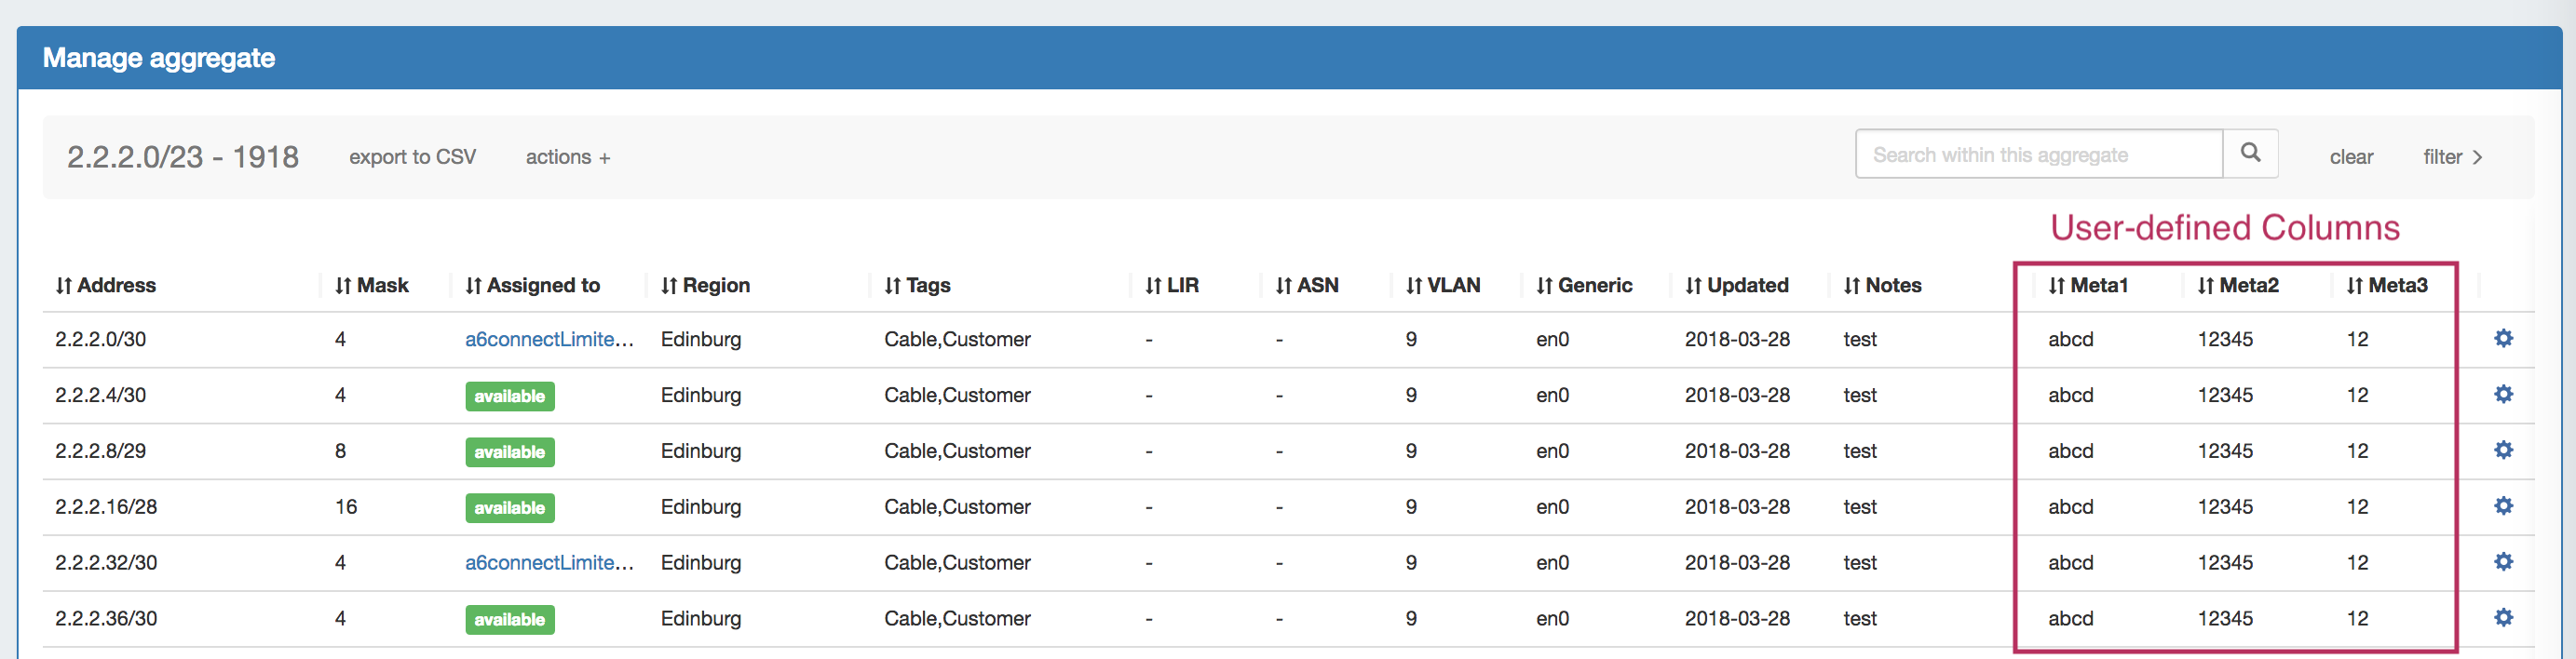
Eleven default ProVision fields and ten user-defined "Metadata" fields are available for customization.
From here: To edit a column name, simply type your changes in to the text box. and click the "Update" button. To reorder the columns, click and hold on the "list" icon (three lines) to the left of the subet, then drag to the desired location in the list and release. To toggle visibility for a column, click in the checkmark field to the right of the column name to enable / disable visibility. This affects the columns that show in both IPAM Manage and the IPAM Gadget.
When complete, be sure to click on the "Update" button to save your changes.
Once changes are saved, the enabled columns will show in IPAM Manage Aggregate screen and the IPAM Gadget "IP Blocks" List.
See IPAM Parameters for additional information. |


Updated IPAM Gadget (IPAMv2):
IM-2850, CFR-109, CFR-119, CFR-120, CFR-122: Created a new IPAM Gadget that supports IPAMv2, additional columns, user defined column order and visibility, and other improvements.
A new IPAMv2 Gadget is provided with the IPAMv2 7.0.0 updates!
The IPAMv2 Gadget will automatically replace currently enabled IPAMv1 Gadgets during the 7.0.0 upgrade. However, the IPAMv1 Gadget will remain available to manually add to a Section until a future 7.1.0 release.
The new IPAMv2 Gadget features:
- Improved layout
- Improved backend handling with faster loading, updates, and assignments.
- Pagination! (CFR-119)
- Advanced Filter options for Direct assign and Smart Assign
- Columns able to be sorted into Ascending / Descending order
- Support for customized column order, name, visibility, and up to ten custom columns (CFR-109. See: Admin - Edit Columns)
- Improved IP Block filter options (CFR-120, CFR-122)
- Single-click reverse zone generation (left mouse click on the block CIDR link).
| Expand | ||
|---|---|---|
| ||
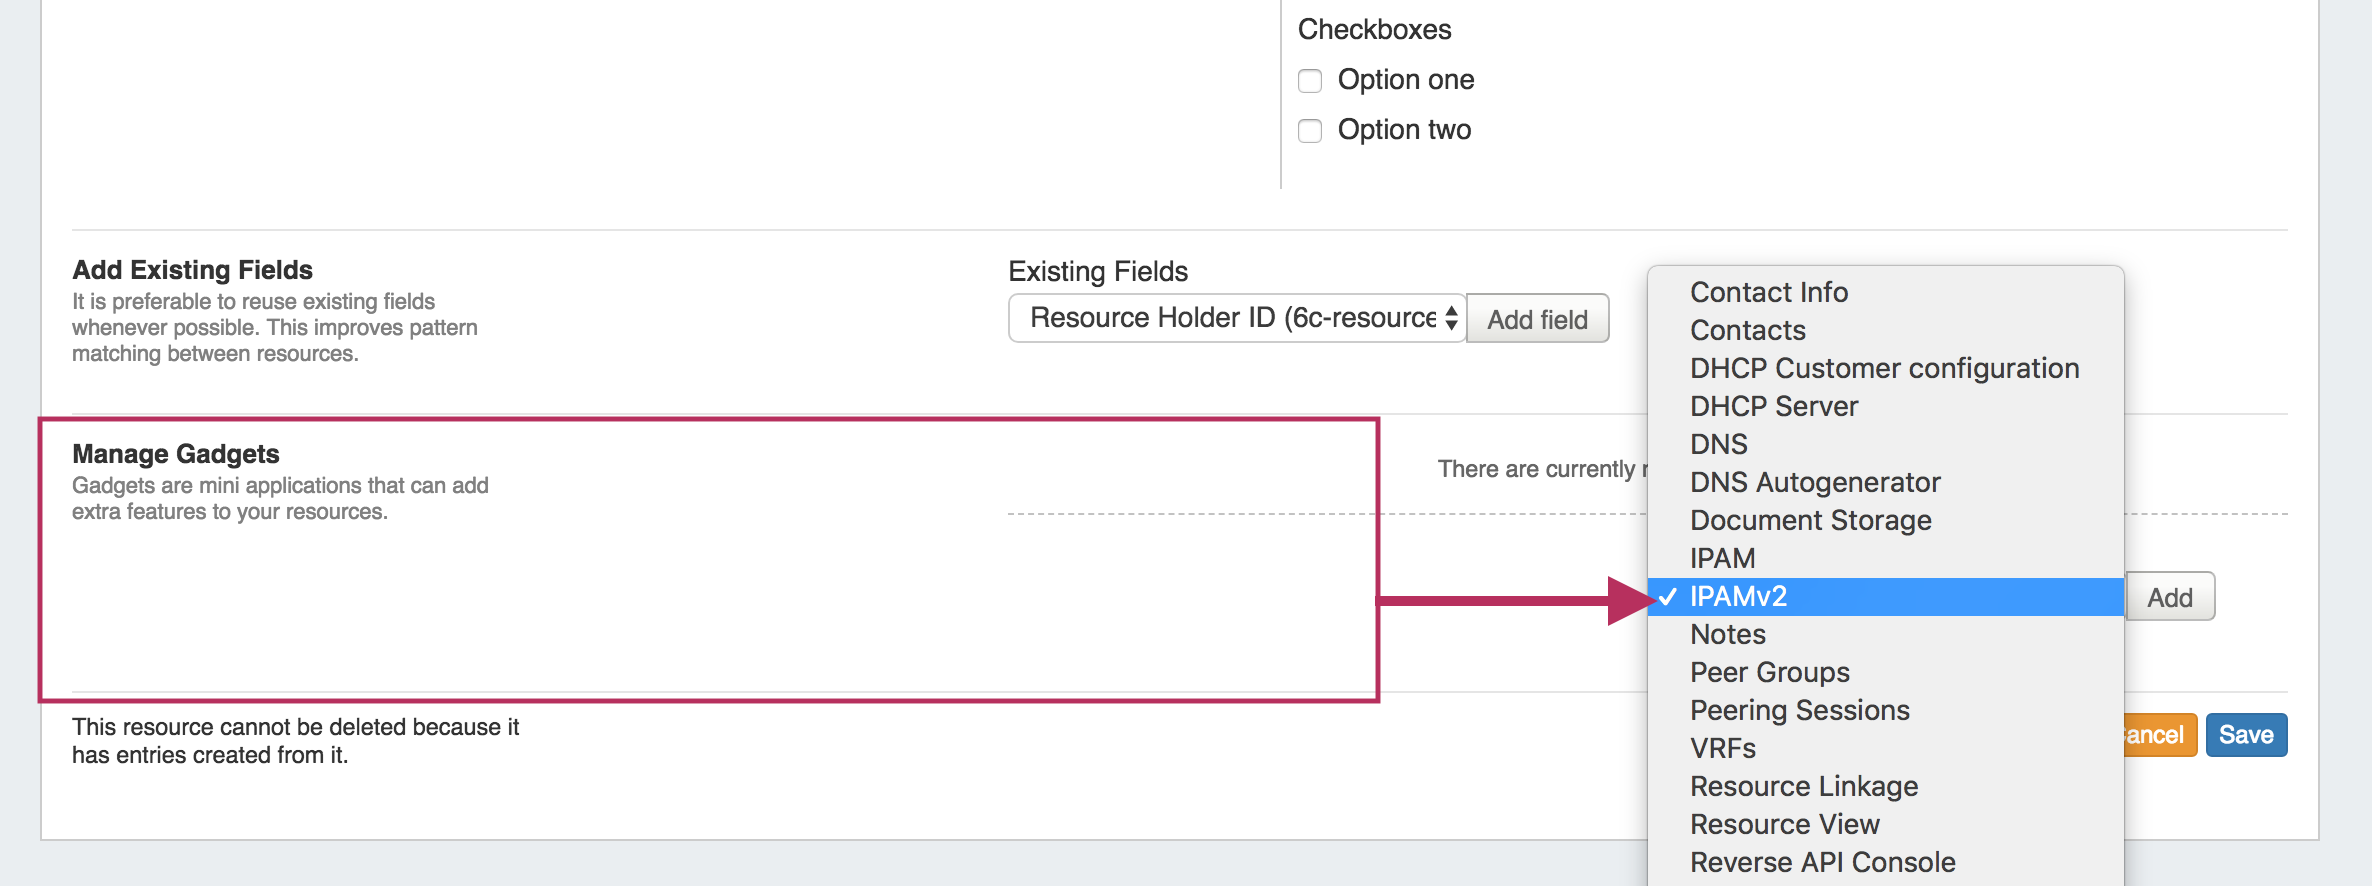
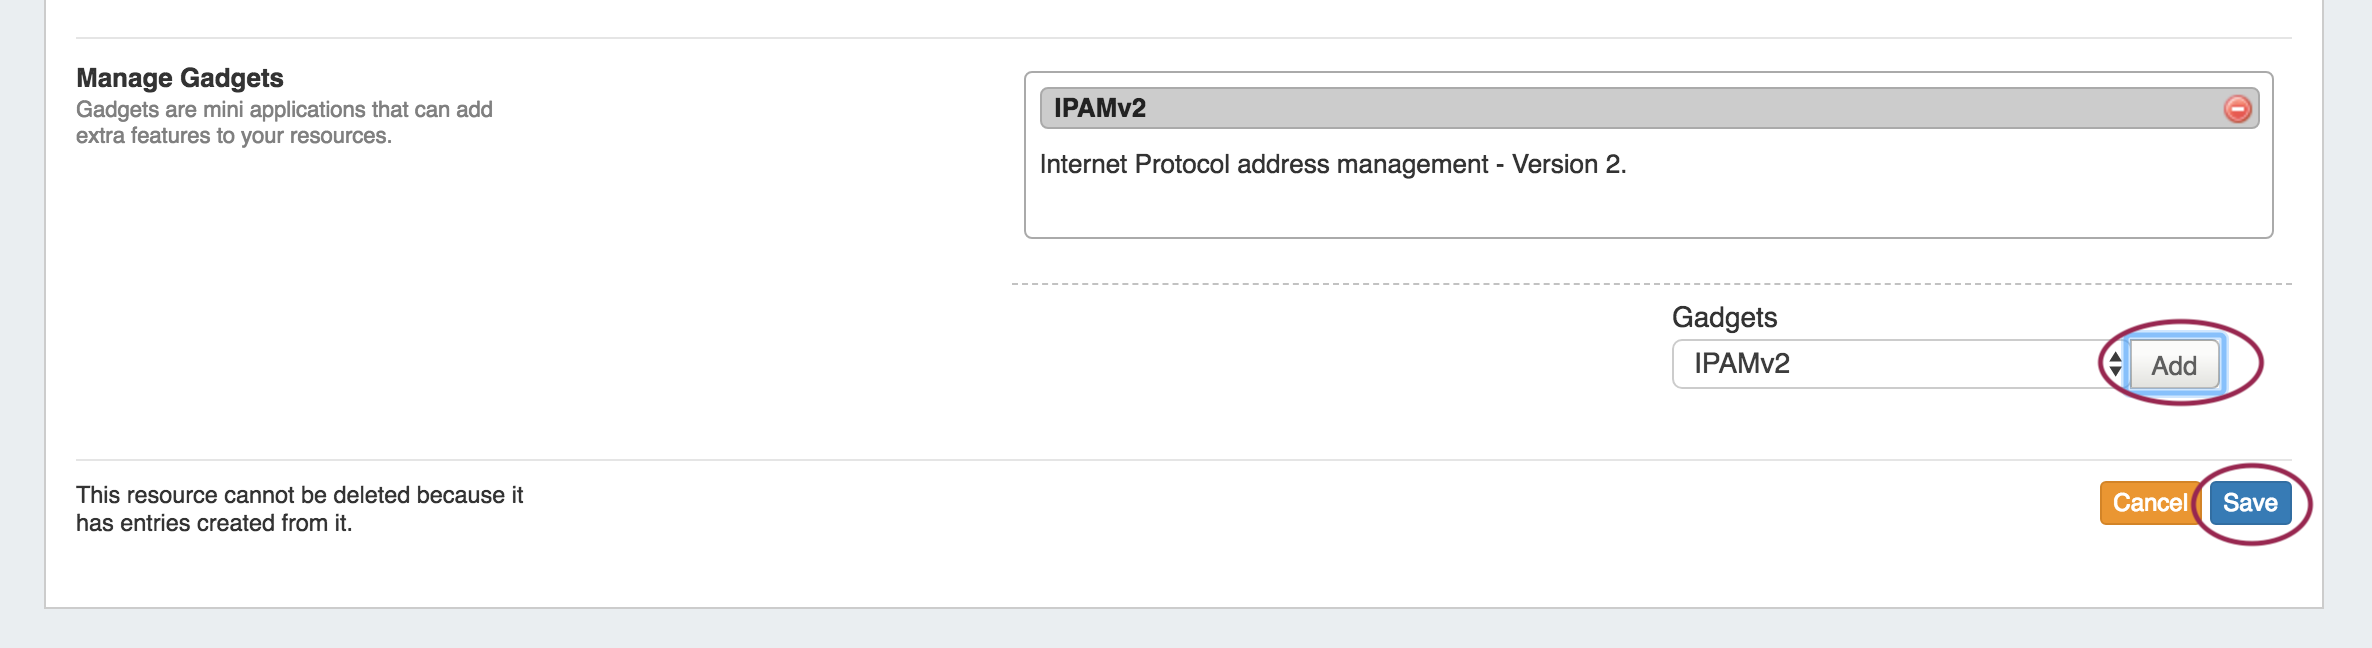
Enabling the IPAMv2 Gadget: To Enable the IPAMv2 Gadget, navigate to the Resources Tab -> Sections subtab, and click on the Section you wish to add the IPAMv2 Gadget to, and Click "Edit Section".
In the "Edit Section page, navigate to "Manage Gadgets", then select "IPAMv2" from the Gadget dropdown list. (Note: the previous IPAM gadget - "IPAM" is still available, and may be concurrently placed in the same Section with the IPAMv2 Gadget).
Click the "Add" Button, and then Save your changes.
The IPAMv2 Gadget will now display on Resource Entry pages under the edited Section. |

Working with the IPAMv2 Gadget:
Additional details provided below on specific tasks involving the IPAMv2 Gadget:
| Expand | ||
|---|---|---|
| ||
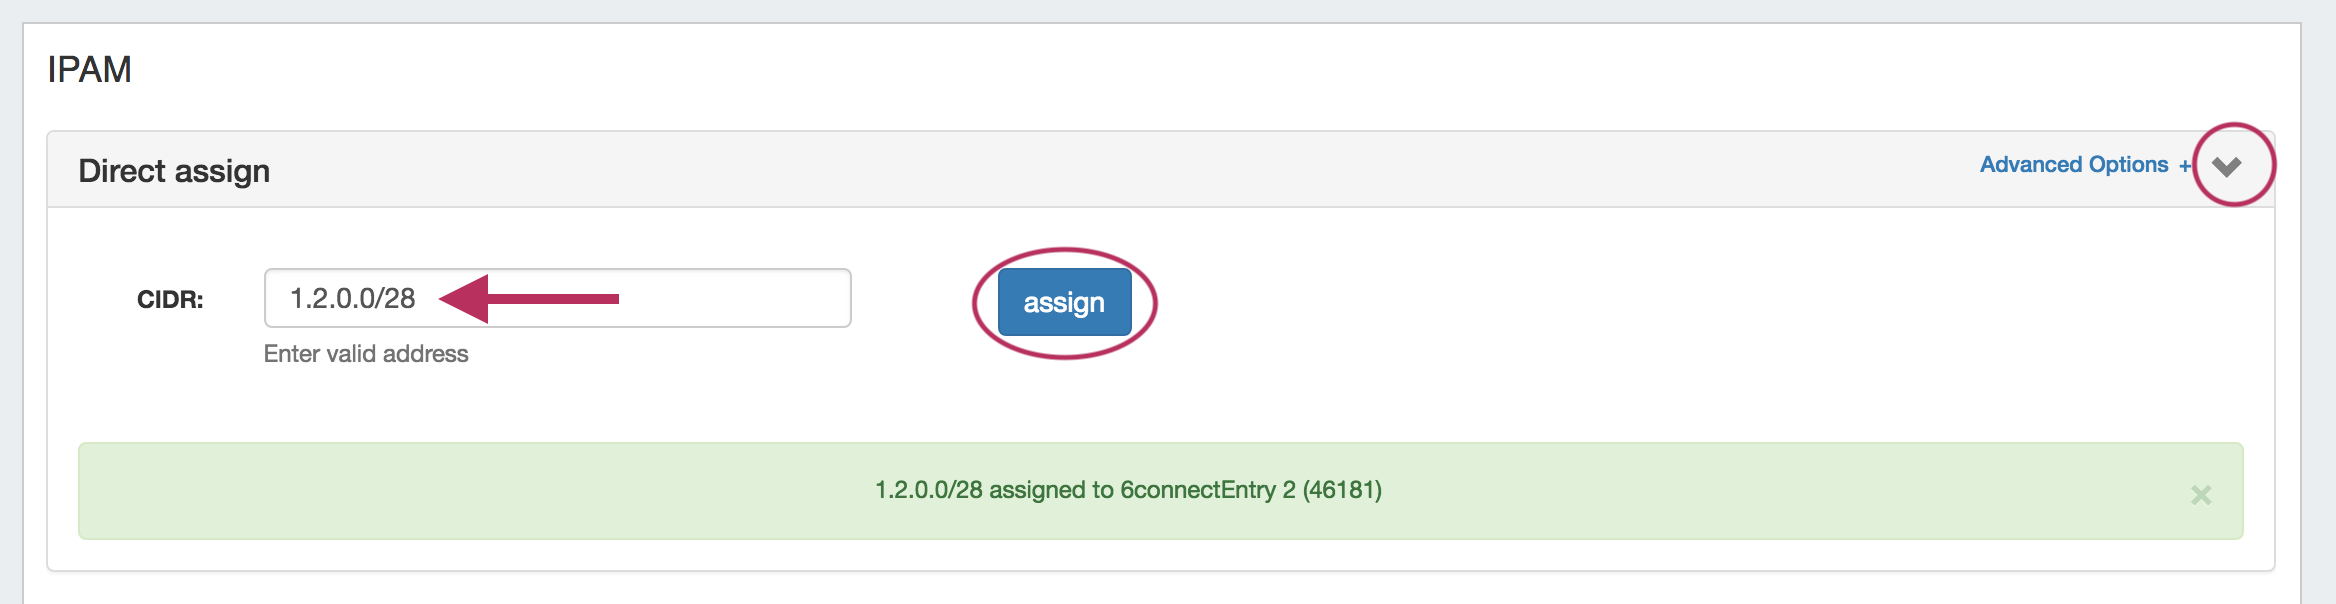
Direct Assign: Simple Direct Assign: Expand the "Direct Assign" module of the IPAMv2 Gadget by clicking the "Expand" arrow on the right side of the header.
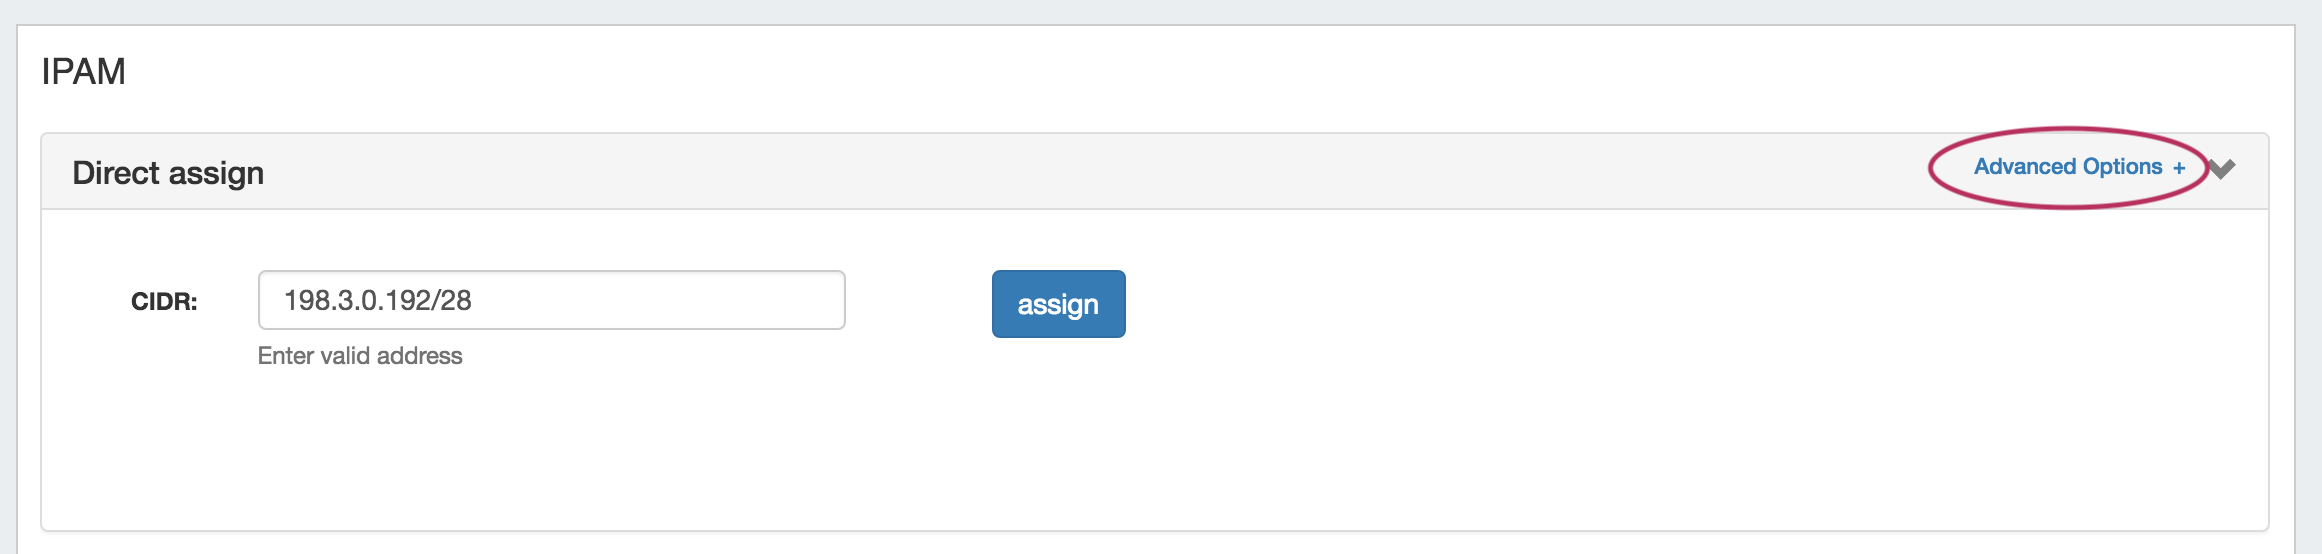
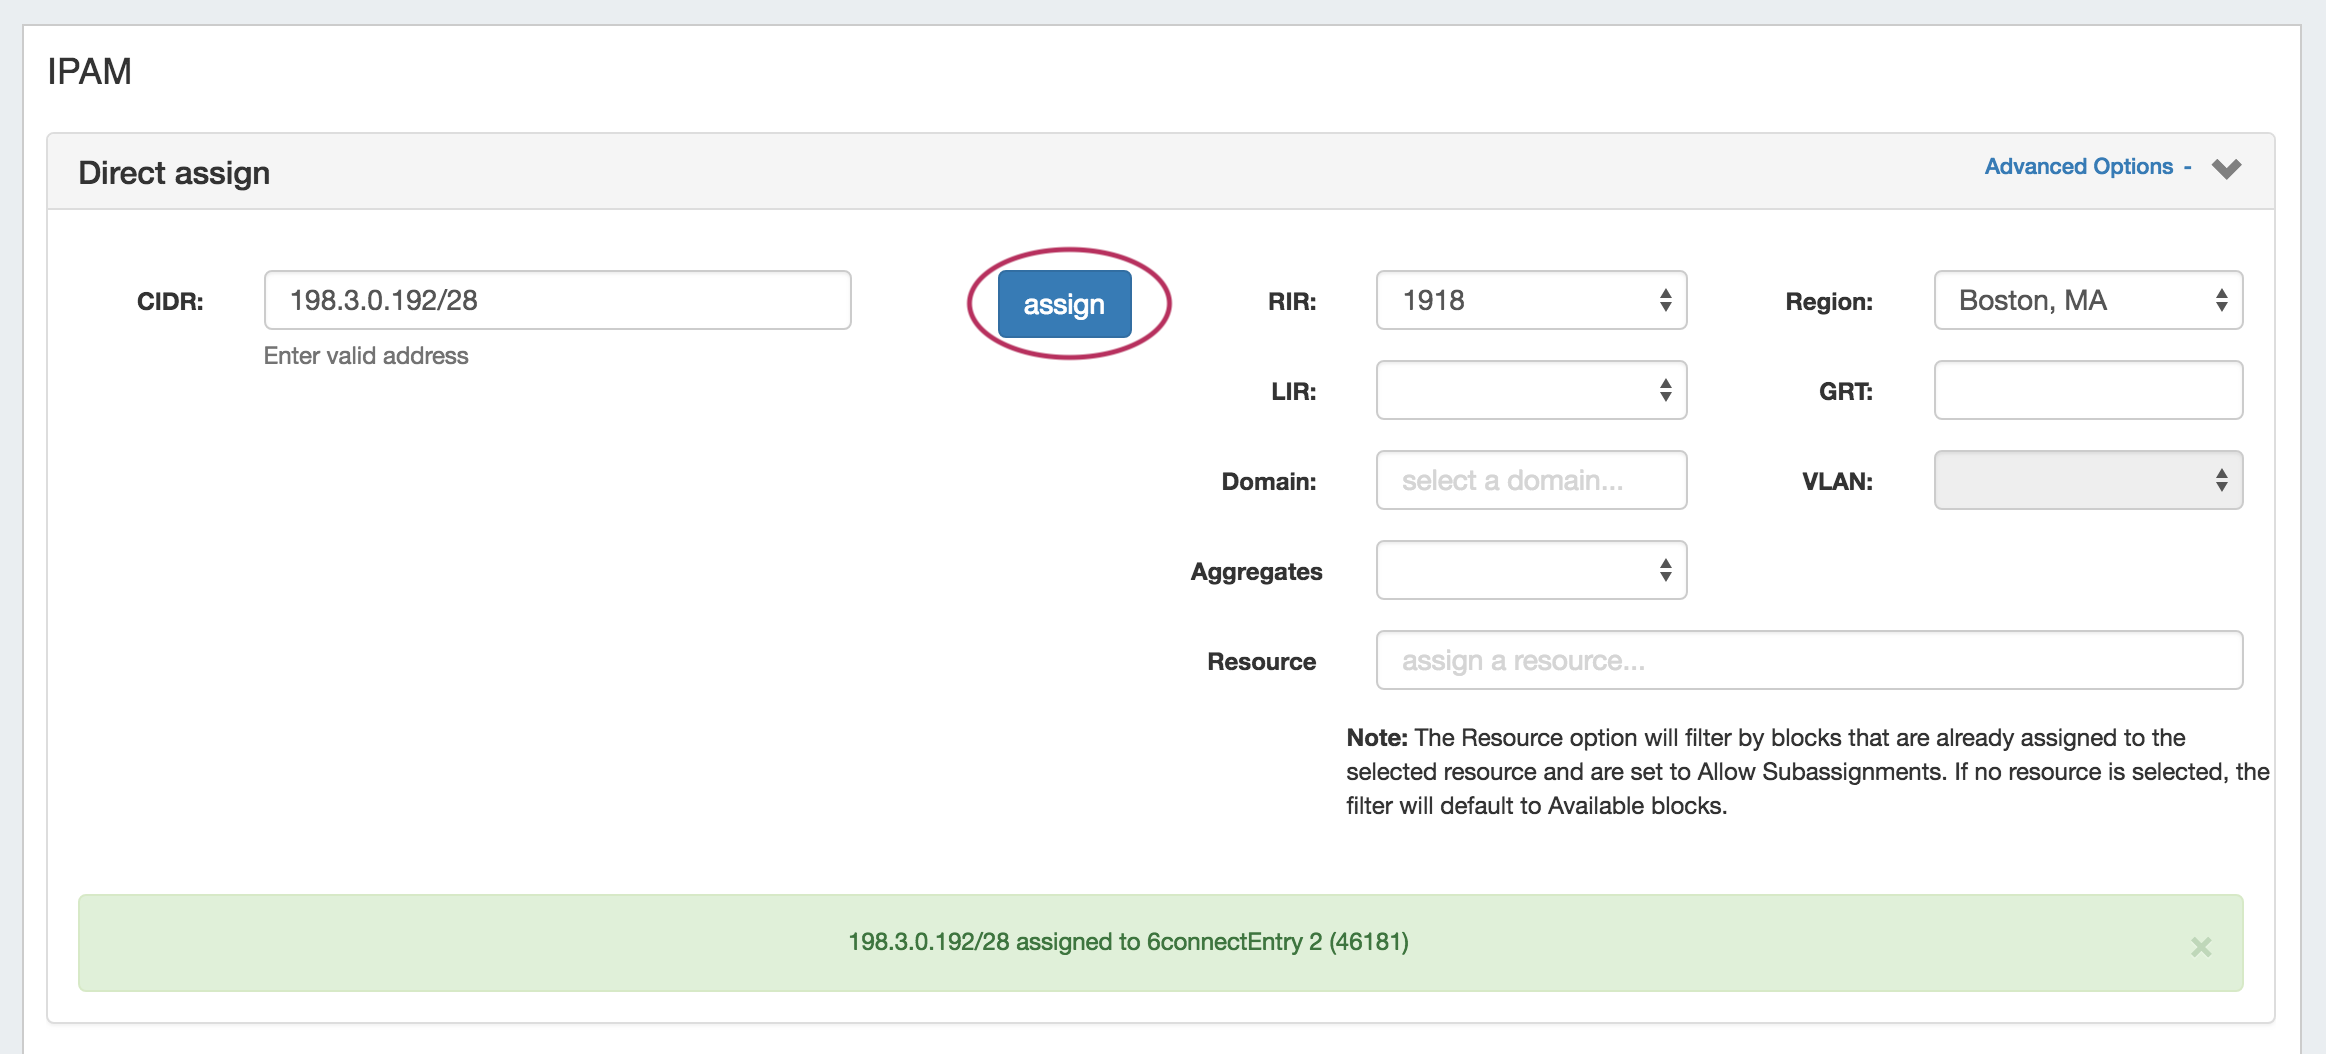
Advanced Direct Assign: In some cases, you make need the ability to further specify a block to direct assign - such as if you have duplicate 1918 blocks. The "Advanced Options" filters allow for further detail to be provided to ensure ProVision assigns the specific block that is intended. Expand the "Advanced Options + " link to the right of the "Direct Assign" module header.
Then, add in the desired CIDR, and set your additional filter criteria, such as RIR, region, LIR, VLAN, and so forth. When done, hit "Assign".
|
| Expand | ||
|---|---|---|
| ||
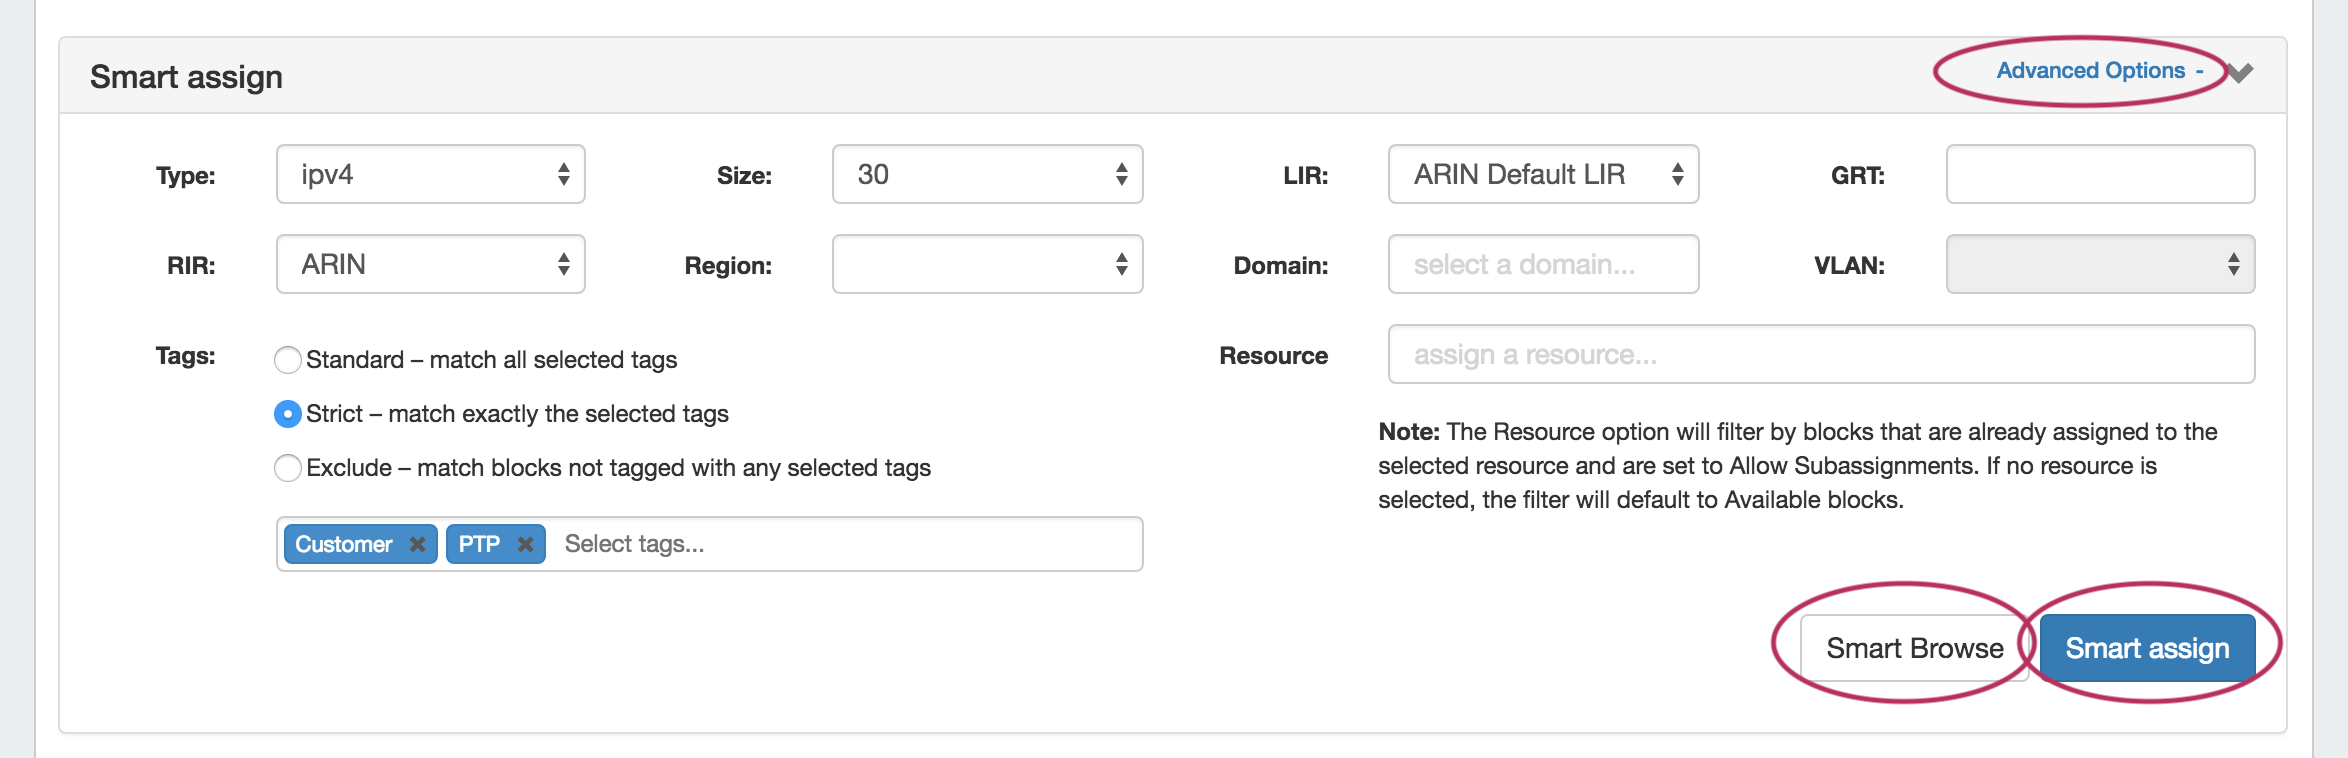
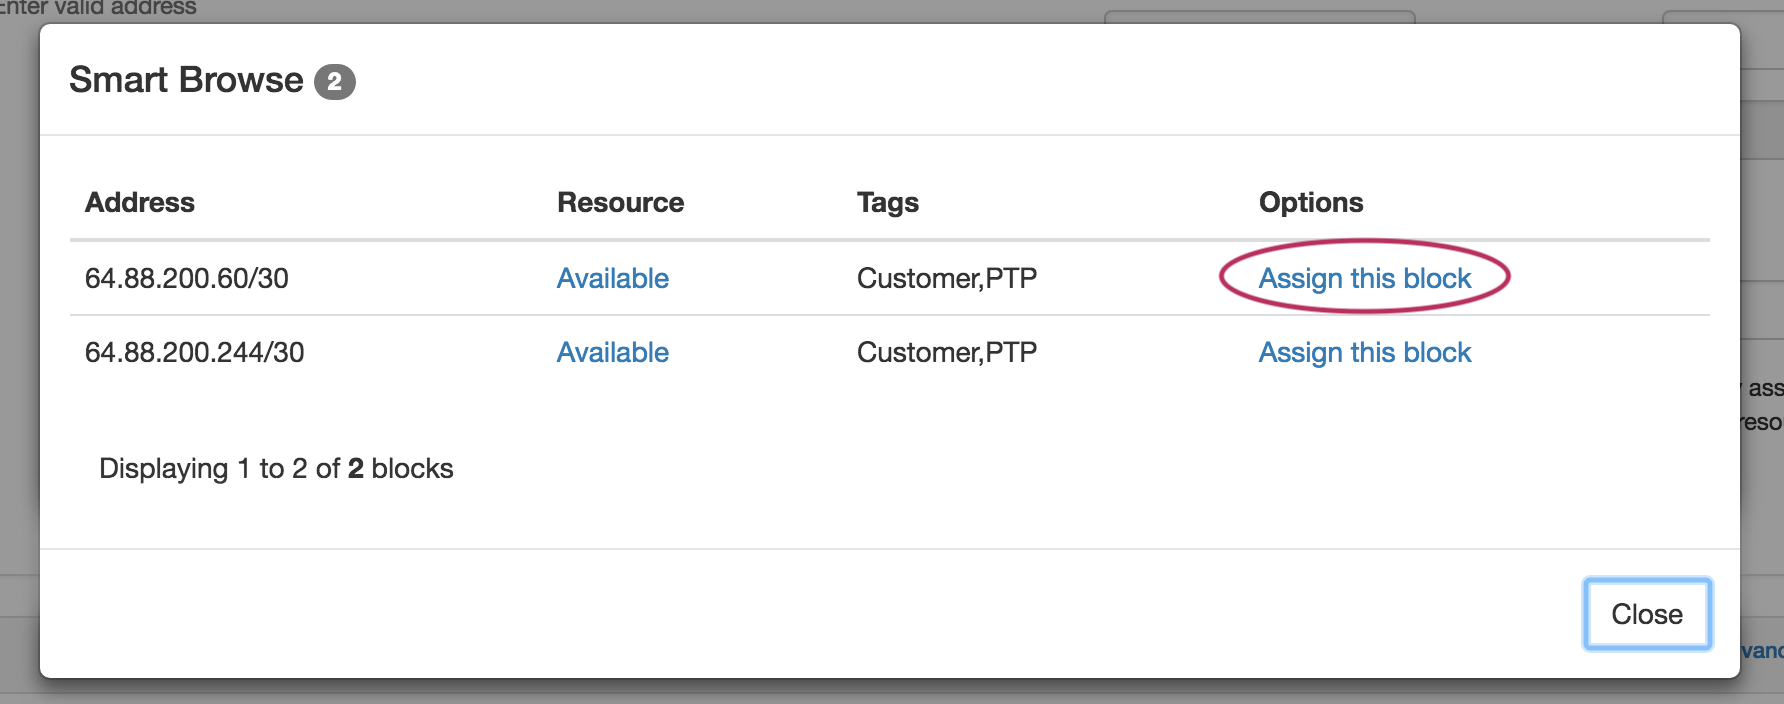
Smart Assign / Smart Browse: Expand the "Smart Assign" module in the IPAMv2 by clicking the expansion arrow in the right side of the Smart Assign header. For a basic assignment, enter at least the IP type, RIR, and block size.
IP Tag filters are optional. IP Tag filters exist in three modes: Standard - checks to see if the selected tag is associated with the block Strict: limits results to blocks with exactly the selected tag(s) Exclude - blocks without the selected tag(s) For Advanced Options, Click the "Advanced Options +" expansion link in the top right of the header. Additional filter criteria will be available to apply to both Smart Browse and Smart Assign.
Then click "Smart Browse" or "Smart Assign". For Smart Assign, you will receive a message indicating a successful assignment, or information regarding an error. If no blocks are available meeting the criteria, the message will say so. In this case, try removing one or more of your filter criteria and try again. For Smart Browse, a screen will pop up showing blocks meeting your criteria. Browse to the block you want to assign, and click either "Assign this block", or "Assign from this block"(splits a larger block down).
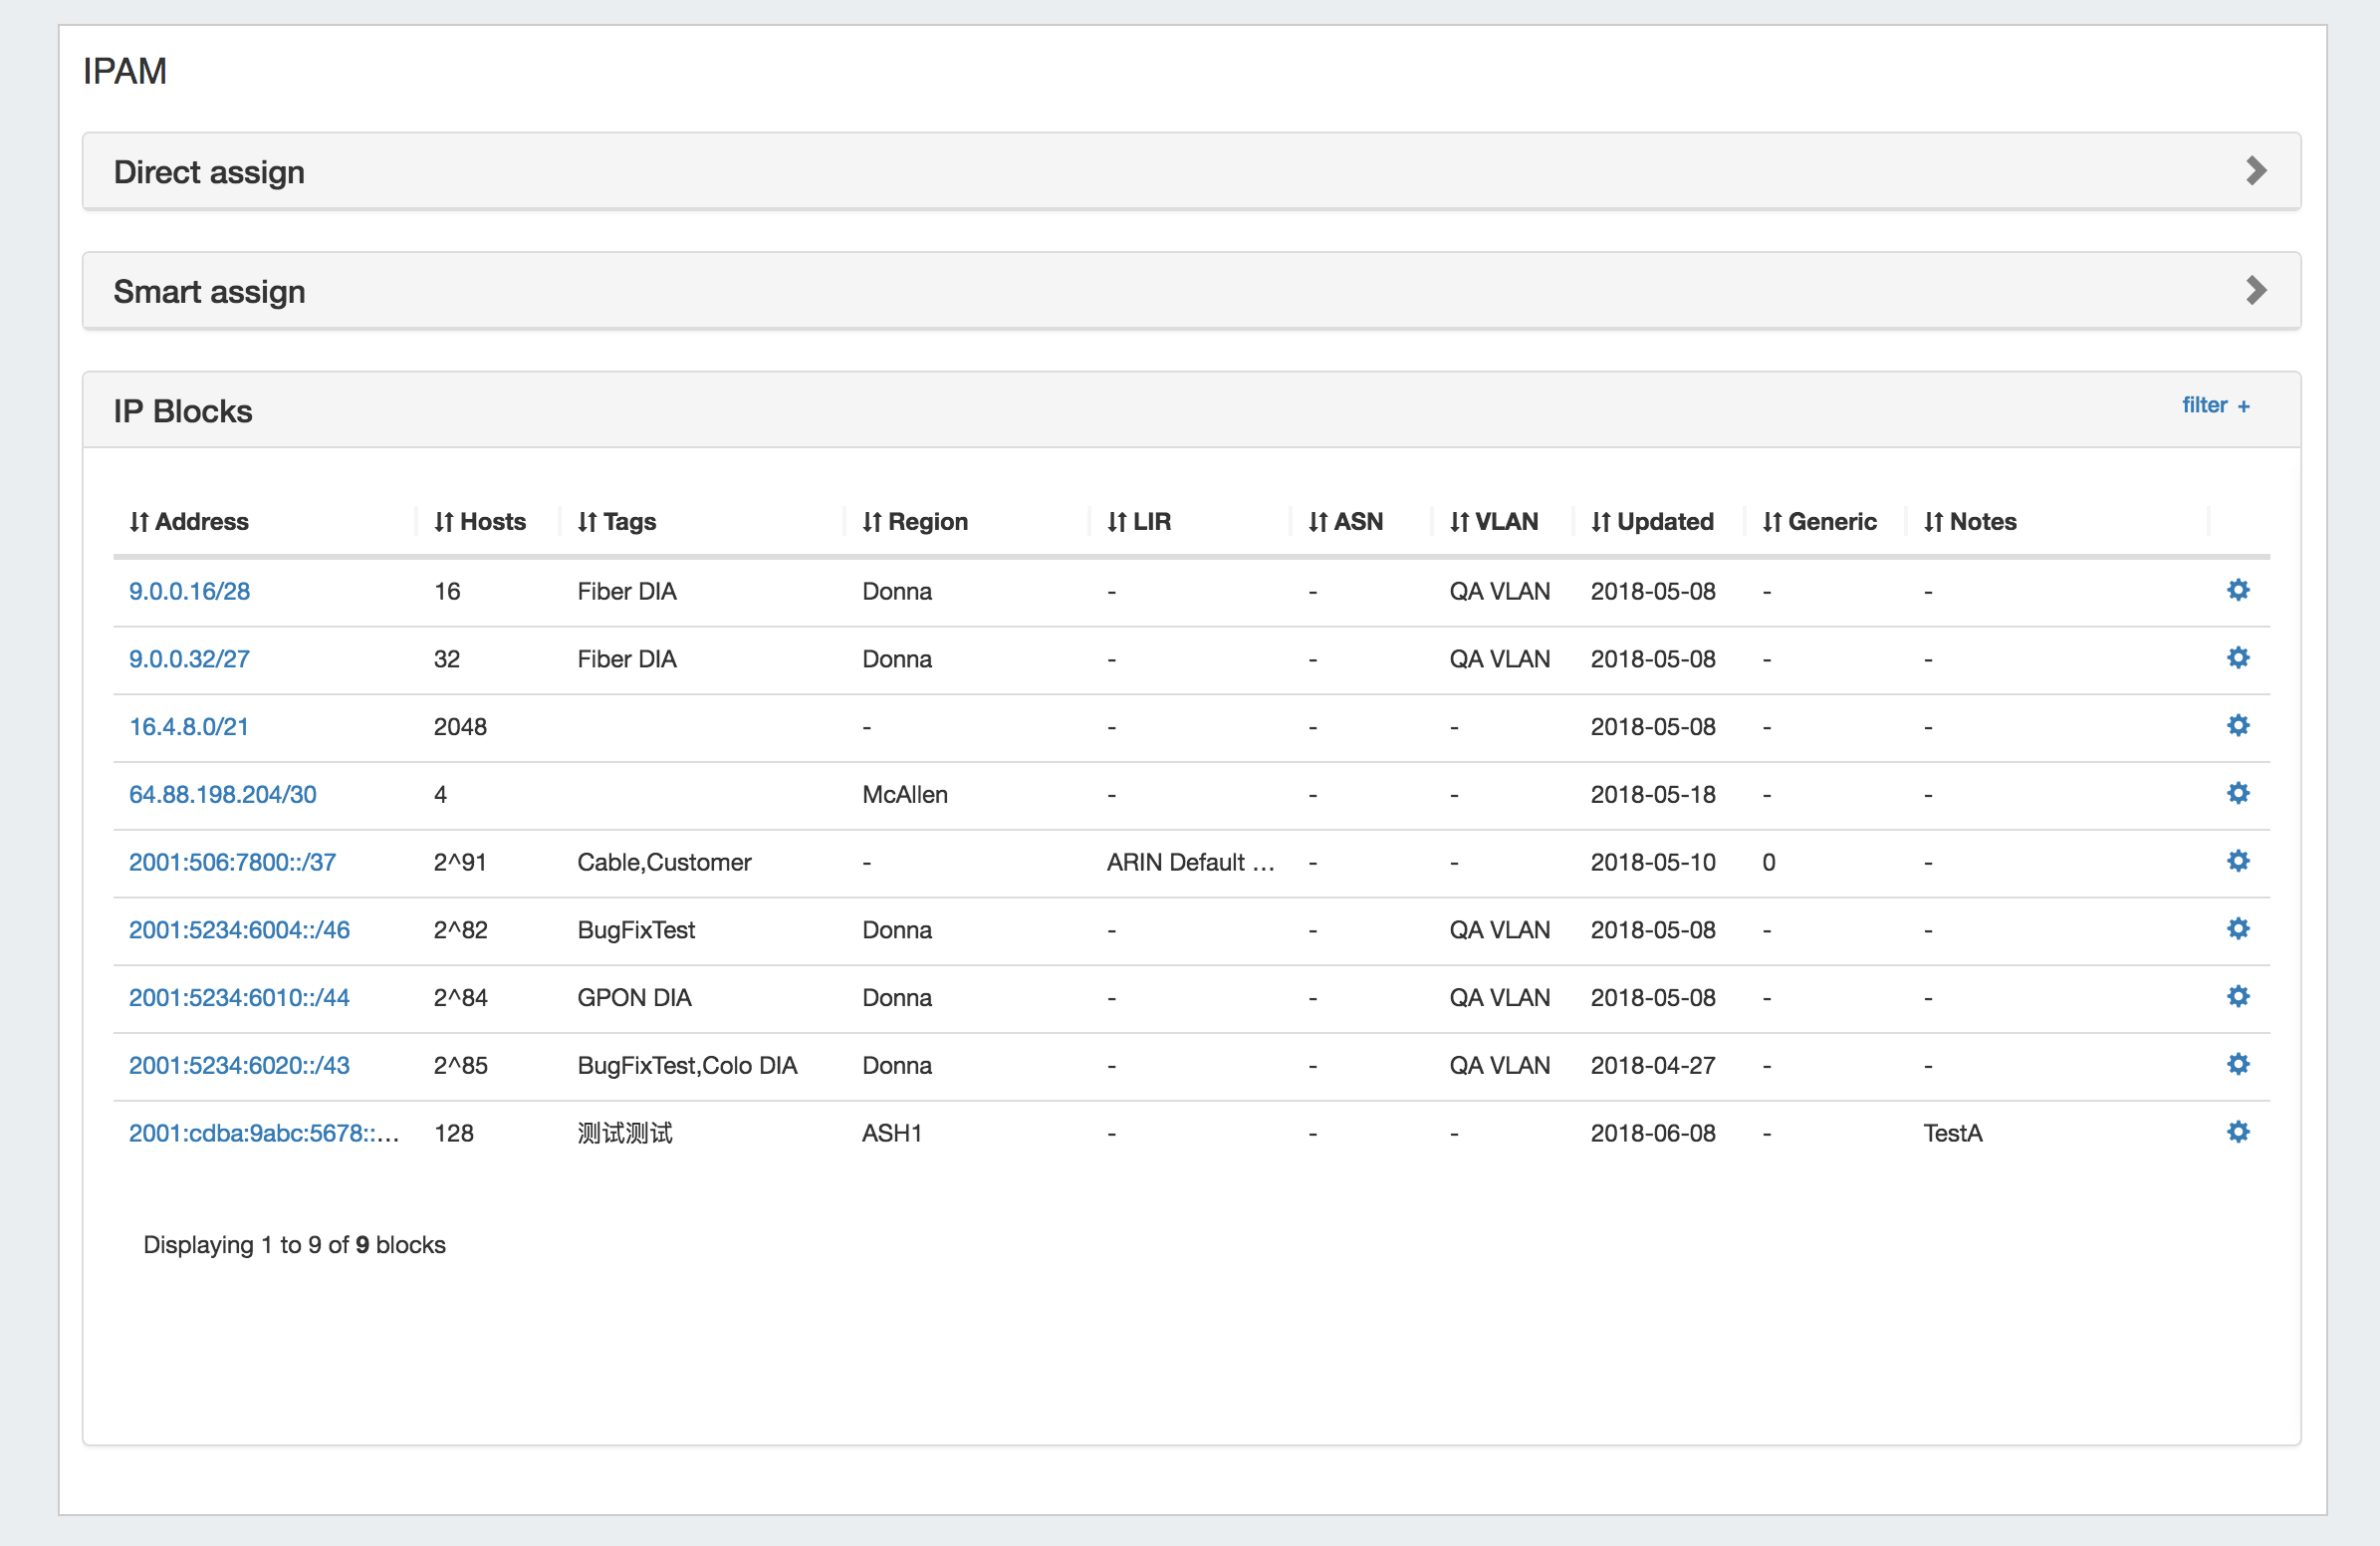
Successful assignments will be added to the "IP Blocks" list in the IPAMv2 Gadget, and are able to be managed in the IPAM Gadget, IPAMv2 Gadget, or IPAM Manage Screen. |

| Expand | ||
|---|---|---|
| ||
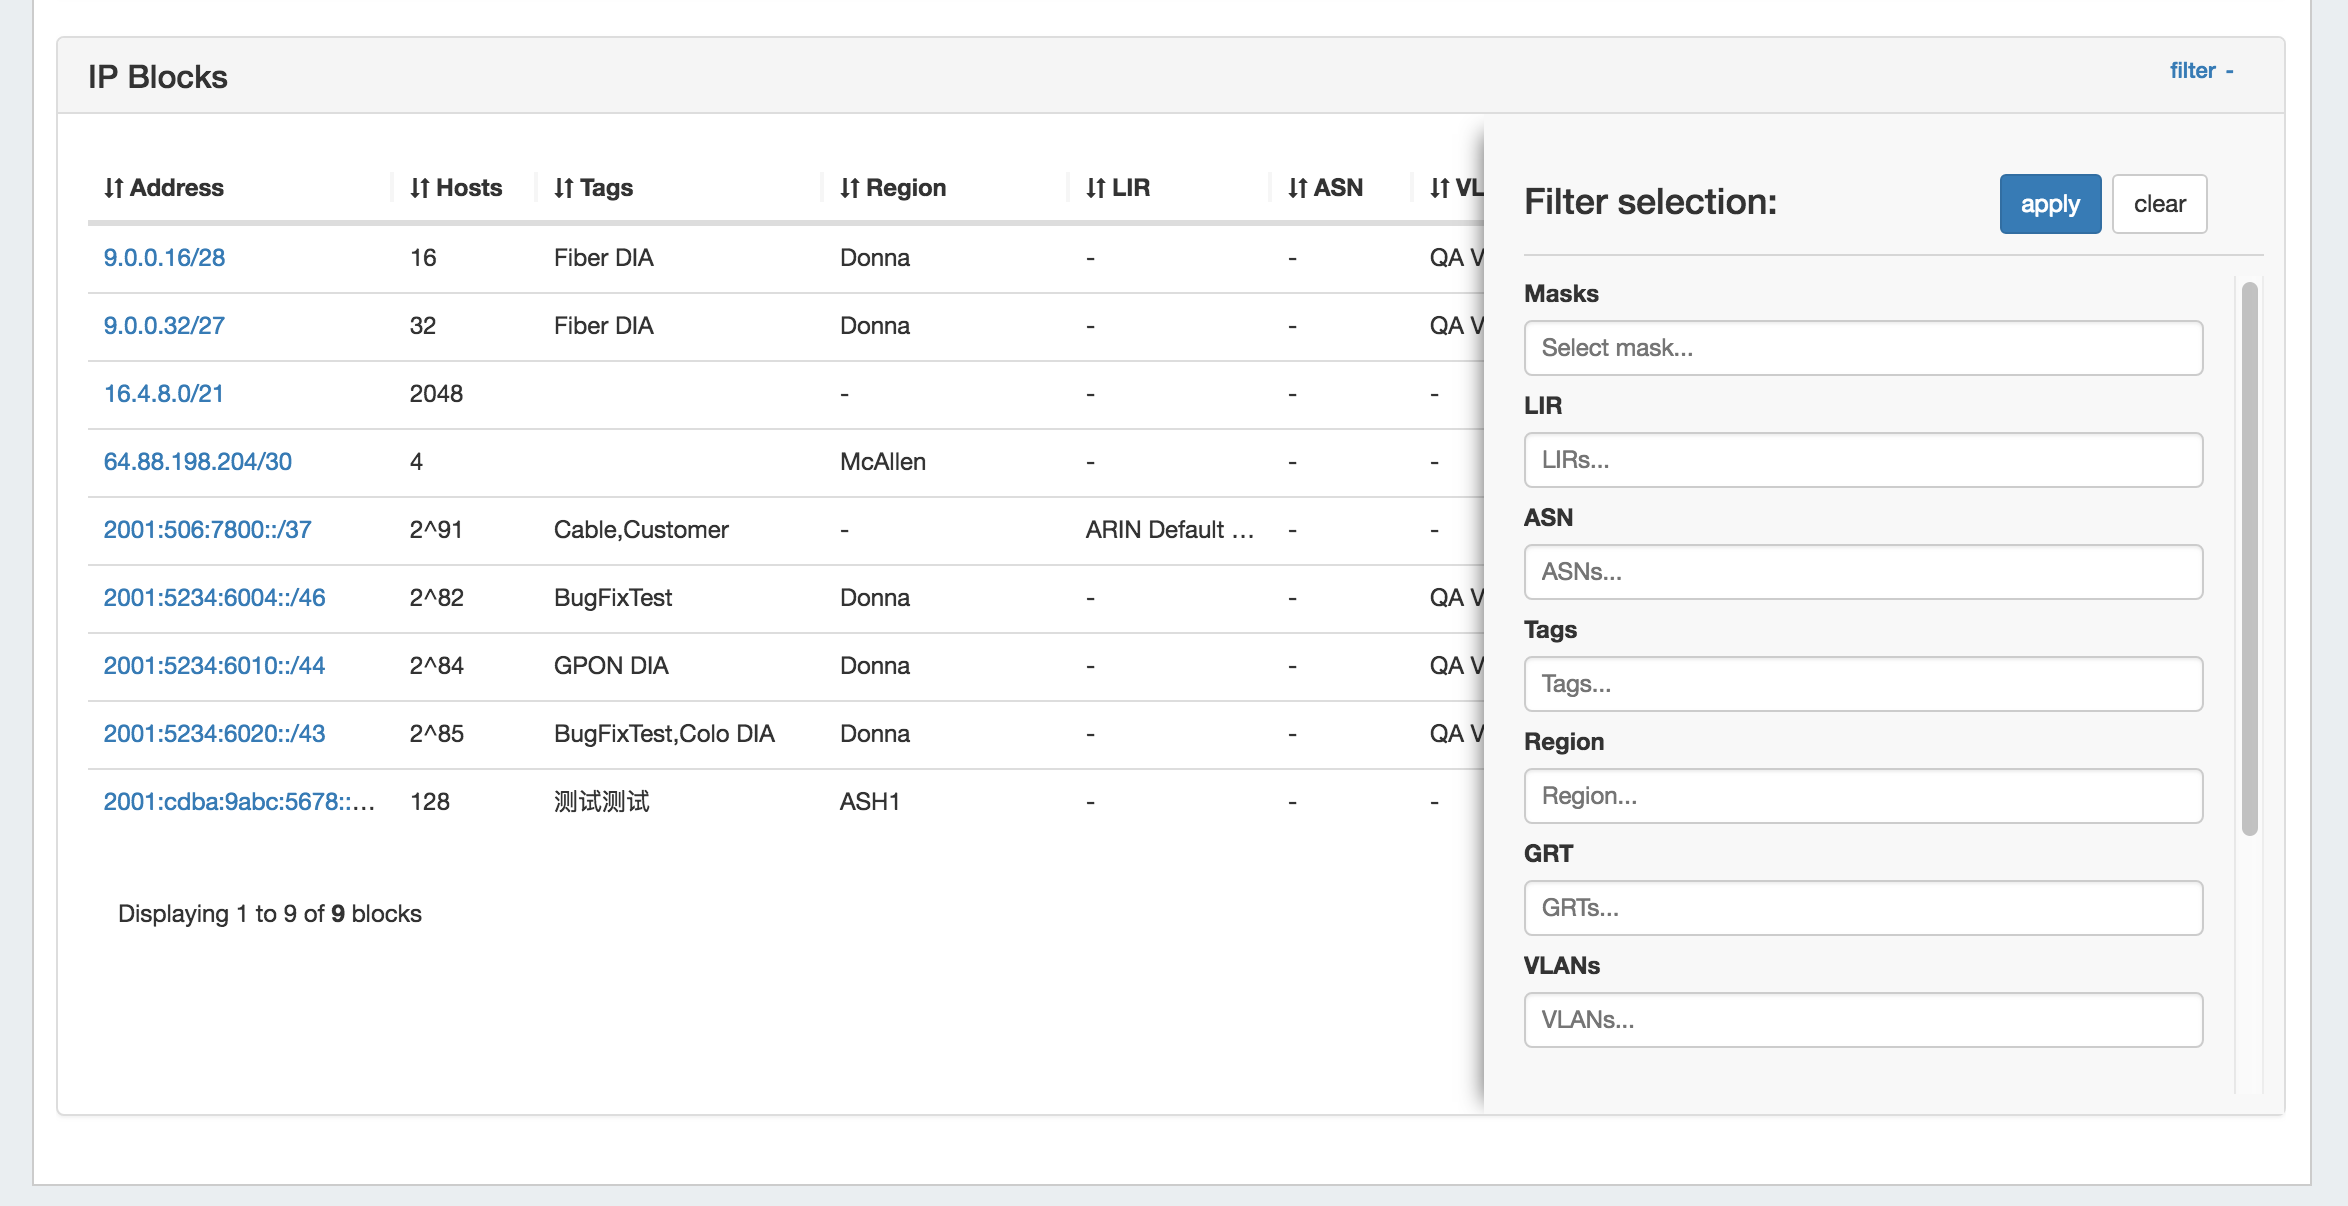
Managing IP Blocks in the IPAMv2 Gadget:
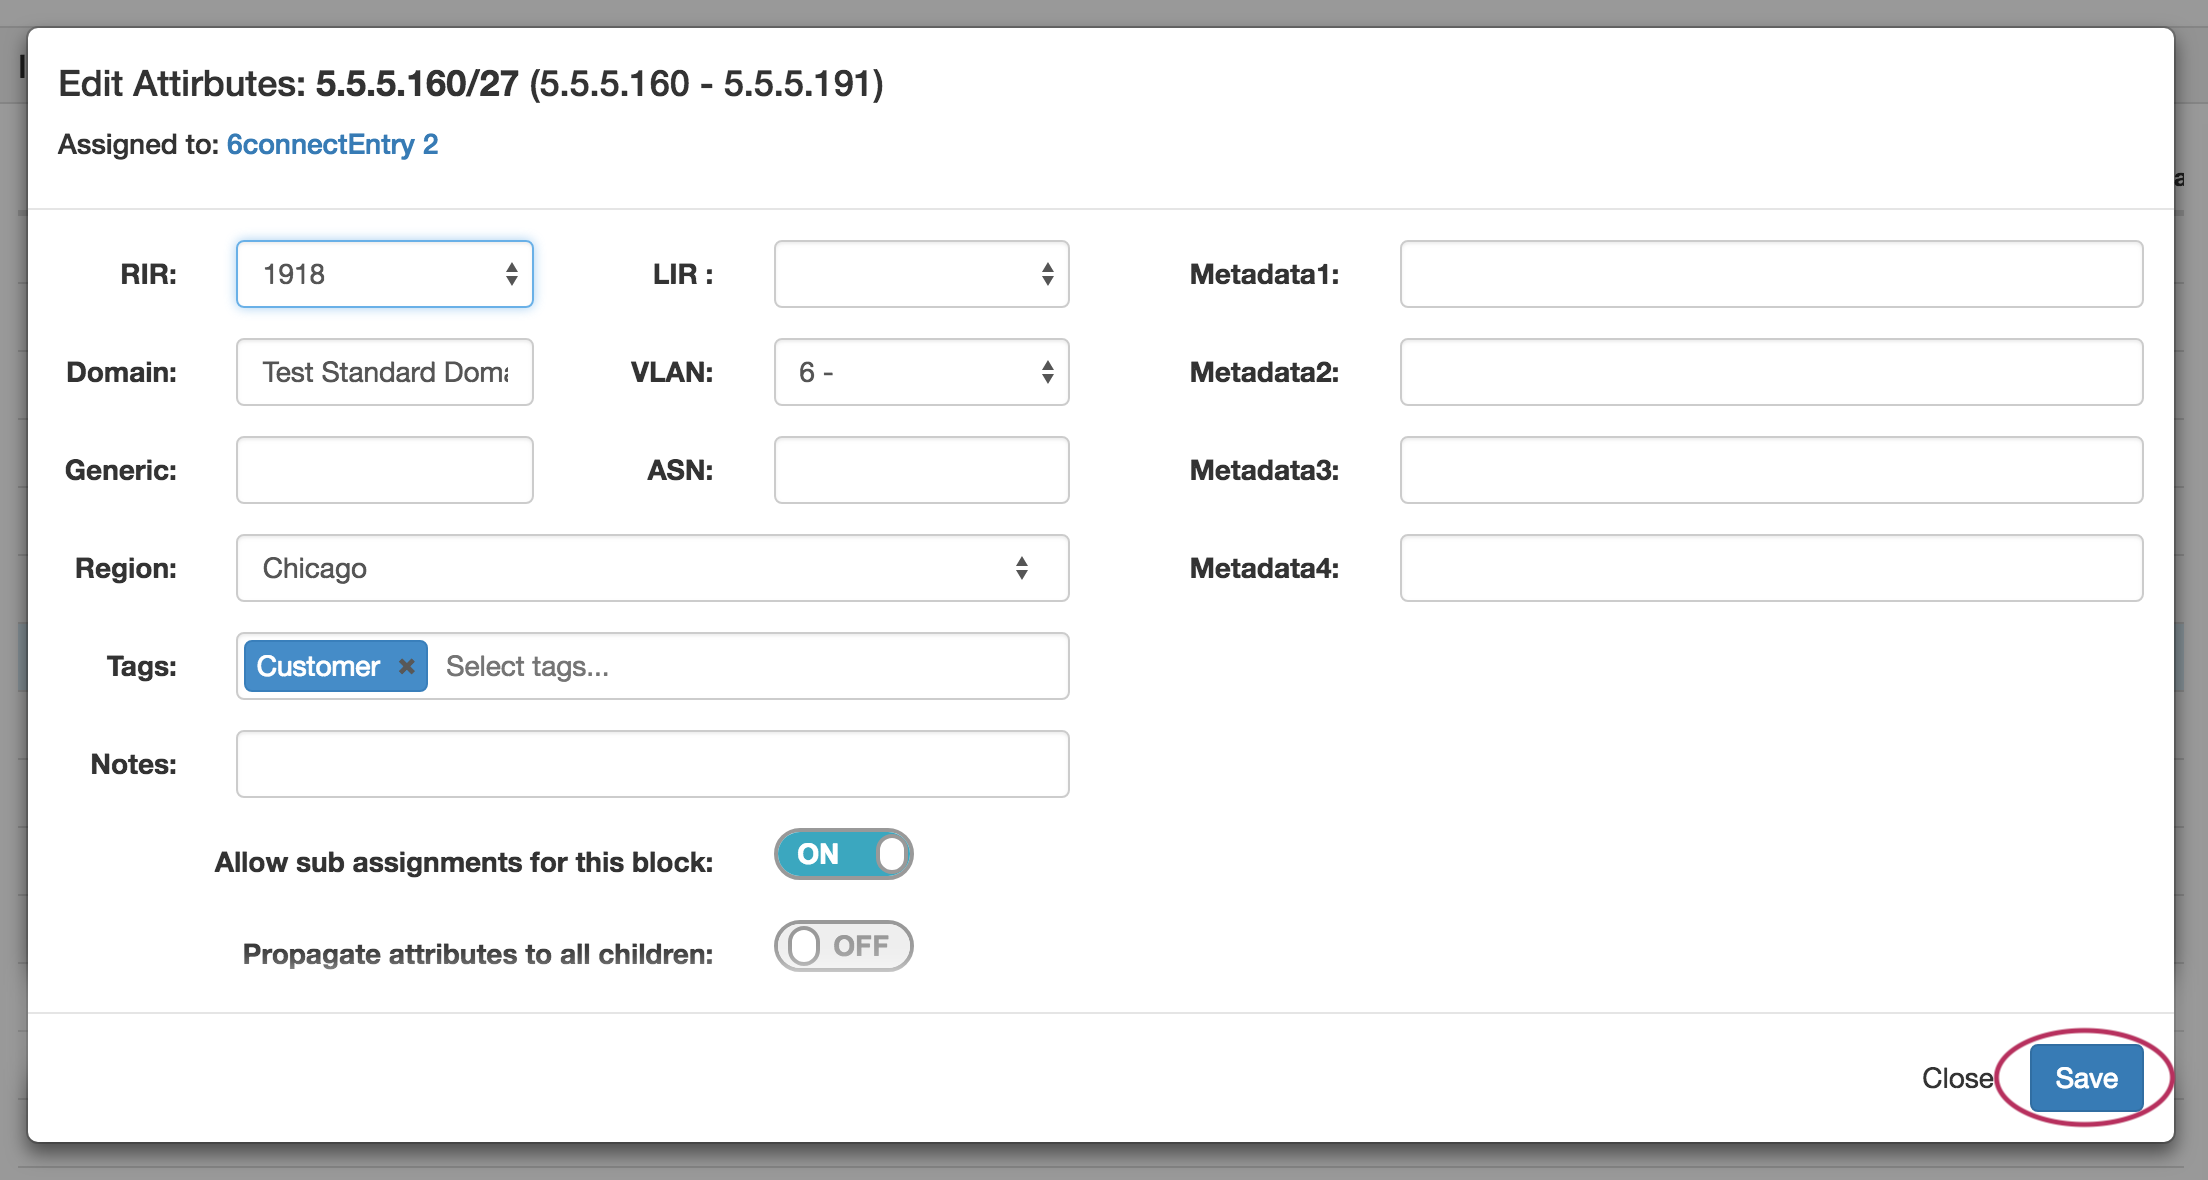
Managing IP blocks in the IPAMv2 Gadget remains similar to the previous IPAM Gadget, with minor updates: The IP Block list may be sorted by field! Just click the column name to toggle between ascending / descending by that field. IP Blocks may now be filtered! Click on the "filter +" link in the top right header to display the filter options. Type in or search for the term under your desired field, and hit "Apply". When done, click "clear". To hide the filter flyout, just click the "filter -" link again. To edit a block, you may either click on the Action Menu (now a Gear Icon), or double click on the row of the block you wish to edit. "Edit Attributes" supports additional IPAM attributes, including RIR, LIR, ASN, Propagate attributes to children, and up to ten user-defined metadata fields as set in IP Admin->Edit Columns. Just add in your custom data, and click "Save"! Changes to attribute field name and visibility (as set up IP Admin-> Edit columns) are reflected in the "Edit Attributes" modal. Click-to-create-reverse-zones is back! Single left click on the Block address to automatically generate a reverse DNS zone for that block. The IP Blocks list now includes pagination. Up to 15 blocks are displayed per-page. Columns widths are now manually adjustable, and side-scrolling is automatically enabled when additional columns exist out of view range. |
| Expand | ||
|---|---|---|
| ||
IPAMv2 Gadget column customization is accessed via the IPAM Admin area of ProVision - you must be logged in as a user with Admin access. From the Admin area of ProVision, go to the IPAM Admin tab, then click "Edit Columns" under IPAM Lists Management.
Eleven default ProVision fields and ten user-defined "Metadata" fields are available for customization.
From here: To edit a column name, simply type your changes in to the text box. and click the "Update" button. To reorder the columns, click and hold on the "list" icon (three lines) to the left of the subet, then drag to the desired location in the list and release. To enable / toggle visibility for a column, click in the checkmark field to the right of the column name to enable / disable visibility. This affects the columns that show in both IPAM Manage and the IPAMv2 Gadget.
When complete, be sure to click on the "Update" button to save your changes. Once changes are saved, the enabled columns and their changes will be visible in the IPAMv2 Gadget. |
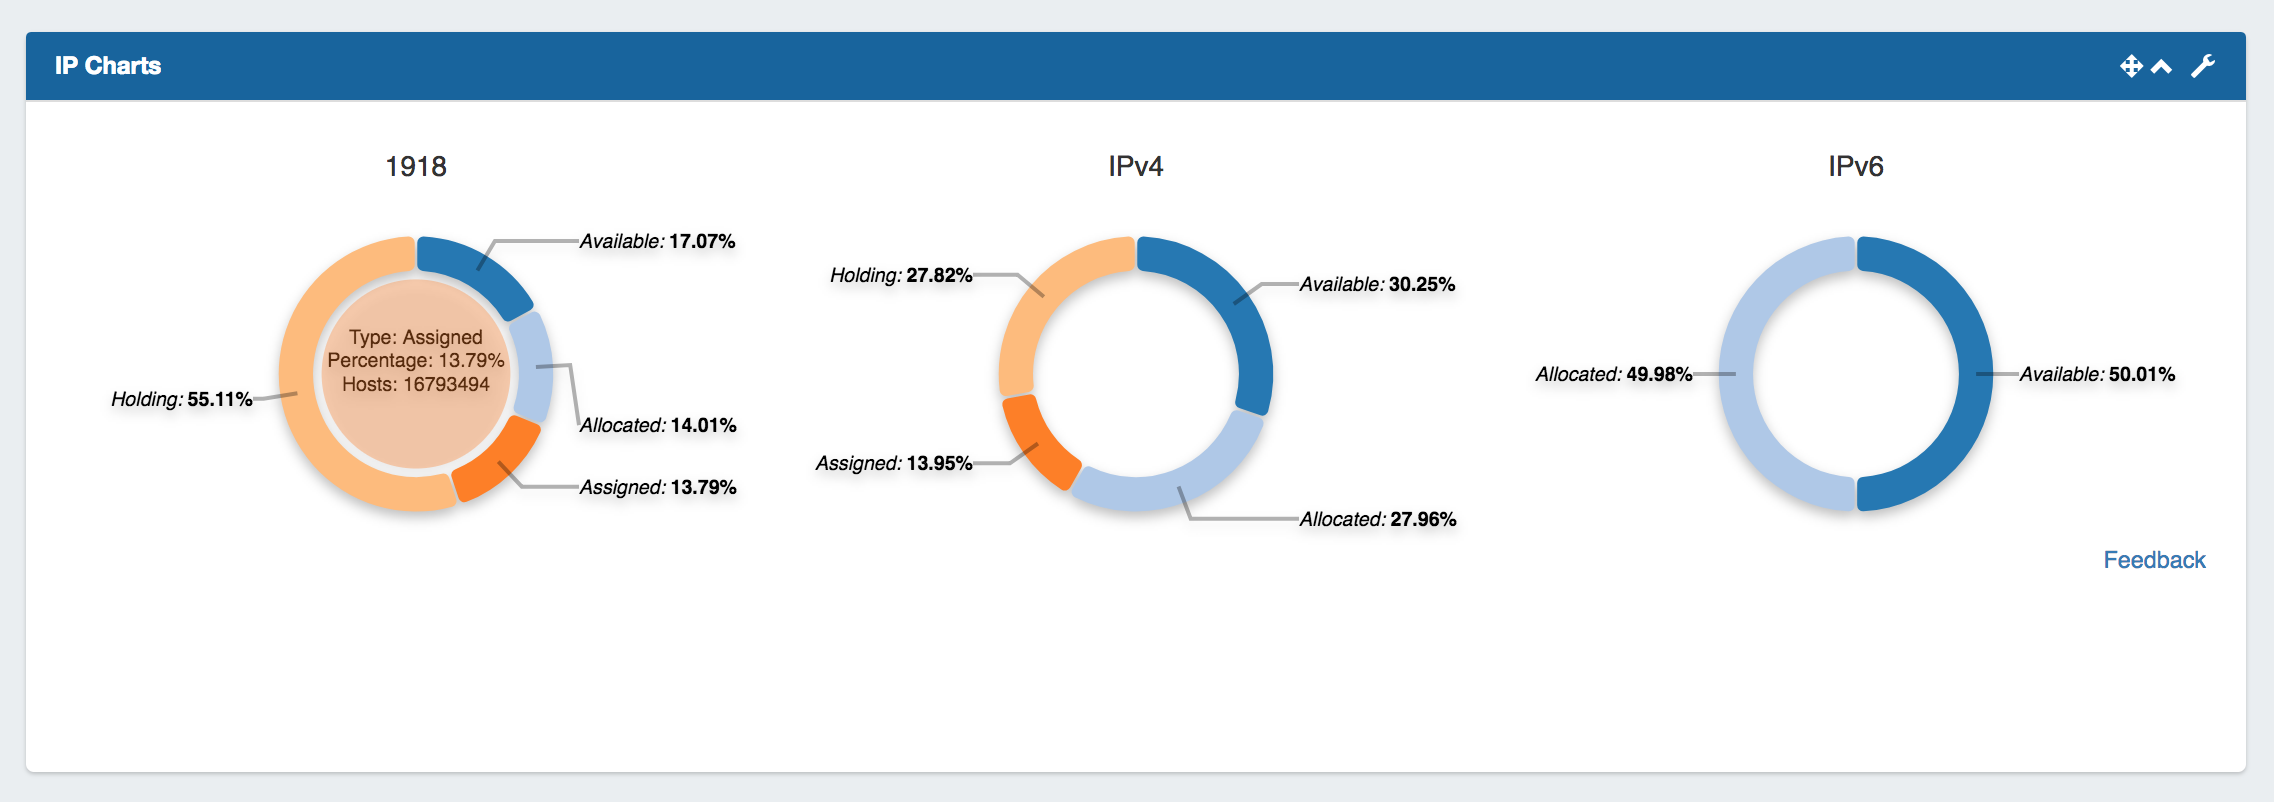
Updated Dashboard IP Charts:
The Dashboard "IP Charts" Widget has been updated to show block percentages that are assigned, unassigned, allocated, or in the holding tank. Hovering over a status will show additional details.
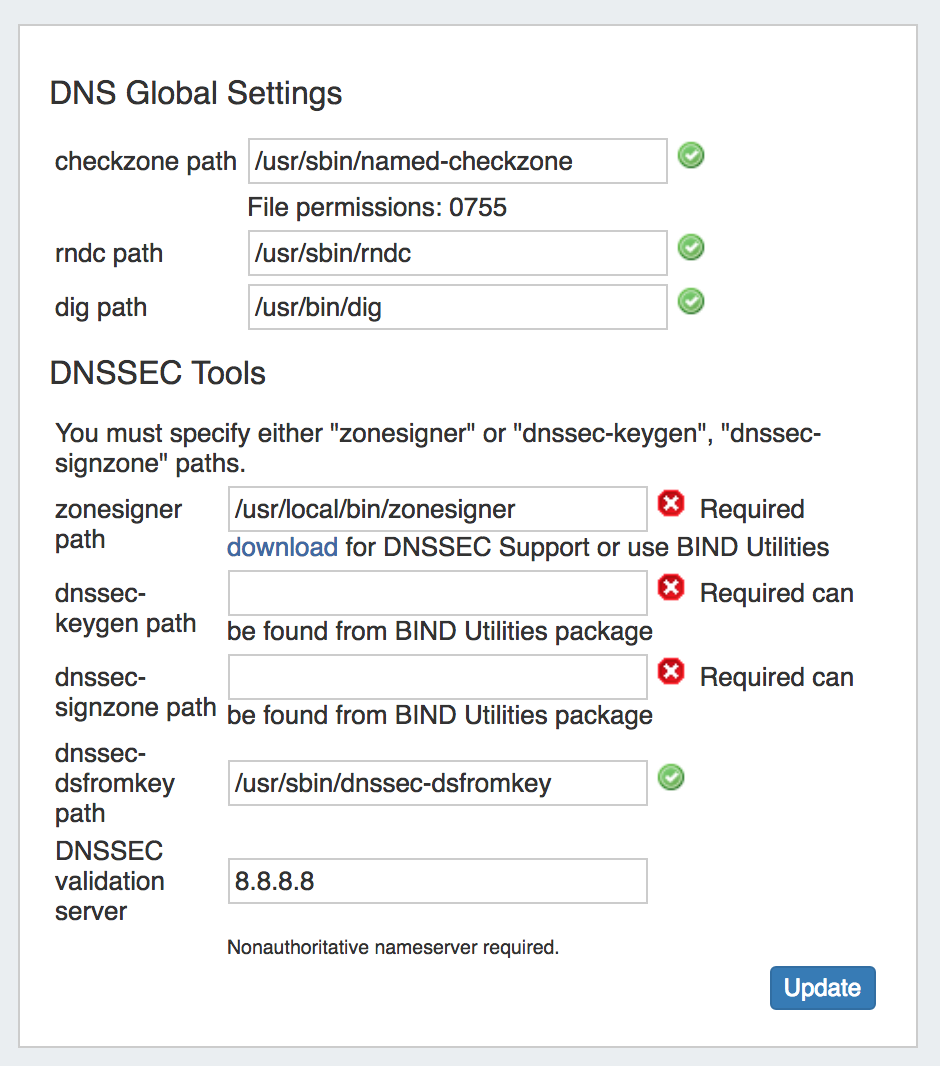
Updated DNSSEC Toolstack:
IM - 2629: ProVision now supports new DNSSEC toolstack bind-utils (dnssec-genkey and dnssec-signzone), set in the Admin Preferences page "DNSSEC Tools" settings. See Admin Preferences for additional details
| Expand | ||
|---|---|---|
| ||
Field Details: zonesigner path : Enter the zonesigner path that will be used for DNS. Zonesigner is required if dnssec-keygen and dnssec-signzone are not set. dnssec-keygen path: Enter the keygen path. Required if zonesigner is not set. dnssec-signzone path: Enter the signzone path. Required if zonesigner is not set. dnssec-dsfromkey path : Enter the dnssec-dsfromkey path that will be used for DNS. Required in all cases. DNSSEC validation server: Enter the IP of the nonauthoritative DNSSEC validation nameserver. Optional. |
DNS Push Policy Configuration
IM - 2674: Added configuration options for DNS Push Policy under DNS Groups.
...
- Zone-centric : Pushes all the zones to all the servers attached to them including servers not attached to the group.
- Server-centric: Pushes all the servers with all the zones attached to them, including the zones not attached to a group.
- Group-centric: Pushes all the zones in the group to the servers attached to the group.
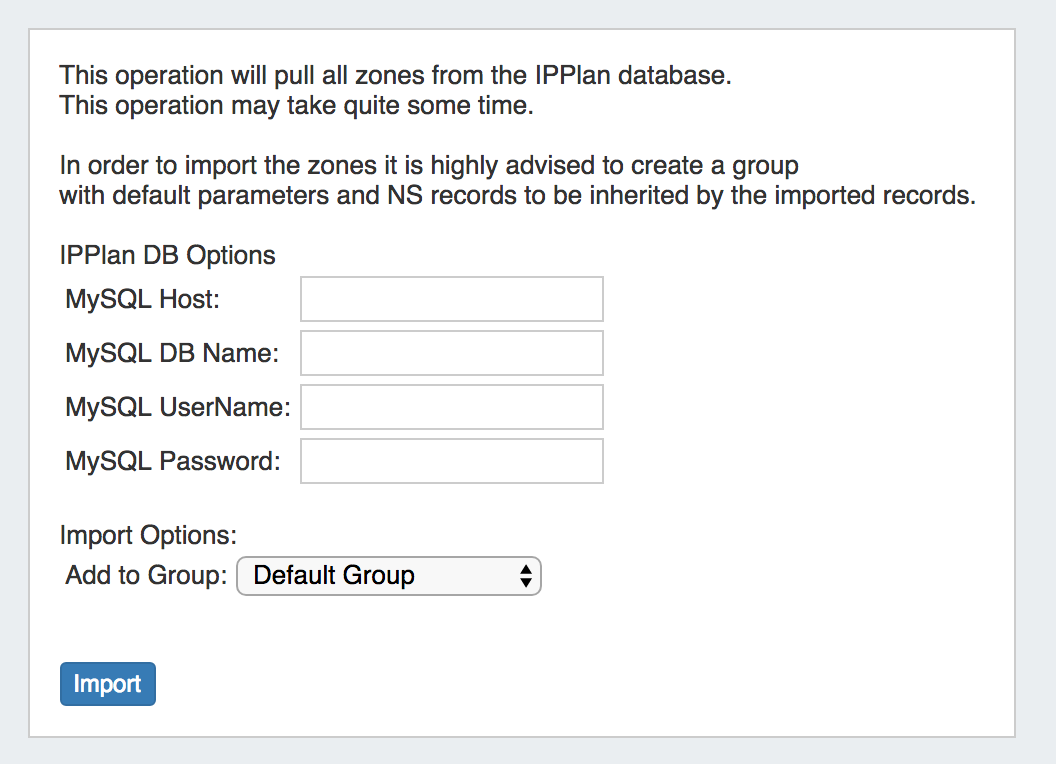
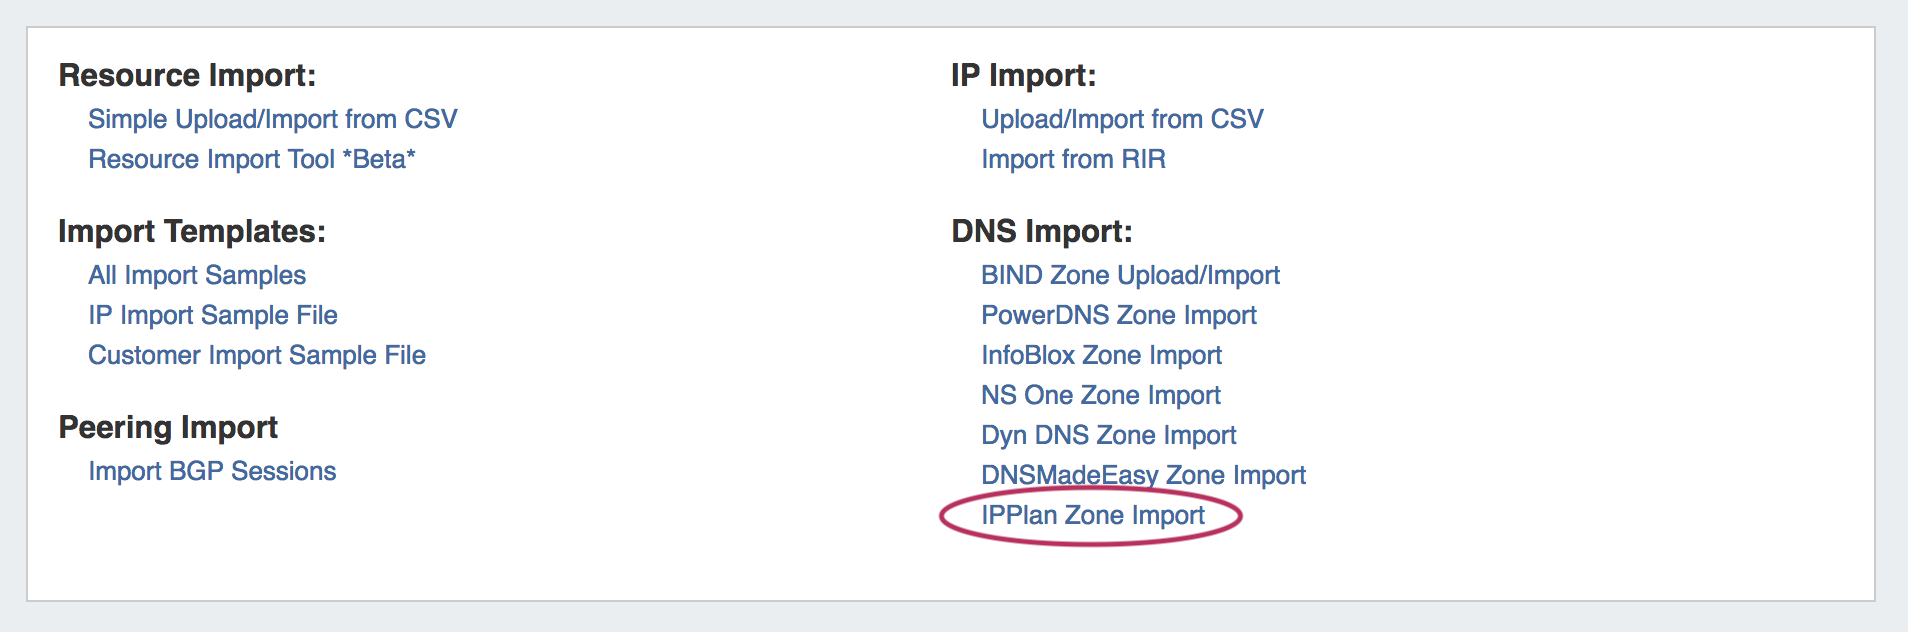
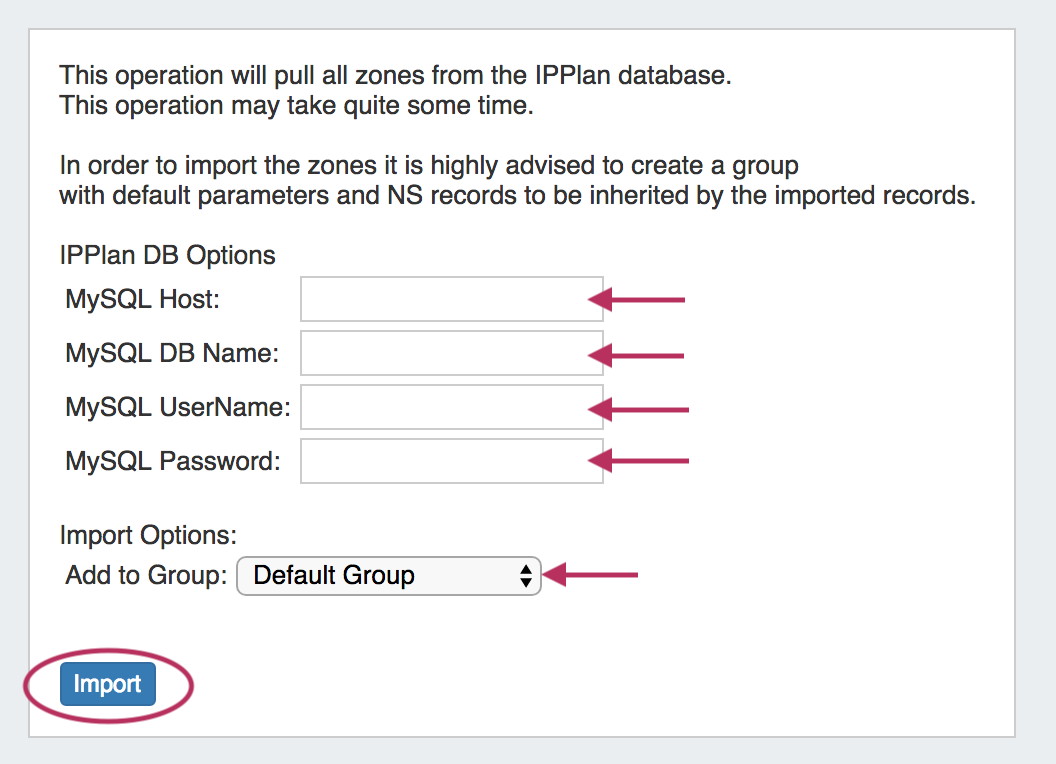
IPPlan (MySQL DB) Zone Import
IM-1950: ProVision now supports importing IPPlan data via the Data Import tab. IPPlan Zone Import pulls zones from IPPlan MySQL databases. It is advised to create a DNS Group prior to the import with default parameters and NS records to be inherited by the imported records.
...
the servers attached to the group.
IPPlan (MySQL DB) Zone Import
IM-1950: ProVision now supports importing IPPlan data via the Data Import tab. IPPlan Zone Import pulls zones from IPPlan MySQL databases. It is advised to create a DNS Group prior to the import with default parameters and NS records to be inherited by the imported records.
| Expand |
|---|
To import zones from a IPPlan MySQL database, navigate to the Admin area Data Import Tab, and click on "IPPlan Zone Import".
From there, enter the IPPLAN DB Options - Host, Database Name, MySQL Username, and MySQL Password, then select the desired DNS Group to add the zones under.
When done, click the "Import" button. |
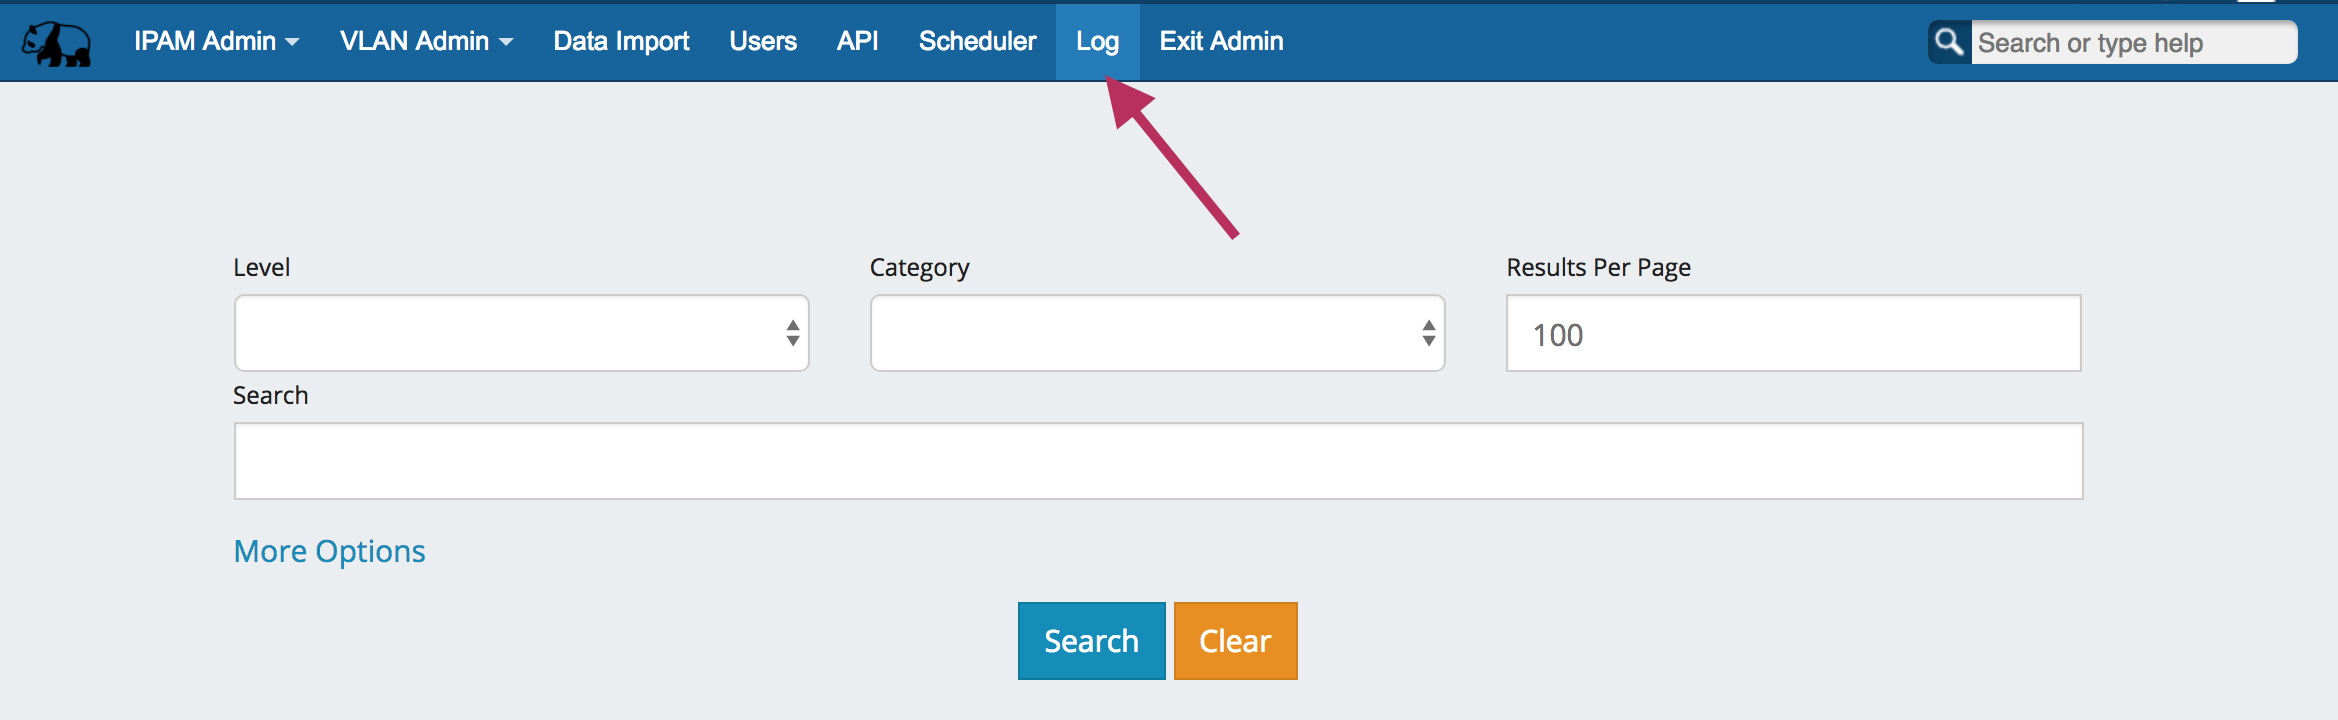
Logging
The Log Tab has decided to join its other Admin-only brethren in the Admin area of ProVision. You may now find it between the Scheduler Tab and Exit Admin.
Bug Fixes/Improvements
IM - 994: Added mouseover display definitions in IPAM aggregate listing for "Available", "Allocated", "Assigned", and "Holding" statuses.
...