Workflow Concepts
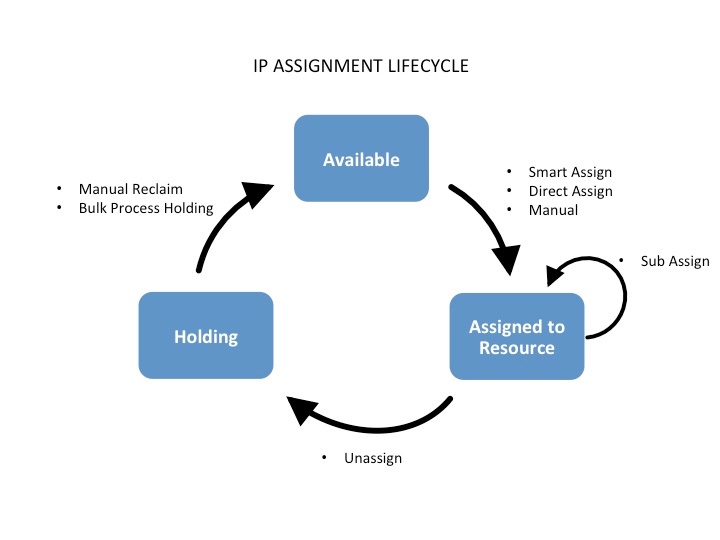
IP Assignment Lifecycle
In ProVision, the IP assignment lifecycle starts with an available block which is free to be assigned to any IPAM-enabled resource holder. There are multiple methods that may be used to assign a block to a resource holder: Smart Assign, Direct Assign, or Manual Assign (Smart Browse). Once an IP block is assigned, blocks can be further subassigned via the same methods if desired. When an assigned block is un-assigned it proceeds into the Holding Tank: a special resource where blocks are held until either a set time has elapsed or until they are manually reclaimed to 'available' status.
For more information on performing tasks in this IP Assignment Lifecycle, see the following documentation sections:
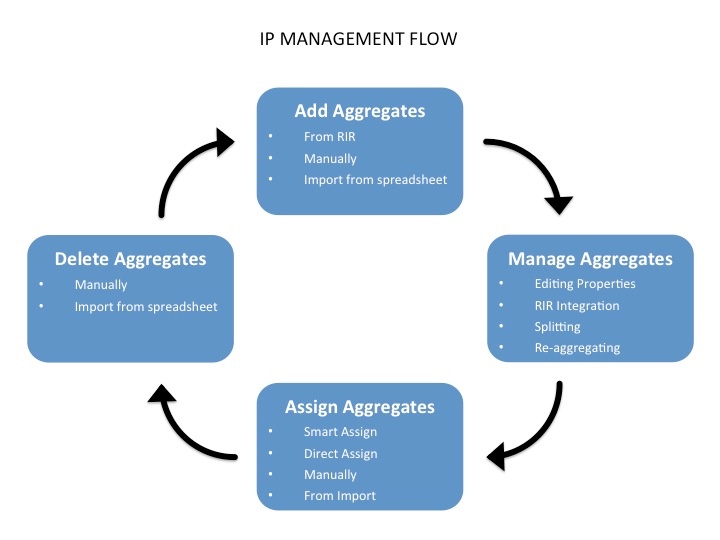
IP Management
IP Management is comprised of four basic functions: adding aggregates into ProVision, managing those aggregate blocks, assigning them to a resource, and deleting the aggregates.
ProVision provides multiple ways for you to achieve each step, depending on your needs. For example, if your organization currently uses spreadsheet data to track aggregates, ProVision provides tools that can import your existing spreadsheets for bulk updates, saving you time. Need to just quickly assign a single IP? Direct Assign will allow you to do so with just a few clicks.
For more information on performing tasks in this IP Management Flow, see the following documentation sections:
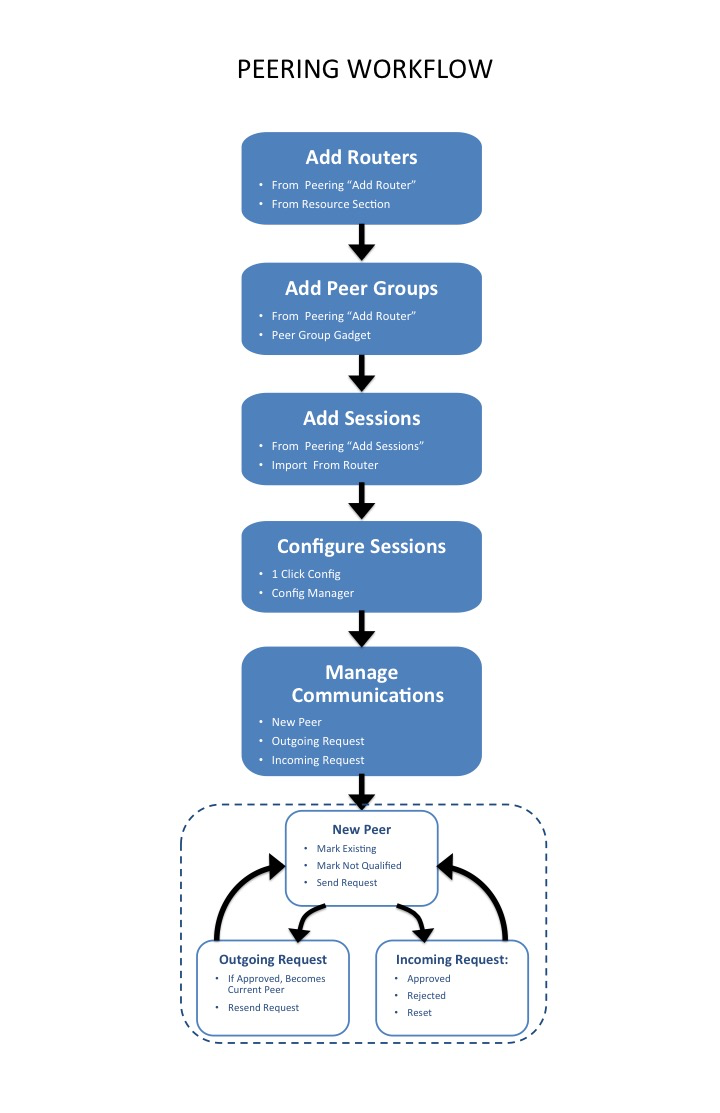
Peering
In ProVision, Peering starts with designating Routers. Routers may be added through the Resource system under a router Section, but the simpler approach is to add a new router via the "Add Router" button under the Peering Tab. Through this dialog, Peer Groups may be added at the same time.
After the router(s) and Peer Groups have been created in ProVision, Sessions need to be added. Sessions may be added manually through the "Add Session" dialog in the Peering tab, or Imported from a router (requires ProVision Admin permissions). Once a session has been created, it can be configured and managed through the Sessions list. The Peer that is associated with the session is added to the Peer Communications list, where communications and status may be managed.
For more information on performing tasks under Peering, see the following documentation sections:
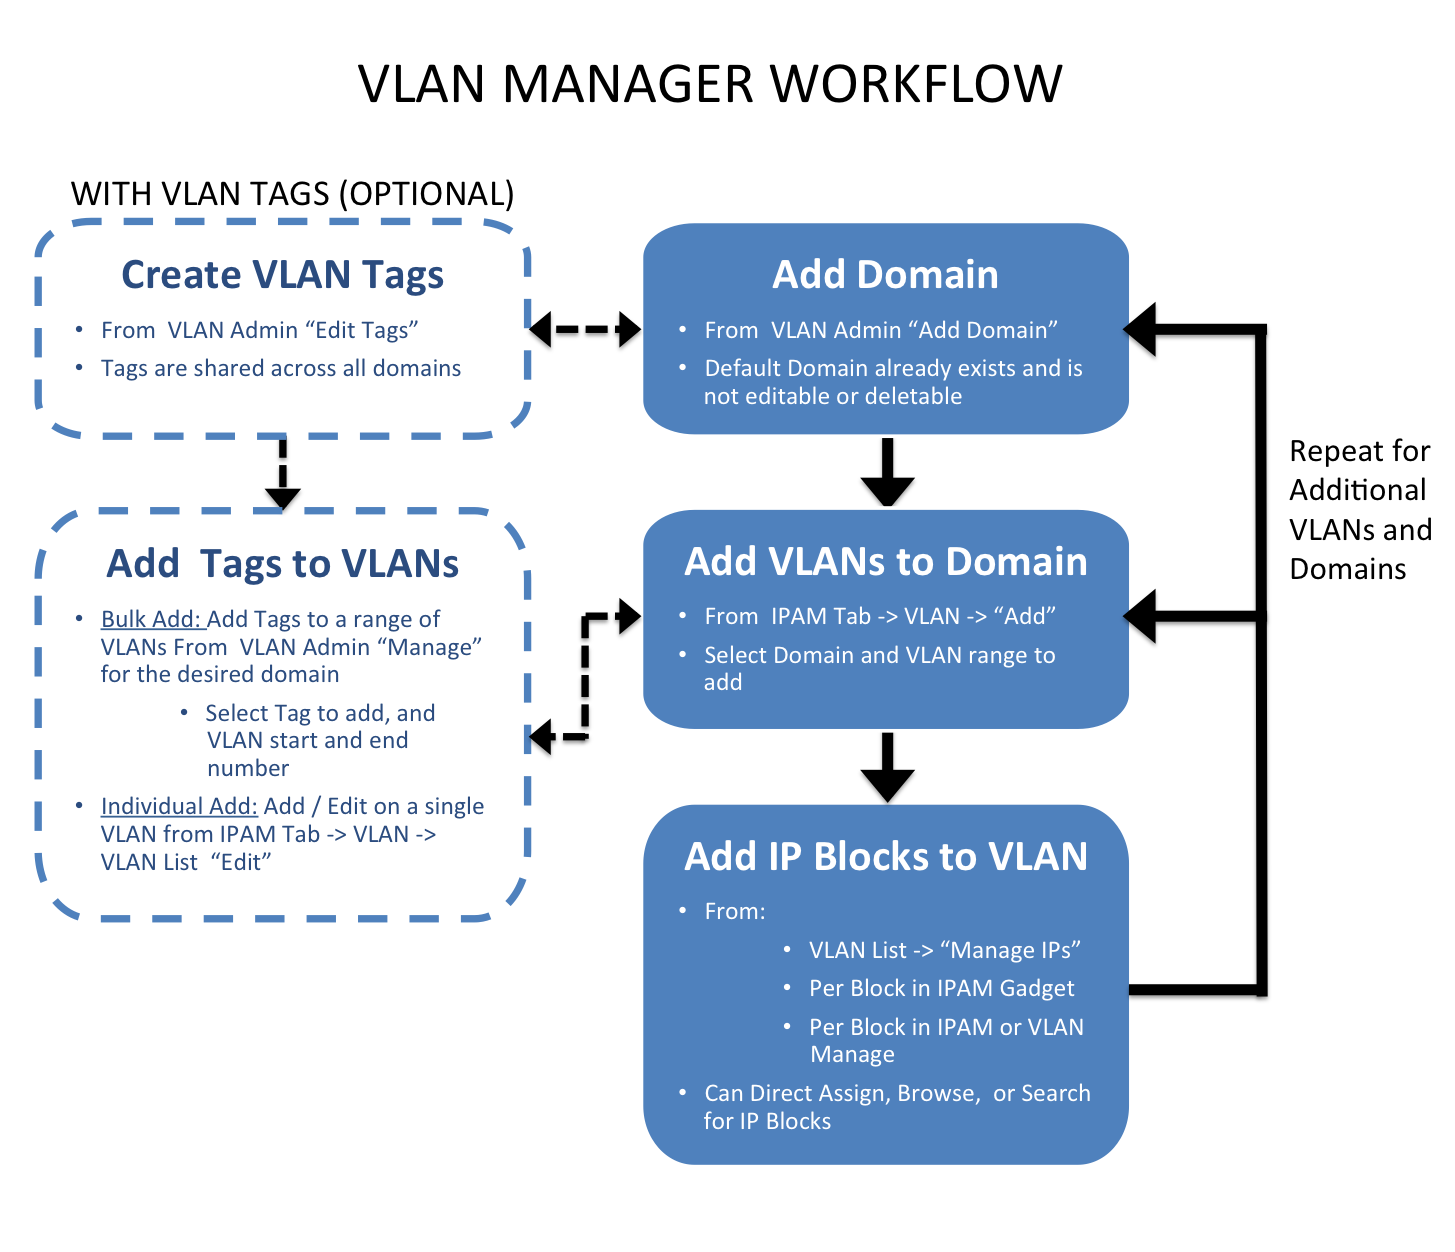
VLAN Manager
The VLAN Manager allows Admin users to add domains and VLANs to their ProVision instance, and associate them with IP Blocks. Optionally, VLAN tags may be associate with ranges or individual VLANs under a domain, to help limit VLAN search results when enabling VLANs.
Standard flow (without VLAN tags):
The workflow starts with creating a domain in the VLAN Admin section of ProVision. During creation, domains may be selected as "standard" or "extended" domains, declaring the size of the VLAN pool from which VLANs are available to be enabled. Next, VLANs must be enabled and added to the domain. This is done under the IPAM Tab -> VLAN section of ProVision. Add VLANs to the domains by clicking "Add", searching for the desired range of VLANs to enable from the standard / extended pool, and selecting the desired VLANs to enable. Once enabled, VLANs may be edited or have IP blocks associated with that VLAN. Editing VLANs and Direct / Smart Browse / Search IPs functions for adding blocks to VLANs are available from the Domain/ VLAN list under under the IPAM Tab -> VLAN section of ProVision by expanding the desired domain and clicking on the VLAN link. IP blocks may also be edited individually through the IPAM gadget, IPAM Manage, and VLAN Manage areas to add domain and VLAN information to the block.
Optional flow (with VLAN tags):
The workflow starts with creating a domain in the VLAN Admin section of ProVision. During creation, domains may be selected as "standard" or "extended" domains, declaring the size of the VLAN pool from which VLANs are available to be enabled. VLAN tags may be added (from the VLAN Admin Tab -> Edit Tags submenu) before or after domain creation. Tags created in this area are available to all domains and VLANs.
If the tags created need to be added to a large range of VLANs, the next step would be to add tags to the desired range(s) of VLANs from the VLAN Admin -> Domain "Manage" button. Domain Manage allows you to select an existing tag, type in the numeric VLAN start and end point, and assign that tag to that entire range of VLANs under the current domain.
Once a bulk range of tags is associated with VLANs, you can use the tag as a search criteria when adding VLANs to a domain. This is done under the IPAM Tab -> VLAN section of ProVision. Add VLANs to the domains by clicking "Add", using the tag name as a search field for the desired range of VLANs, and then selecting the desired VLANs to enable.
If tags are only desired for individual VLANs, they may be added when editing a VLAN after the VLAN has already been added/enabled for the domain. Editing VLANs may be accessed from the IPAM Tab -> VLAN section, then expanding the desired domain and clicking on the VLAN link, selecting "Edit".
Next, VLANs must be enabled and added to the domain. This is done under the IPAM Tab -> VLAN section of ProVision. Add VLANs to the domains by clicking "Add", searching for the desired range of VLANs to enable from the standard / extended pool, and selecting the desired VLANs to enable. Once enabled, VLANs may be edited or have IP blocks associated with that VLAN. Editing VLANs and Direct / Smart Browse / Search IPs functions for adding blocks to VLANs are available from the Domain/ VLAN list under under the IPAM Tab -> VLAN section of ProVision. IP blocks may also be edited individually through the IPAM gadget, IPAM Manage, and VLAN Manage areas to add domain and VLAN information to the block.
DHCP
The DHCP Workflow in ProVision begins with denoting the DHCP IP Aggregate(s) from the IPAM Tab -> "Add Aggregate". When creating DHCP aggregates, ensure that the block is designated as 1918 space, and has the check boxes next to "DHCP Aggregate" and "Allow Sub-assignment" selected. This will ensure the block is automatically added to the DHCP Available Resource, and is usable when defining DHCP Pools.
Separately, ensure that the DHCP server is added into ProVision. New DHCP servers may be added from the DHCP Tab "Add DHCP Server" button. Type the server name, then choose the resource to which the DHCP server belongs. This creates a hierarchical relationship, with the server as a child resource under the selected parent.
Once the server has been created in ProVision, click on the server name in the DHCP server list to go to the server's Entry Page. If the server was created through the DHCP Tab, the DHCP Management Gadget will already be enabled for the DHCP server. If created elsewhere, the DHCP Gadget may need to be enabled by simply selecting the "On" radio toggle next to "DHCP Services", and clicking the "Update" button. Next, add in the connection configuration and server details for the DHCP server in the DHCP Gadget.
Now that the DHCP server is set up and DHCP aggregates created, DHCP Pools may be created and managed. Pools may be created by subnet or host. Creating by subnet allows for a block to either be directly assigned manually, or for ProVision to SmartAssign a block based on the provided criteria. Creating by host requires providing a host and MAC address, and then likewise may have an IP directly assigned or Smart Assigned. DHCP Pools, once created, are managed by linking or unlinking to the DHCP server. IP assignments and pool details may be changed at any time by clicking on the pool name, editing the details as desired, then clicking "Save".
For more information on working with DHCP in ProVision, see the DHCP Tab documentation.